
Latner's mobile Work Order screens let a technician run a job from a phone - accept it, complete the safety checklist, record time, parts and expenses, capture the customer's signature and mark their part of the job done, all from site.
Overview
A Work Order on a phone is deliberately narrow. The technician sees the handful of jobs that are theirs, works down one screen, and taps a single button at the bottom to move the job forward. Everything else - approving, invoicing, closing the Work Order - stays in the office.
-
The mobile list only shows Work Orders that are Open and whose Tech Status is not Completed or Cancelled, so finished work drops off the list by itself.
-
The job moves through Tech Statuses: Allocated to Accepted to (for field service) On Site to Completed. The footer shows one action at a time.
-
Where a Take 5 safety checklist is configured for the Work Order's Location Type, work entry stays locked until a Take 5 has been completed.
-
Time, parts, expenses, meter readings, photos, comments and a customer signature can all be captured from the phone.
-
Completing on the phone sets the Tech Status to Completed and stamps the Work Completed Date. It does not complete the Work Order itself.
Before You Begin
The technician's user needs a few permissions, and a couple of settings change what they are asked to do on site.
|
Requirement |
Where to Find It |
|---|---|
|
Mobile Work Order screen permission |
Security › Configuration › Permission Groups › Service › Screen |
|
Complete Work Order - without it the Complete Work Order button is hidden |
Security › Configuration › Permission Groups › Service › Option |
|
Add Timesheet to Work Order, Add Stock to Work Order, Add Expense to Work Order - each one shows its own section |
Security › Configuration › Permission Groups › Service › Option |
|
Assign Work Order Technician - adds the Unallocated tab and lets a user edit Work Orders they are not assigned to |
Security › Configuration › Permission Groups › Service › Option |
|
The user must be linked to a Skilled Person, because My Work Orders matches on it |
Service › Configuration › Skilled Persons |
|
Work Order Take 5 Checklist and Take 5 Work Order Location Types |
Security › Settings › Service |
|
Enforce Meter Reading Entry in Work Orders |
Security › Settings › Service |
|
Completed Checklists Required for Work Orders |
Security › Settings › Equipment |
|
Timesheet Input Type - decides whether the timesheet asks for Hours and Minutes or a Start and End Time |
Security › Settings › Timesheet |
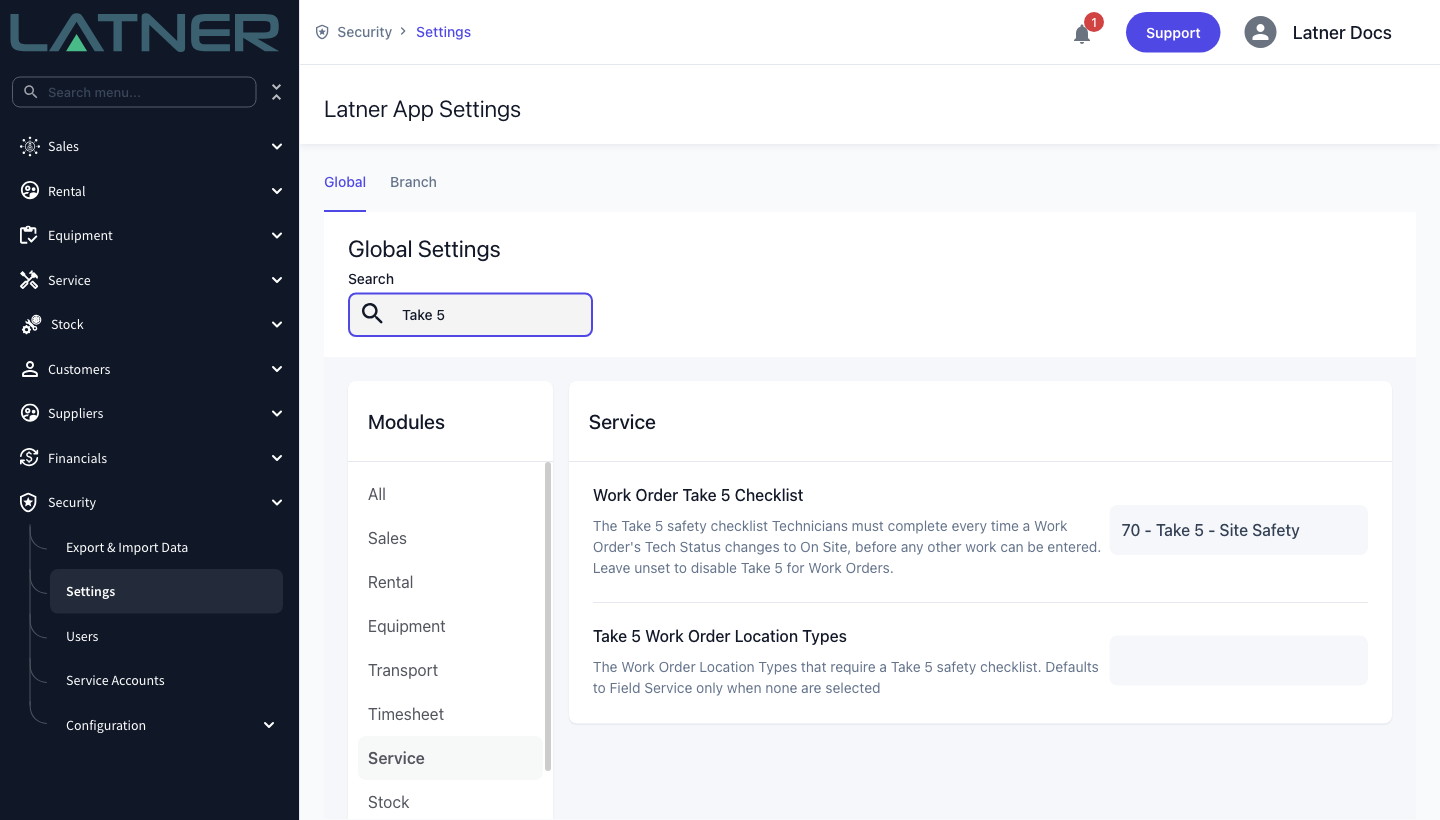
Take 5 only applies when a checklist template is chosen in Work Order Take 5 Checklist. When Take 5 Work Order Location Types is left empty it falls back to Field Service only, so workshop jobs are unaffected. Clear the template to switch Take 5 off for Work Orders entirely.
Completing the Work Order
Step 1 - Open Work Orders on your phone
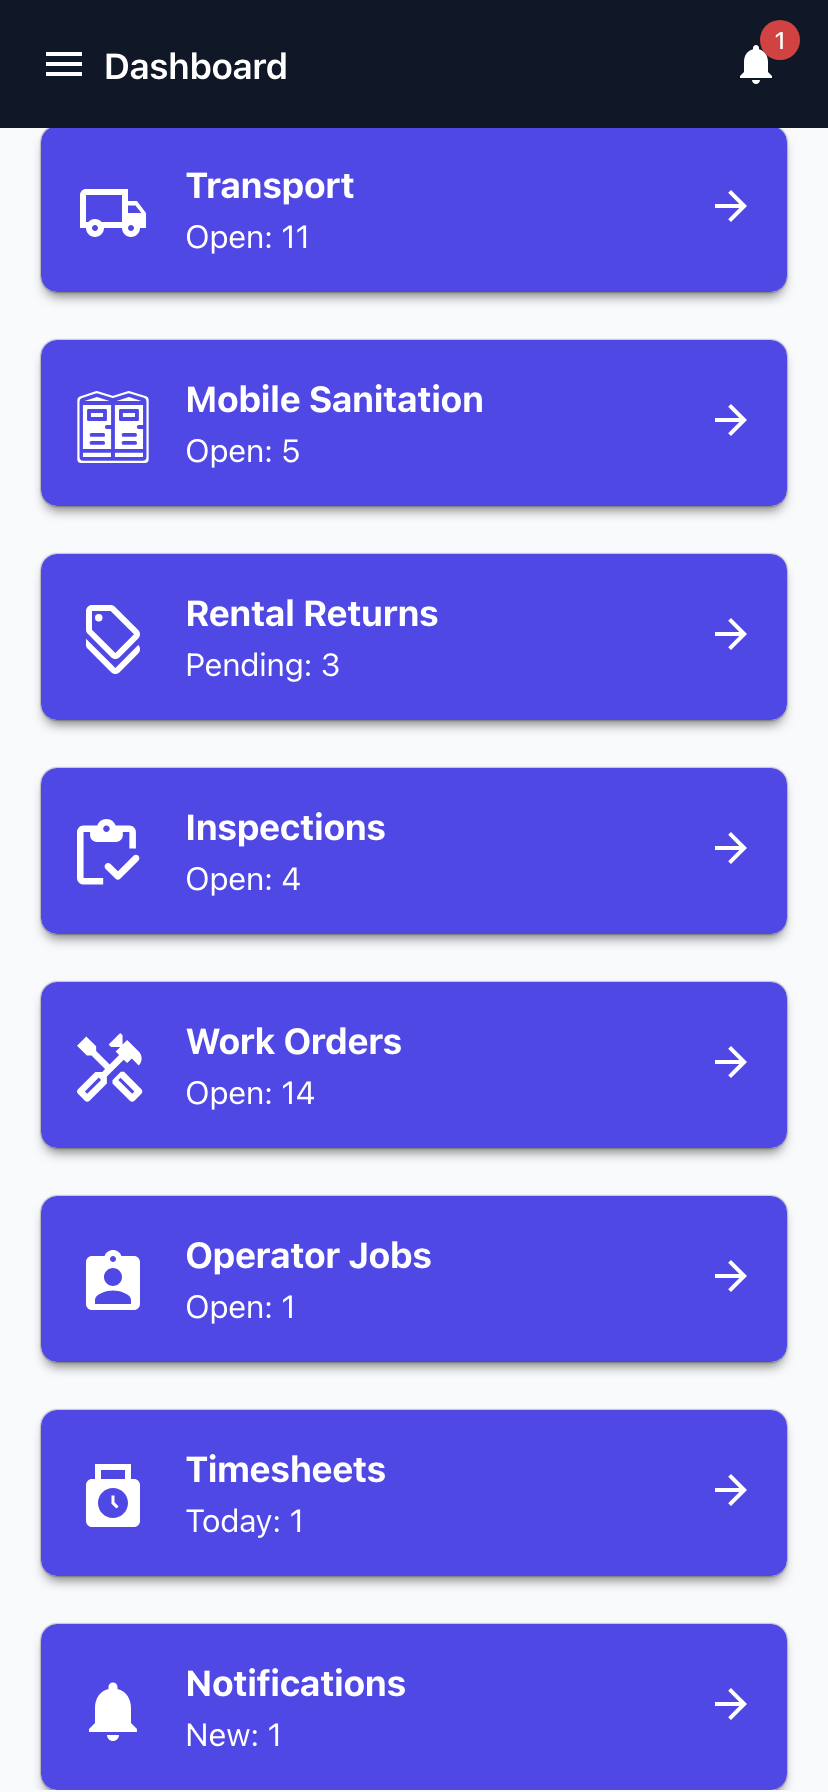
Sign in to Latner in your phone's browser. The mobile dashboard replaces the desktop menu with a stack of cards. Tap Work Orders.
Step 2 - Find your Work Order
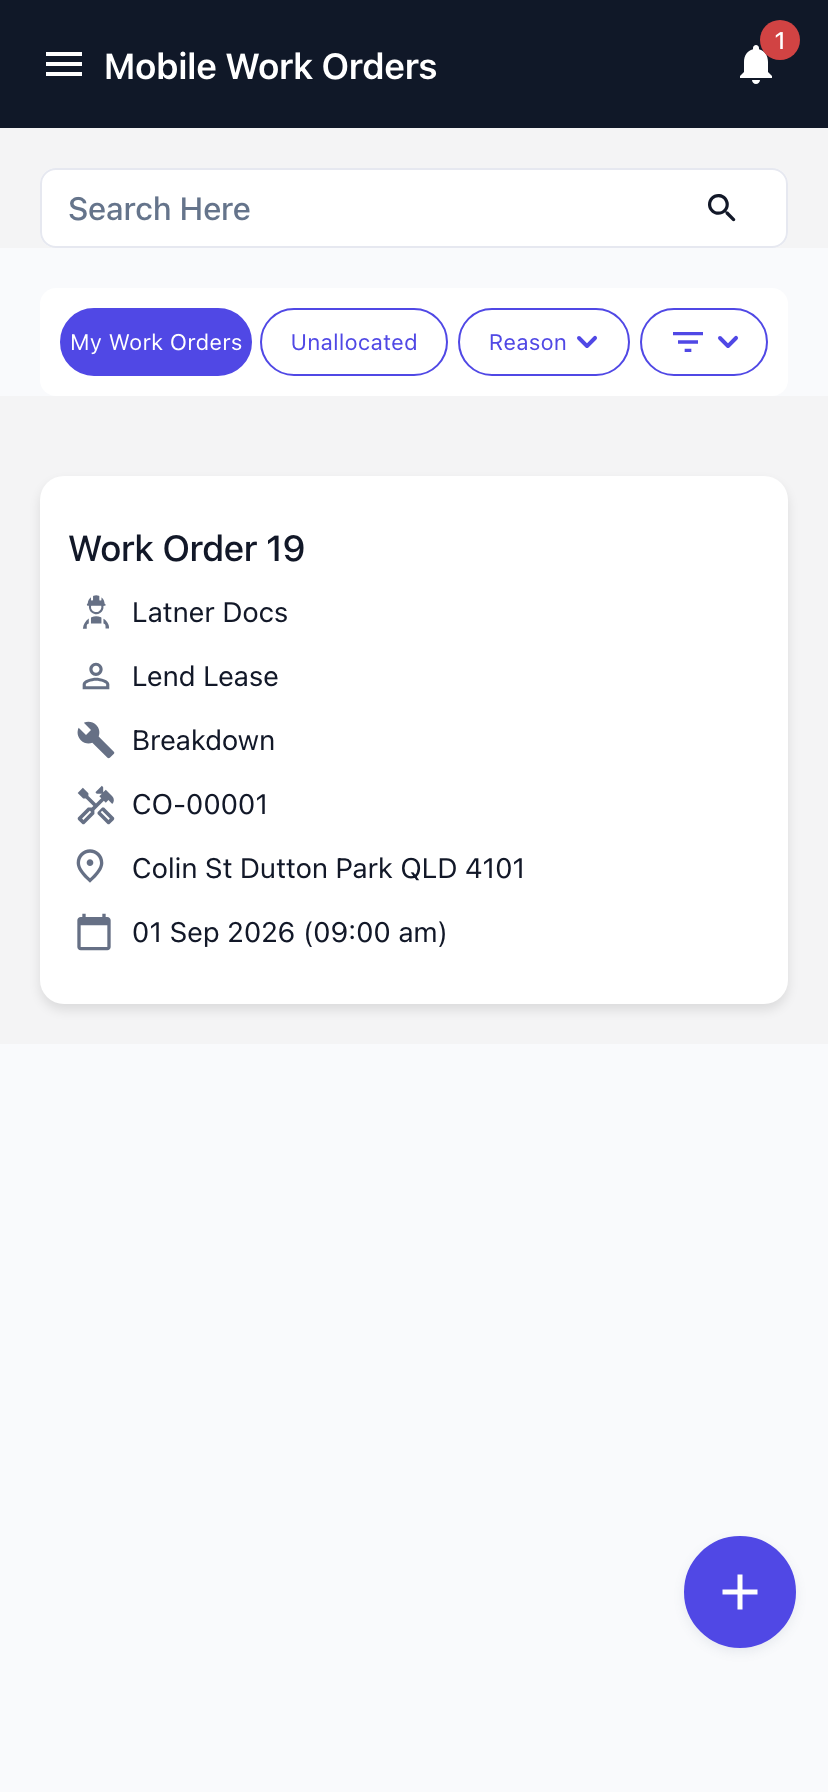
The list opens on Mobile Work Orders. Tap My Work Orders to narrow it to jobs where you are the primary or a secondary technician. Unallocated shows work that has nobody assigned yet, Reason filters by the Work Order's reason, and the filter icon adds My Branch. Then tap the job you are about to do.
Step 3 - Review the job before you start
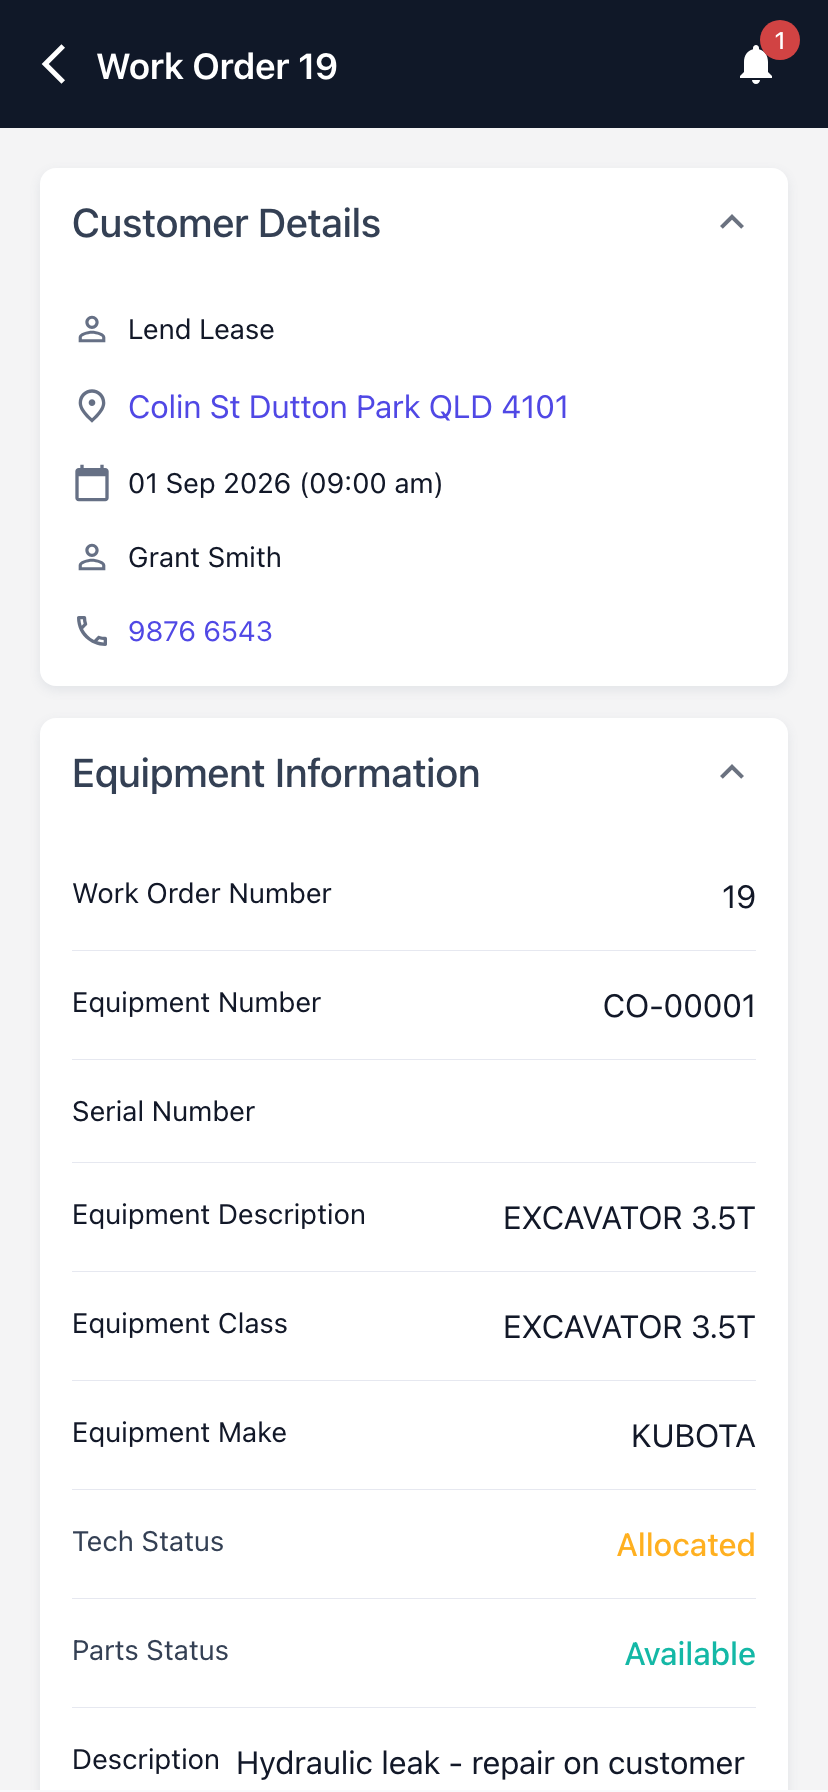
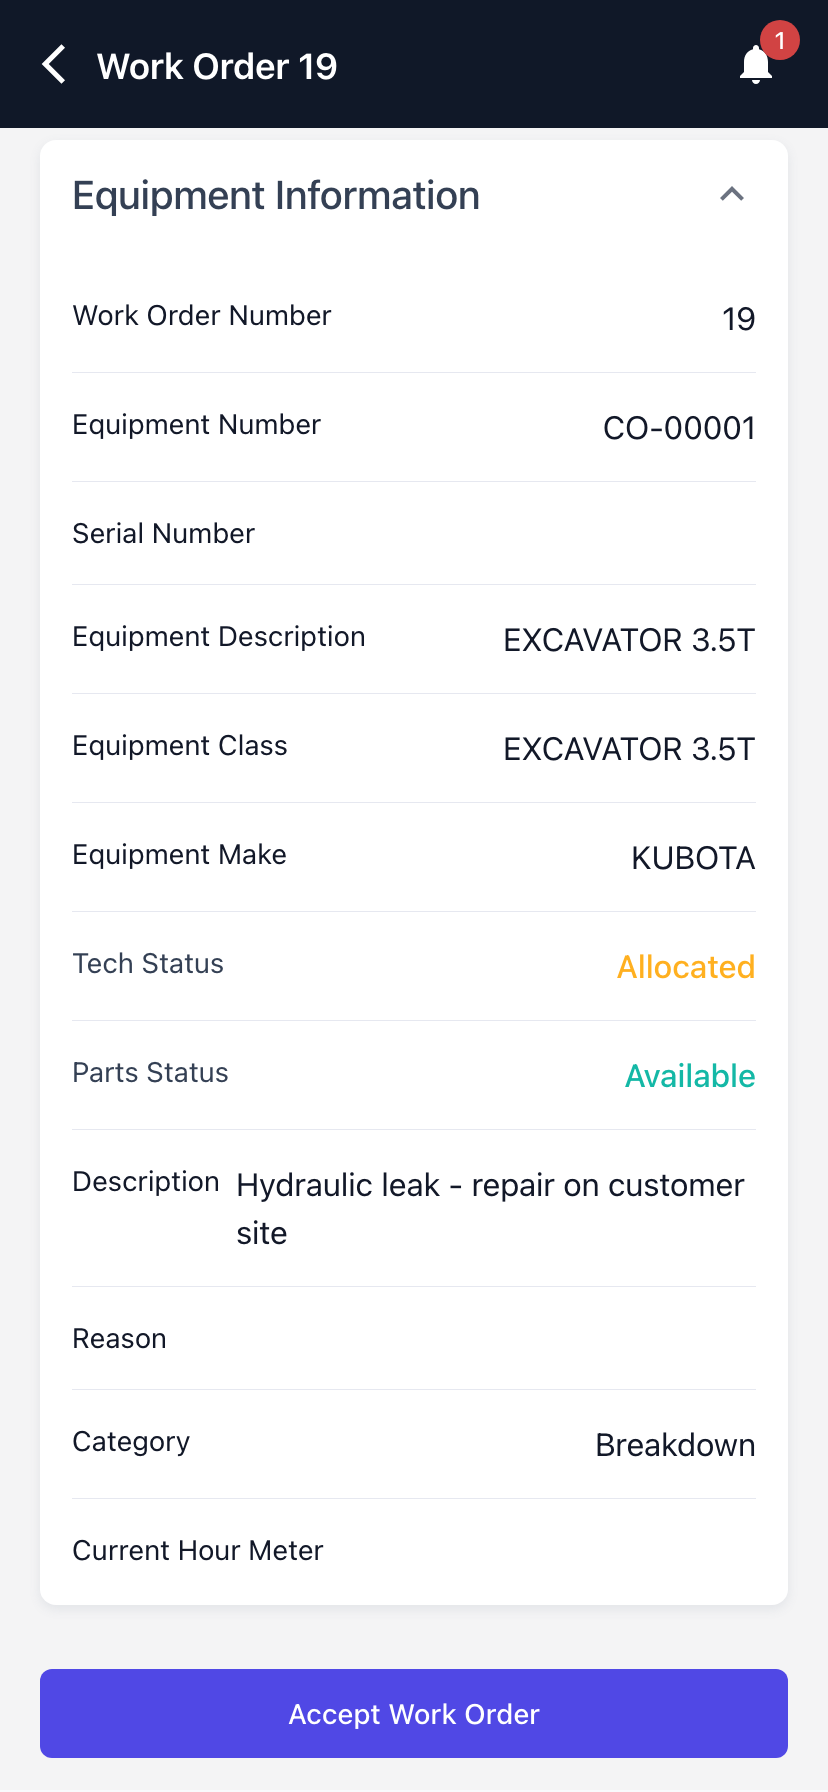
Customer Details and Equipment Information are the two cards you get while the job is still Allocated. The address is a link that opens the site in your maps app, and the contact's phone number dials straight out.
Step 4 - Accept the Work Order
Scroll to the bottom and tap Accept Work Order. This is the only action offered while the Tech Status is Allocated - nothing can be recorded against the job until you accept it.
Step 5 - Arrive on site
Once accepted, the Tech Status becomes Accepted and a Tech Details card appears with a Tech Status dropdown, so you can set Travelling or Parts Requested as the day goes. On a field service job that needs a Take 5, the footer now reads Arrive On Site. Tap it when you get there.
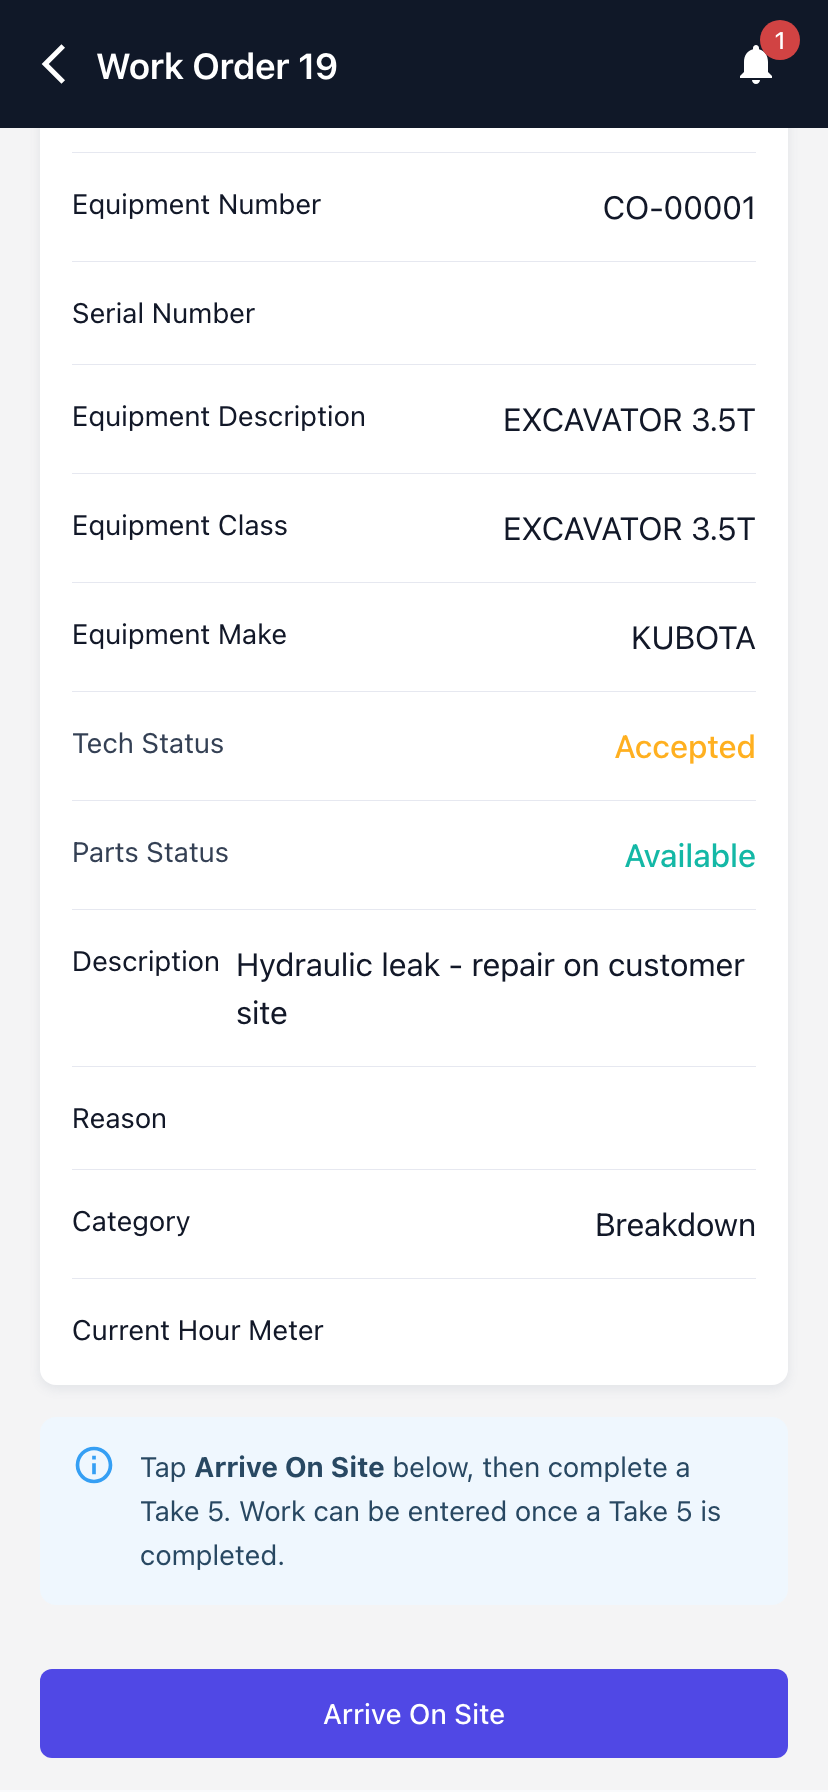
Workshop Work Orders, and any Work Order where Take 5 is not configured, skip this step - the footer goes straight from Accept Work Order to Complete Work Order.
Step 6 - Complete the Take 5
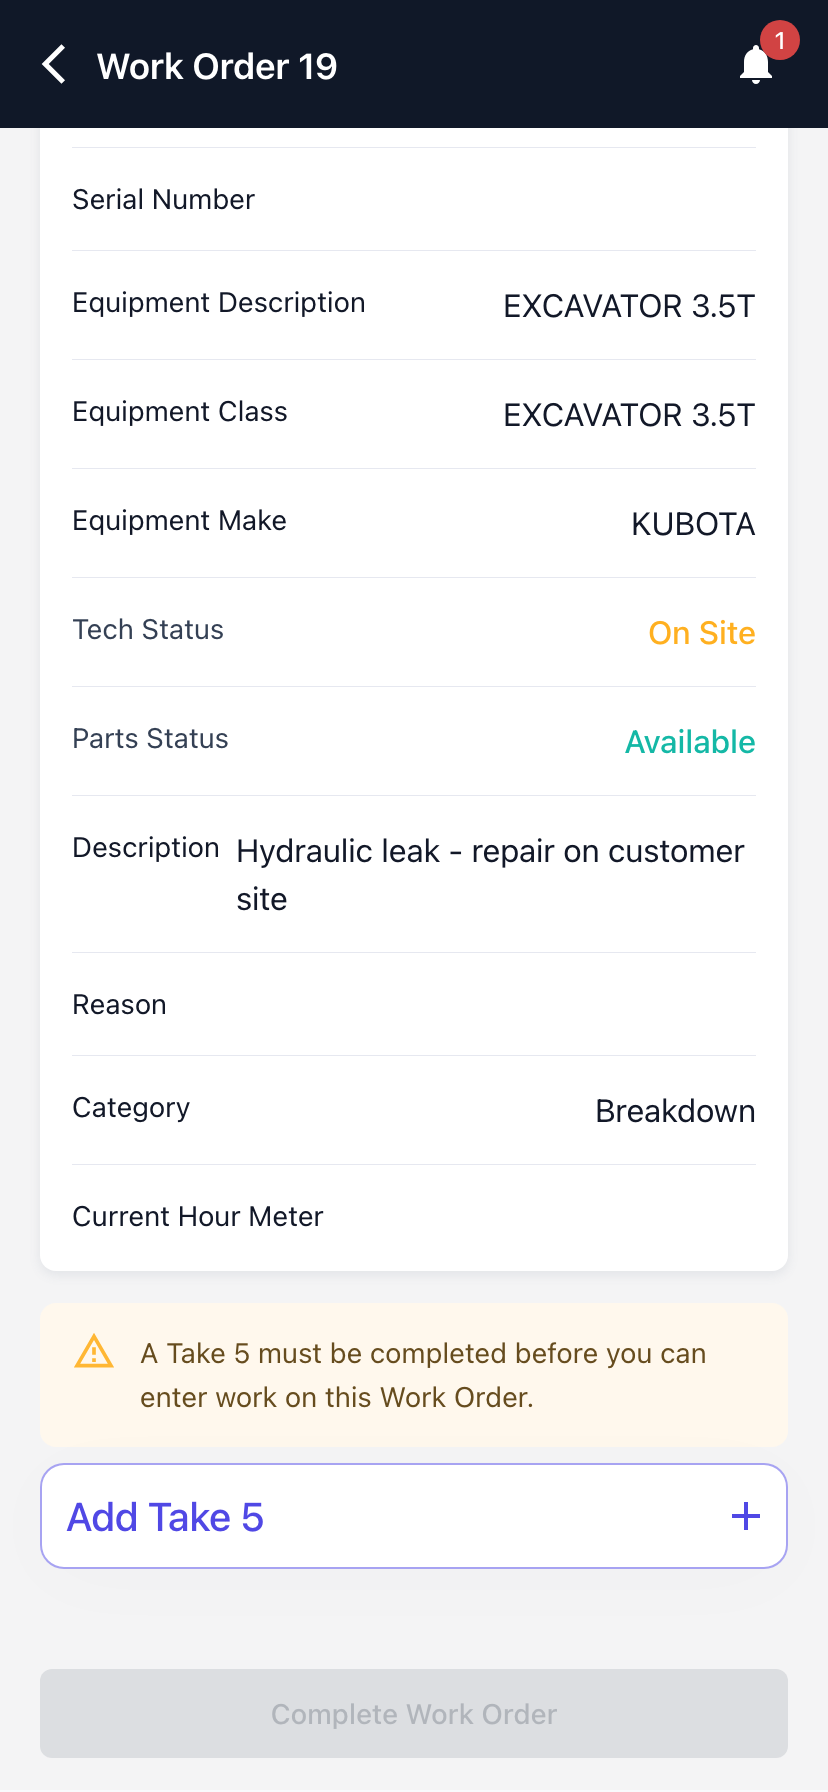
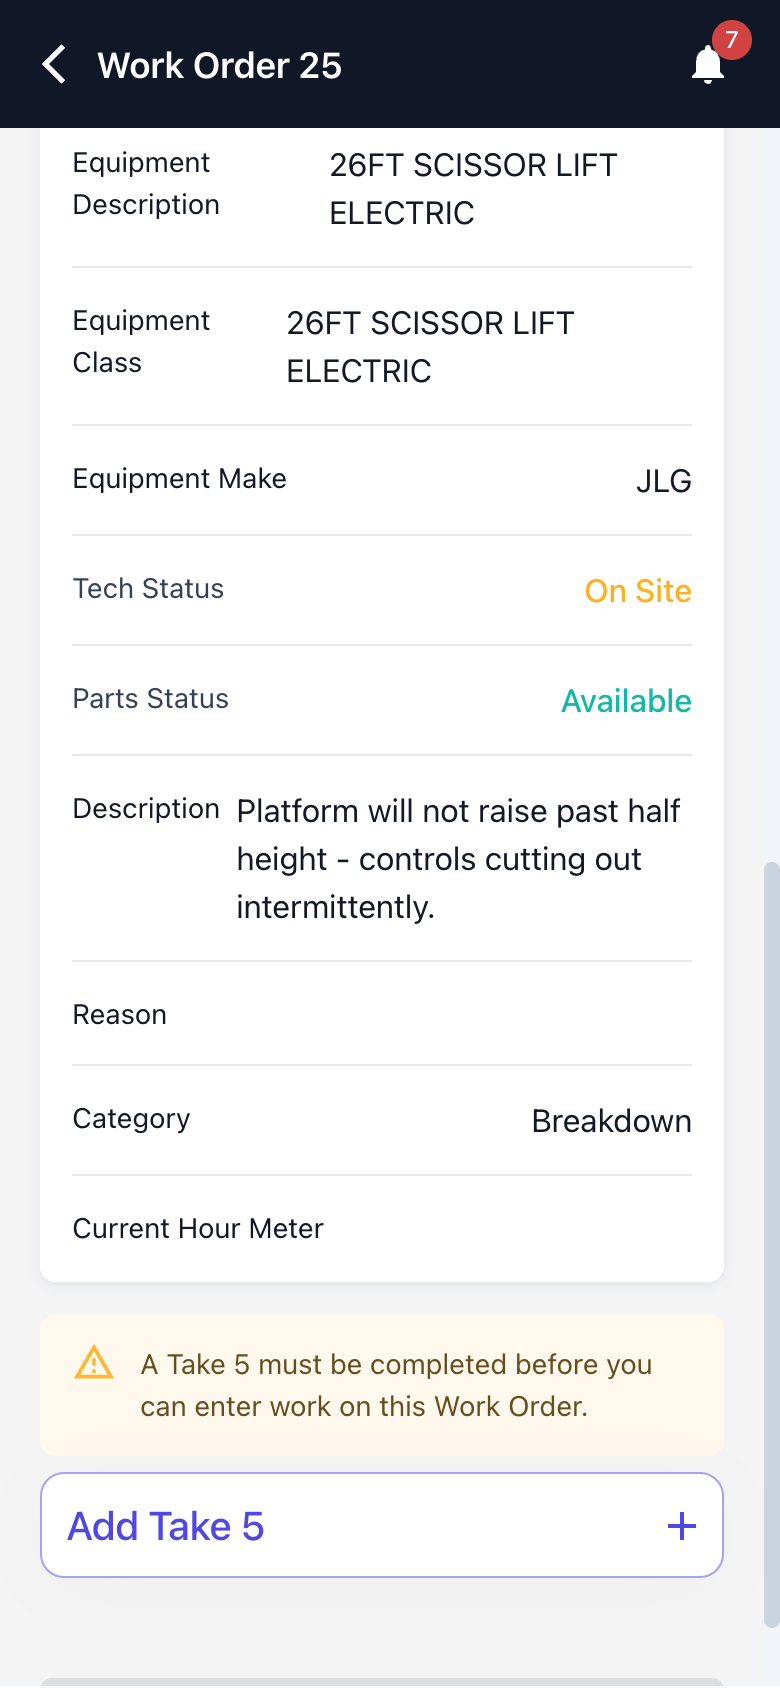
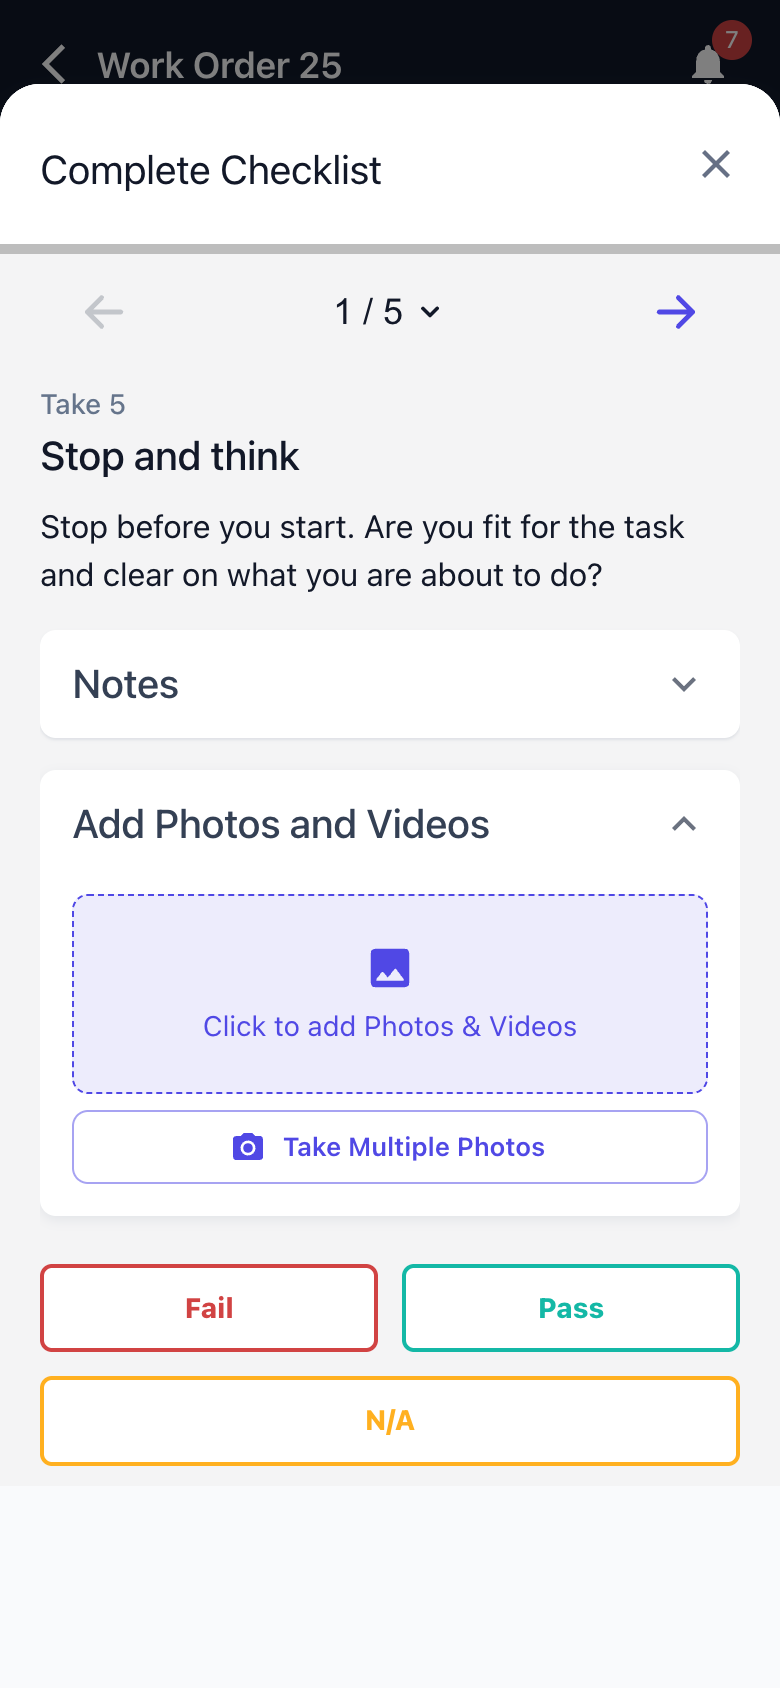
With the Tech Status at On Site, a warning appears and Complete Work Order is greyed out. Tap Add Take 5 to start one. The checklist opens as a drawer, one task per screen, with Fail, Pass and N/A at the bottom and room for notes and photos against each task. Answering the last task closes the drawer.
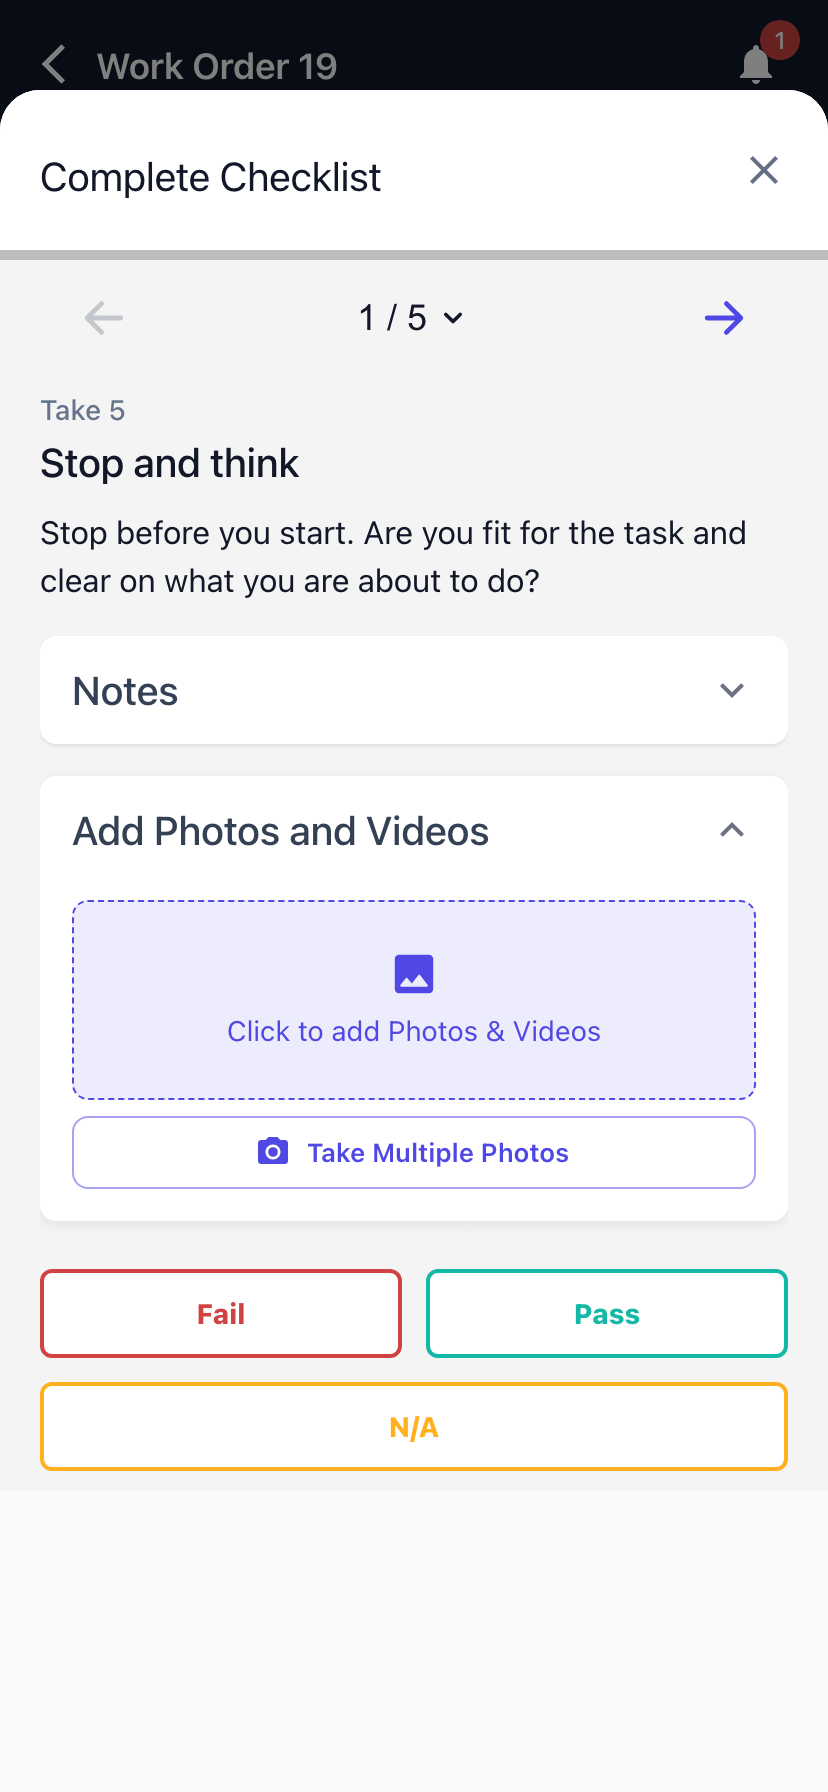
If a task was set up as photo required, Latner rejects the answer with Checklist task requires a photo. Attach the photo under Add Photos and Videos on that task first, then tap Pass.
Step 7 - The work entry sections unlock
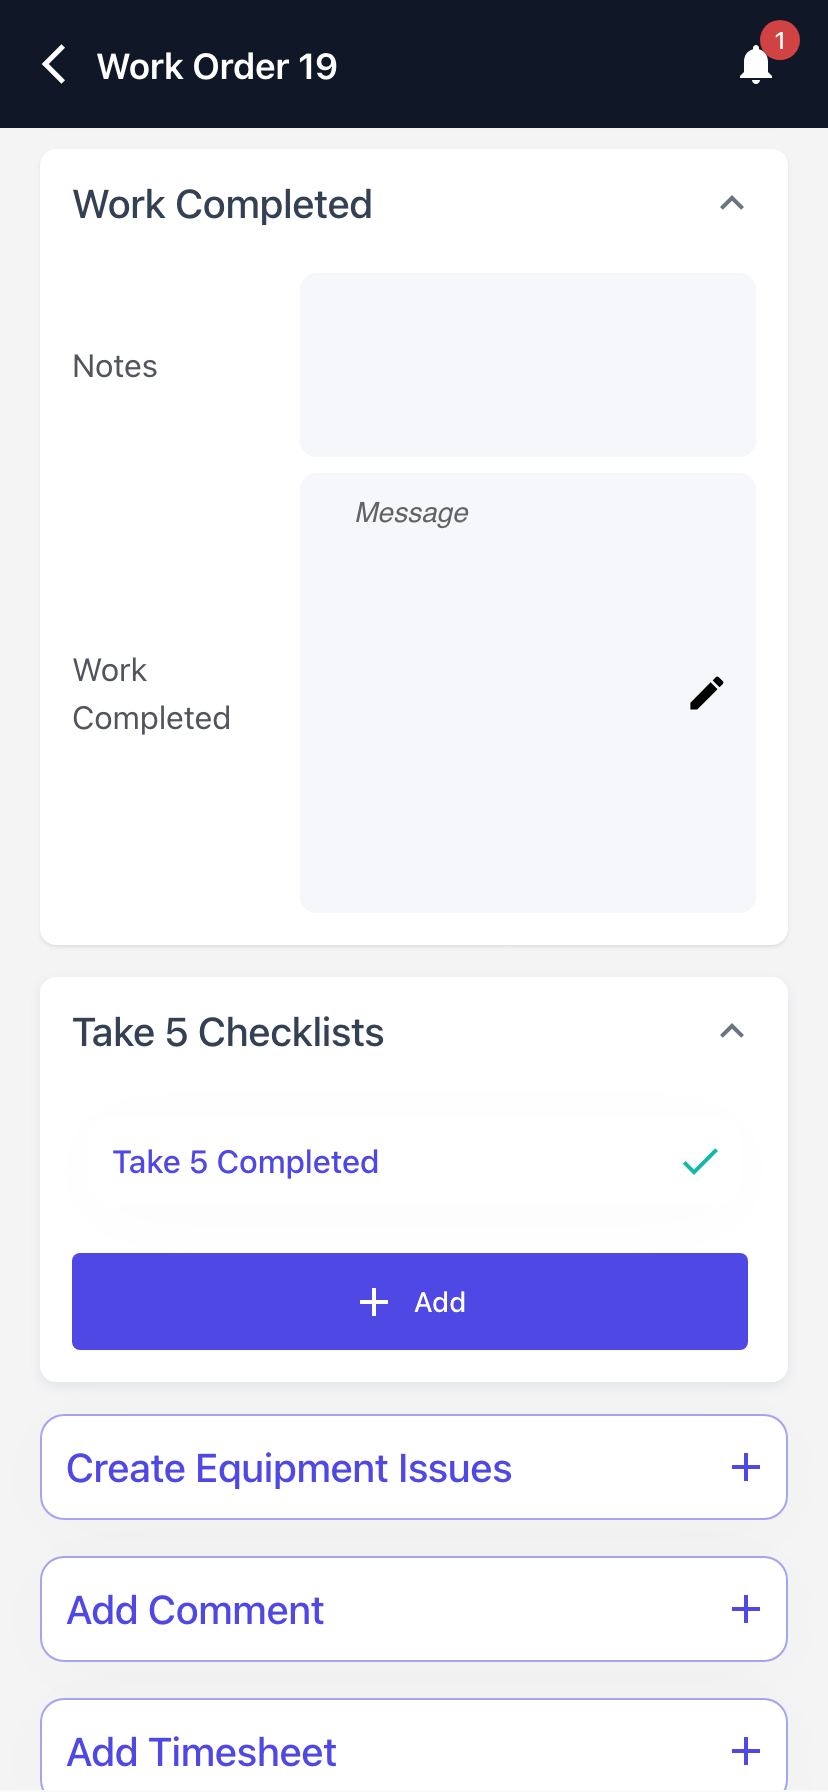
As soon as a Take 5 is completed the rest of the page appears: Work Completed, Take 5 Checklists, Create Equipment Issues, Add Comment, Add Timesheet, Add Stock, Add Expense, Update Meter Reading, Add Photos and Videos and Add Signature. Where the Work Order carries other checklists, a Complete Checklist button appears for each of them too.
Step 8 - Record your time
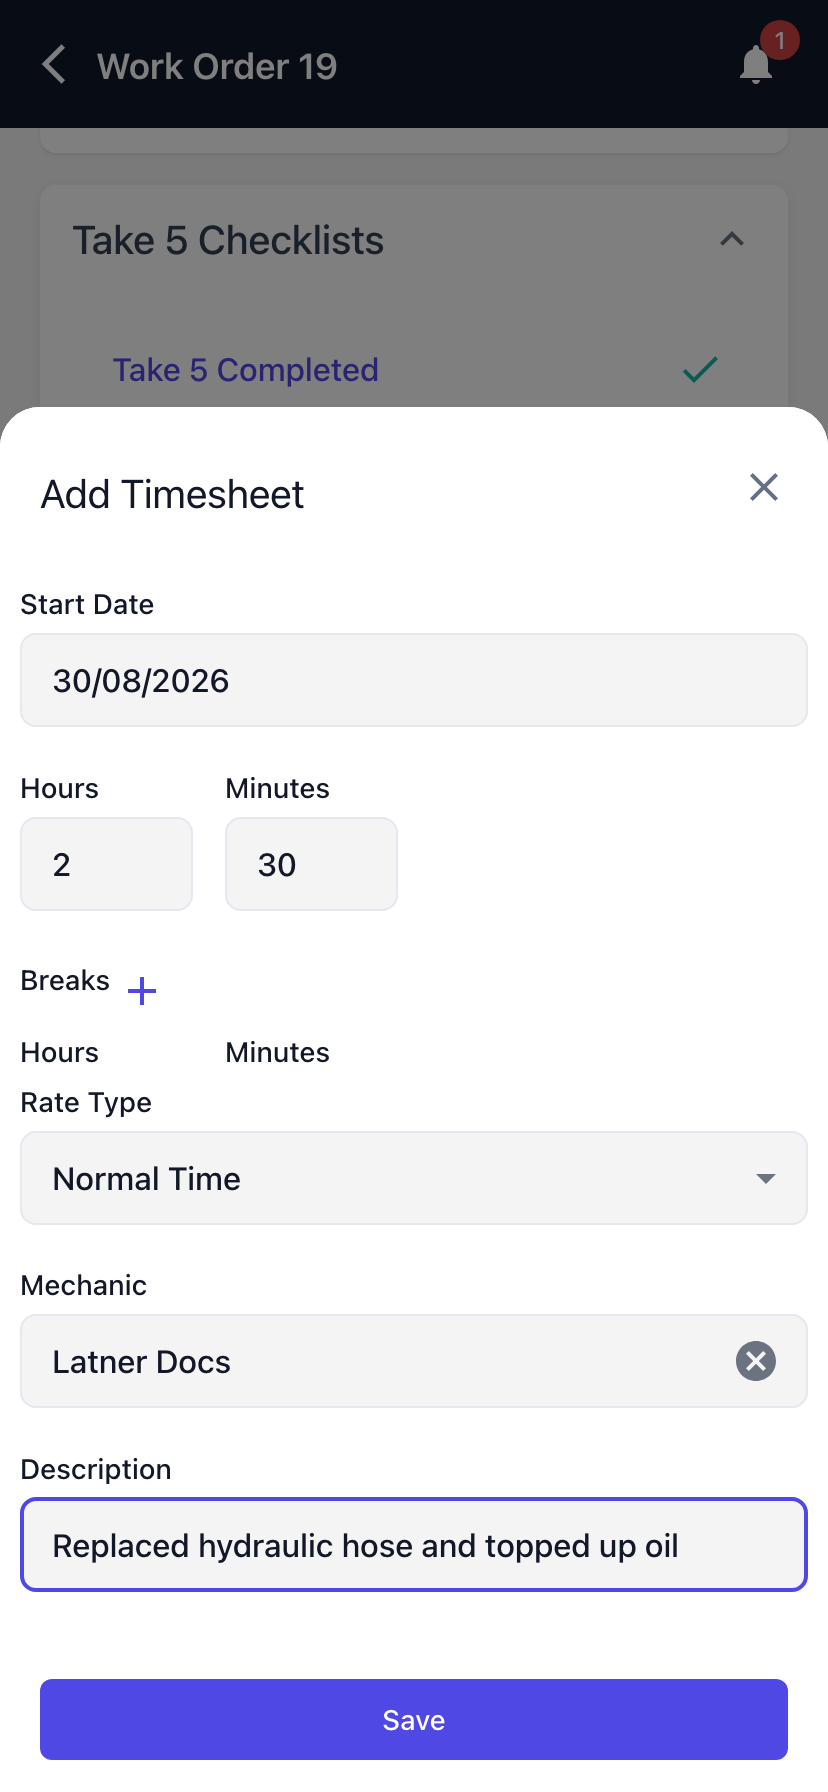
Tap Add Timesheet. Every field except Breaks is required:
-
Start Date - defaults to today in the branch's timezone.
-
Hours and Minutes, or Start Time and End Time - which pair you get depends on the Timesheet Input Type setting.
-
Breaks - optional, added as extra rows with the plus icon.
-
Rate Type - Normal Time, Call Out Rate or Overtime Rate.
-
Mechanic - defaults to you.
-
Description - defaults to Labour; replace it with what you actually did.
Tap Save. The line lands in a Timesheets list on the page with its total hours, and tapping it back open lets you correct it.
Step 9 - Add parts and expenses
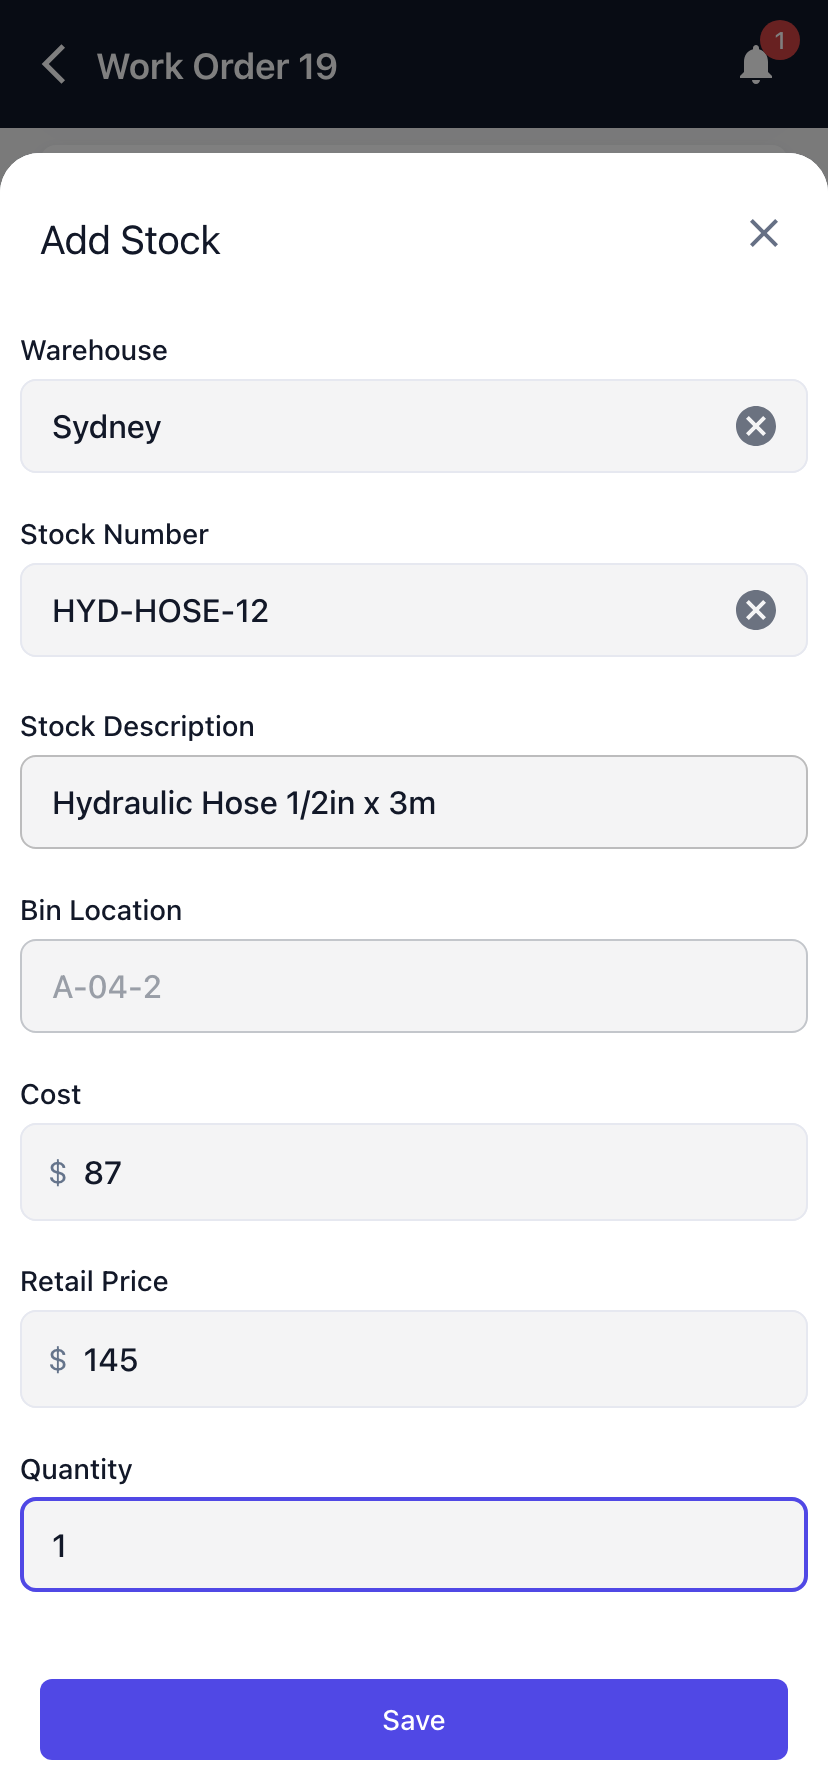
Tap Add Stock for parts. Pick the Warehouse (it defaults to your own) and search the Stock Number; the search shows the quantity on hand per warehouse, and choosing an item fills in Stock Description, Bin Location, Cost and Retail Price for you. Enter the Quantity and tap Save.
Add Expense works the same way for costs that are not stock - pick an Expense Type, then enter Expense Description, Cost, Retail Price and Quantity.
Step 10 - Update the meter reading
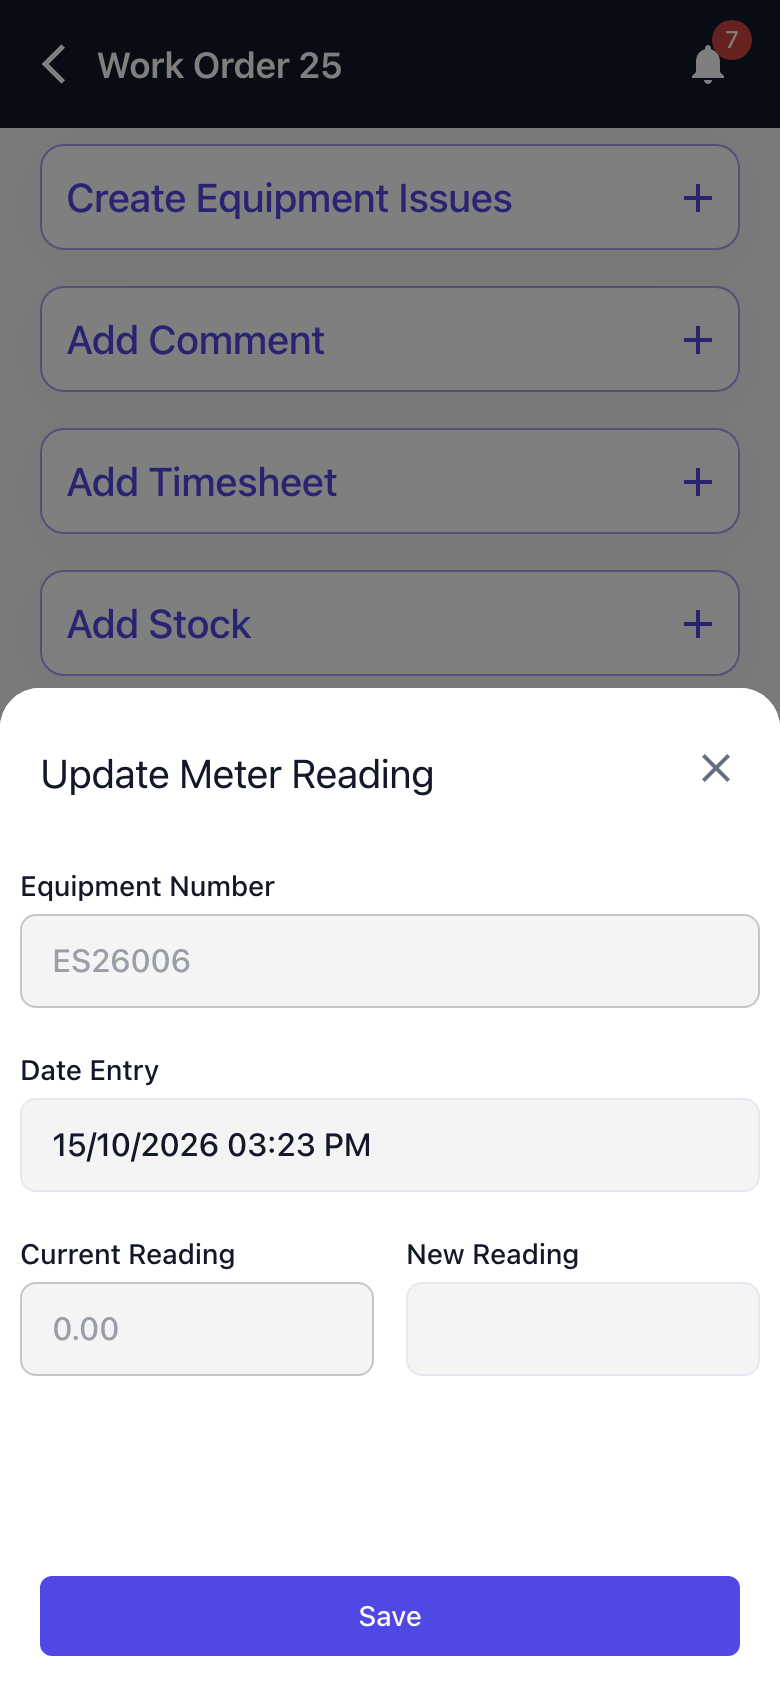
For metered equipment, tap Update Meter Reading and enter the New Reading. Equipment Number is filled in and locked, and Current Reading shows the equipment's latest reading so you can check your figure against it.
Date Entry is the date and time the meter was read. It starts at the current date and time, which is right if you've just read the meter. If you read it earlier, for example when you arrived on site, tap Date Entry and change the date or time to when you took the reading. An approximate time is fine. Latner uses the time to put readings taken on the same day in order, and the reading with the latest date and time becomes the equipment's latest reading.
Tap Save. The reading is recorded against the Work Order and added to the equipment's Meter Reading History with the Source Work Order, which Latner fills in for you. For more on dates, times and correcting a reading, see How to Update a Meter Reading.
Step 11 - Write up what you did
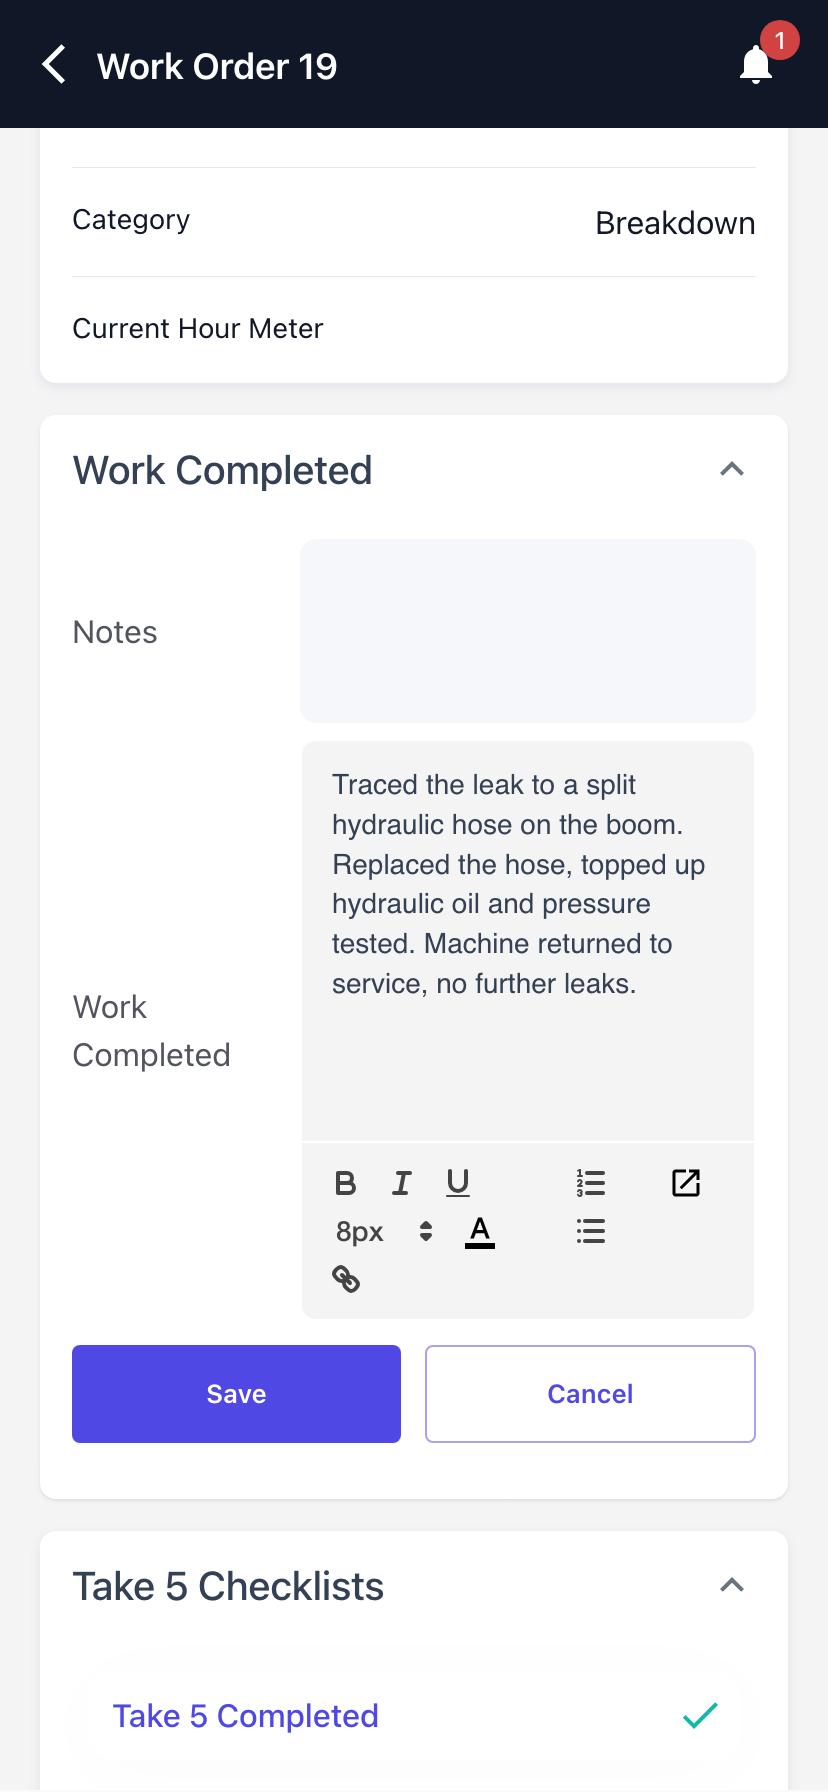
In the Work Completed card, tap the pencil next to Work Completed and type your write-up. It is a rich text field, so bold, lists and links are available. Tap Save in the card. Notes in the same card is read-only on the phone - it is the office's note to you.
Step 12 - Add photos and the customer's signature
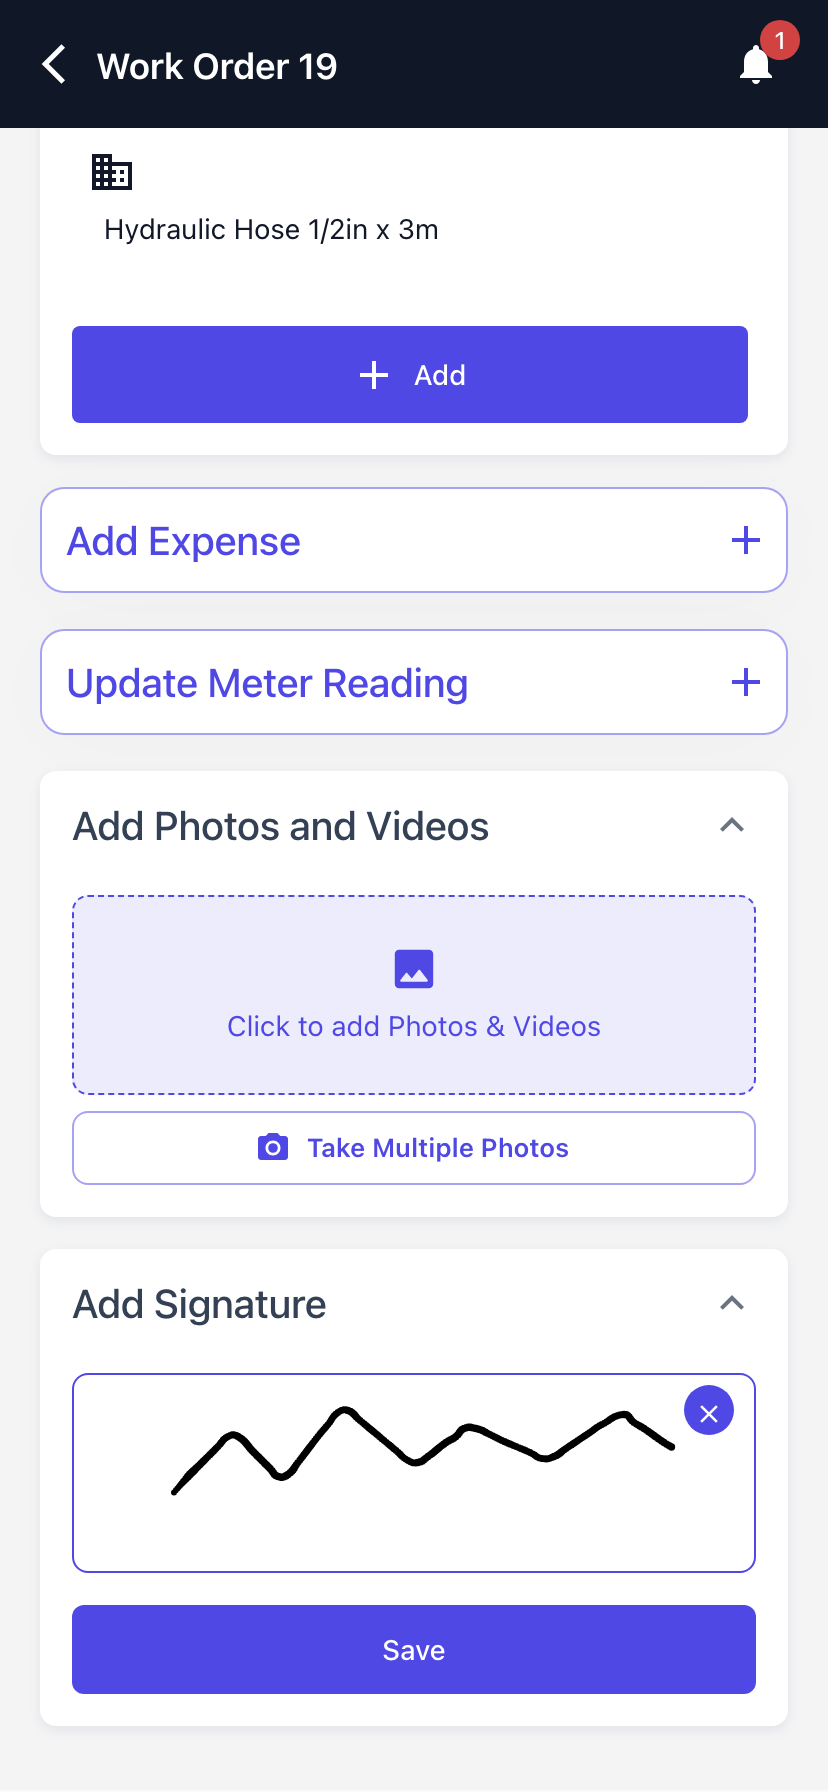
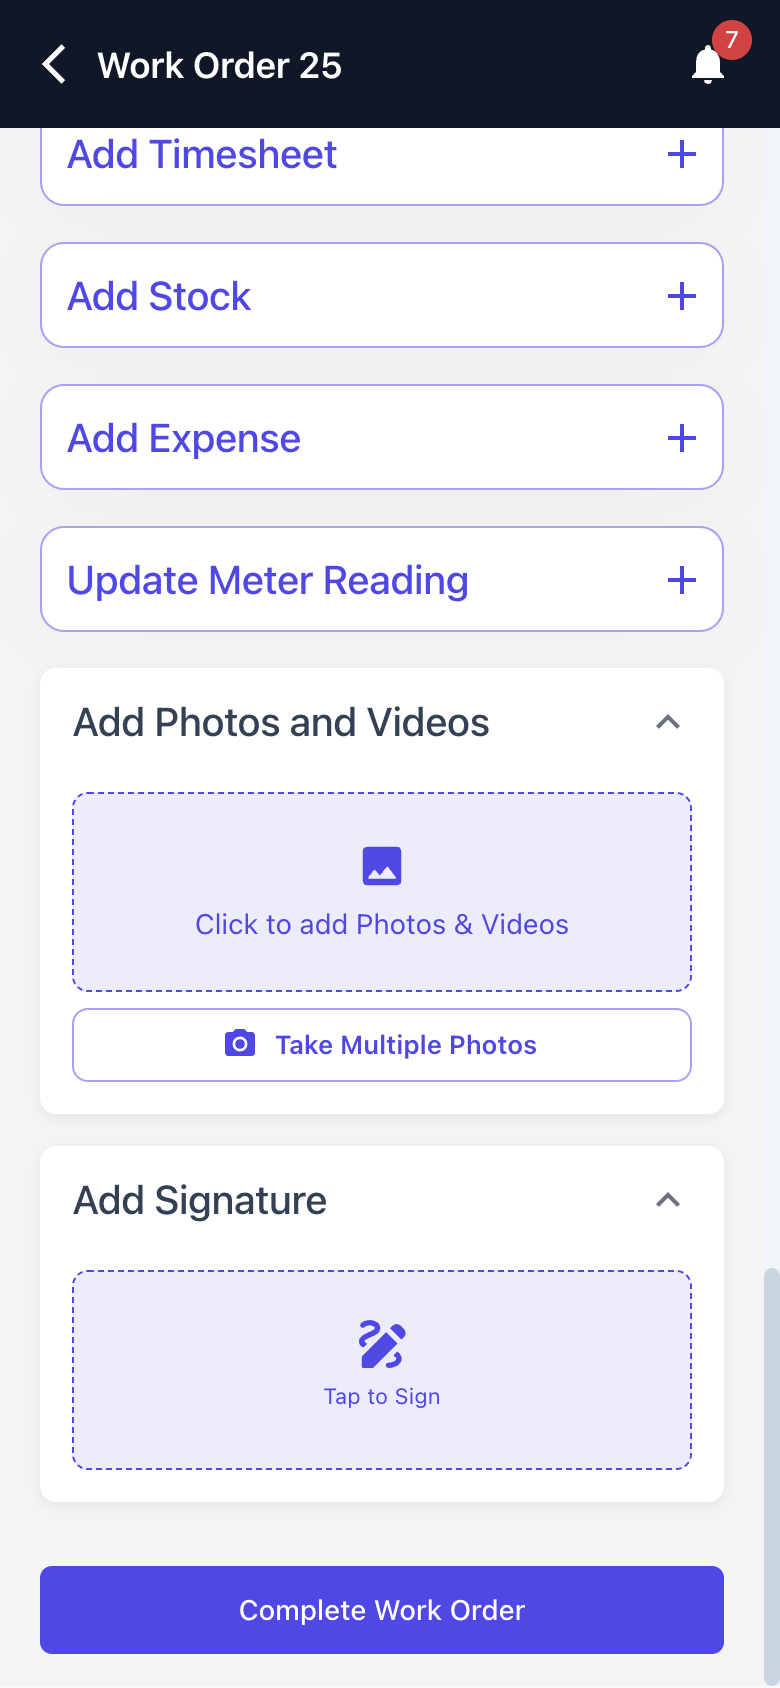
Under Add Photos and Videos, tap Click to add Photos & Videos to attach from the phone, or Take Multiple Photos to shoot several in a row. Then hand the phone to the customer: under Add Signature, tap Tap to Sign, sign on the pad and tap Save.
Step 13 - Complete the Work Order
Tap Complete Work Order at the bottom of the page. Latner confirms with Tech Completed Work Order and takes you back to the list, where the job is gone because its Tech Status is now Completed.
After Completing
-
The Work Order's Tech Status is Completed and the Work Completed Date is stamped with the time you tapped the button.
-
The Work Order Status stays Open. Completing on the phone is the technician signing off, not the Work Order closing.
-
The job disappears from the mobile list, which filters out Completed and Cancelled Tech Statuses.
-
Your timesheet, parts and expense lines are on the Work Order as details, ready for the office to invoice.
-
The signature, photos and the Take 5 are attached to the Work Order and print on the Work Order PDF.
-
An Internal Work Order can complete itself at this point, but only when its Category allows auto-completion and the user holds Auto Complete Internal Work Order.
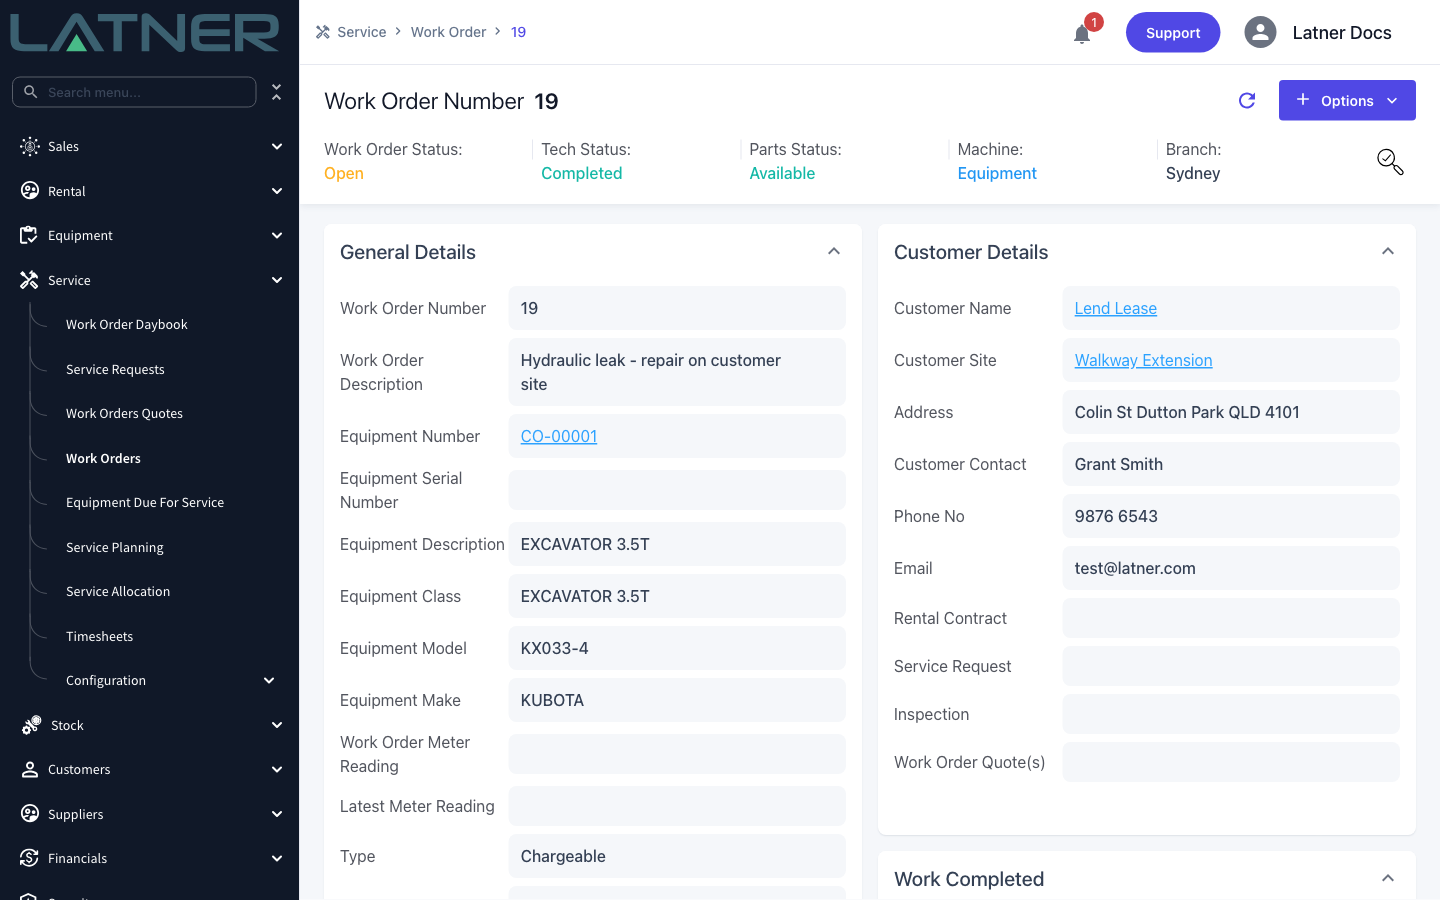
Once the Tech Status is Completed the Work Order is no longer in the mobile list, so a technician cannot add a forgotten timesheet or part from the phone. Someone with Assign Work Order Technician has to set the Tech Status back to an active status on Service › Work Orders before it reappears.
FAQs
Watch the Demo
Prefer to watch it? Step through the same flow here.
Mobile Work Orders is the phone version of the Work Order screen, so a technician can pick up a job, raise a new one from the yard or the roadside, and record everything about it without going back to a desk.
Overview
A technician's day rarely starts at a computer. The mobile screen shows the jobs that matter to them right now, and lets them raise a new one the moment a machine goes down in front of them.
-
Shows only Open Work Orders that have not been completed or cancelled, oldest scheduled job first.
-
Tabs narrow the list to your own jobs, unallocated jobs, a particular job reason, or your branch. The tabs you leave selected are remembered for you next time you open the screen.
-
Create Work Order raises a Work Order in three short steps, filling the customer, site, contact and address in from whatever the equipment is currently on hire to.
-
Opening a Work Order gives you the customer and site details, a tappable address and phone number, the equipment details, and a Tech Status you can change as the job progresses.
-
Where a Take 5 safety checklist is configured for the job's Location Type, work cannot be entered until a Take 5 has been completed.
-
Once work entry is unlocked you can add timesheets, stock, expenses, comments, equipment issues, a meter reading, photos, videos and the customer's signature.
Before You Begin
Mobile Work Orders needs a small amount of setup before a technician can use it.
|
Requirement |
Where to Find It |
|---|---|
|
Mobile Work Order permission |
Security › Configuration › Permission Groups › Service › Screen - without it the Work Orders card and menu item don't appear. |
|
Create Work Order permission |
Security › Configuration › Permission Groups › Service › Option - controls the Create Work Order action on the mobile screen. |
|
Assign Work Order Technician permission |
Security › Configuration › Permission Groups › Service › Option - controls the My Work Orders and Unallocated tabs. |
|
The user is linked to a Skilled Person |
Security › Users - this is what makes a job "yours", and what lets Latner allocate a Work Order to you when you raise one. |
|
Work Order Take 5 Checklist setting |
Security › Settings › Service - the Take 5 template technicians complete on site. Leave it unset to switch Take 5 off for Work Orders. |
|
Take 5 Work Order Location Types setting |
Security › Settings › Service - which Location Types require a Take 5. Defaults to Field Service only when nothing is selected. |
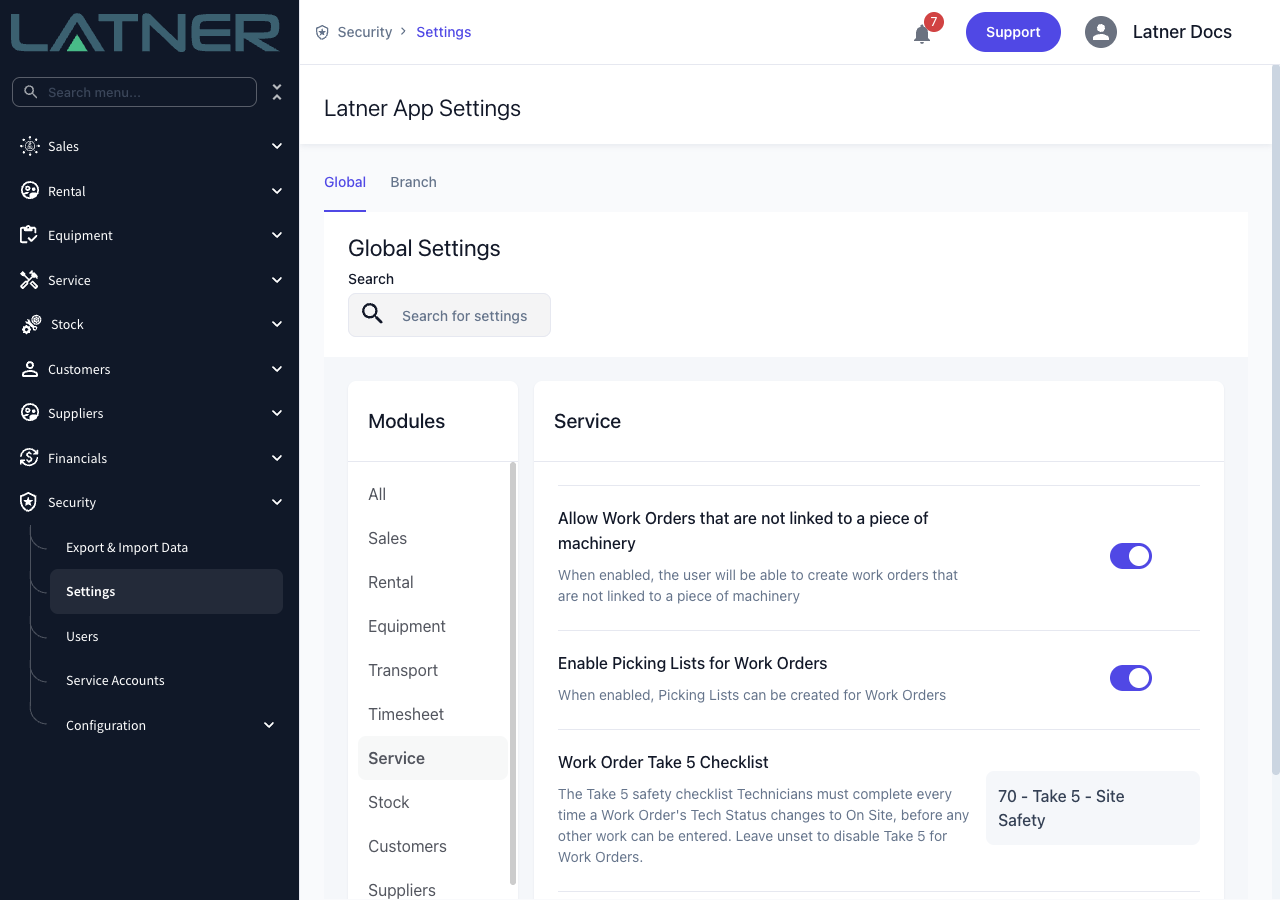
If Work Order Take 5 Checklist is left unset, no Take 5 is asked for and technicians go straight from Accept Work Order to Complete Work Order. Setting a template applies it from the next Work Order onwards; jobs already sitting at On Site are not retrospectively locked.
Finding Your Work Orders
Step 1 - Open Work Orders on your phone
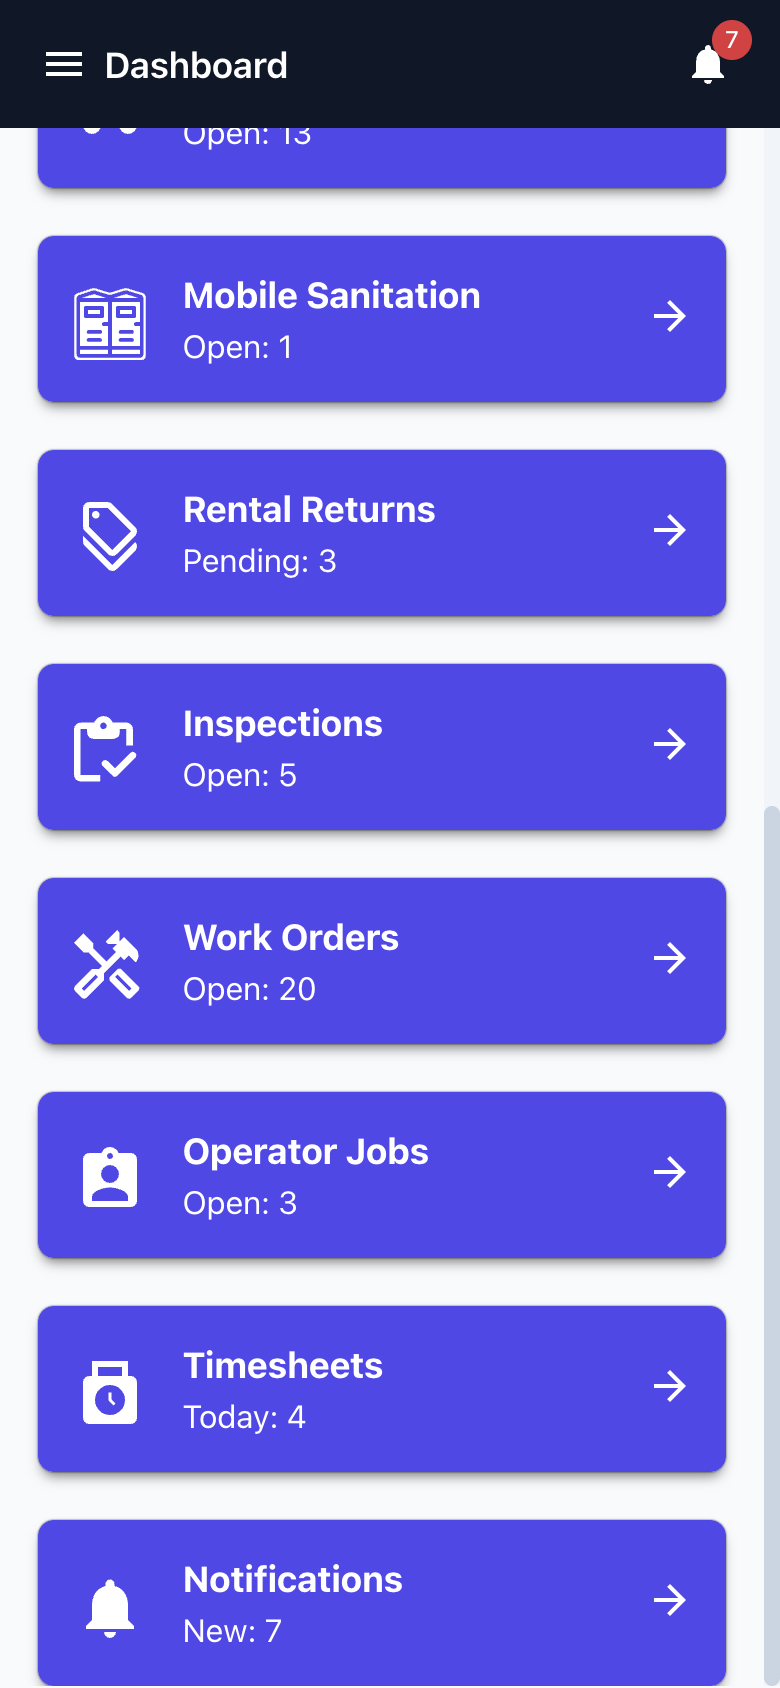
Sign in on the phone and Latner opens the mobile dashboard. Tap the Work Orders card, or open the menu at the top left and choose Work Orders. The count on the card is every Open Work Order at your branch, not just the ones allocated to you.
Step 2 - Narrow the list with the tabs
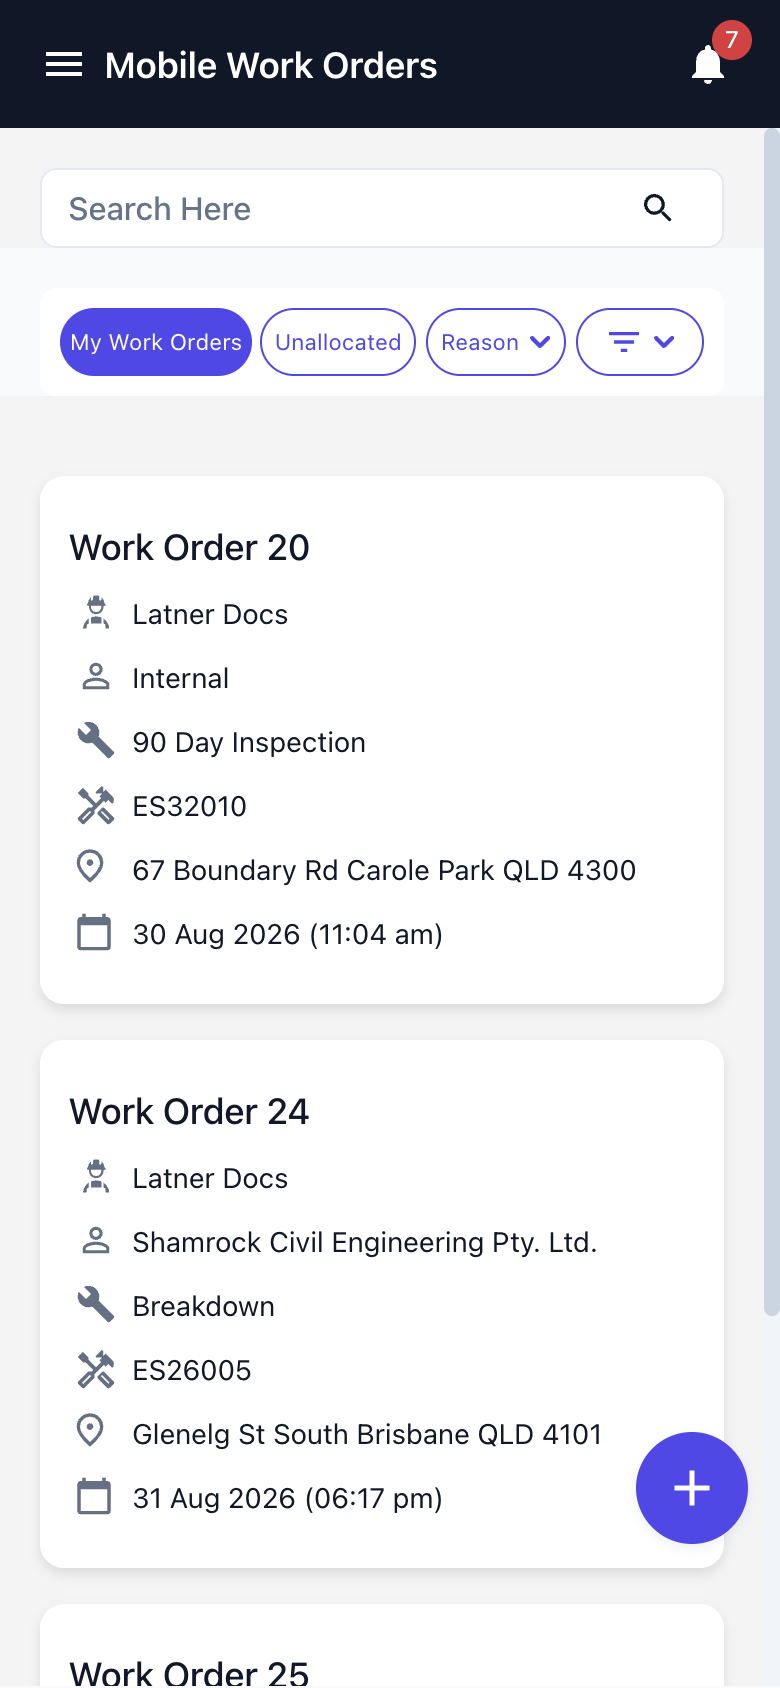
The screen opens on My Work Orders, which shows jobs where you are the primary or a secondary technician. The other tabs stack on top of it, so tapping a second tab narrows the list further rather than replacing it.
-
My Work Orders - Work Orders allocated to you, as primary or secondary technician.
-
Unallocated - Work Orders with no technician yet, plus your own.
-
Reason - one or more job reasons, taken from your Work Order Reason configuration.
-
The filter chip on the right holds My Branch, which limits the list to the branch on your user record.
The list is sorted by scheduled start, then due date, and only ever shows Open Work Orders that are not yet Completed or Cancelled. The search box above the tabs matches on the Work Order number, description, notes, equipment number and description, customer, site, address and the allocated technician's name.
Whichever tabs you leave selected are saved against your user and restored the next time you open the screen - including on another device. If the list looks empty when you know there is work out there, check whether My Work Orders and Unallocated are both still switched on from last time: together they mean "allocated to me and unallocated", which matches nothing.
Step 3 - Open the job
Tap a card to open the Work Order. Customer Details gives you the site address as a link that opens in maps and the site contact's number as a tap-to-call link, so you can be on your way without copying anything out.
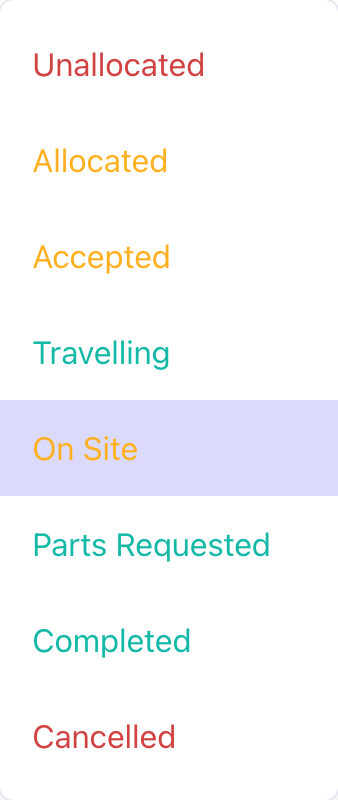
Under Tech Details, Tech Status is a dropdown you change as the job moves along: Unallocated, Allocated, Accepted, Travelling, On Site, Parts Requested, Completed and Cancelled. Setting it to Parts Requested also moves the Work Order's Parts Status to Requested, and setting it to Completed or Cancelled takes you back to the list.
You can only change a Work Order that is yours. If you are not the primary or a secondary technician on it, and you don't have Assign Work Order Technician, Latner refuses the change with "You are not allowed to edit Work Order that you are not assigned to".
Raising a Work Order From the Phone
Step 1 - Tap the plus button
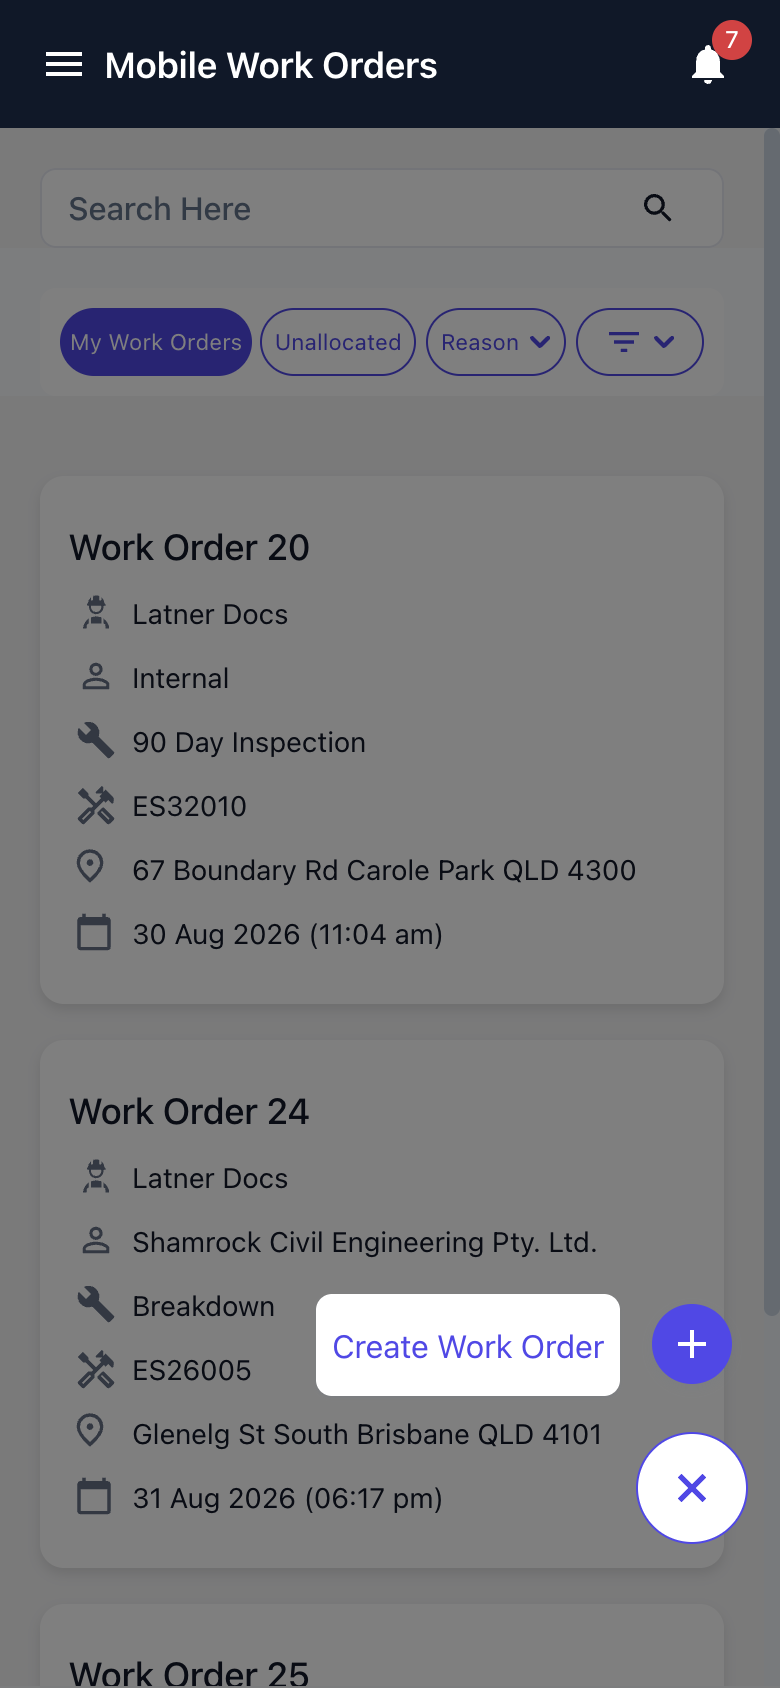
Tap the round + button at the bottom right of the list and choose Create Work Order. The form opens as a three step drawer: Select Equipment, Job Details, then Work Order Details.
Step 2 - Select the equipment
Everything on this step is required.
-
Equipment Class - fills itself in from the equipment you pick, and narrows the equipment search if you set it first.
-
Equipment Number - search by number or description. Only serialized equipment appears, and machines that are Sold, Disposed, Converted or Pending Activation are left out.
-
Equipment Status - Operational or Non-Operational. Choose Non-Operational when the machine cannot be used until the job is done.
Tap Next.
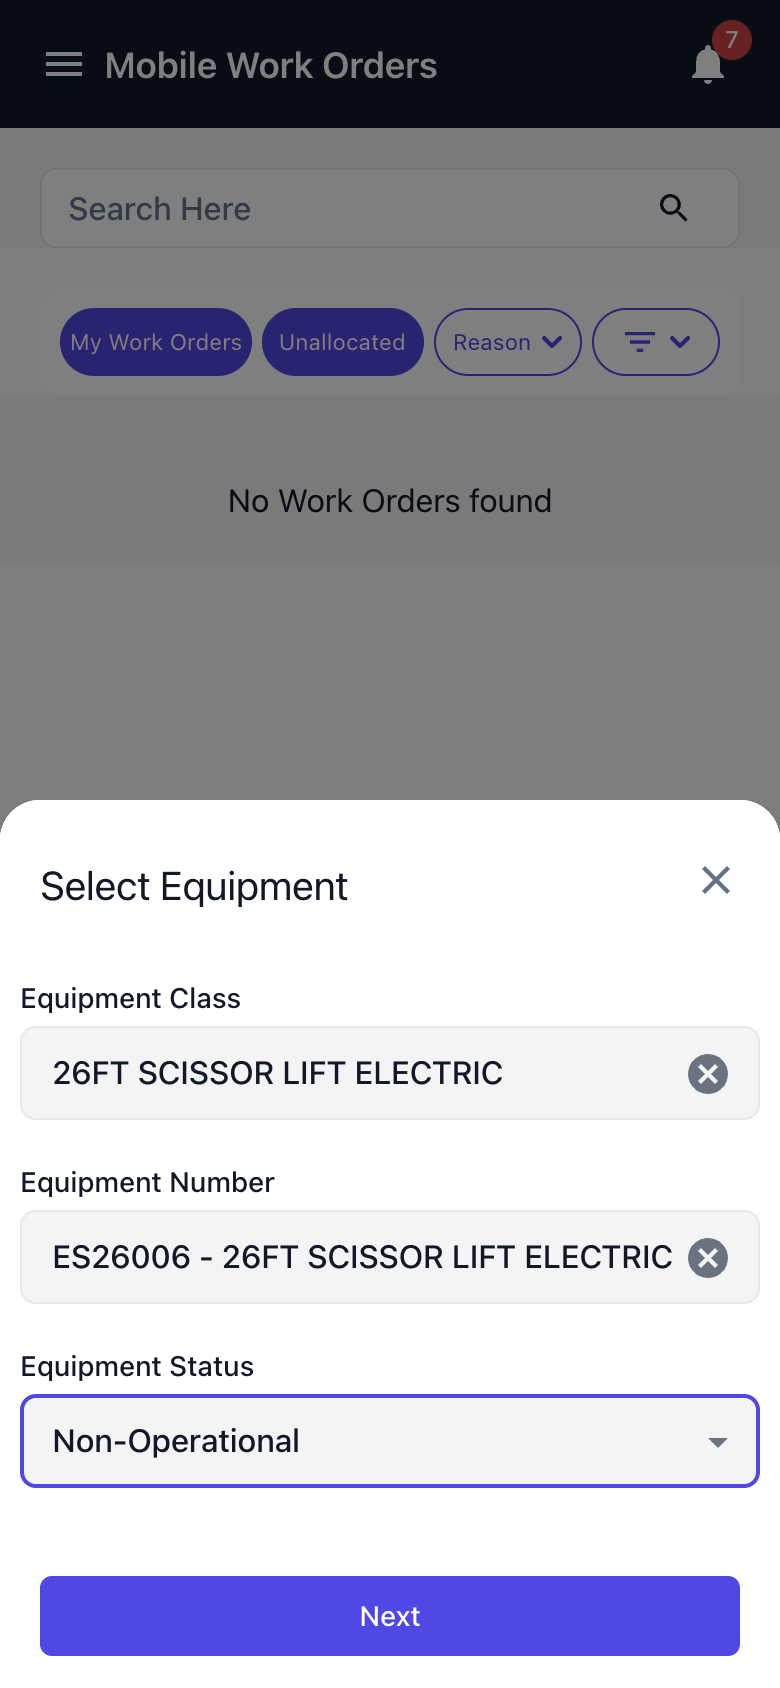
Step 3 - Describe the job
The equipment you picked is shown at the top and can't be changed from here on.
-
Service Schedule (Optional) - link the job to a pending service schedule for this machine. Choosing one fills in the Job Category, Job Reason and description from the schedule and locks the reason and category. This field only appears if you have the Create Service Schedule Work Order permission.
-
Job Type - Internal, Chargeable or Customer Damage. Capital Preparation is not offered on mobile.
-
Job Reason - required. This narrows the categories you can choose from.
-
Job Category - required. Picking a category fills the matching reason back in, and changing the reason clears the category.
Tap Next.
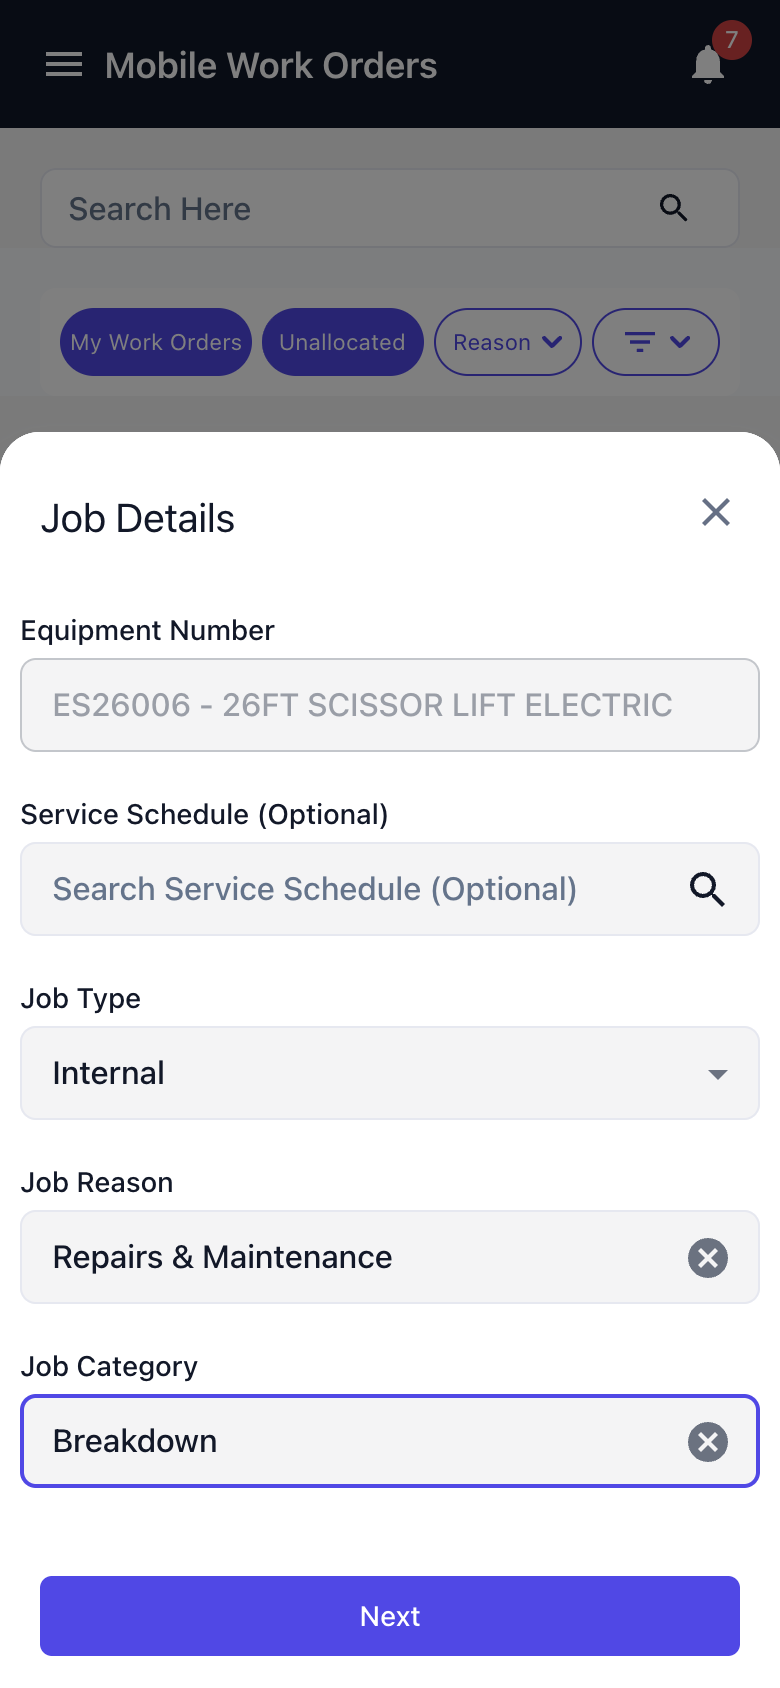
Step 4 - Fill in the Work Order details
-
Address - pre-filled from the rental contract the machine is currently out on. If the machine isn't on hire, it falls back to the customer site address for customer owned equipment, or to the branch address.
-
Due Date - defaults to now; change it if the job is scheduled for later.
-
Work Order Description - required. This is what everyone else sees on the job, so describe the fault.
-
Location Type - Workshop or Field Service. Defaults to Workshop. This is what decides whether a Take 5 is required, so set it to Field Service for work on a customer's site.
The customer, site and contact are carried across behind the scenes from the equipment's current rental contract, so you don't have to enter them.
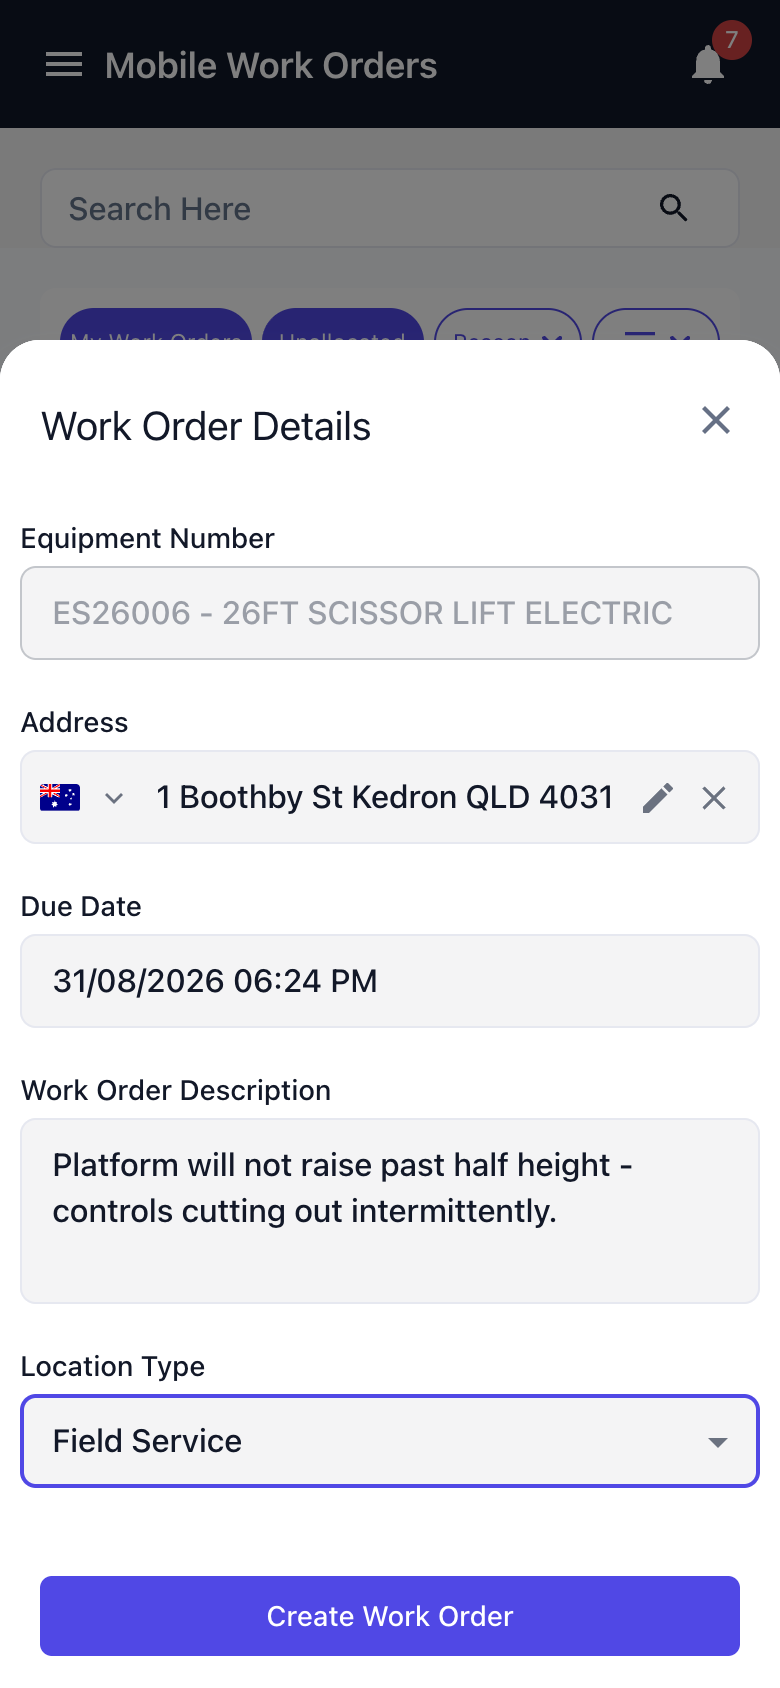
Step 5 - Create the Work Order
Tap Create Work Order. Latner saves the job and opens it straight away. If your user is linked to a Skilled Person, the new Work Order is allocated to you and its Tech Status is set to Accepted, so you can start work without accepting it first.
On a Field Service job with a Take 5 configured, the job opens with a prompt to tap Arrive On Site before anything else.
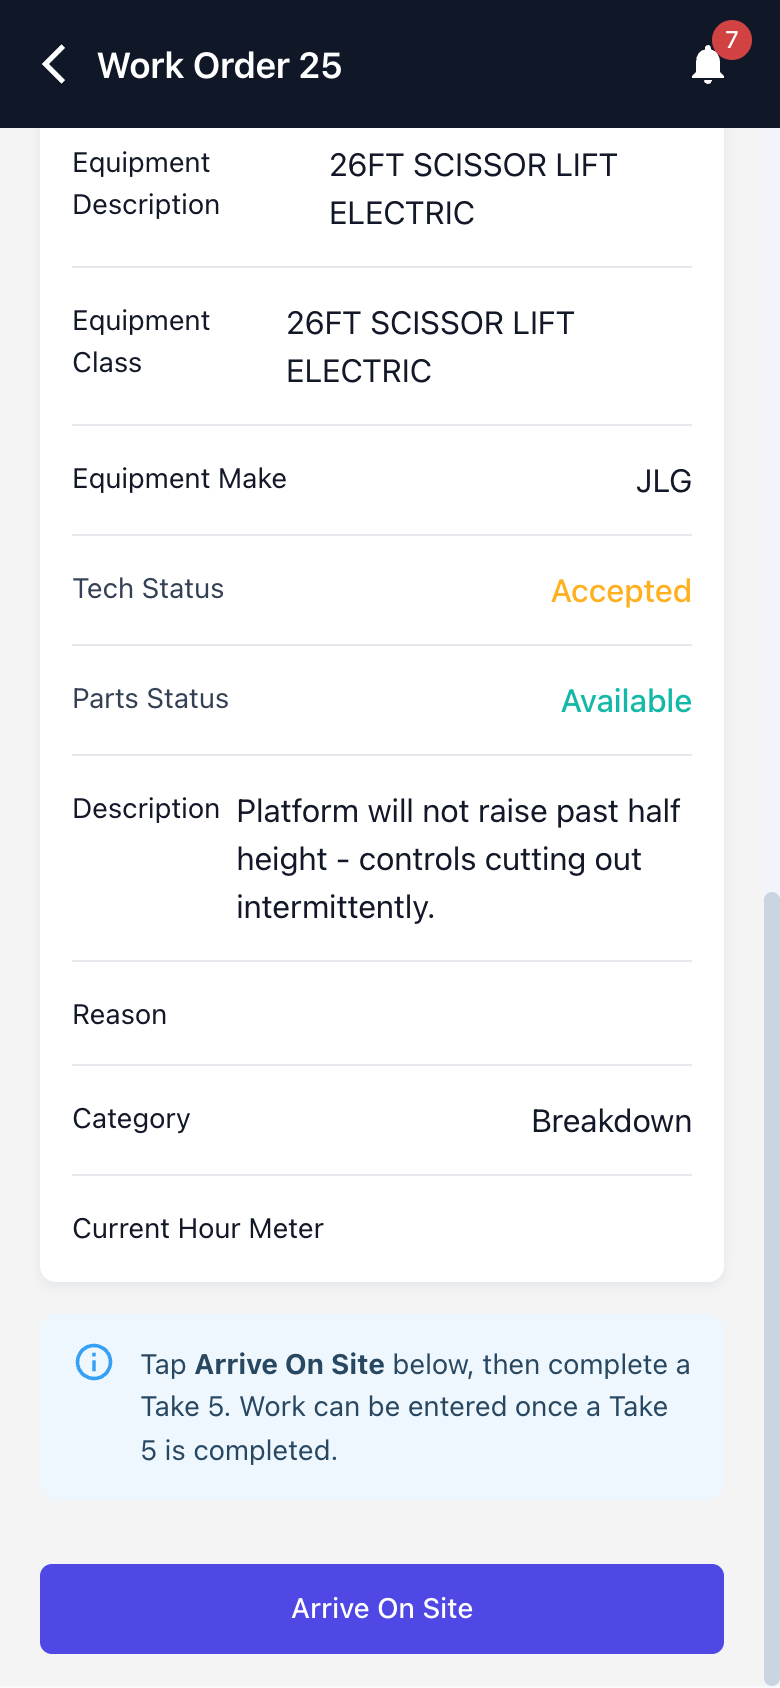
Working the Job
Step 1 - Arrive on site and complete the Take 5
Tap Arrive On Site. The Tech Status moves to On Site and the Take 5 Checklists section appears with a warning that a Take 5 must be completed before you can enter work. Tap Add Take 5 to start one, or Complete Take 5 to pick up one you started earlier.
Work through the checklist points, marking each one Pass, Fail or N/A. Add notes and photos where they help, and where a point requires a photo, Latner won't accept your answer until one is attached.
Step 2 - Record the work
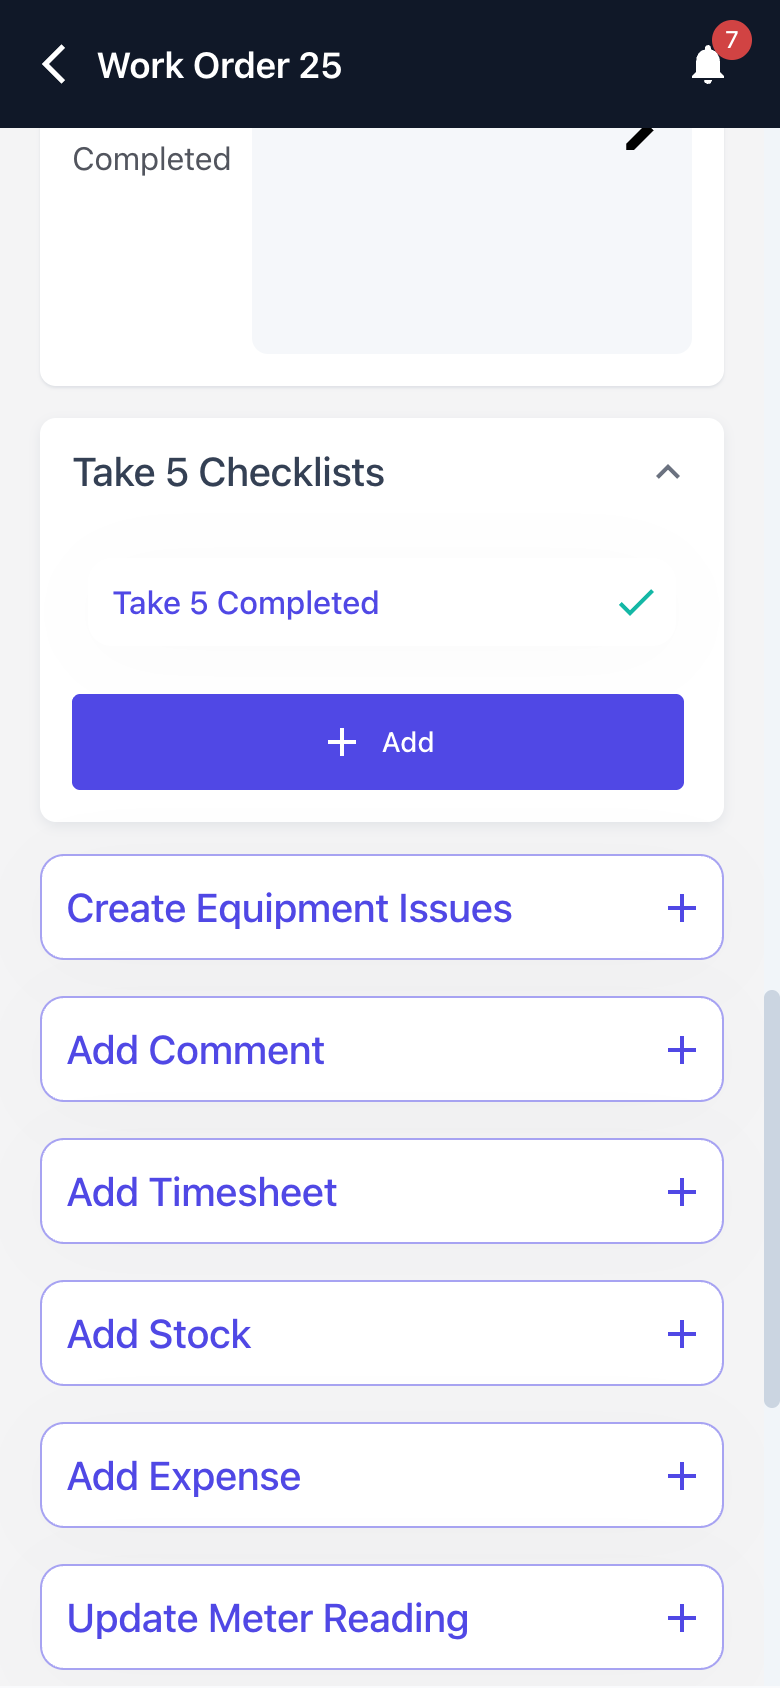
Once the Take 5 is completed the rest of the screen unlocks. Each section expands to show what you have already added and an Add button for a new entry.
-
Create Equipment Issues - raise a defect against the machine, and see any issues already outstanding on it.
-
Add Comment - notes for the office. You can only edit your own comments.
-
Add Timesheet - your labour on the job. Needs the Add Timesheet to Work Order permission.
-
Add Stock - parts used. Needs the Add Stock to Work Order permission.
-
Add Expense - other costs. Needs the Add Expense to Work Order permission.
-
Update Meter Reading - record the machine's hours or kilometres against the Work Order.
Step 3 - Write it up and finish
Fill in Work Completed with a few notes on what you did, attach photos and videos, and take the customer's signature under Add Signature. Then tap Complete Work Order, which sets the Tech Status to Completed and returns you to the list.
For the full walkthrough of a technician's day on the phone, including timesheets, parts and expenses in detail, see How to Complete a Work Order on a Mobile Device.
After Creation
-
The Work Order is created as Open and appears everywhere a Work Order normally does - the Work Order Daybook, the Service Allocation screen and the Work Order Dashboard - not just on mobile.
-
The equipment is taken out of service while the Work Order is open. If you chose Non-Operational, it is also flagged as non-operational, which keeps it off rental availability.
-
If you linked a service schedule, that schedule line is opened against the job, and any checklist template on the schedule is added to the Work Order for you to complete.
-
Completing the Work Order as a technician sets the Tech Status to Completed and stamps the completion time. The Work Order itself stays Open for the office to cost and invoice, unless it is an internal job whose category allows auto-completion and the user has the Auto Complete Internal Work Order permission.
Raising a Work Order takes the machine out of service straight away, so a Work Order raised against the wrong equipment will show that machine as unavailable until the job is dealt with. There is no way to move a Work Order onto different equipment from the phone. If you pick the wrong machine, cancel the Work Order on the desktop screen and raise a new one, or change the equipment there.
FAQs
Watch the Demo
Prefer to watch it? Step through the same flow here.