
Welcome to the November 2025 release of Latner Software. This release delivers Ad Hoc Sanitation Dockets, Lost Rental Quote Dashboard, Purchase Order Improvements & Trackunit Integration. We also delivered improvements to sales orders workflows, work order management and CRM Projects enhancements. Please see below for the details of our changes.
Summary of changes:
New Features
Ad Hoc Sanitation Dockets
An ad hoc Sanitation Docket is a one-off service you raise by hand, for the times a site needs pumping out, cleaning or restocking outside any regular pattern.
Overview
Not every visit fits the timetable. A line set to Ad Hoc has no schedule behind it, so every visit is booked by hand - and a line on a regular schedule sometimes needs an extra visit too. Either way, that one-off booking is an ad hoc Sanitation Docket.
-
An ad hoc docket is raised from the Sanitation tab of the rental contract, against the Sanitation line for the equipment being serviced.
-
It is created with a status of Open, a due date, a charge, and either one of your own drivers or an external supplier carrying out the work.
-
An ad hoc docket can be raised against a Sanitation line of any frequency. On a scheduled line it is a one-off extra service: the scheduled dockets and their due dates are unchanged. Completing an ad hoc docket never raises another one.
-
Ad hoc dockets are not cleared away when the equipment comes off hire - somebody asked for that service, so it stays.
-
From there the docket behaves like any other: it is scheduled on Sanitation Allocation, completed by whoever attends, and billed once it is finished.
Before You Begin
The docket hangs off an existing Sanitation line, so get that in place first.
|
Requirement |
Where to Find It |
|---|---|
|
An open rental contract with a Sanitation line, linked to an equipment line |
Rental › Rental Contracts › the contract › Sanitation |
|
An Equipment Number on the linked equipment line |
The contract's Details tab |
|
Create Sanitation Dockets permission |
Security › Permission Groups › Rental › Options |
|
Sanitation Scheduler Default Duration (Minutes) setting, used when you later schedule the docket |
Security › Settings › Rental |
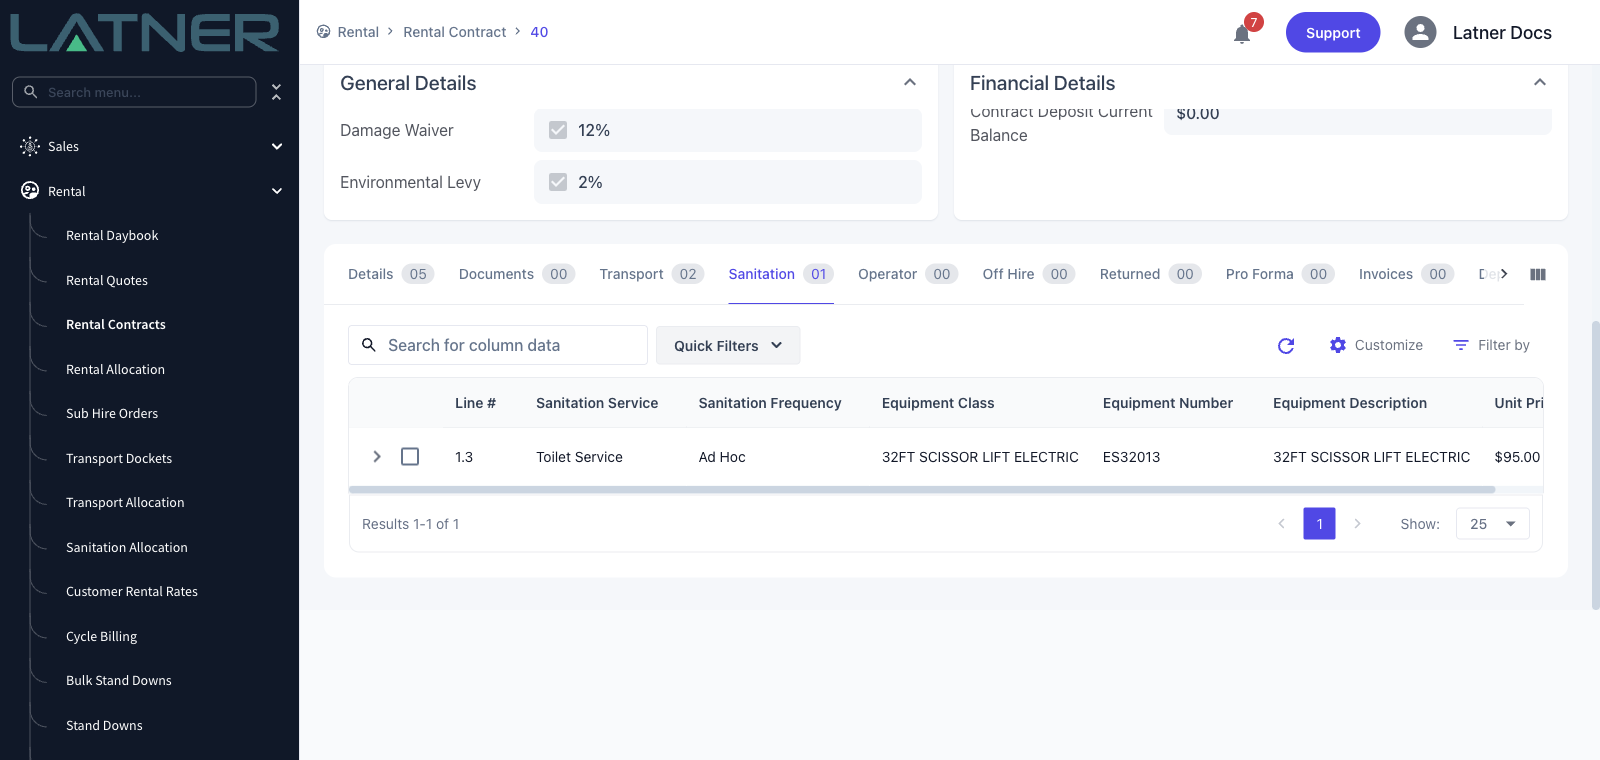
The action is only offered while the contract is still open. On a Completed, Cancelled or Lost contract it is greyed out with Rental Contract must be Open, and it stays greyed out until exactly one Sanitation line is ticked and the equipment line that line points at has an Equipment Number against it.
Creating the Ad Hoc Sanitation Docket
Step 1 - Select the Sanitation line
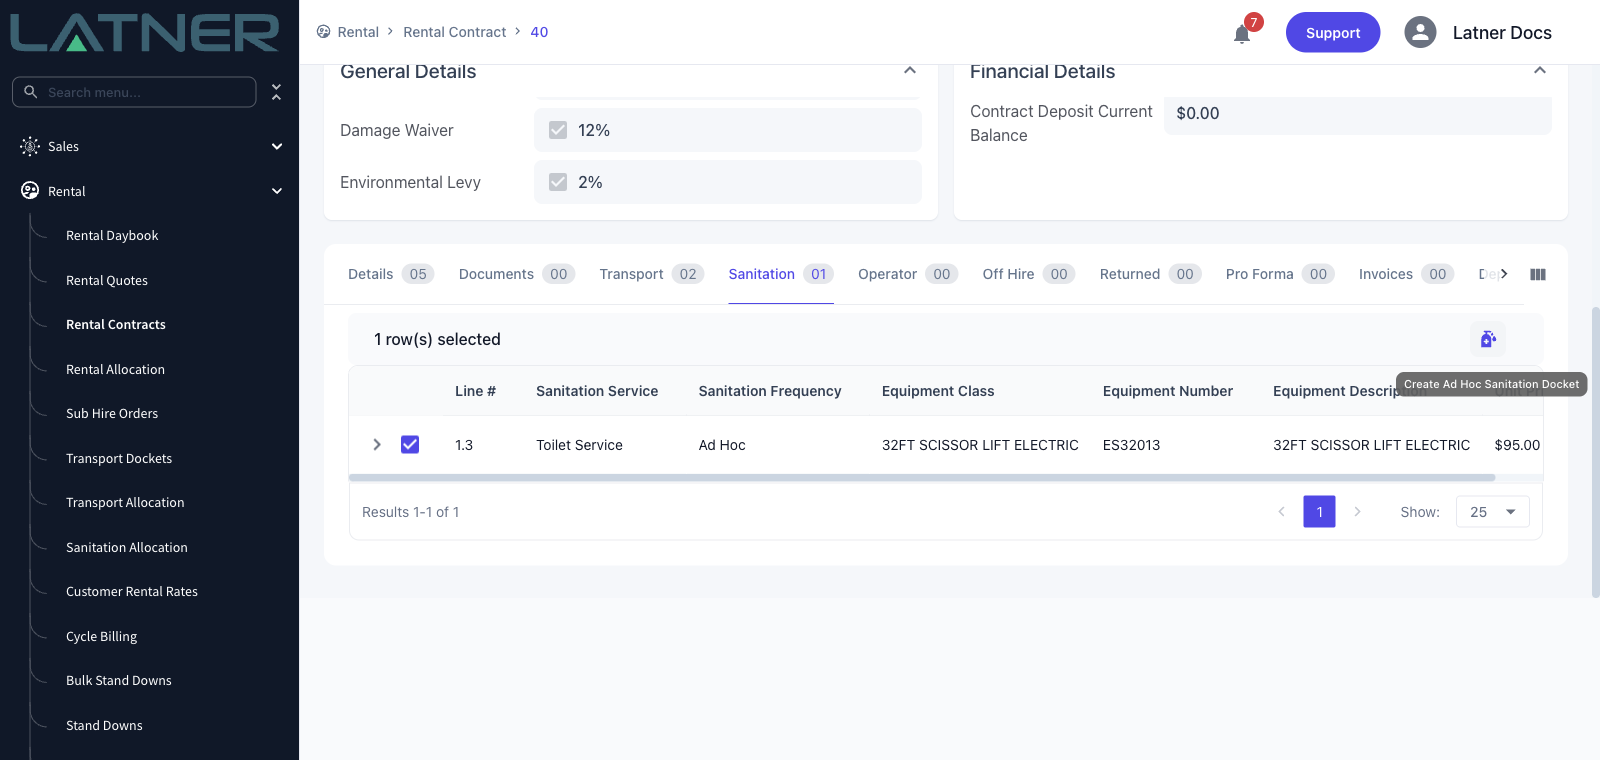
Open the rental contract, go to the Sanitation tab and tick the line you want an extra service on. A selection toolbar appears above the table with a sanitation icon on the right - hover it and it reads Create Ad Hoc Sanitation Docket. Click it.
Step 2 - Check the details and set the due date
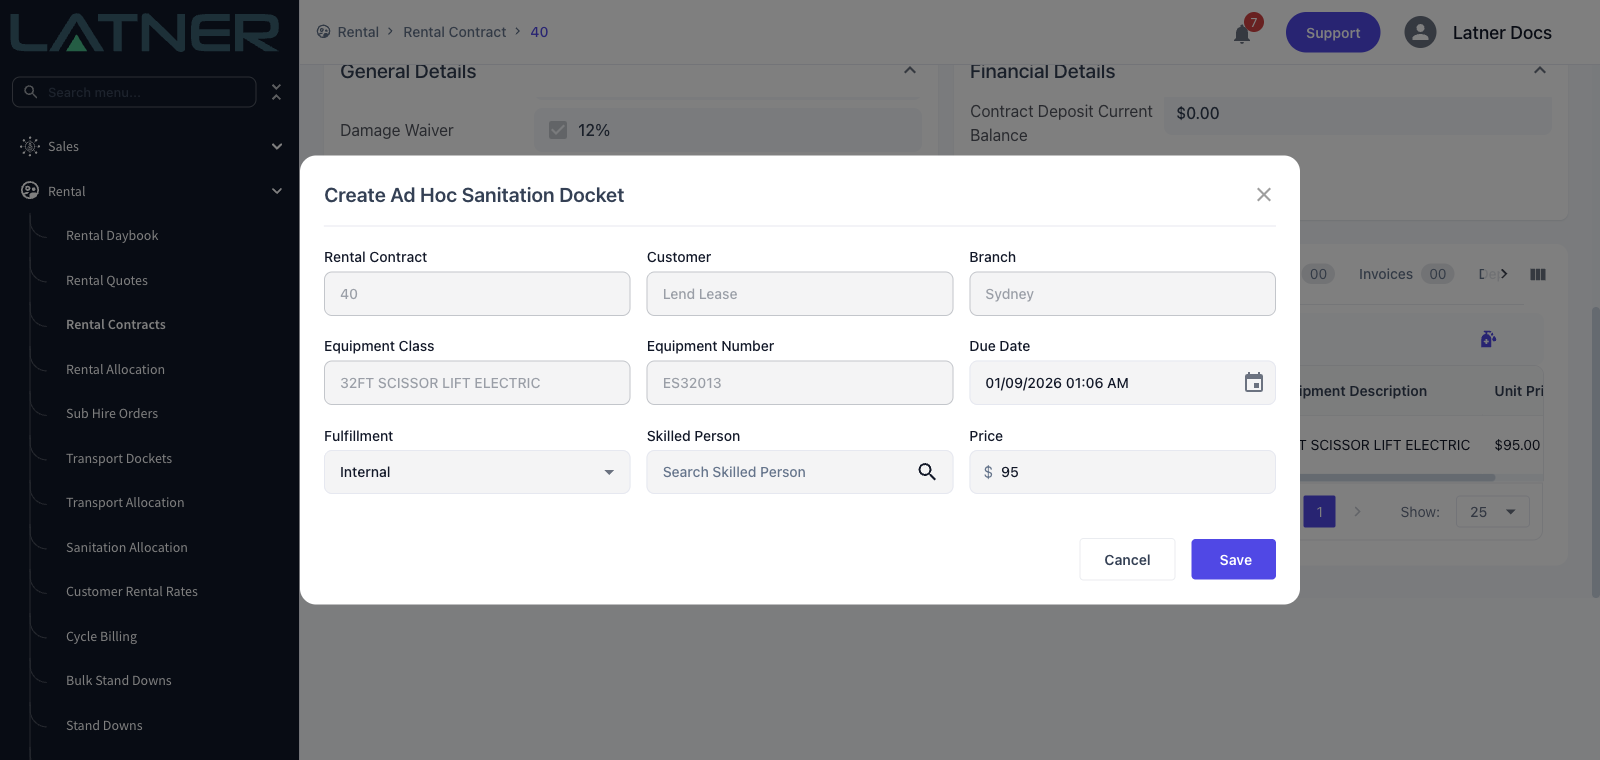
The dialog opens with everything it can work out for itself already filled in. The first five fields are read only - they come from the line you selected, so if any of them look wrong, you have the wrong line.
-
Rental Contract, Customer, Branch, Equipment Class, Equipment Number - carried across from the Sanitation line and its equipment line.
-
Due Date - required. It defaults to right now, so set it to when the service is actually needed. This is what the docket is grouped under on the allocation screen.
-
Fulfillment - required, and it decides which fields you get next. Internal means one of your own pump drivers, External means a contractor.
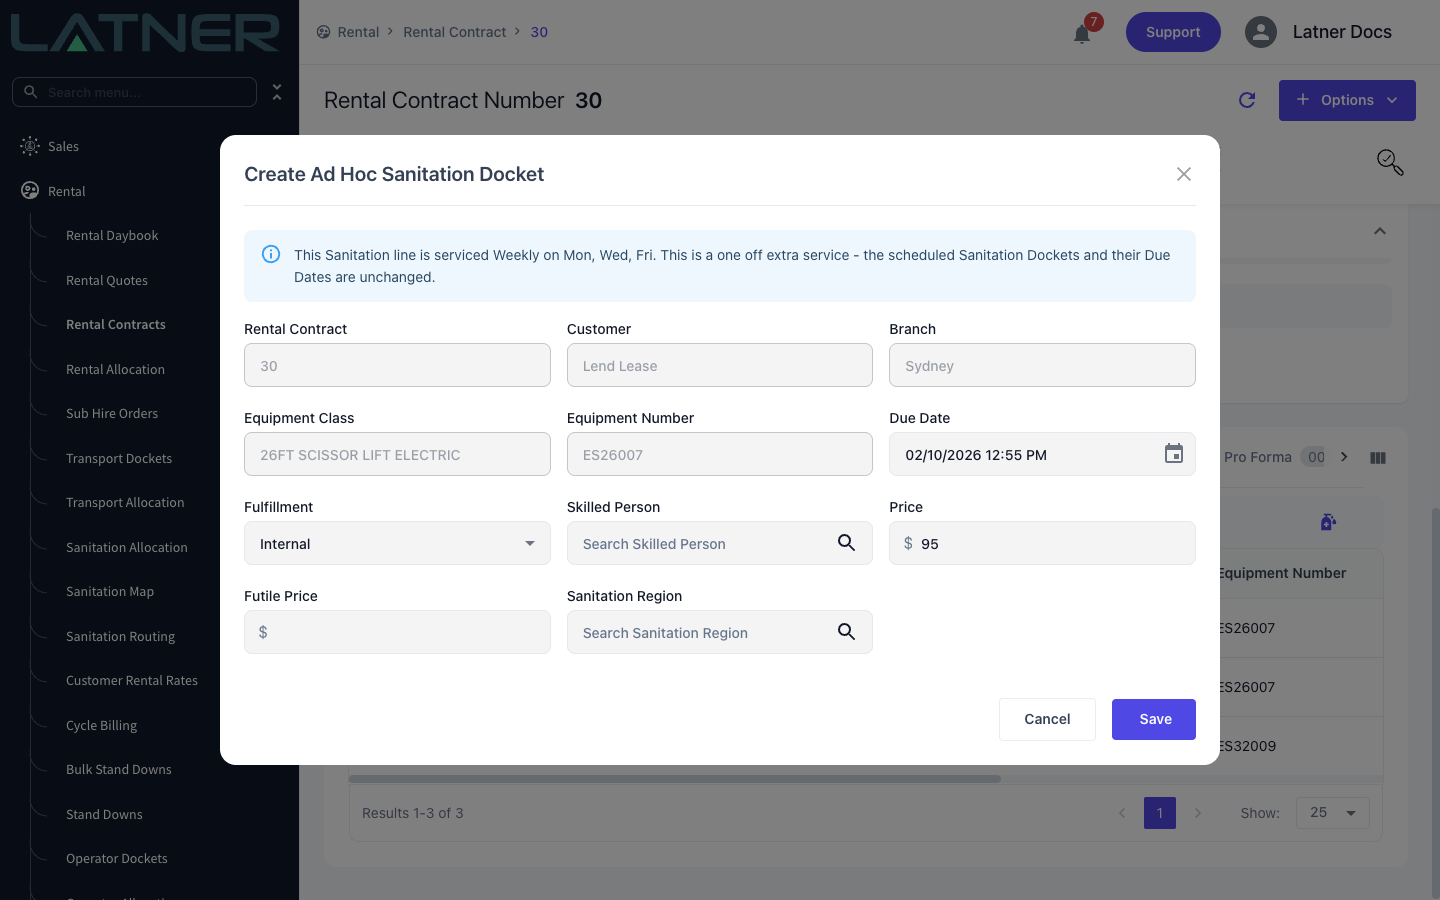
If the line is on a regular schedule, the dialog reminds you that this is an extra visit, for example "This Sanitation line is serviced Weekly on Mon, Wed, Fri. This is a one off extra service - the scheduled Sanitation Dockets and their Due Dates are unchanged." If the equipment is not On Rent, a warning tells you its current status - you can still raise the docket.
Step 3 - Say who is carrying out the service
With Fulfillment on Internal you get a single Skilled Person field, listing the people set up as pump drivers. It is optional - leave it blank if you would rather work out who is going on the allocation screen later.
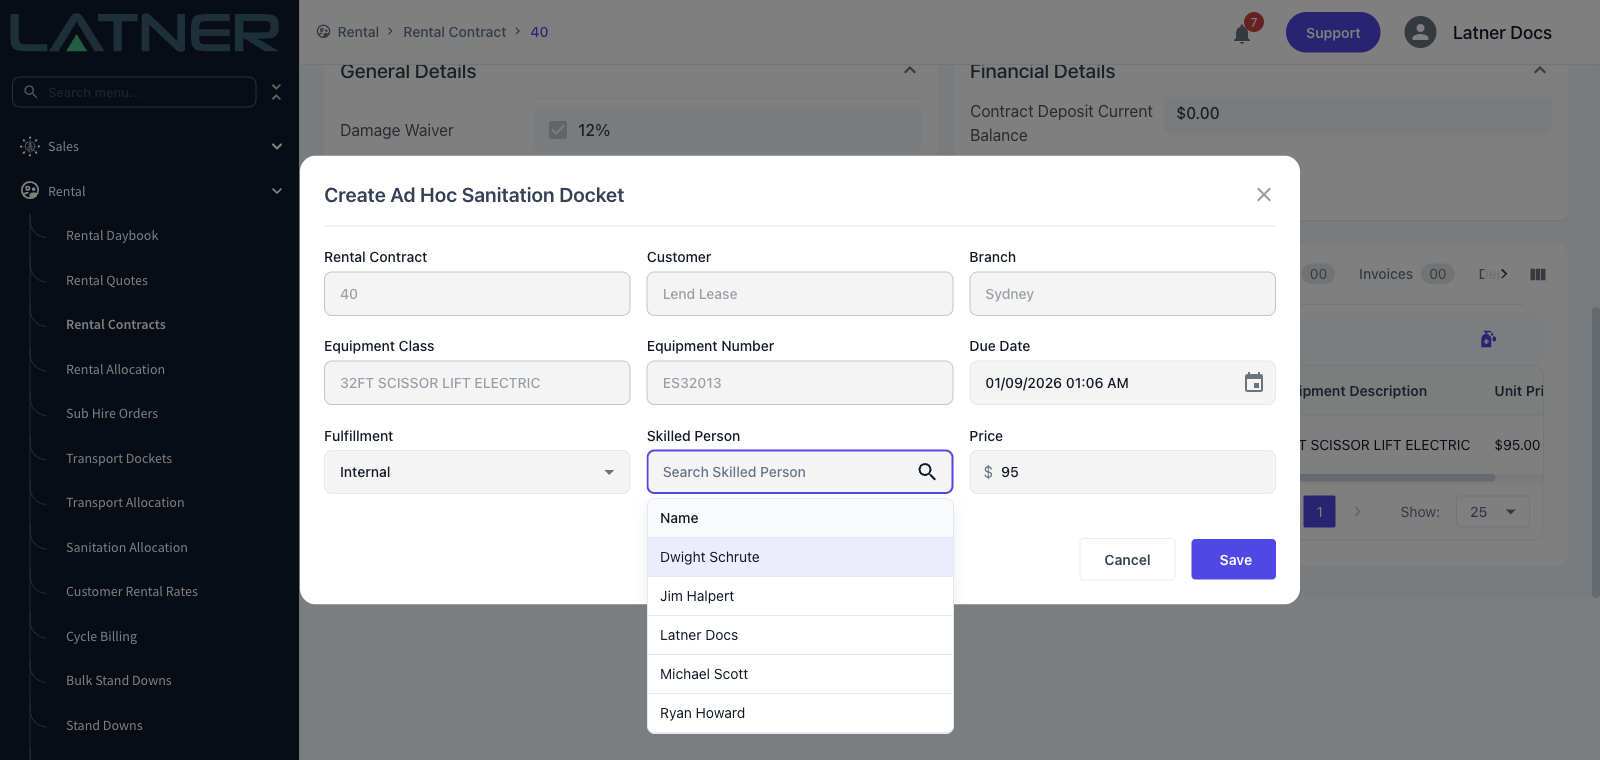
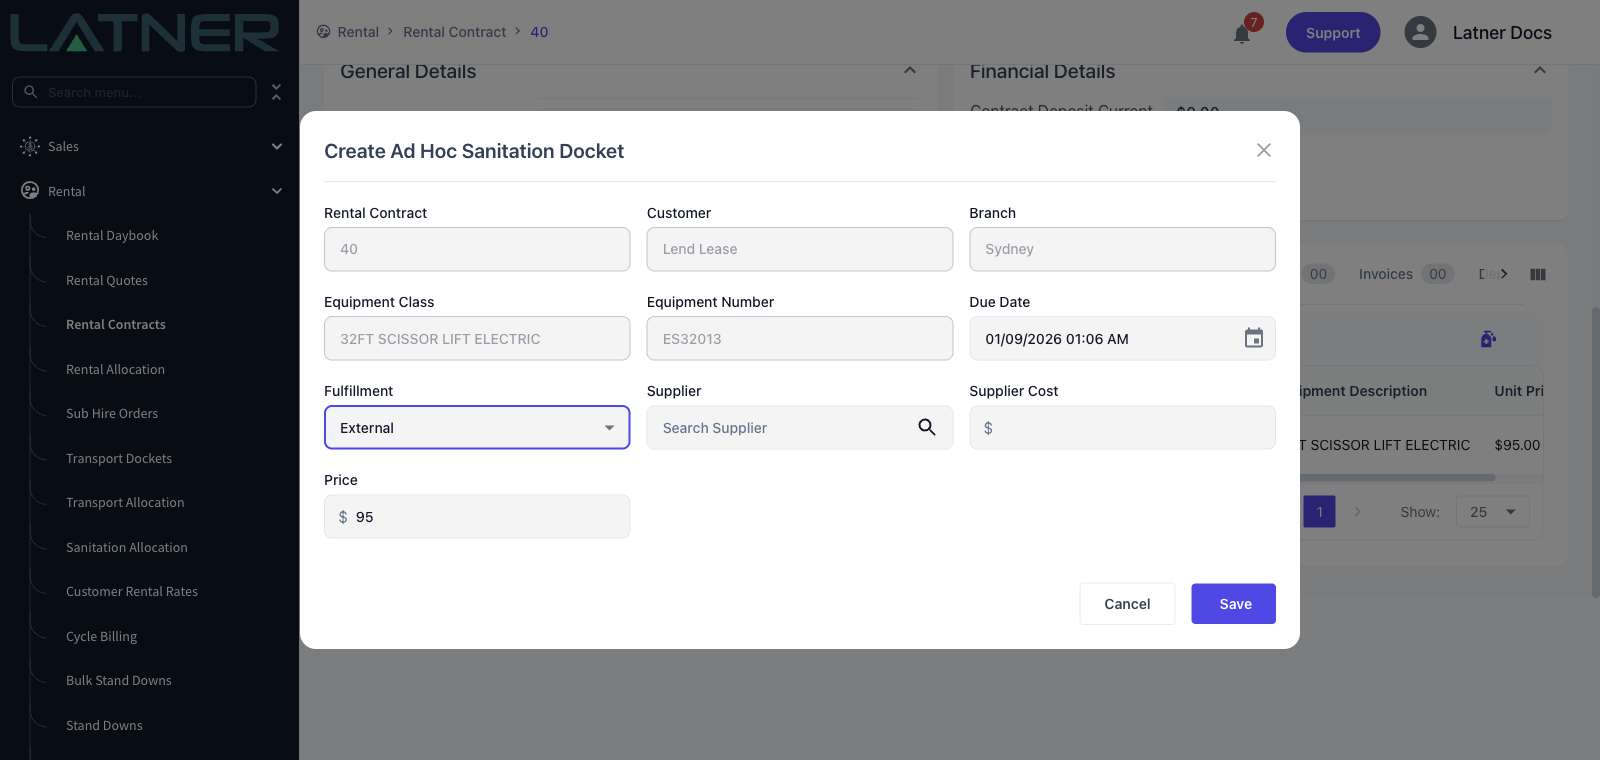
Switch Fulfillment to External and Skilled Person is replaced by two fields, both required:
-
Supplier - the contractor doing the work.
-
Supplier Cost - what they are charging you for it. This is your cost, not the customer's charge.
Step 4 - Confirm the charge and save
Price is required and starts at the charge on the Sanitation line, which is what a normal service for this unit is worth. Change it if this particular visit is charged differently - an after-hours call-out, say, or a service you have agreed to do for nothing. Then choose Save.
Two optional fields follow the price. Futile Price starts at the line's futile price and is what the visit is charged at if the driver attends but cannot do the service. Sanitation Region starts at the line's region and only appears once the Sanitation Map is switched on for your business.
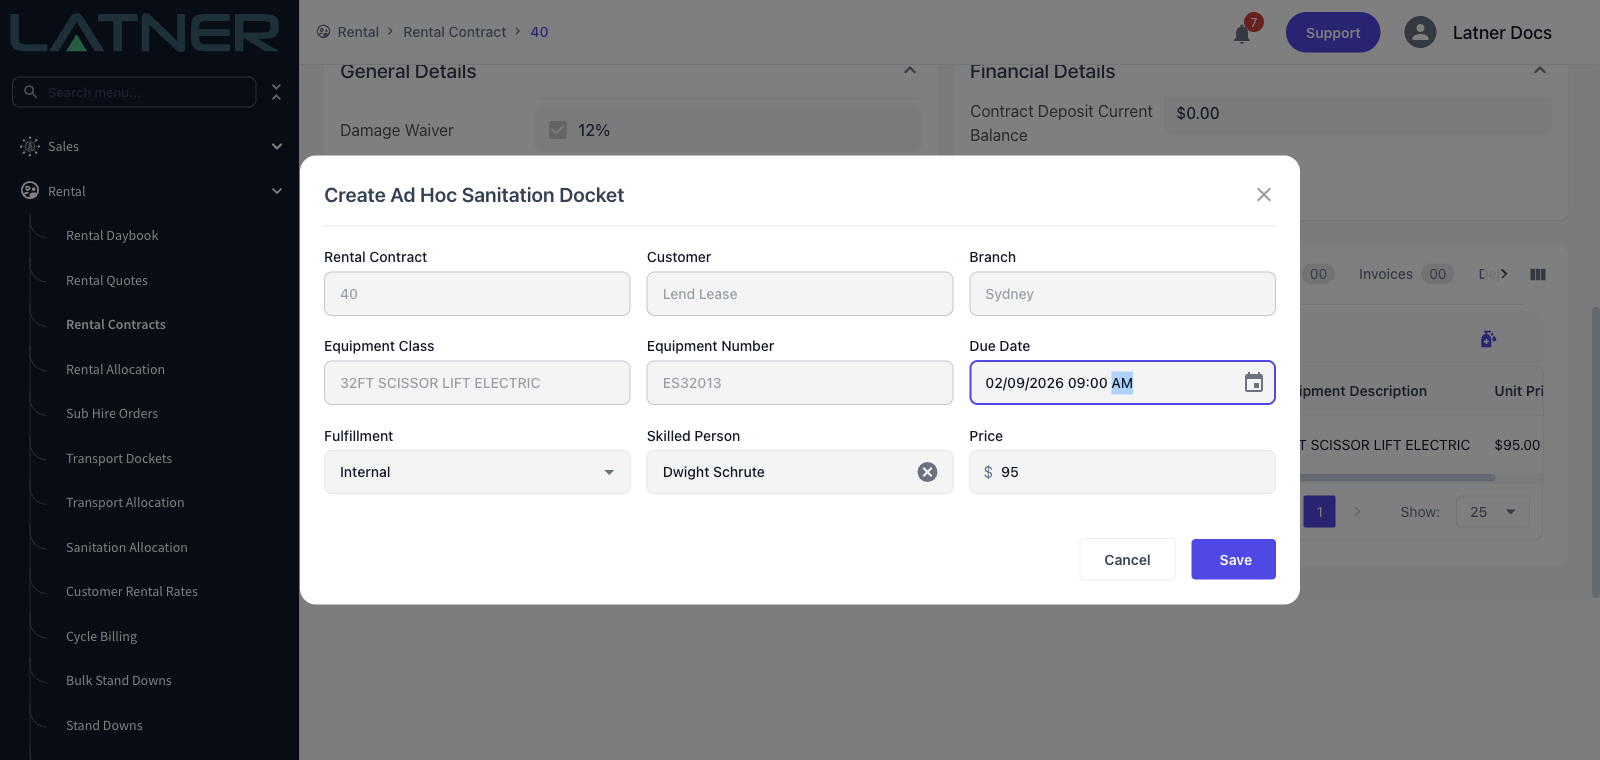
Latner confirms with Sanitation Docket Created and the dialog closes.
Step 5 - Find the new docket on the line
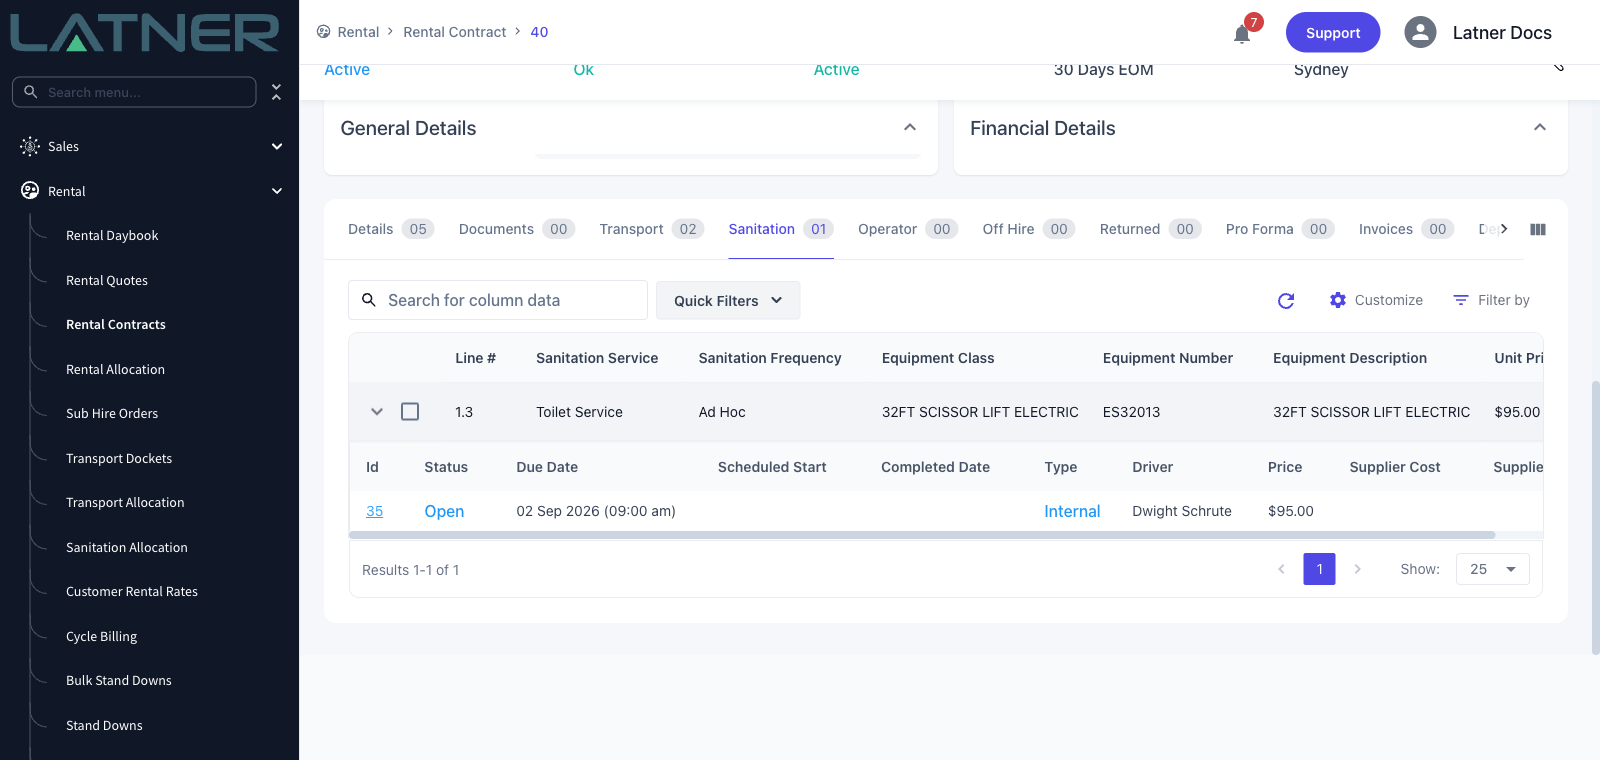
Back on the Sanitation tab, click the arrow at the start of the Sanitation line to expand it. Every docket ever raised against that line is listed underneath, with the new one showing as Open against the due date you gave it.
After Creation
-
The docket gets its own number and page, reachable from the Id column on the line. It records the service address (editable as Service Address on the docket page while it is open), the site contact and the phone number to ring, taken from the contract's delivery details.
-
It appears in the Sanitation Dockets Due queue on Rental › Sanitation Allocation, grouped under its due date, ready to be dragged onto a driver or a supplier.
-
Giving it a scheduled window on that screen needs the resource that matches its Fulfillment: an Internal docket must be allocated to a Skilled Person, an External one to a Supplier. It also needs both ends of the window - a start without an end is rejected.
-
Once someone attends, the docket is finished from its own page with Options › Complete Sanitation (or Mark as Futile if the service could not be done), which is also when the Sanitation Service's admin charge, if it has one, is added to the contract.
-
A finished docket is picked up by the next invoice for the contract, at the price on the docket rather than the price on the line.
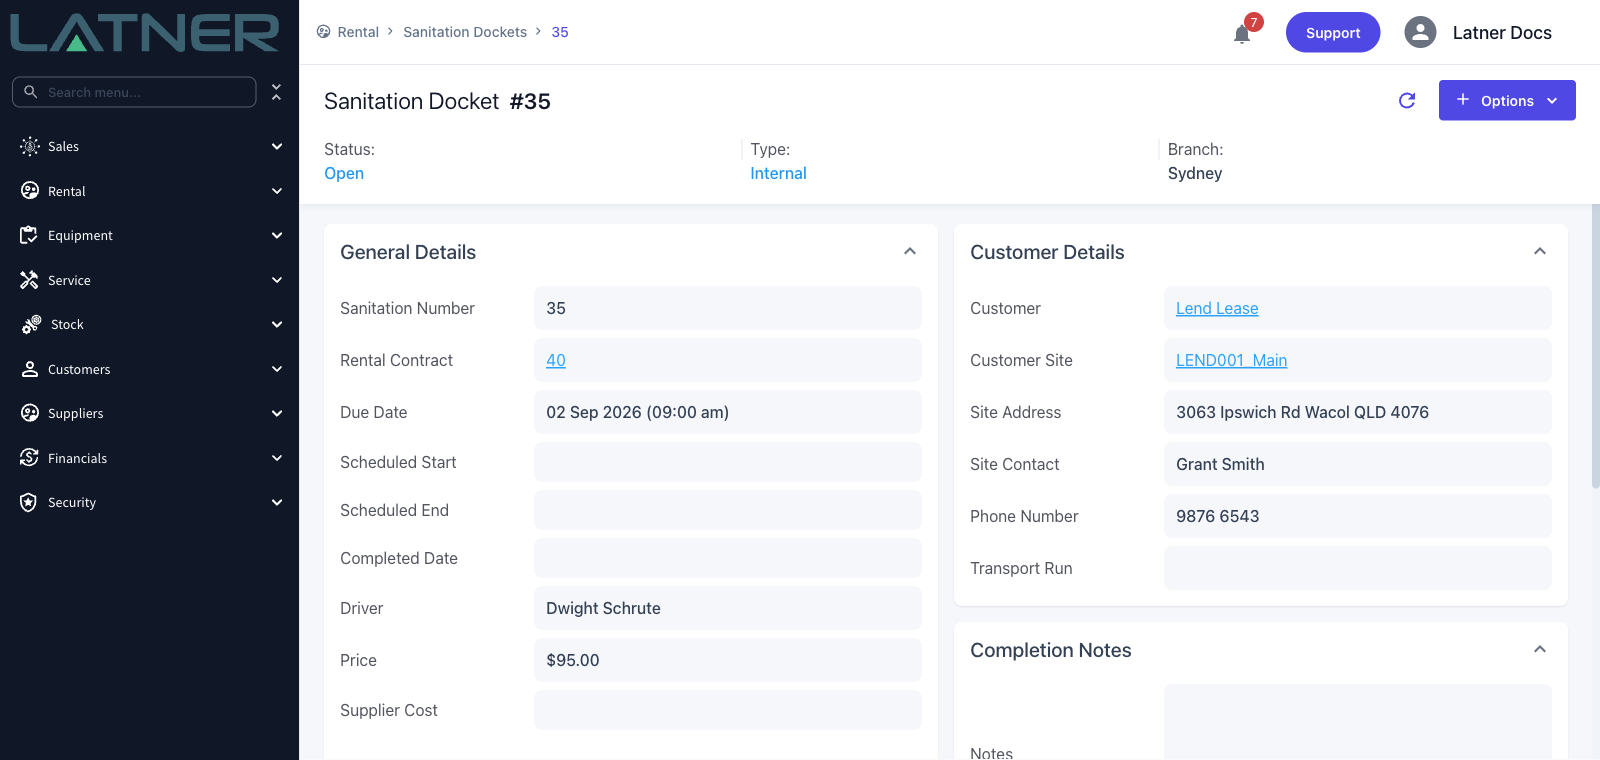
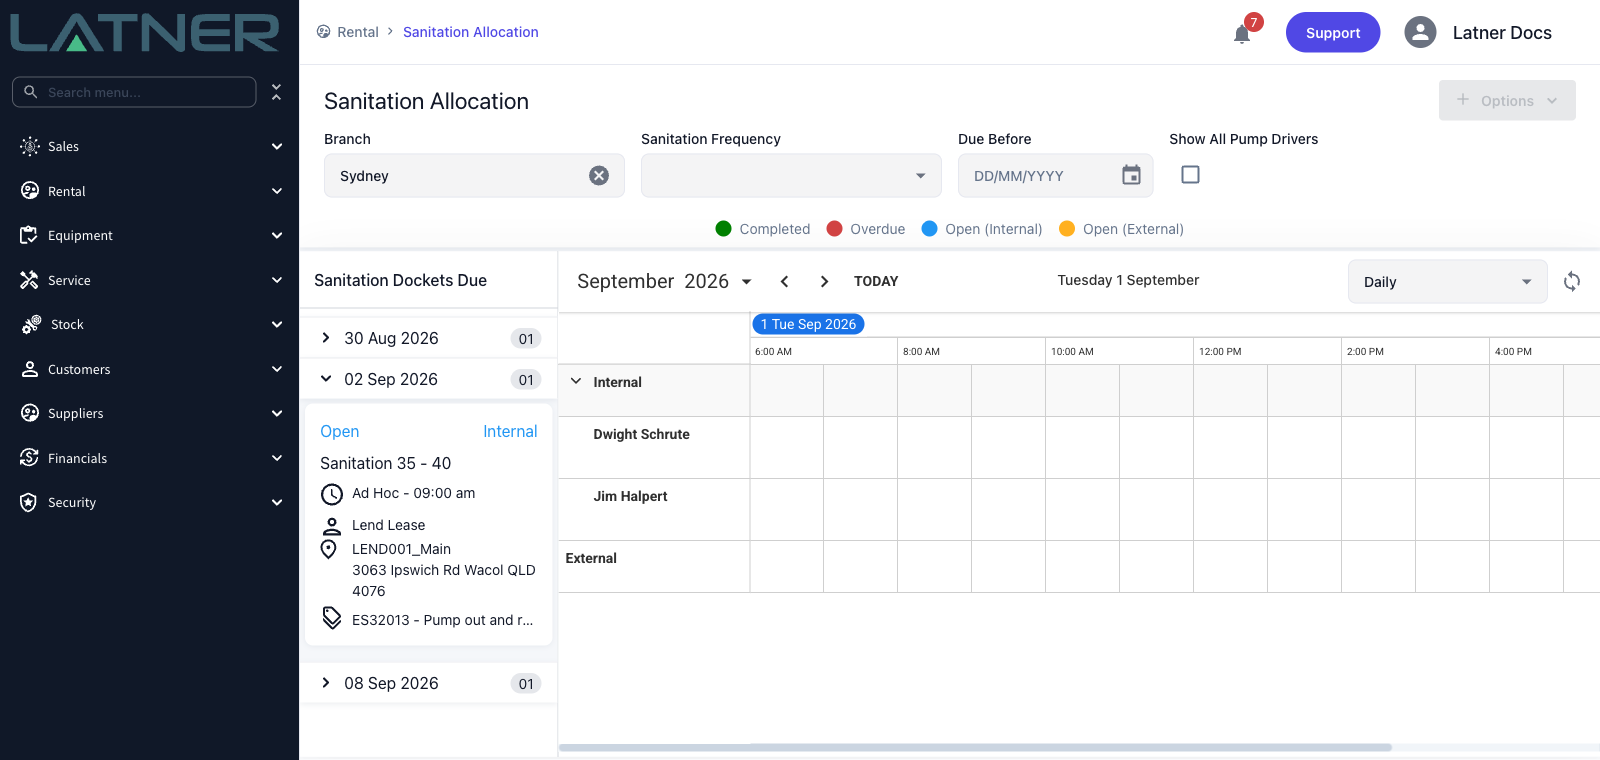
There is no way to delete or cancel a Sanitation Docket once it exists. If you raise one you did not mean to, or the customer stands the service down, close it off from its page rather than leaving it open - it will otherwise sit in the allocation queue indefinitely. A closed docket is billed at its Price, so check the Price on the docket page before you close it.
FAQs
Watch the Demo
Prefer to watch it? Step through the same flow here.
Lost Rental Quote Chart Dashboard
The Lost Rental Quote Chart tab on the Dashboard shows the value of the quotes you didn't win, month by month, so you can see why work is being lost and how much it's worth.
Overview
It's a tab on the Dashboard home screen, next to Rental Quote.
-
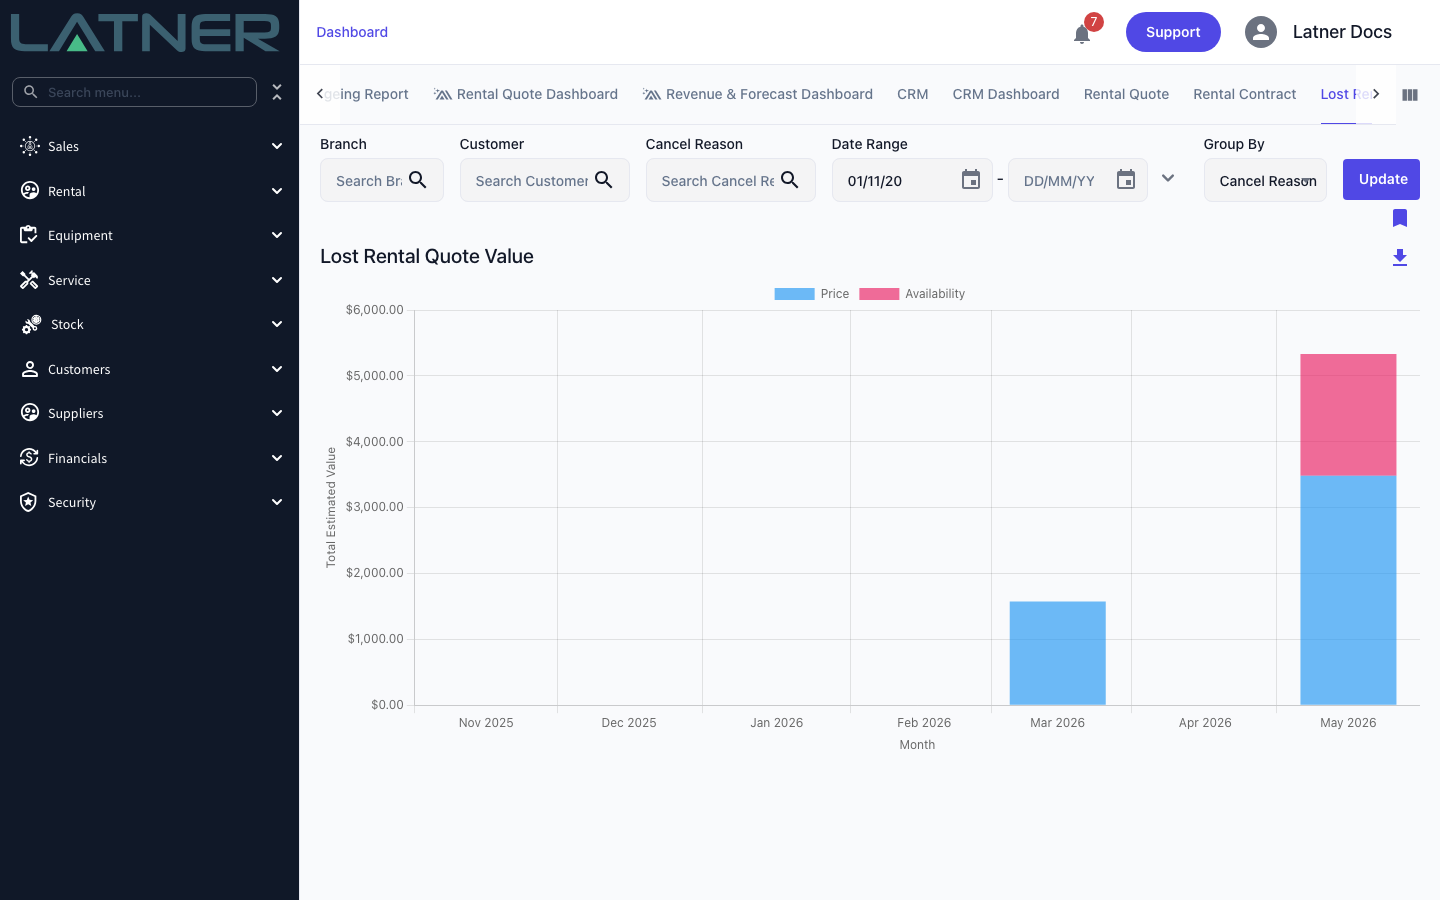
Each bar is a month; the height is the total value of quotes marked Lost or Cancelled, stacked by your Group By choice.
-
Value is the quote's total, including GST, damage waiver and environmental levy.
-
A quote sits in the month it was created, not the month it was lost.
-
The chart covers up to the last 12 months.
Before You Begin
Here's what you need to see this tab.
|
Requirement |
Where to Find It |
|---|---|
|
Rental Quote Dashboard permission (the same as the Rental Quote tab) |
Security › Configuration › Permission Groups, Rental module |
|
Cancel reasons |
Rental › Configuration › Cancel Reasons |
Using the Lost Rental Quote Chart
Step 1 - Set the filters
-
Branch, Customer and Cancel Reason - narrow the quotes. Only active cancel reasons are offered.
-
Date Range - quote creation date; defaults to the last 12 months including this one.
-
Group By - Cancel Reason (default), Branch, Sales Rep or Source. Quotes with no sales rep show as No Sales Rep Assigned.
Click Update. Hover over a bar to see the month's Total Lost Value.
Step 2 - Download the data
Click Download Chart Data to save Lost Rental Quote Value.csv: one row per group and one column per month. The bookmark icon saves the current filters as a Saved Filter.
FAQs
Watch the Demo
Prefer to watch it? Step through the same screen here.
Purchase Order Improvements
Improved the Reversing Receipts process for Purchase Orders. Receipts can now be logged as Reversals, indicating that items were not received. This also allows deletion of the corresponding detail line when the item is also cancelled.
Reversing a receipt undoes a Purchase Order receipt that should not have happened, putting the quantity back on order and taking the goods back off hand.
Overview
Deliveries get counted wrong. Someone receipts six hoses when four turned up, or ticks off the whole order before anyone opened the pallet. Reversing a receipt is how you put that right without deleting anything.
-
Reversing is done line by line, in quantities. You enter how much of each line to put back and leave the rest at zero.
-
Latner never deletes the original receipt. It creates a second Purchase Order Receipt of type Reversal, dated and stamped with your name, so the record of what was counted and when stays intact.
-
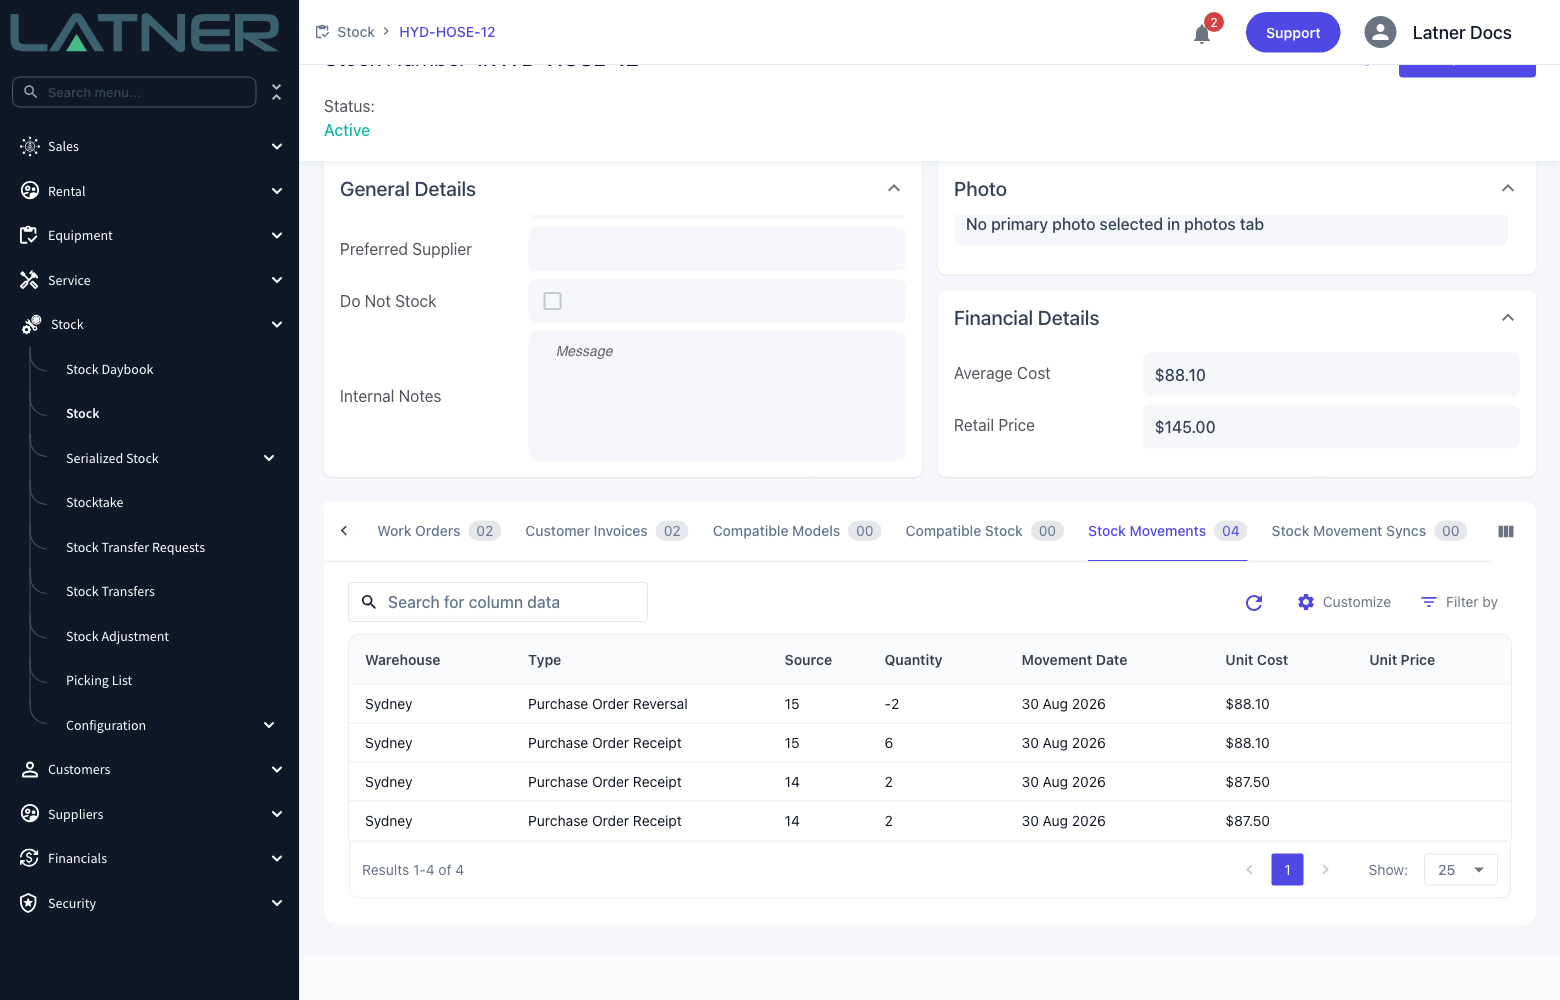
Reversing a Stock line takes the quantity back off hand and puts it back on backorder, and writes a Purchase Order Reversal movement against the stock item.
-
The order's status and Received Cost recalculate. A Fully Received order drops back to Partly Received, and an order with nothing left received goes back to Confirmed.
-
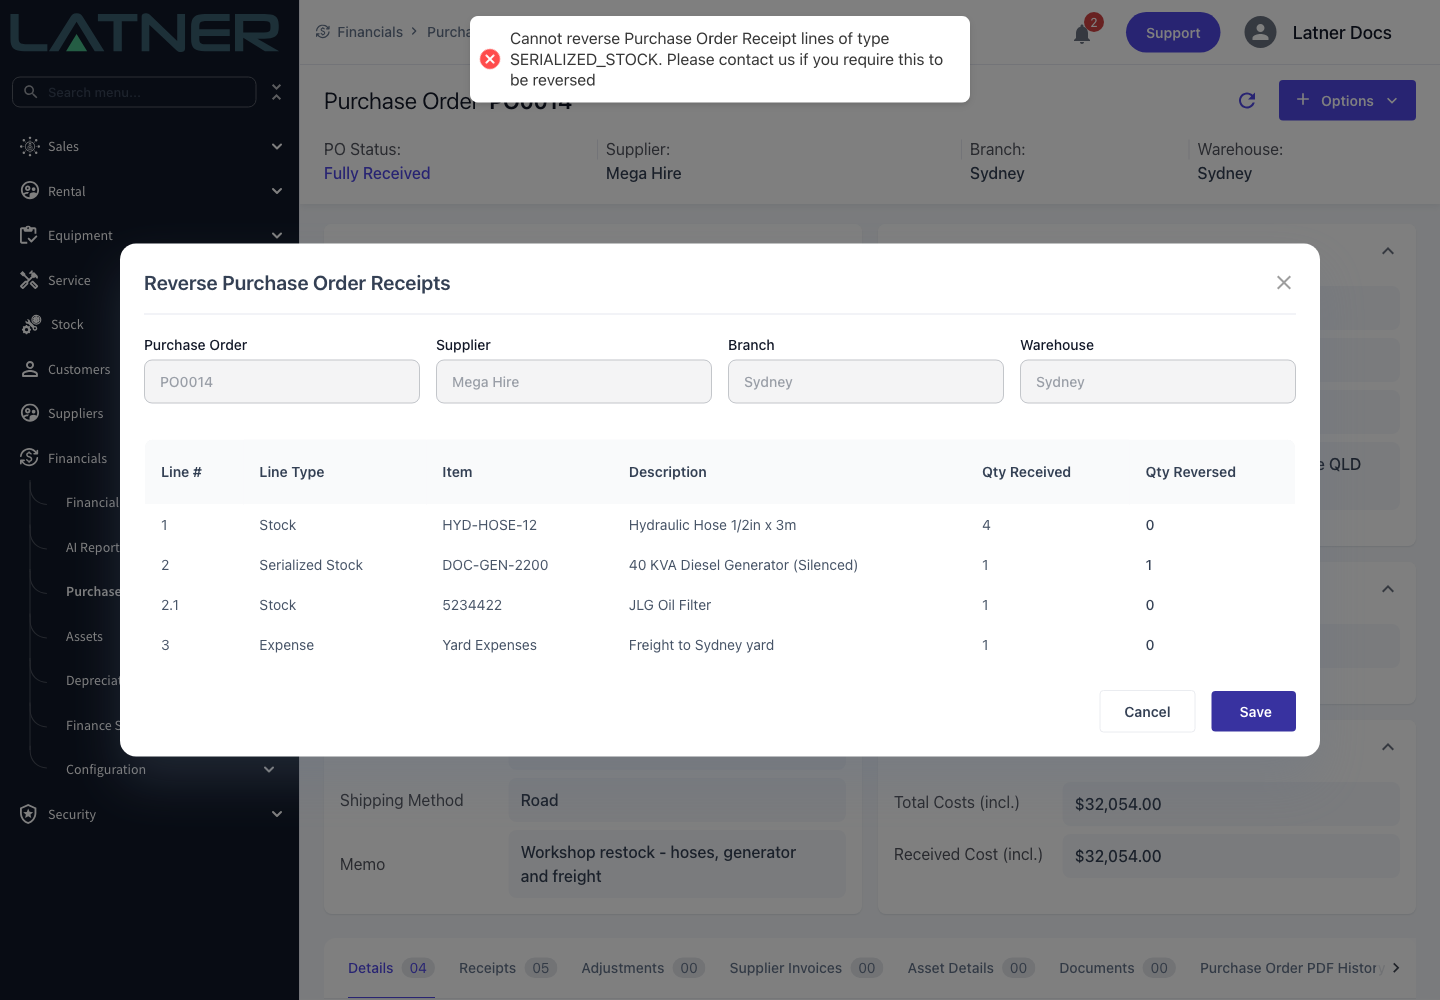
Only Stock, Expense and Transport lines can be reversed. Equipment, Asset and Serialized Stock lines cannot.
-
Anything already invoiced is locked. You can reverse down to the invoiced quantity and no further.
Before You Begin
You'll need the following before you can reverse a receipt.
|
Requirement |
Where to Find It |
|---|---|
|
Purchase Orders permission |
Security › Configuration › Permission Groups › Financials › Screen |
|
Receipt a Purchase Order permission |
Security › Configuration › Permission Groups › Financials › Option |
|
Cancel/Reverse a Purchase Order Receipt permission |
Security › Configuration › Permission Groups › Financials › Option |
|
A Purchase Order at Partly Received or Fully Received status |
Financials › Purchase Orders |
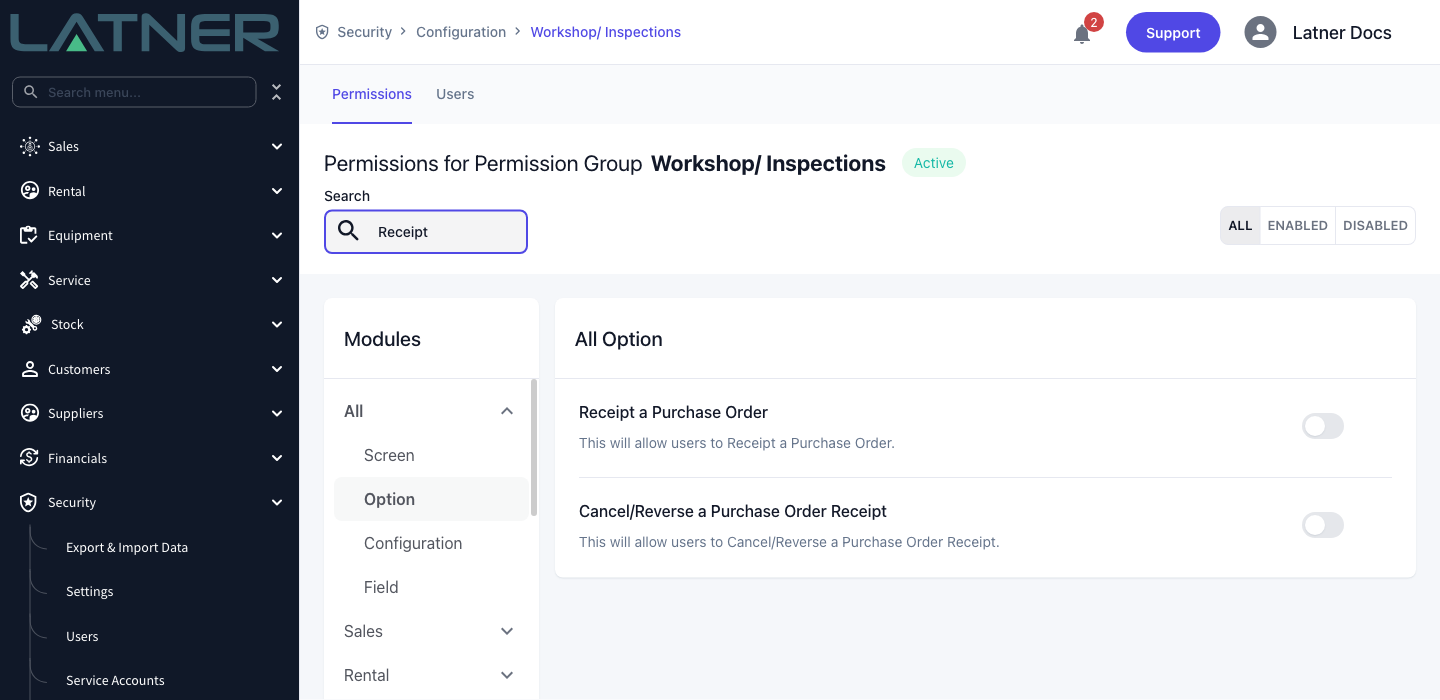
Those two permissions do different jobs. Receipt a Purchase Order decides whether Reverse Purchase Order Receipts appears in the Options menu at all, while Cancel/Reverse a Purchase Order Receipt is checked when you save. If you have the first but not the second, the option is there and the reversal is refused when you press Save - ask your administrator for both.
No system setting has to be turned on to reverse a receipt.
Reversing the Receipt
Step 1 - Open the Purchase Order
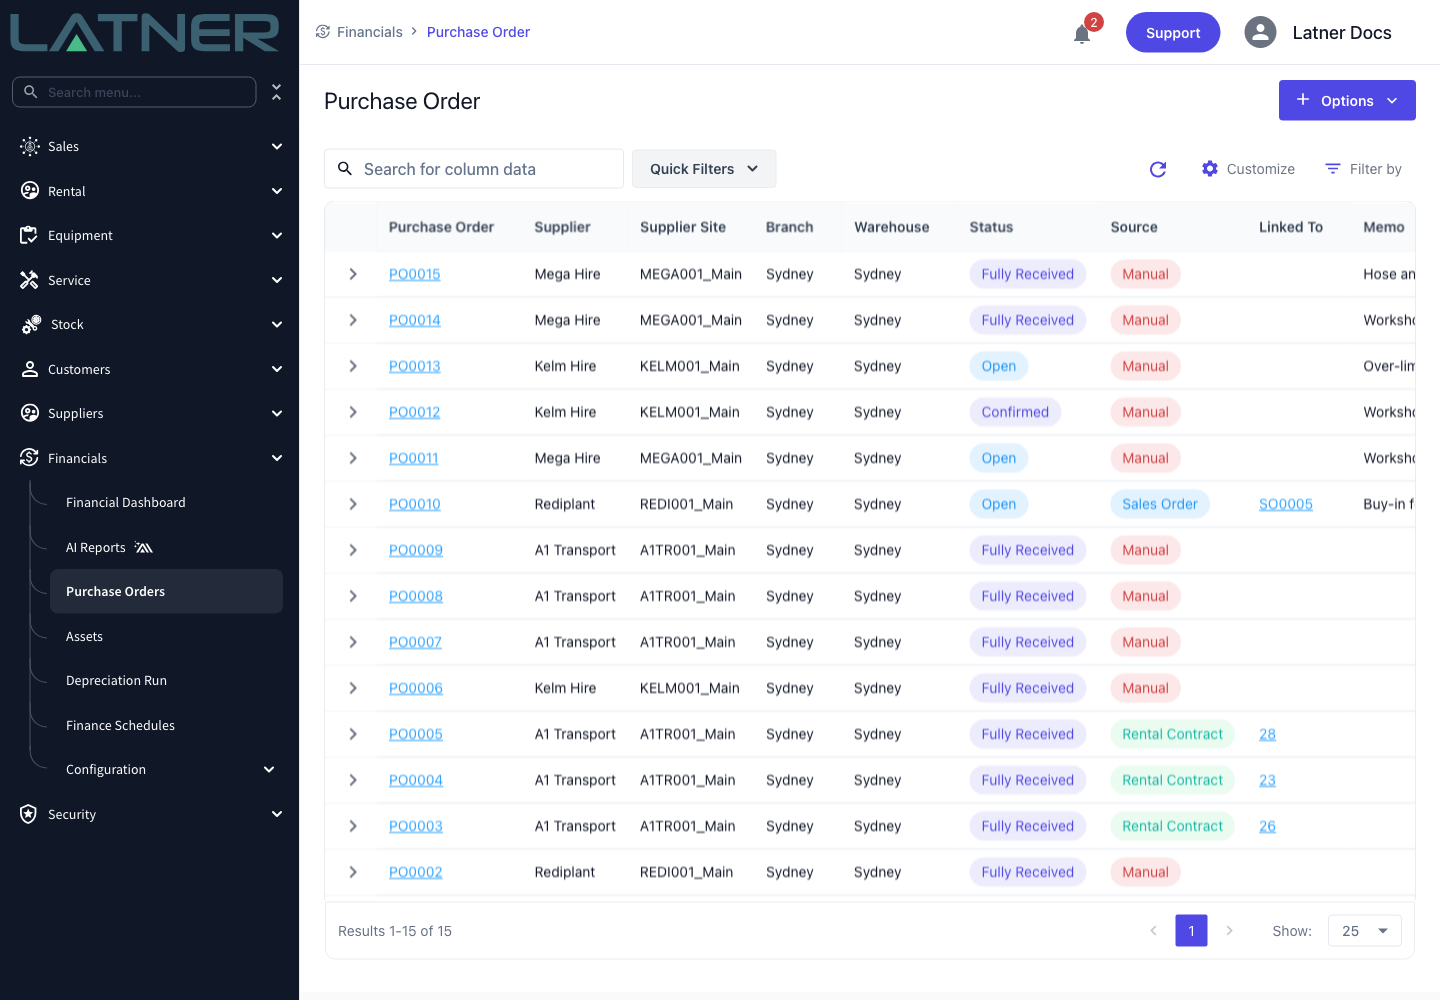
Go to Financials › Purchase Orders and open the order the receipt belongs to. The Status column tells you which orders have something received against them.
Step 2 - Choose Reverse Purchase Order Receipts
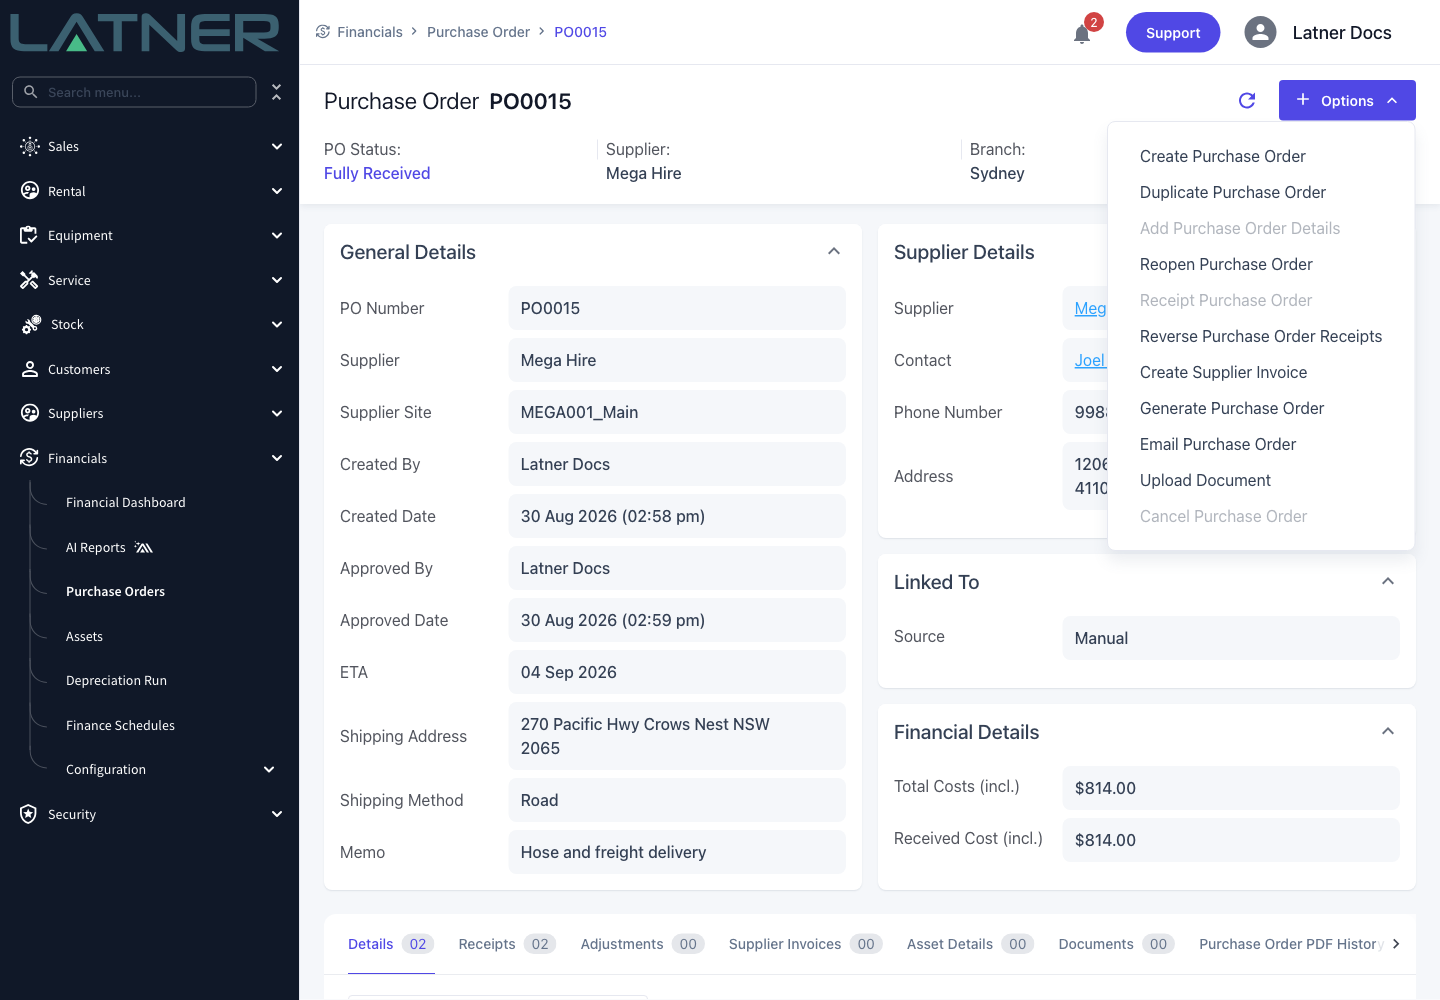
Select Options › Reverse Purchase Order Receipts.
Step 3 - Check the lines you can reverse
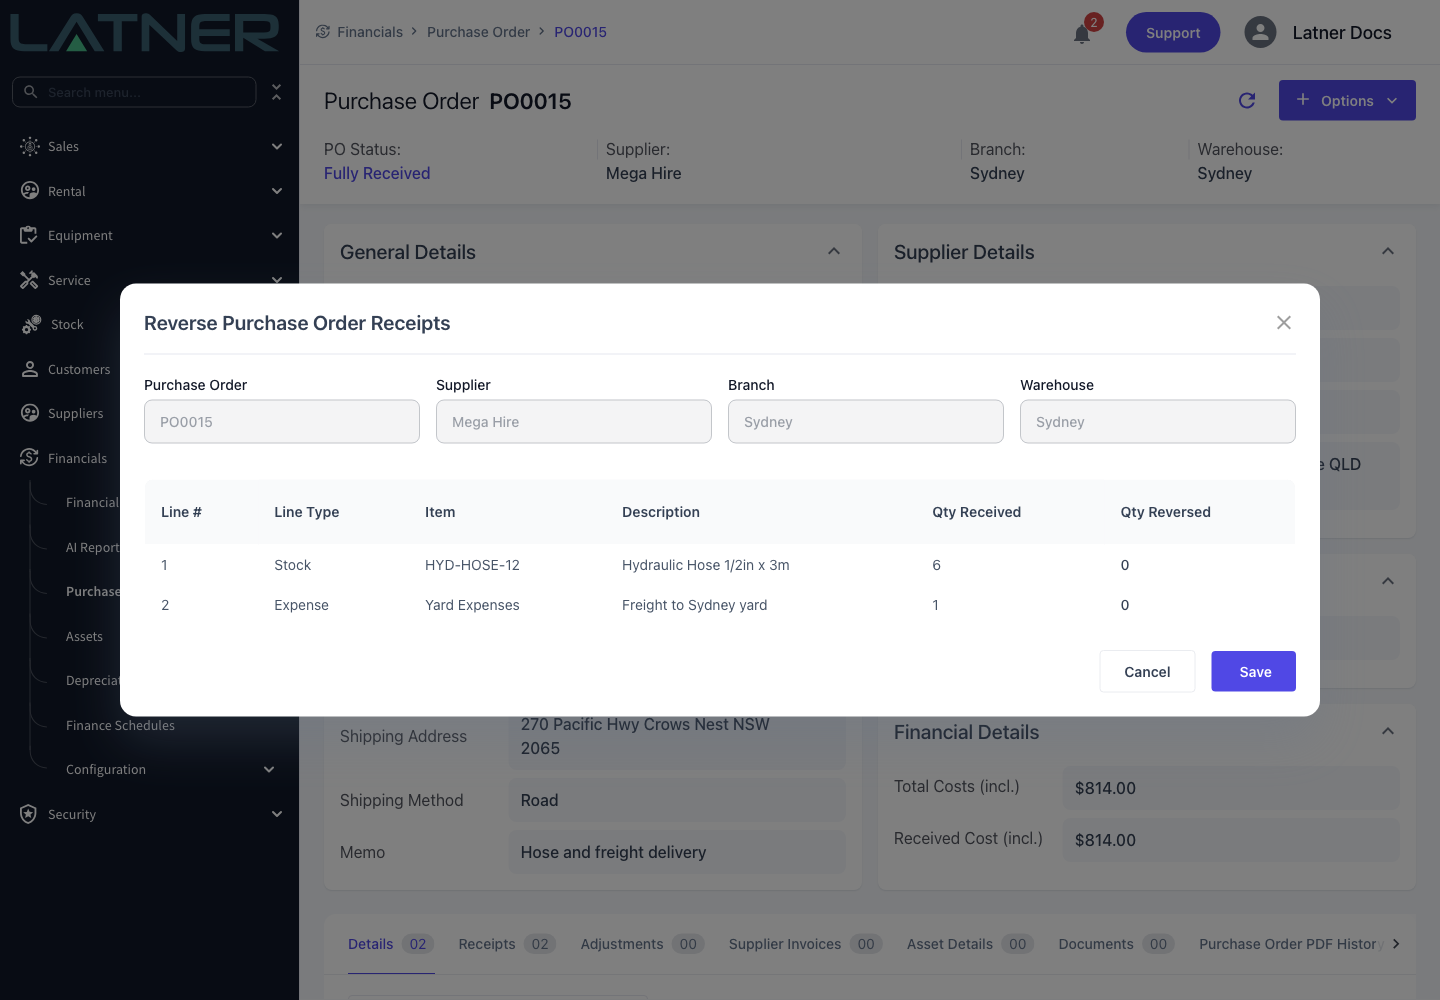
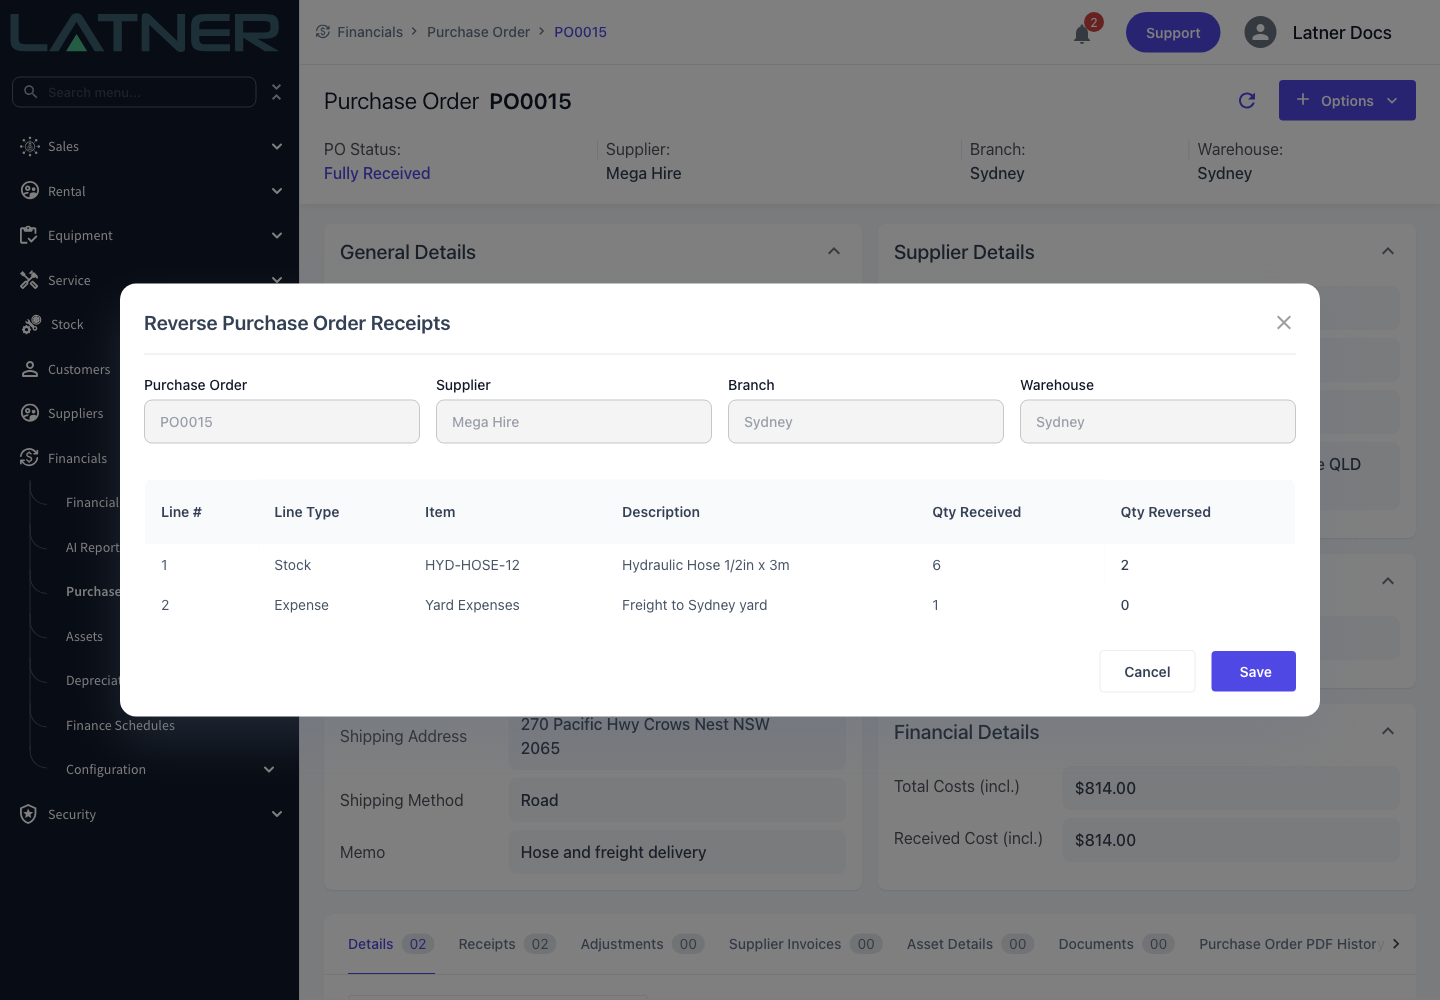
The Reverse Purchase Order Receipts dialog opens. Purchase Order, Supplier, Branch and Warehouse are shown for reference and cannot be changed.
The table lists only the lines that have a received quantity, so a line nobody has receipted yet never appears. Each row shows:
-
Line # - the Purchase Order line, including sub-lines such as an accessory that came in under a parent line.
-
Line Type - Stock, Serialized Stock, Equipment, Asset, Expense or Transport.
-
Item and Description - what was ordered.
-
Qty Received - how much is currently receipted against the line. This is the ceiling for the reversal.
-
Qty Reversed - the quantity you want to put back. Every row starts at zero.
Step 4 - Enter the quantity to put back
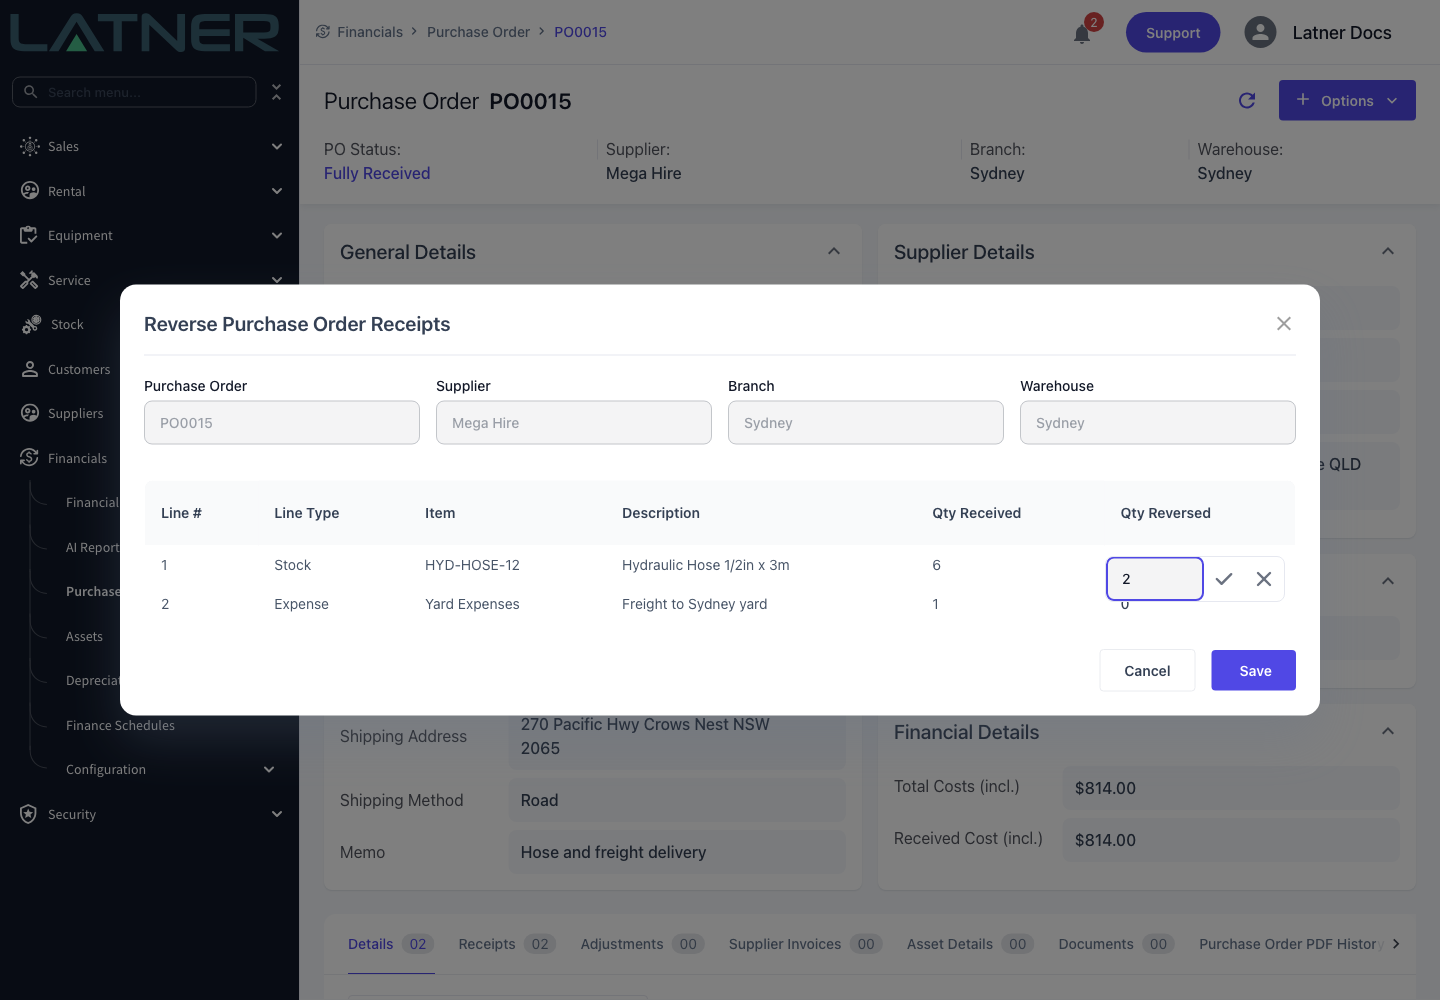
Click the Qty Reversed cell on the line you want to correct, type the quantity and confirm it with the tick. Leave every other line at zero.
-
You cannot enter more than the line's Qty Received.
-
Negative quantities are rejected, and quantities are limited to two decimal places.
-
Entering a quantity on several lines reverses them all together, as one reversal.
Step 5 - Check the quantities
Read the Qty Reversed column back before you commit. This is the last point at which the reversal costs you nothing to abandon - Cancel closes the dialog and changes nothing.
Step 6 - Save
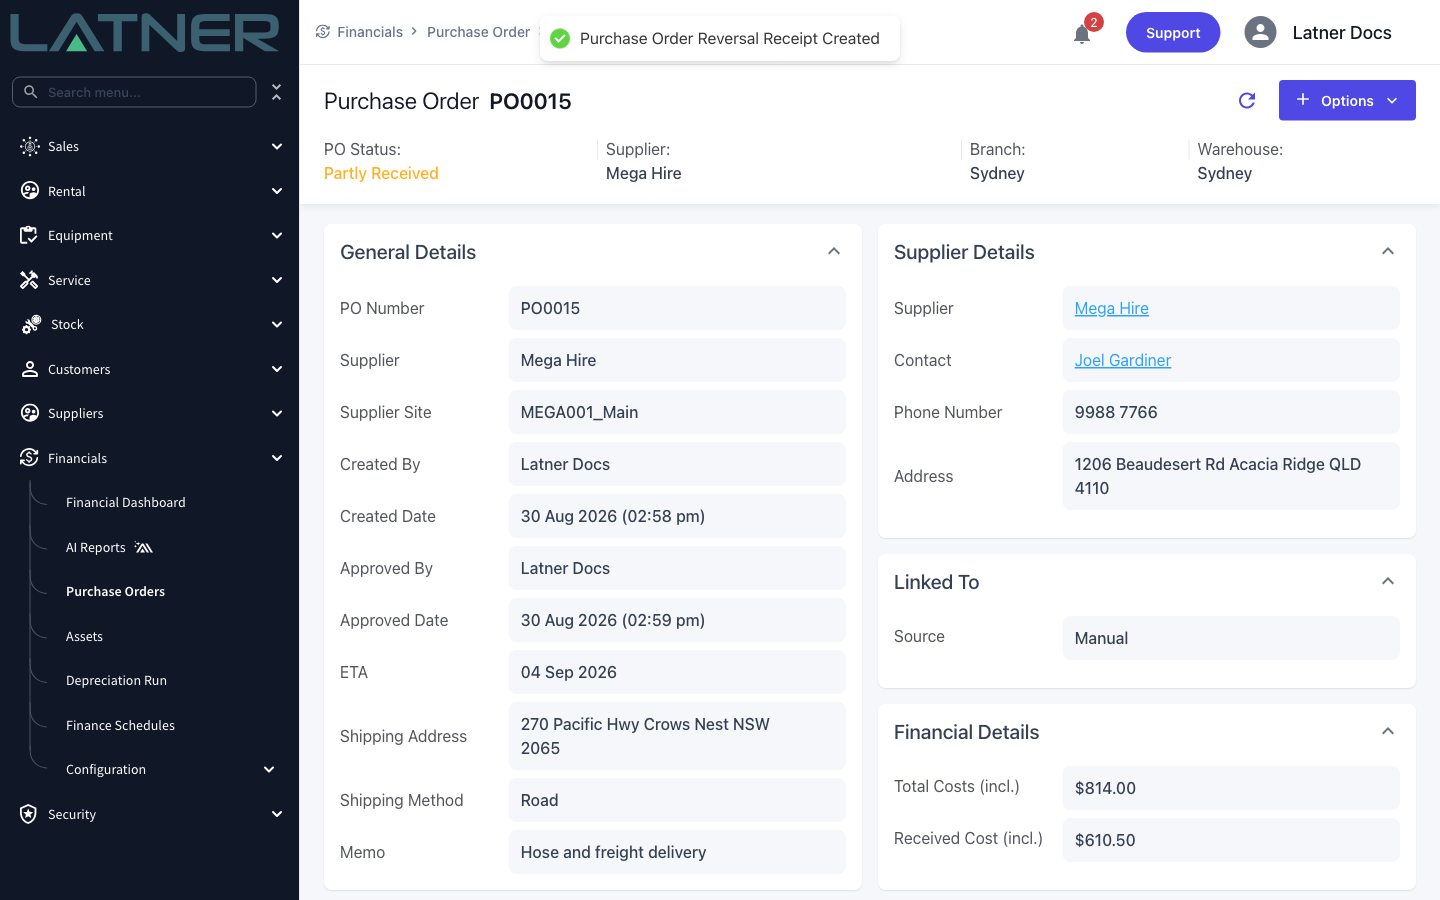
Select Save. Latner confirms with Purchase Order Reversal Receipt Created, and the order's status and Received Cost update straight away.
After the Reversal
-
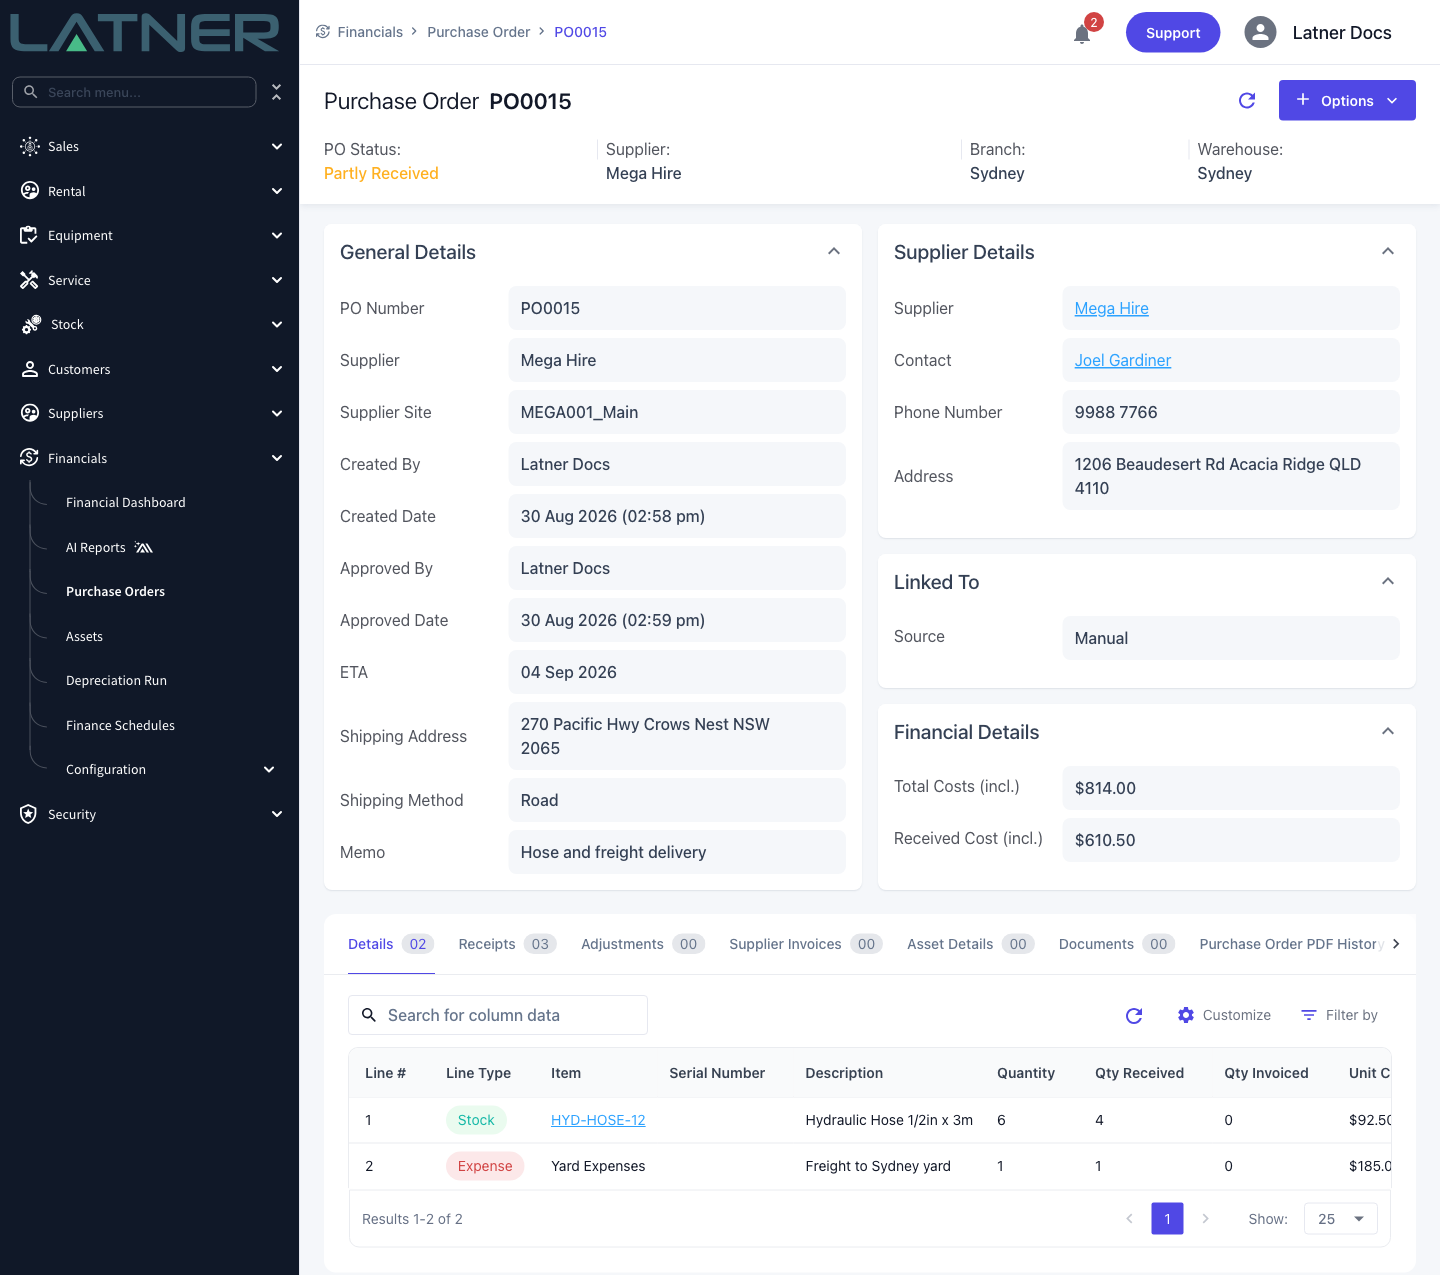
The line's Qty Received drops by the quantity you reversed, and its received cost is recalculated from the new quantity.
-
The order's status is recalculated: still Fully Received if every line remains fully received, Partly Received while anything is outstanding, and back to Confirmed once nothing is received at all.
-
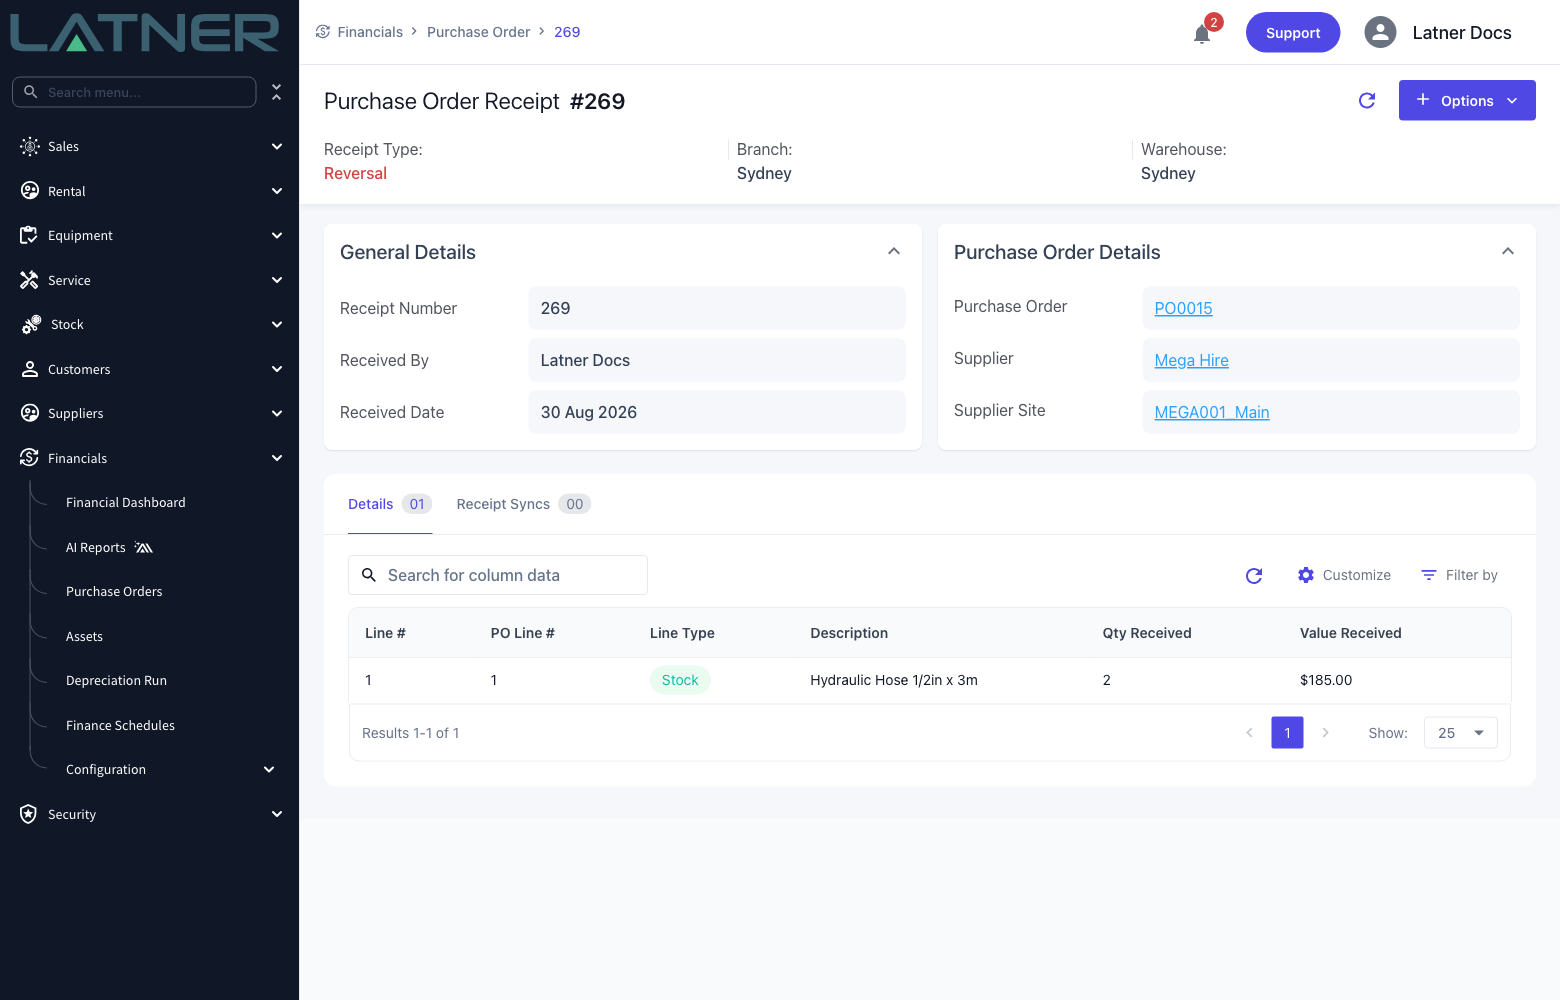
A new row appears on the Receipts tab with type Reversal. The quantity and value on it are shown as positives - it is the type that tells you the movement went the other way.
-
Reversed Stock comes off Qty Available and goes back onto Qty Backordered at the order's warehouse, because it is on order again.
-
Reversing a line that was raised for a Work Order removes the part or expense from that Work Order.
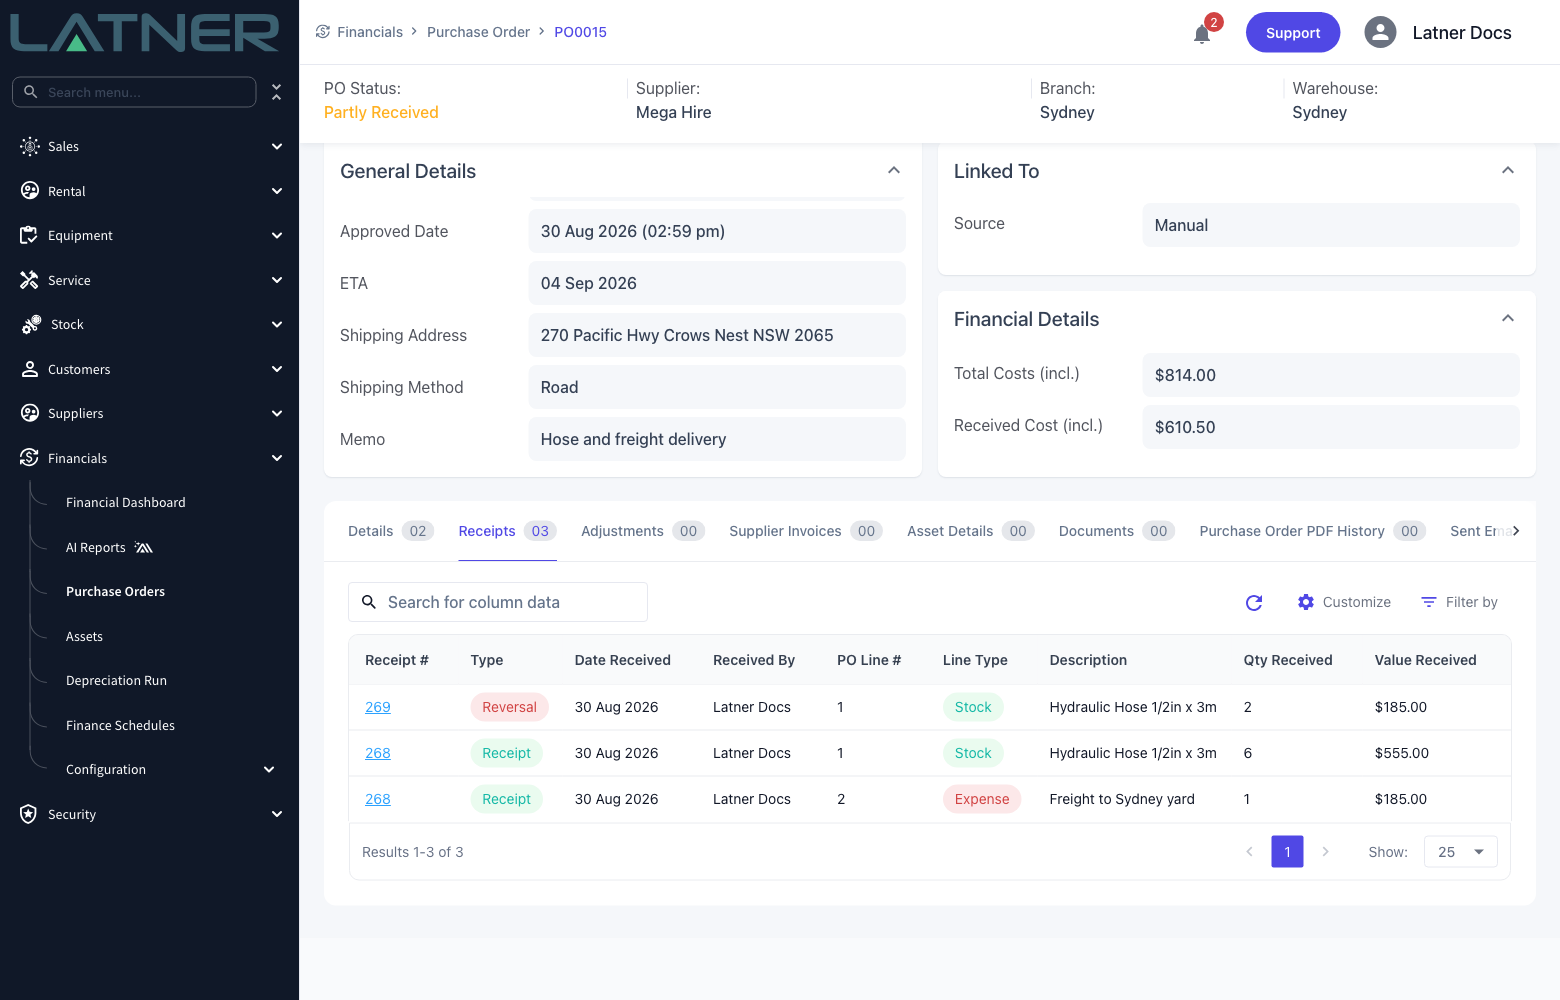
Selecting the Receipt # opens the reversal as a record in its own right, with its own detail lines and its own Receipt Syncs tab for accounting integrations.
On a Stock line, the Stock Movements tab of the stock item records the correction as well, so the part's history explains why the count changed.
Reversing does not put the Purchase Order back the way it was before anyone touched it. The original receipt stays on the order, the reversal sits beside it, and both are visible to anyone reading the history later. If the delivery never arrived at all and the order should not exist, cancel the Purchase Order instead of reversing line by line.
What You Cannot Reverse
Three line types are refused outright, because receipting them created records elsewhere in Latner that cannot simply be unwound.
-
Equipment - receipting creates the equipment record.
-
Asset - receipting creates the asset record.
-
Serialized Stock - receipting brings the serial number into stock.
If you enter a quantity against one of those lines, the whole reversal is rejected and nothing on the order changes - including the quantities you entered against lines that were allowed.
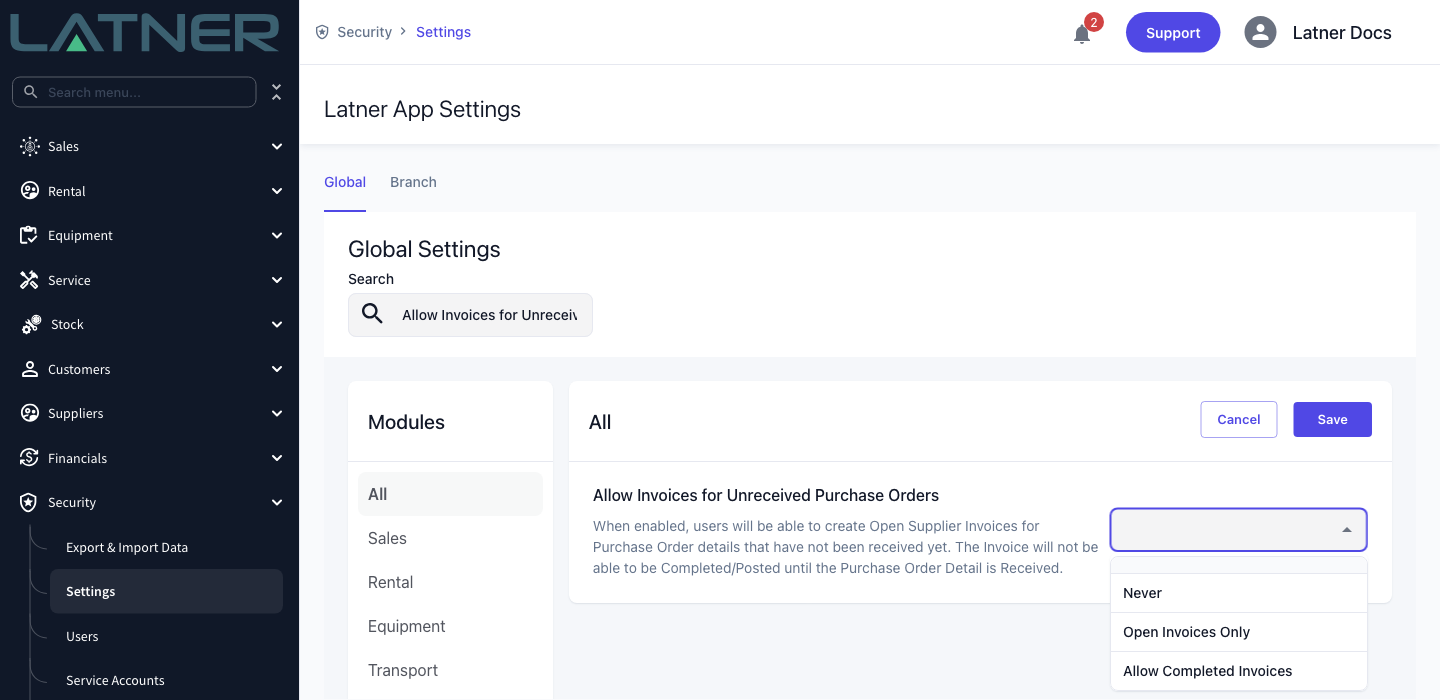
Invoiced quantities are the other blocker. A reversal cannot take a line below the quantity that has been invoiced against it, so a line received six and invoiced four can only be reversed by two. Exactly which invoices count is controlled by Allow Invoices for Unreceived Purchase Orders under Security › Settings › Financials.
-
Never - every supplier invoice line counts, whatever status the invoice is at.
-
Open Invoices Only - only Completed and Paid supplier invoices count, so a line sitting on an Open invoice can still be reversed.
-
Allow Completed Invoices - invoiced quantities are not checked at all, and a receipt can be reversed even after the supplier invoice has been posted.
FAQs
Watch the Demo
Prefer to watch it? Step through the same flow here.
In addition, Purchase Orders can be reopened after receipts have started, enabling users to add new detail lines, adjust costs and quantities (even for received items), or delete items that were not received.
Reopening a purchase order takes a confirmed order back to Open status so you can correct a quantity, a cost or a missing line before the goods arrive, then confirm it again.
Overview
A purchase order stops being editable the moment it is confirmed, and that is deliberate - once the order has gone to the supplier, Latner treats the lines as a commitment. Reopening is the controlled way to unwind that commitment when something on the order turns out to be wrong.
-
Reopen Purchase Order sets the status back to Open and clears the Approved By and Approved Date fields.
-
It is available on purchase orders in Pending Approval, Confirmed, Partly Received and Fully Received status.
-
It is not available on an Open order (there is nothing to reopen), it is greyed out on an Invoiced order, and a Cancelled order cannot be reopened.
-
Reopening releases the outstanding backorder that confirming the order created against your stock, and removes any serialised stock items that were still on order.
-
Quantities that have already been received are kept. Reopening does not reverse a receipt.
-
Nothing else about the order changes - the PO number, supplier, lines, documents and receipt history all stay as they are.
Before You Begin
Reopening is an option on the purchase order itself, so there is nothing to switch on first - you just need the right permission and an order in a status that allows it.
|
Requirement |
Where to Find It |
|---|---|
|
Purchase Orders permission |
Security › Configuration › Permission Groups › <group> › Financials › Screen. Lets the user search and view purchase orders. |
|
Confirm Purchase Order permission |
Security › Configuration › Permission Groups › <group> › Financials › Option. The same permission covers confirming, reopening and cancelling. |
|
A purchase order in the right status |
Financials › Purchase Orders. The order must be Pending Approval, Confirmed, Partly Received or Fully Received. |
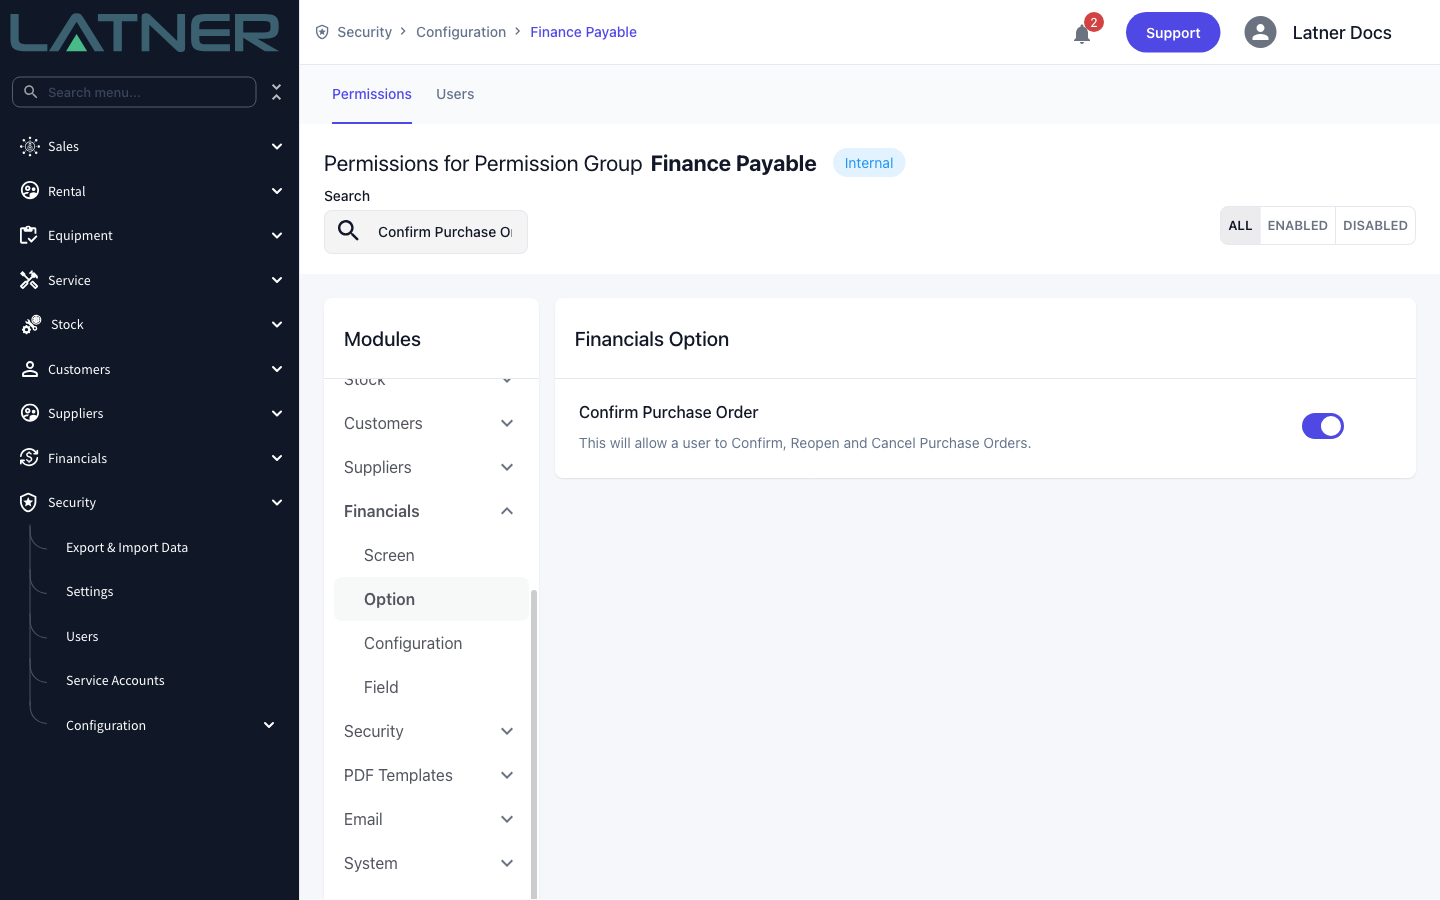
There is no separate "Reopen Purchase Order" permission. If a user can confirm purchase orders, they can also reopen and cancel them. If you need to stop someone reopening orders, you have to take Confirm Purchase Order off their permission group entirely.
Which Correction to Use
Reopening is only one way to correct a purchase order, and the right one depends on how far the order has got. Find the order's stage first, then use the correction for that stage.
|
Stage of the order |
Correction to use |
|---|---|
|
Confirmed, nothing received yet |
Reopen it with Options › Reopen Purchase Order, fix the lines, then confirm it again - the steps below. A purchase order raised against the wrong work order (and so the wrong machine) cannot be relinked - the work order link is fixed when the order is created. Cancel it with Options › Cancel Purchase Order and raise a new one from the right work order, as in How to Raise a Purchase Order From a Work Order. |
|
Partly Received or Fully Received |
Reverse the receipt, as in How to Reverse Receipt for a Purchase Order - but only when the receipt should not have happened (the goods were booked in by mistake or miscounted) or the goods are going back to the supplier. Never reverse a genuine receipt because the plan changed. The receipt records goods that really arrived, so it stays. |
|
Invoiced |
The order stays closed - Reopen Purchase Order is greyed out. Correct the supplier invoice instead:
Then, if a line still has to change, reopen the order. A line can only be deleted once nothing on it is received or invoiced. |
Reopening a Purchase Order
Step 1 - Open the purchase order
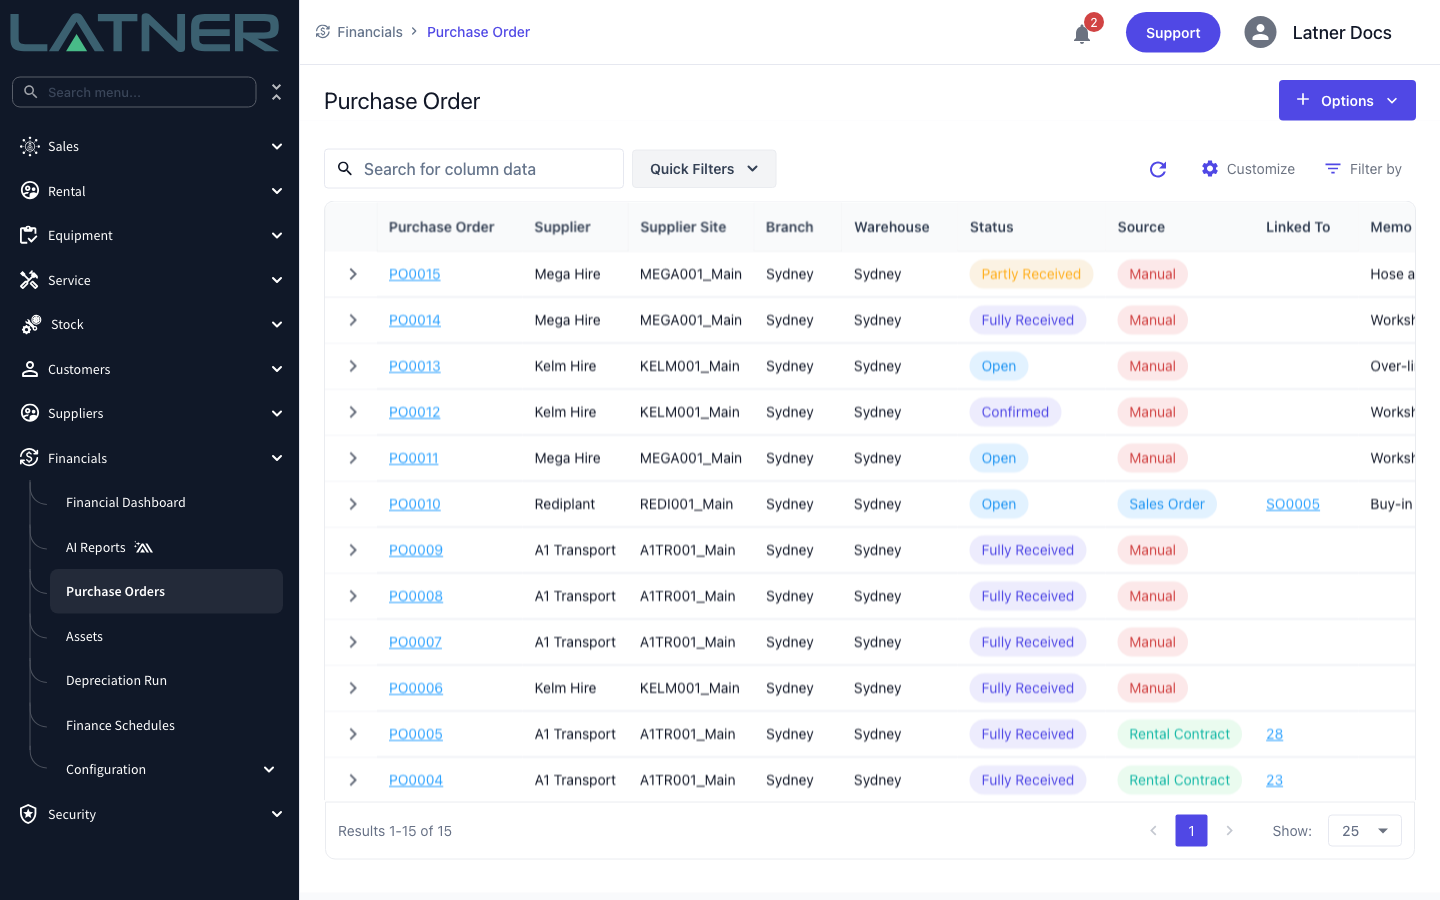
Go to Financials › Purchase Orders and click the purchase order number you need to amend. The Status column tells you at a glance which orders can be reopened.
Step 2 - Check the status and what is locked
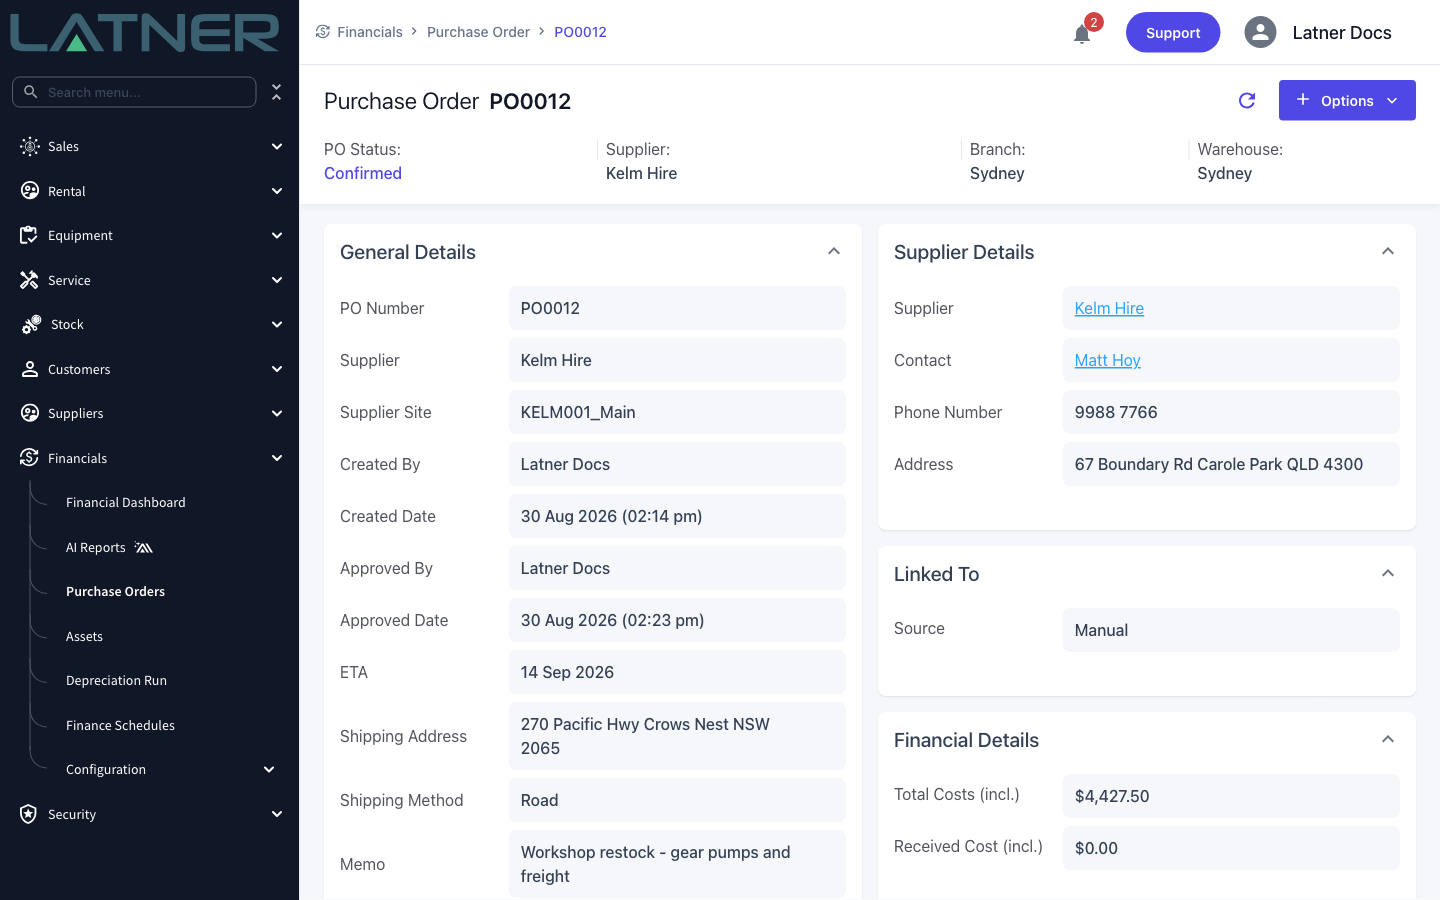
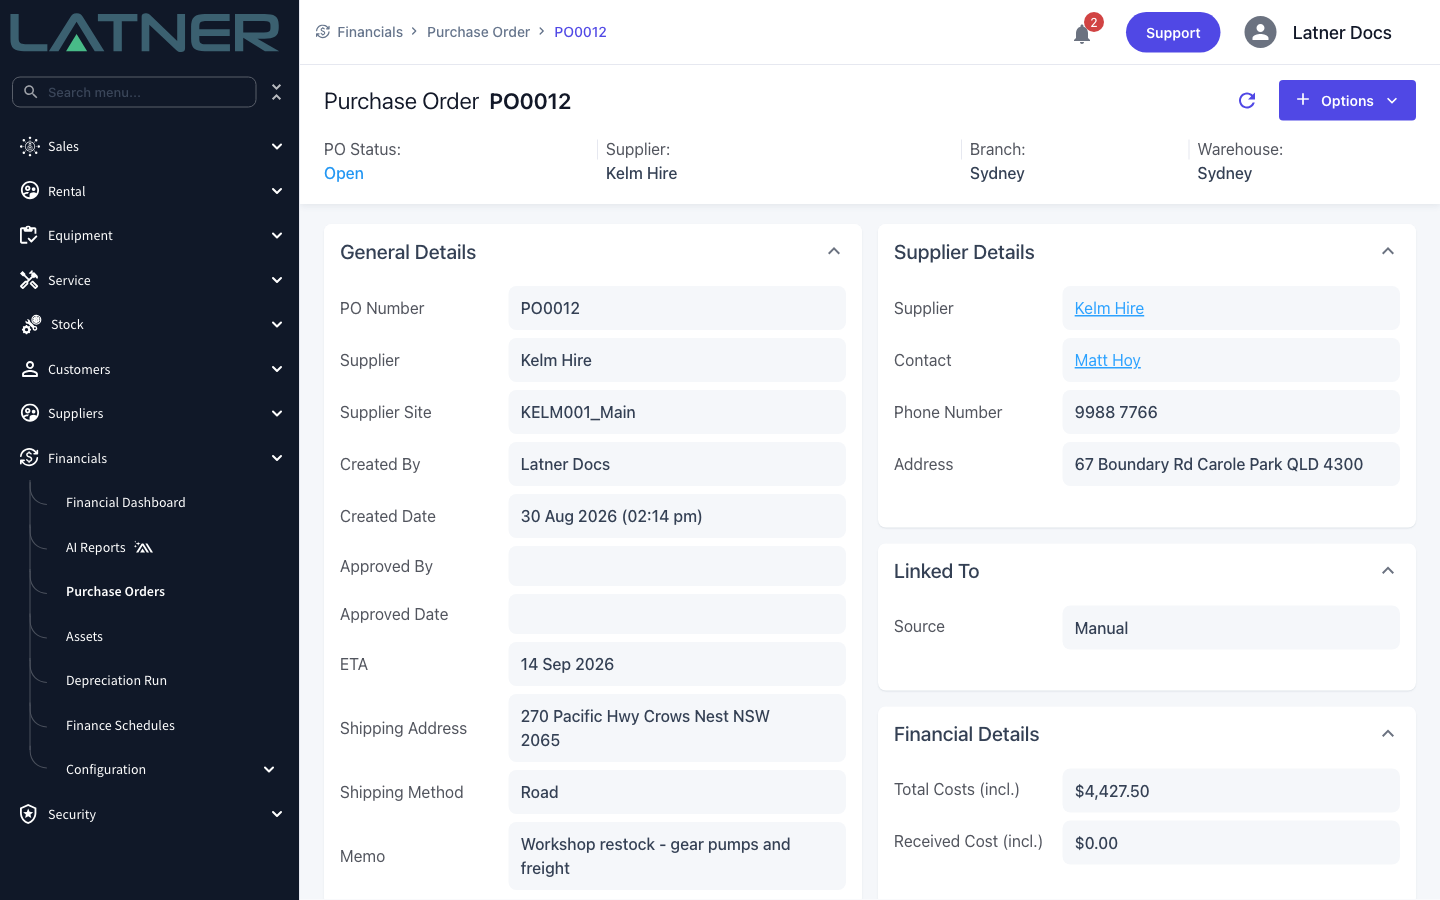
The header shows PO Status, and General Details shows who confirmed the order and when. These are the two fields reopening will clear.
-
PO Status - must be Pending Approval, Confirmed, Partly Received or Fully Received.
-
Approved By - the user who confirmed the order. Cleared on reopen.
-
Approved Date - when it was confirmed. Cleared on reopen.
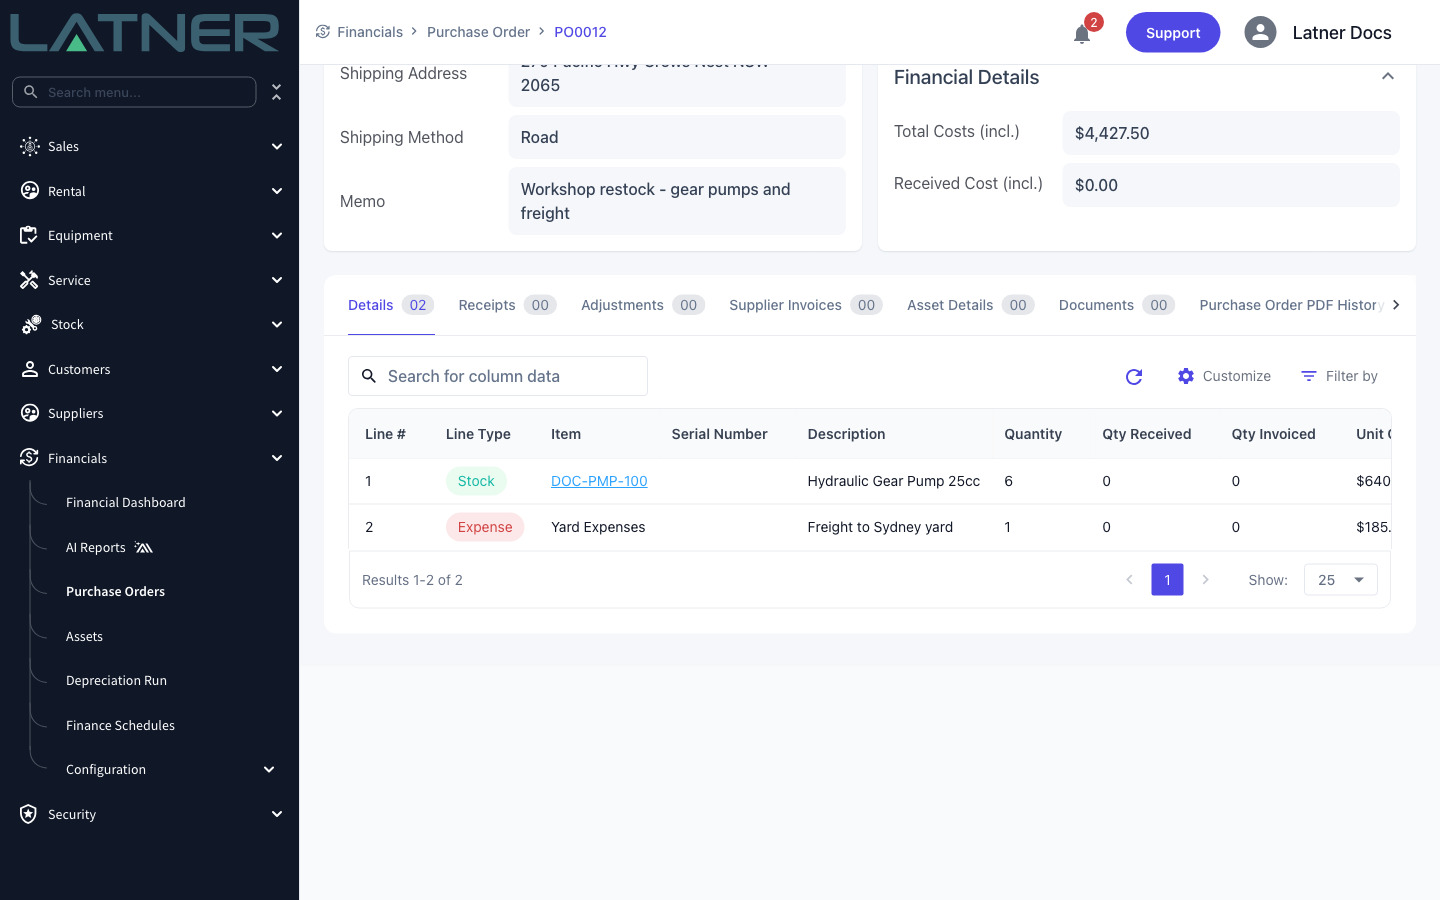
Scroll down to the Details tab and you will see why reopening matters. While the order is not Open, the lines have no selection column, so there is no way to edit or delete one, and Add Purchase Order Details is greyed out on the Options menu.
Step 3 - Choose Reopen Purchase Order
Click Options in the top right, then Reopen Purchase Order.
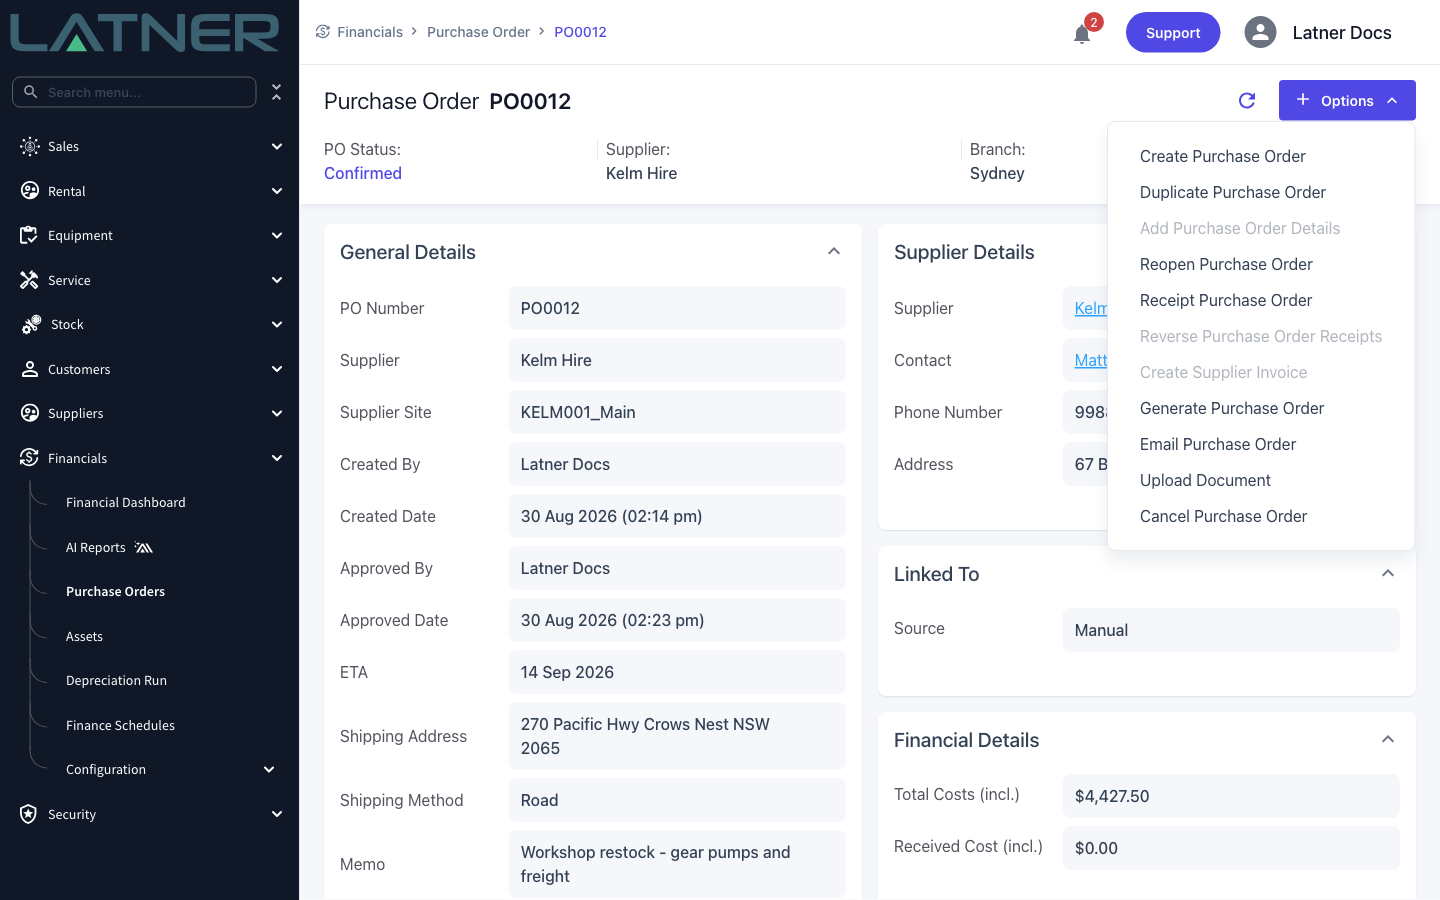
Reopening happens as soon as you click - there is no confirmation prompt and no undo. If you only wanted to look at the order, close the menu instead.
Step 4 - Check the order is back to Open
Latner confirms with a Purchase Order Reopened message. The header now reads Open, and Approved By and Approved Date are empty.
Step 5 - Make your amendments
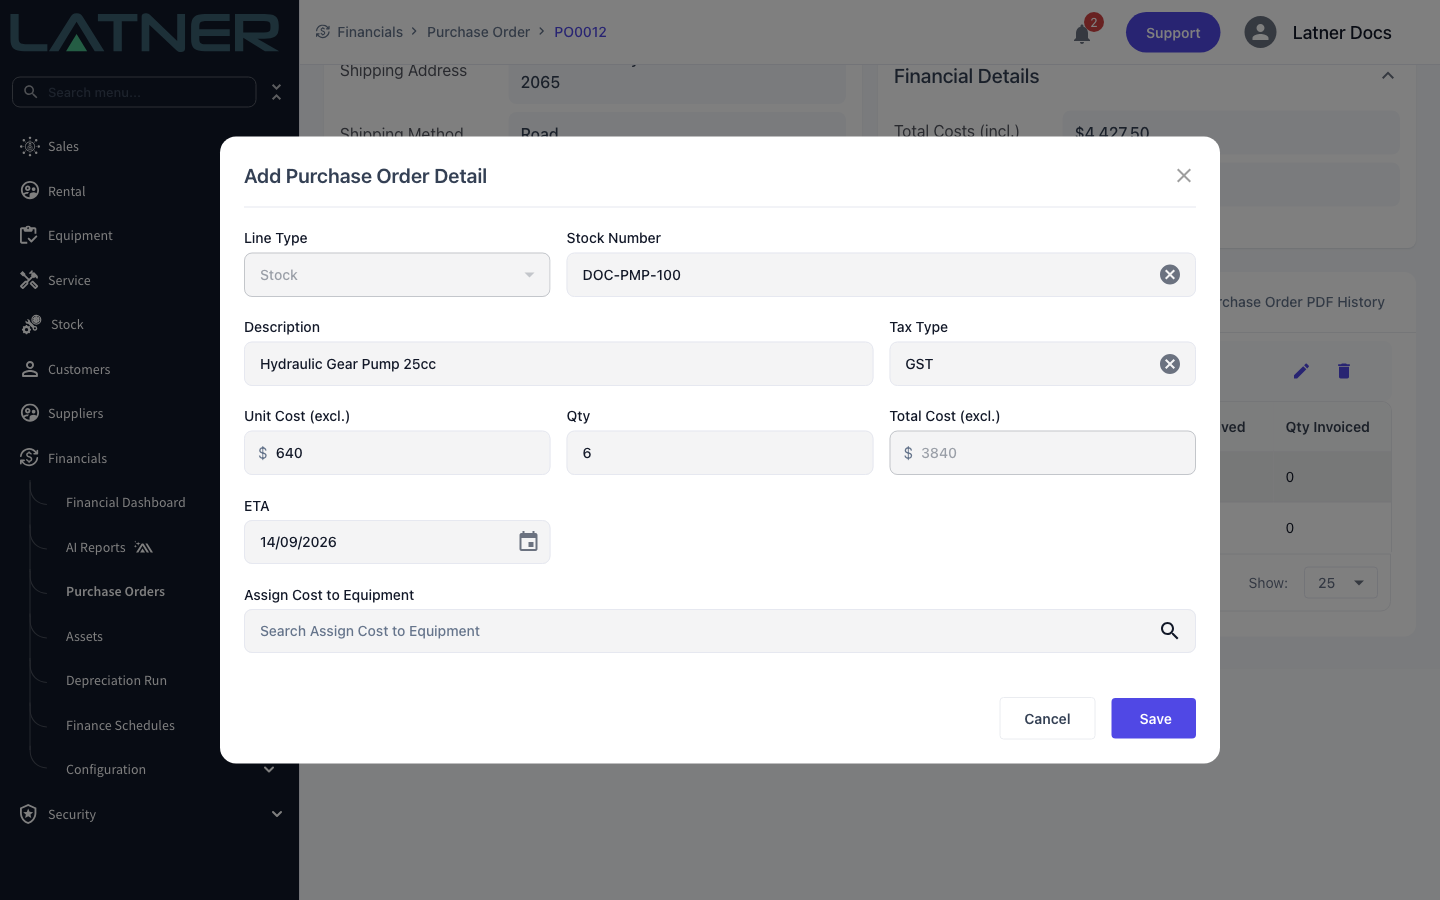
With the order Open, the Details tab gets its selection column back. Tick a line and use the pencil icon to edit it, or the bin icon to delete it. Options › Add Purchase Order Details is available again for new lines.
-
Qty - editable again, but it cannot be set lower than the quantity already received or invoiced on that line.
-
Unit Cost (excl.) - editable again, but not on a line that has already been invoiced.
-
Description, Tax Type, ETA and Assign Cost to Equipment - editable as normal.
Step 6 - Confirm the purchase order again
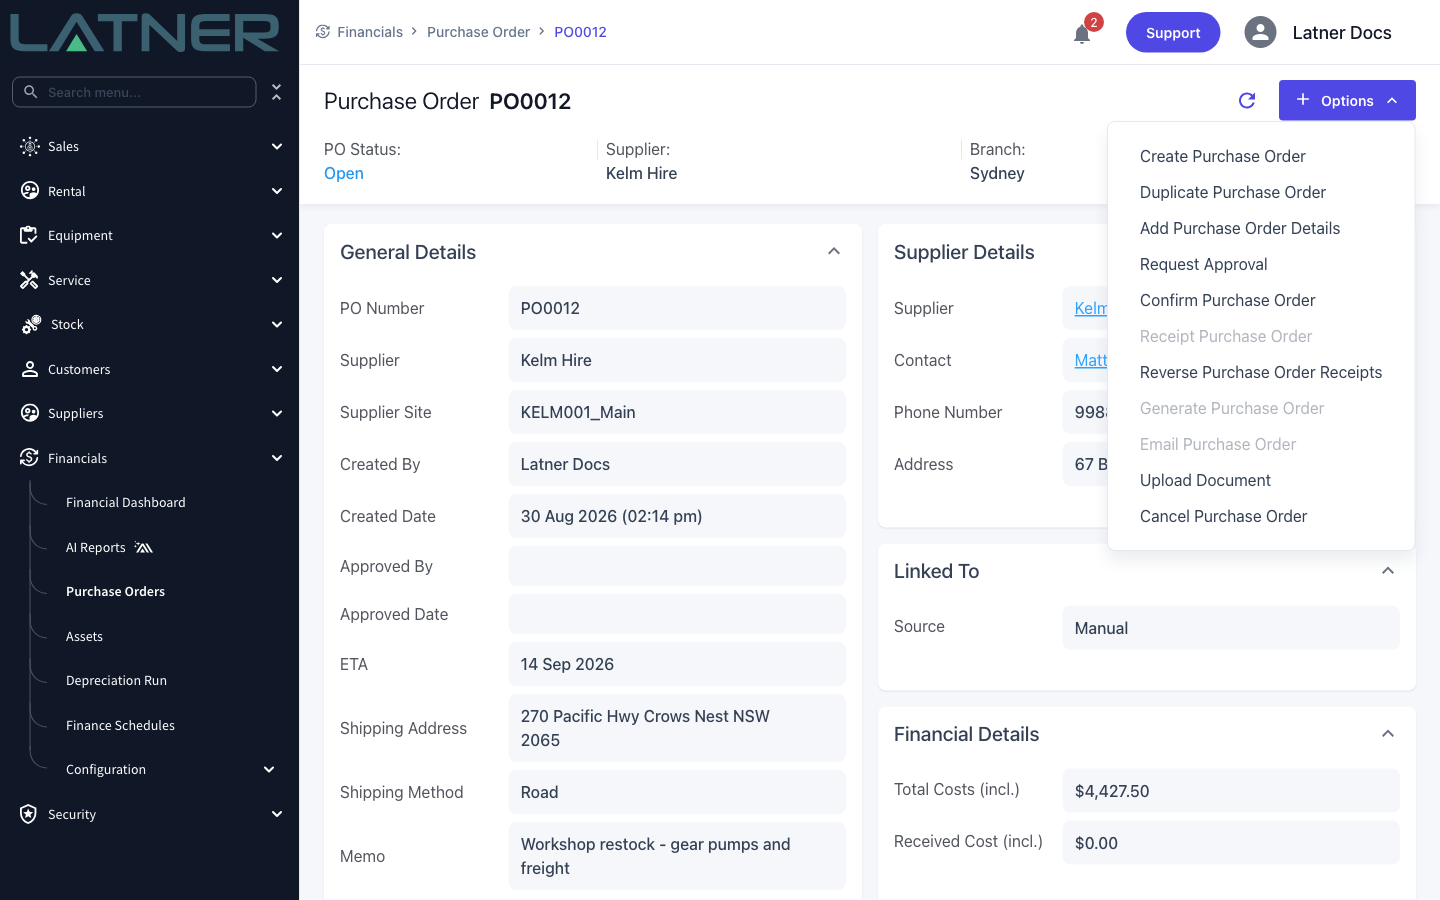
An Open purchase order is not on order with anyone, so finish the job: choose Options › Confirm Purchase Order, or Options › Request Approval if it has to go back through an approver first. Confirming stamps Approved By and Approved Date with your name and reinstates the backorder against your stock.
Reopening an Order That Has Been Received
You can reopen a Partly Received or Fully Received purchase order, and Latner protects everything that has already come in. The Options menu shows a tooltip warning about received quantities, but the option itself stays available.
-
Received quantities, receipts and stock movements are untouched, and Received Cost (incl.) stays as it was.
-
Only the outstanding balance is released - if 4 of 6 units have been received, 2 come off backorder.
-
Serialised stock items that have already been received are kept. Only the ones still sitting at Ordered status are removed.
-
You still cannot reduce a line's quantity below what has already been received.
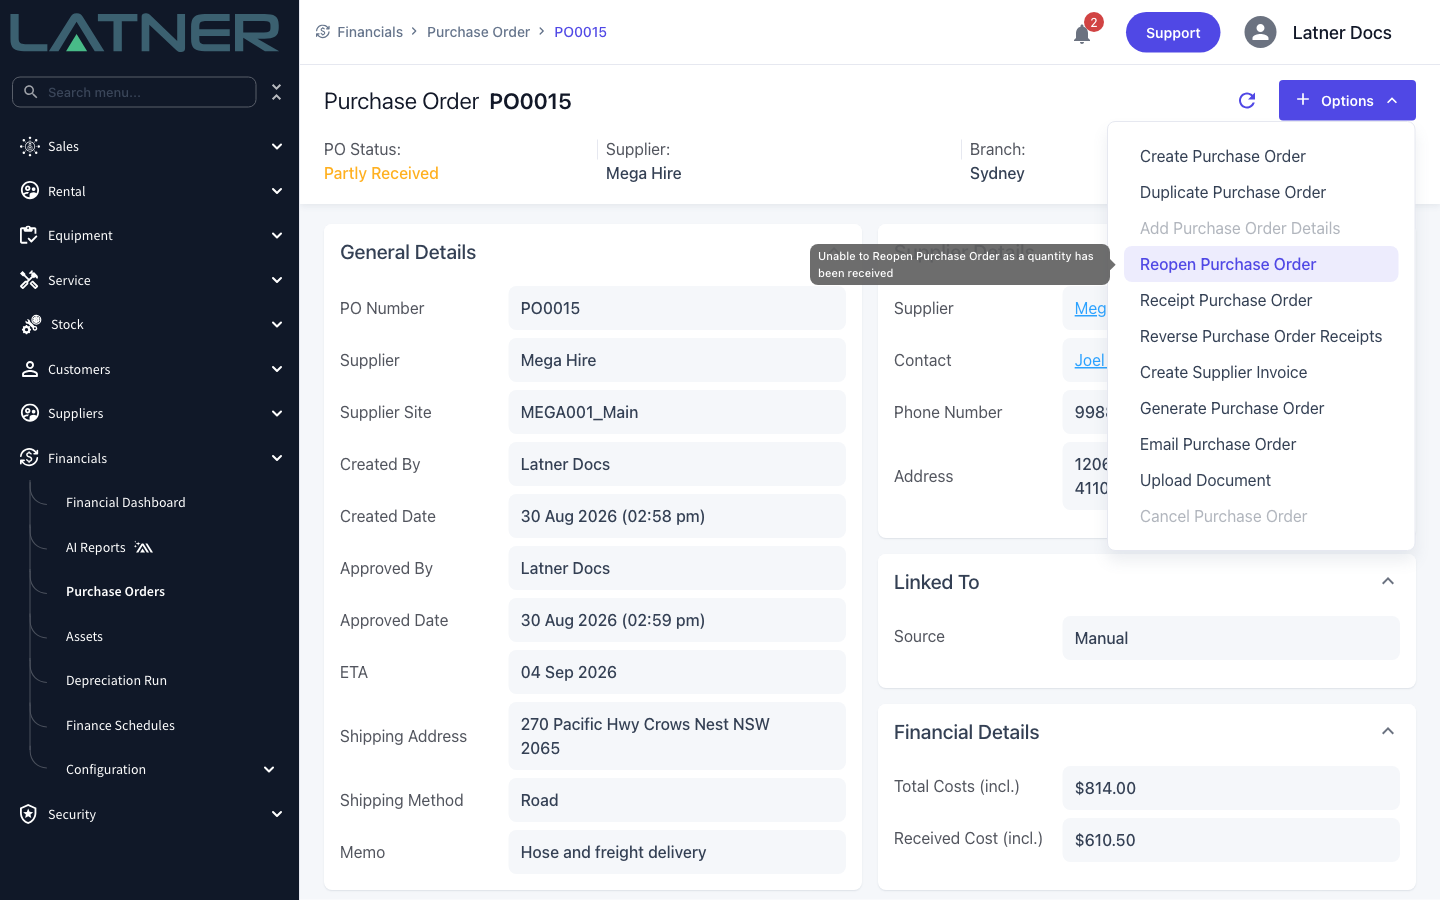
Reopening is not how you undo a receipt. If the goods were receipted in error, use Options › Reverse Purchase Order Receipts instead - that is the action that puts the quantity back.
After Reopening
-
The order shows as Open on the Purchase Order list, and Approved By and Approved Date are blank on the header.
-
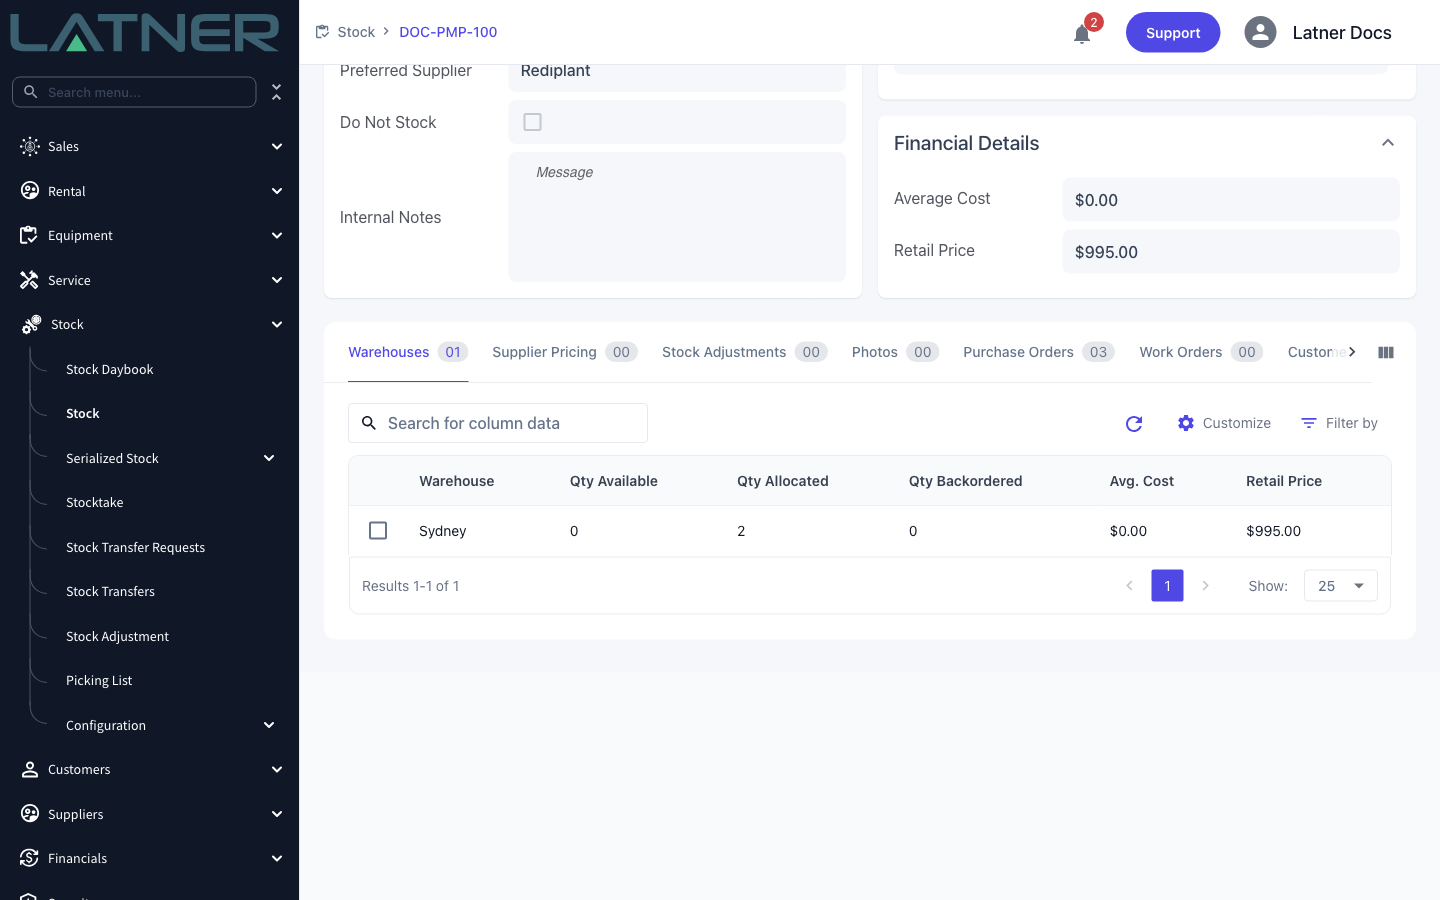
For each stock line, the outstanding quantity comes off Qty Backordered on the stock item's Warehouses tab, and the warehouse Avg. Cost is recalculated without that backordered value. Both are restored when you confirm the order again.
-
Serialised stock items created at confirmation that are still at Ordered status are deleted. Confirming again recreates them for whatever is still outstanding.
-
Receipt Purchase Order is unavailable until the order is confirmed again, so the goods cannot be booked in while it sits Open.
-
Generating and emailing the purchase order PDF are both greyed out while the order is Open. Previously generated PDFs stay on the Purchase Order PDF History tab.
A reopened purchase order is no longer approved, so nobody downstream is expecting the goods. Reopen it, amend it and confirm it again in one sitting - an order left sitting in Open cannot be receipted, and the supplier has no idea the order changed until you resend it.
FAQs
Watch the Demo
Prefer to watch it? Step through the same flow here.
Trackunit Integration
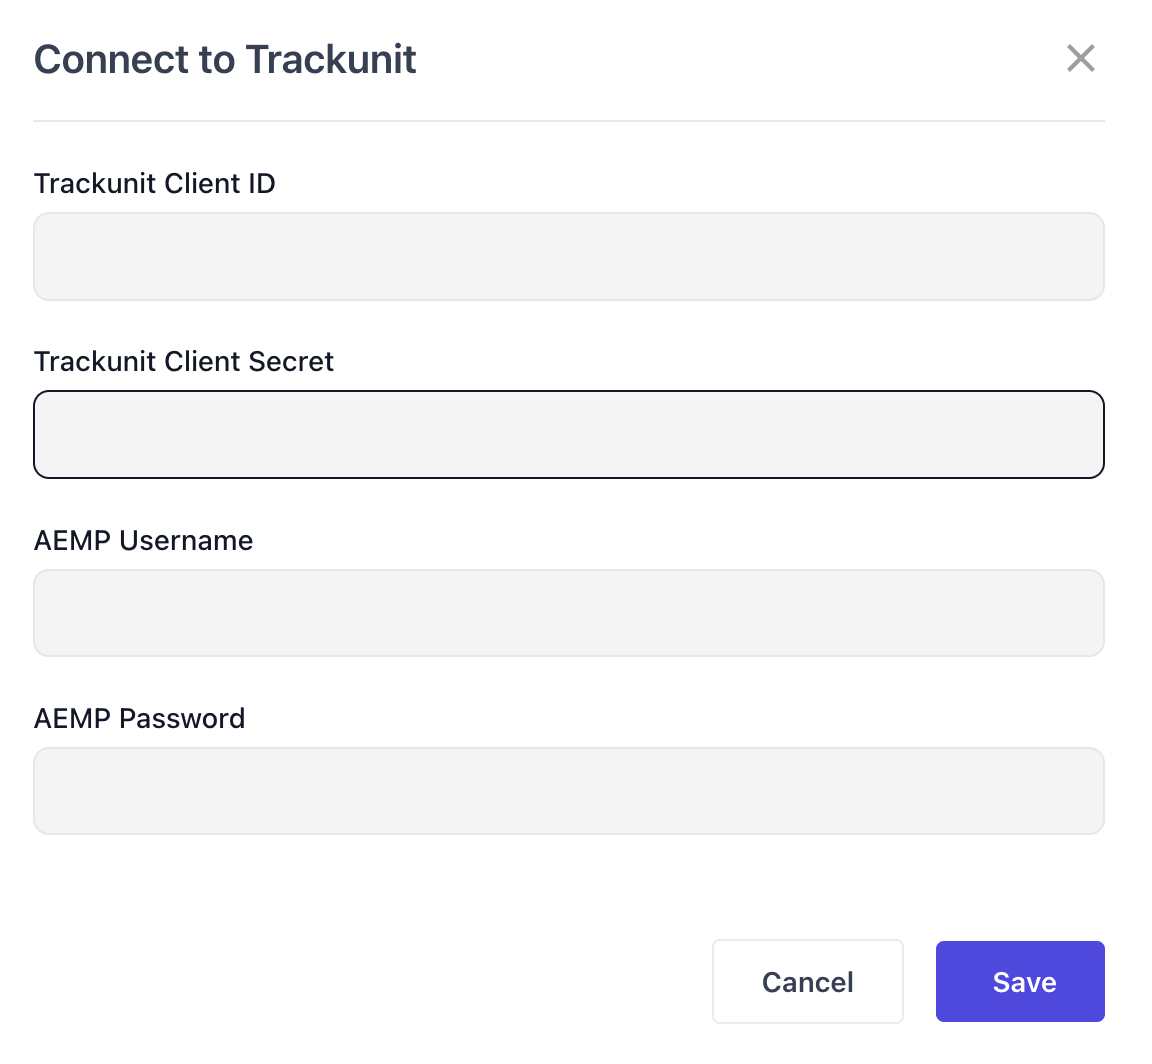
Trackunit can now be integrated to Latner from Equipment > Configurations > Telematics Integration. Click Connect to be able to provide Client & Validation.
Other Updates & Improvements
-
Ability to Add Labour Services to Sales Orders
-
Allow Users to Create Customer Collections for Sales Orders
-
Show Work Completed information on Equipment Work Order History Tab
-
Ability to Delete Work Order Documents from Desktop
-
Ability to Create Work Orders for Returned Equipment on Rental Contracts
-
Show Customer Pop Up Note when opening a Rental Contract
-
Multi-selecting Branches on Transport Allocation Screen
-
Ability to Link Purchase Order Details to CRM Projects
-
Ability to Link Rental Contracts to CRM Projects
-
Allow Sales Orders to be linked to CRM Projects
-
Ability to Filter by Sales Reps for CRM Projects
-
Plus a range of smaller fixes and performance improvements.