
Welcome to March 2026 Release of Latner! This month’s release brings a fresh set of highly requested enhancements across equipment management, sales workflows, mobility, and system personalisation. We’ve focused on features that make your day‑to‑day tasks smoother, give you more control over your data, and help your team work more efficiently across the platform. Below is a full breakdown of what’s new in this release.
New Features
Equipment Document Types
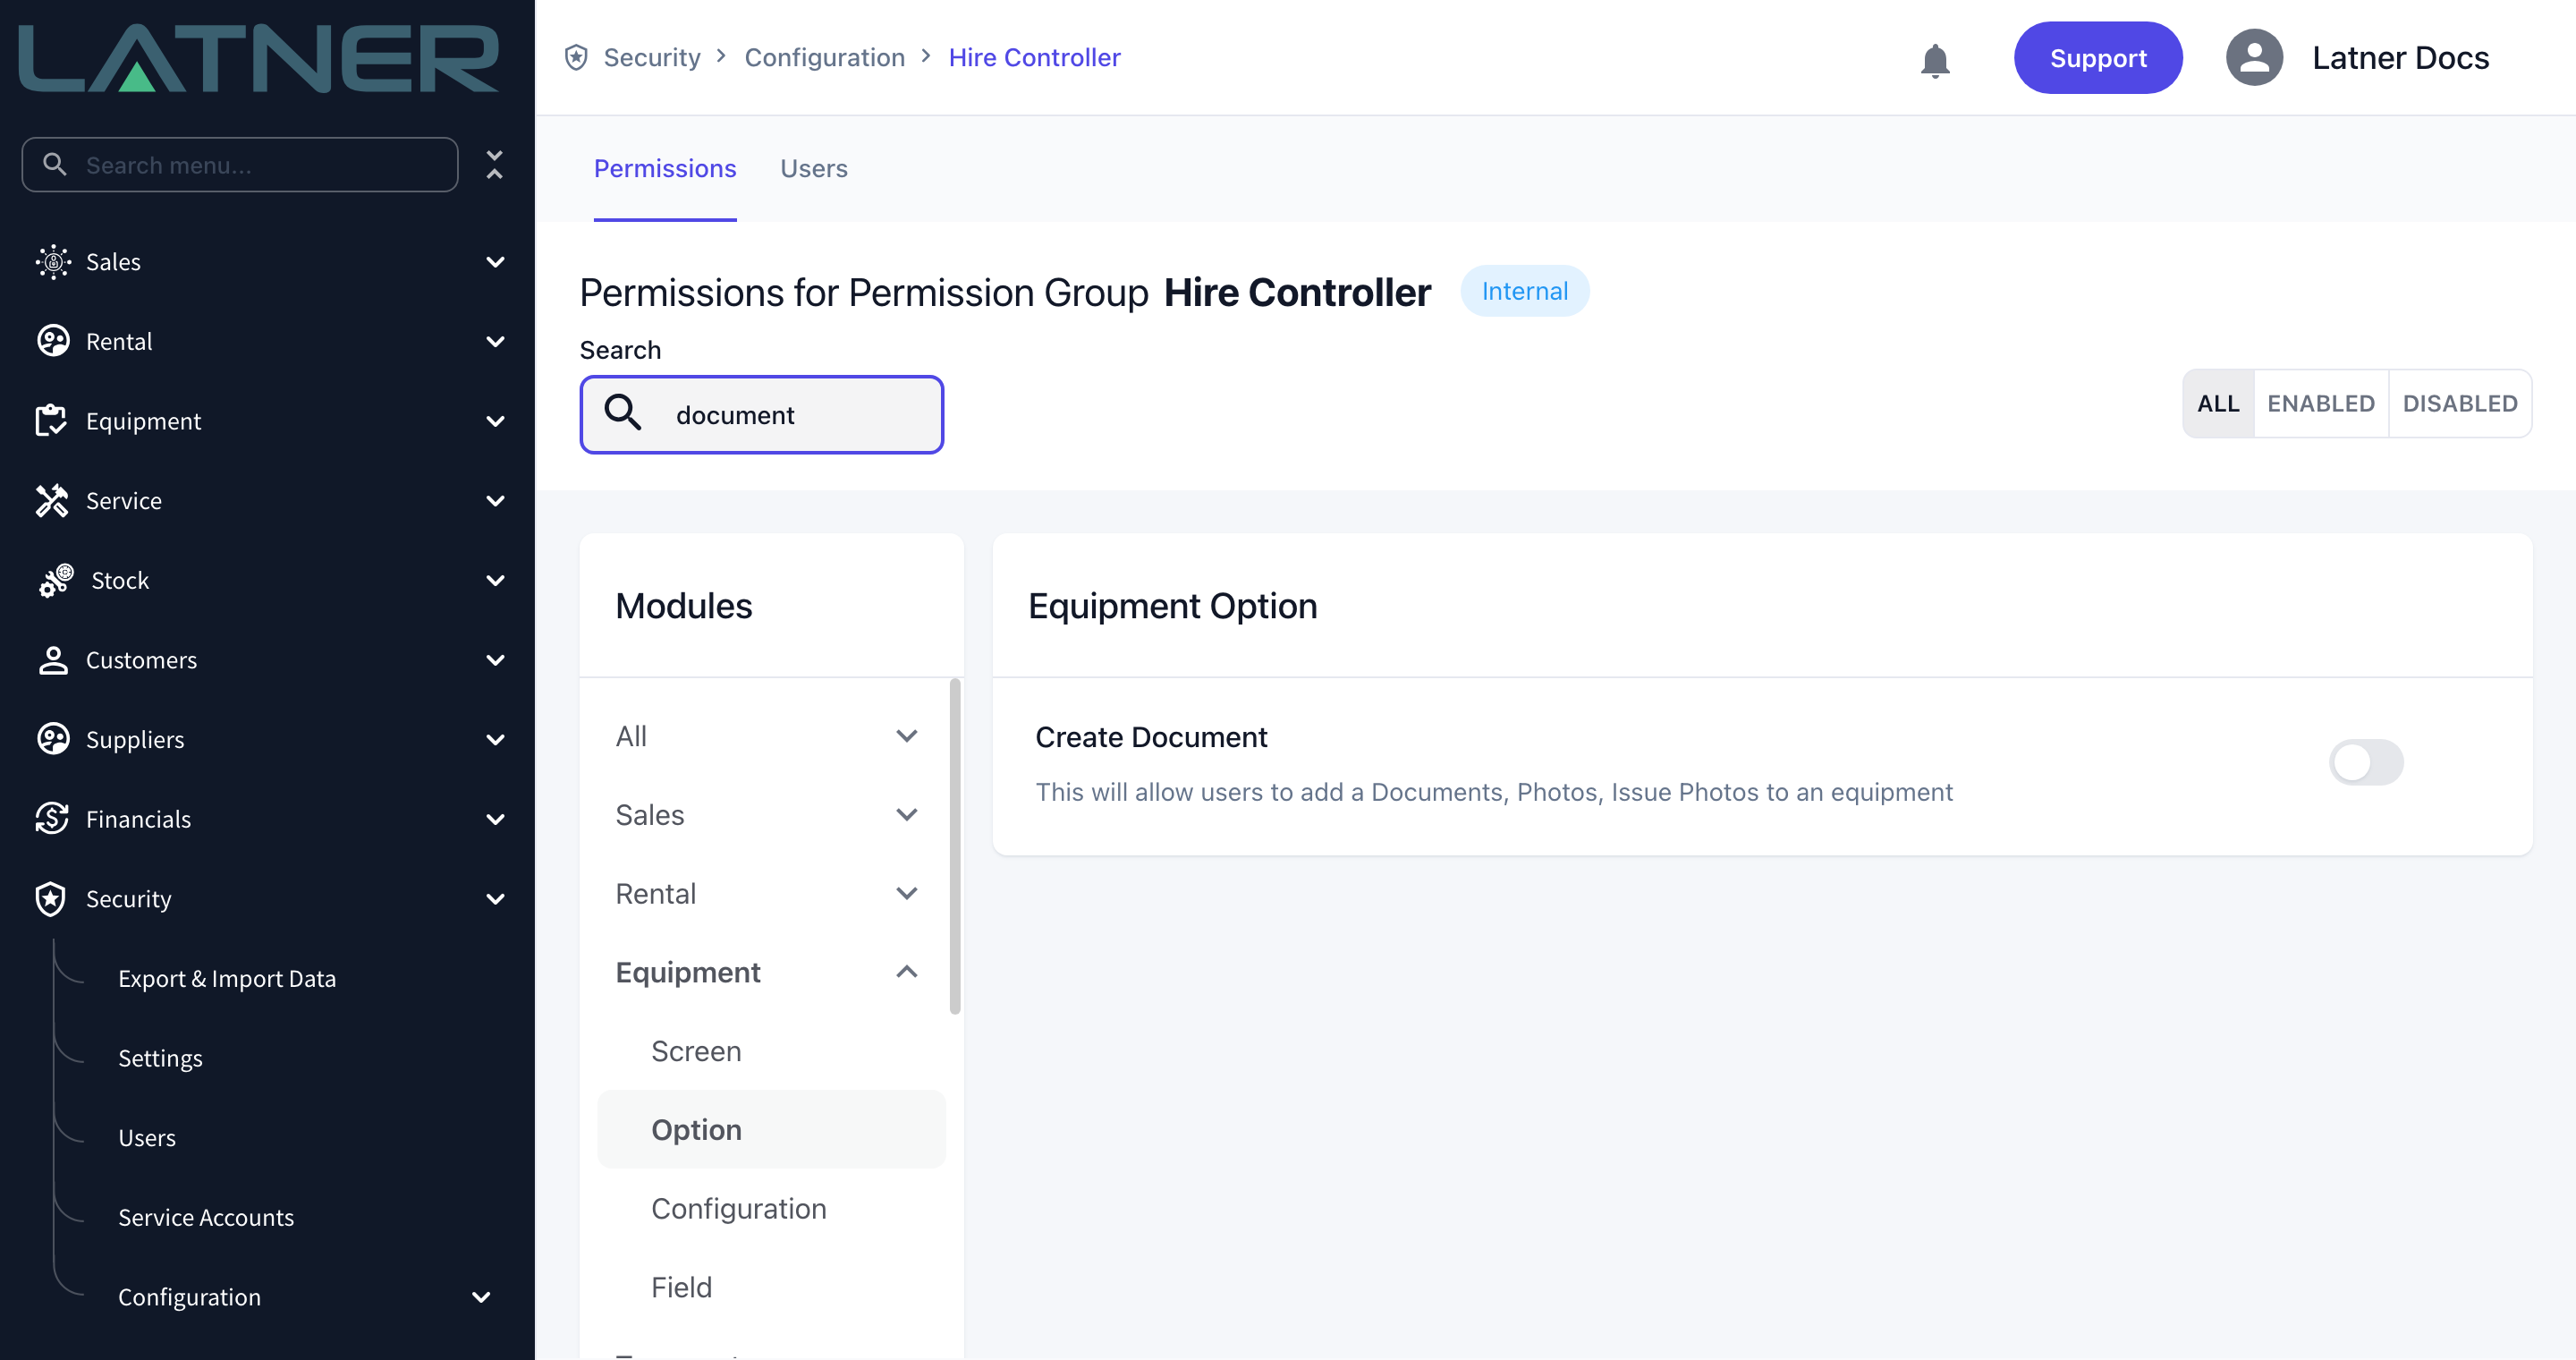
This update introduces configurable Equipment Document Types, allowing you to organise and categorise the documents you upload against individual equipment items. Whether it’s a parts manual, service guide, compliance certificate, or any other document, you can now define types that matter to your business. These can be set up under Equipment > Configurations > Equipment Document Type.
Equipment Documents let you store the paperwork for a single machine - its registration, insurance certificate, risk assessment or specification sheet - against the equipment record itself, with a document type and an expiry date so nothing quietly lapses.
Overview
Every machine collects paperwork, and most of it belongs to that machine alone. Latner keeps those files on the equipment record, tagged with a document type so you can tell a registration from a lifting certificate at a glance.
-
Documents are attached to one equipment record and live on its Documents tab, not on the equipment class or model.
-
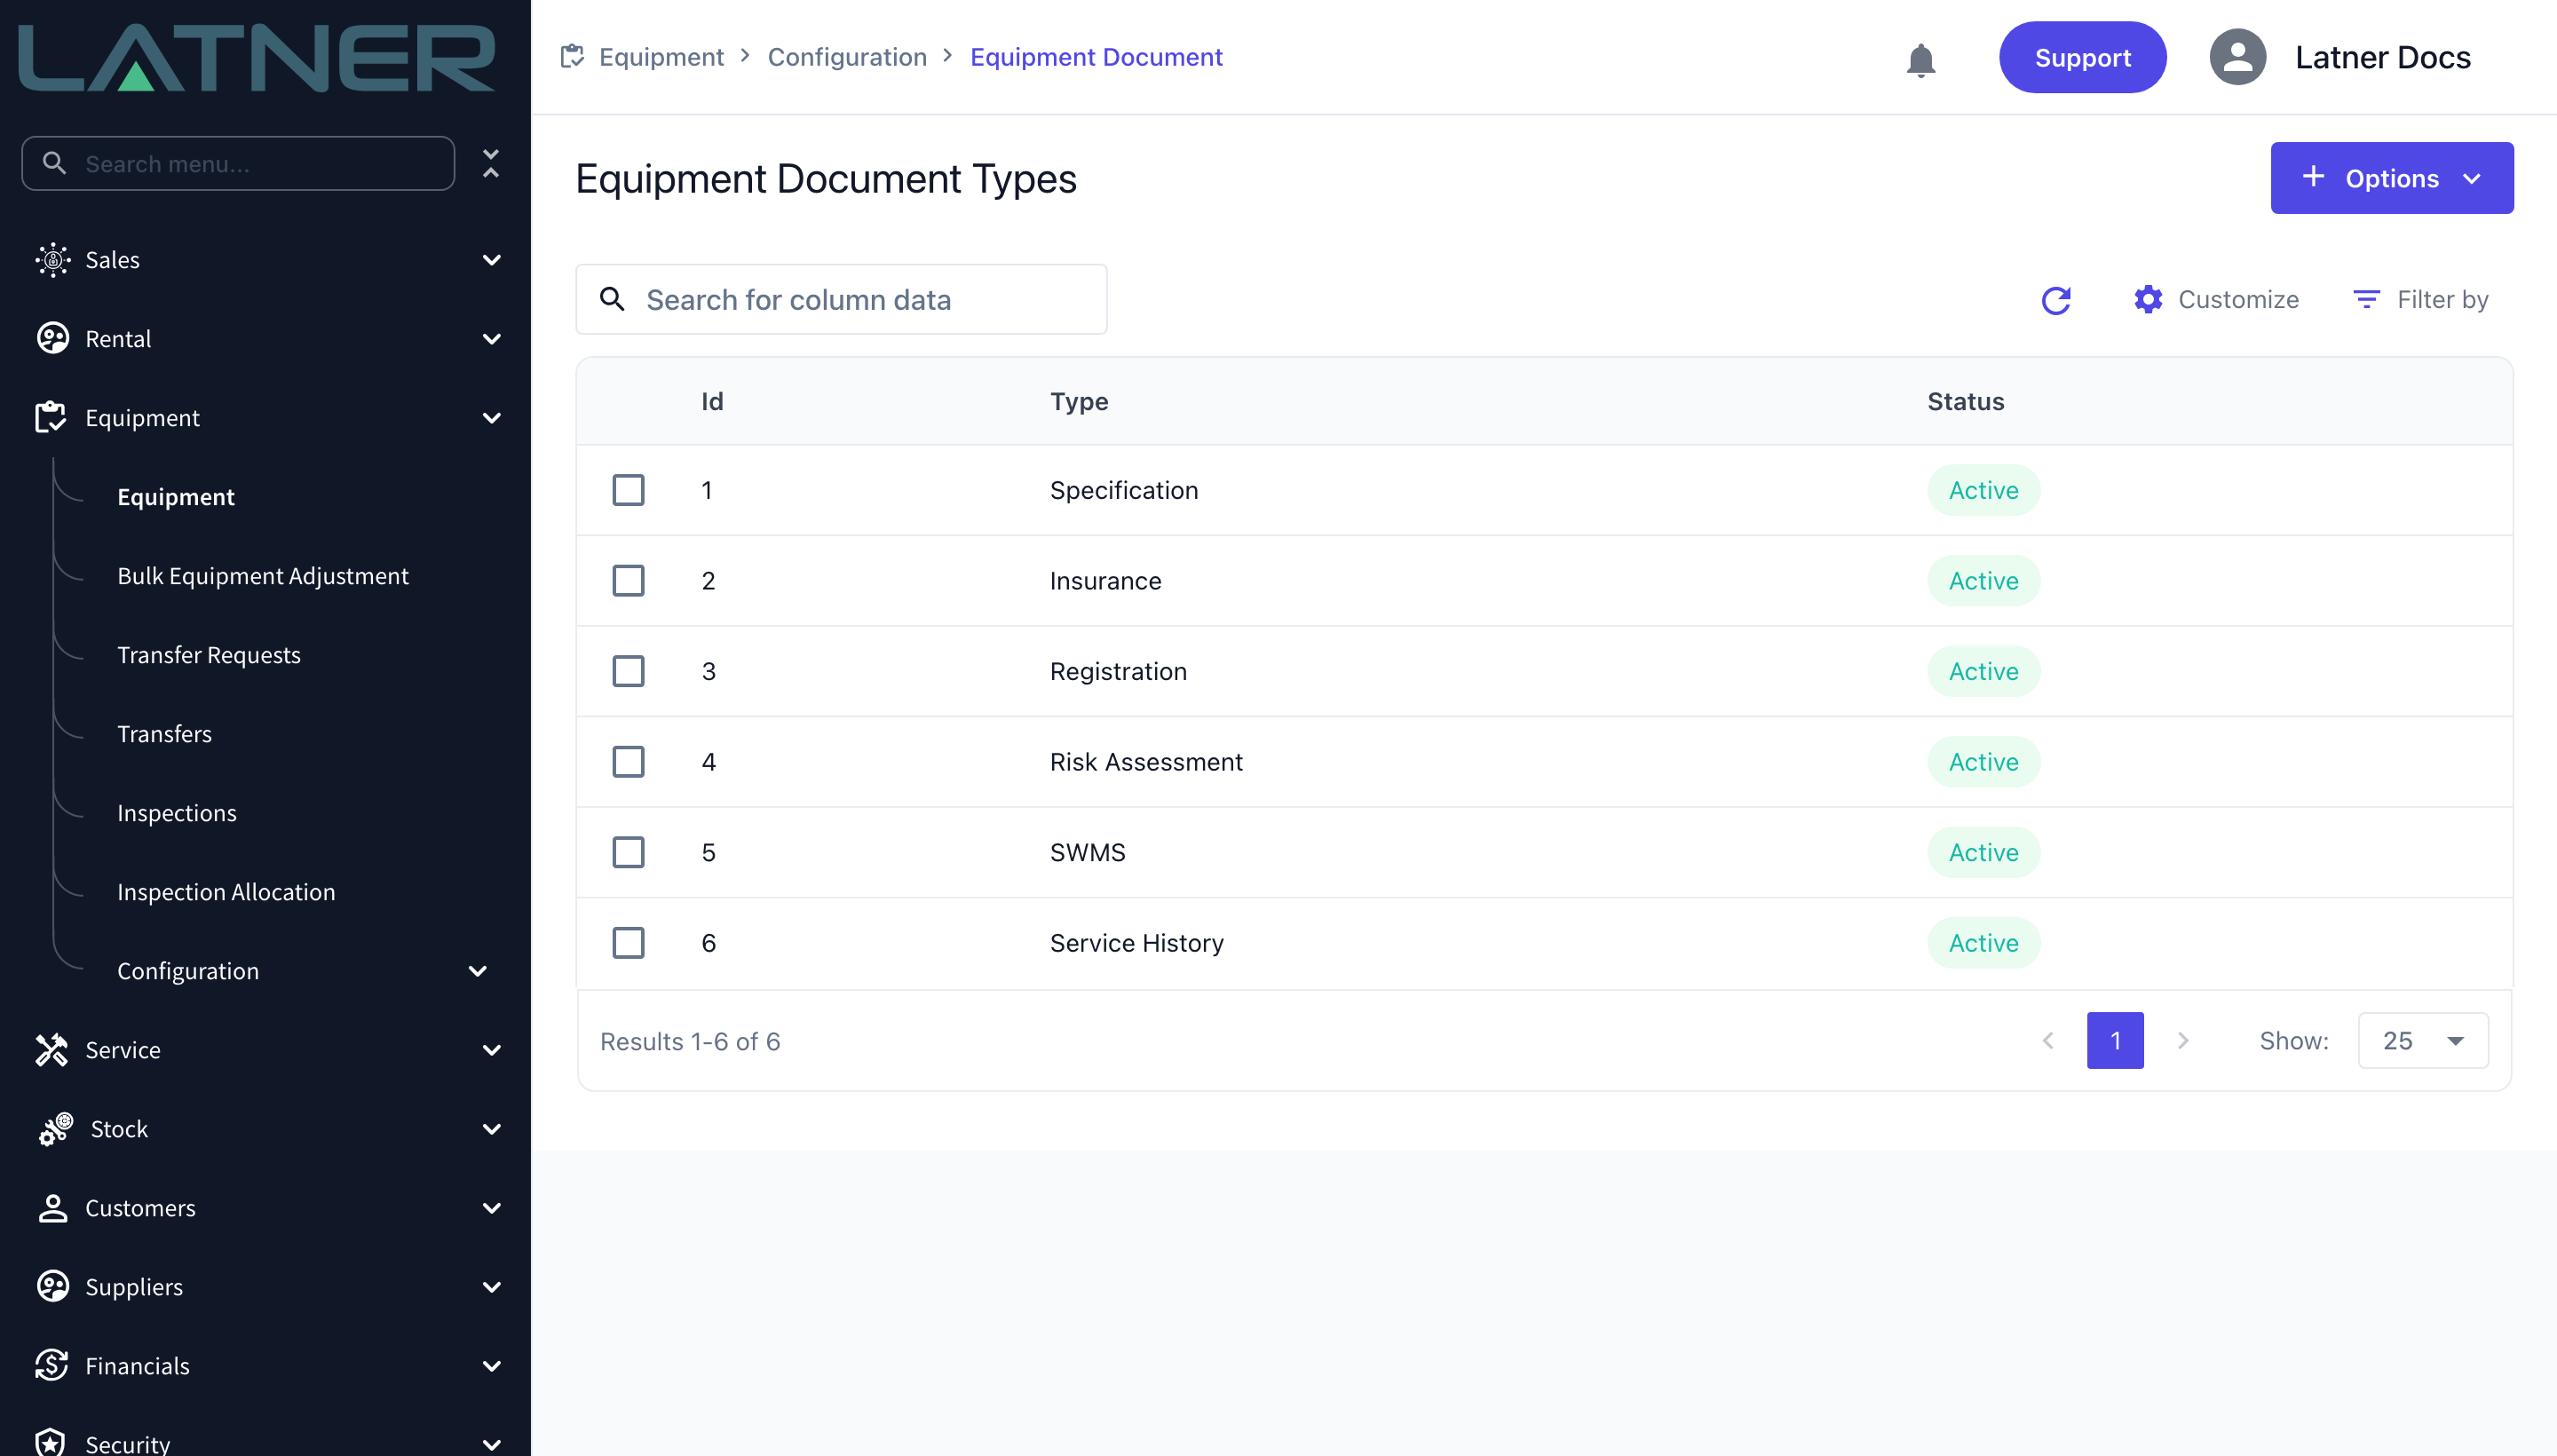
Every document must have a Document Type. Latner ships with six - Specification, Insurance, Registration, Risk Assessment, SWMS and Service History - and you can add your own.
-
An optional Expiry Date drives the document's status: Active until the expiry date arrives, Expired from that date onwards.
-
You can upload the same document type more than once against the same machine, which is what you want when a certificate is renewed.
-
Documents that are no longer current can be deactivated, which keeps the file and its history on the record.
-
Equipment documents are internal. They are not the files your customers see in the equipment portal - those are Portal Documentation, which is configured separately.
Before You Begin
Check that you have the following in place.
|
Requirement |
Where to Find It |
|---|---|
|
Create Document permission |
Security › Configuration › Permission Groups › [your group] › Equipment › Option. This covers uploading, editing, deleting and deactivating equipment documents. |
|
Equipment Document Type permission |
Security › Configuration › Permission Groups › [your group] › Equipment › Configuration. Only needed if you have to create a new document type. |
|
An equipment record that is not Inactive or Pending Activation |
Equipment › Equipment. The Upload Document option is disabled on equipment with either of those rental statuses. |
|
A file in a supported format |
Images (jpg, jpeg, png), PDF, Office and text files (csv, xls, xlsx, txt, doc, docx), and machine files (mch, machine, mx3). |
The document types you create are shared across the whole business, so it is worth agreeing on names before you start adding them. A type cannot be deleted once it exists - it can only be made Inactive.
Creating the Document Type
Skip to the next section if the type you need is already on the list.
Step 1 - Open the Equipment Document Types screen
Go to Equipment › Configuration › Equipment Document Types. The screen lists every type with its status.
Step 2 - Add the new type
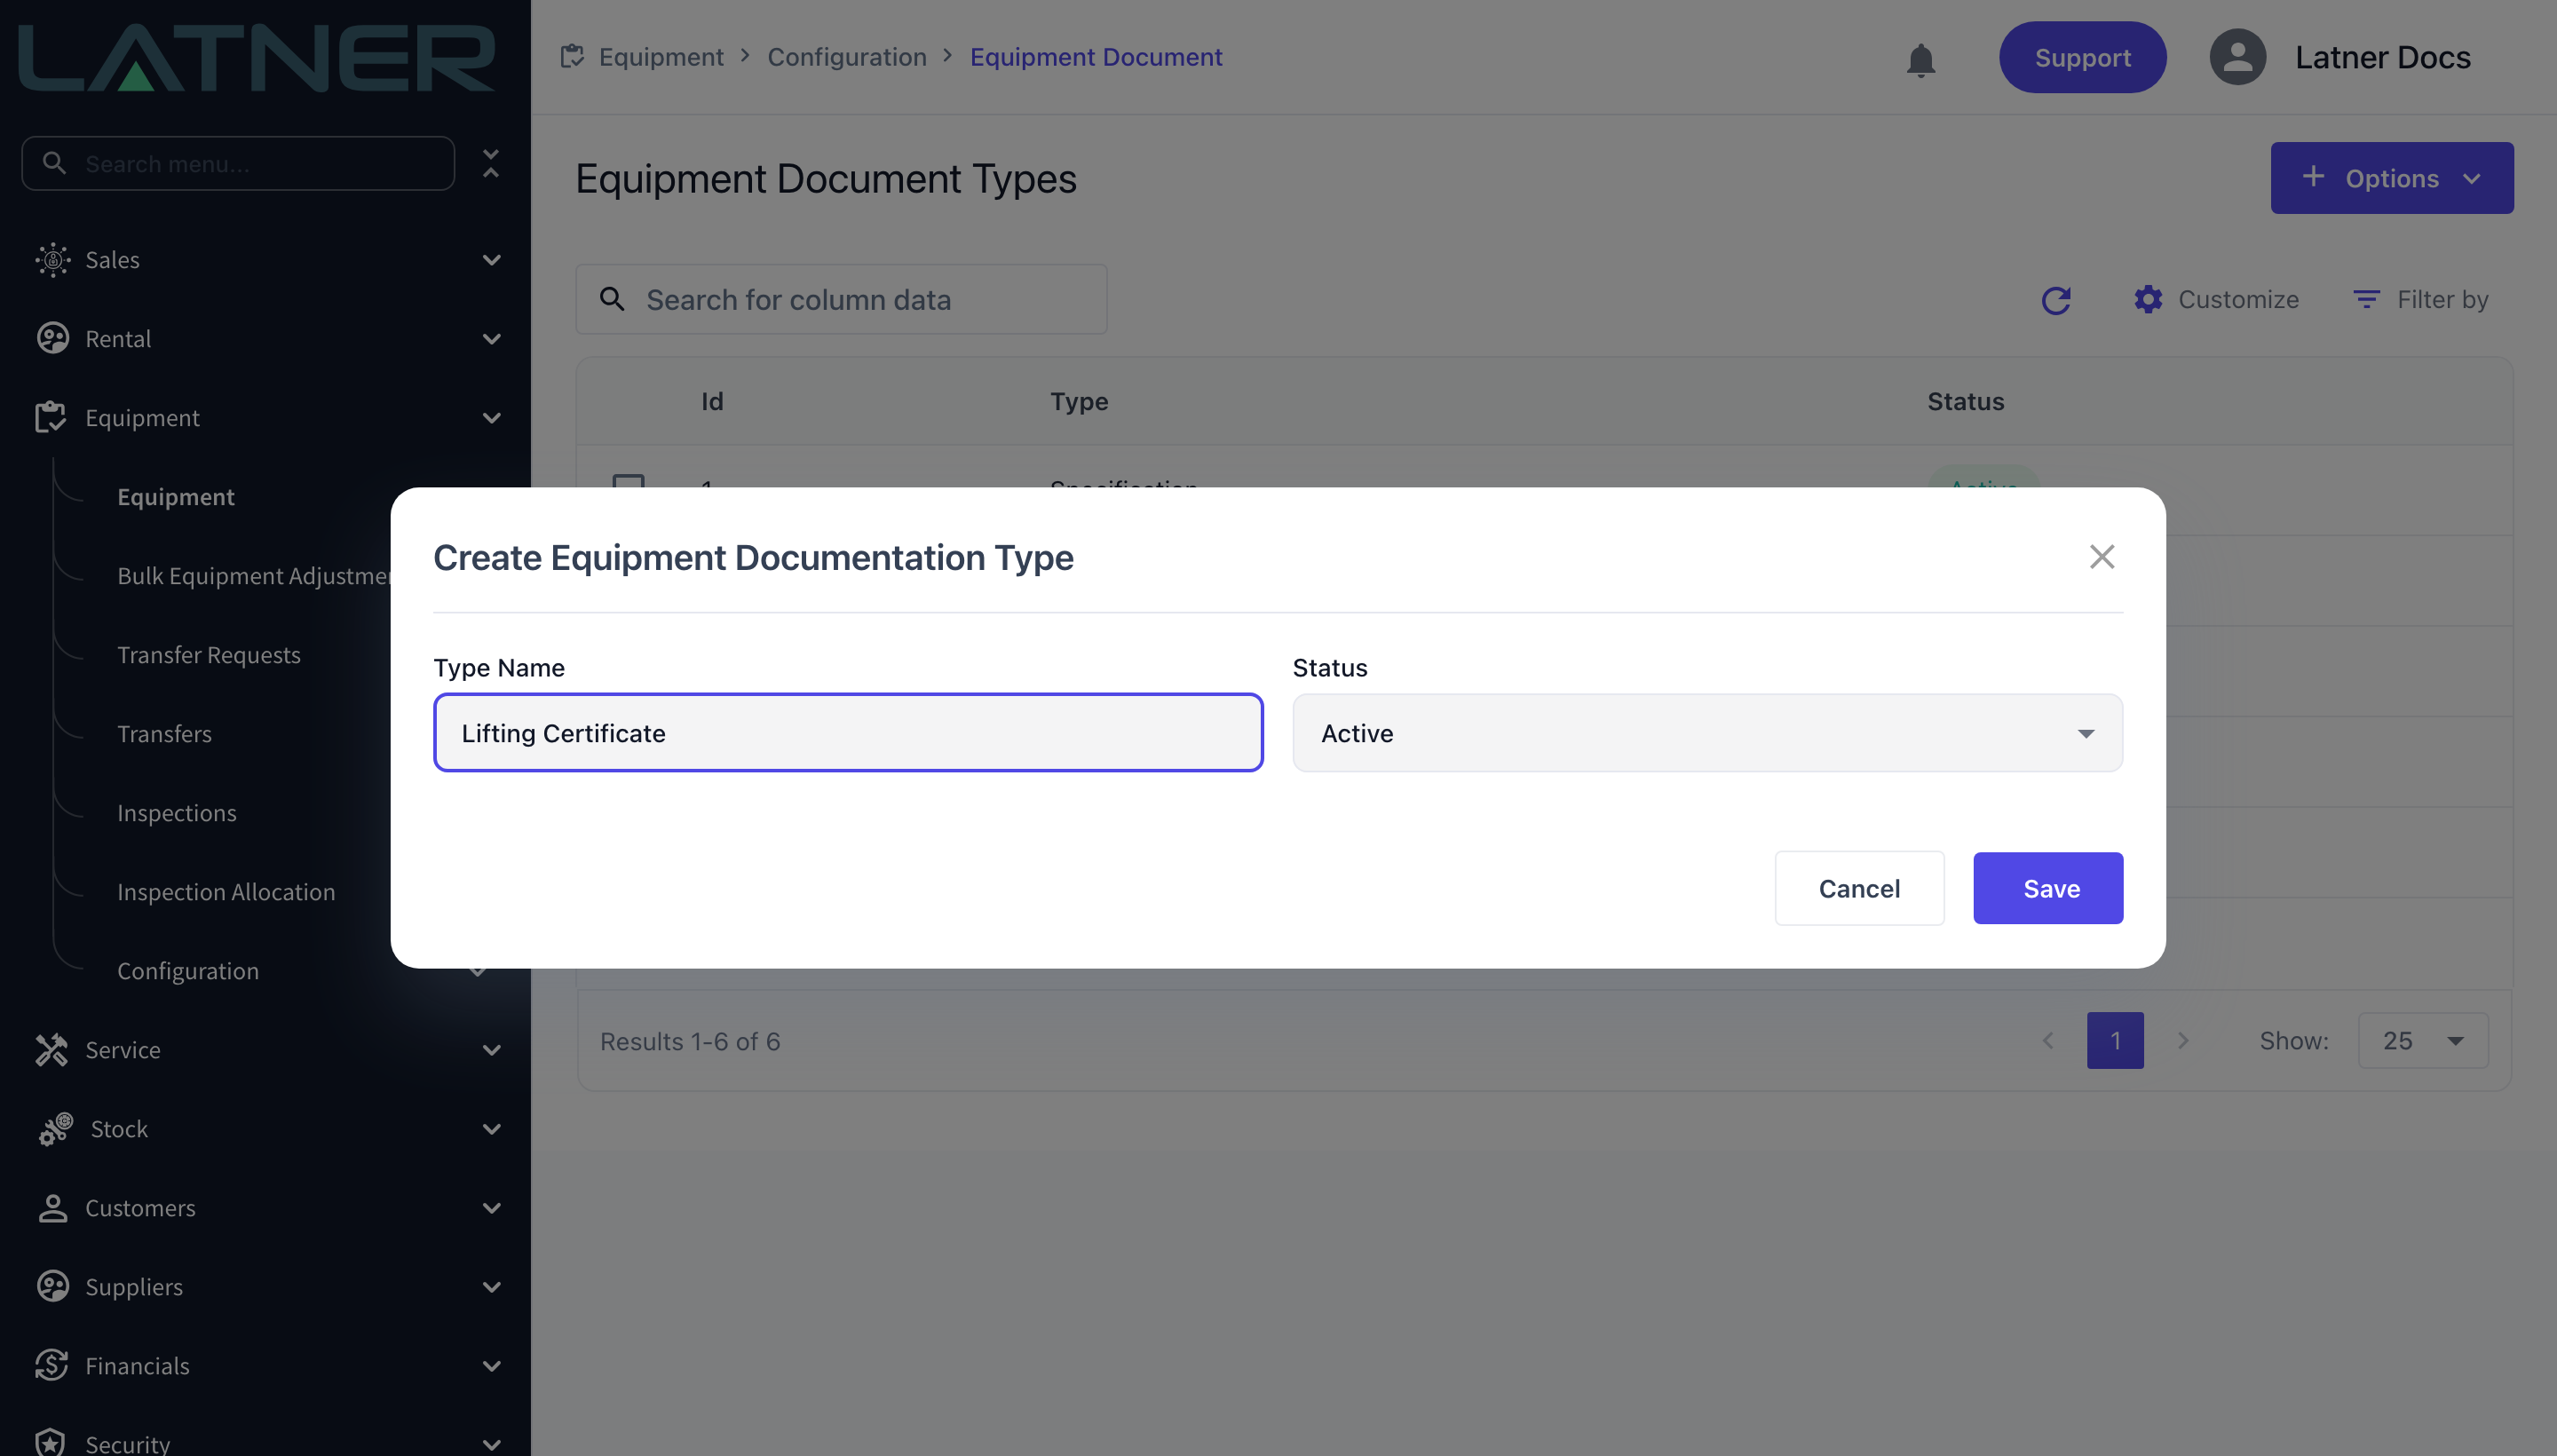
Select Options › Create Equipment Document Type and complete the Create Equipment Documentation Type dialog.
-
Type Name - required, and must be unique. This is the name people will pick from when they upload a file, so keep it short and specific ("Lifting Certificate" rather than "Certificate").
-
Status - required, and defaults to Active. Only Active types can be selected when uploading a document.
Step 3 - Save
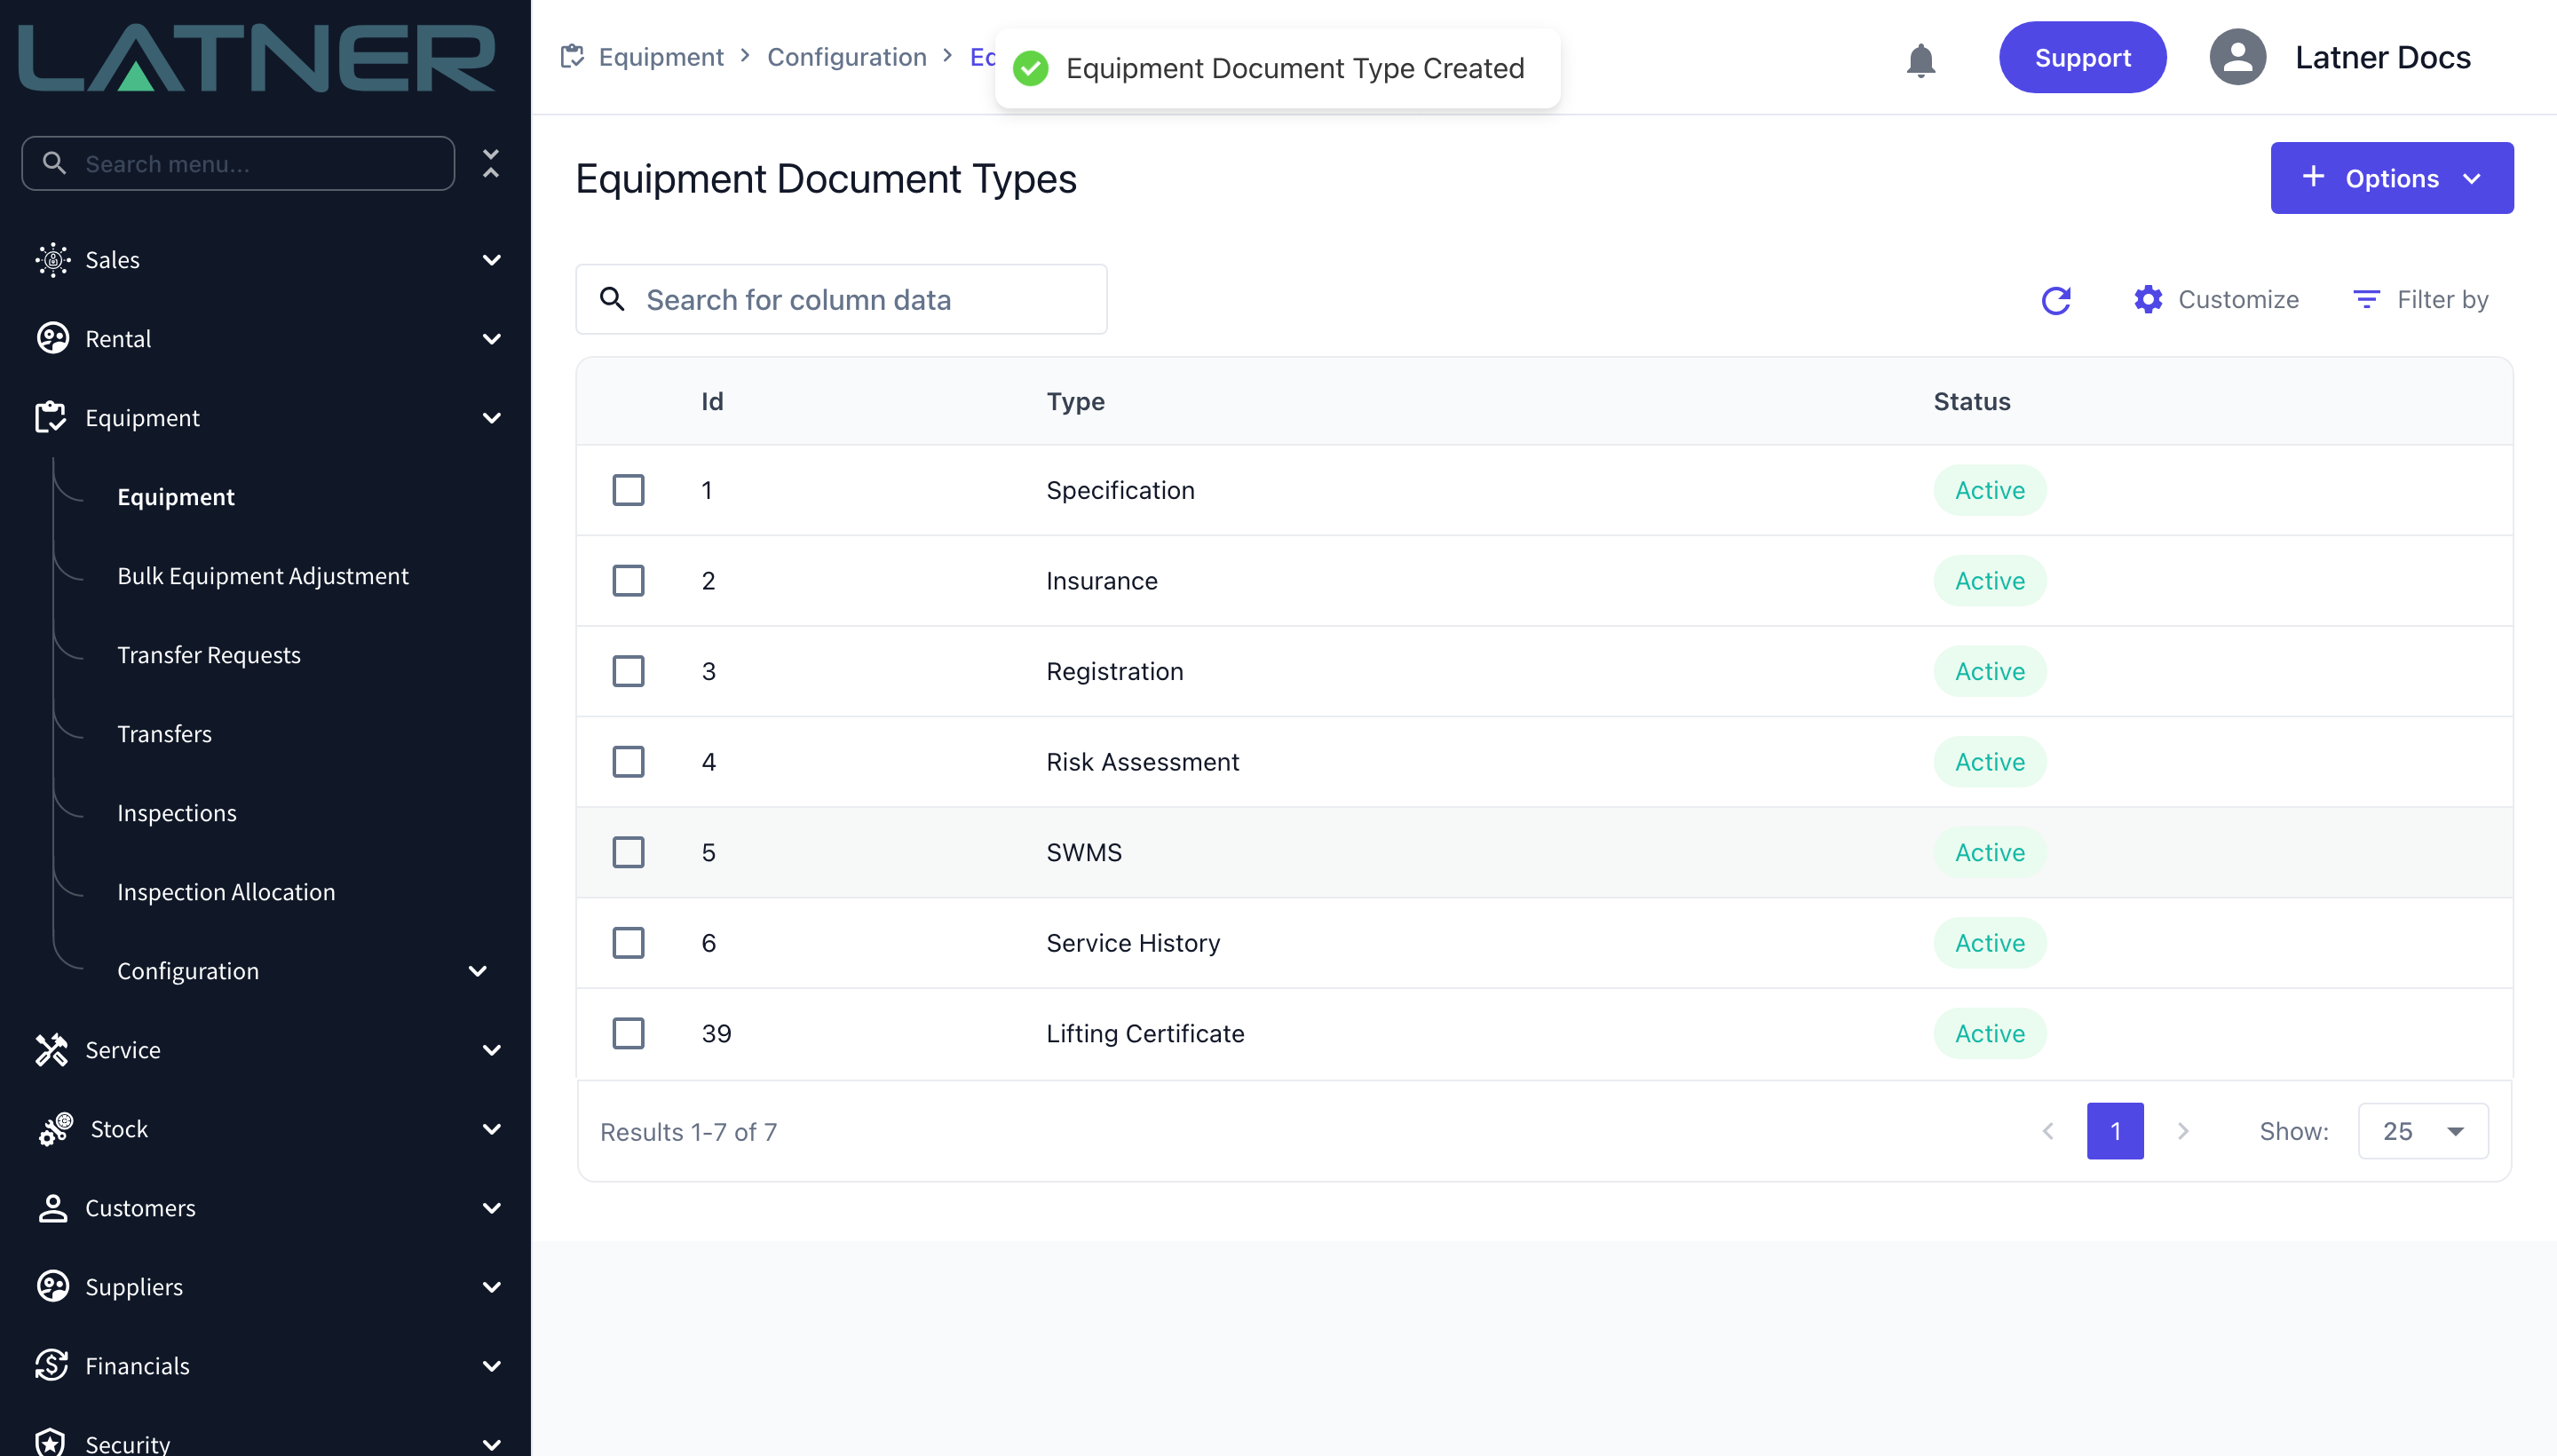
Select Save. The new type appears at the bottom of the list and is immediately available on every equipment record.
Adding the Document to the Equipment
Step 4 - Open the equipment record
Go to Equipment › Equipment and open the machine you want to attach the file to.
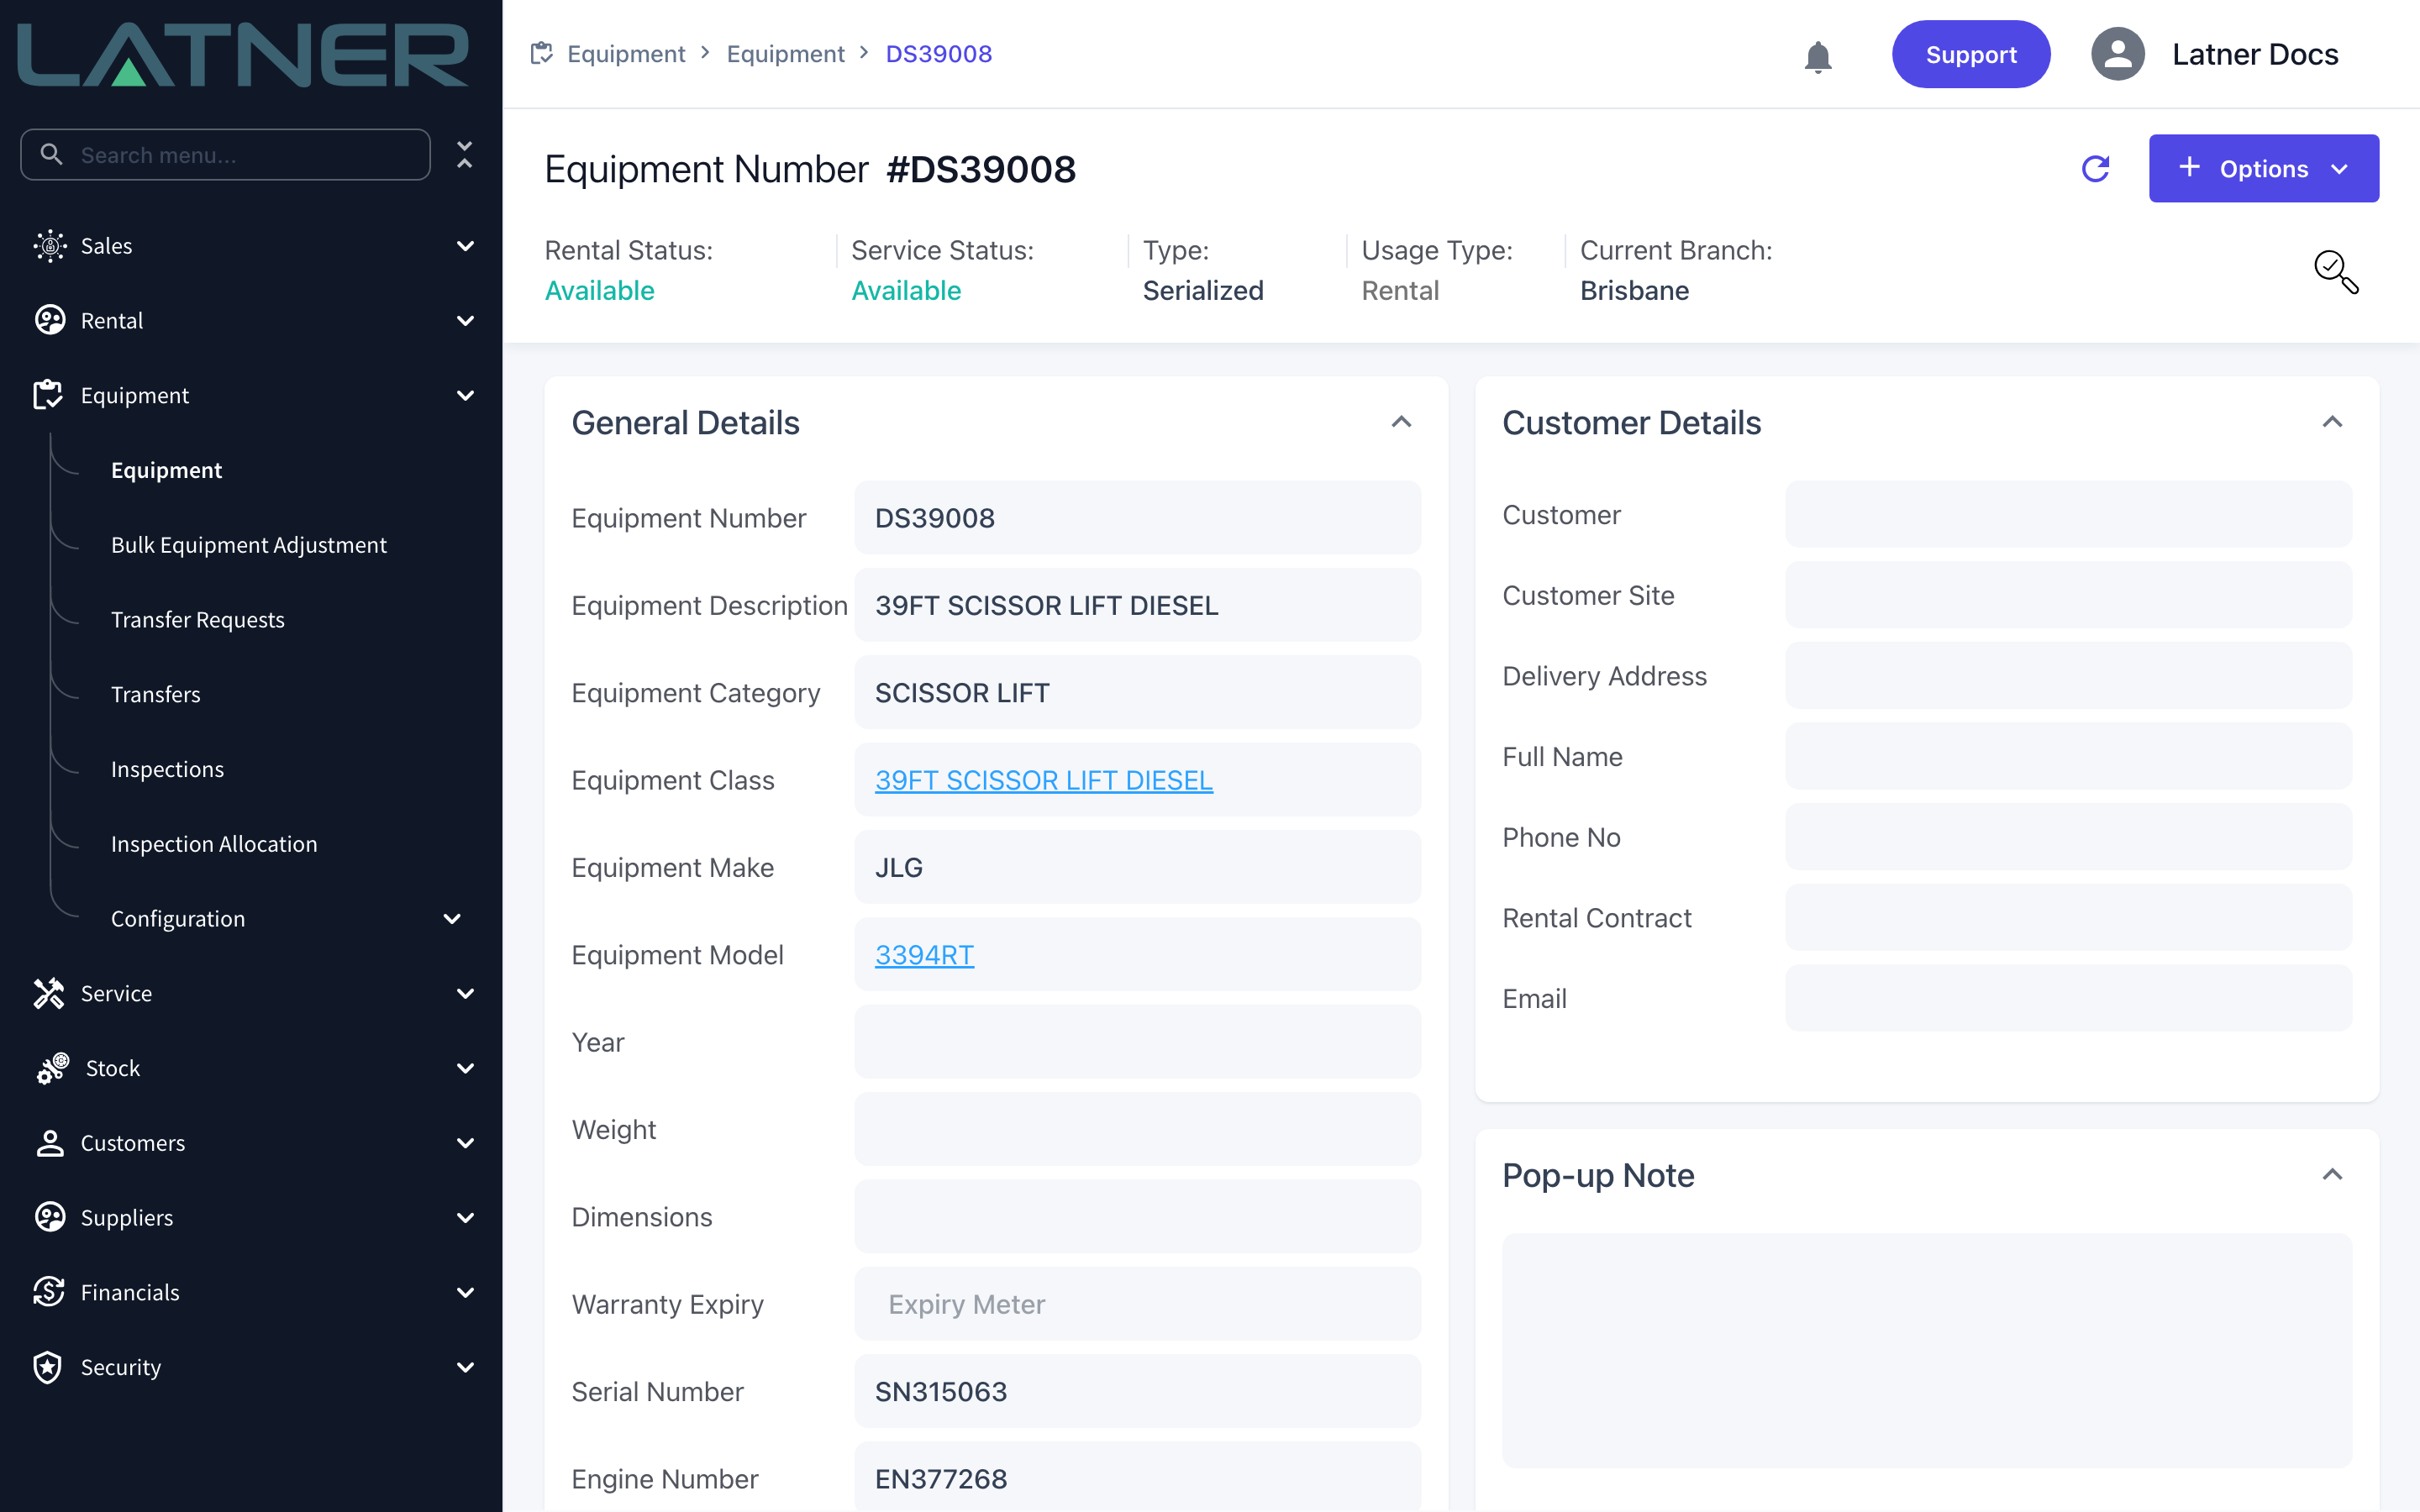
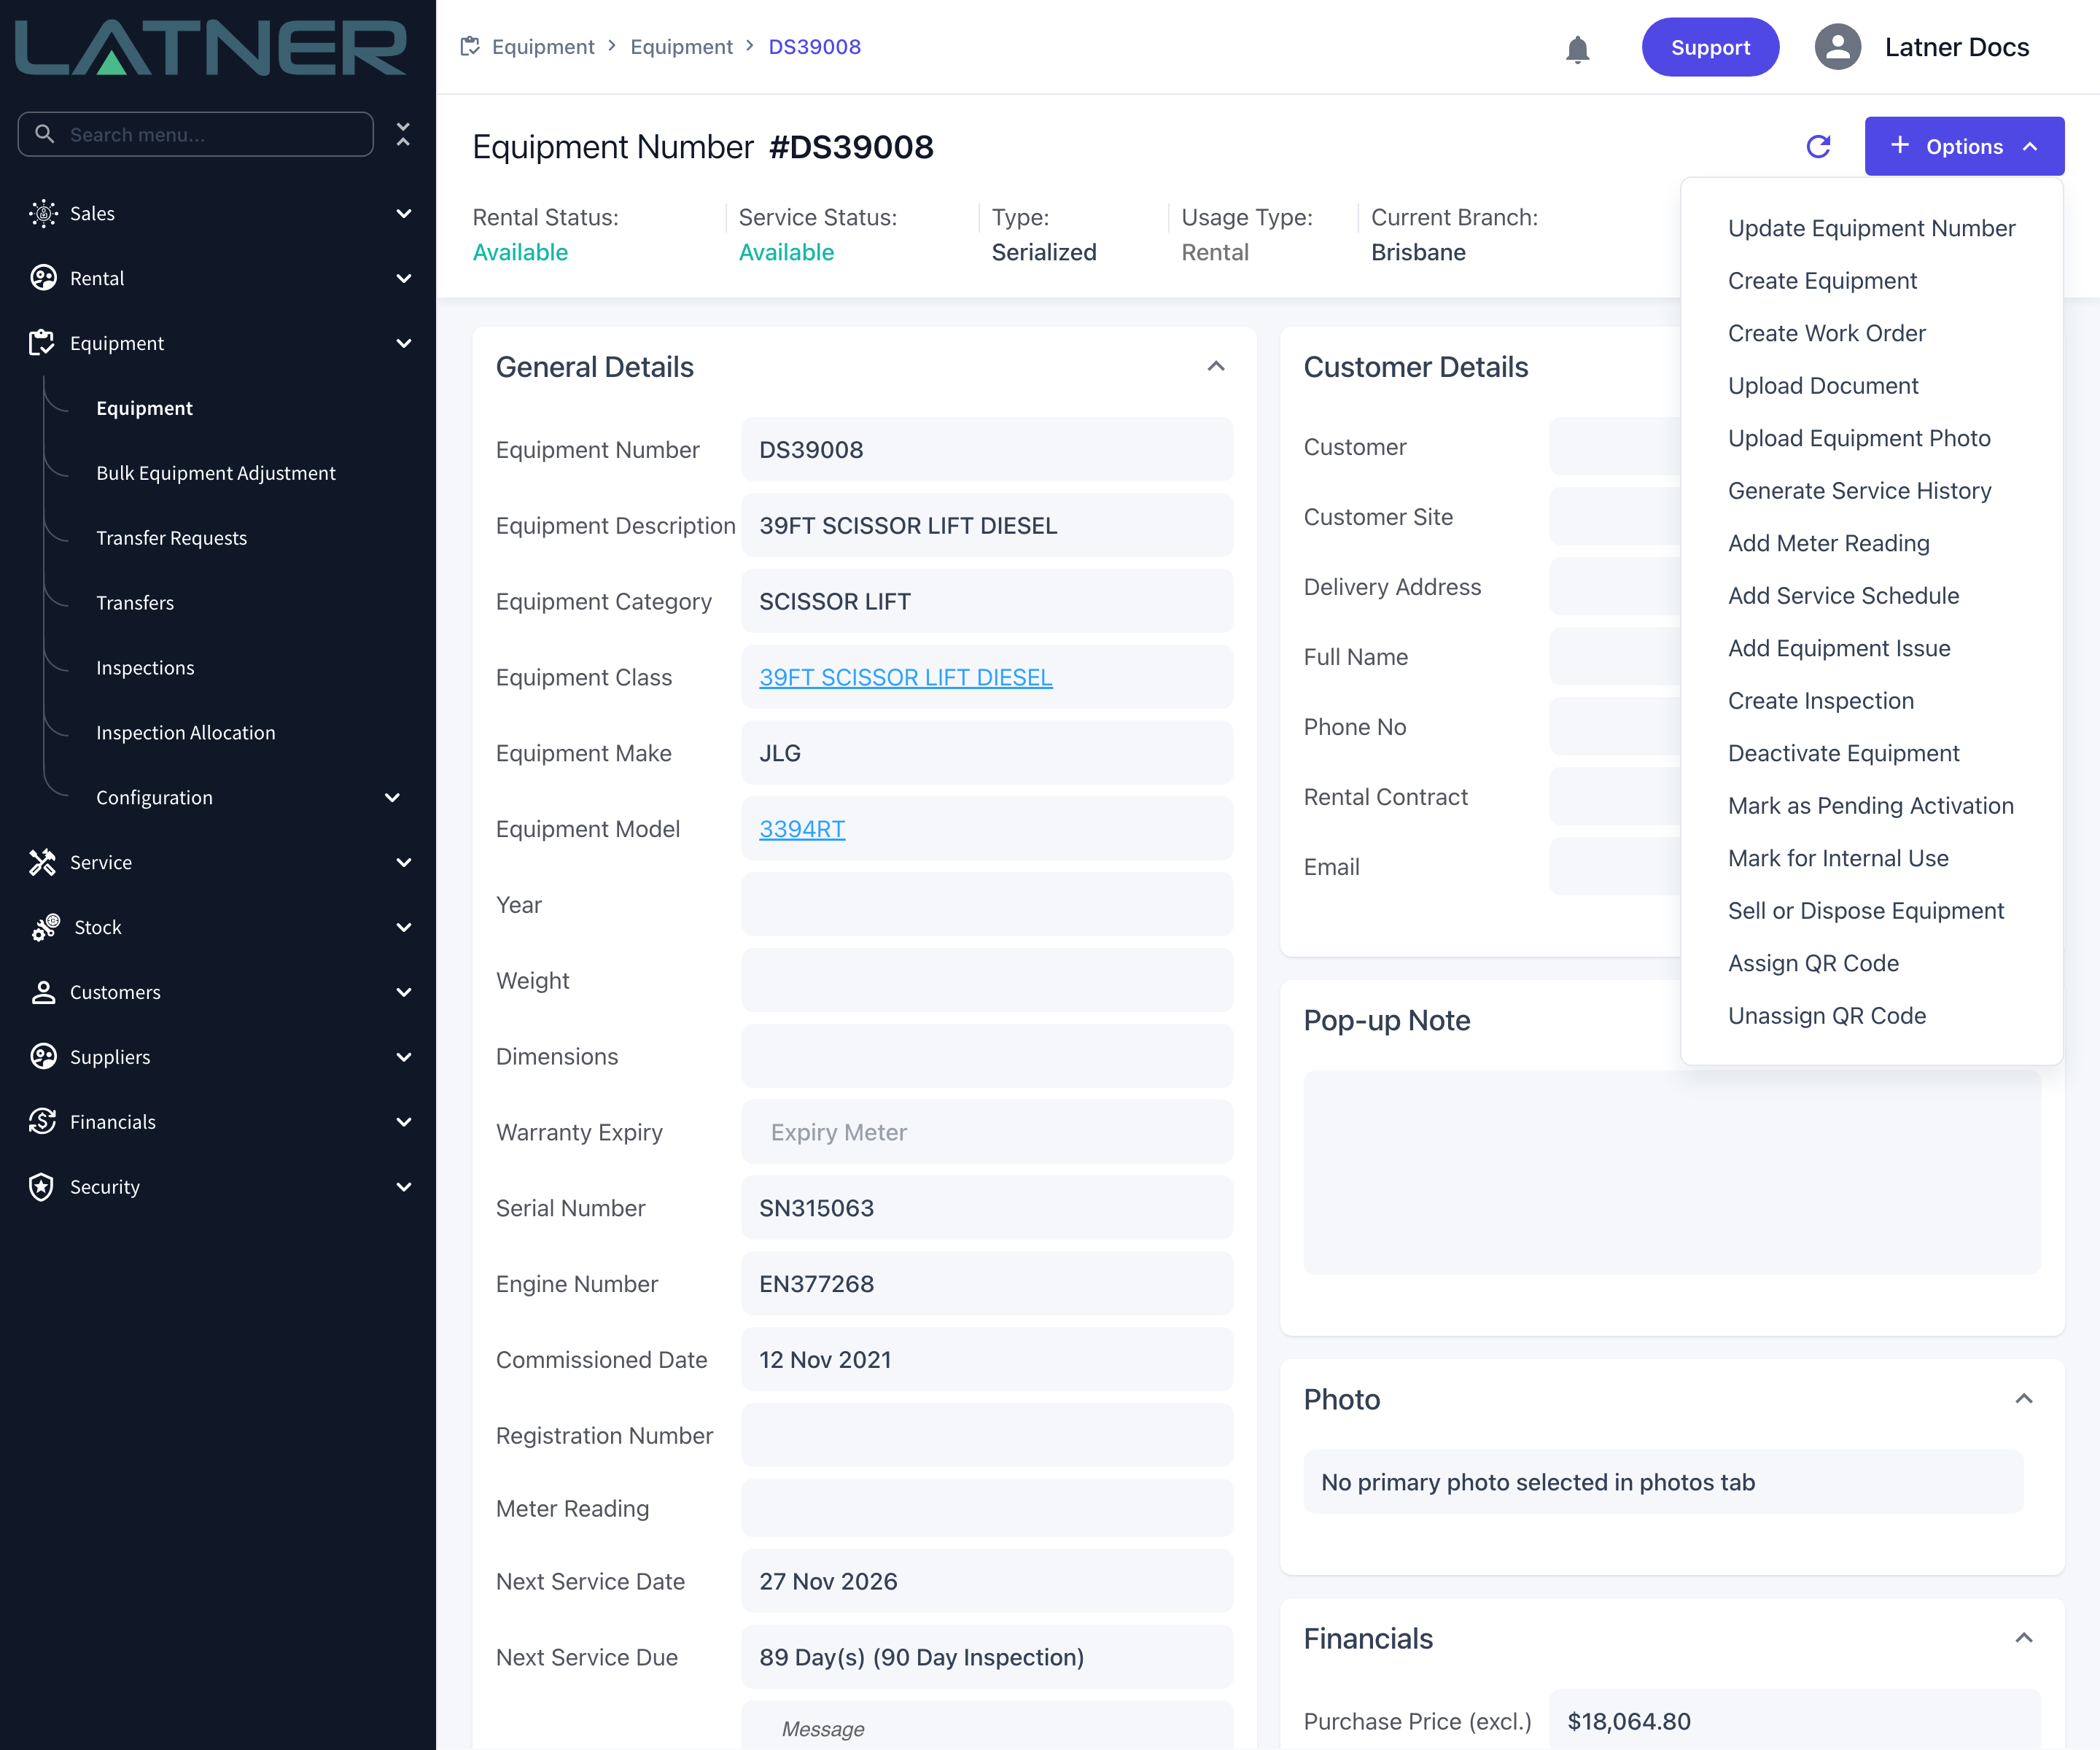
Step 5 - Choose Upload Document
Select Options › Upload Document.
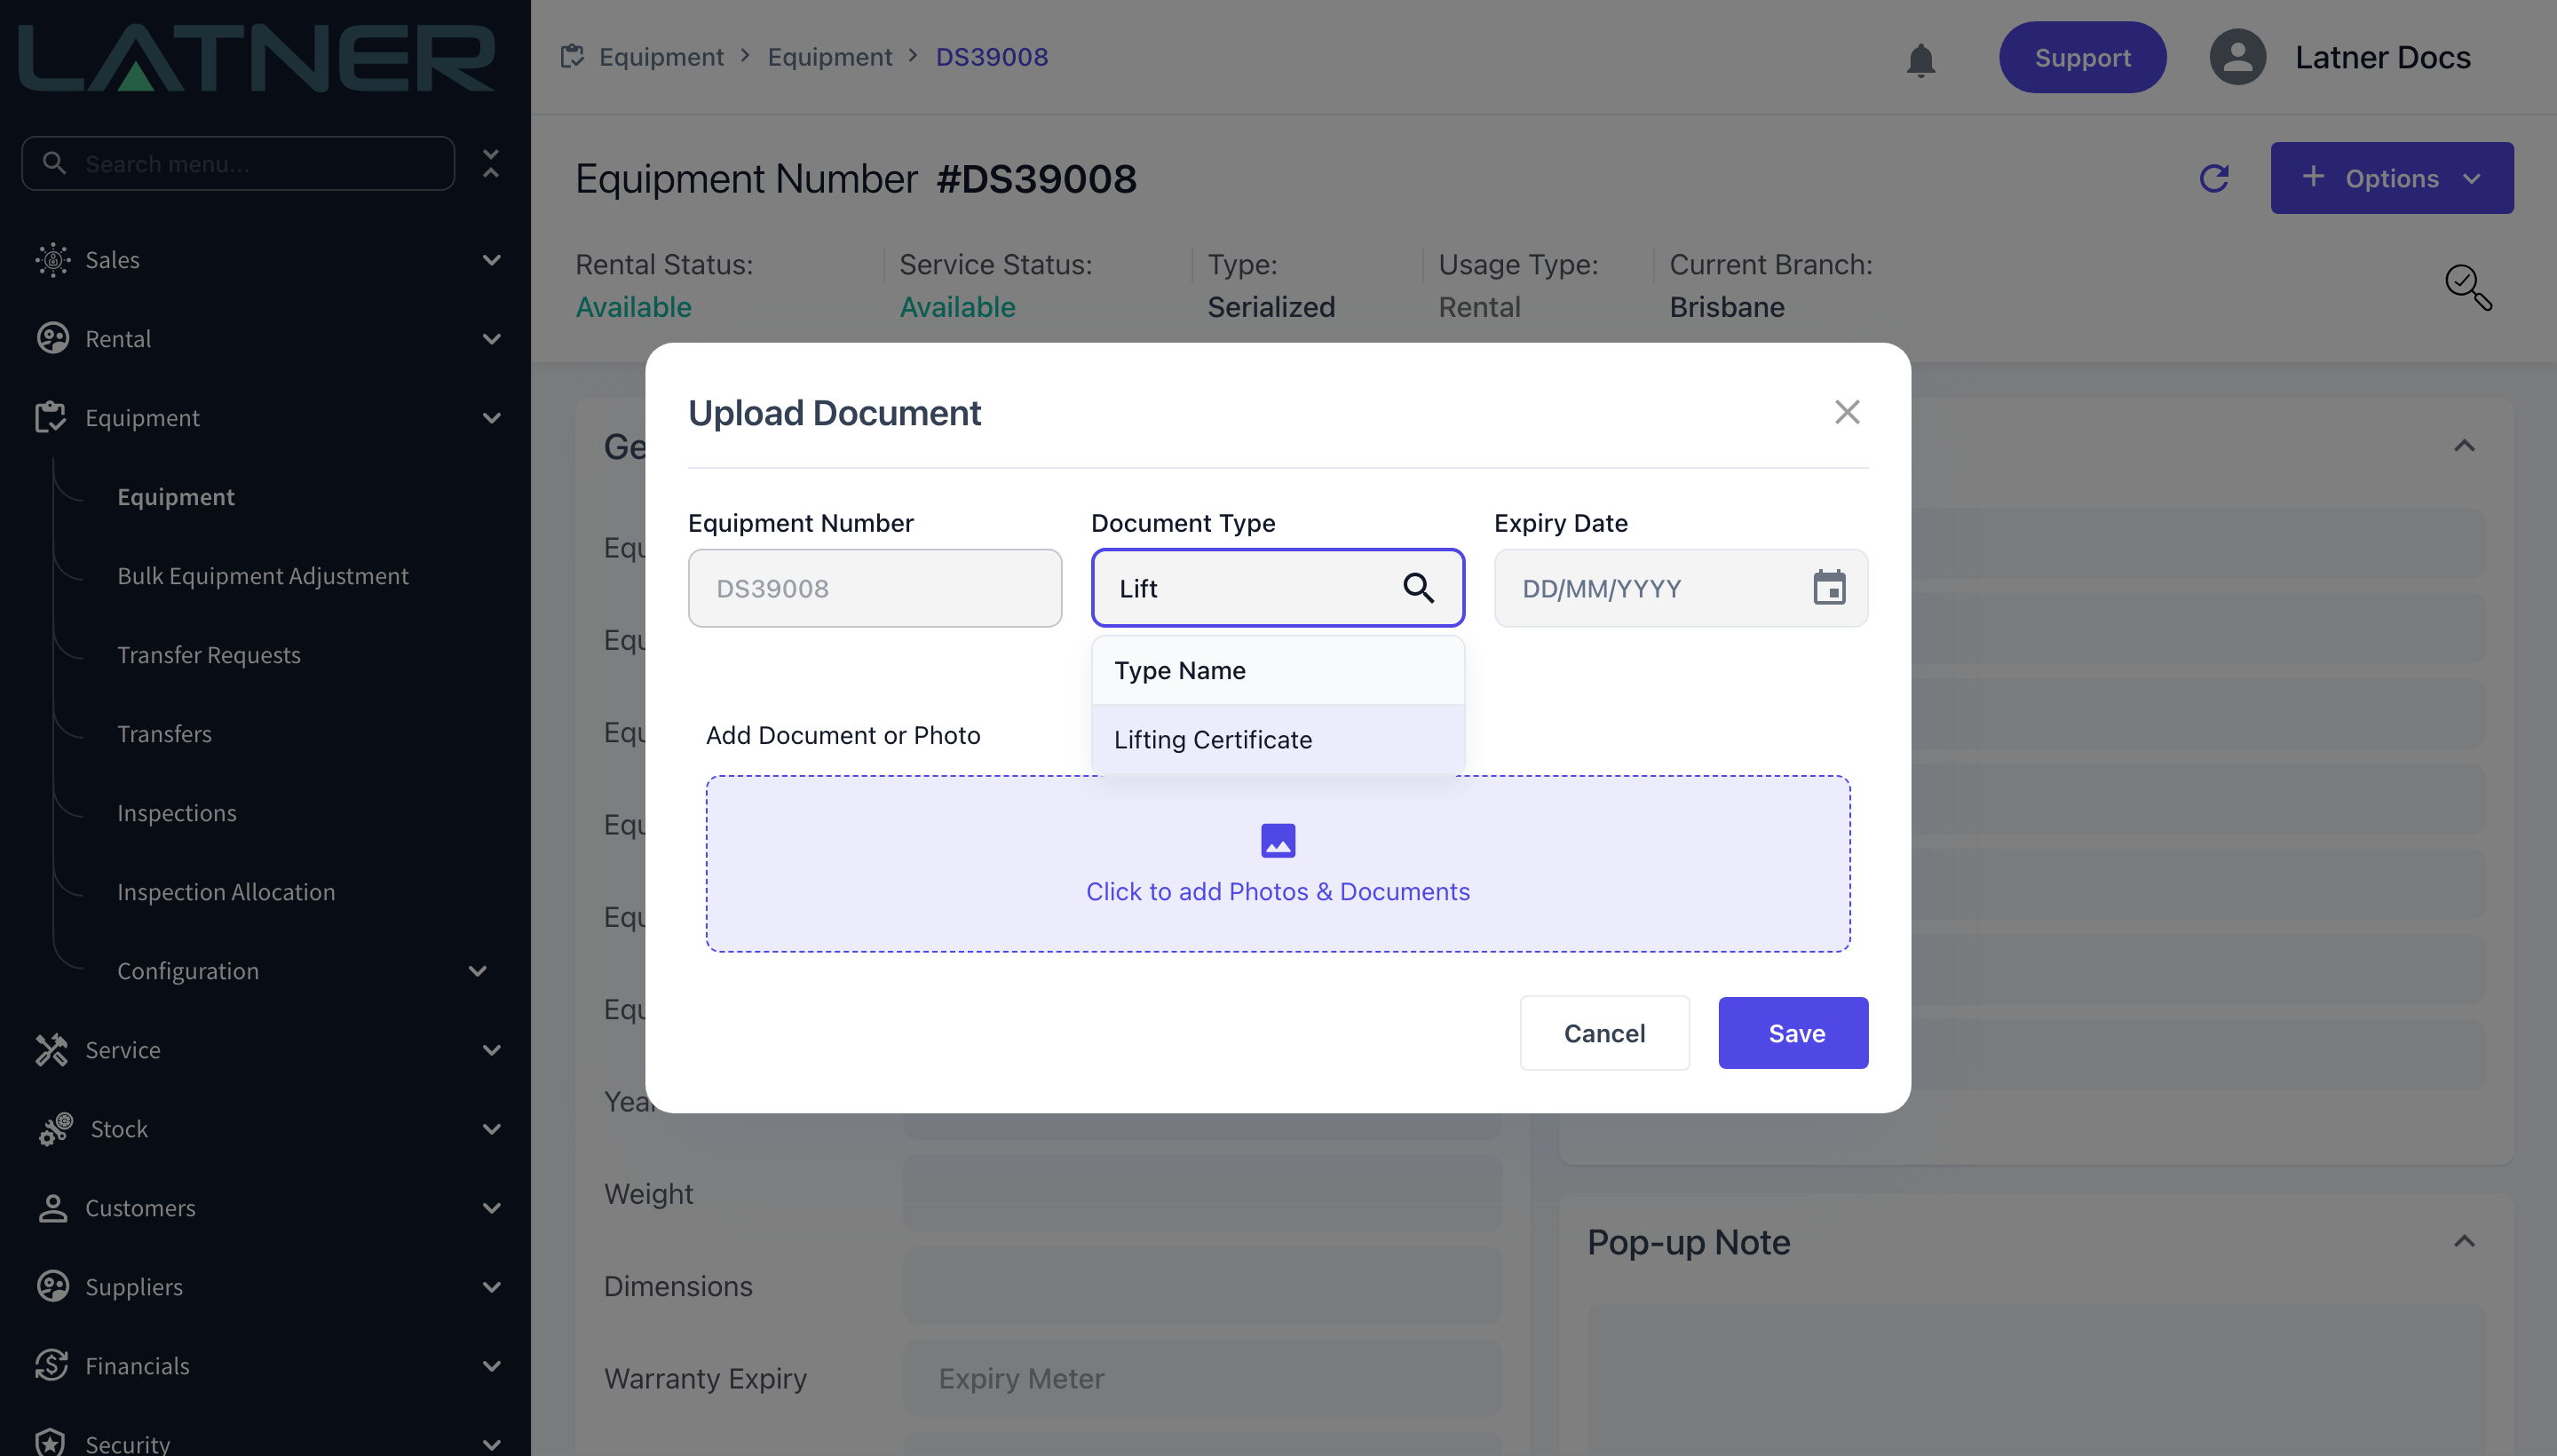
Step 6 - Pick the document type
Equipment Number is filled in for you and cannot be changed - it confirms which machine you are attaching the file to. In Document Type, start typing and select the type from the list.
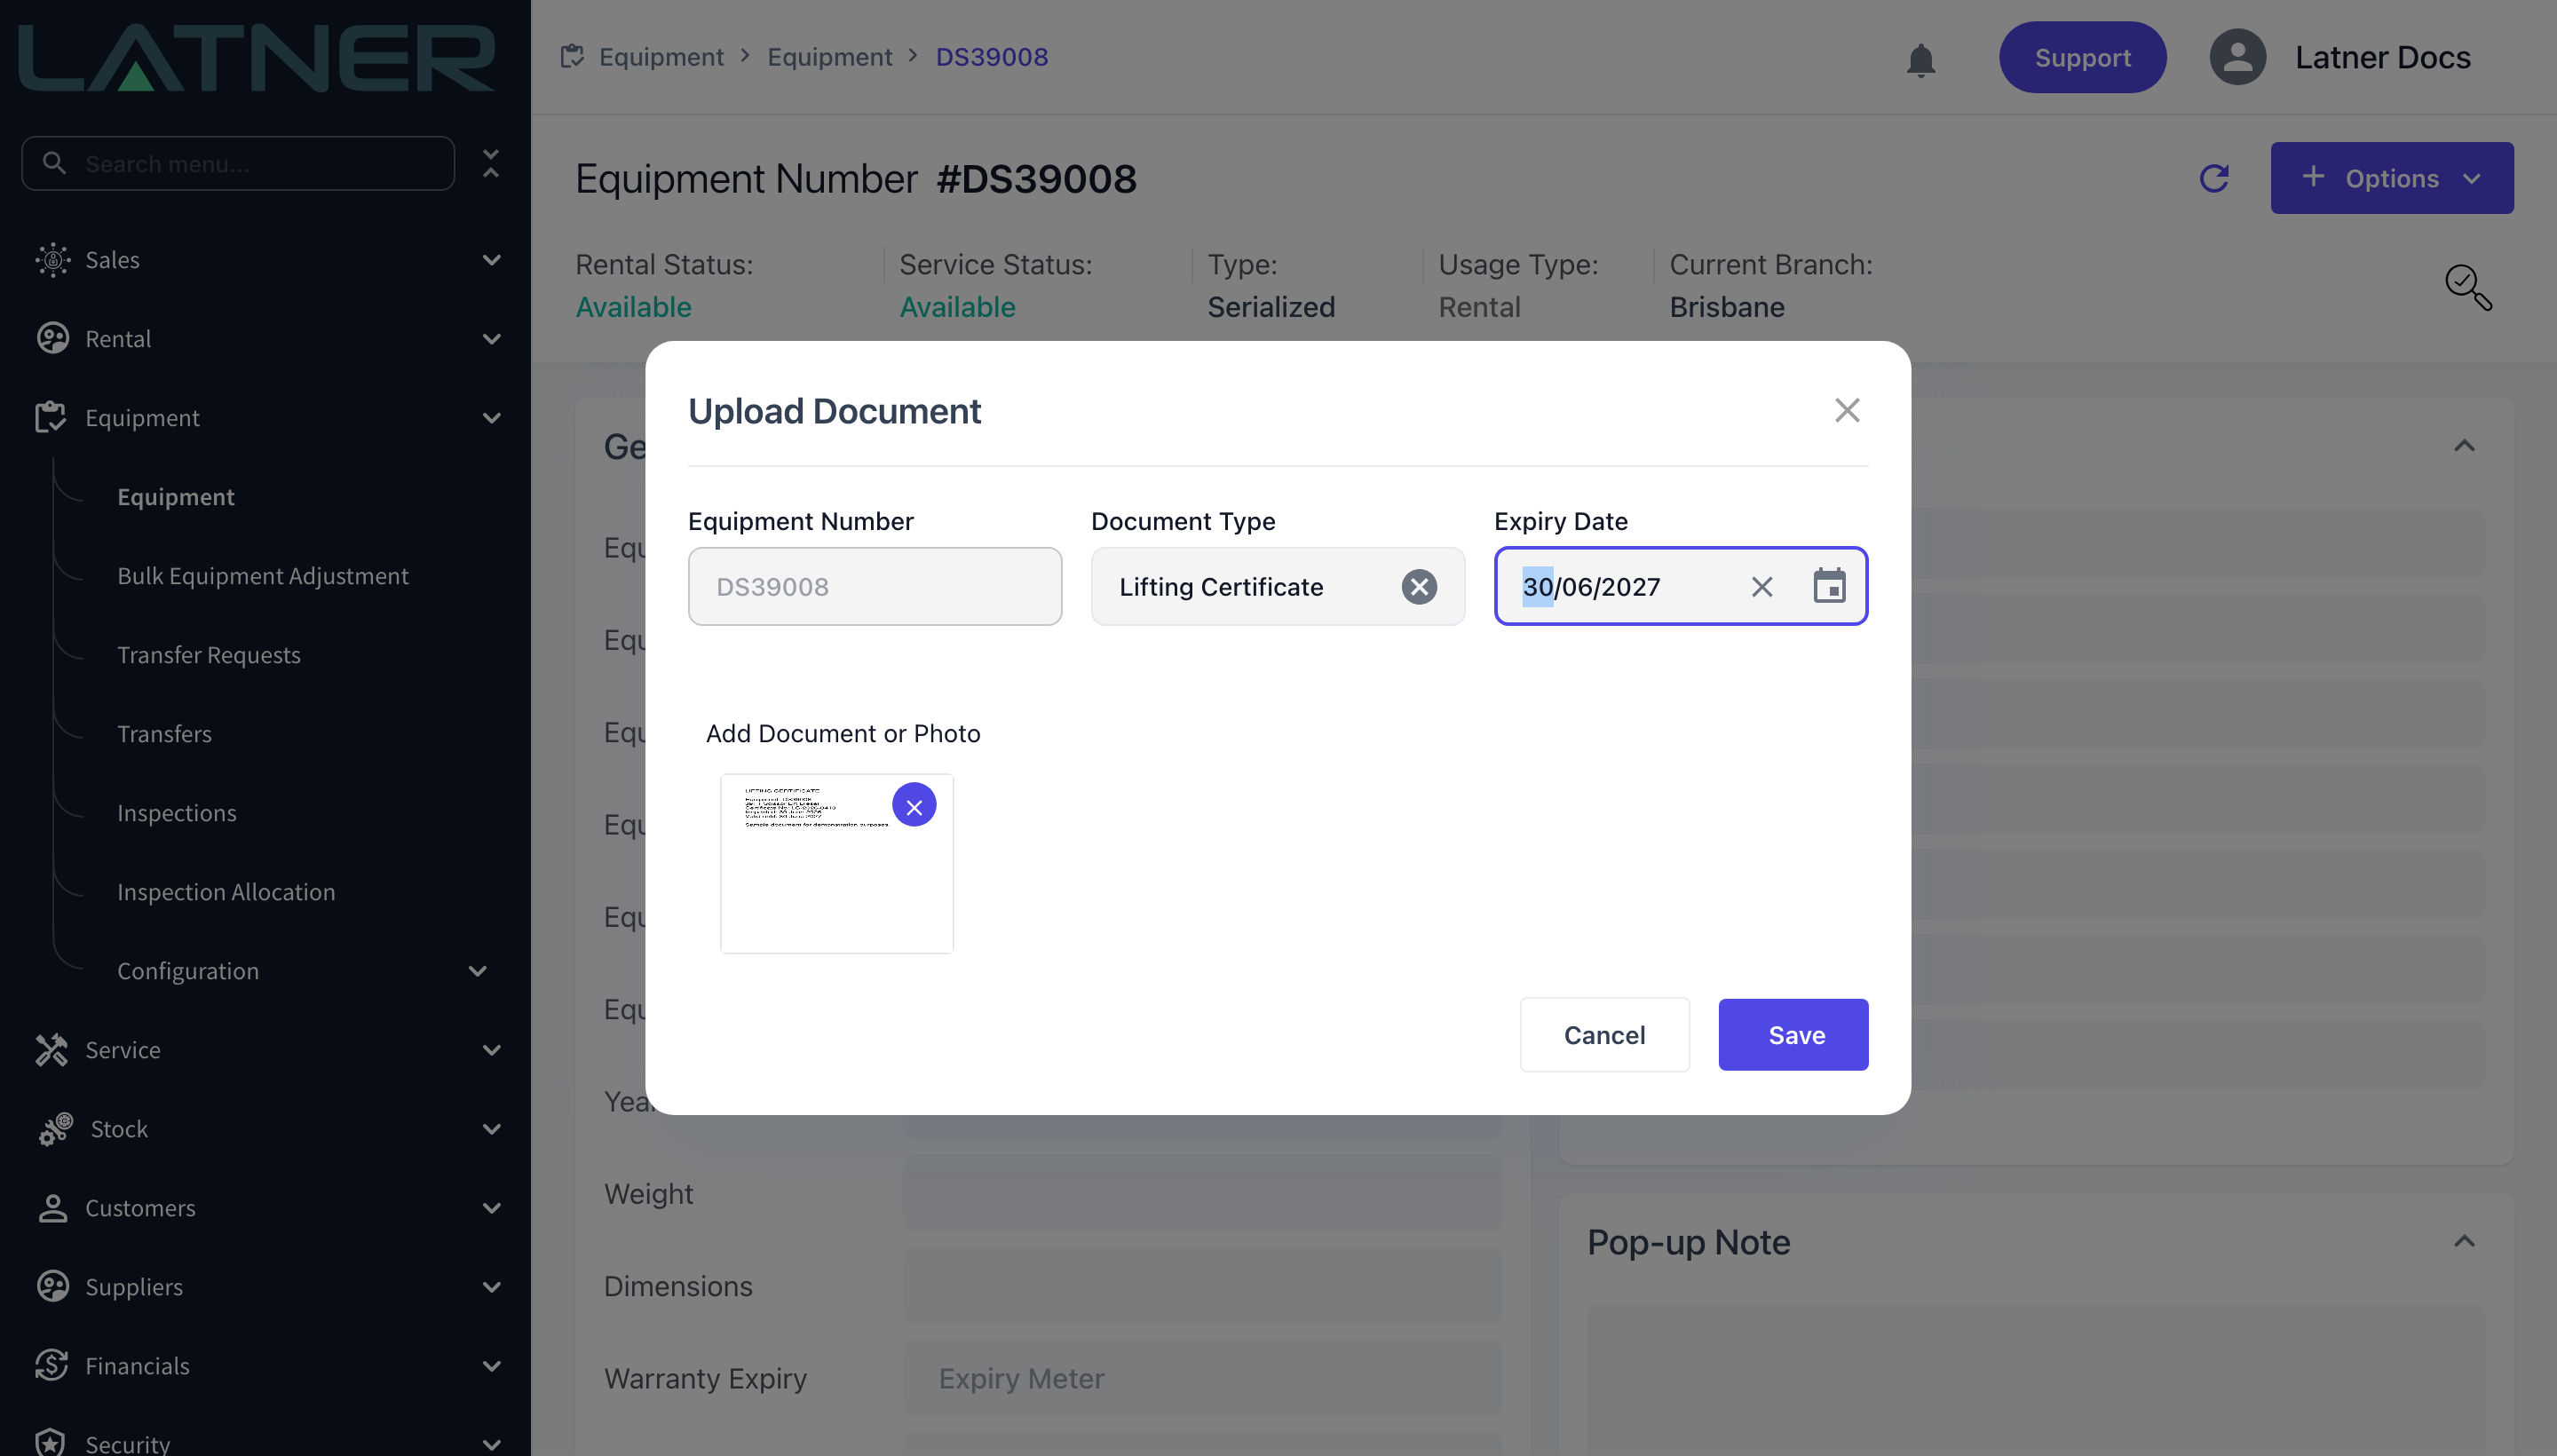
Step 7 - Set an expiry date and attach the file
Fill in the rest of the dialog.
-
Expiry Date - optional, in DD/MM/YYYY format. Set it for anything that lapses (registration, insurance, certification) and leave it blank for reference documents such as a specification sheet.
-
Add Document or Photo - select Click to add Photos & Documents and choose the file. One file per document line.
Step 8 - Save
Select Save. Latner confirms with a Document Uploaded message and the file appears on the Documents tab of the equipment record.
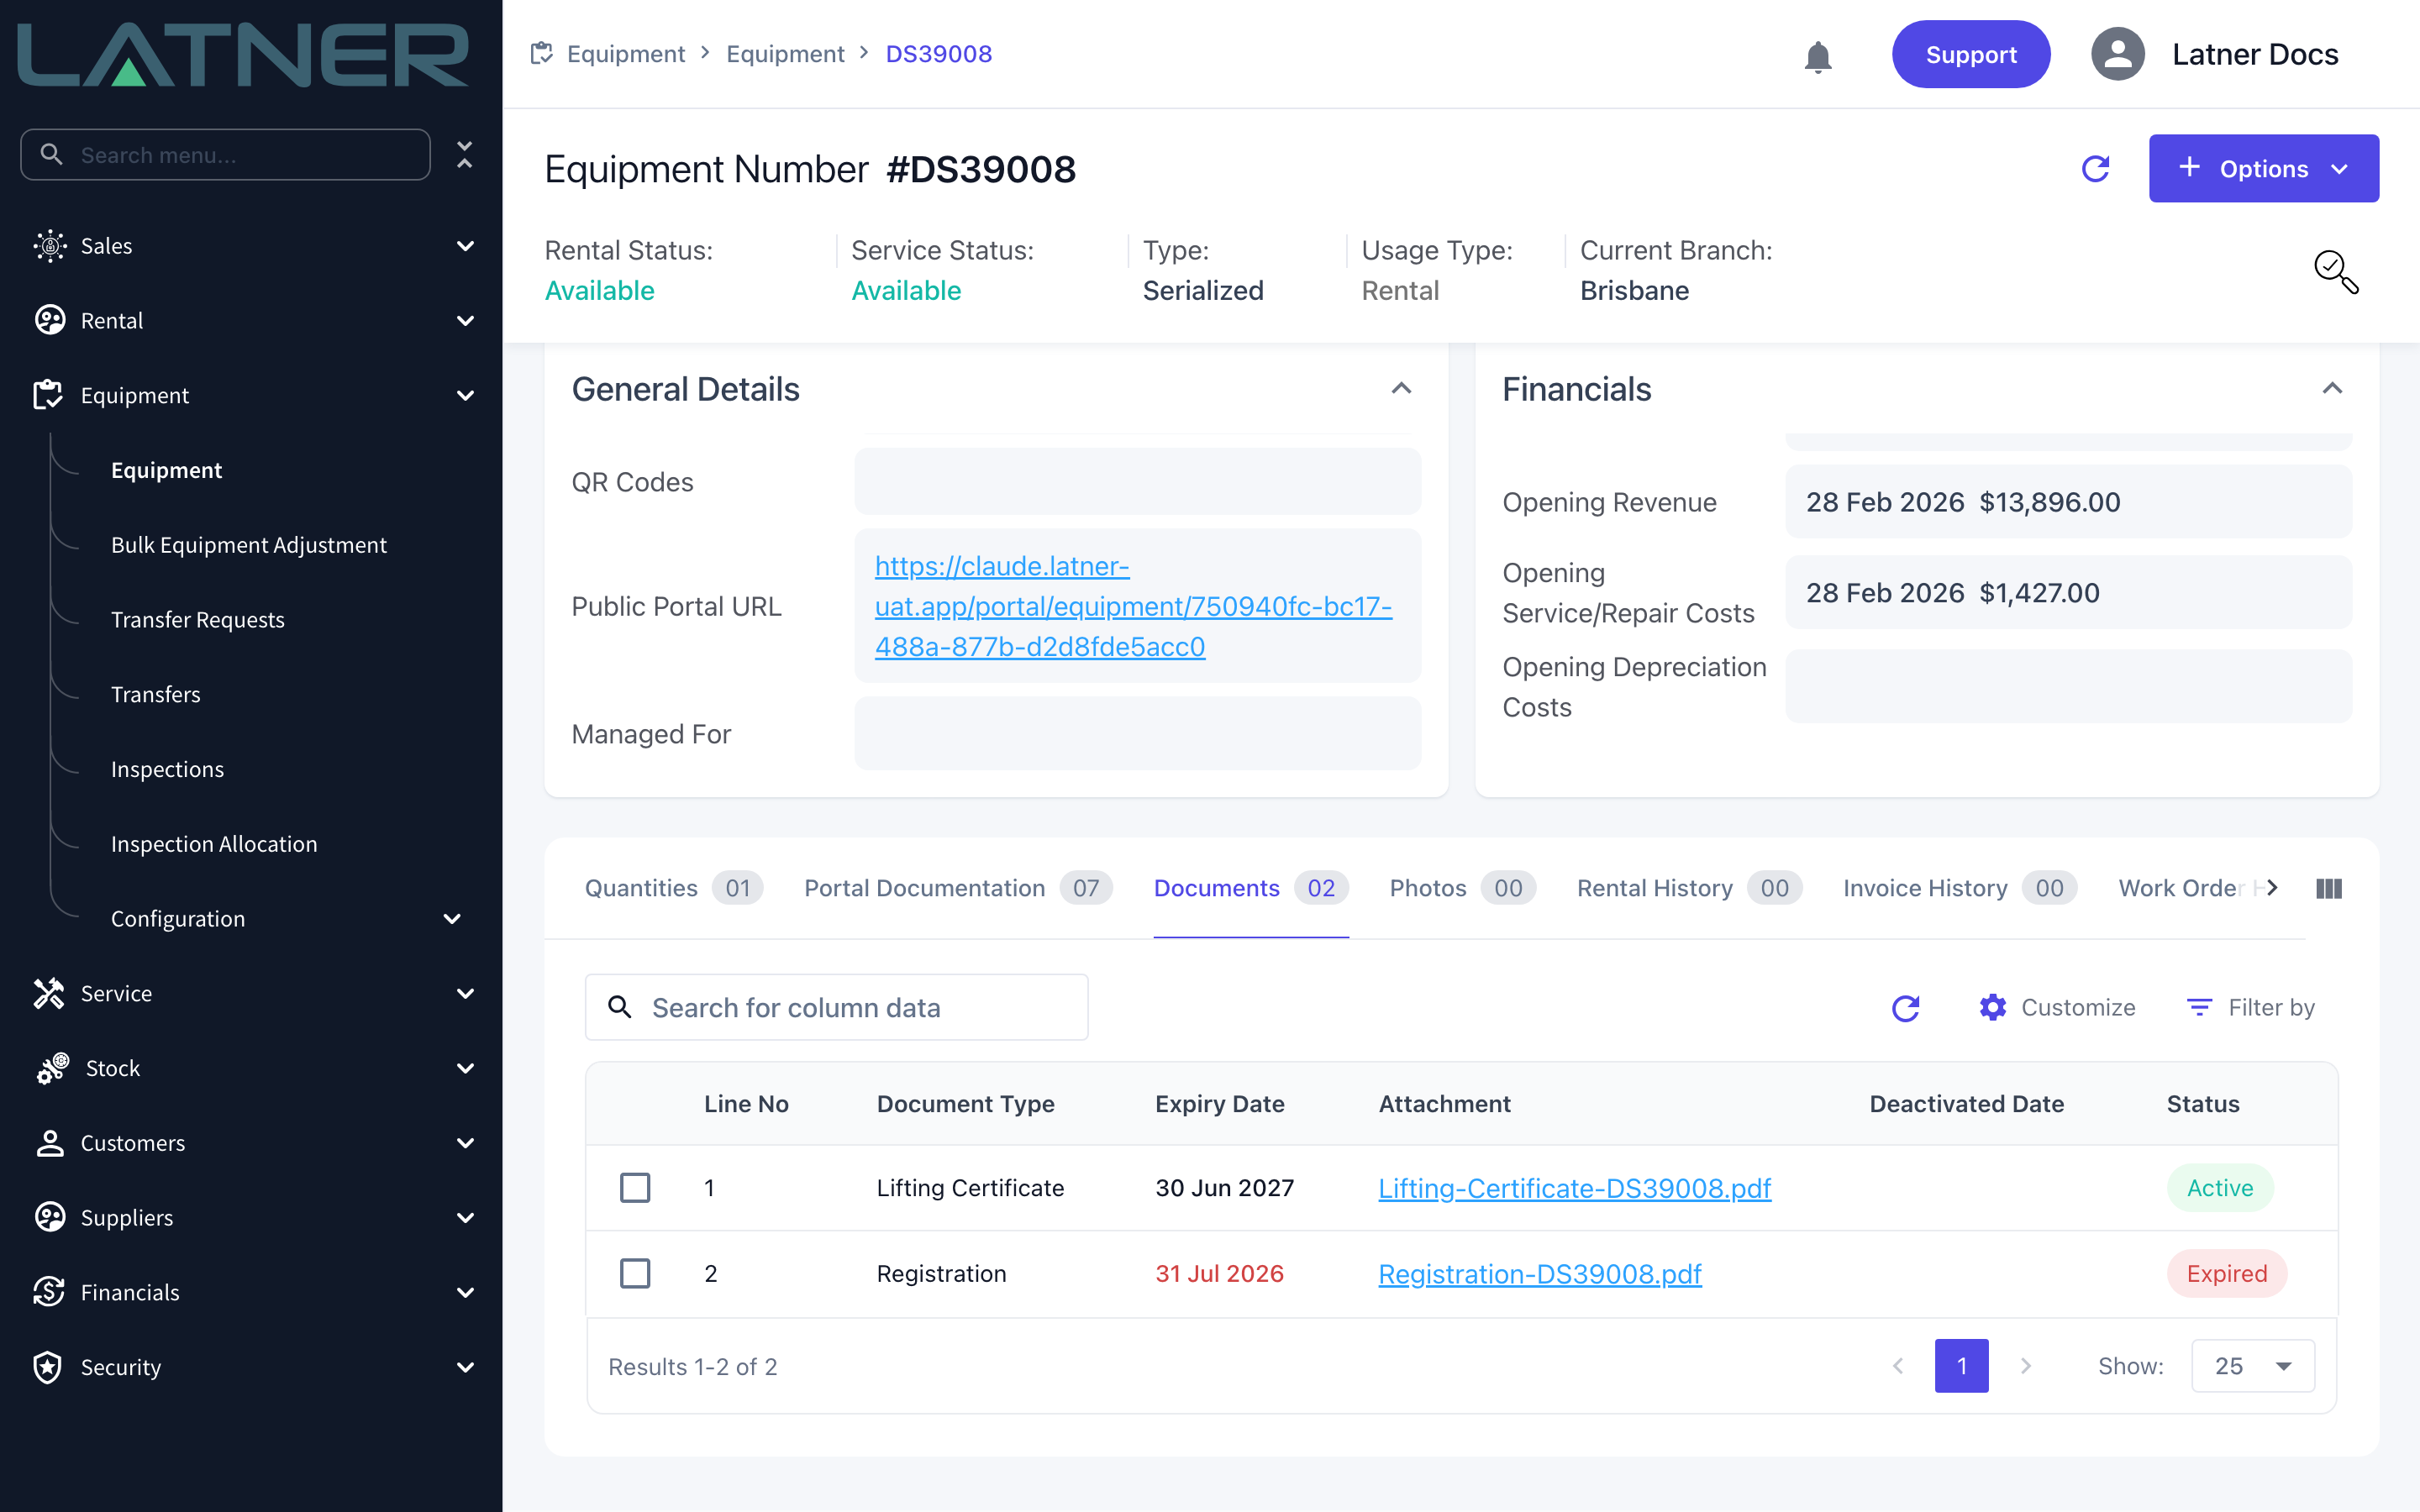
You can skip the Options menu entirely: drag a file onto the Documents tab and Latner opens the same dialog with the file already attached, so you only have to pick the type and the expiry date.
After Uploading
-
The document is listed on the equipment's Documents tab with its line number, type, expiry date, attachment link and status. Select the file name to open it.
-
Status is worked out for you: Active for a current document, Expired once the expiry date is today or earlier, and Inactive once the document has been deactivated.
-
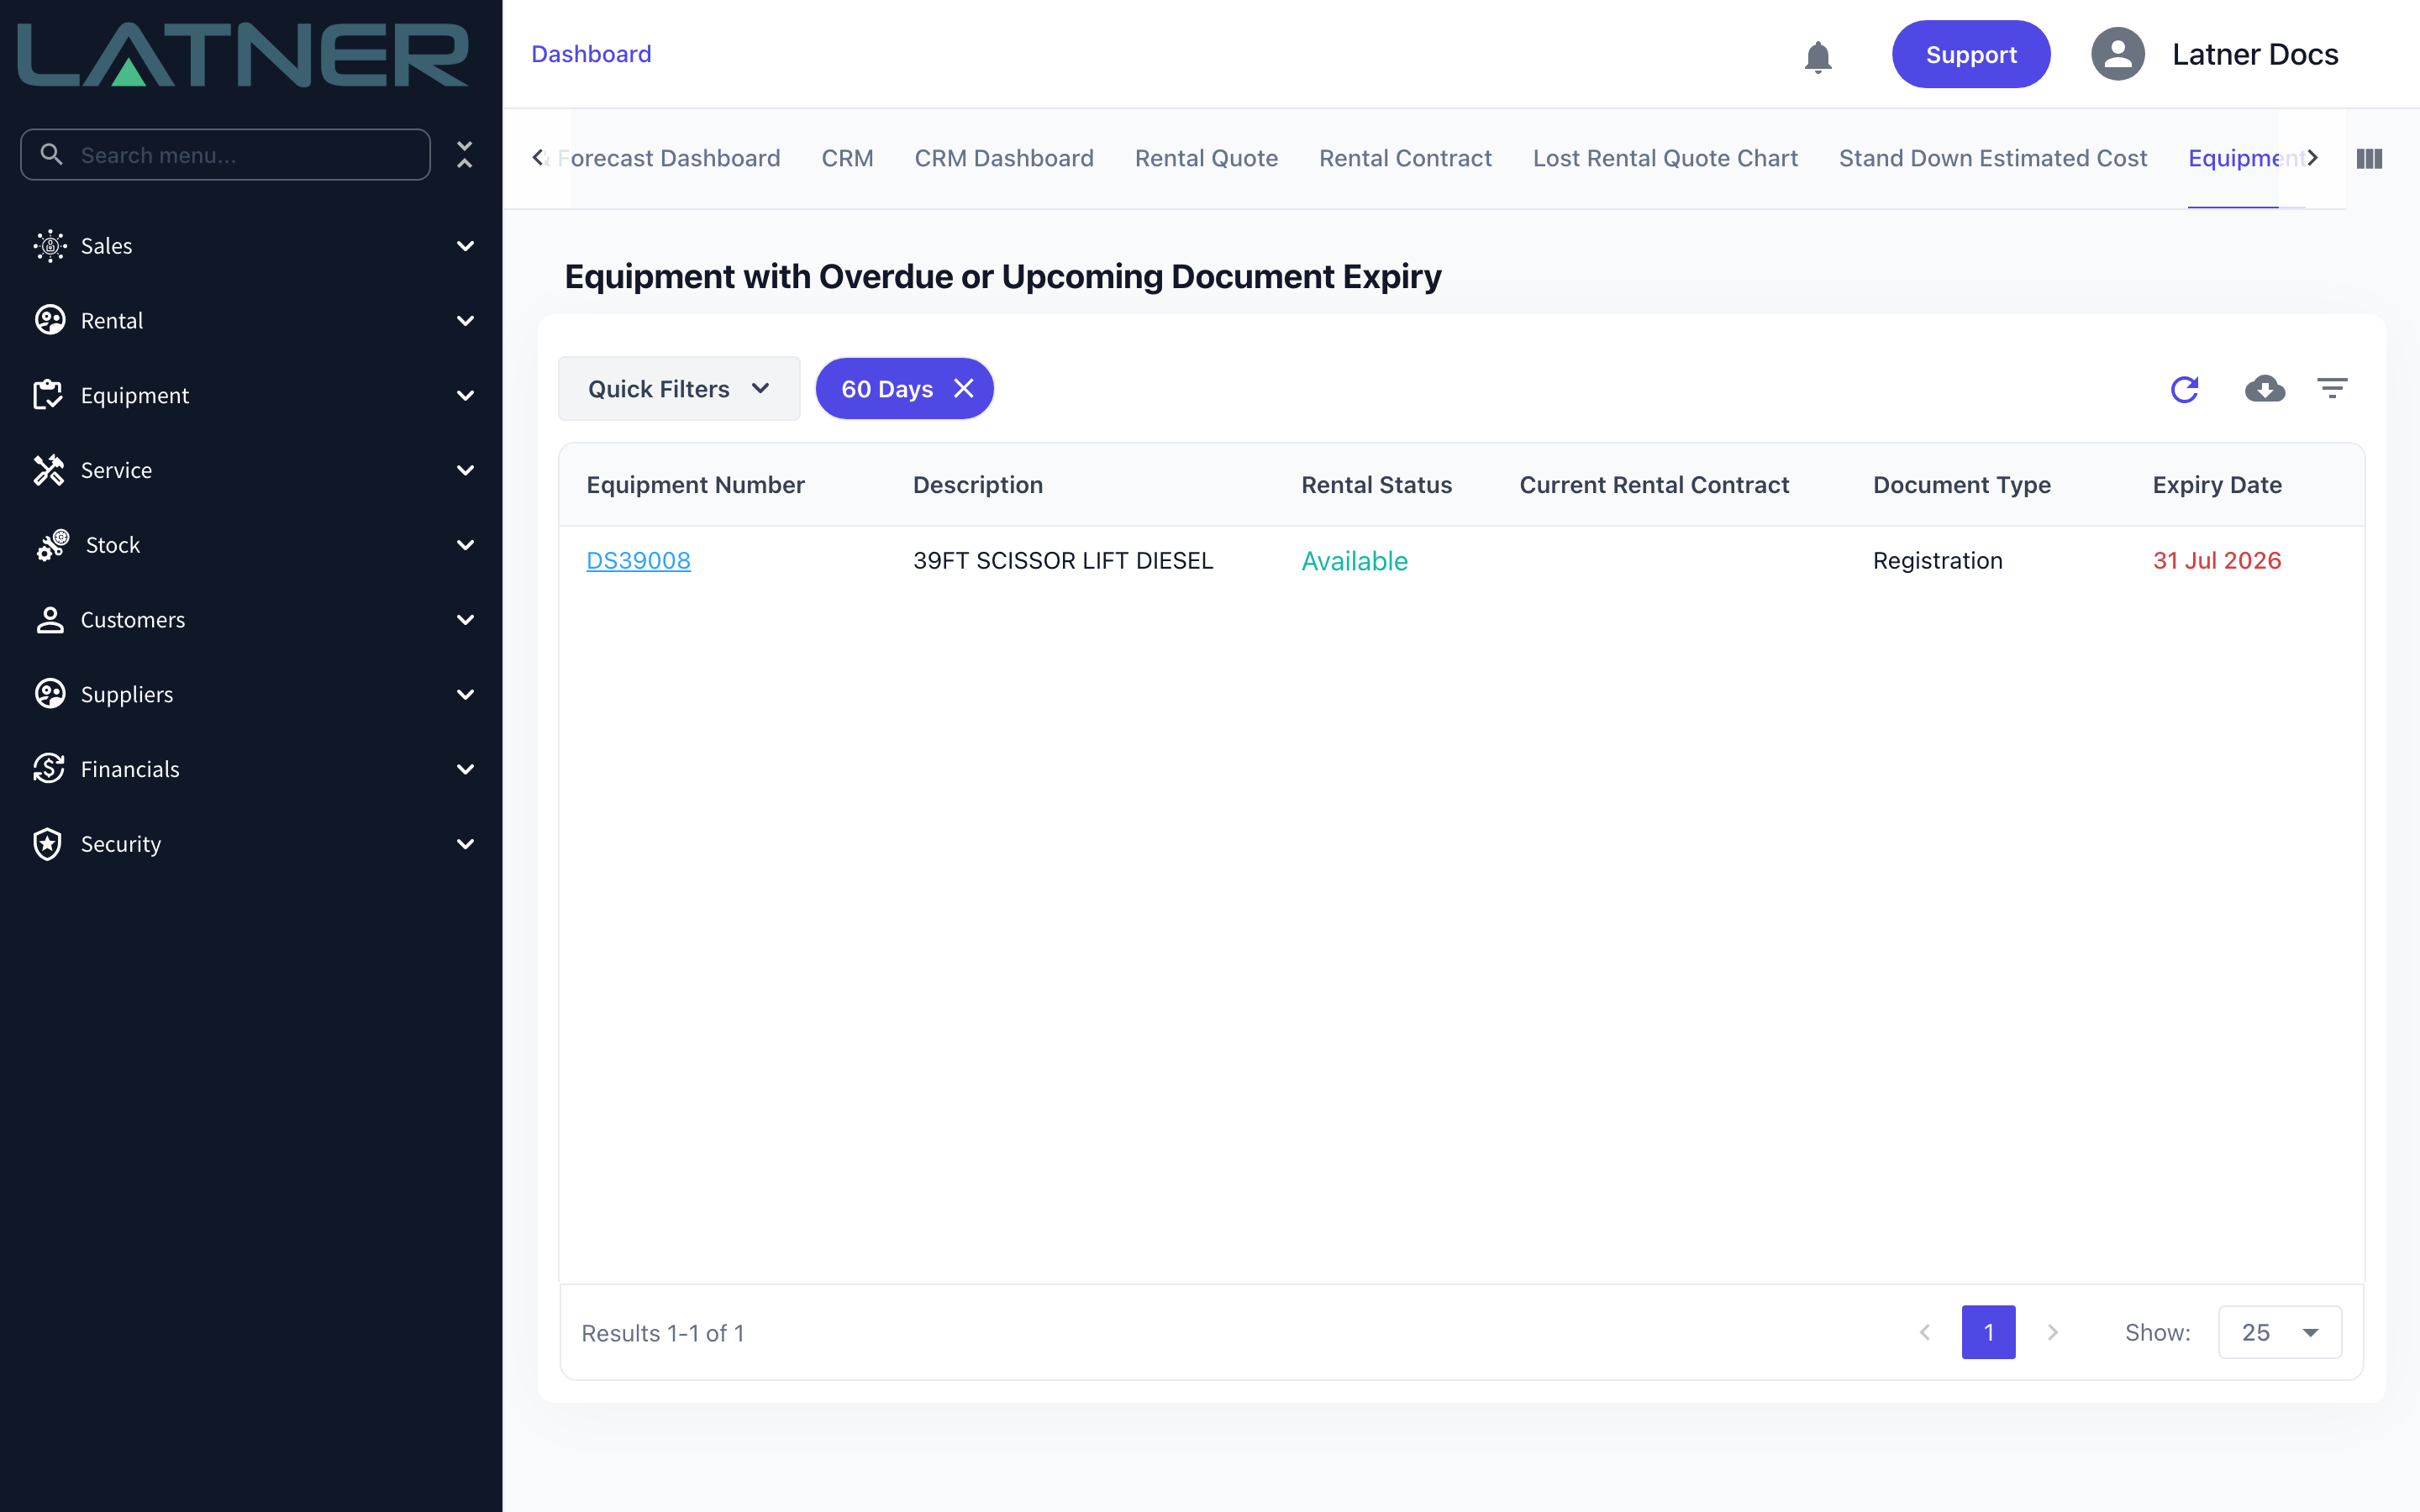
Equipment with a document expiring soon (or already expired) is listed on Dashboard › Equipment under Equipment with Overdue or Upcoming Document Expiry, with quick filters for 60 Days, 90 Days, Registration, Internal Equipment and On Rent.
-
That dashboard shows only the latest document of each type per machine, ignores deactivated documents, and leaves out equipment that is Inactive, Sold, Disposed, Converted or Pending Activation.
-
To take a document out of circulation, tick its row on the Documents tab and select the Deactivate Document icon. The row stays, with a deactivated date and a status of Inactive.
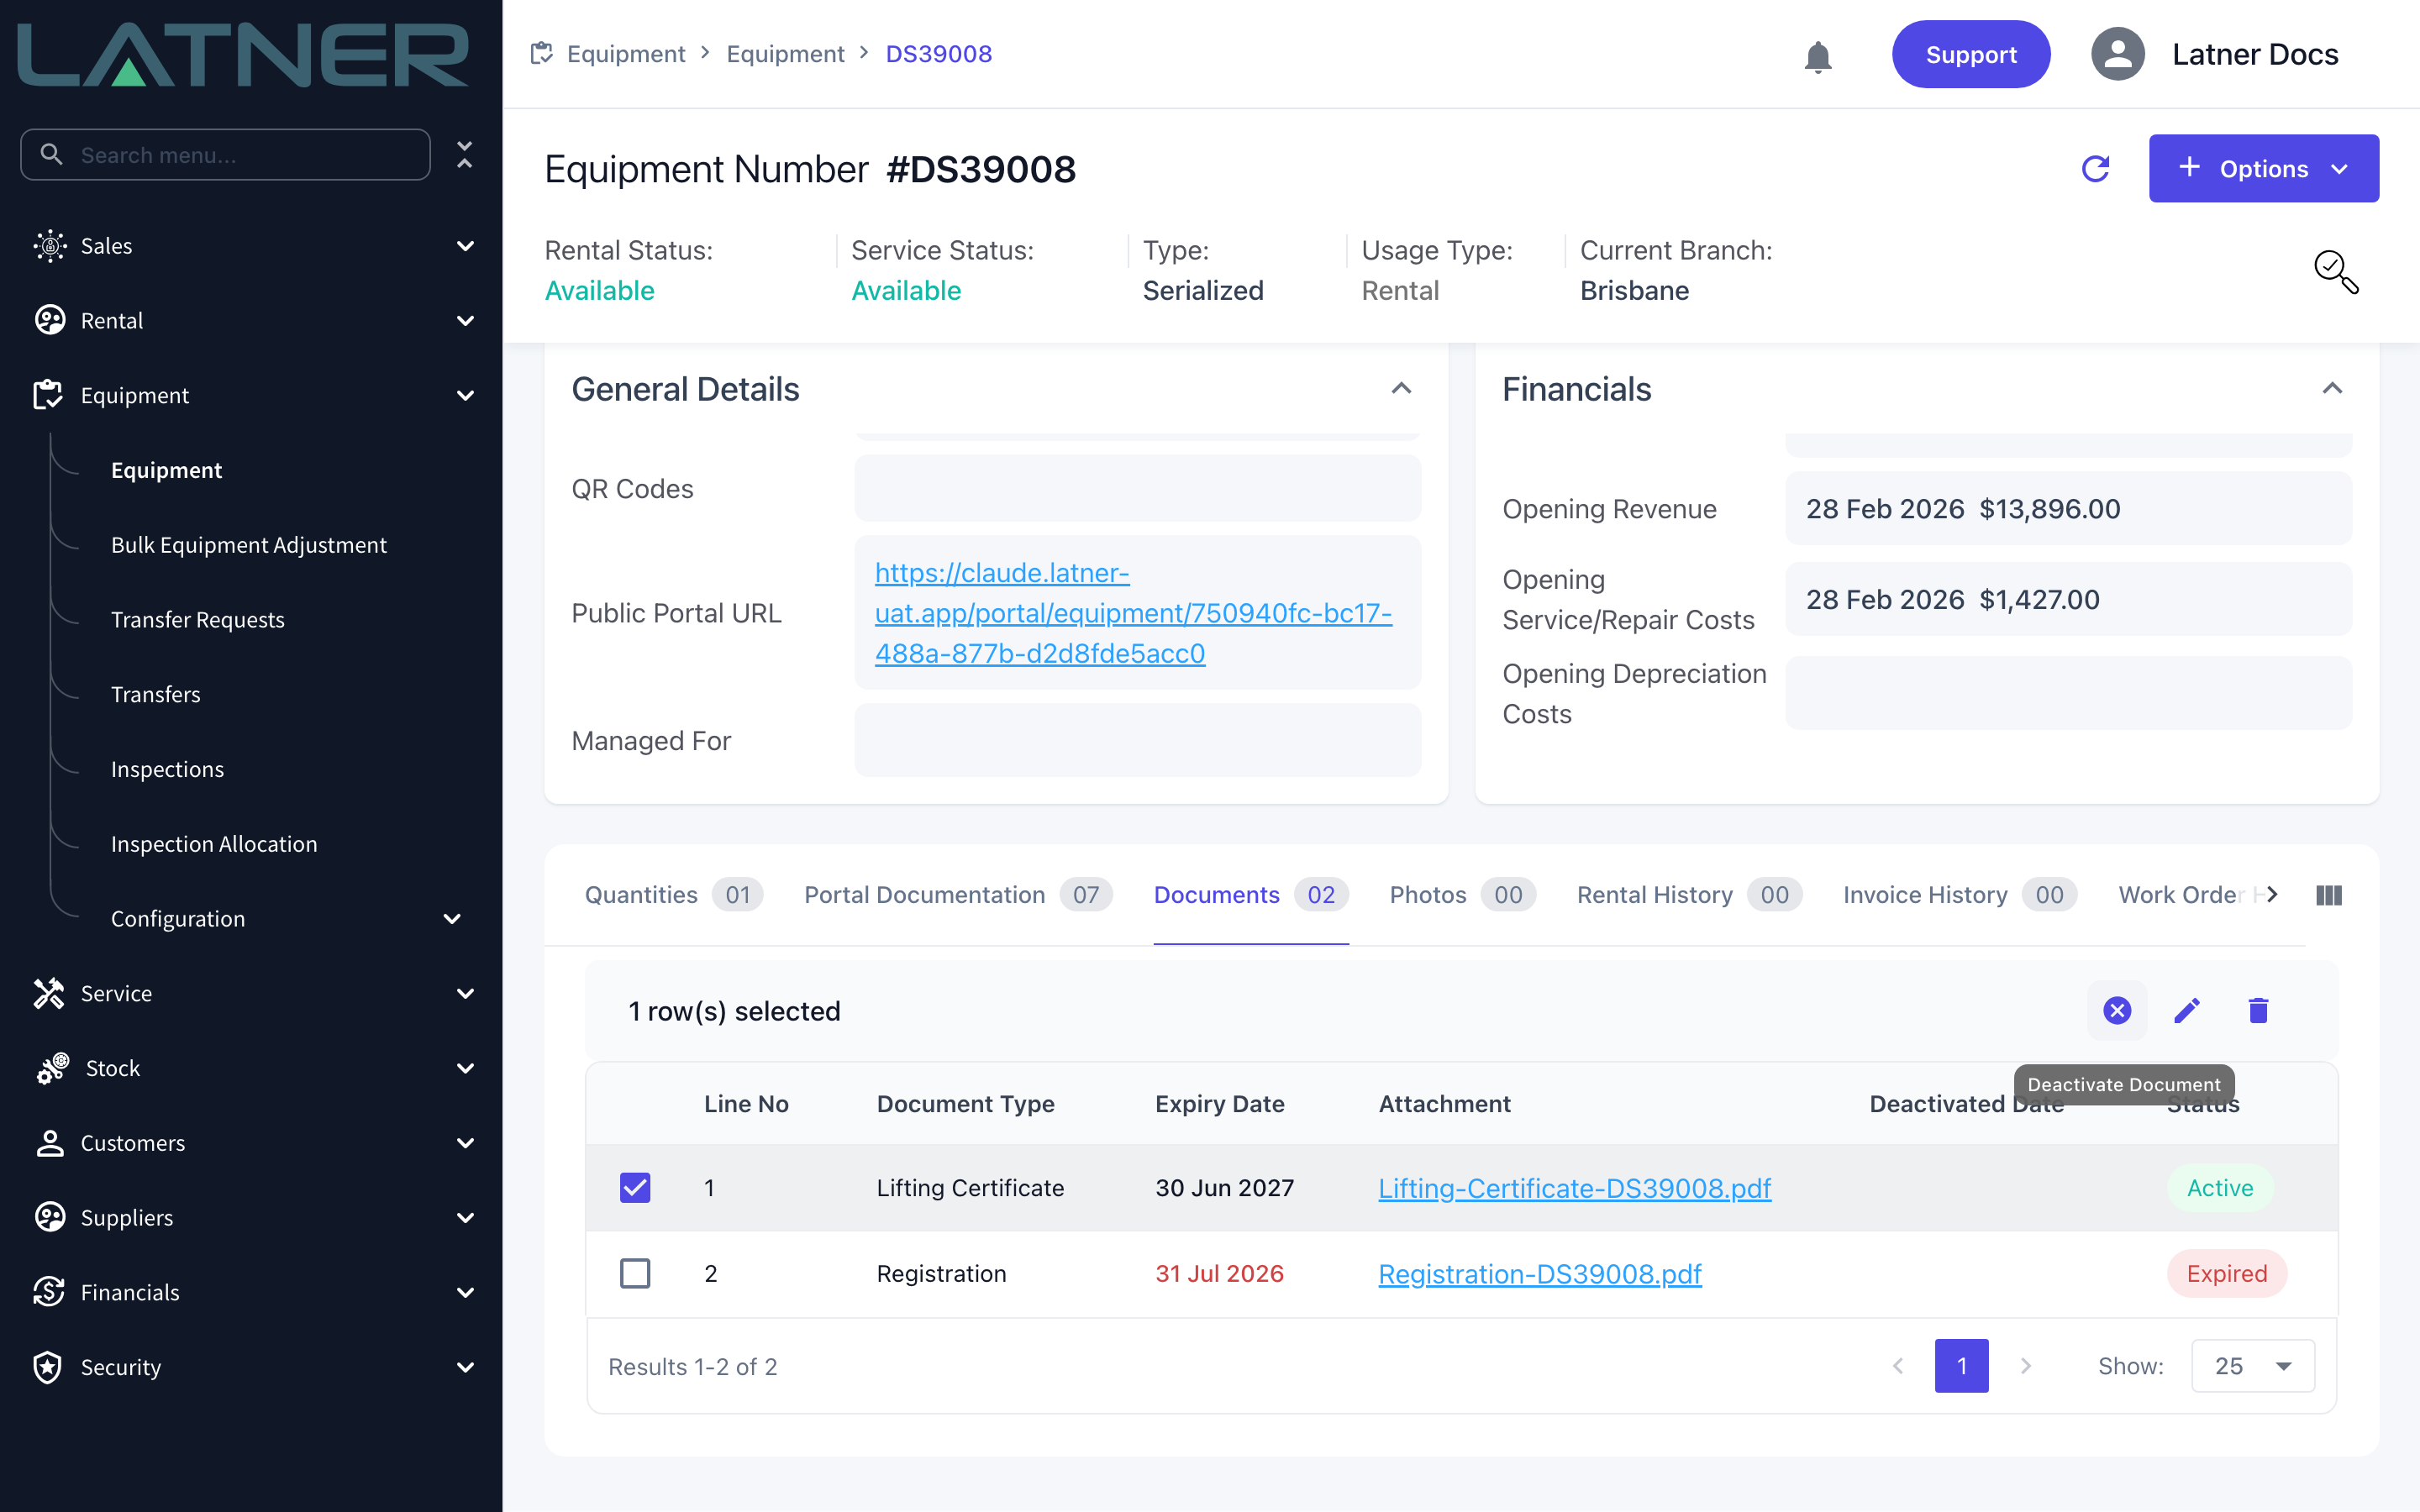
Deactivating a document cannot be undone, and deleting a row removes the file for good. If a certificate has simply been renewed, upload the new one against the same document type instead - the Documents tab keeps both, and the dashboard follows the latest expiry date.
FAQs
Watch the Demo
Prefer to watch it? Step through the same flow here.
Equipment Sales Orders
You can now sell equipment directly through Sales Orders, making it easier to invoice customers and track sold assets. Once an item is invoiced, it’s automatically marked as Sold and removed from availability. You can still sell or dispose an equipment from the Equipment screen, create quotes, generate sales orders and invoices as needed, or mark them as sold - giving you full flexibility in how you manage equipment sales.
Pre Starts
Pre Start Checklists can now be assigned to Equipment via QR code or URL, allowing your customers to complete their Pre Starts on site when the Equipment is on rent. After scanning, they’ll authenticate using their mobile number before completing the checklist. If a checklist fails, you can choose to notify a user so issues can be reviewed and actioned quickly.
Public Mobile Pre Starts let an operator on site complete a pre-start safety check on the machine they are using, straight from their own phone, without needing a Latner login.
Overview
The people who use your machines every day are rarely the people who use Latner. Public Mobile Pre Starts closes that gap: the operator scans a QR code on the machine, verifies who they are with a code sent to their phone, works through the checklist, and the completed record lands back in Latner against the equipment and the rental contract it is out on.
-
Operators do not need a Latner user account. They identify themselves once with their name and mobile number, verified by SMS.
-
The checklist that appears comes from the Pre Start Checklist template configured on the equipment's Equipment Model, falling back to its Equipment Class.
-
Every checklist item must be answered before the pre-start can be submitted. A Pass All button answers them all at once so the operator only has to change the exceptions.
-
The operator can attach up to five photos and a note.
-
On submission Latner builds a PDF report, texts the operator a link to it, and records the pre-start against the equipment and its current rental contract.
-
If any item is failed, a Pre-Start Failed Checklist notification is raised for the equipment's branch.
Before You Begin
A few things need to be in place before an operator can complete a pre-start.
|
Requirement |
Where to Find It |
|---|---|
|
The Pre-Start feature is enabled for your site |
A feature flag held by Latner. Contact Latner Support to have it turned on - it is not a setting you can change yourself. |
|
A Pre Start checklist template |
Equipment › Configuration › Checklist Templates, with the type set to Pre Start |
|
The template attached to the equipment |
Pre Start Checklist on the Equipment Model, or on the Equipment Class to cover every model in it |
|
The equipment is out on an active rental contract |
The equipment record's rental status. A pre-start is always recorded against the contract the machine is currently on |
|
A way in for the operator |
A QR code with the type Pre Start, or the Pre-Start Portal URL from the equipment record |
|
Optional - your own PDF layout |
Security › Settings › Global › PDF Templates › Pre-Start Checklist PDF Template ID. Leave it blank and Latner uses a generic layout |
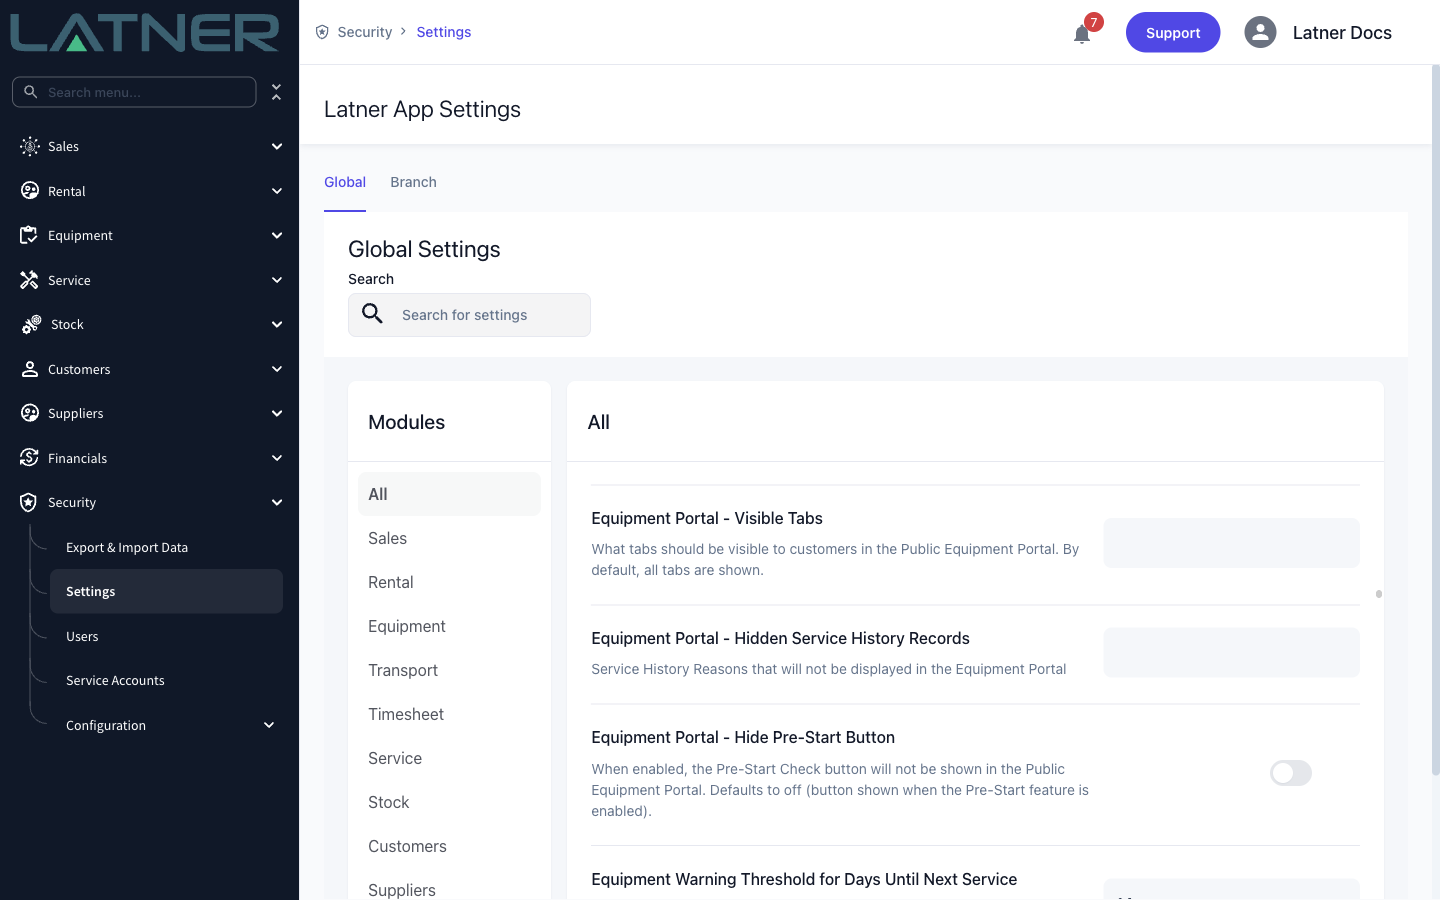
The Equipment Portal - Hide Pre-Start Button setting under Security › Settings › Global › Equipment lets you keep the Pre-Start feature switched on while hiding the button from the Public Equipment Portal. Operators who scan a Pre Start QR code or open the Pre-Start Portal URL directly can still complete a check.
Setting Up the Equipment
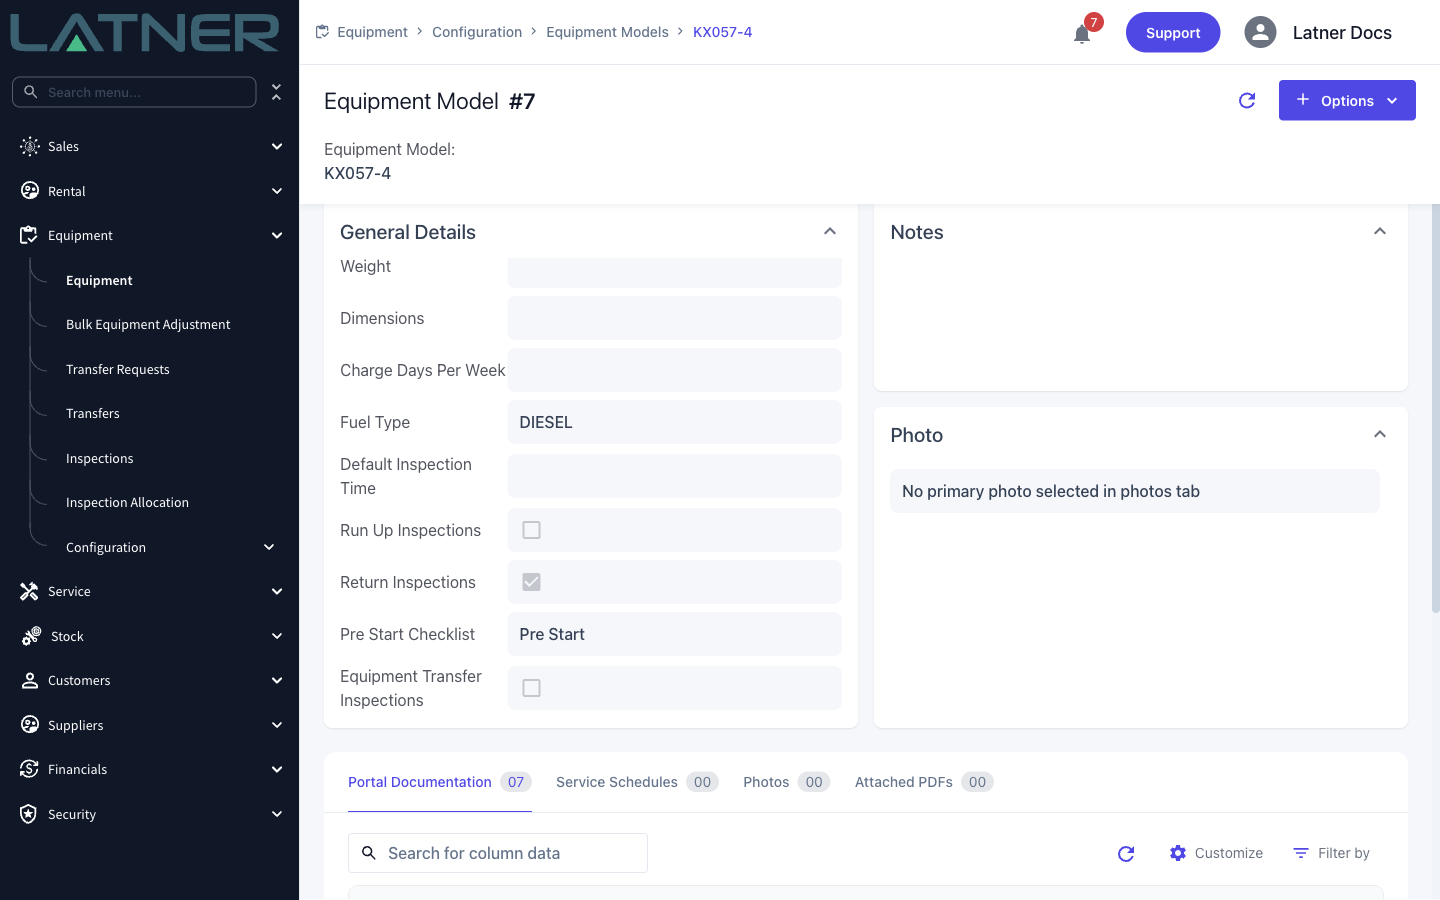
Step 1 - Attach the checklist template
Open the Equipment Model and set Pre Start Checklist to your Pre Start template. If you would rather cover a whole family of machines at once, set the same field on the Equipment Class instead - Latner looks at the model first and falls back to the class.
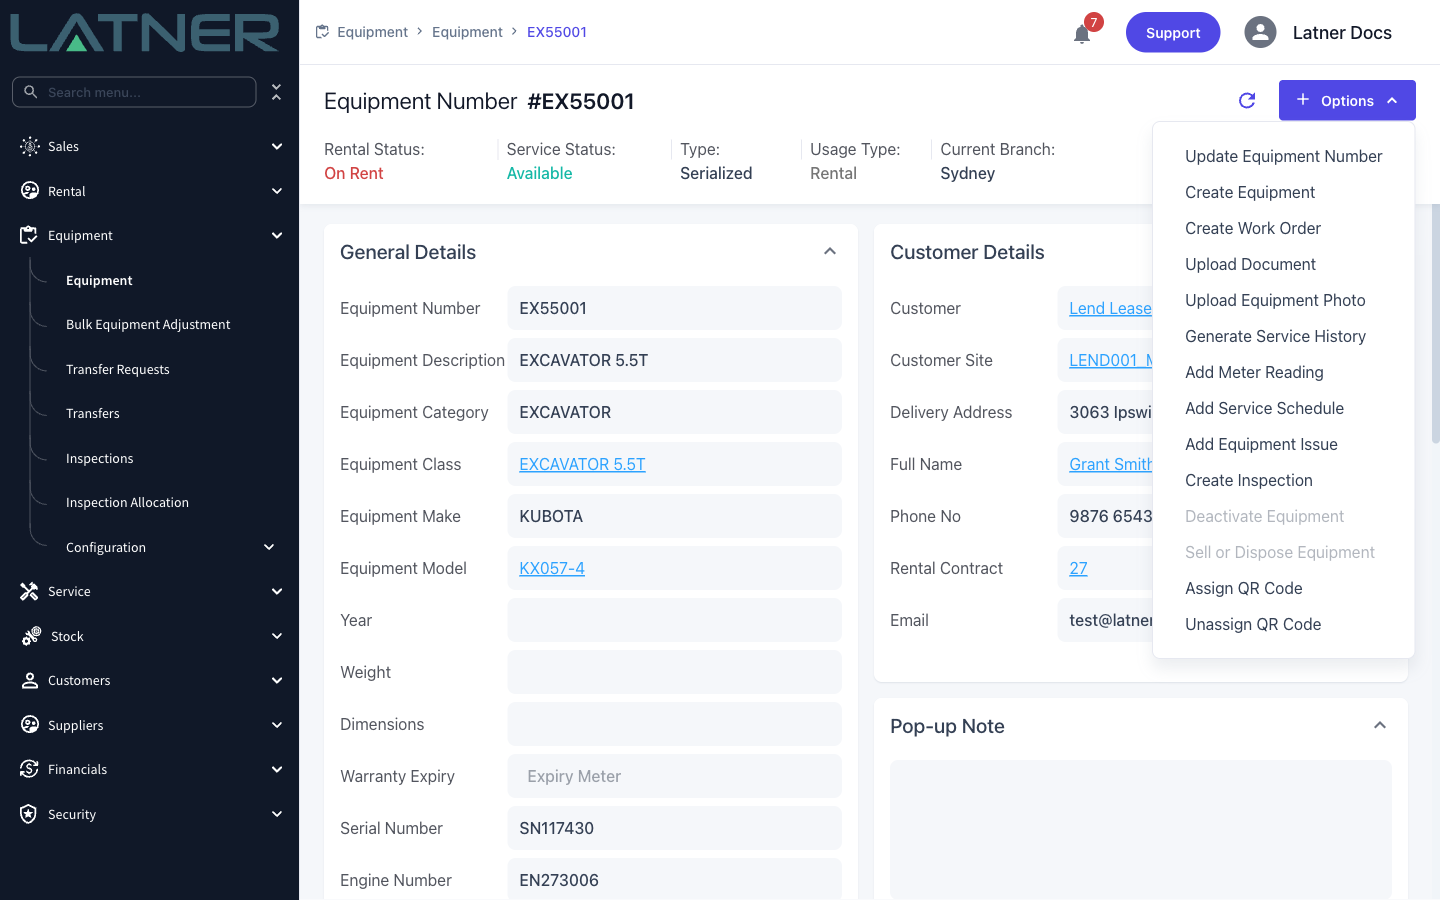
Step 2 - Give the machine a Pre Start QR code
On the equipment record, choose Options › Assign QR Code.
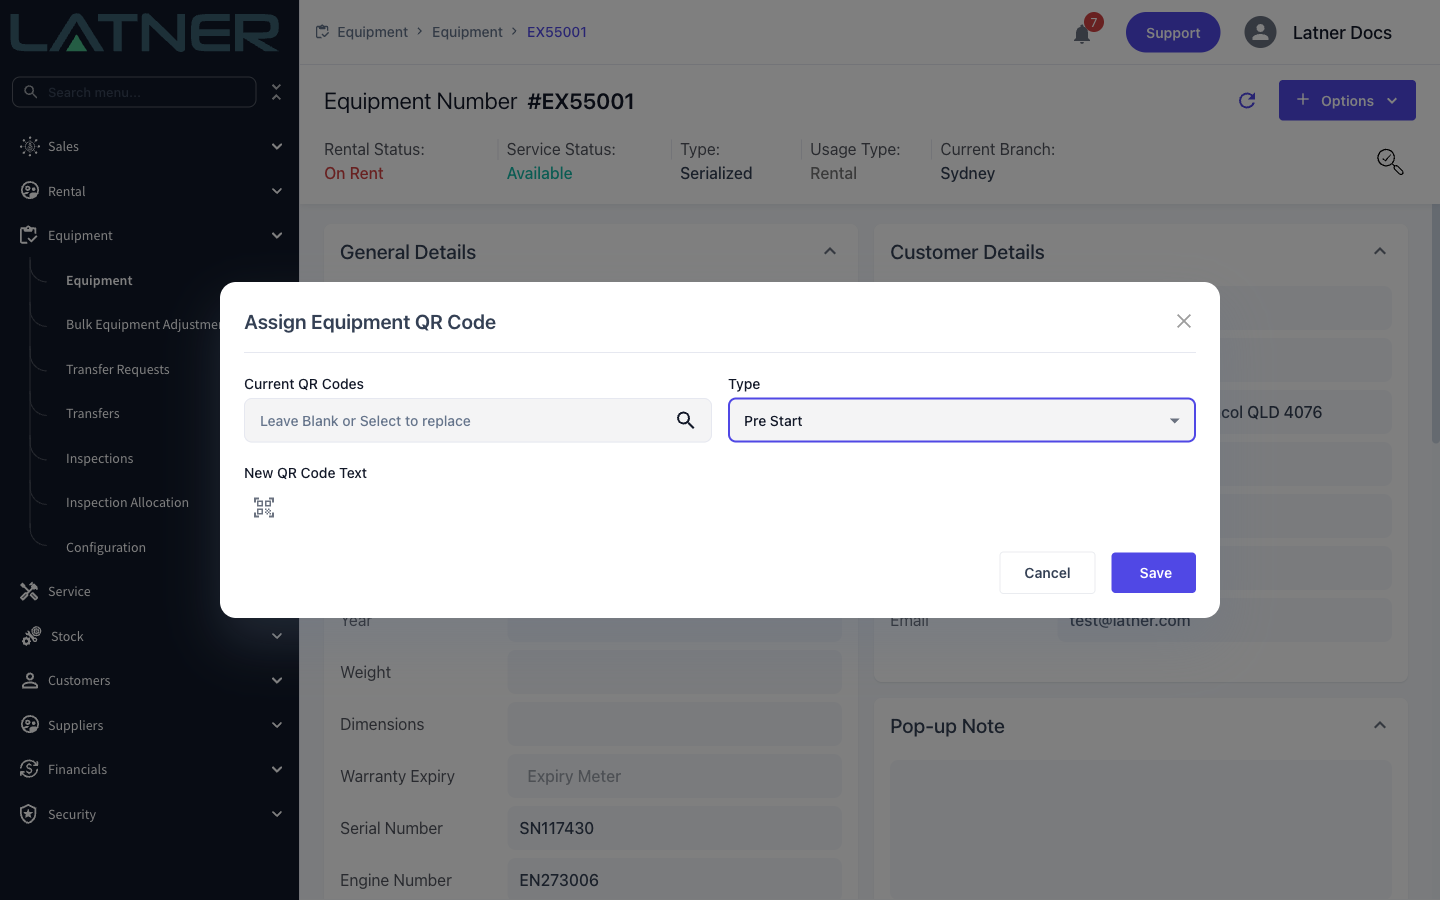
In the Assign Equipment QR Code dialog, set:
-
Type - choose Pre Start. This is what sends a scan straight to the pre-start rather than to the equipment portal.
-
New QR Code Text - scan or enter the code printed on the sticker you are putting on the machine.
-
Current QR Codes - leave blank to add a new code, or pick an existing one to replace it.
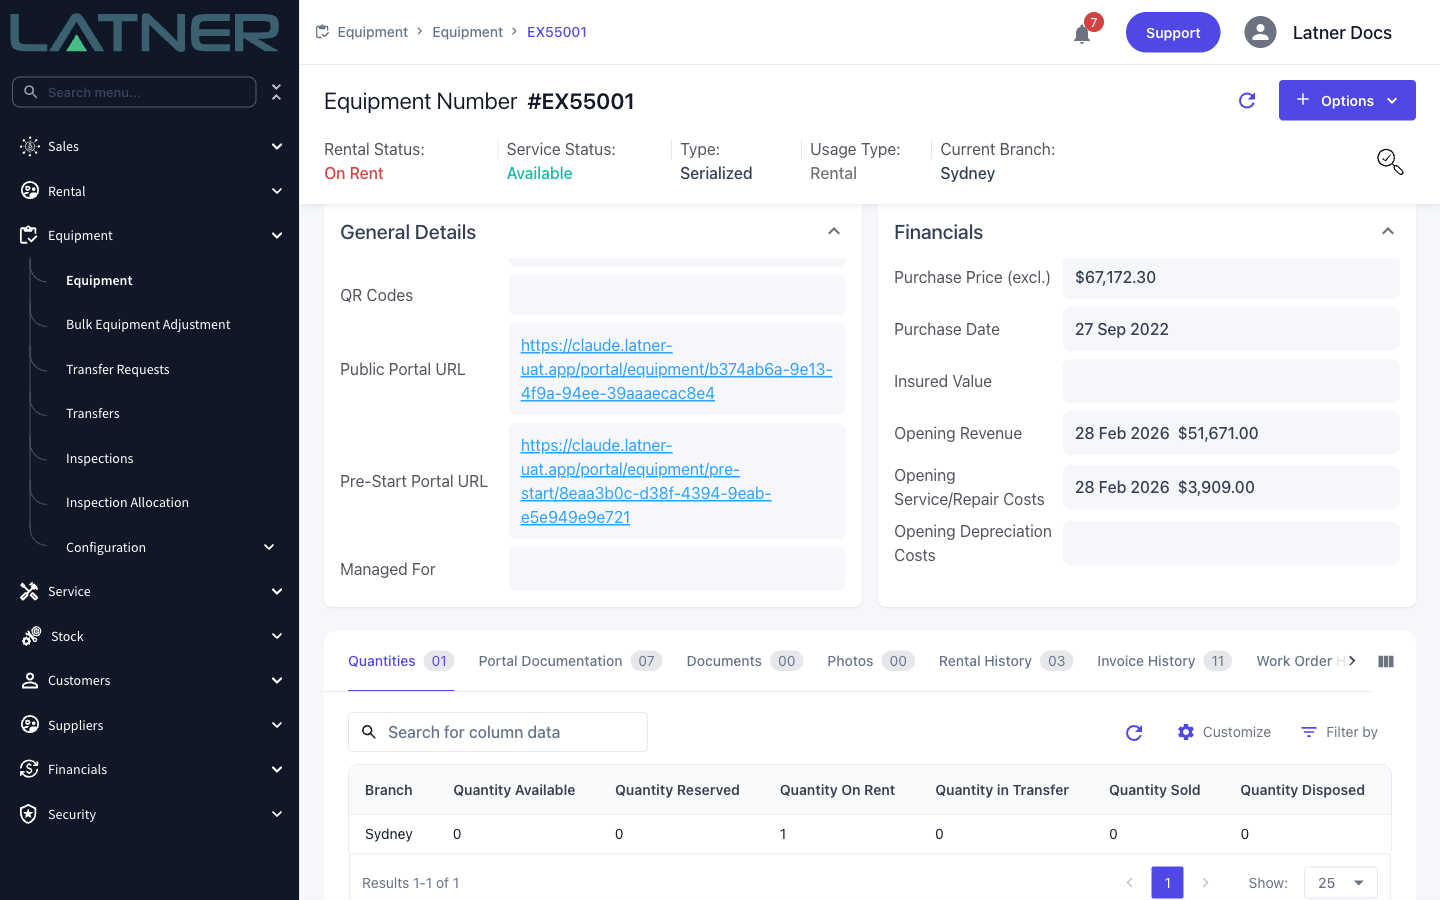
Step 3 - Or share the Pre-Start Portal URL
Every piece of equipment has its own Pre-Start Portal URL on the equipment record. It is a permanent link to that machine's pre-start and can be printed on a sticker, sent to a site supervisor, or turned into a QR code of your own.
Completing the Pre-Start
Everything from here happens on the operator's phone.
Step 1 - Open the pre-start
The operator can get to the pre-start three ways: scan the machine's Pre Start QR code, open the Pre-Start Portal URL, or tap Start Pre-Start Check in the Public Equipment Portal for that machine.
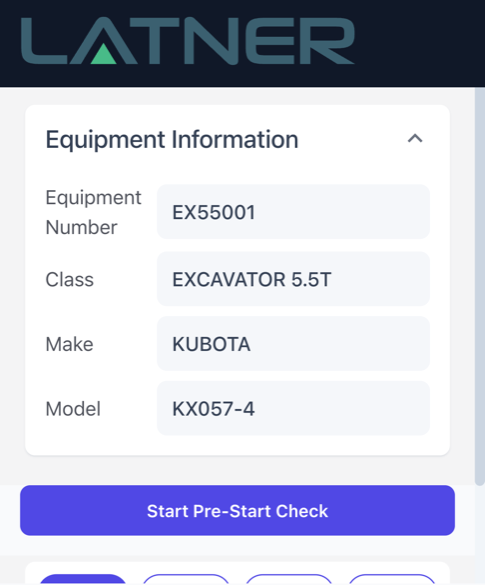
The Start Pre-Start Check button is a mobile-only control - the Public Equipment Portal opened on a desktop browser shows the Pre-Start history tab but no button. The QR code and the Pre-Start Portal URL work on any device.
Step 2 - Verify the operator's phone
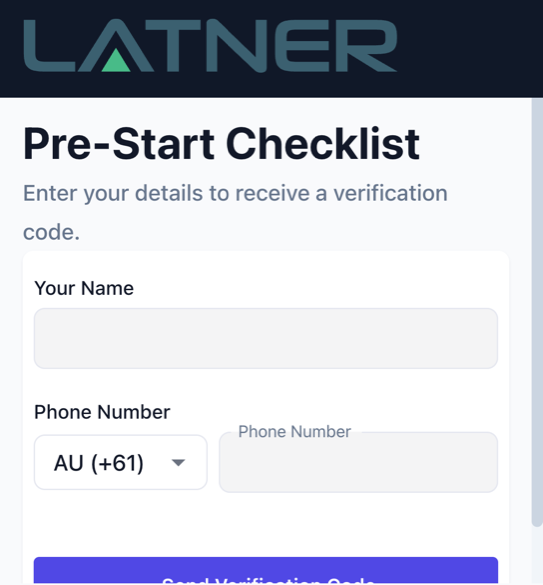
The first time an operator opens a pre-start they are asked who they are. They enter:
-
Your Name - whatever name should appear on the pre-start record. Latner does not check it against anything.
-
Phone Number - the mobile that will receive the verification code and, later, the PDF report.
Tapping Send Verification Code texts them a six-digit code, which they enter on the next screen and confirm with Verify. If it does not arrive, Resend Code becomes available again after sixty seconds.
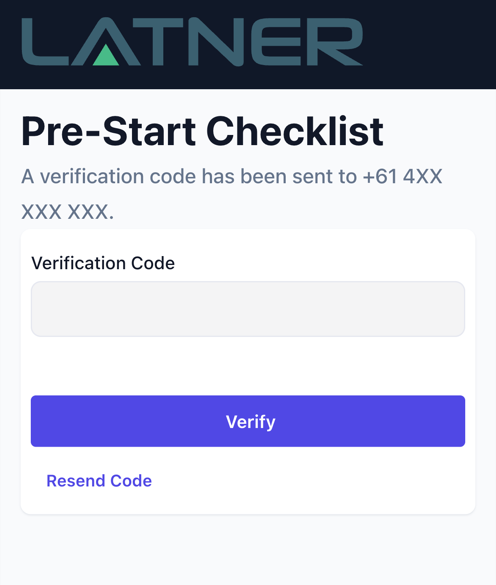
The code expires five minutes after it is sent. Once verified, the operator stays verified on that phone for about a week, so daily pre-starts on the same machine take one tap to open.
Step 3 - Work through the checklist
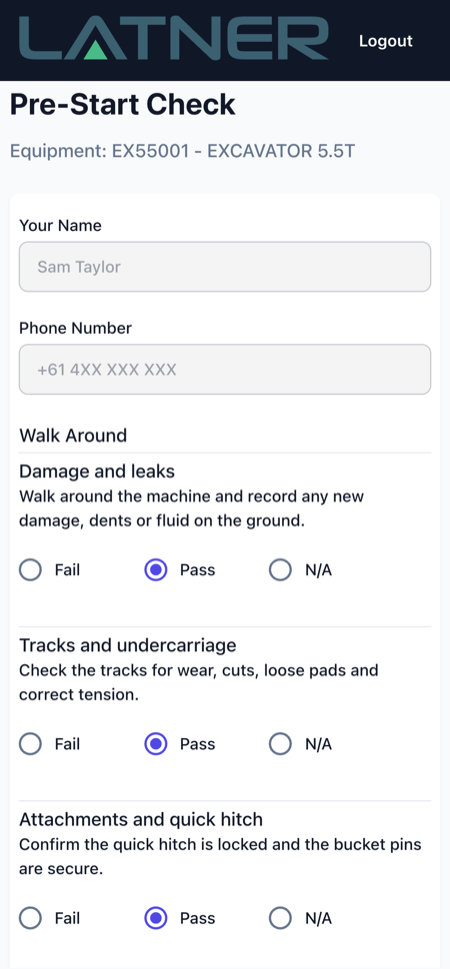
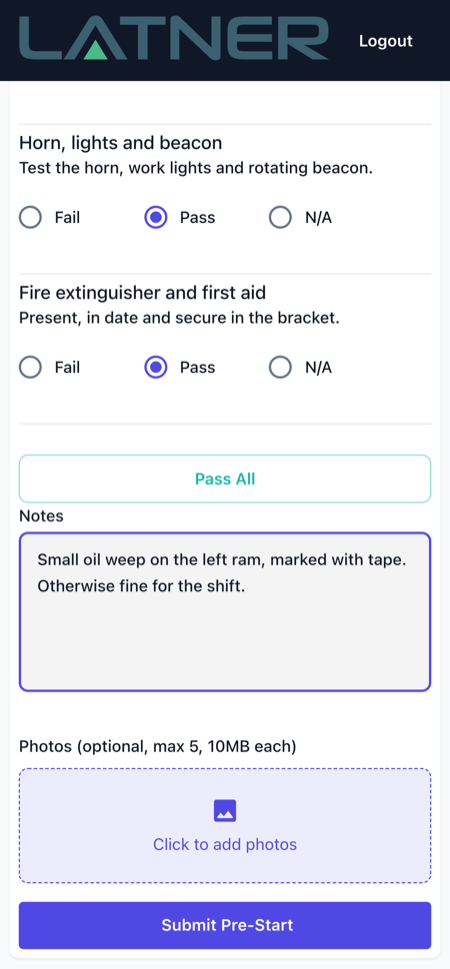
The Pre-Start Check screen names the machine at the top and lists every item on the checklist template, grouped under the headings set up on the template. Your Name and Phone Number are already filled in from the verification step and cannot be edited.
Each item is answered with the response options configured on the template - commonly Pass, Fail and N/A. Every item has to be answered; anything left blank is flagged as Required when the operator tries to submit.
Tapping Pass All sets every item to the template's Pass option in one go, leaving the operator to change only the items that need a different answer.
Step 4 - Add photos and notes
Under the checklist the operator can attach up to five photos of up to 10MB each, in JPEG or PNG format. Photos are optional and attach to the pre-start as a whole rather than to a particular checklist item.
The Notes field is a single free-text box for anything worth recording about the machine or the site.
Step 5 - Submit
Tapping Submit Pre-Start records the check. The operator sees a Pre-Start Submitted confirmation telling them a PDF report is on its way by SMS.

After Submission
-
The pre-start is recorded against the equipment and against the rental contract the machine was on at the time.
-
Latner generates a PDF of the completed checklist and texts the operator a link to it.
-
The record appears on the equipment's Pre-Starts tab, showing the operator, their phone number, the contract, the date, a pass/fail summary, any notes, and a link to the PDF report.
-
Your customer can see it too, on the Pre-Start tab of the Public Equipment Portal for that machine.
-
If any item was failed, a Pre-Start Failed Checklist notification is raised for the equipment's branch, listing the failed items and linking to the equipment's Pre-Starts tab.
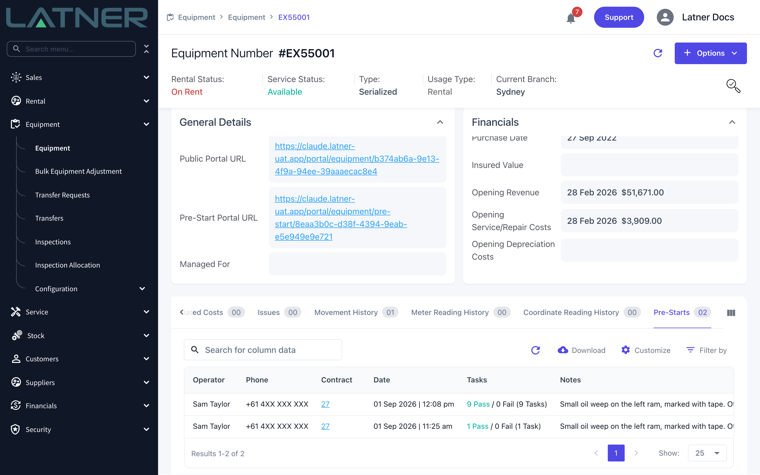
A submitted pre-start cannot be edited or deleted from the operator's phone, and the operator gets no way back into it once the confirmation screen appears. If something was answered incorrectly, have the operator complete a fresh pre-start - both records are kept, and the most recent one is the one at the top of the Pre-Starts tab.
FAQs
Watch the Demo
Prefer to watch it? Step through the same flow here.
Custom Logo & Colour Settings
You can now personalise your Latner environment by updating your company logo and colour theme. These branding settings help you tailor the look and feel of the Latner app to match your organisation. You can upload and configure these options from Security > Settings.
Latner can wear your company's brand colours and logo instead of ours.
Overview
Out of the box Latner looks like Latner. It doesn't have to. A few settings swap our logo and colours for yours, so the system your team signs into every morning looks like your business rather than your software vendor's. On top of that, each person can flip their own screens to dark mode without affecting anyone else.
-
Four settings control your branding: Primary Color, Side Menu Color, Logo and Mini Logo.
-
Branding is system wide. When you change it, everyone in your business sees the same thing - there is no per-user or per-branch version of these four settings.
-
Colours are entered as hex codes, including the # (for example #E4572E). Anything that isn't a valid hex code is ignored and the standard colour stays.
-
Logos are image files, up to 10 MB each.
-
Dark Mode is the opposite: it's personal, it needs no permission, and it only applies to the browser you switch it on in.
-
Branding on generated PDFs is separate - see the FAQs.
Before You Begin
You need one permission and a couple of things prepared.
|
Requirement |
Where to Find It |
|---|---|
|
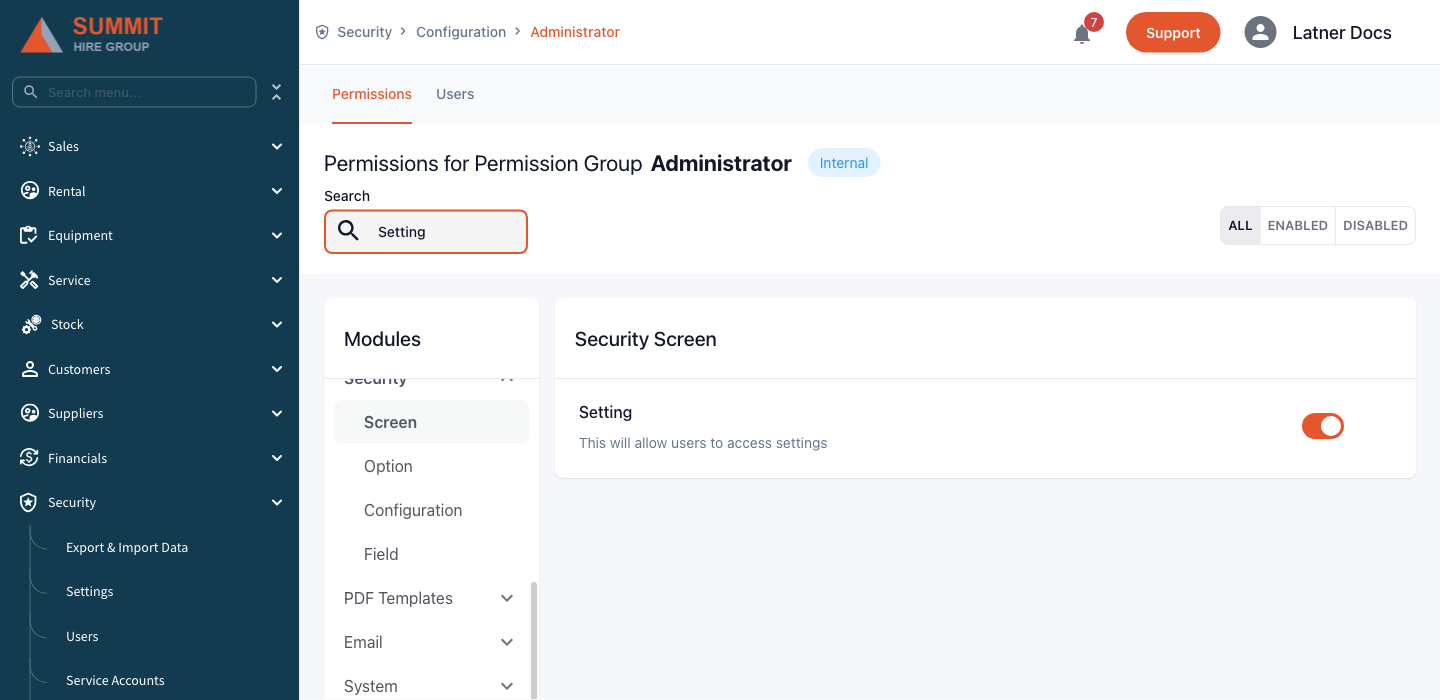
The Setting permission ("This will allow users to access settings") |
Security › Configuration › Permission Groups, then the group, then Security › Screen |
|
Your logo as an image file, under 10 MB |
Your marketing or brand folder. A transparent PNG works best |
|
A square version of your logo (just the mark, no wording) |
Used when the side menu is collapsed |
|
Your brand colours as hex codes |
Your brand guide, or a colour picker |
Dark Mode is the exception to all of this. It needs no permission and no setting, so every user can turn it on for themselves from day one.
Changing Your System's Branding
Step 1 - Open the System settings
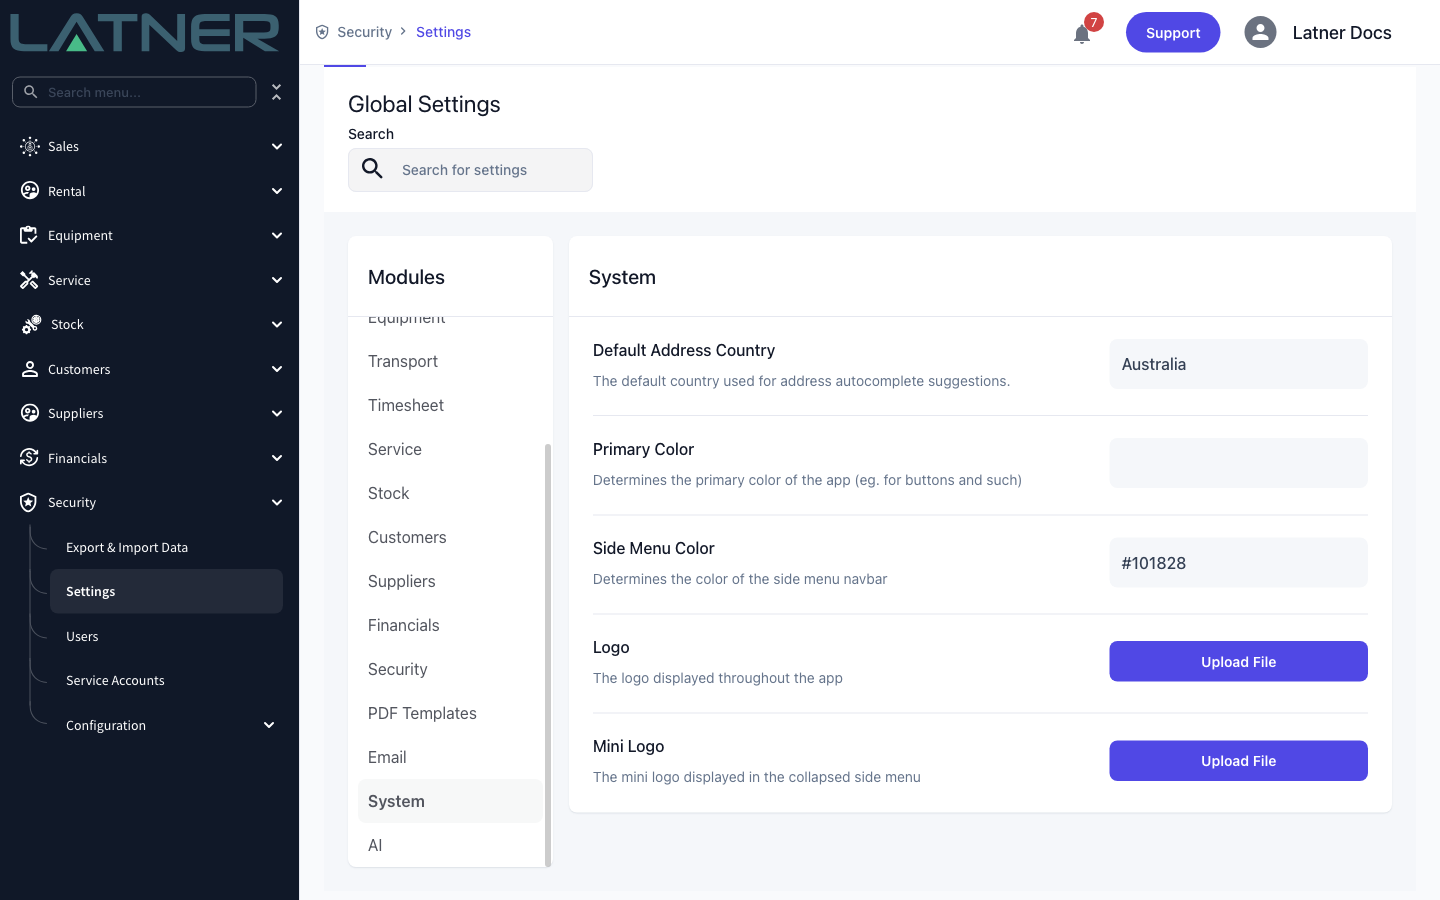
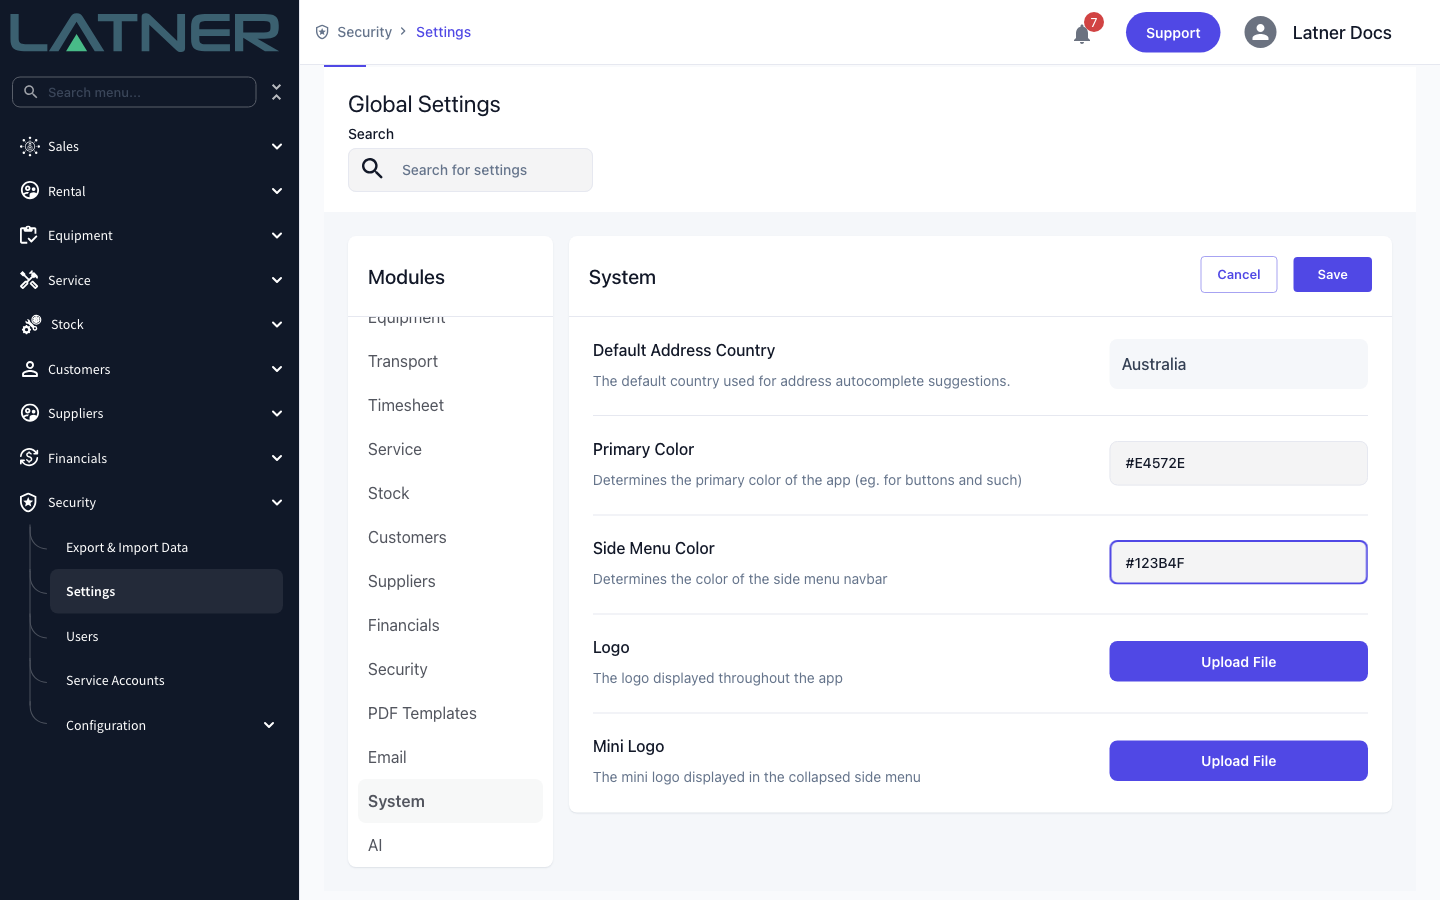
Go to Security › Settings. In the Modules panel on the left, scroll down and click System. The four appearance settings sit together under the heading:
-
Primary Color - "Determines the primary color of the app (eg. for buttons and such)". This is the colour of buttons, links, selected menu items and other highlights.
-
Side Menu Color - "Determines the color of the side menu navbar". This is the background of the navigation panel down the left.
-
Logo - "The logo displayed throughout the app". Shown at the top of the side menu.
-
Mini Logo - "The mini logo displayed in the collapsed side menu".
Step 2 - Set your brand colours
Click the value box beside Primary Color and type your hex code, then do the same for Side Menu Color. Both fields can be edited at once - Cancel and Save appear in the card header, and one Save commits everything you've changed.
Include the #. Six-digit codes (#E4572E) and three-digit shorthand (#E42) both work; anything else is quietly ignored and the standard colour is kept.
Step 3 - Upload your logo
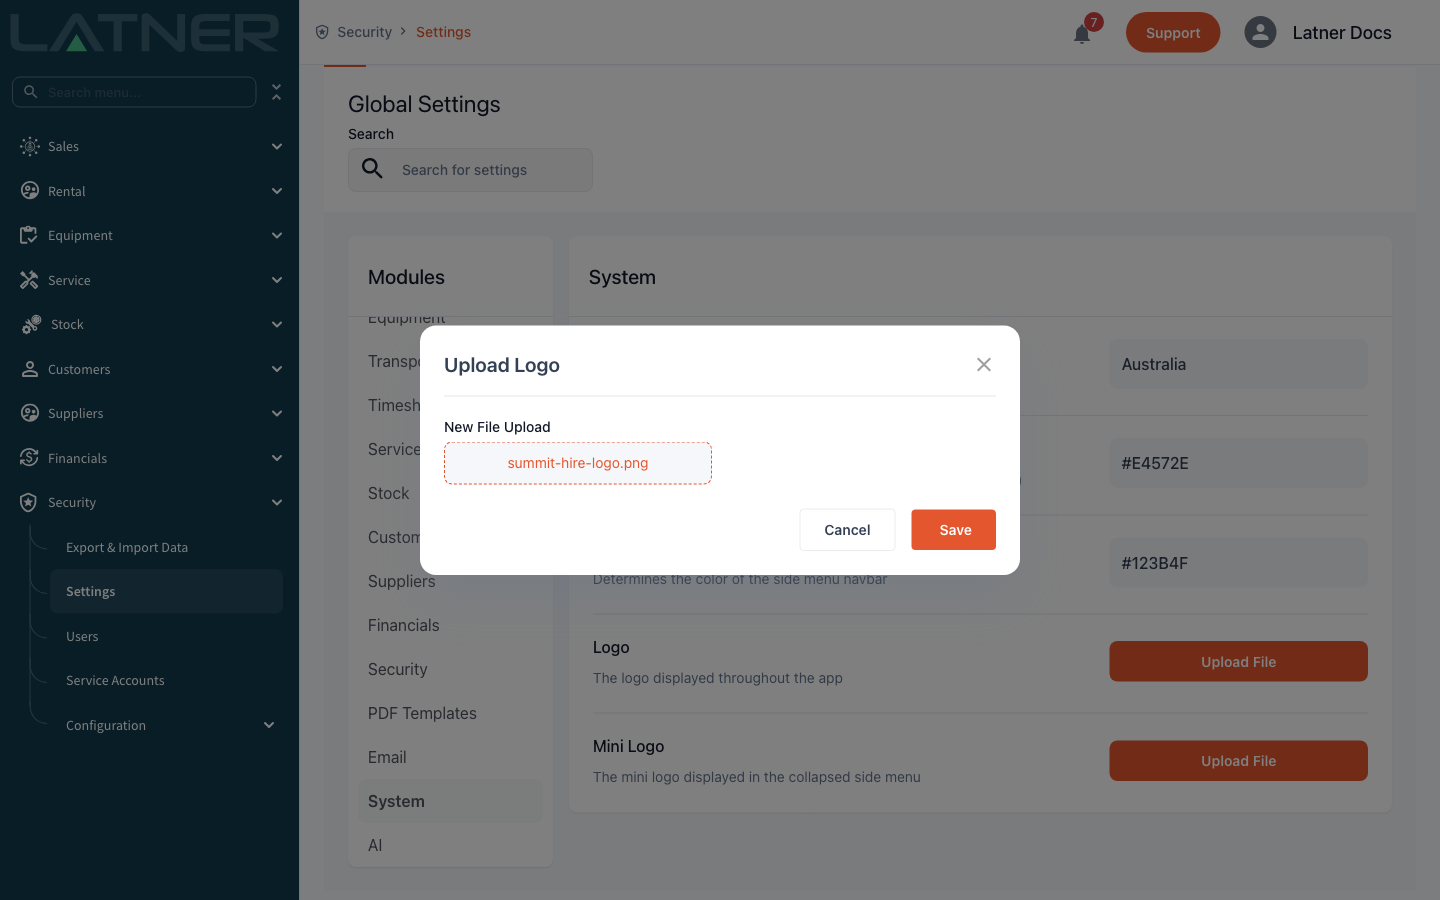
Click Upload File beside Logo. The Upload Logo window opens with a single New File Upload box - click it, pick your image, then click Save. You'll get a "File Upload Successful" message when it lands.
Latner fits the logo into a space roughly 280 by 70 pixels and scales it to fit, so a wide, landscape image works best. The side menu is dark by default, so make sure your logo is still readable against your Side Menu Color.
Step 4 - Upload your mini logo
Repeat the same steps against Mini Logo, using a square version of your mark. This is what shows when someone collapses the side menu, and the space is only about 50 pixels wide, so a full wordmark shrinks to nothing there.
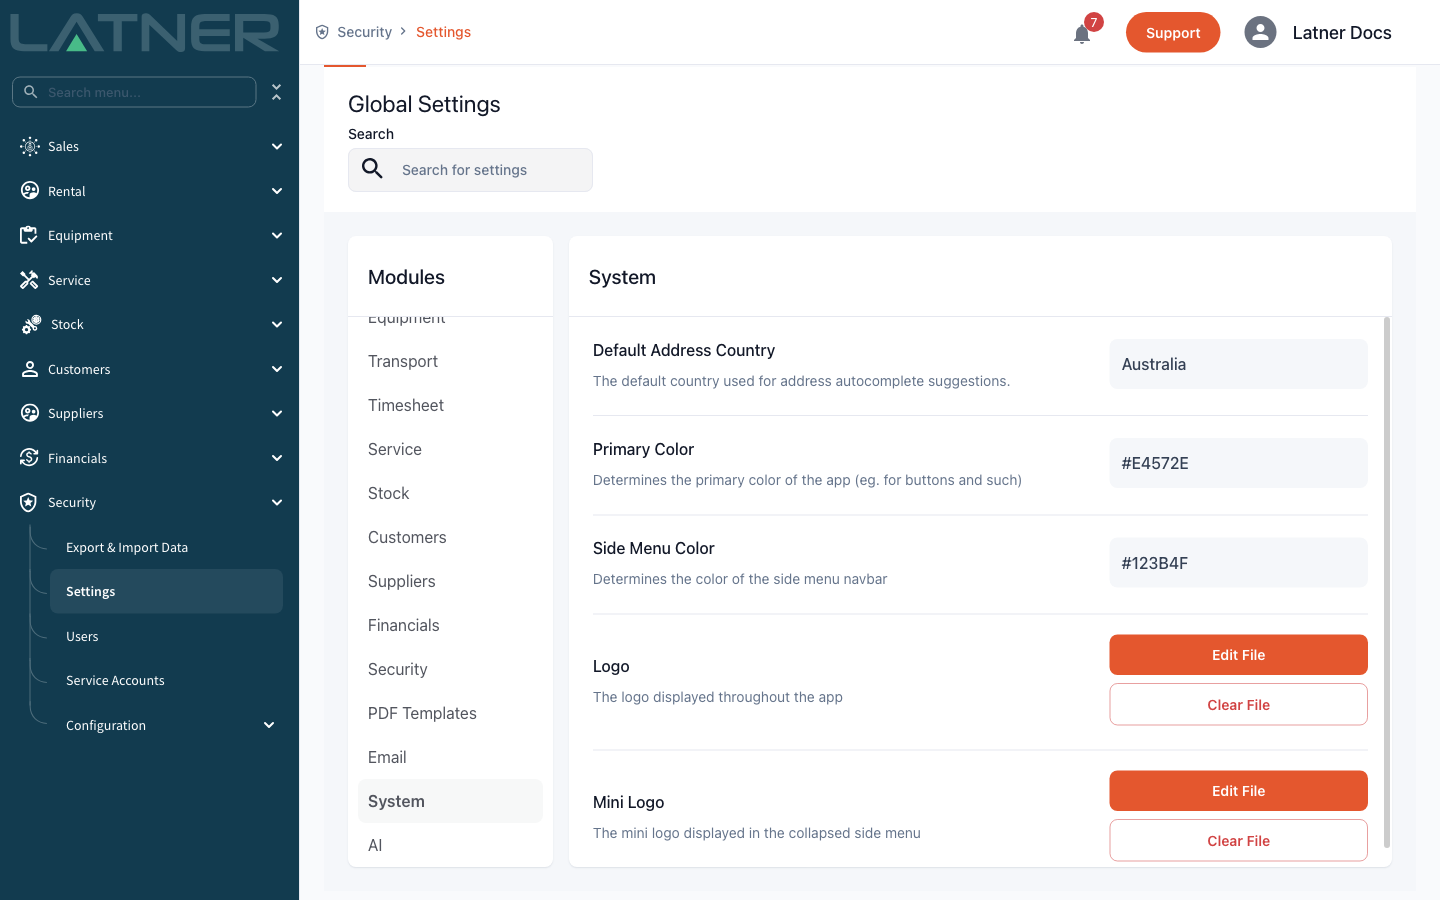
Once a file is saved, the button changes from Upload File to Edit File and a Clear File button appears underneath it.
Step 5 - Refresh to see the change
Colours and logos are read when Latner loads, so refresh the page (or navigate to another screen and back) to see your branding applied. Everyone else picks it up the next time their browser loads Latner.
After the Change
-
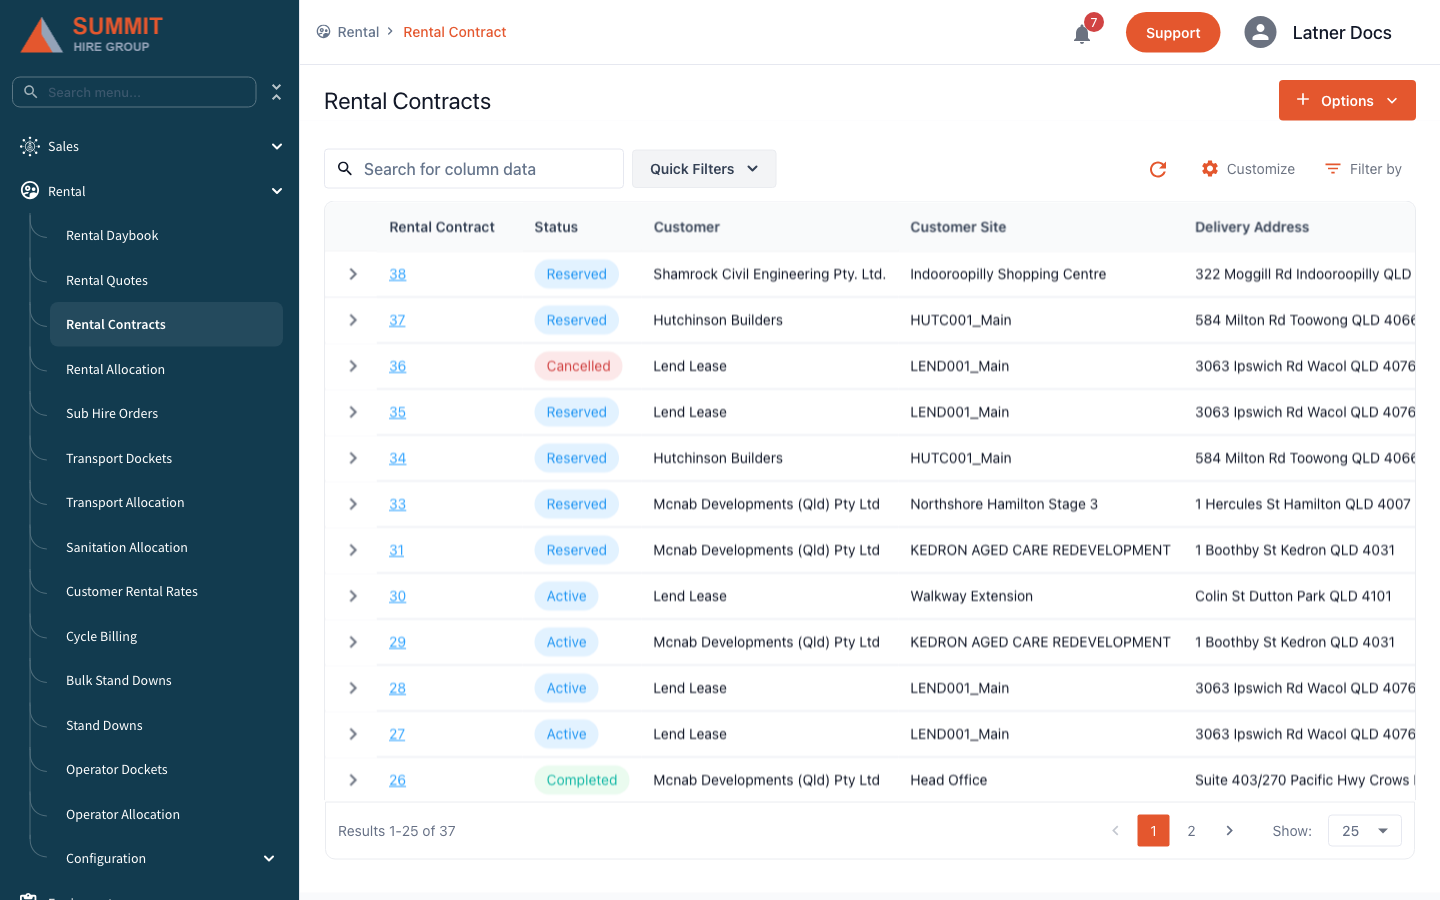
Your Logo replaces the Latner logo at the top of the expanded side menu.
-
Your Mini Logo takes over when the side menu is collapsed. If you haven't uploaded one, Latner falls back to the full Logo, which usually looks squashed in that small square.
-
Your Primary Color flows through buttons, links, tabs, pagination and other highlights across every screen.
-
From your Side Menu Color, Latner works out the hover and sub-menu shades, and picks either white or near-black menu text so the labels stay readable against whatever colour you chose.
-
The change applies to every user in your business, on every screen, at once.
Clear File removes a logo permanently - Latner asks "Are you sure you want to clear this file? This cannot be undone." and there is no way to bring the old file back from within Latner. Keep your own copy of the image before you clear it, and use Edit File when you simply want to replace one logo with another.
FAQs
Watch the Demo
Prefer to watch it? Step through the same flow here.
Other Updates & Improvements
-
Allow exporting CRM Equipment Availability
-
Improved Utilisation Dashboard with additional view options
-
Ability to ignore Excess Hours for Minimum Hours Per Month rate type
-
Added Serial Number and Registration Number to Rental Contract and Invoice PDFs
-
Added “Rental Contract Type” filter to Cycle Billing
-
Added Document Link to Rental Contract PDFs when Equipment is Managed For Sub Hire
-
Display Purchase Date in Equipment Profitability Dashboard (grouped by Equipment)
-
Ability to upload photos against an Equipment Class / Model
-
Added Insured Value field to Equipment Detail
-
Allow editing of Stock Pricing / Cost from the Stock Detail screen
-
Sync Internal or Chargeable Work Order Expenses to Accounting Integrations
-
Ability to upload Terms & Conditions PDF against a Customer
-
Added more dynamic fields to Email Template Data
-
Added Popup Note field to the Equipment List
-
Ability to filter My Leads for CRM Leads List
-
Added additional fields to the Purchase Order List
-
Ability to export Transport Dockets for Docketbook
-
Various improvements to Rich Text Editors
-
Option to enable opening files in a new tab instead of auto‑downloading
-
Plus a range of smaller fixes and performance improvements