
Welcome to the October 2025 release of Latner Software. We introduced Branch Level Permissions & Emails, Checklist Templates for Work Orders, Stock on Hand Journals for Xero, and a suite of Serialized Stock Modifications. Alongside these, we delivered major improvements to rental contracts, equipment management, billing, and user experience. Please see below for the details of our changes.
Summary of changes:
New Features
Branch Level Permissions
Permissions can now be set for users per branch allowing for finer access controls such as only allowing editing of contracts by users from that branch.
Email Signatures
Users can set up a signature that will be included when sending emails from Latner.
Checklist Templates on Work Orders
Checklist Templates can now be added to any Work Order via the Options menu.
Adding a checklist template to a work order gives the mechanic a fixed list of tasks to work through and sign off, so the same checks get done - and get recorded - on every job.
Overview
Not every job can be planned in advance. A work order raised from an equipment service schedule already brings its checklist with it, but for a breakdown, a customer request or an extra safety check you add the checklist yourself, straight from the work order.
-
Adding a checklist copies the template's tasks onto the work order as a working copy - task groups, summaries, descriptions and photo requirements all come across.
-
The copy is a snapshot. Editing the template later creates a new version of the template and leaves checklists that have already been added exactly as they were.
-
Every checklist template is offered, whatever its type - Service, Run Up, Rental Return, Pre Sale, Pre Start or Take 5. The list isn't restricted to Service checklists.
-
You can add as many checklists to a work order as you need, including the same template twice.
-
Tasks start as TODO and are answered with the response options attached to the template, which are Pass / Fail / N/A unless someone has set up a different response set.
-
Once every task has an answer the checklist is marked as completed, recording who finished it and when.
Before You Begin
Adding a checklist needs one permission, at least one checklist template to choose from, and a work order that is still live.
|
Requirement |
Where to Find It |
|---|---|
|
Add Checklist to Work Order permission |
Security › Configuration › Permission Groups › Service › Option |
|
At least one checklist template |
Equipment › Configuration › Checklist Templates |
|
A work order that isn't Completed or Cancelled |
Service › Work Orders |
|
Completed Checklists Required for Work Orders (optional) |
Security › Settings › Equipment |
|
Failed Work Order Checklist Points Require Approval (optional) |
Security › Settings › Equipment |
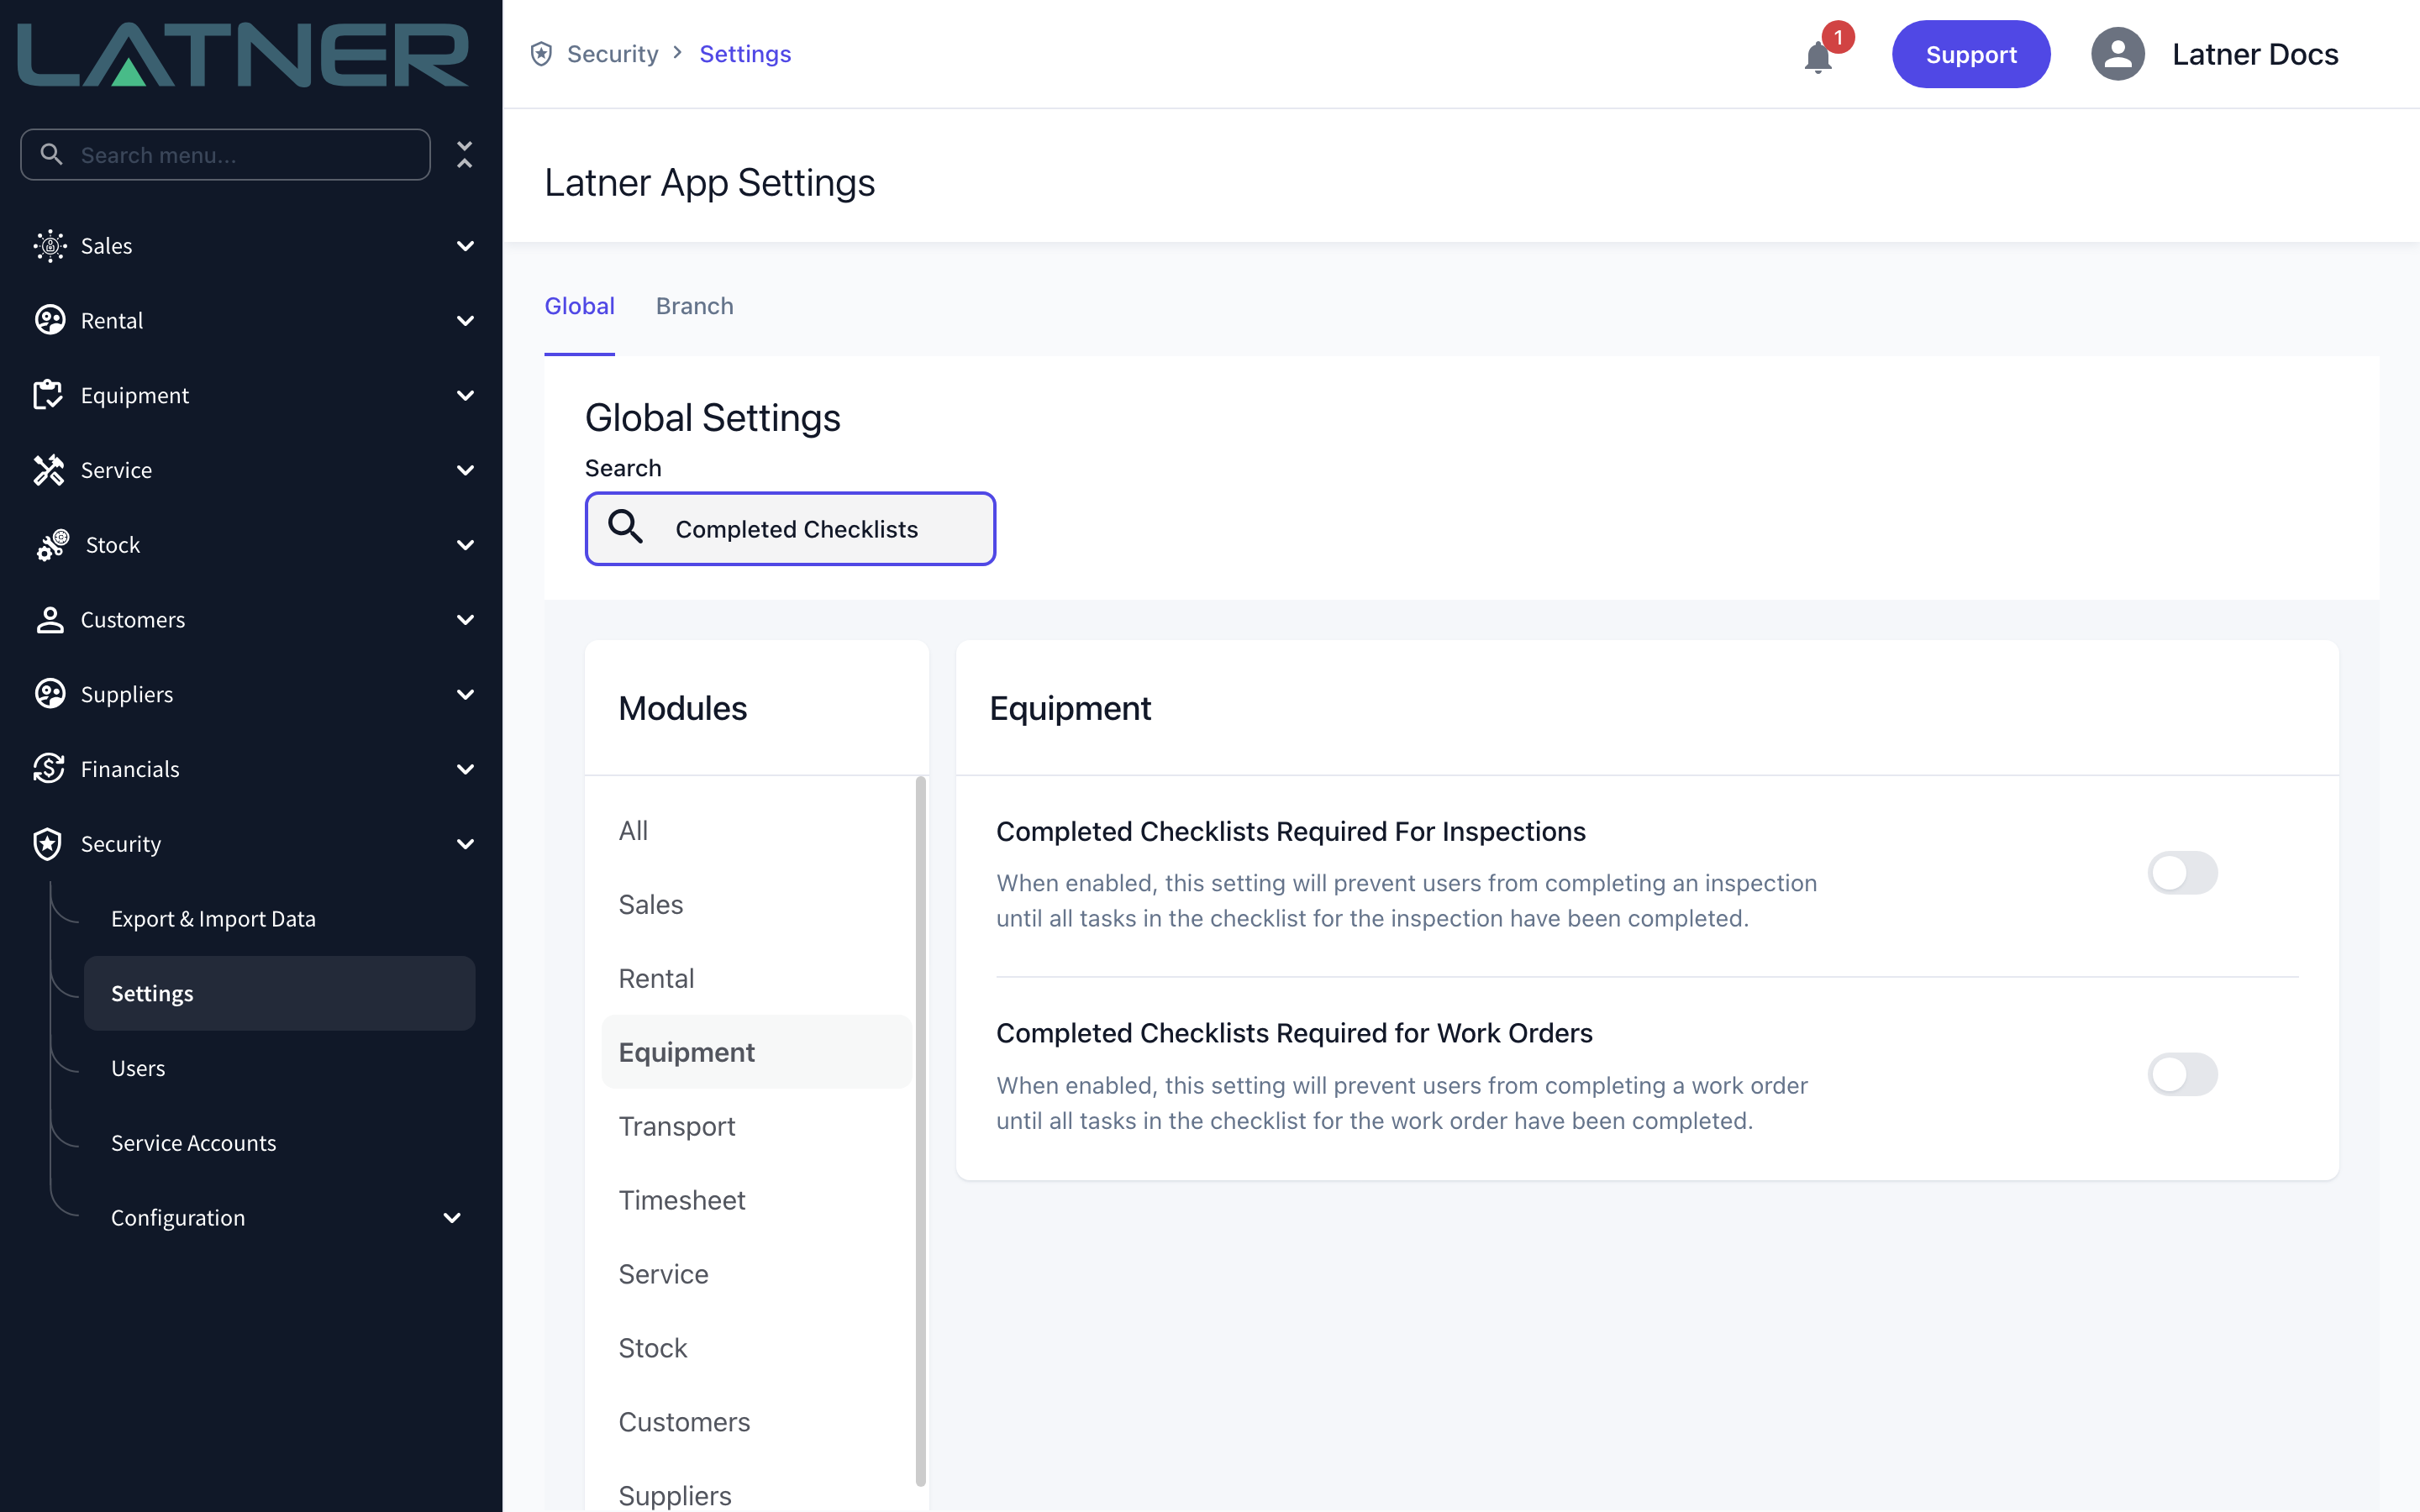
With Completed Checklists Required for Work Orders switched on, every checklist you add becomes a gate: neither the work order nor the mechanic's Tech Status can move to Completed while a single task is still TODO. It's worth knowing before you add a checklist to a job that's nearly finished.
Adding a Checklist to a Work Order
Step 1 - Open the work order
Go to Service › Work Orders and open the work order you want the checklist on. Any status works except Completed and Cancelled, where Add Checklist is greyed out.
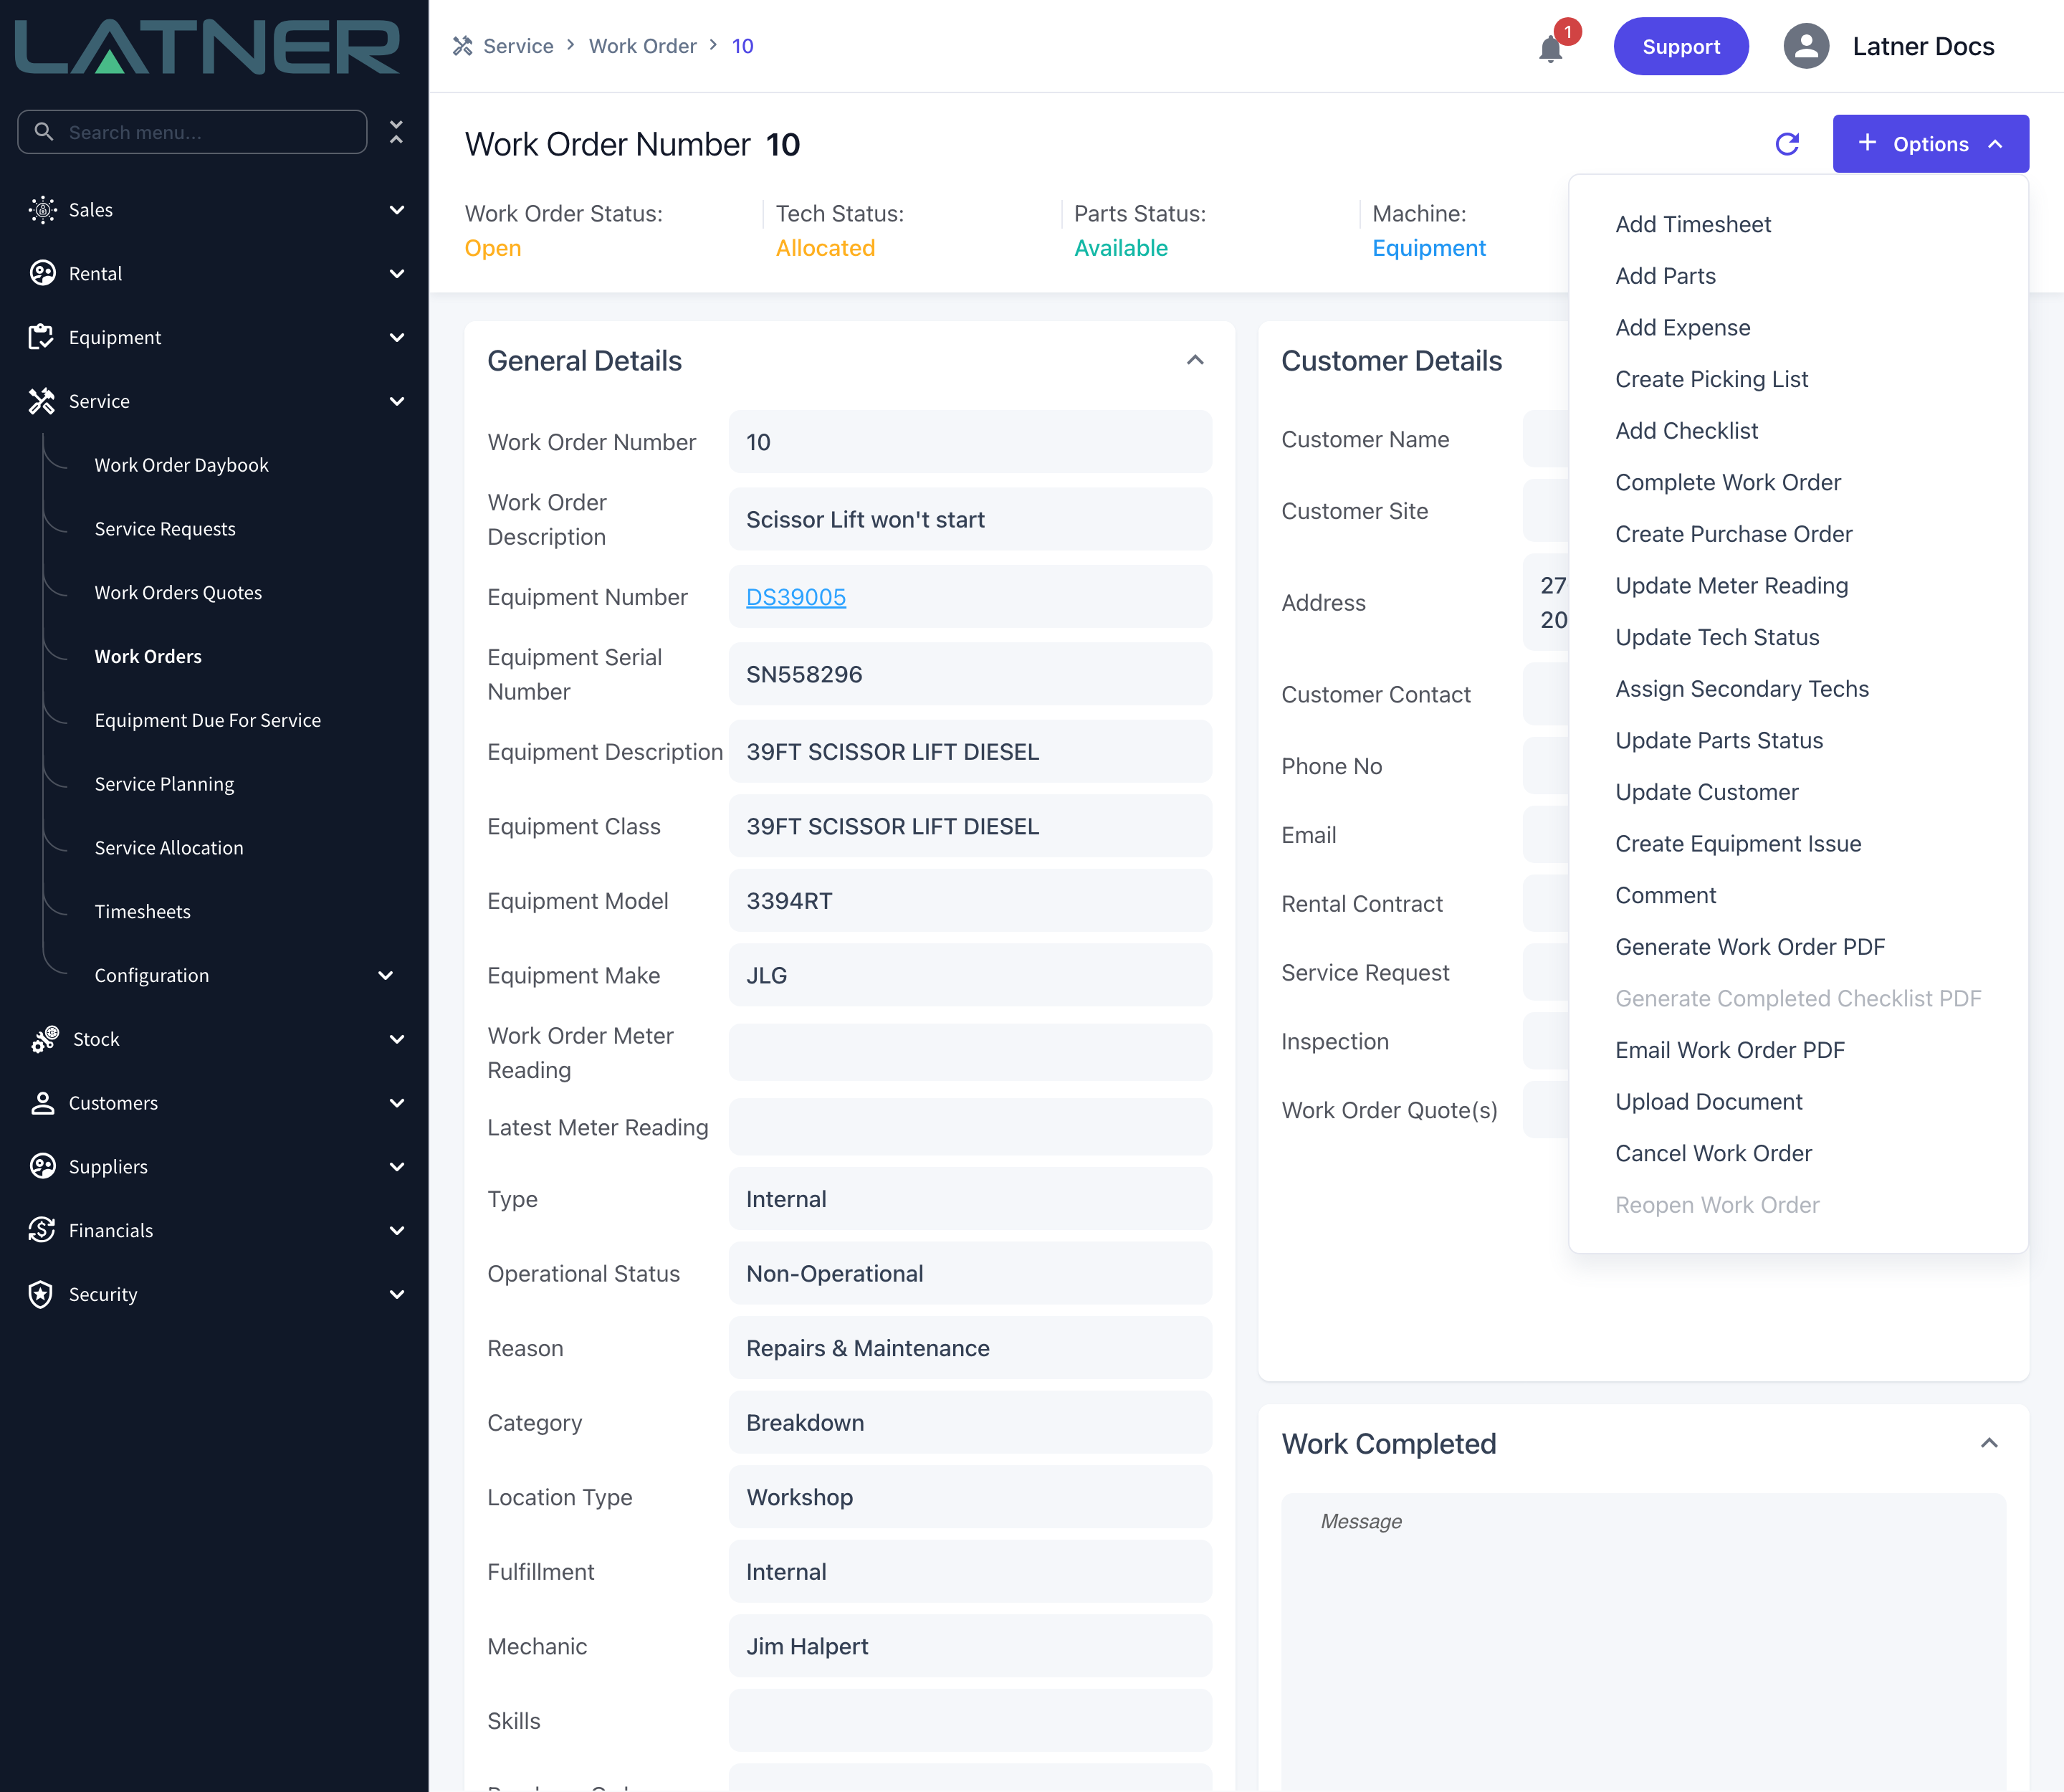
Step 2 - Choose Options › Add Checklist
Select Options at the top right of the work order, then Add Checklist. If you can't see the option at all, you're missing the Add Checklist to Work Order permission rather than looking in the wrong place.
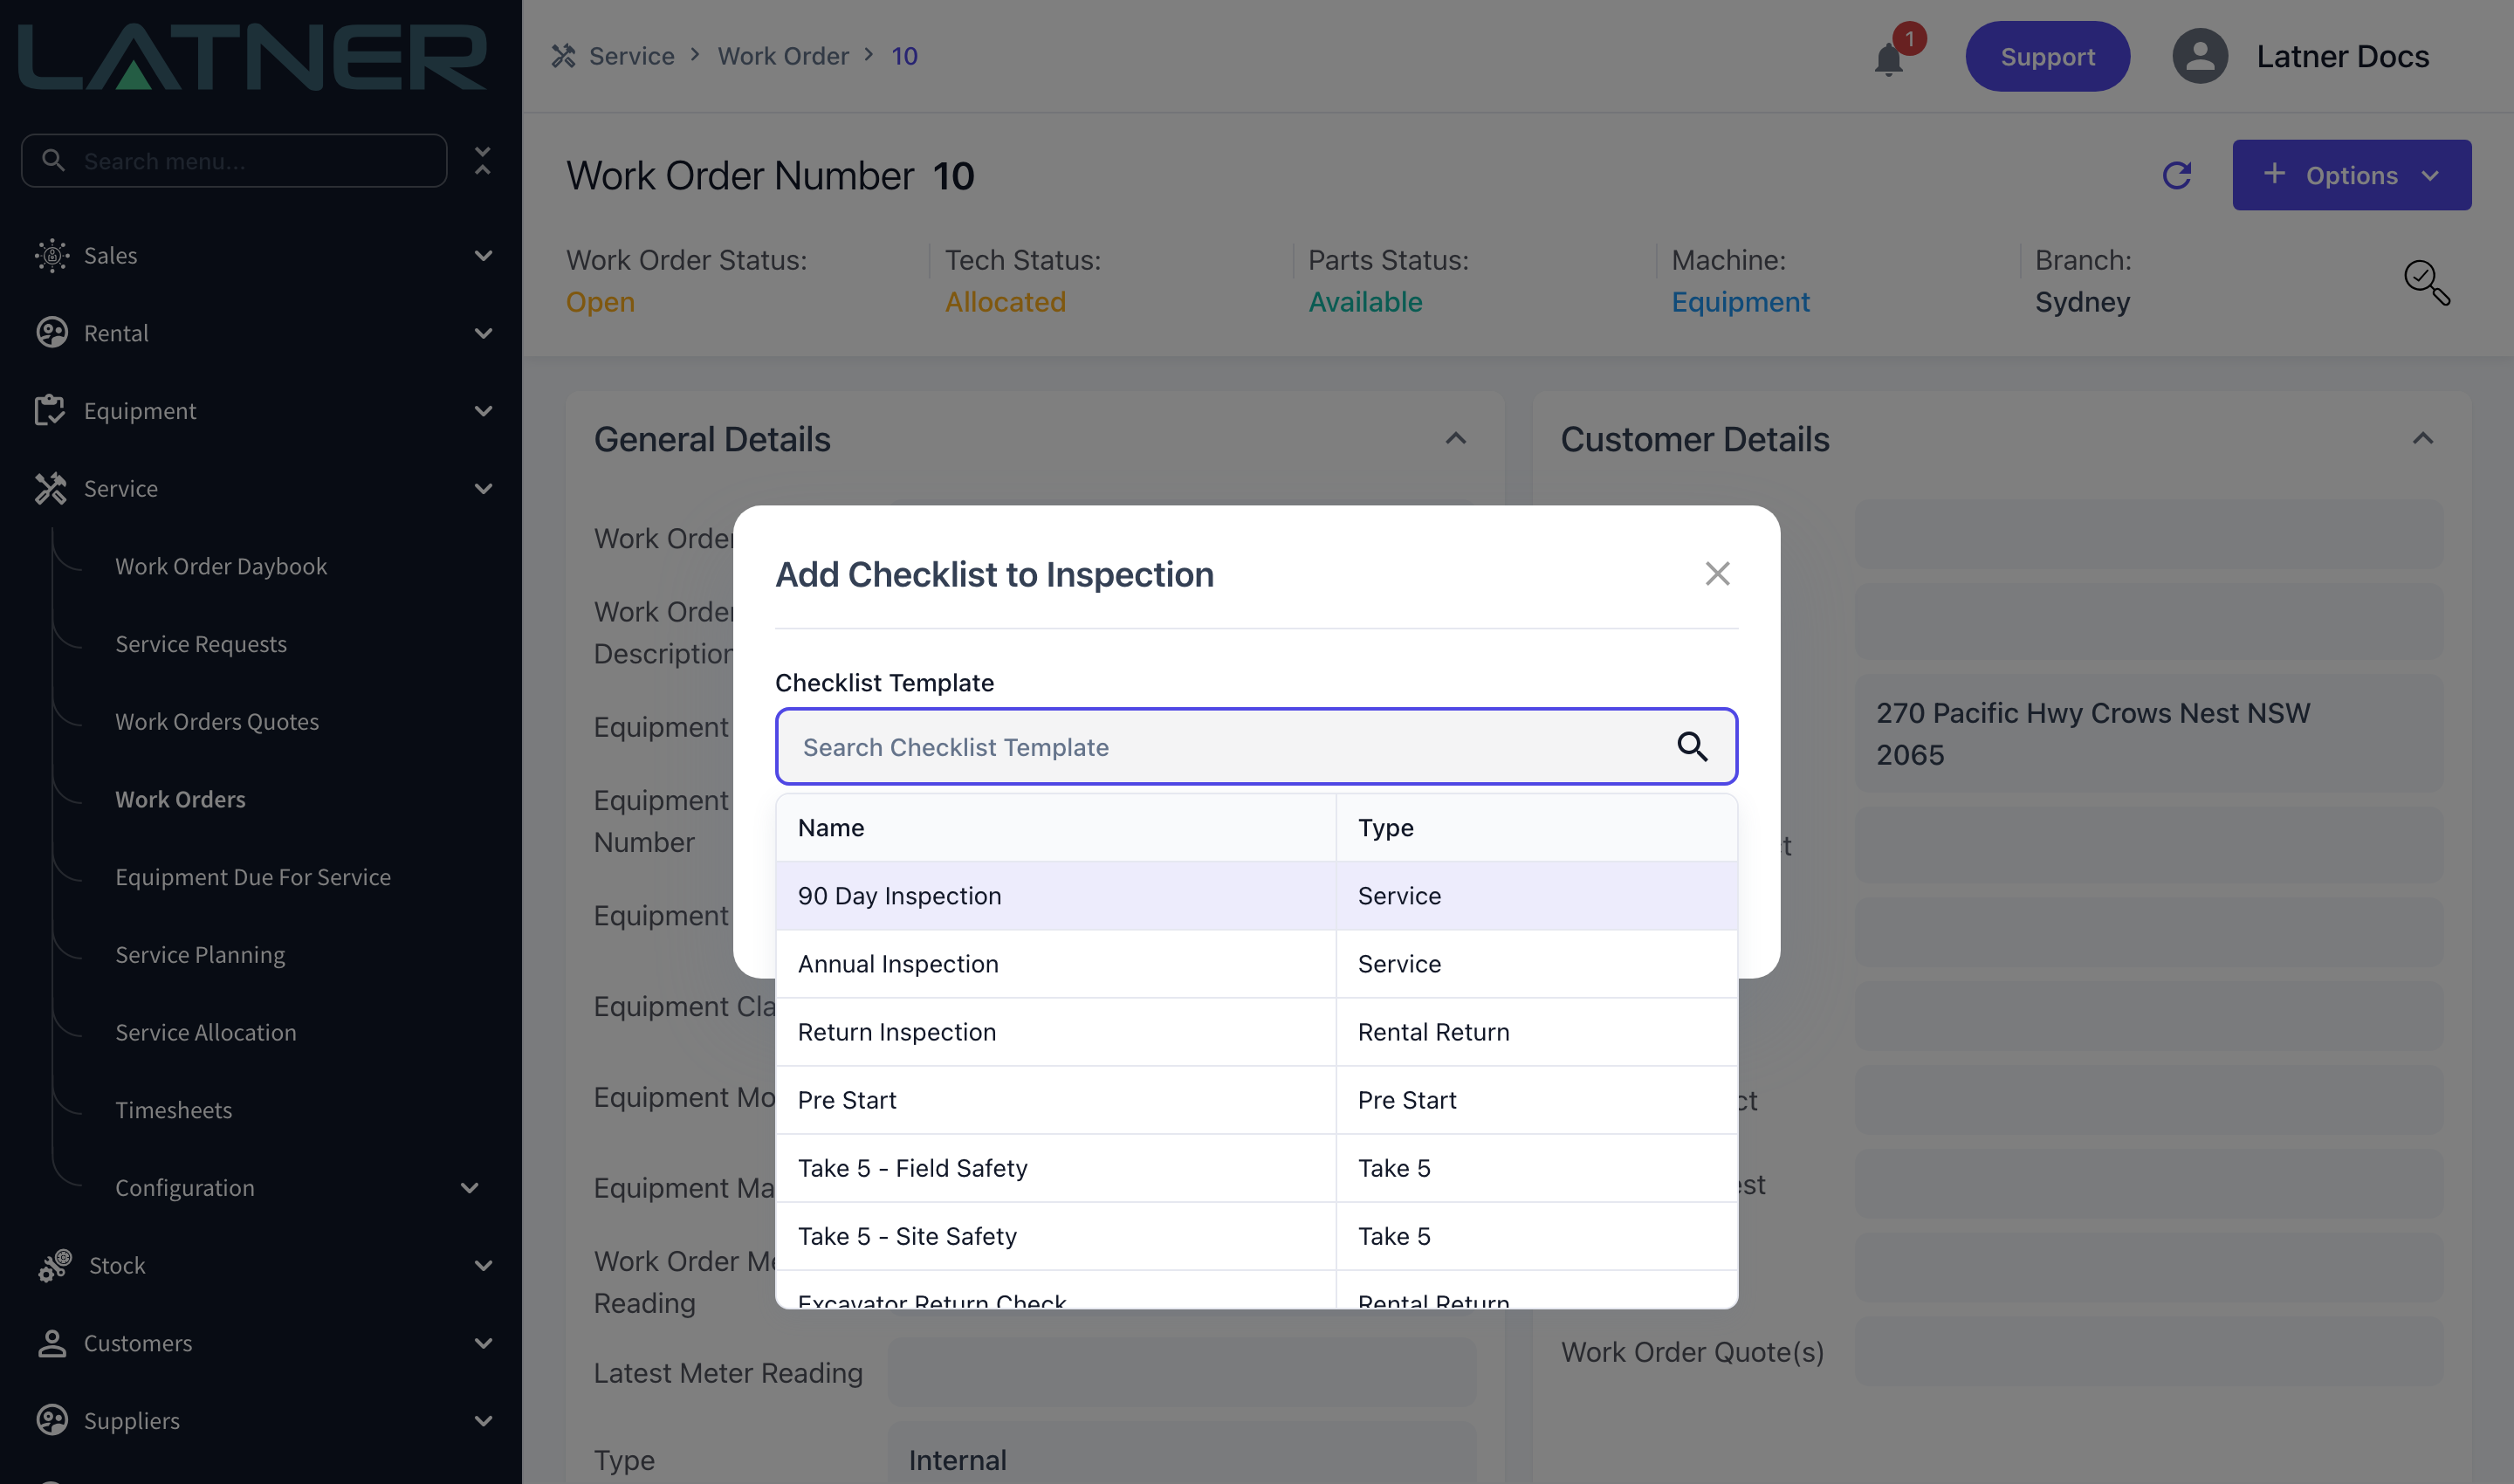
Step 3 - Pick the checklist template
Click into Checklist Template to see every template, or type part of a name to narrow the list down.
-
Checklist Template - required. The template whose tasks are copied onto this work order. This is the only field on the form.
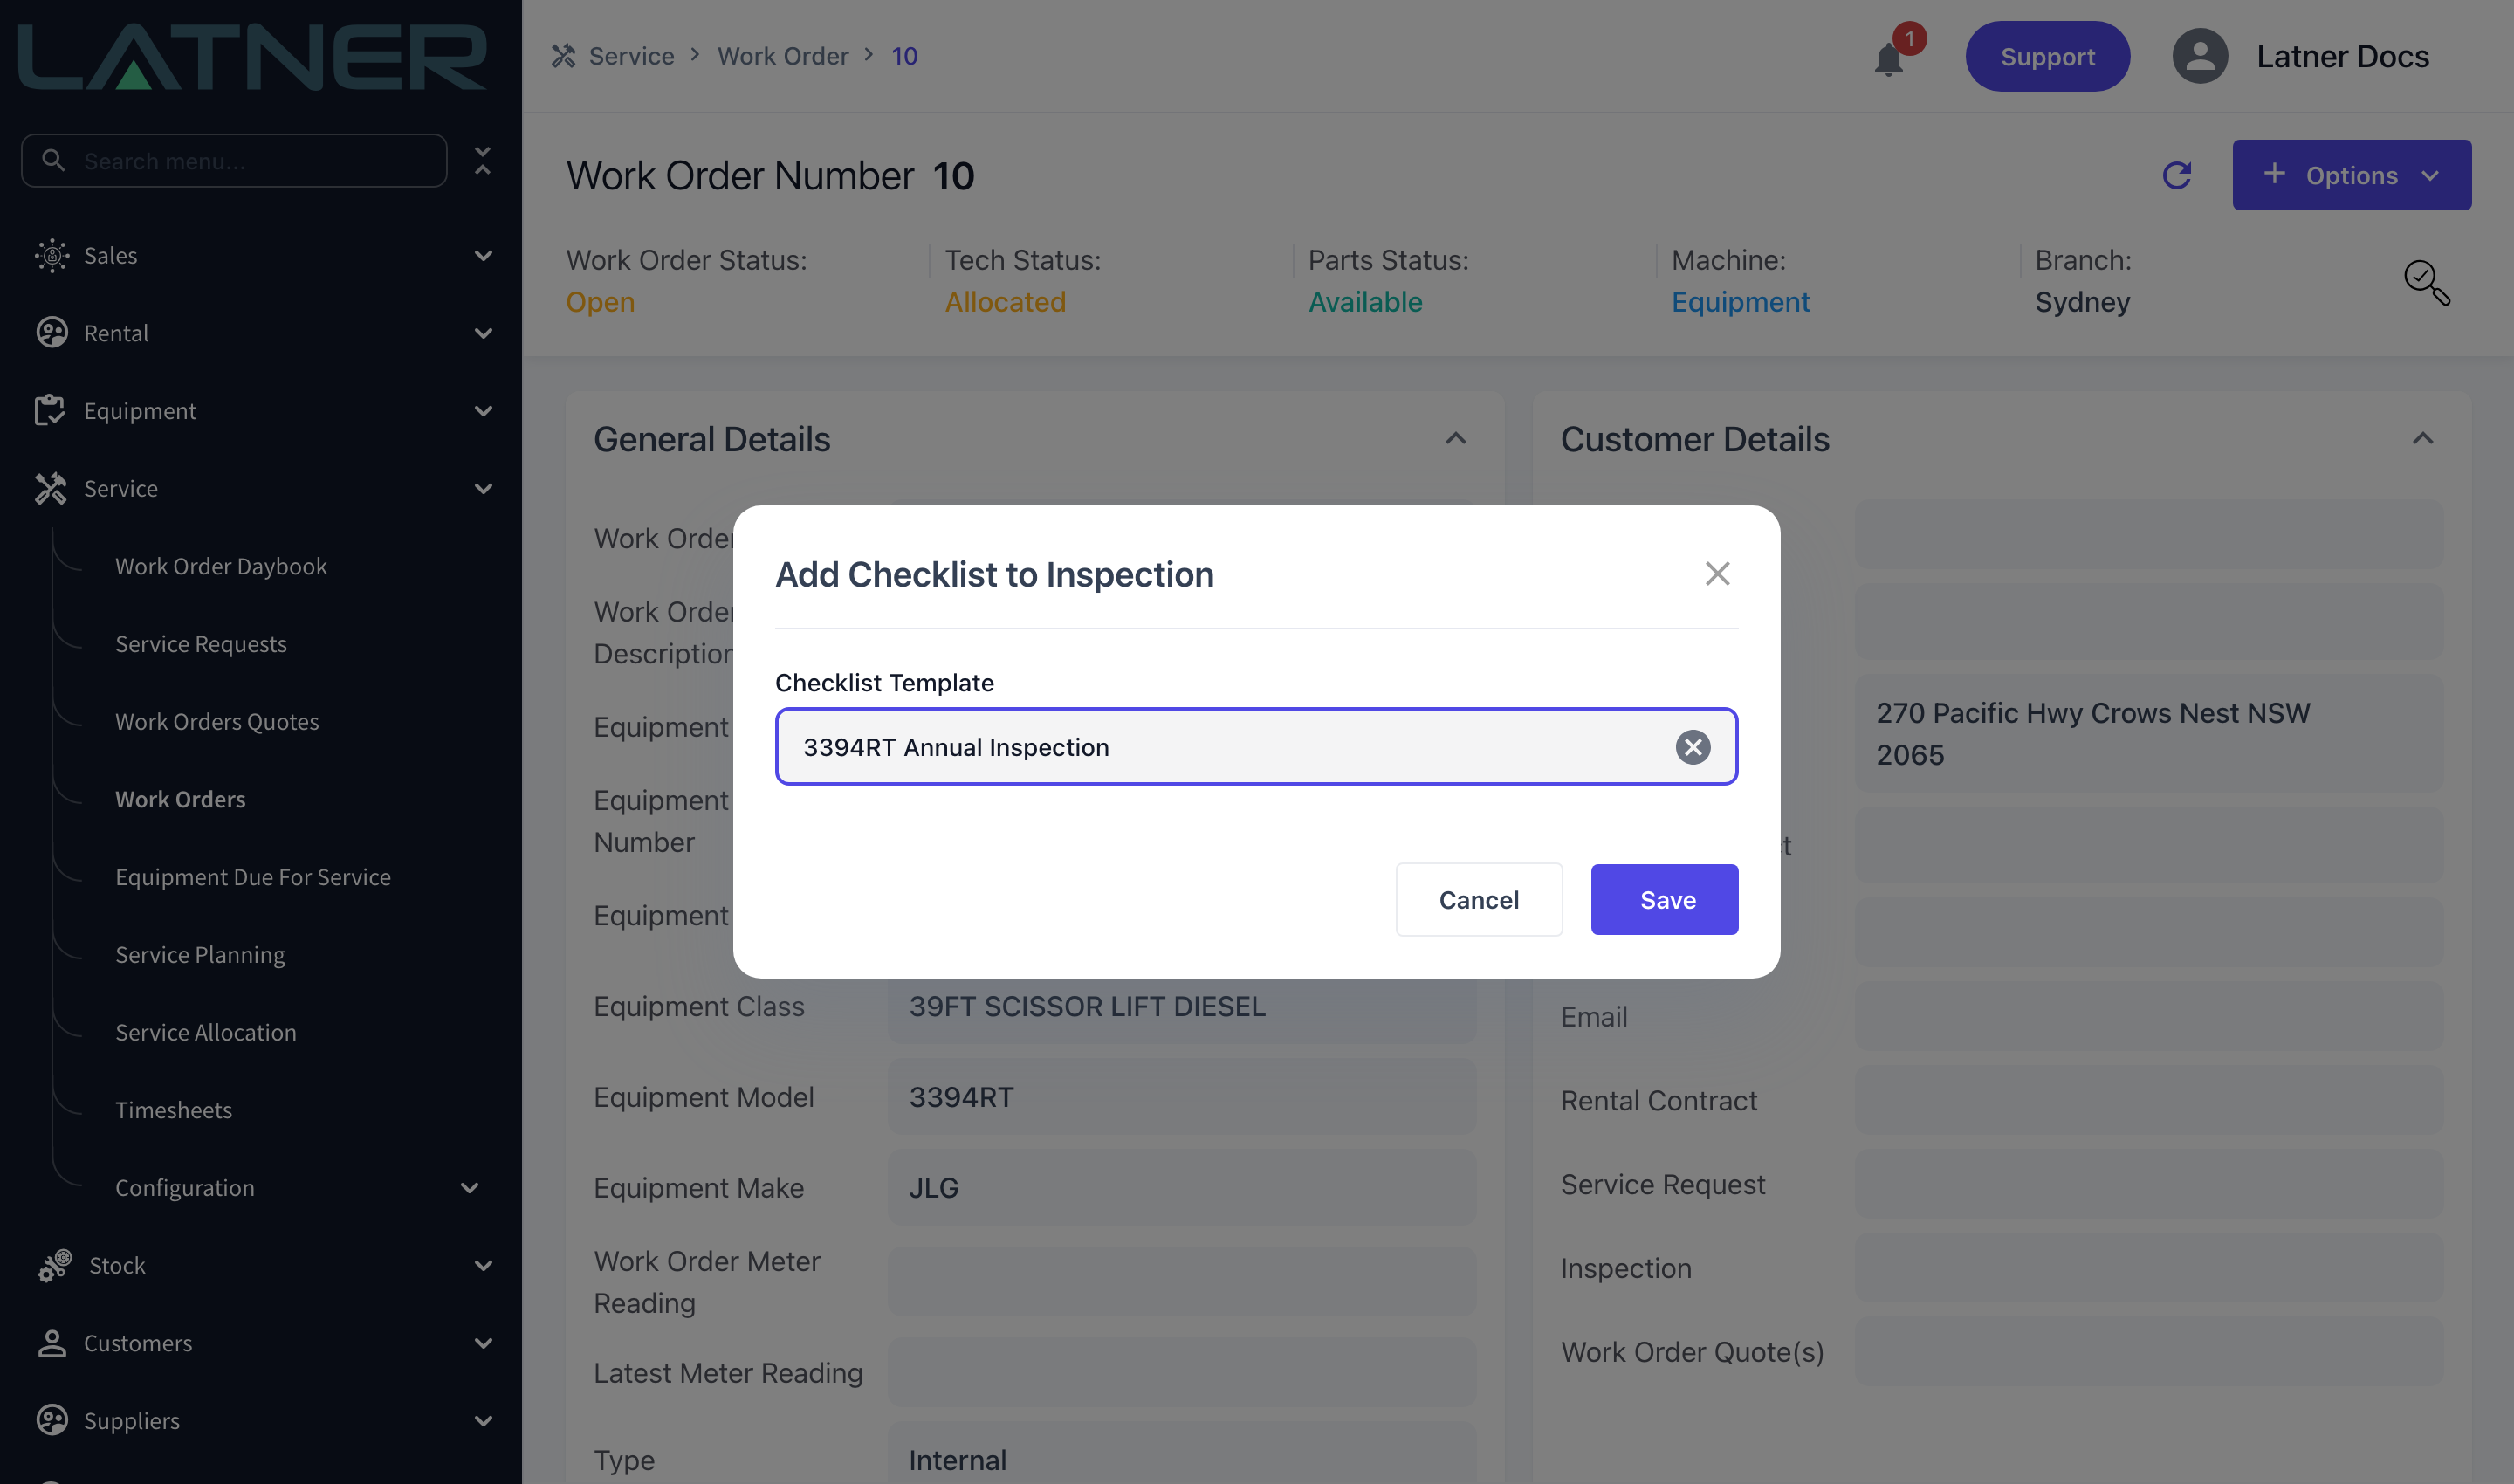
Step 4 - Save
Select Save. Latner confirms with Checklist Added to Work Order and the work order refreshes with the new checklist on it.
After You Add the Checklist
-
The checklist shows on the work order's Checklists tab, with its type, name and a running tally of passes and fails against the total number of tasks.
-
Expanding the row lists the copied tasks in template order, grouped exactly as they were set up.
-
To answer a task from the desktop, right-click its Task Response badge and pick a response. The task's Completed By and Updated Date fill in as you go.
-
When the last task is answered, the checklist itself is marked as completed and stamps the Completed By and Completed Time on the checklist row.
-
Out in the field, the checklist appears on the mechanic's mobile work order as a Complete Service Checklist button once they've accepted the job - and, on field service work orders, once they've arrived on site and finished any required Take 5.
-
Quick Filters › Failed Tasks on the Checklists tab narrows the tab to checklists with a failed point, and the expanded rows to the failed tasks themselves.
-
Once the work order is Completed, Options › Generate Completed Checklist PDF produces a PDF of the answered checklists, which is filed on the Checklist PDF History tab.
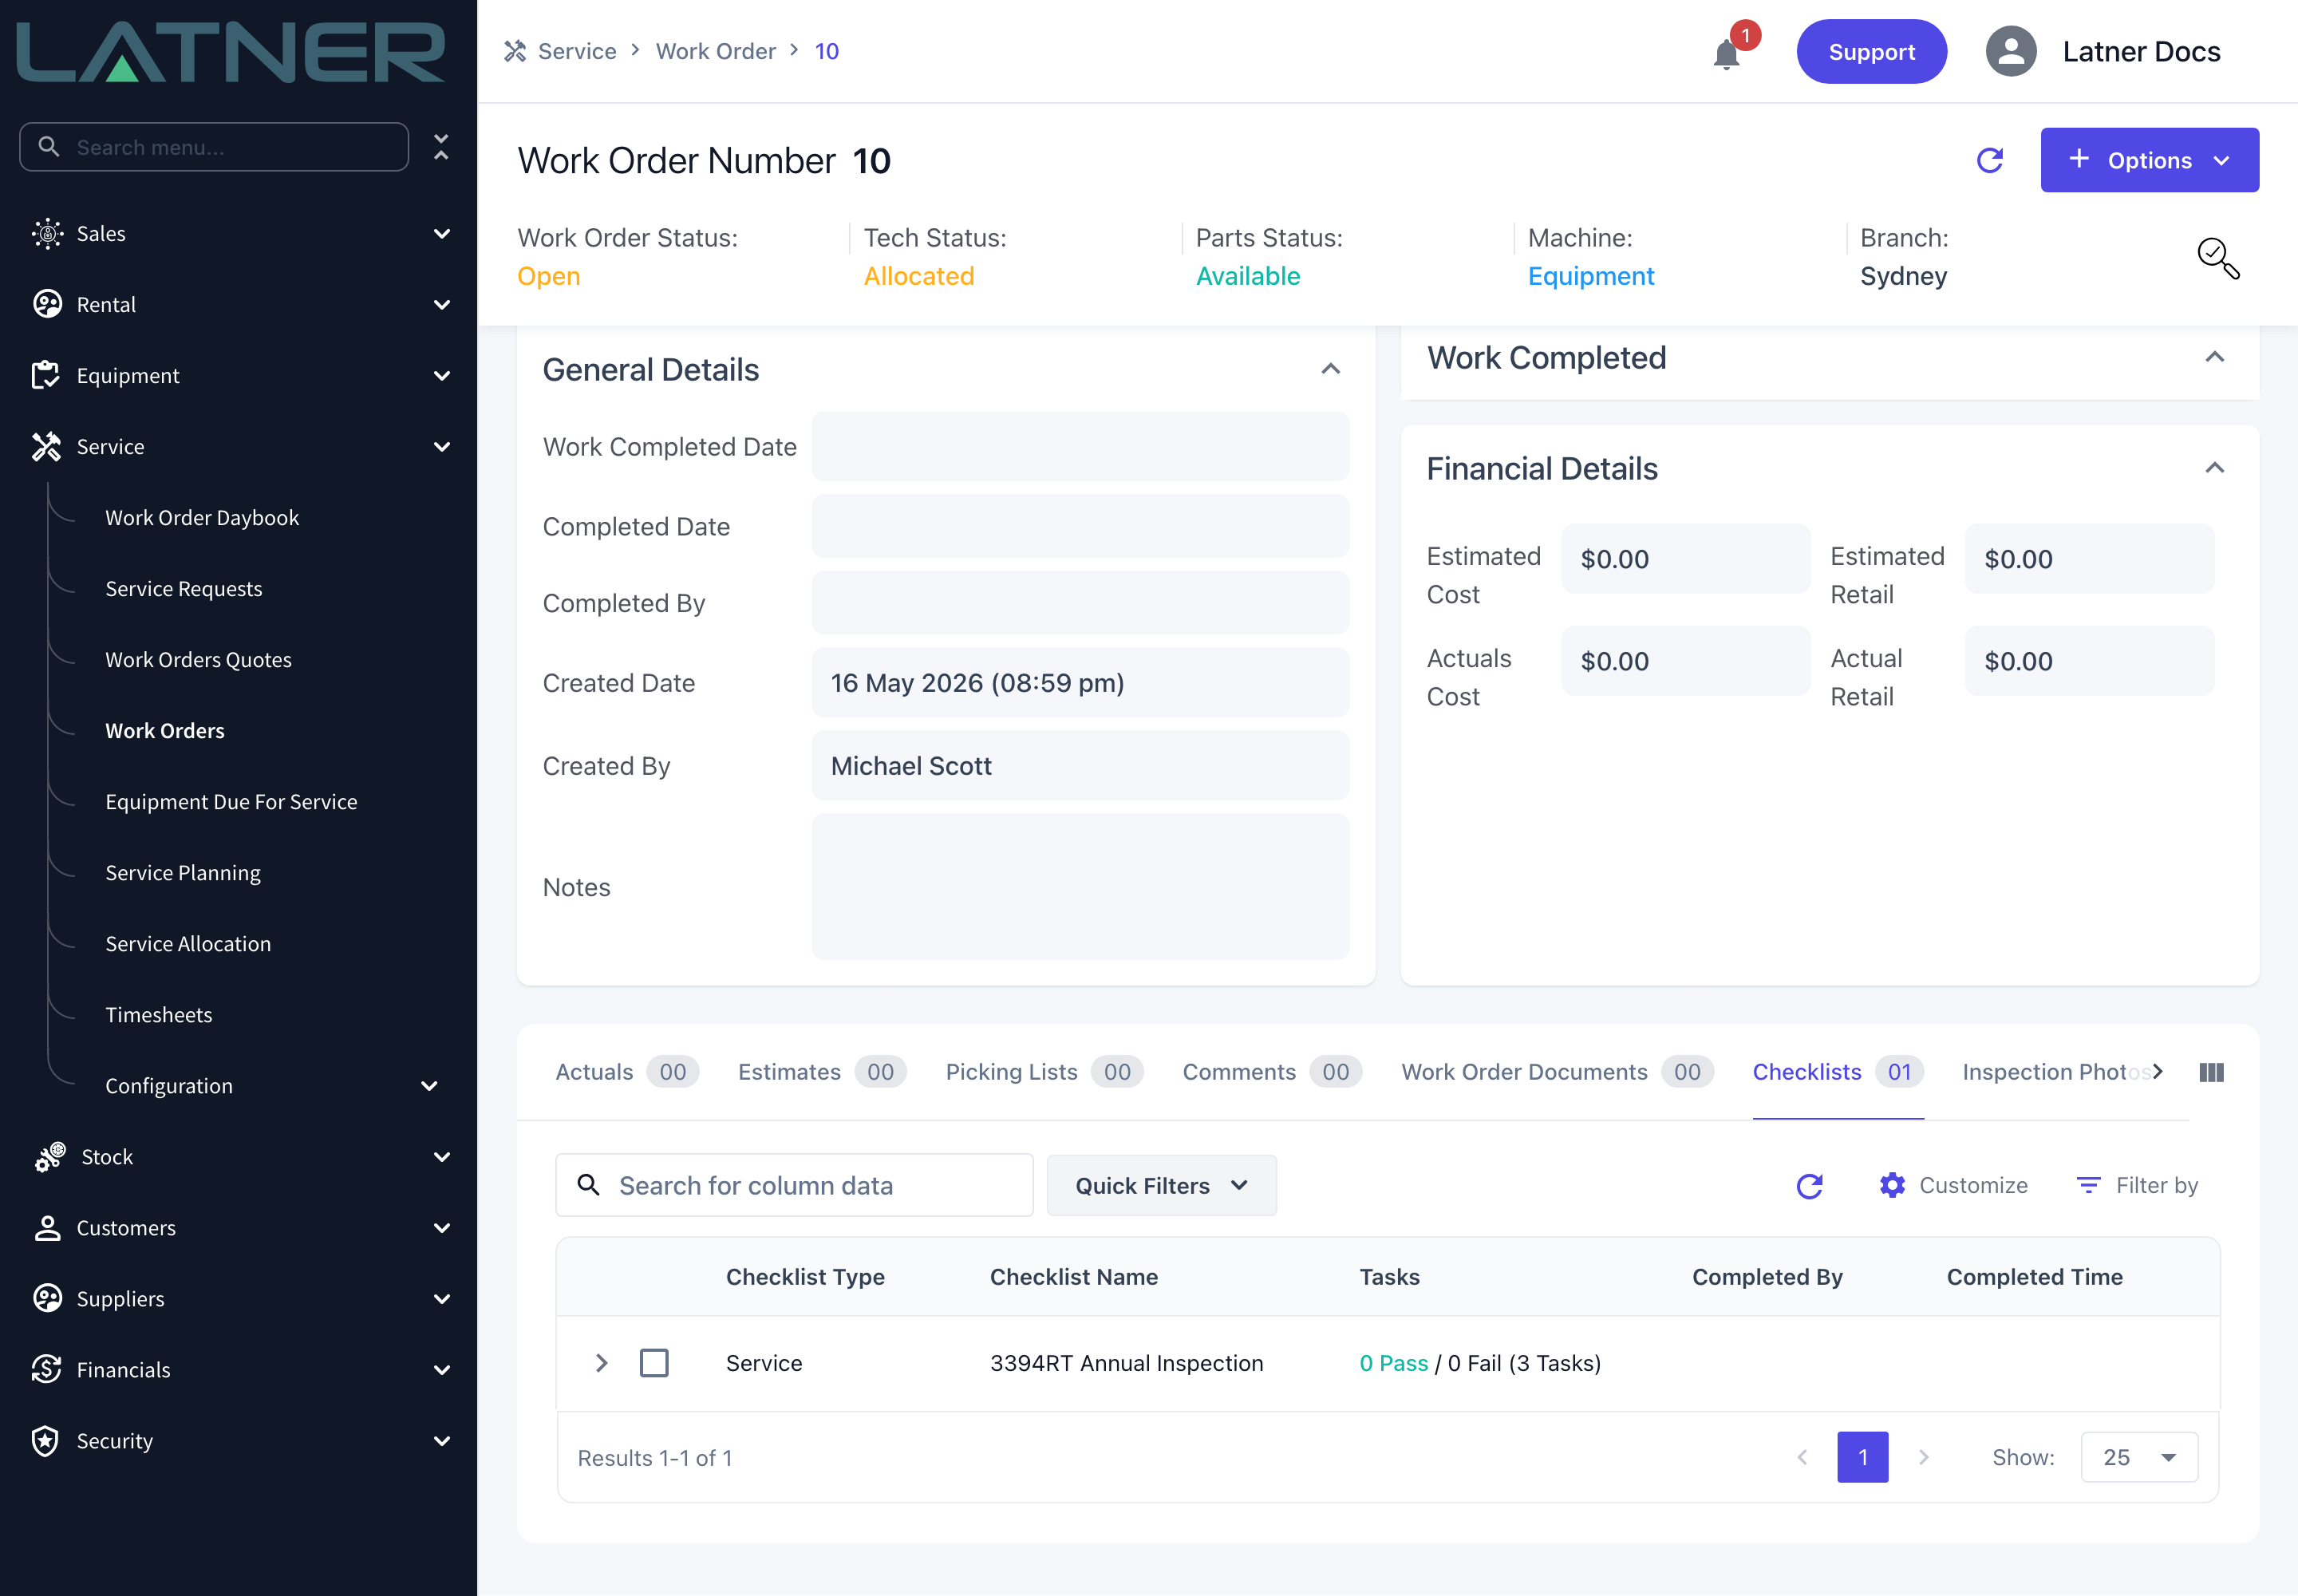
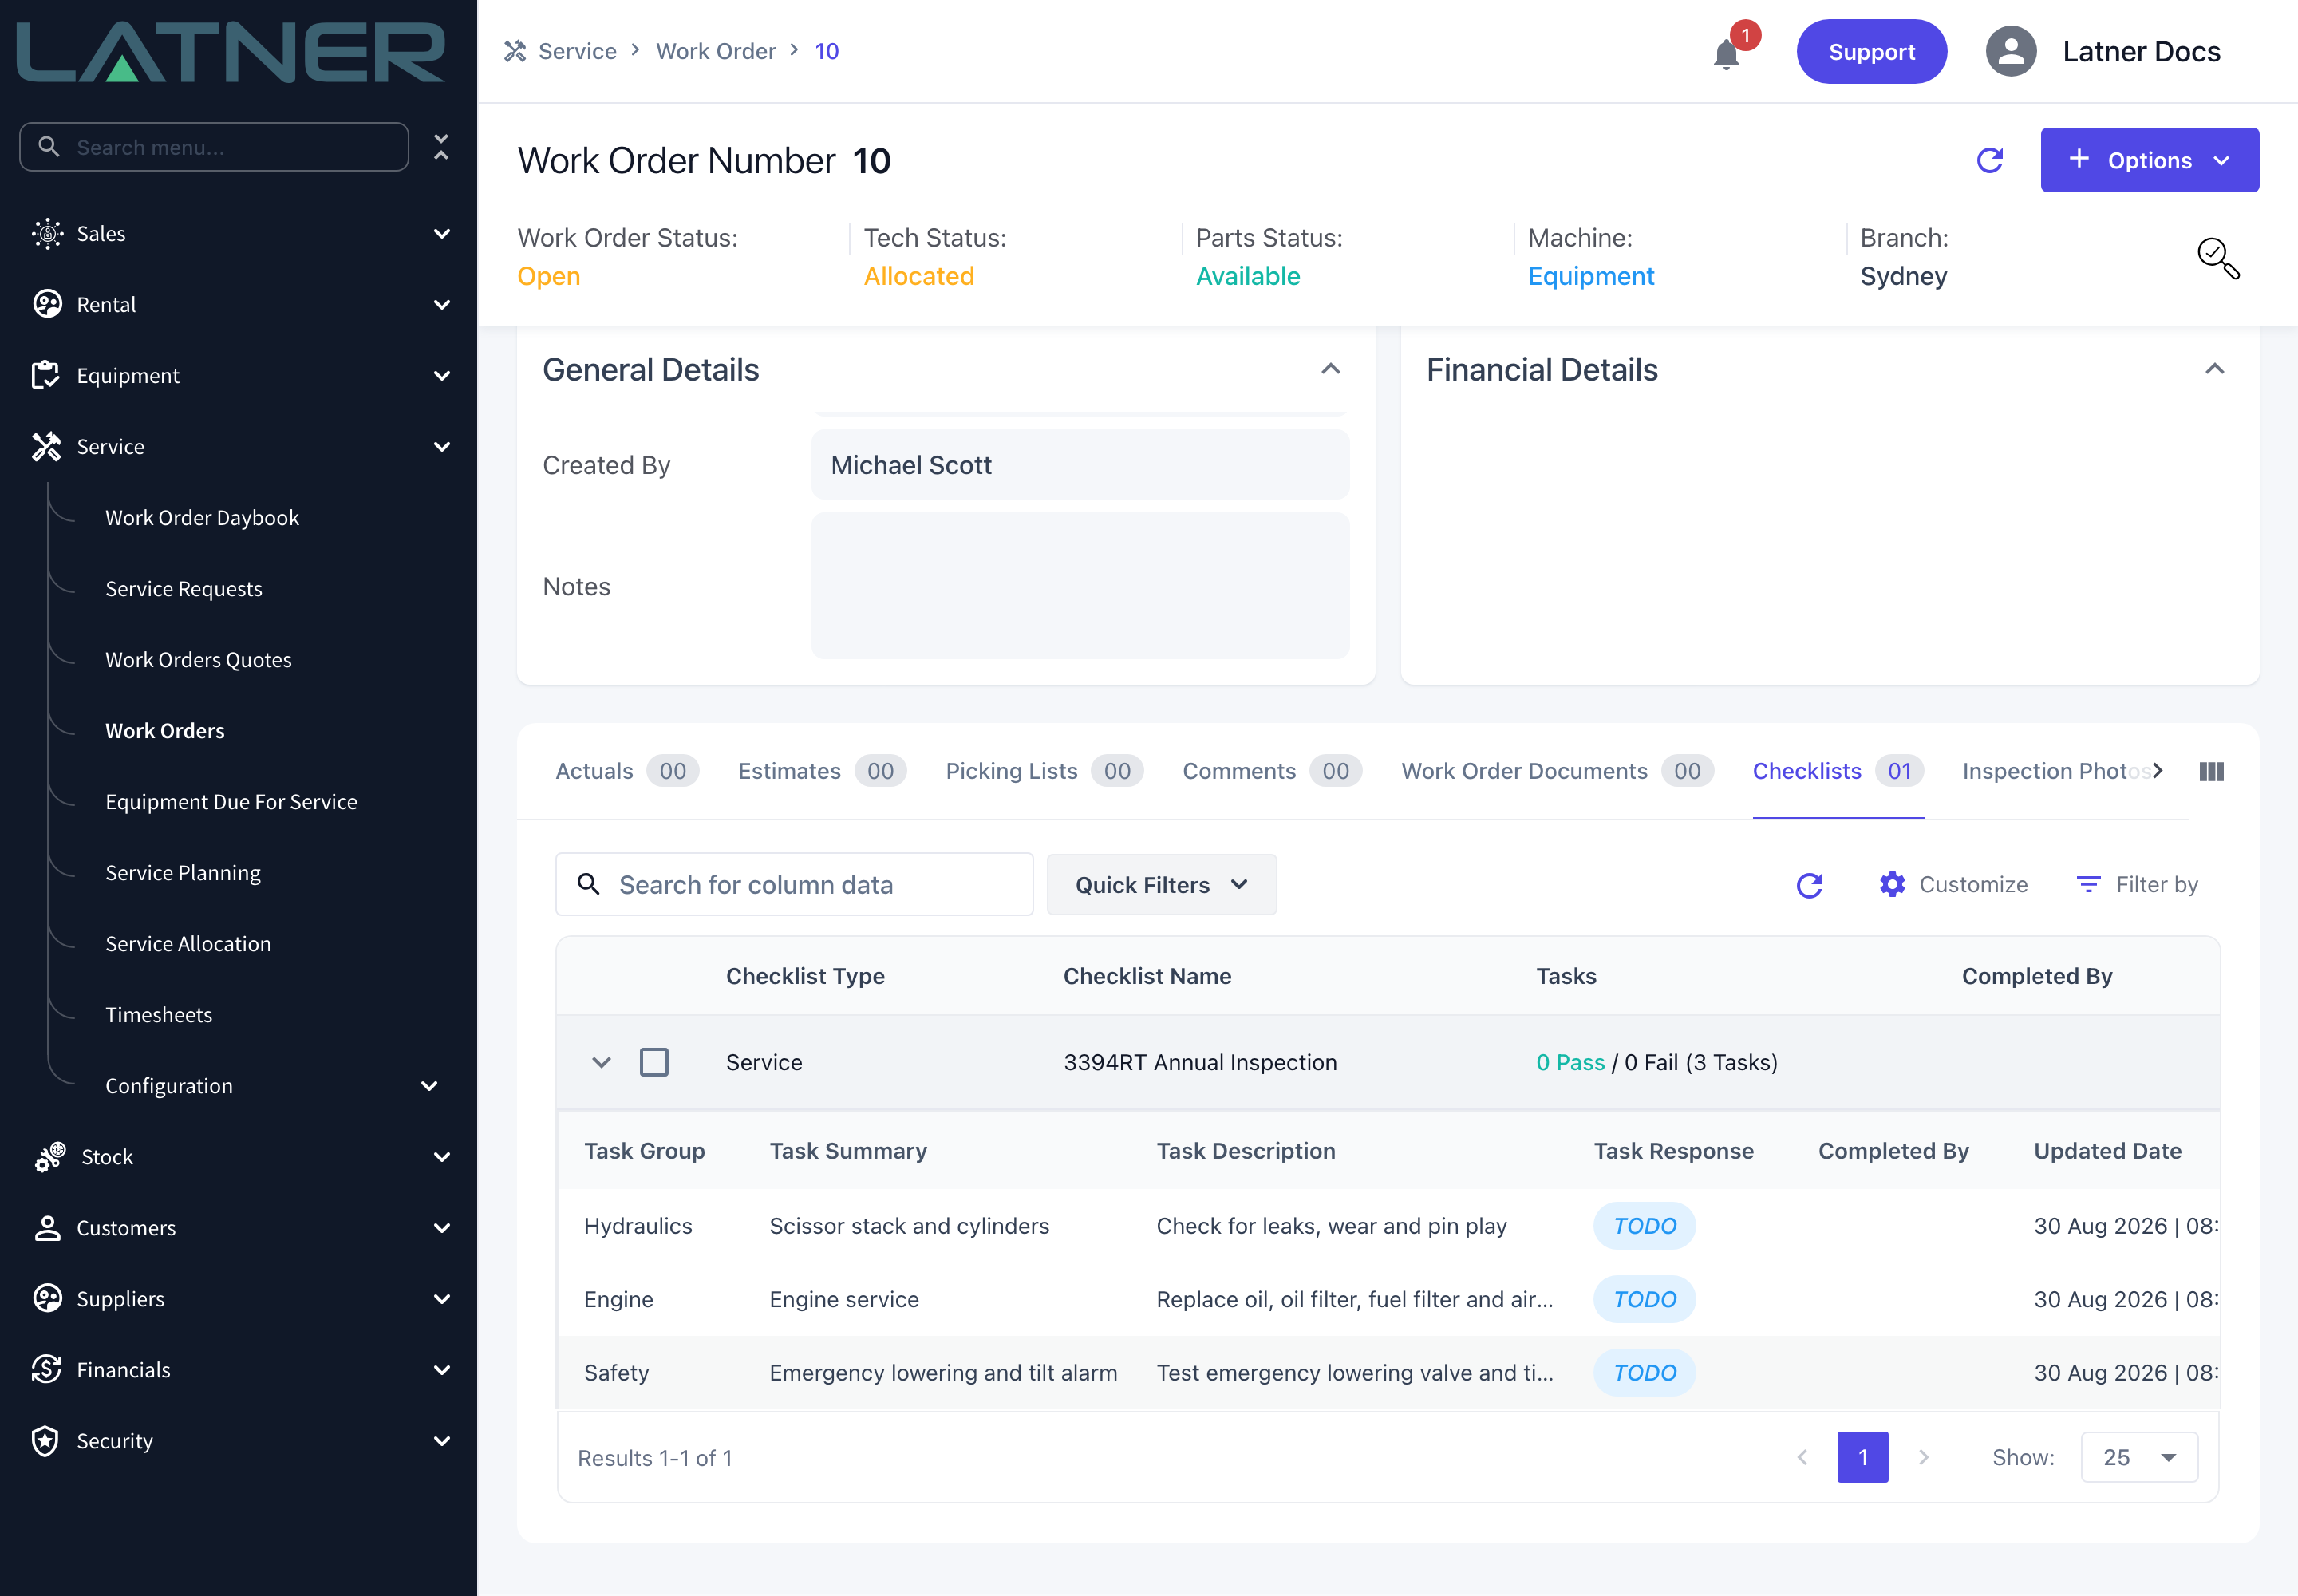
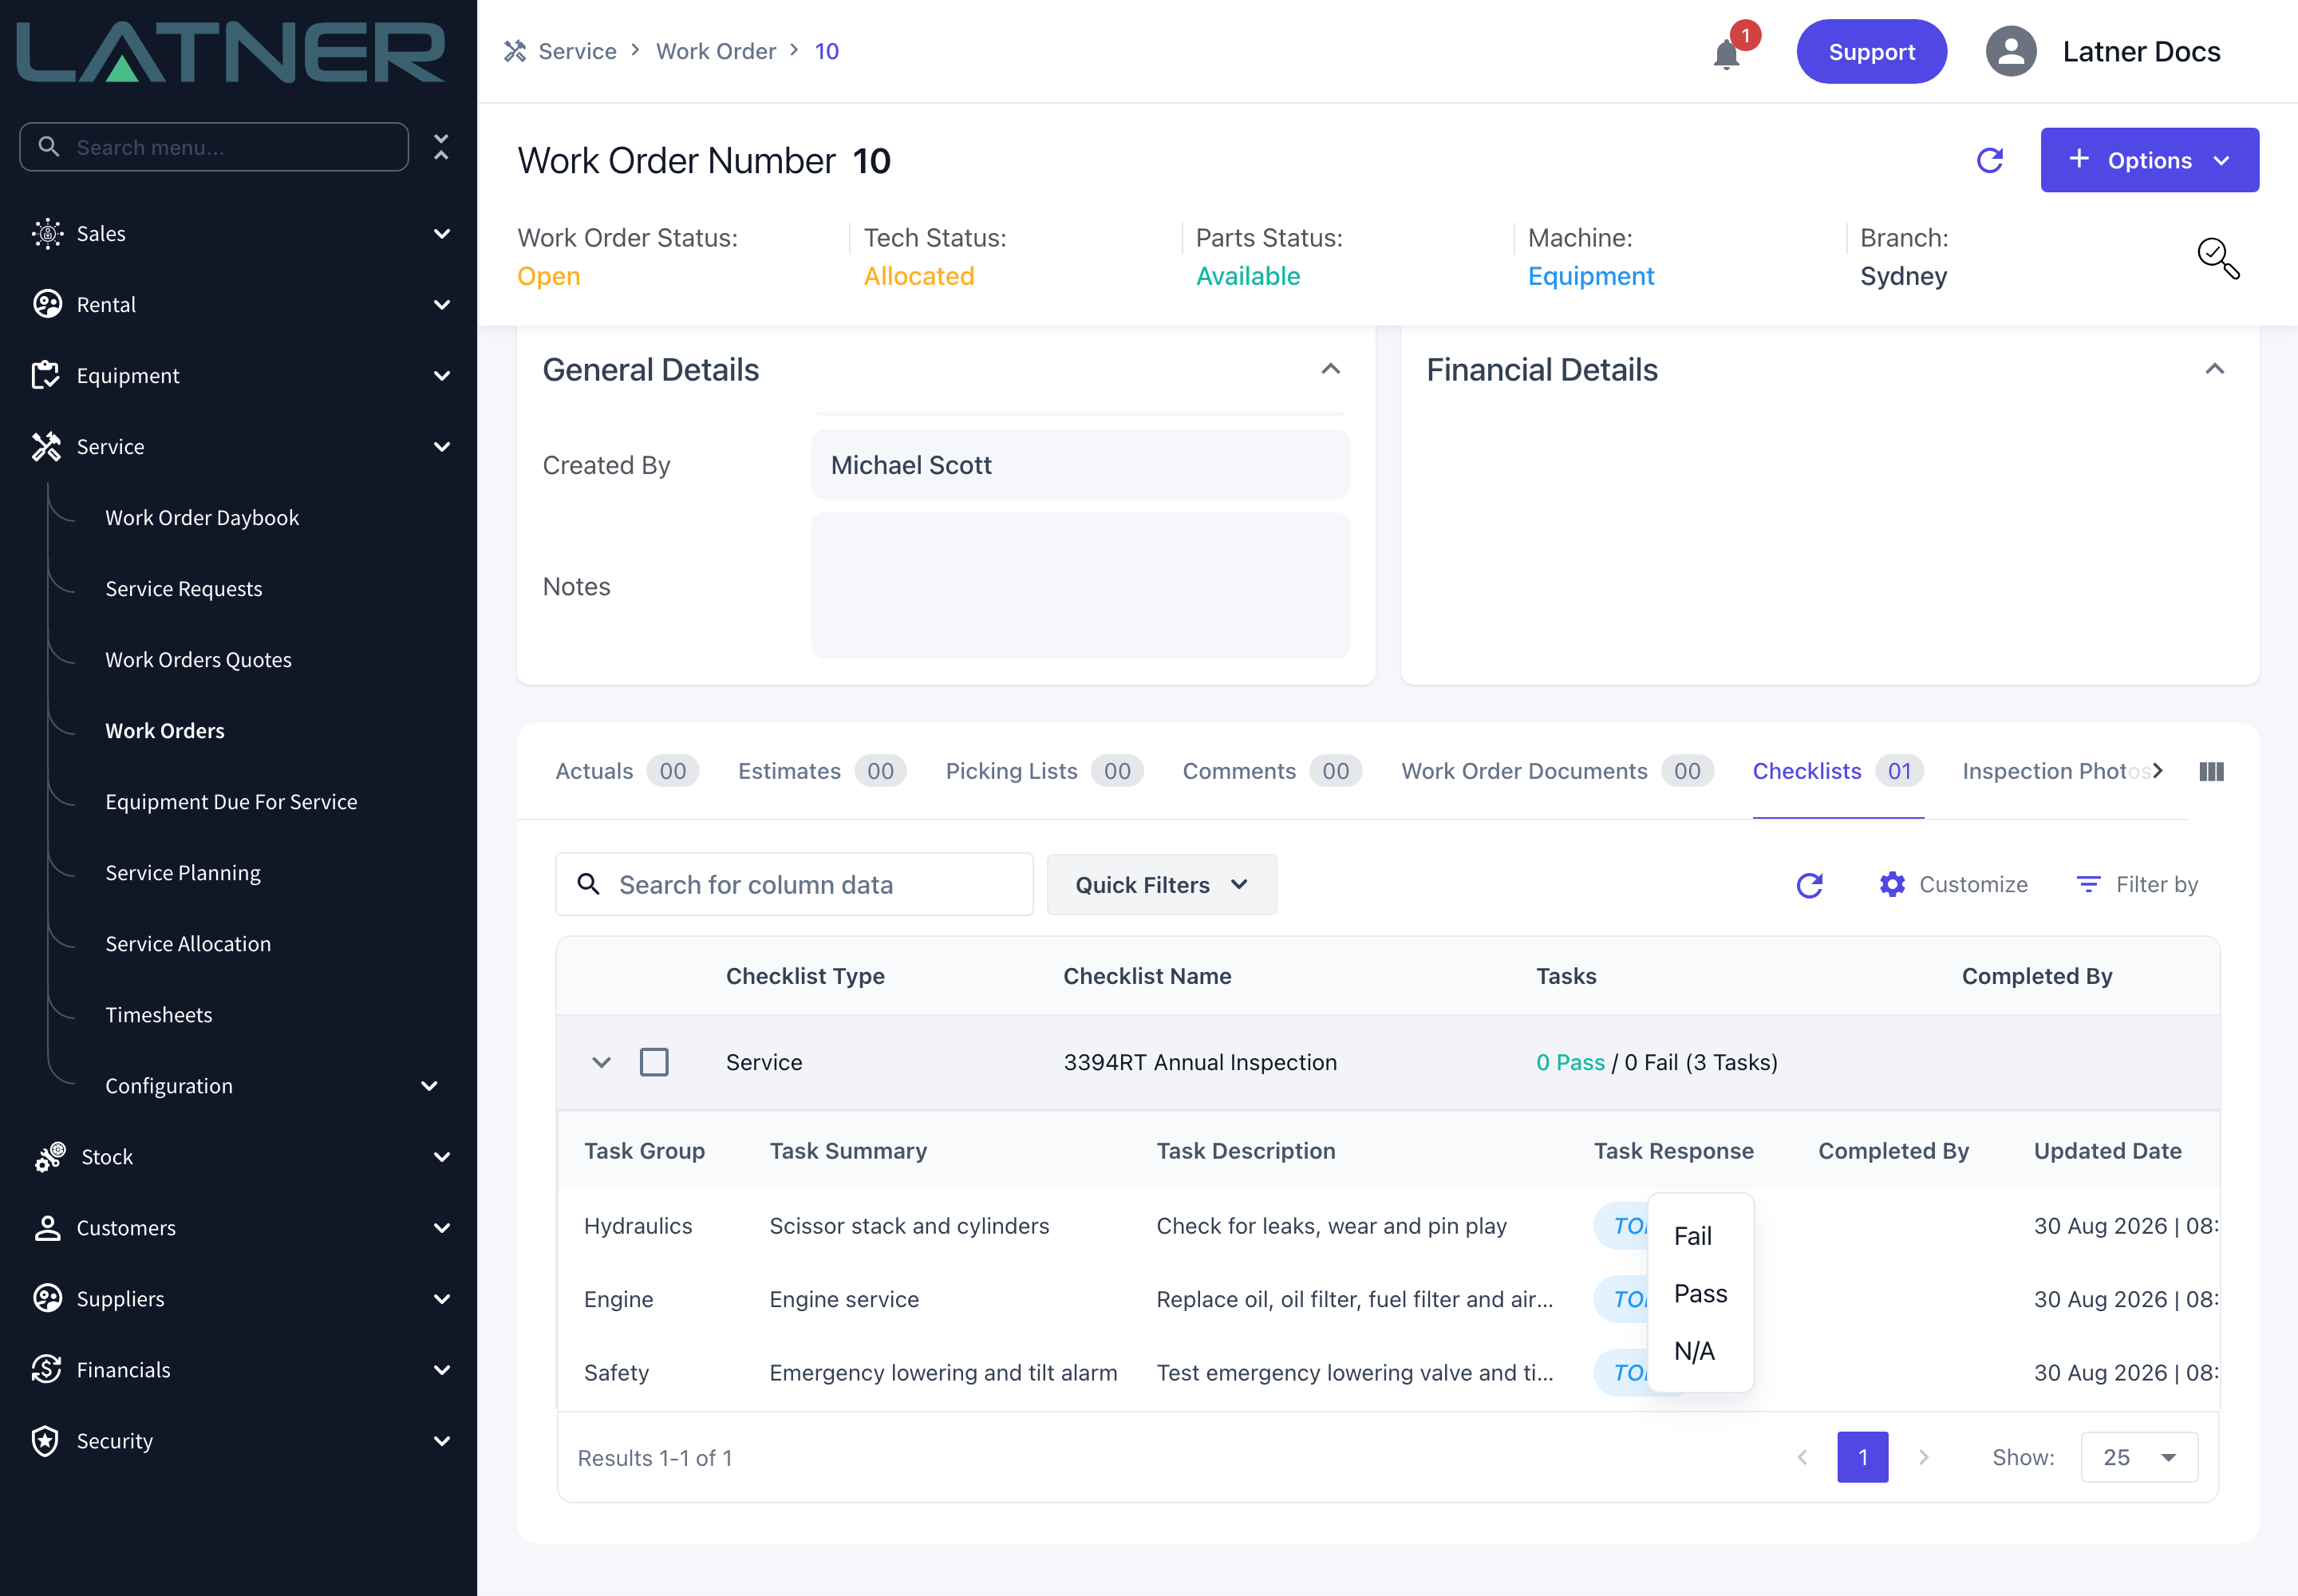
A checklist can't be taken off a work order once it's been added - selecting the row offers no delete. If you add the wrong one, add the right one alongside it and answer the unwanted checklist's tasks as N/A, which clears it out of the way and stops it blocking completion.
FAQs
Watch the Demo
Prefer to watch it? Step through the same flow here.
Stock on Hand Journals for Xero
Stock movements can now be synced to Xero as stock on hand journals.
Serialized Stock Modifications
-
Pre‑sale inspections with checklists are now automatically created when serialized stock is added to a sales order.
-
Transport dockets can now be generated for sales orders.
-
Retail prices can be stored against serialized stock and flow through to sales orders.
-
Serialized stock can now be converted into rental equipment.
-
Serialized stock records now display total cost, purchase price, capital prep cost, sale price, margin, and margin percentage.
-
Serialized stock import now available
Other Updates & Improvements
-
Create Opportunities directly from CRM Daybook Screen
-
Main Equipment Photo included on Rental Contracts
-
Ability to search Sub Hire Equipment Number on Rental Contracts & Work Orders
-
Added a setting to control automatic creation of Sub Hire Invoices
-
Show deposit value on the Rental Contract PDF and Invoice totals
-
Option to postpone Rental Contracts backwards
-
Ability to add Damage Waiver to Rental Contract detail lines
-
Allowed multi-selecting Branches on Transport Allocation
-
Ability to add default Damage Waiver values per Equipment Class
-
Added phone & email details to Rental Contract contact drop down
-
Option to disable Service Schedules on a specific piece of Equipment
-
Option to delete Service Schedules that are set on an Equipment Class / Model
-
Ability to mark Equipment as Customer‑Owned when selling
-
Ability to search notes from Equipment screen
-
Contact Name visible on Equipment Due for Service screen
-
Added Meter Reading to Public Equipment Portal
-
Ability to choose visible tabs in Public Equipment Portal
-
Added Service Category and Reason as Revenue Group By filter options
-
Added Purchase Order Number to Cycle Billing preview
-
Added Payment Terms filter to Cycle Billing screen
-
Allow Minimum Charge and Excess Hours rate to be changed after invoicing has started
-
Prices can now be stored against labour services in Configuration
-
Allowed adding fuel lines in Additional Items
-
New table view for tracking Stock movements
-
Ability to drag modal dialog screens
-
New Digital Time Picker on mobile screens
-
Plus a range of smaller fixes and performance improvements.