
Welcome to the December 2025 release of Latner Software, the last one for 2025! We hope you all enjoy a Merry Christmas and a Happy New Year, and we look forward to supporting you in 2026.
This release delivers several highly requested enhancements across Bulk Stand Downs, Converting Equipment, Timesheets Input Type and Calendar Month Rate Type, along with a range of quality‑of‑life improvements and workflow refinements. Please see below for the full details of what has changed.
New Features
Bulk Stand Down for Rental Contracts
Bulk Stand Downs let you apply the same stand down to many rental contracts at once, so a public holiday or a week of rain can be credited across the whole fleet without opening a single contract.
Overview
When a site shuts, it usually shuts for everyone on it. Rather than adding a stand down to each rental contract by hand, the Bulk Stand Down screen lets you filter every on-hire line in your branch, tick the ones affected and apply one stand down to the lot.
-
Every line in a run gets the same From Date, To Date, Discount % and Stand Down Reason.
-
Latner groups the selected lines by rental contract and creates one Stand Down per contract, with a detail line for each of that contract's selected lines.
-
Runs happen in the background. The History tab tracks each one as Pending, Running, Completed or Failed, right down to the individual line.
-
Only Equipment, Sub Hire Equipment and Package lines can be stood down, and only on rental contracts that are Reserved or Active.
-
The discount is a billing reduction, not a flag. A stand down removes (stood down days x Discount %) from the days billed, so 100% takes the period off the invoice entirely and 50% halves it.
Before You Begin
You'll need the following before the screen will do anything useful.
|
Requirement |
Where to Find It |
|---|---|
|
Create Bulk Stand Downs permission |
Security › Permission Groups › Rental › Options. It controls both the menu item and the run itself. |
|
At least one Stand Down Reason |
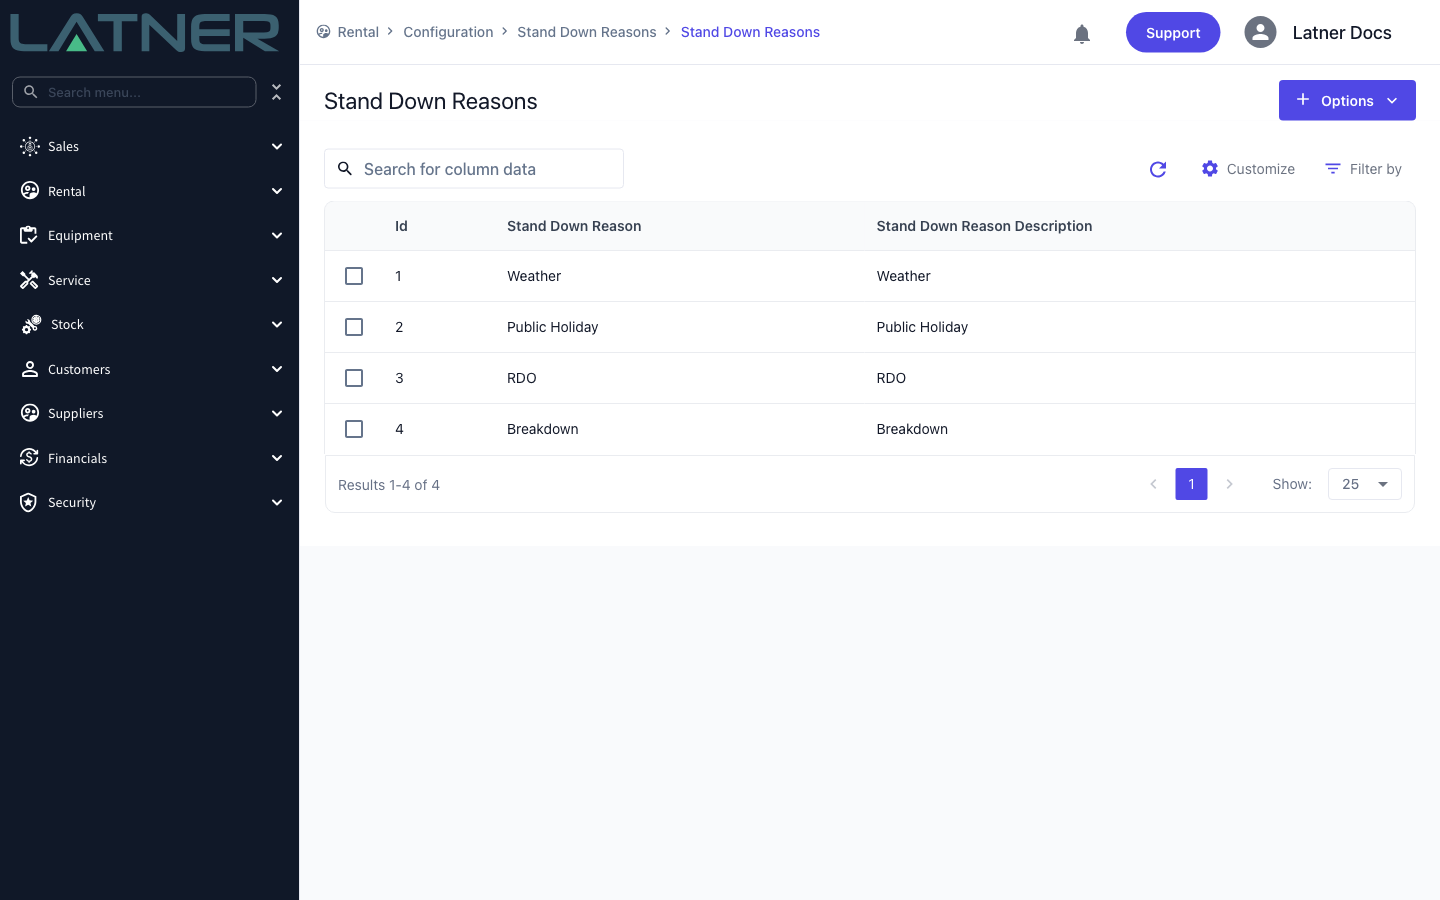
Rental › Configuration › Stand Down Reasons. Latner ships with Weather, Public Holiday, RDO and Breakdown. |
|
Rental contracts that are Reserved or Active, with lines on hire |
Rental › Rental Contracts |
Bulk Stand Downs only ever looks at Reserved and Active rental contracts. That restriction is built into the screen and isn't one of the filters, so a line on a Completed or Cancelled contract will never appear no matter how you search.
Creating a Bulk Stand Down
Step 1 - Open the Bulk Stand Down screen
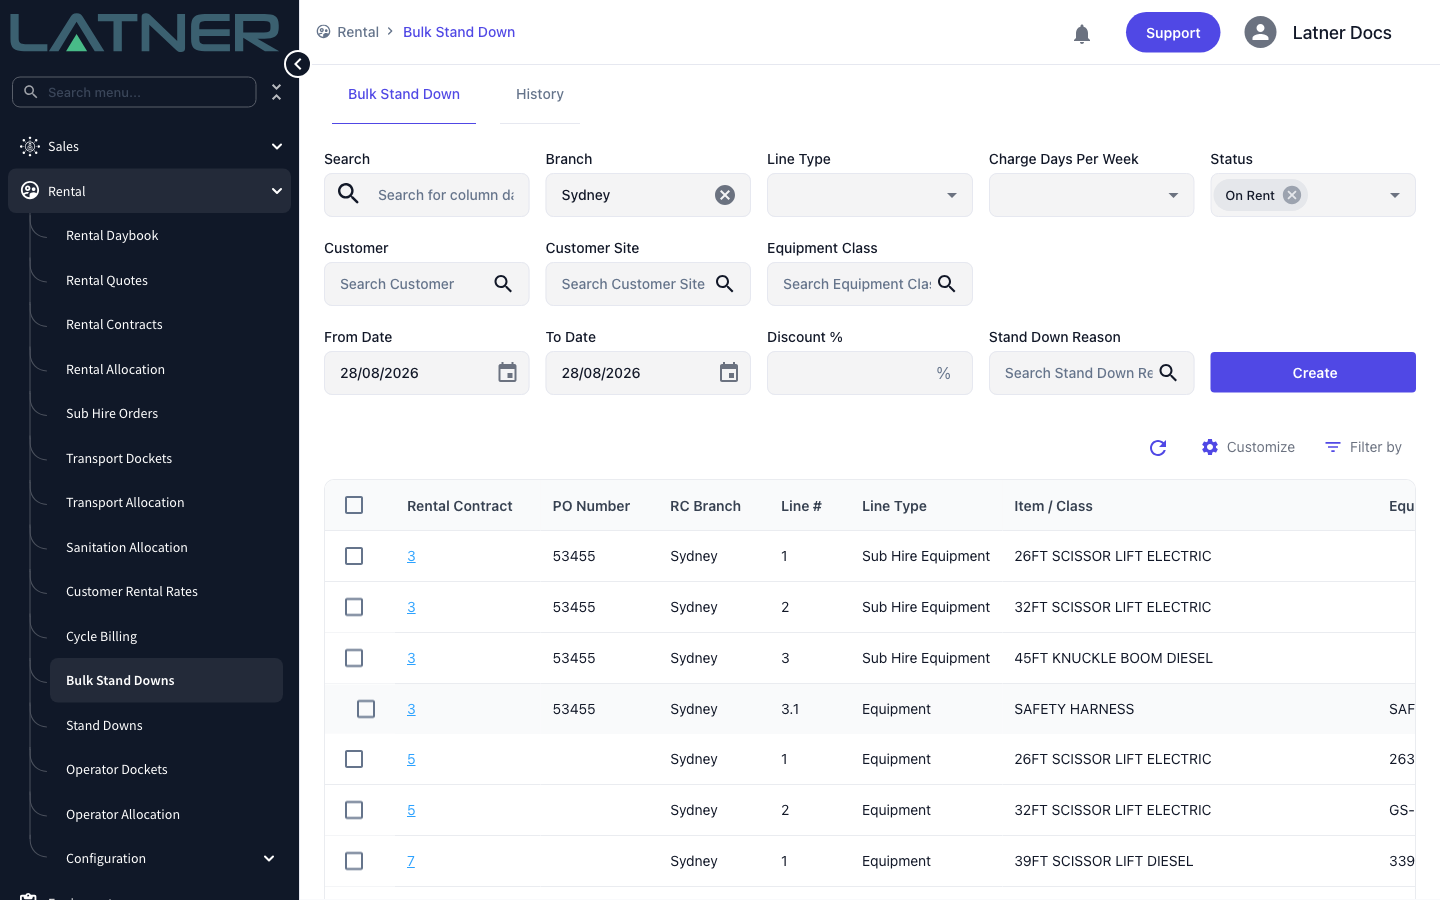
Go to Rental › Bulk Stand Downs. The screen has two tabs: Bulk Stand Down, where you build and start a run, and History, where you review the runs that have already gone through. It opens with your own branch selected and the line Status set to On Rent.
Step 2 - Narrow the list to the lines you need
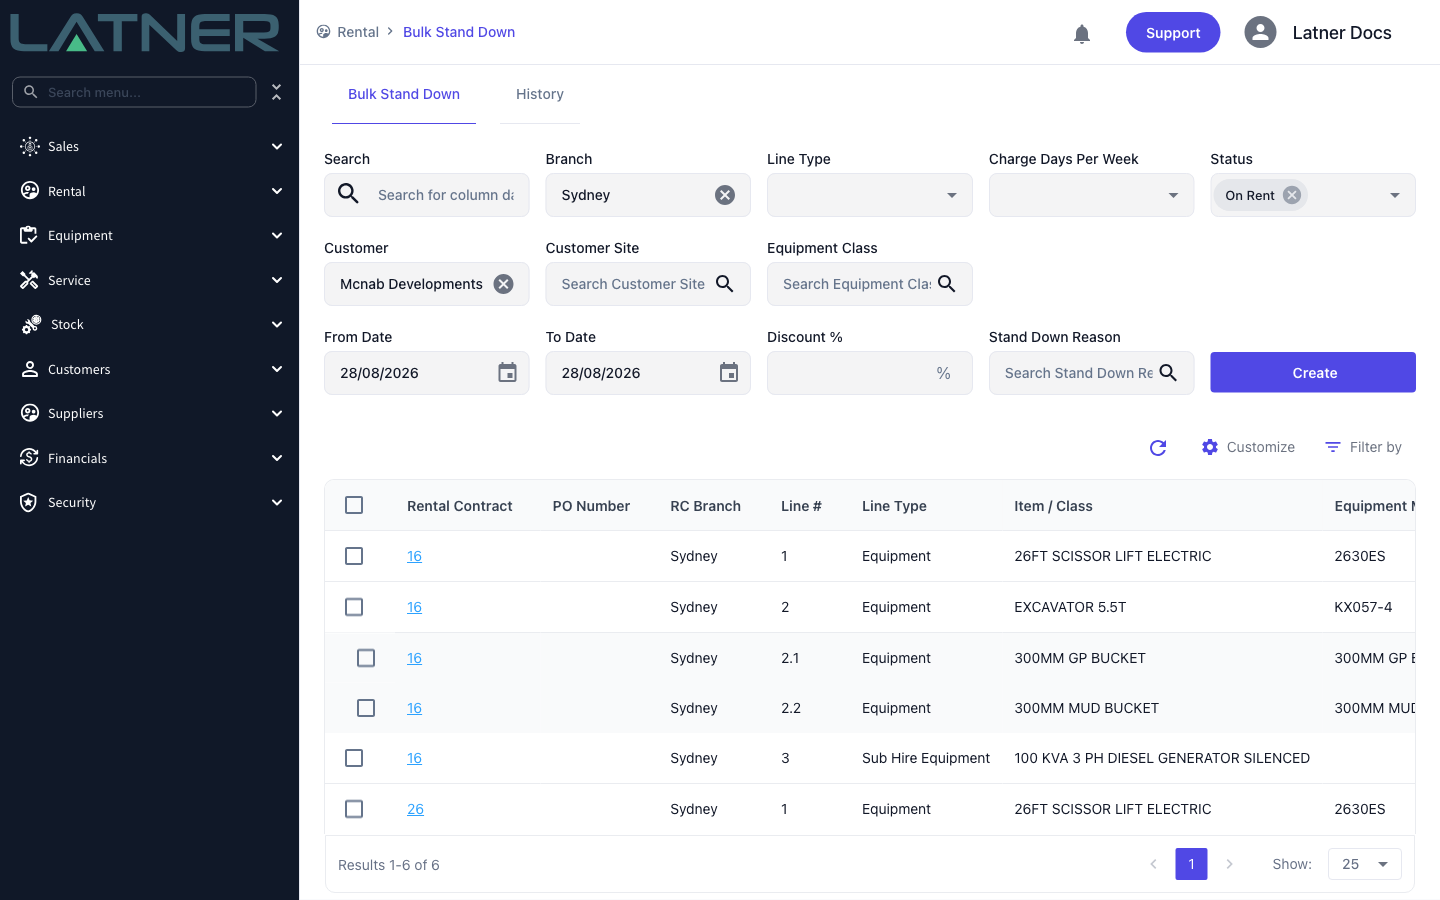
The filters across the top rebuild the table as you change them. Nothing is committed at this stage, so filter freely.
-
Search - free text across the listed columns.
-
Branch - defaults to your own branch, and takes more than one.
-
Line Type - Equipment, Sub Hire Equipment or Package. Other line types (Transport, Fuel, Admin and so on) can't be stood down and aren't offered.
-
Charge Days Per Week - 5 Days, 6 Days, 7 Days, Saturday or Weekend. Handy when a shutdown only matters to contracts that charge on the days in question.
-
Status - the line's own status, defaulting to On Rent. You can add others, such as Pre-Allocated or Off Hire.
-
Customer and Customer Site - the usual pair for a site shutdown. Customer Site only offers sites belonging to the customers you've picked.
-
Equipment Class - narrow to a class where only some of the fleet is affected.
Step 3 - Select the lines
Tick the lines you want stood down, or use the checkbox in the table header to take every row on the page. The toolbar above the table keeps a count of what you have selected.
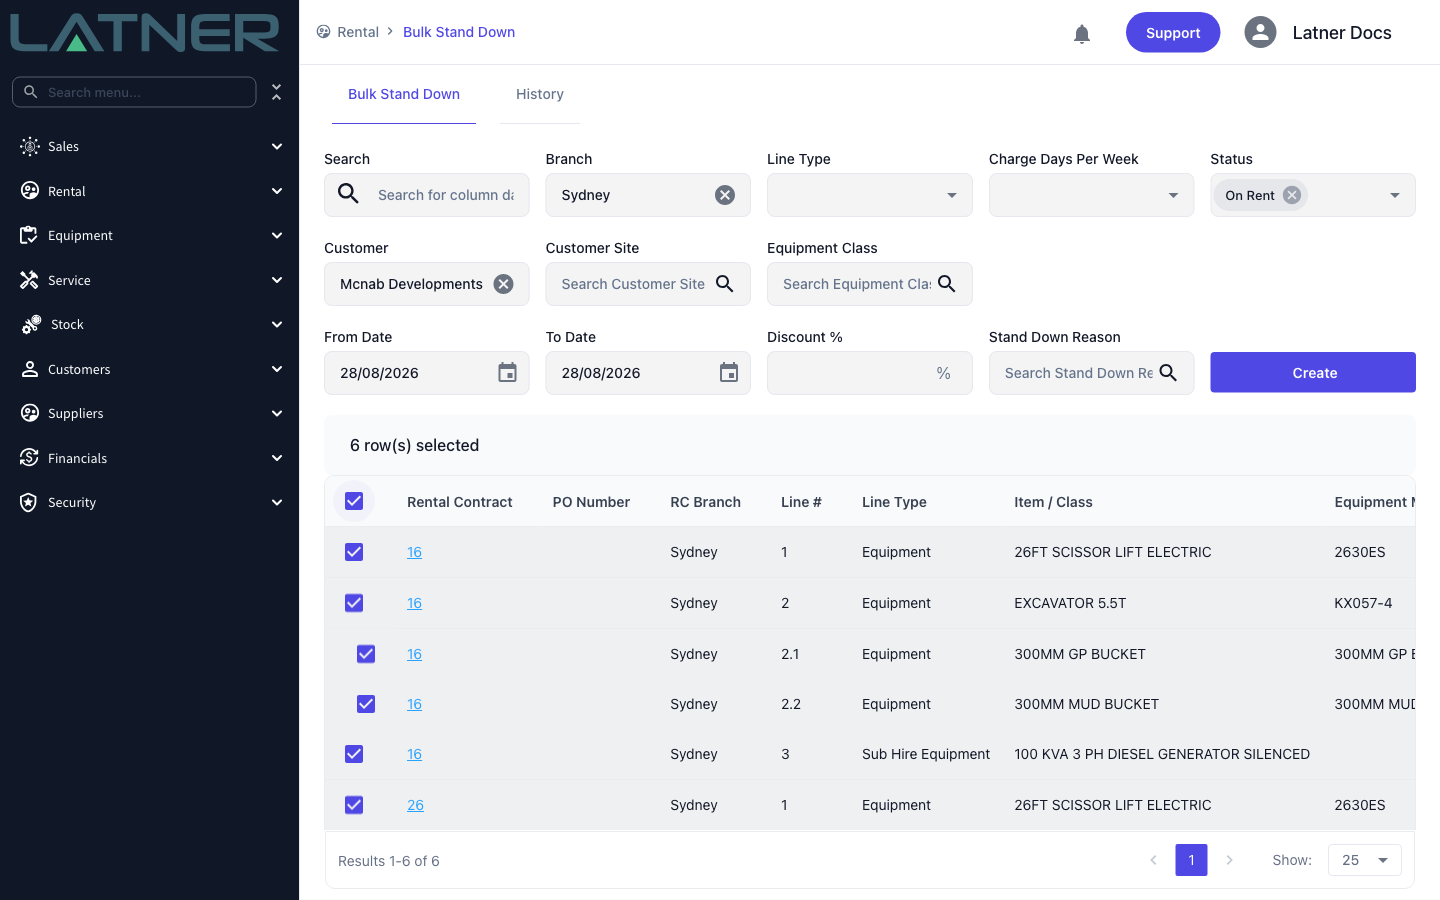
If your filter matches more lines than fit on one page, select every row on the page and a Select all N rows button appears. That option sends the filter itself to the run rather than a list of ticked rows, so every matching line is included, not just the page you can see.
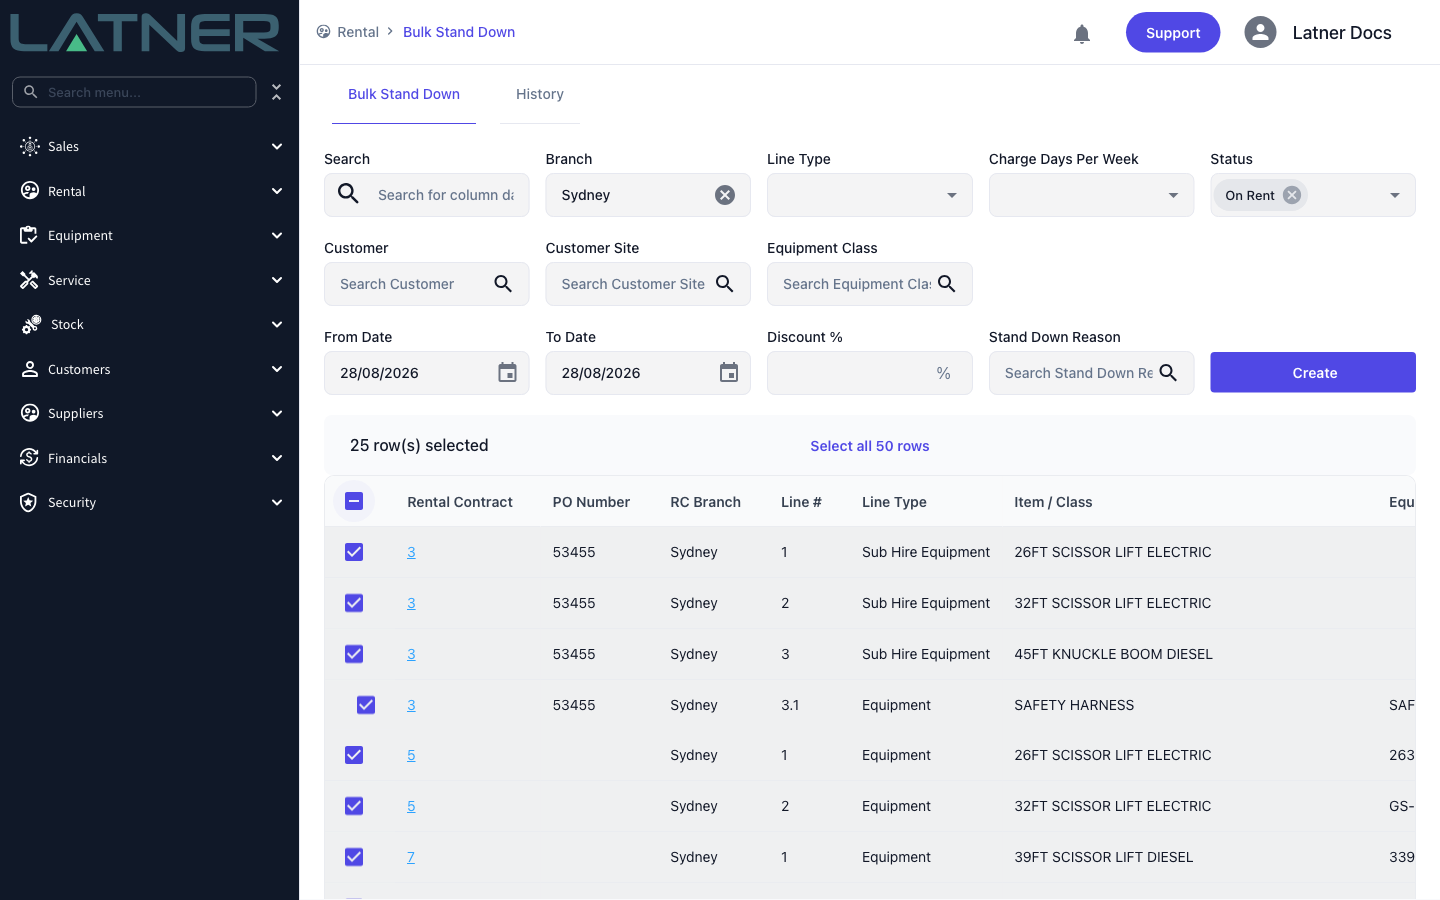
Step 4 - Enter the stand down details
The four fields to the right of the filters describe the stand down itself. All of them are required.
-
From Date - the first day of the stand down. Defaults to today.
-
To Date - the last day, and it's inclusive. It can be the same day as From Date for a single-day shutdown, but it can't be earlier.
-
Discount % - how much of each stood-down day comes off the bill, from 0 to 100, to two decimal places.
-
Stand Down Reason - one of your configured reasons. It's carried onto every stand down the run creates and is what stand down reporting groups by.
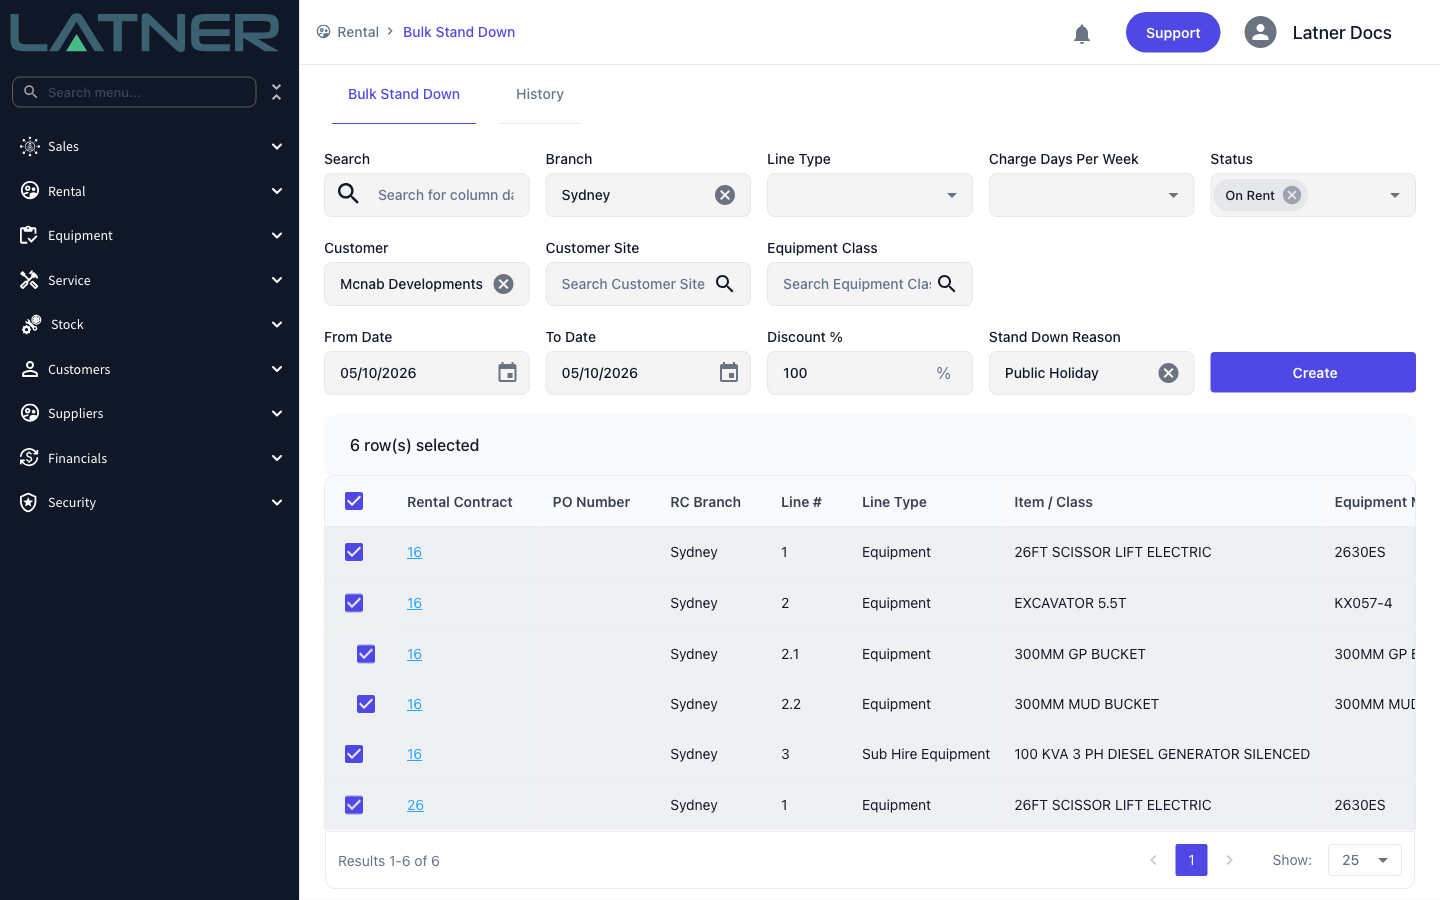
Step 5 - Start the run
Click Create. Latner summarises what's about to happen - how many rental contract lines were selected, the dates, the discount and the reason - and waits for you to confirm with Start Bulk Run. This is the last point at which you can back out, so read the line count and the dates before you commit.
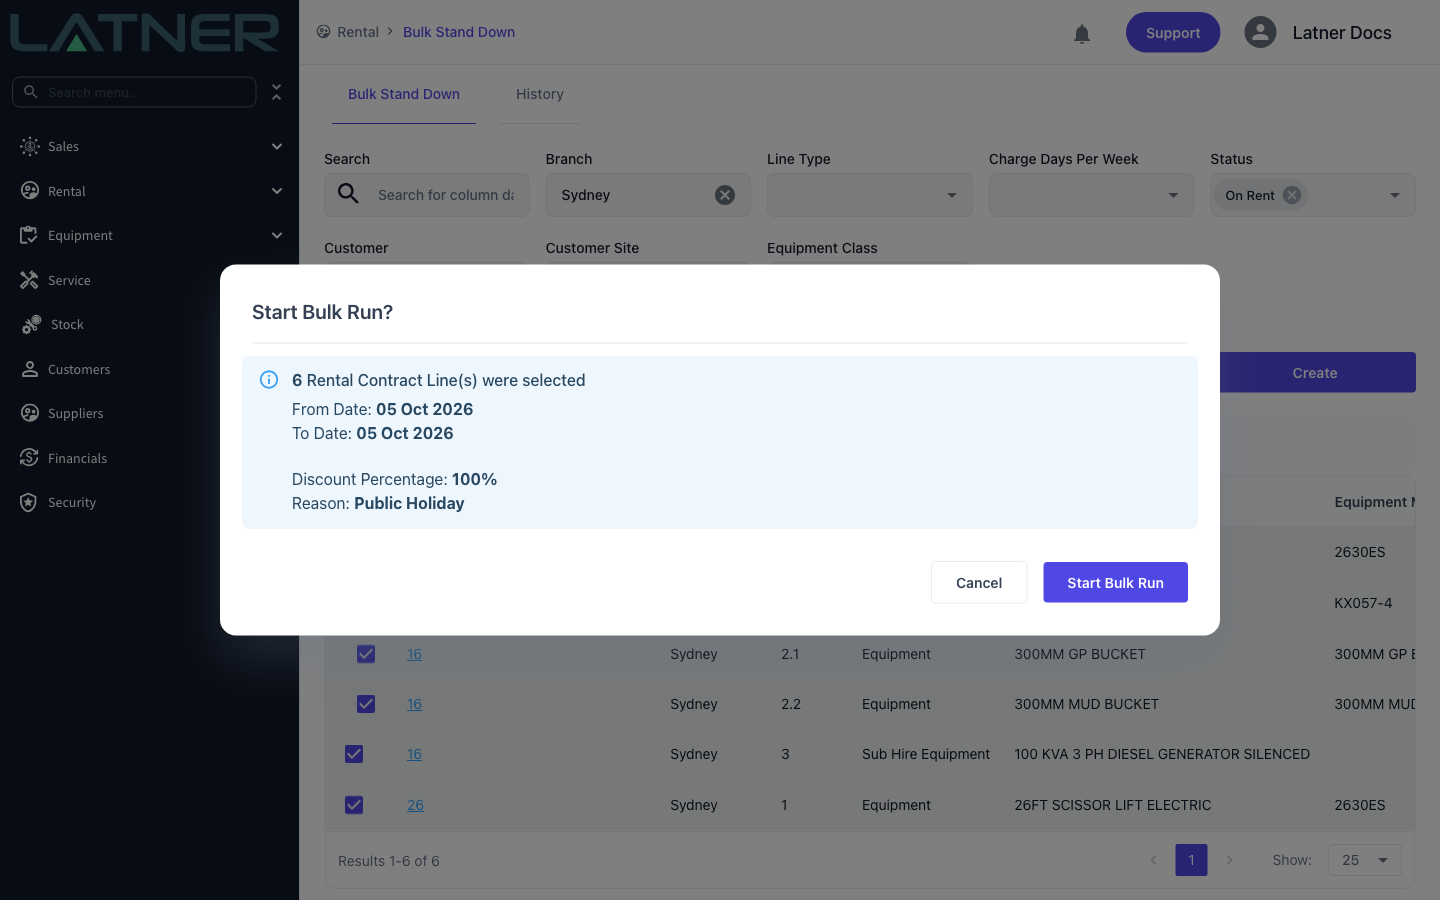
Once you confirm, Latner reports Bulk Run Started and clears the form and the selection. The stand downs themselves are created in the background, so a large run may still be working after the screen comes back.
Step 6 - Check the results on the History tab
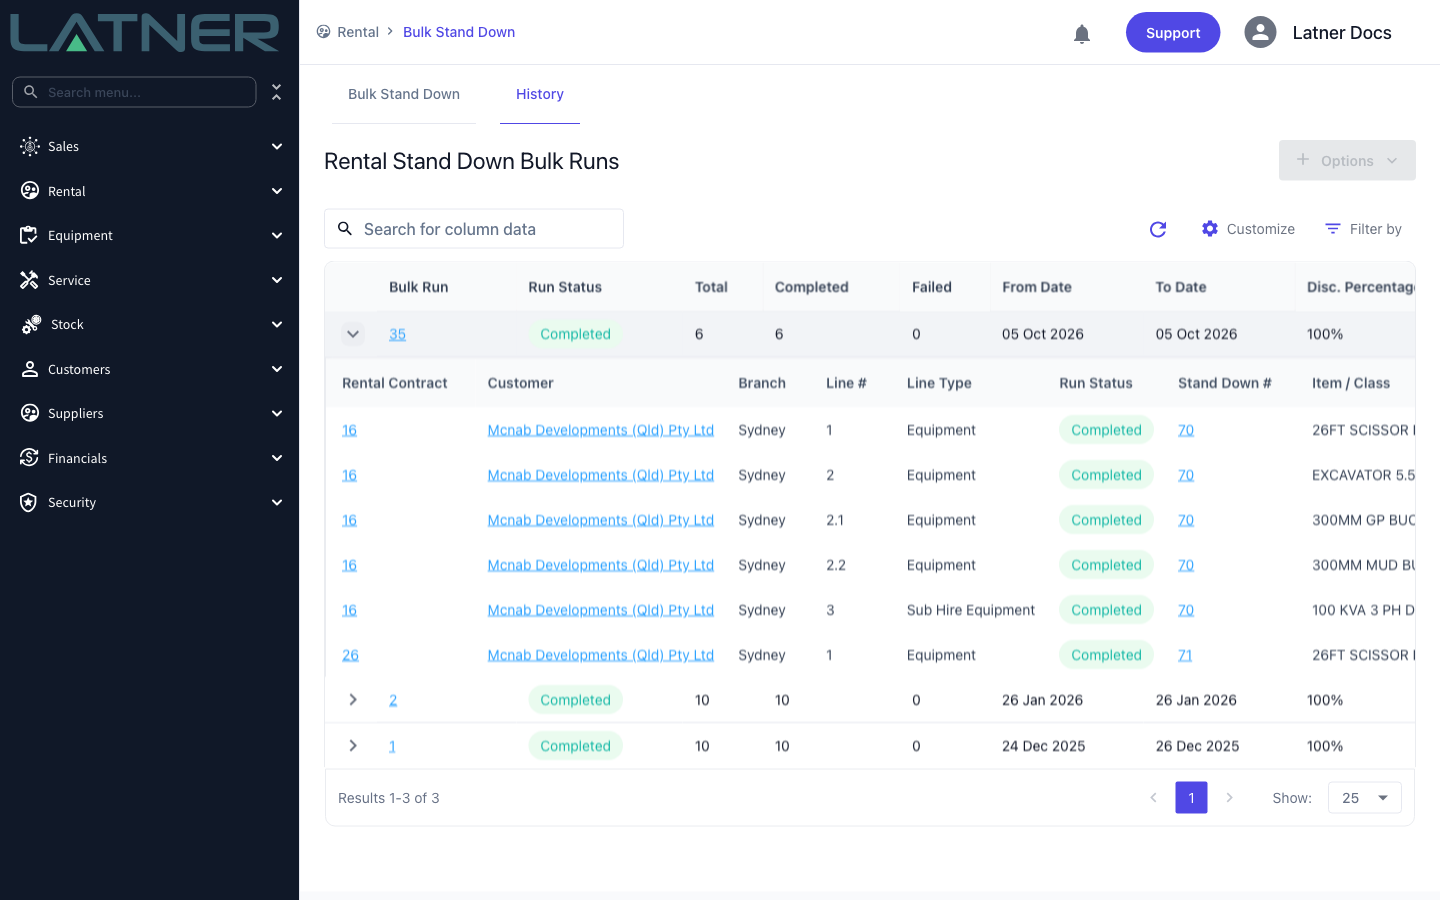
Switch to History. Each run is one row, showing its Run Status and a Total / Completed / Failed count alongside the dates, discount, reason and who started it. A run sits at Pending, moves to Running, then finishes as Completed, or as Failed if any line in it failed.
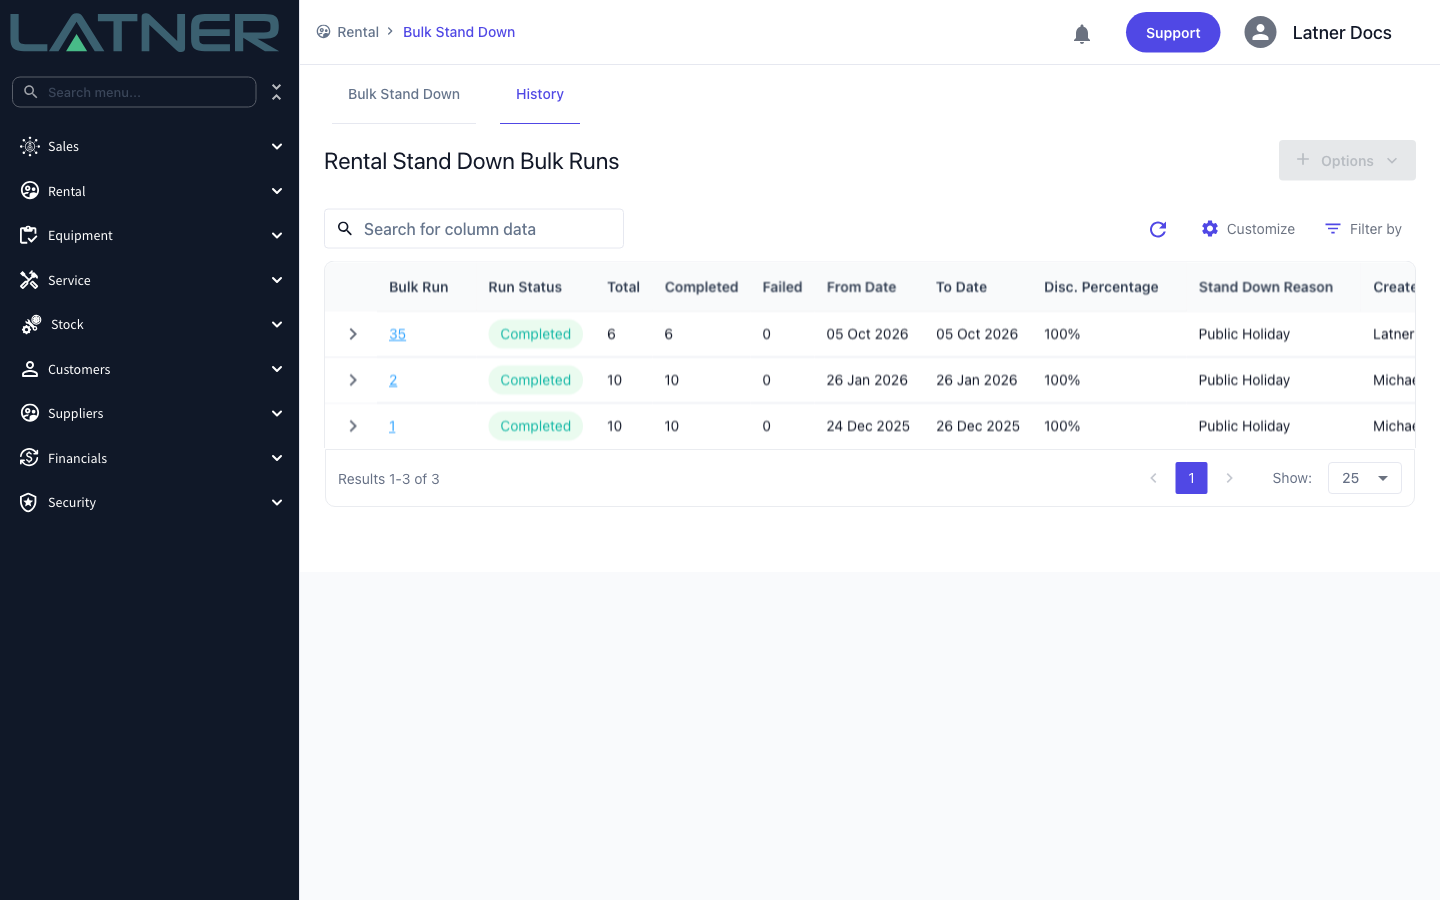
Expand a run with the arrow at the left to see the individual lines. The Stand Down # column links to the stand down each line ended up on, and lines from the same rental contract share a number. If a line shows a red Failed status, click the status to read the error.
After the Run
-
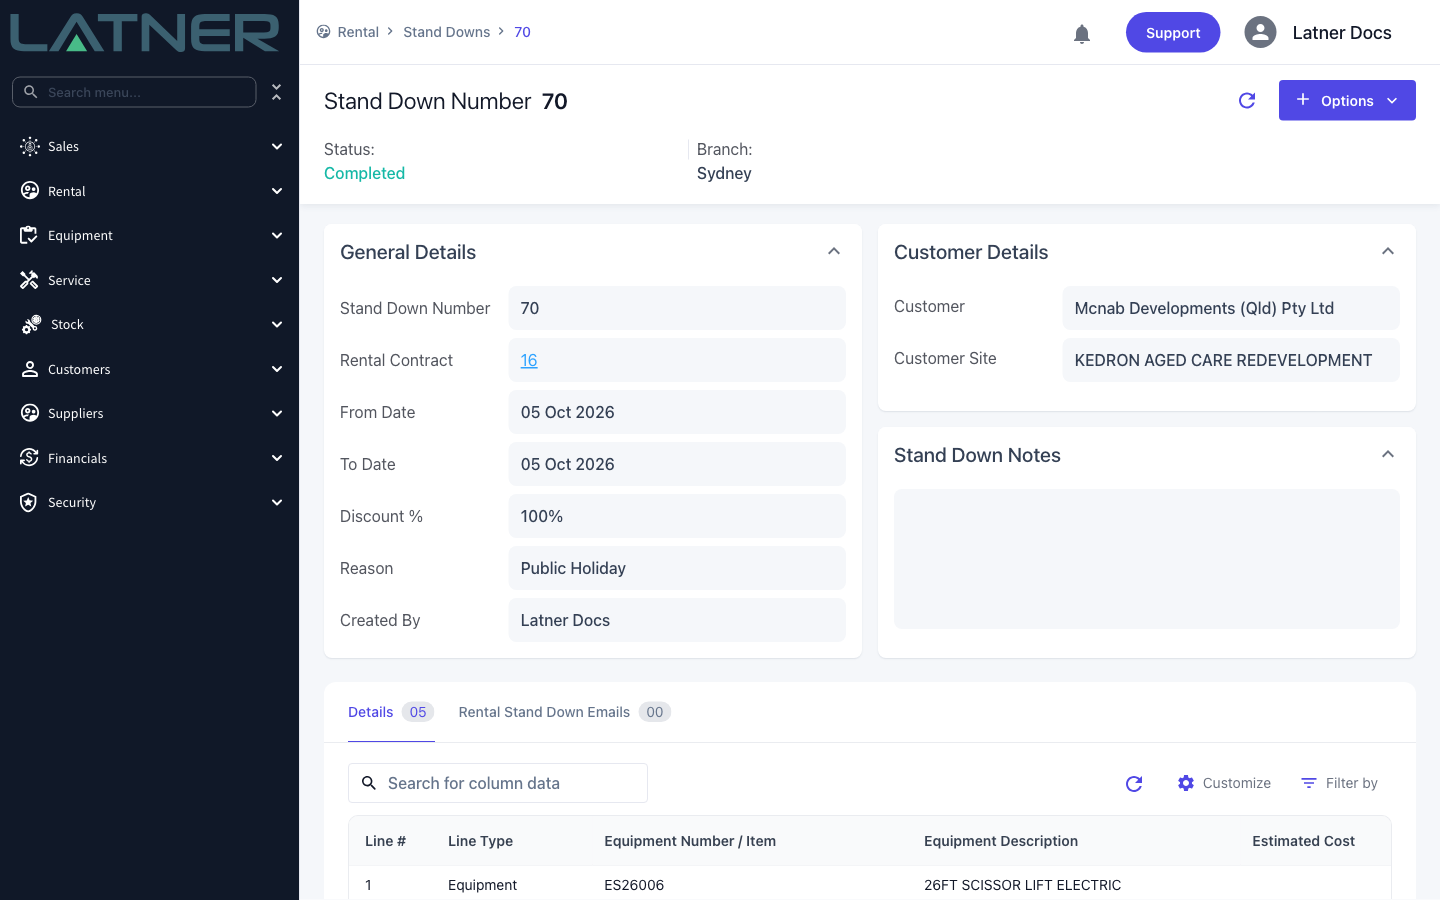
One Stand Down is created per rental contract, in Completed status, carrying the run's dates, discount and reason.
-
Each stand down appears under Rental › Stand Downs and on its rental contract, with a detail line for every line the run selected.
-
Billing for the affected lines drops by the stood-down days multiplied by the discount, on the next invoice that covers the period.
-
Estimated Cost on each stand down line is filled in when the contract is invoiced for a period that covers the stand down, and feeds the stand down cost reporting.
A bulk run doesn't warn you when the dates fall in a period that has already been invoiced, and there's no bulk undo. If you get the dates wrong, each stand down has to be cancelled individually from its own record with Options › Cancel Stand Down. Check the dates on the confirmation before you start the run.
FAQs
Watch the Demo
Prefer to watch it? Step through the same flow here.
Converting Equipment
Convert Equipment turns one or more items in your fleet into different equipment, carrying their written-down value across, so both your fleet list and your asset register stay accurate when a machine is rebuilt, split up or tracked a different way.
Overview
Equipment doesn't always stay the shape you bought it in. A pair of general-purpose buckets gets re-profiled, a machine is stripped and rebuilt as two smaller units, or a bulk item you've been counting by the dozen now needs to be tracked one by one. Convert Equipment handles all of those in a single step, rather than disposing of one record and creating another with no link between them.
-
One conversion can take several items in (Convert From) and produce several items out (Convert To).
-
Everything you convert from is disposed of. Bulk quantity moves from available to disposed, and a serialized machine's Rental Status and Service Status both become Converted.
-
Everything you convert to is either added as quantity onto an existing bulk equipment record, or created as a brand-new serialized equipment record.
-
You choose how the value carries across by giving each Convert To line a Value Proportion. Whatever is left of 100% is written off as scrapped.
-
The conversion is irreversible, so the lines are worth checking twice before you save.
Before You Begin
Convert Equipment needs no settings turned on, but it does need a permission and equipment in the right state.
|
Requirement |
Where to Find It |
|---|---|
|
Convert Equipment permission |
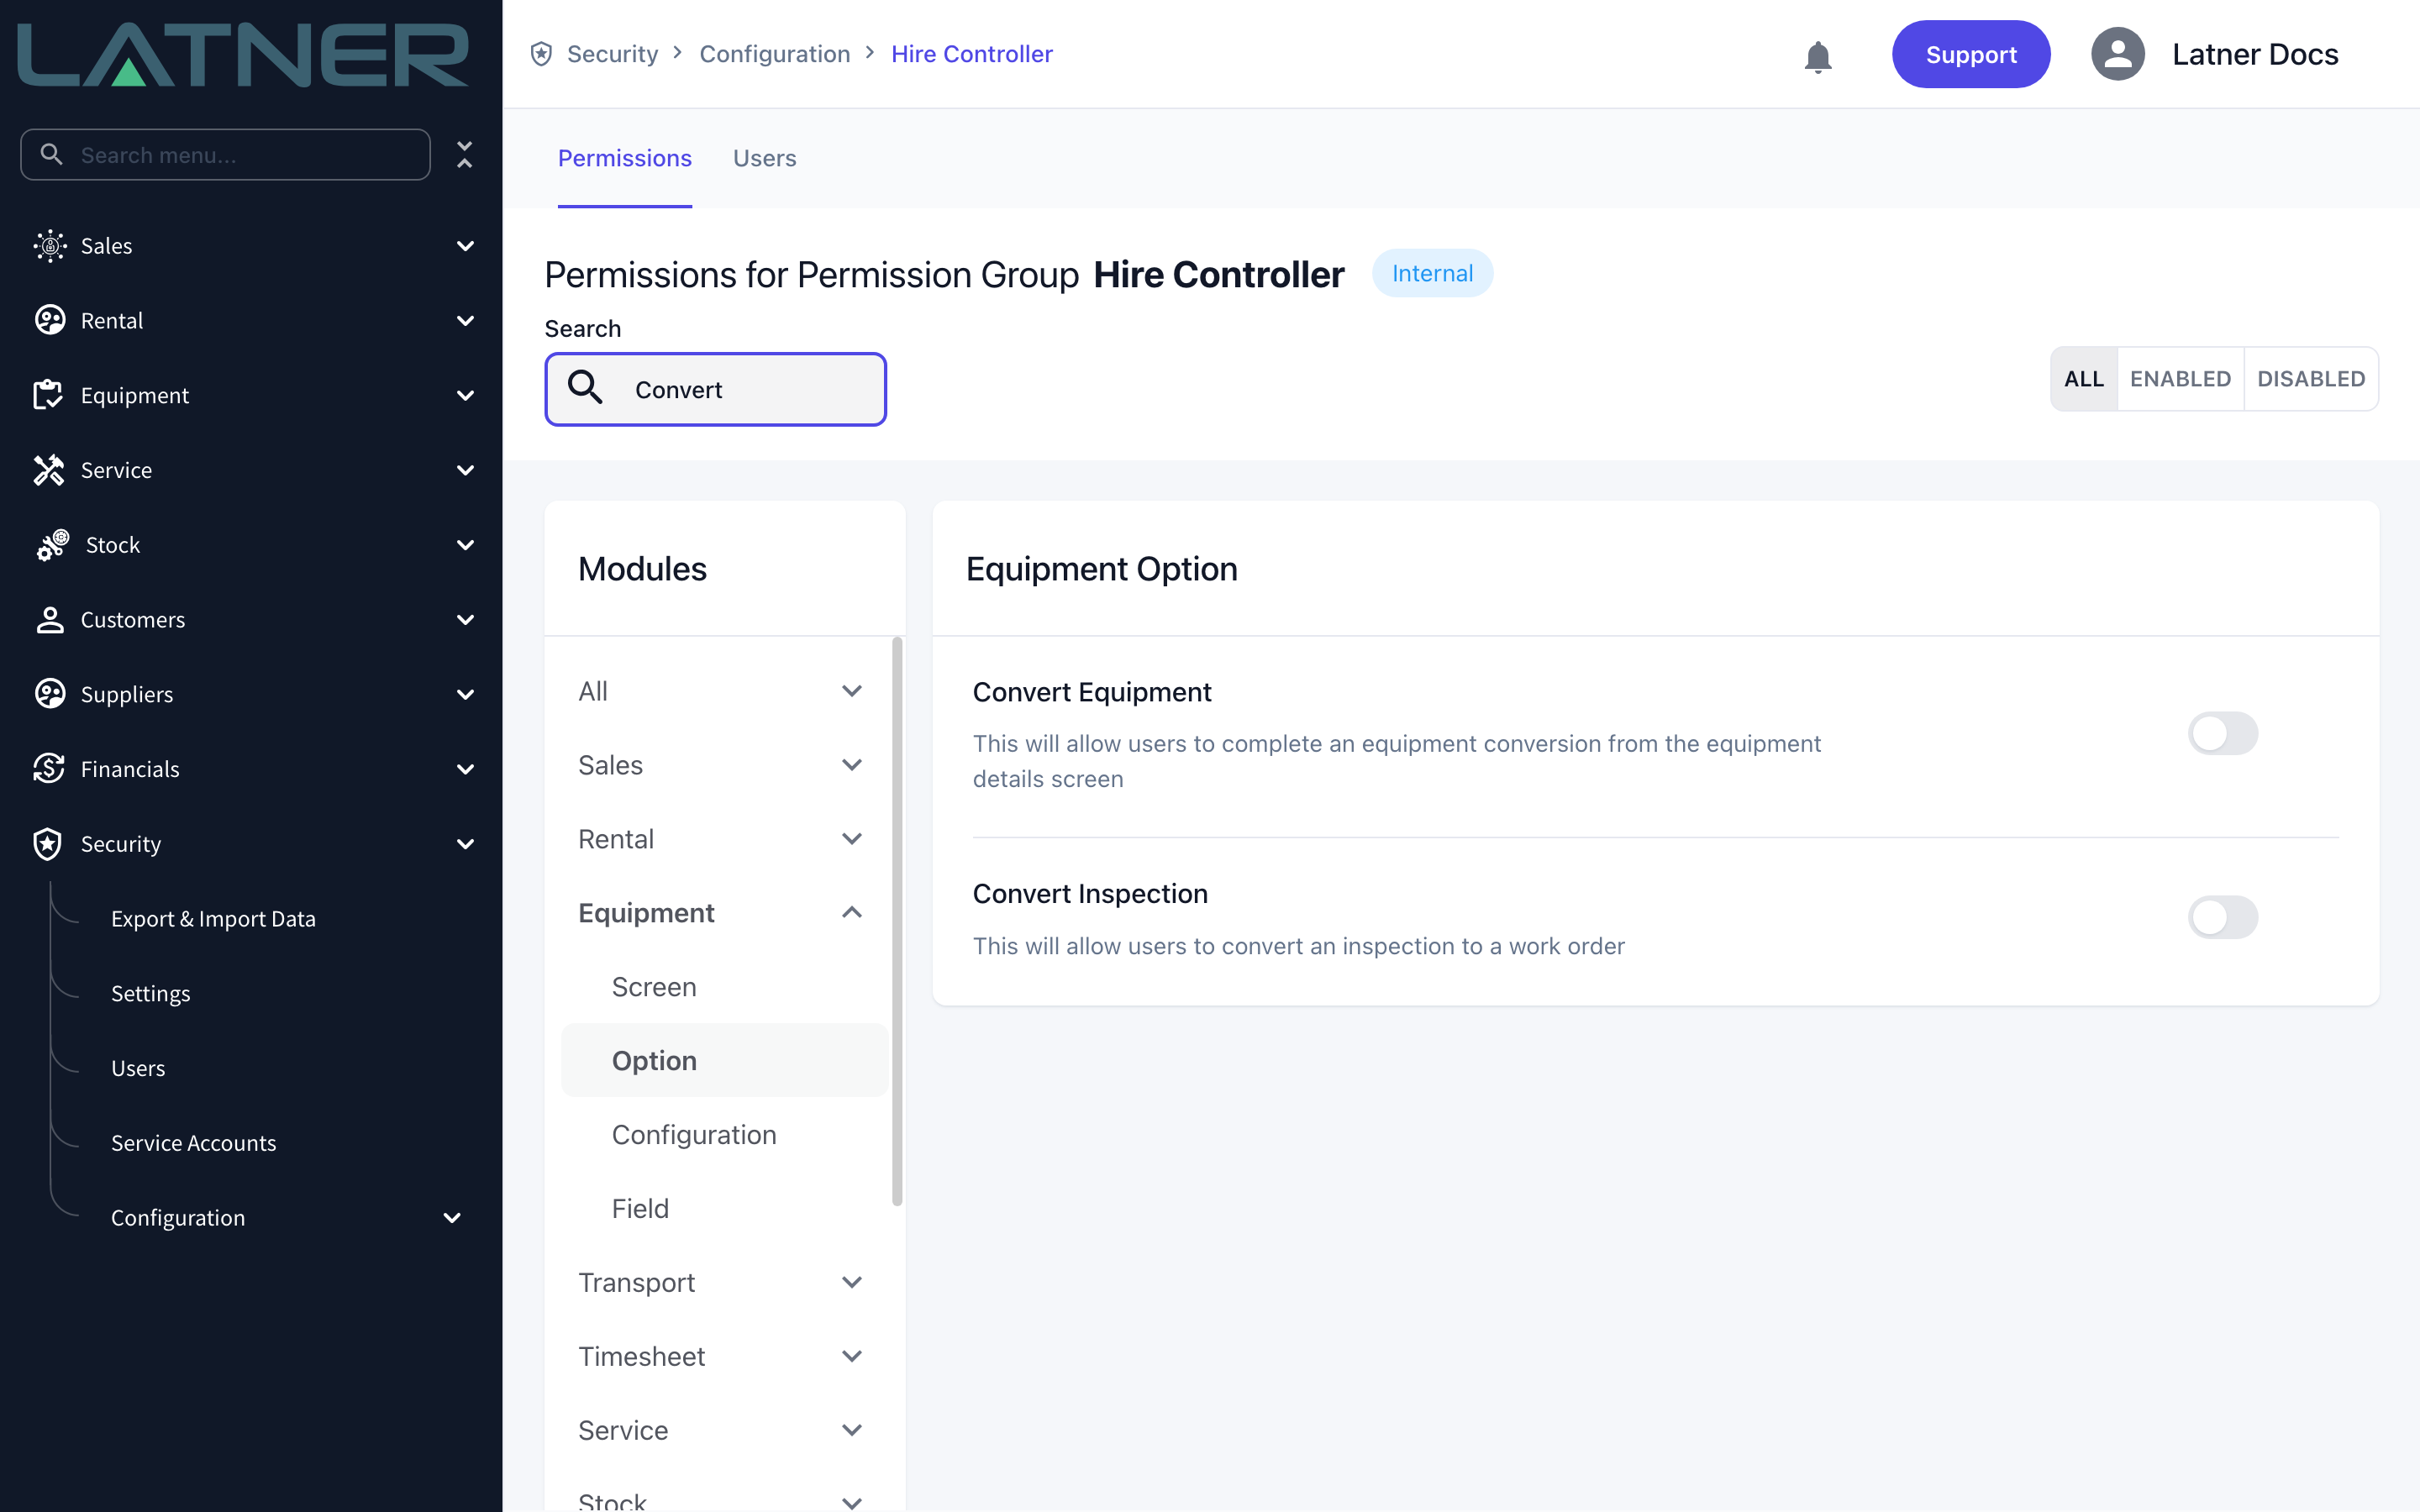
Security › Configuration › Permission Groups › your group › Equipment › Option › Convert Equipment |
|
Equipment in Available status |
Equipment › Equipment - both Rental Status and Service Status must read Available |
|
Available quantity at the branch you're converting at |
Equipment › Equipment - the branch line must have quantity available |
|
A bulk equipment record to convert into (if converting to bulk) |
Equipment › Equipment |
|
An equipment model to convert into (if converting to serialized) |
Equipment › Configuration › Equipment Models |
Convert Equipment runs from the Equipment list screen, not from an individual equipment record, and you pick the equipment inside the dialog rather than by selecting a row first.
Converting the Equipment
Step 1 - Open Convert Equipment
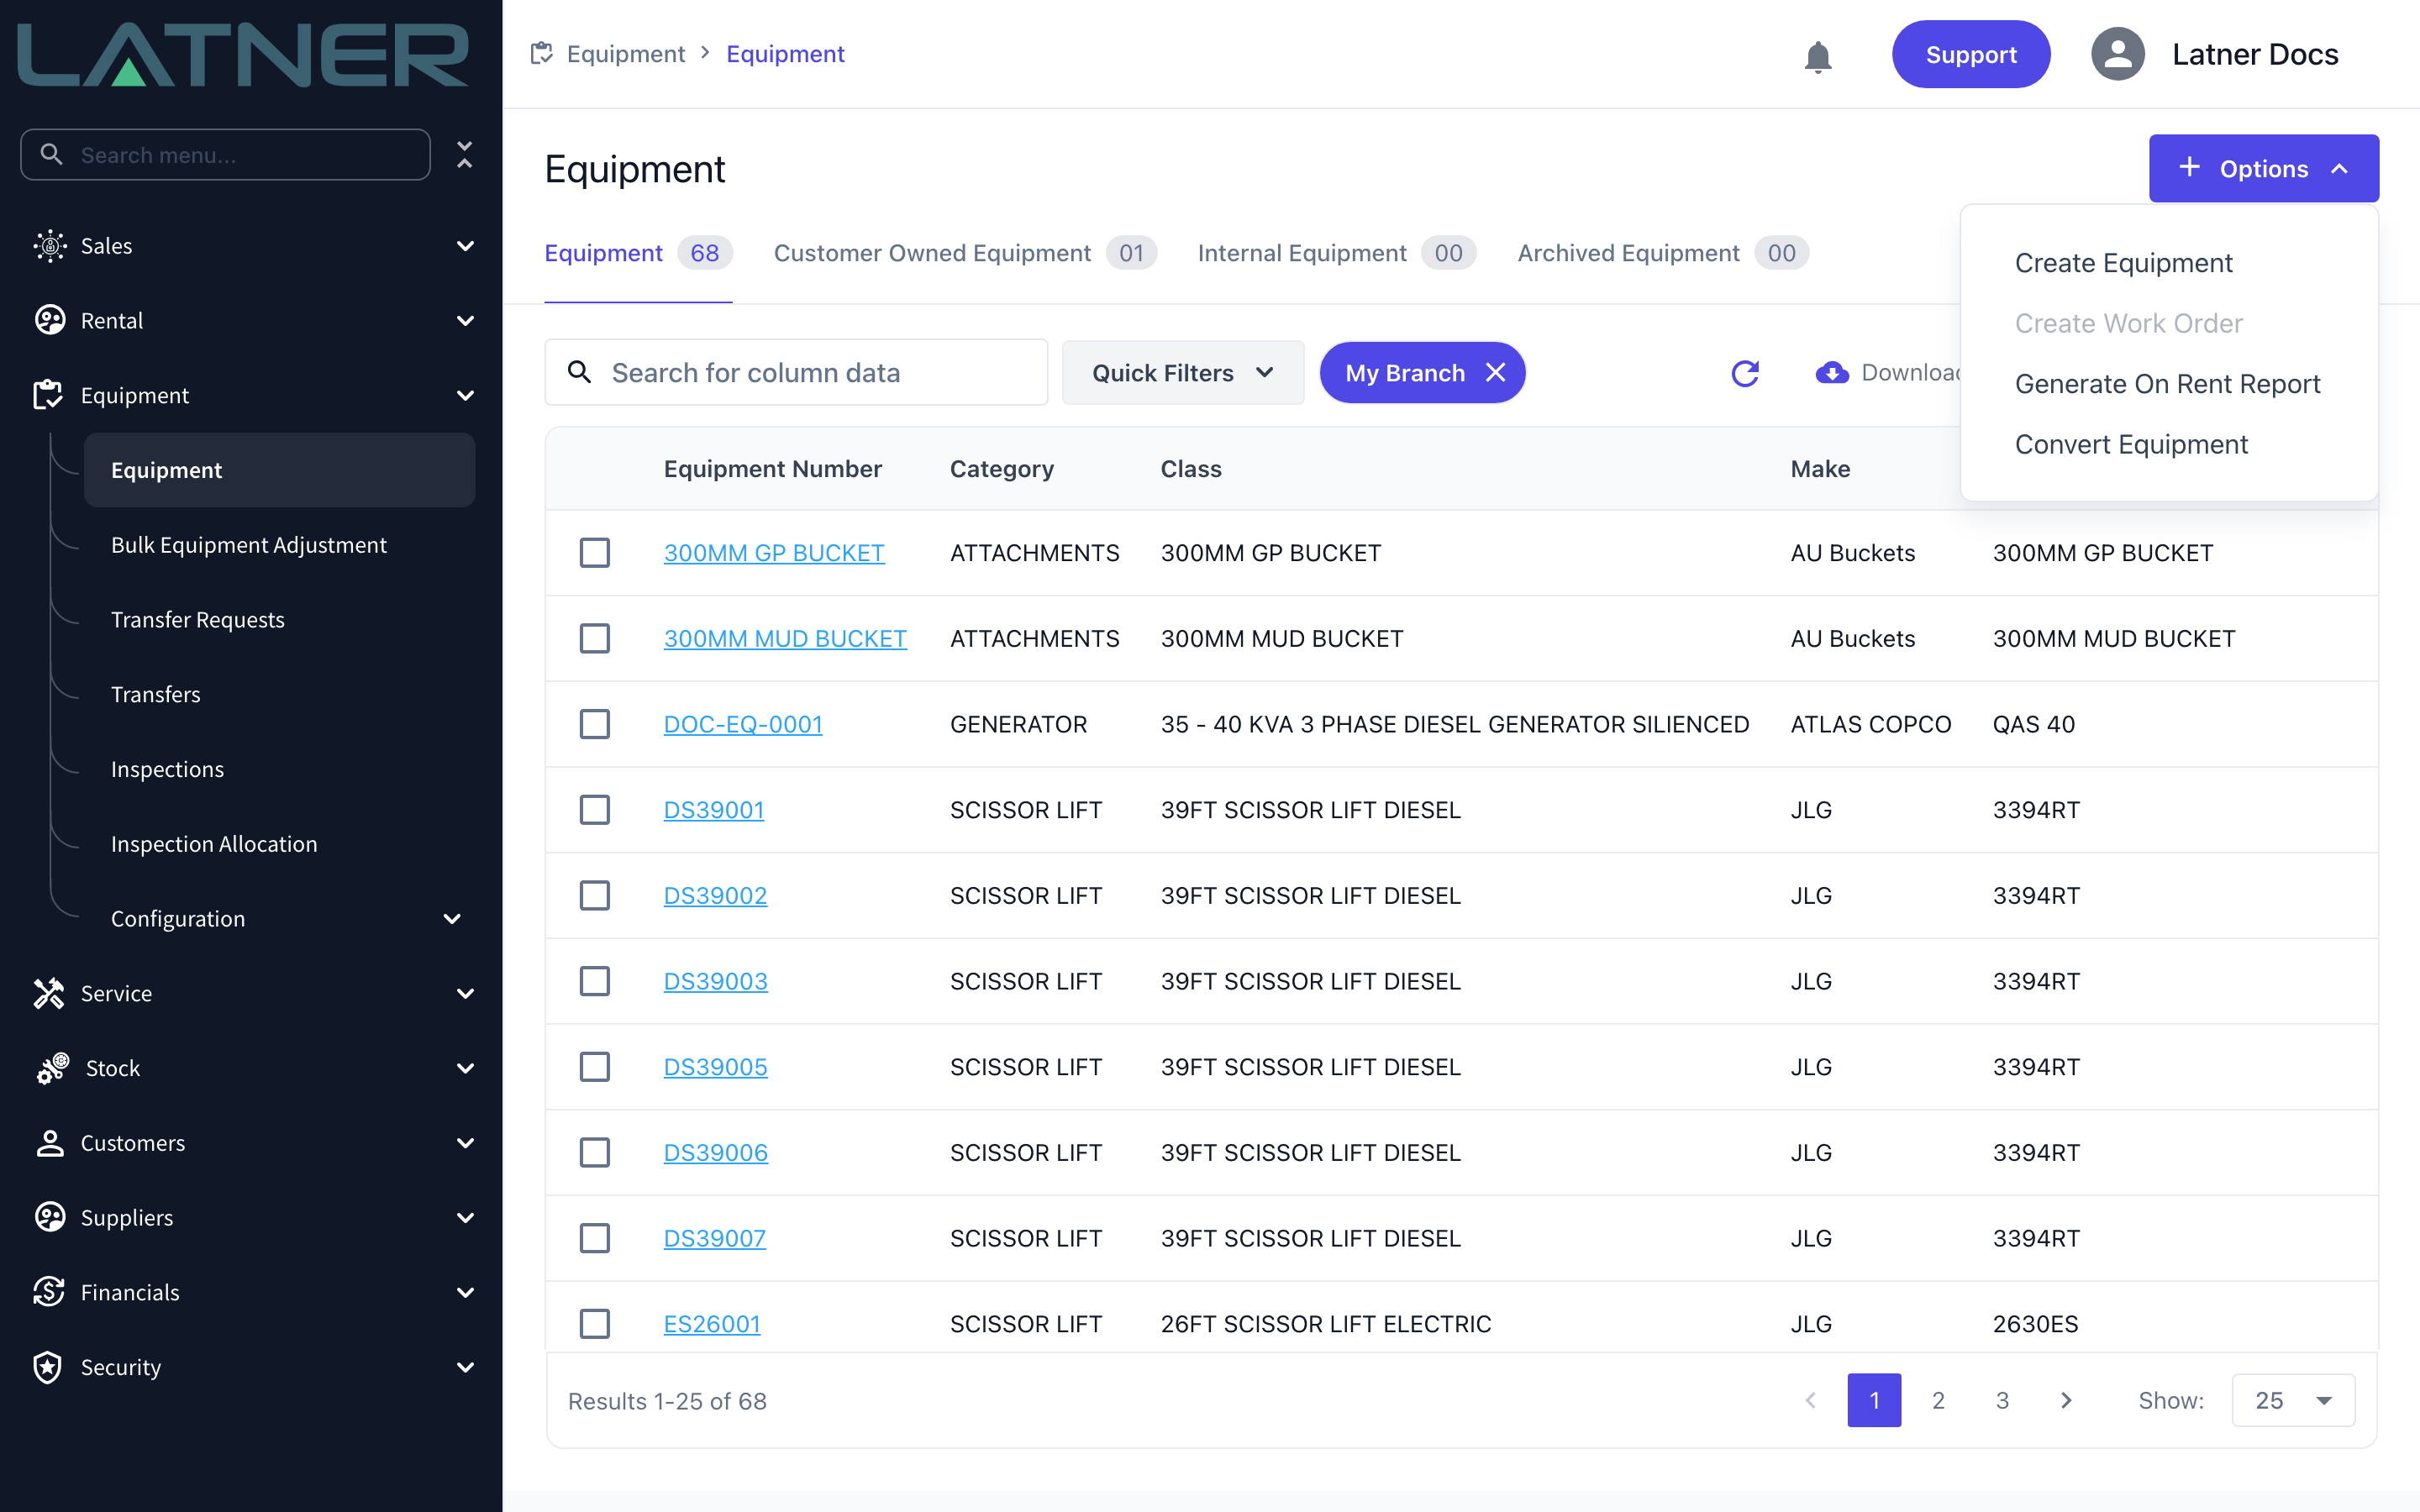
Go to Equipment › Equipment, then choose Options › Convert Equipment.
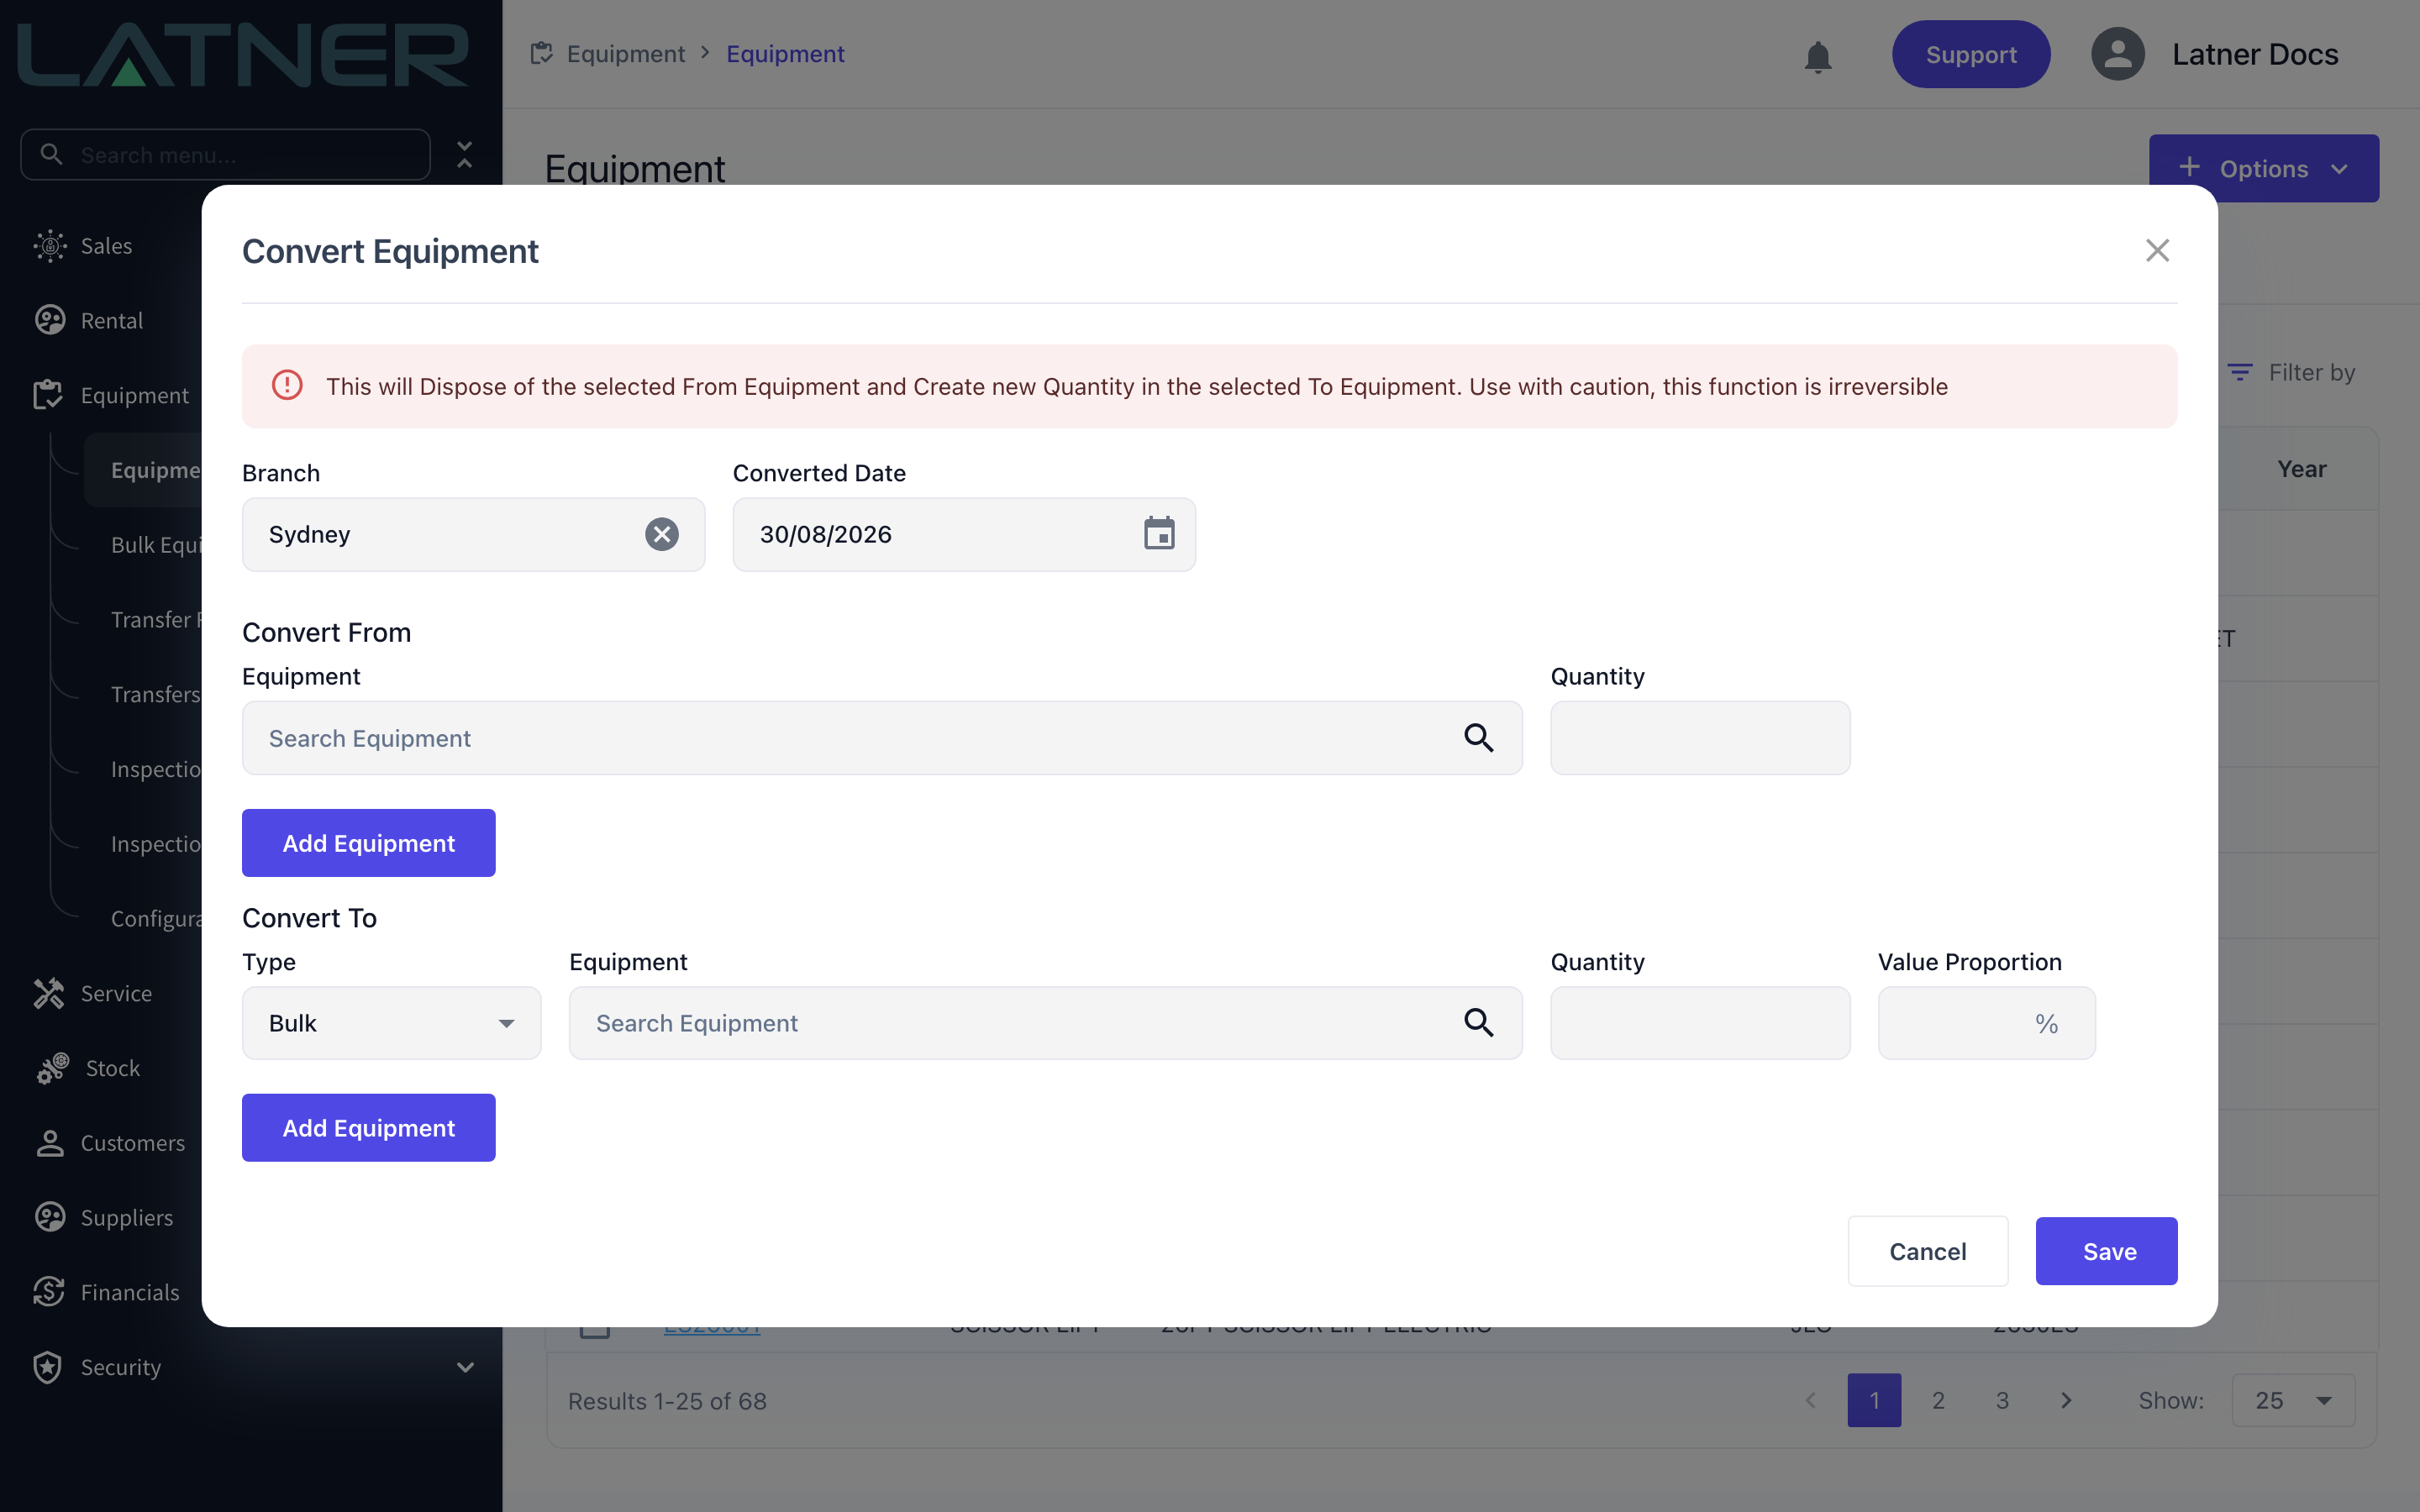
Step 2 - Set the branch and converted date
The dialog opens with a red banner reminding you that the conversion disposes of the From equipment and cannot be undone.
-
Branch - required, and defaults to your own branch. Both the Convert From search and the new equipment you create are tied to it. Changing it clears any lines you've already entered, so set it first.
-
Converted Date - required, and defaults to today. This is the date the equipment movements are recorded against, and the date the outgoing equipment's value is depreciated up to.
Step 3 - Choose what you're converting from
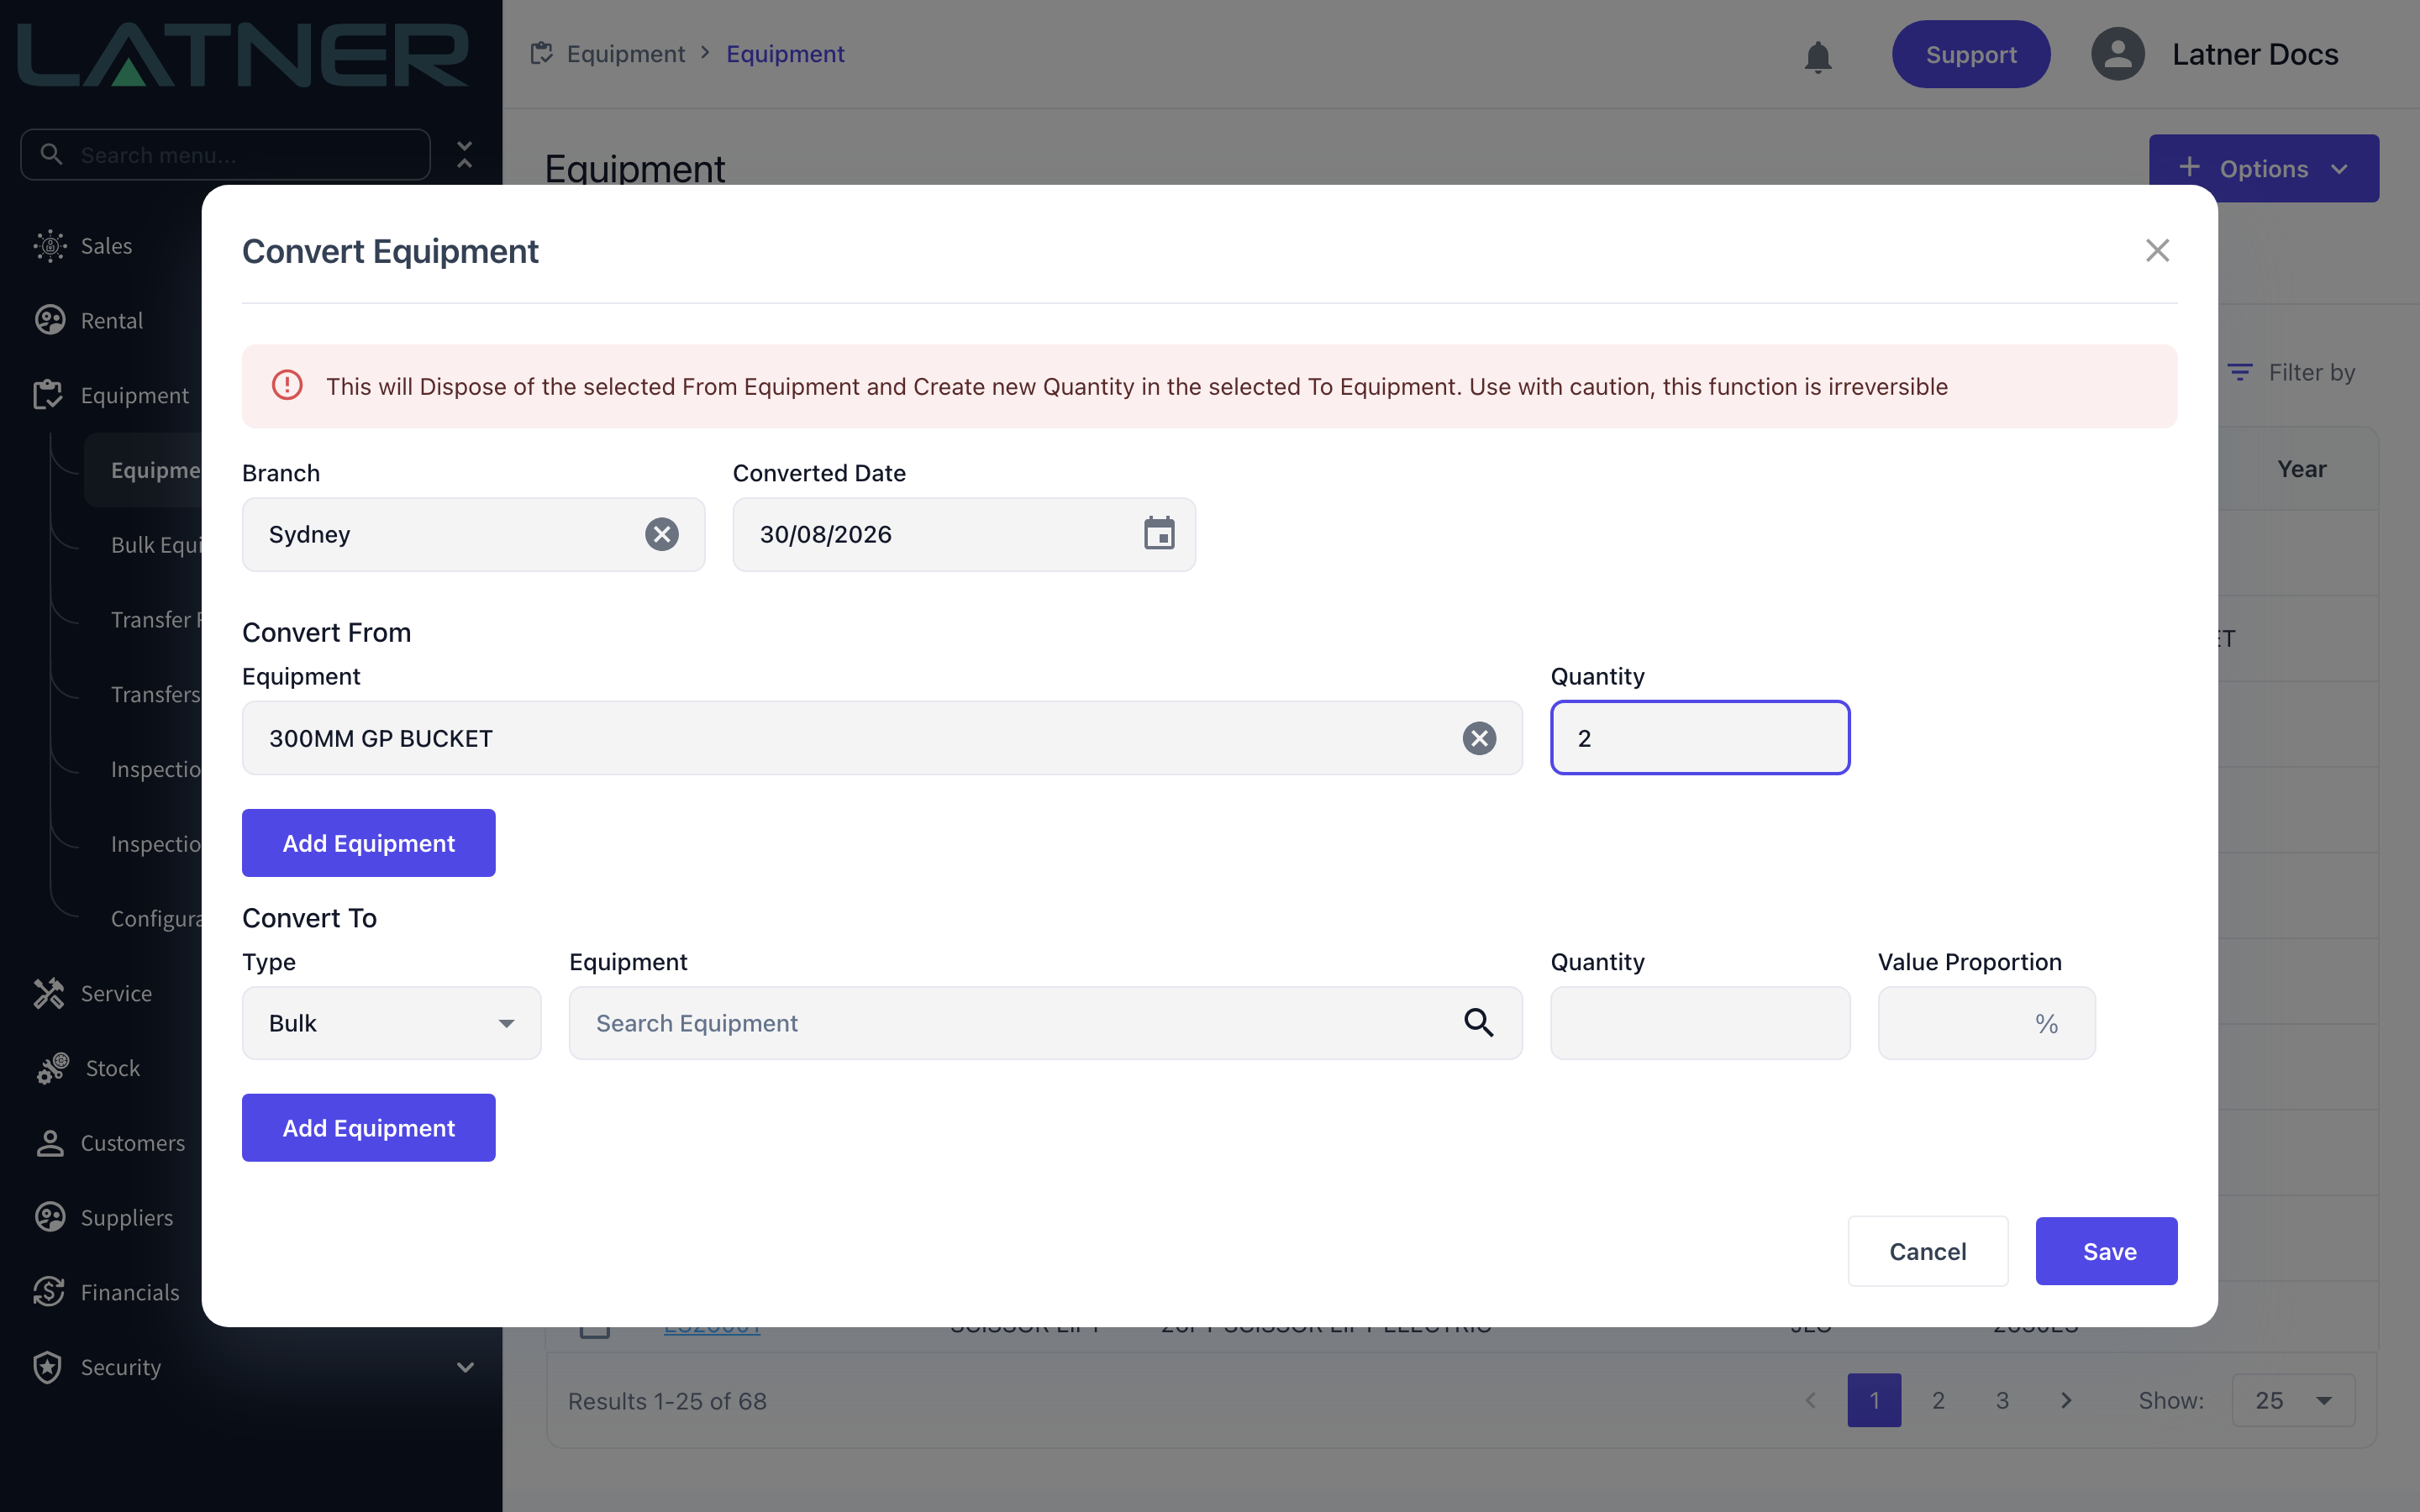
Under Convert From, search for the equipment you're taking out of the fleet and set the quantity. Use Add Equipment to add more lines if the conversion draws on several items.
-
Equipment - required. The search only returns equipment at the selected branch whose Rental Status and Service Status are both Available and which still has quantity available.
-
Quantity - required. It fills in as 1 as soon as you pick the equipment, and is locked at 1 for serialized equipment because there's only ever one of it.
Step 4 - Add the equipment you're converting to
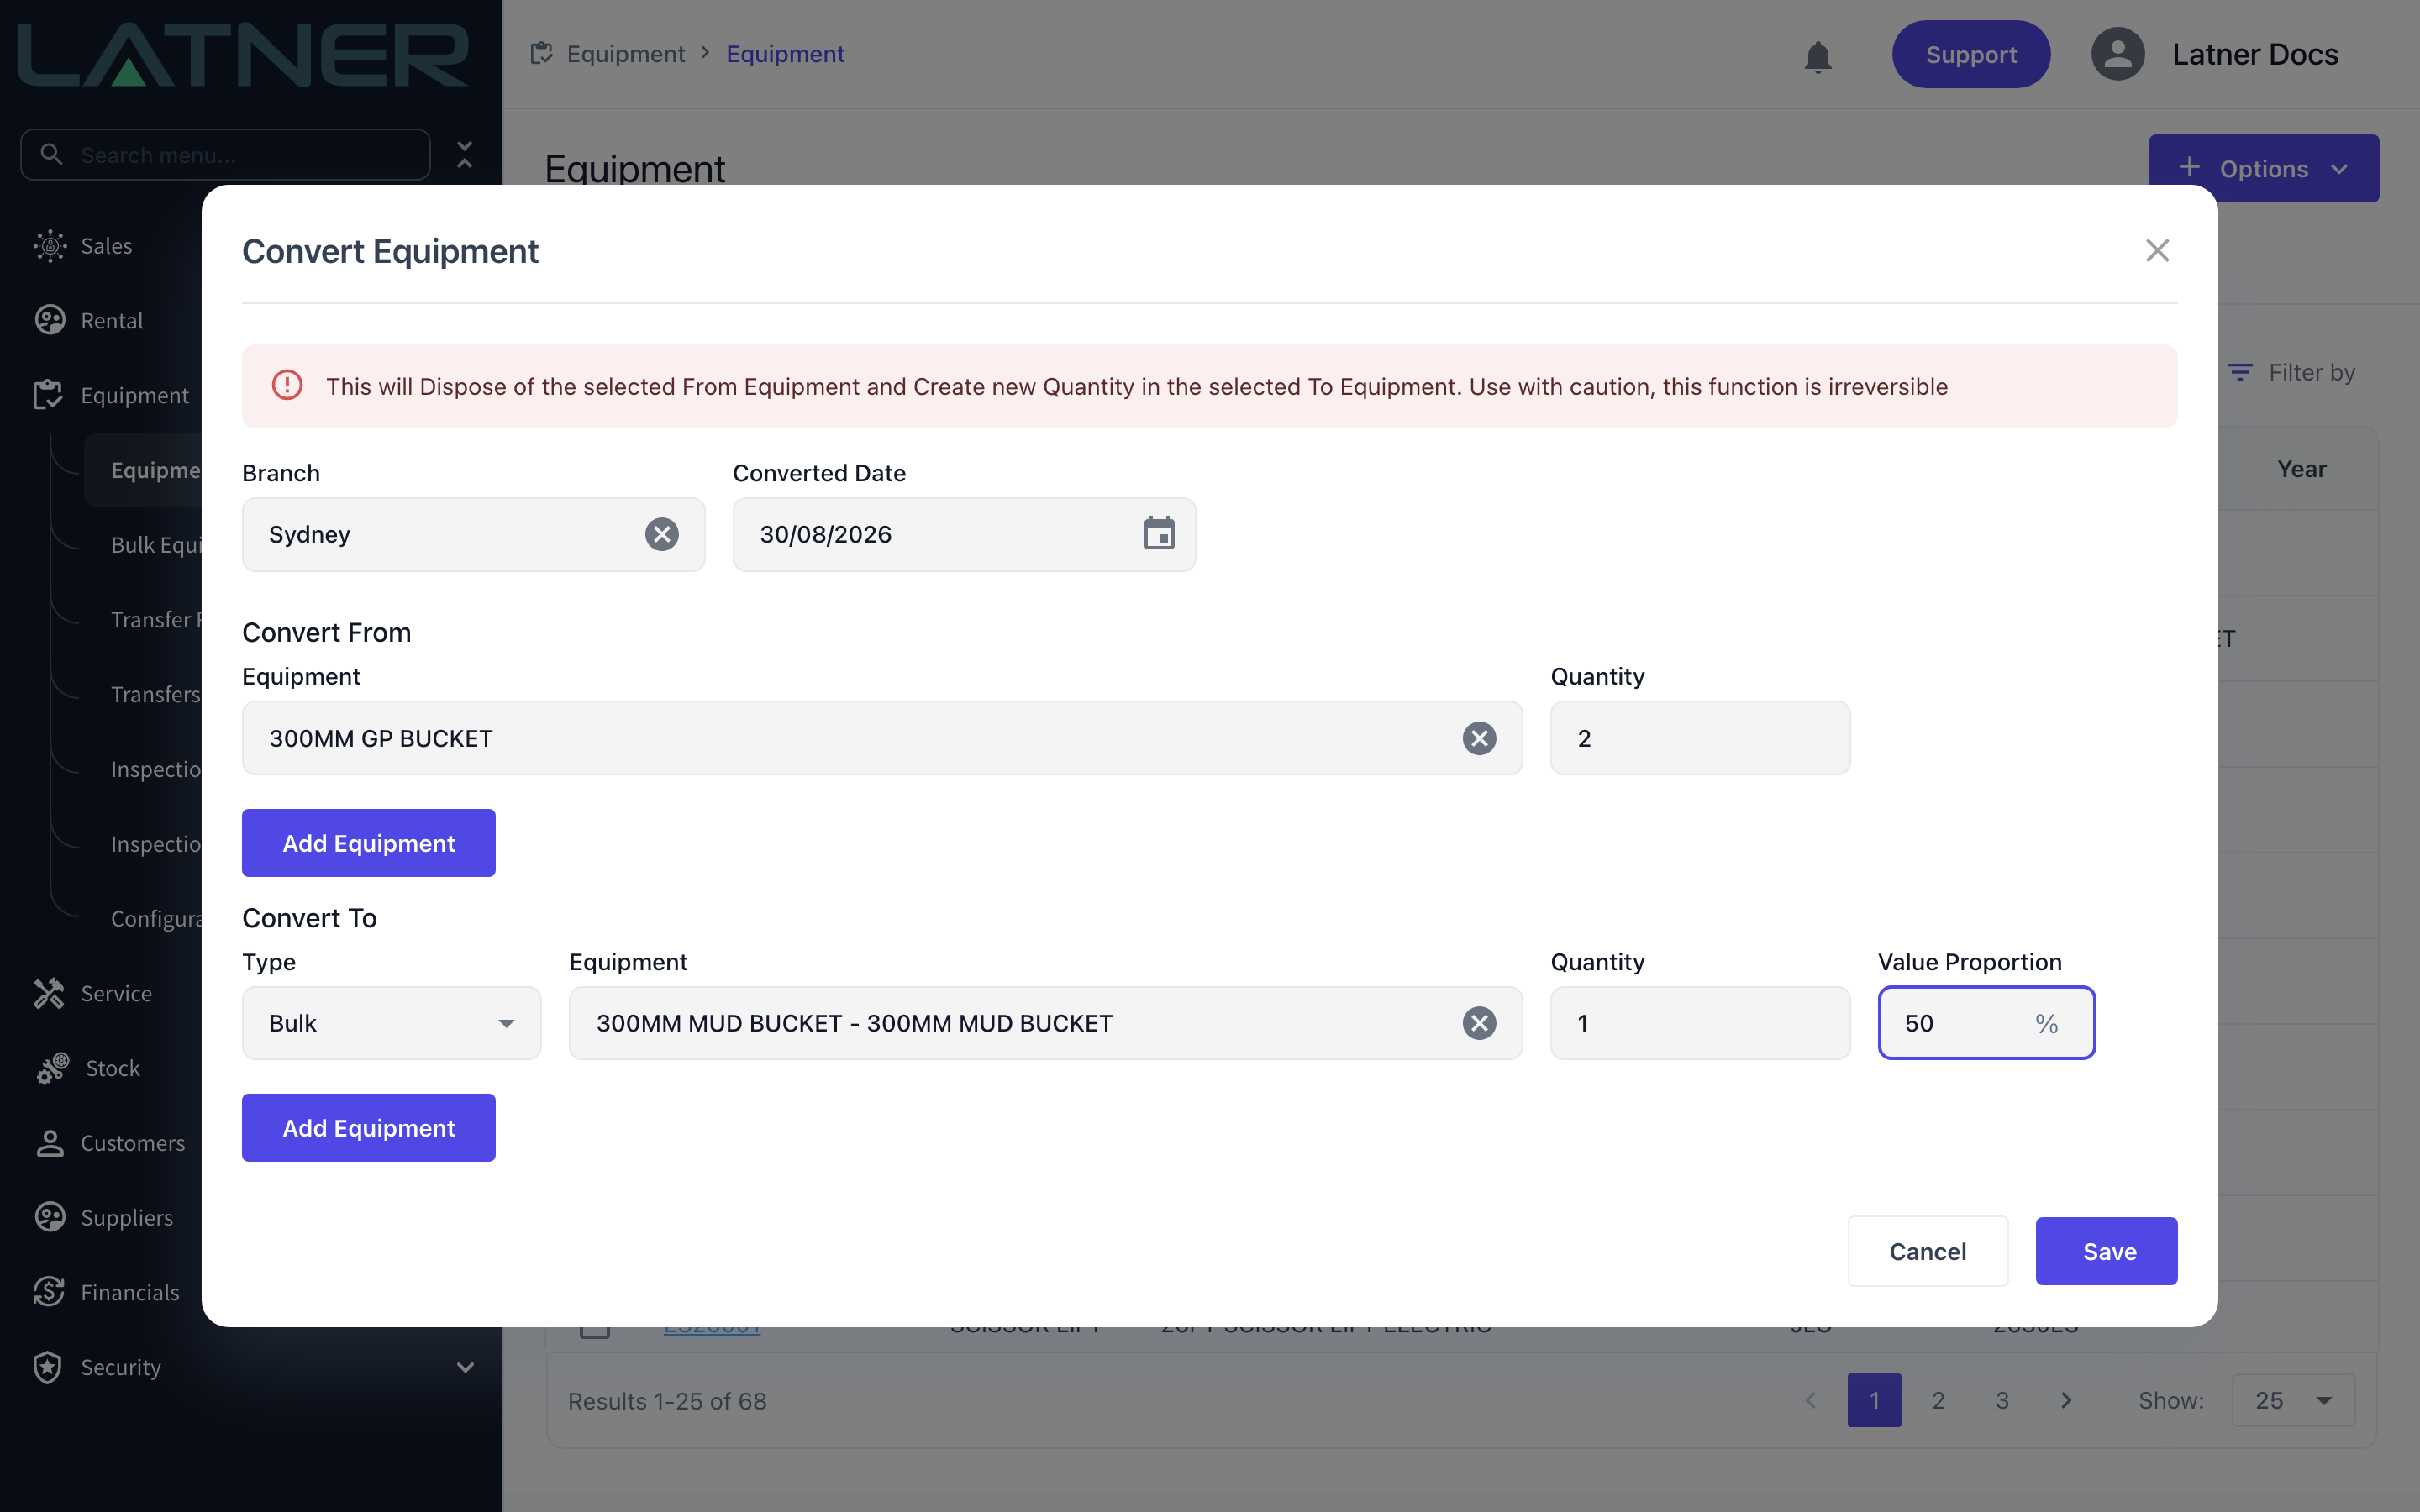
Under Convert To, each line is one thing the conversion produces. Type starts as Bulk, which adds quantity to an equipment record you already have.
-
Type - required. Bulk or Serialized.
-
Equipment - required for a Bulk line. Only bulk equipment is listed, and it doesn't have to have stock at your branch already; the branch line is created for you if it doesn't exist.
-
Quantity - required. How many units this line adds.
-
Value Proportion - required. The share of the outgoing equipment's value that this line takes with it, as a percentage.
Step 5 - Add a serialized result, if you need one
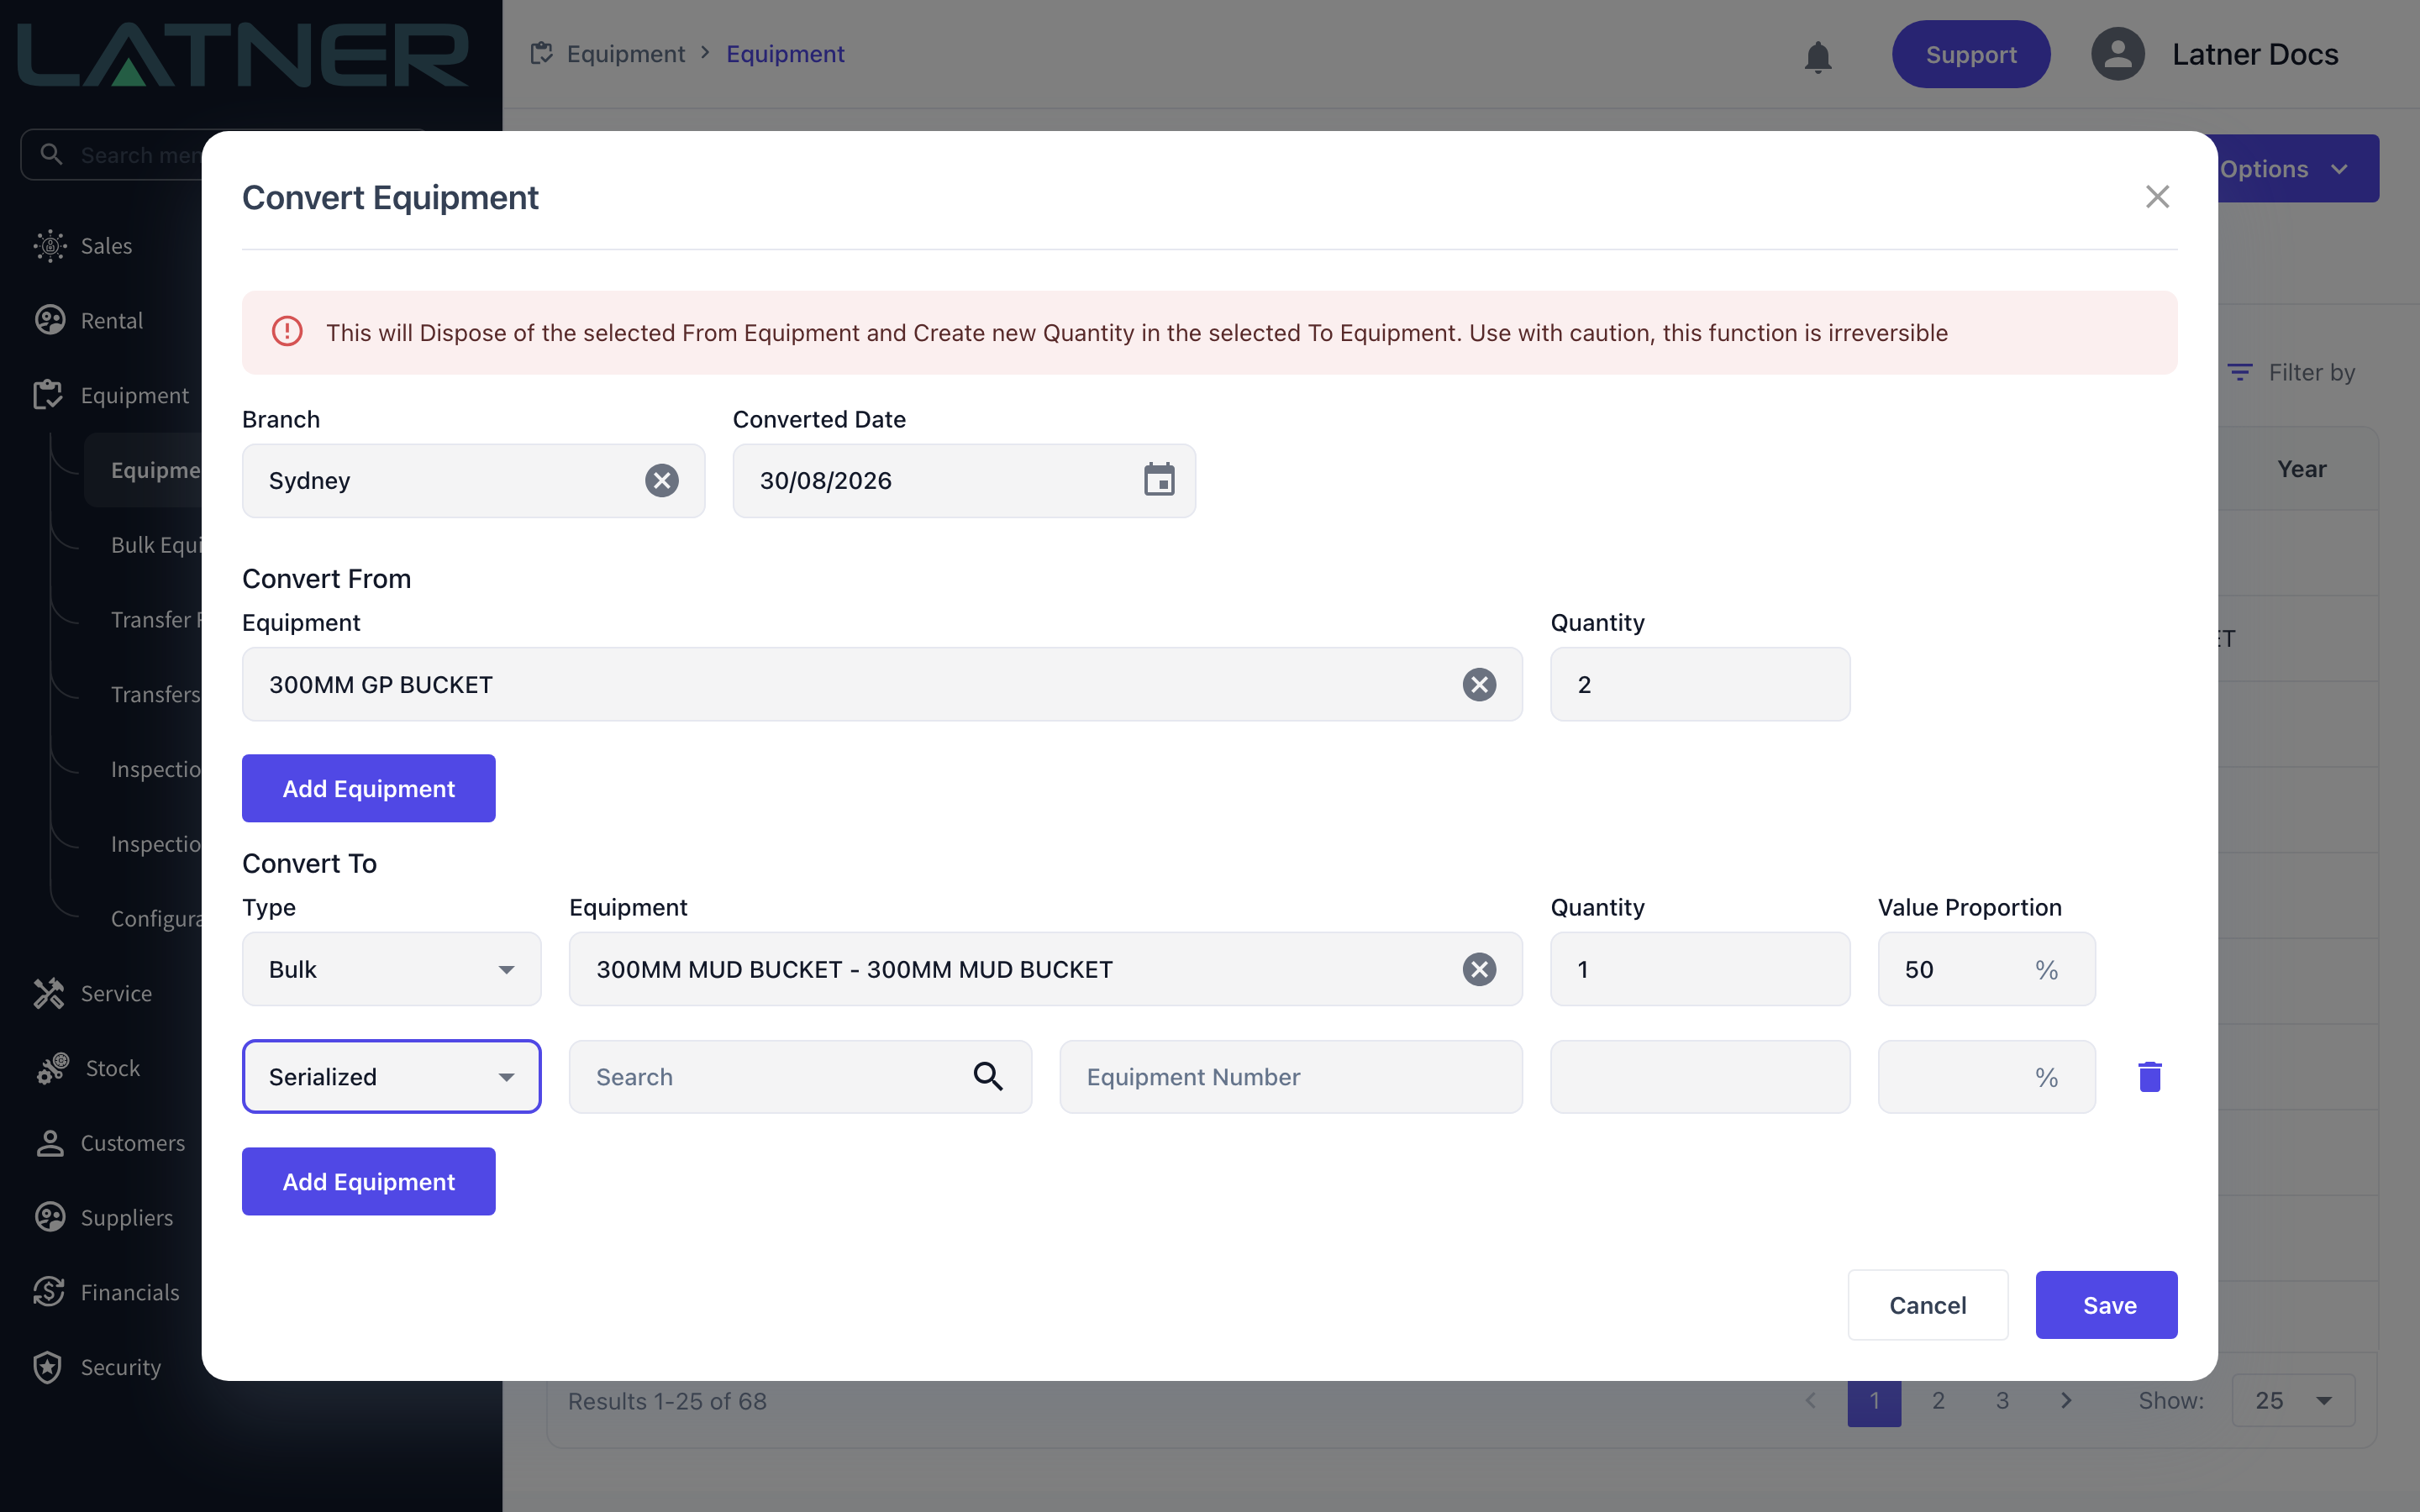
Click Add Equipment under Convert To and set Type to Serialized. The Equipment search is replaced by two fields, because the equipment doesn't exist yet and Latner creates it for you.
-
An equipment model search - required. The new record inherits its category, class, make and description from the model you pick.
-
Equipment Number - required, and must not already be in use by another item of equipment.
Set Quantity to 1 on a serialized line - it produces a single equipment record.
Step 6 - Check the proportions and save
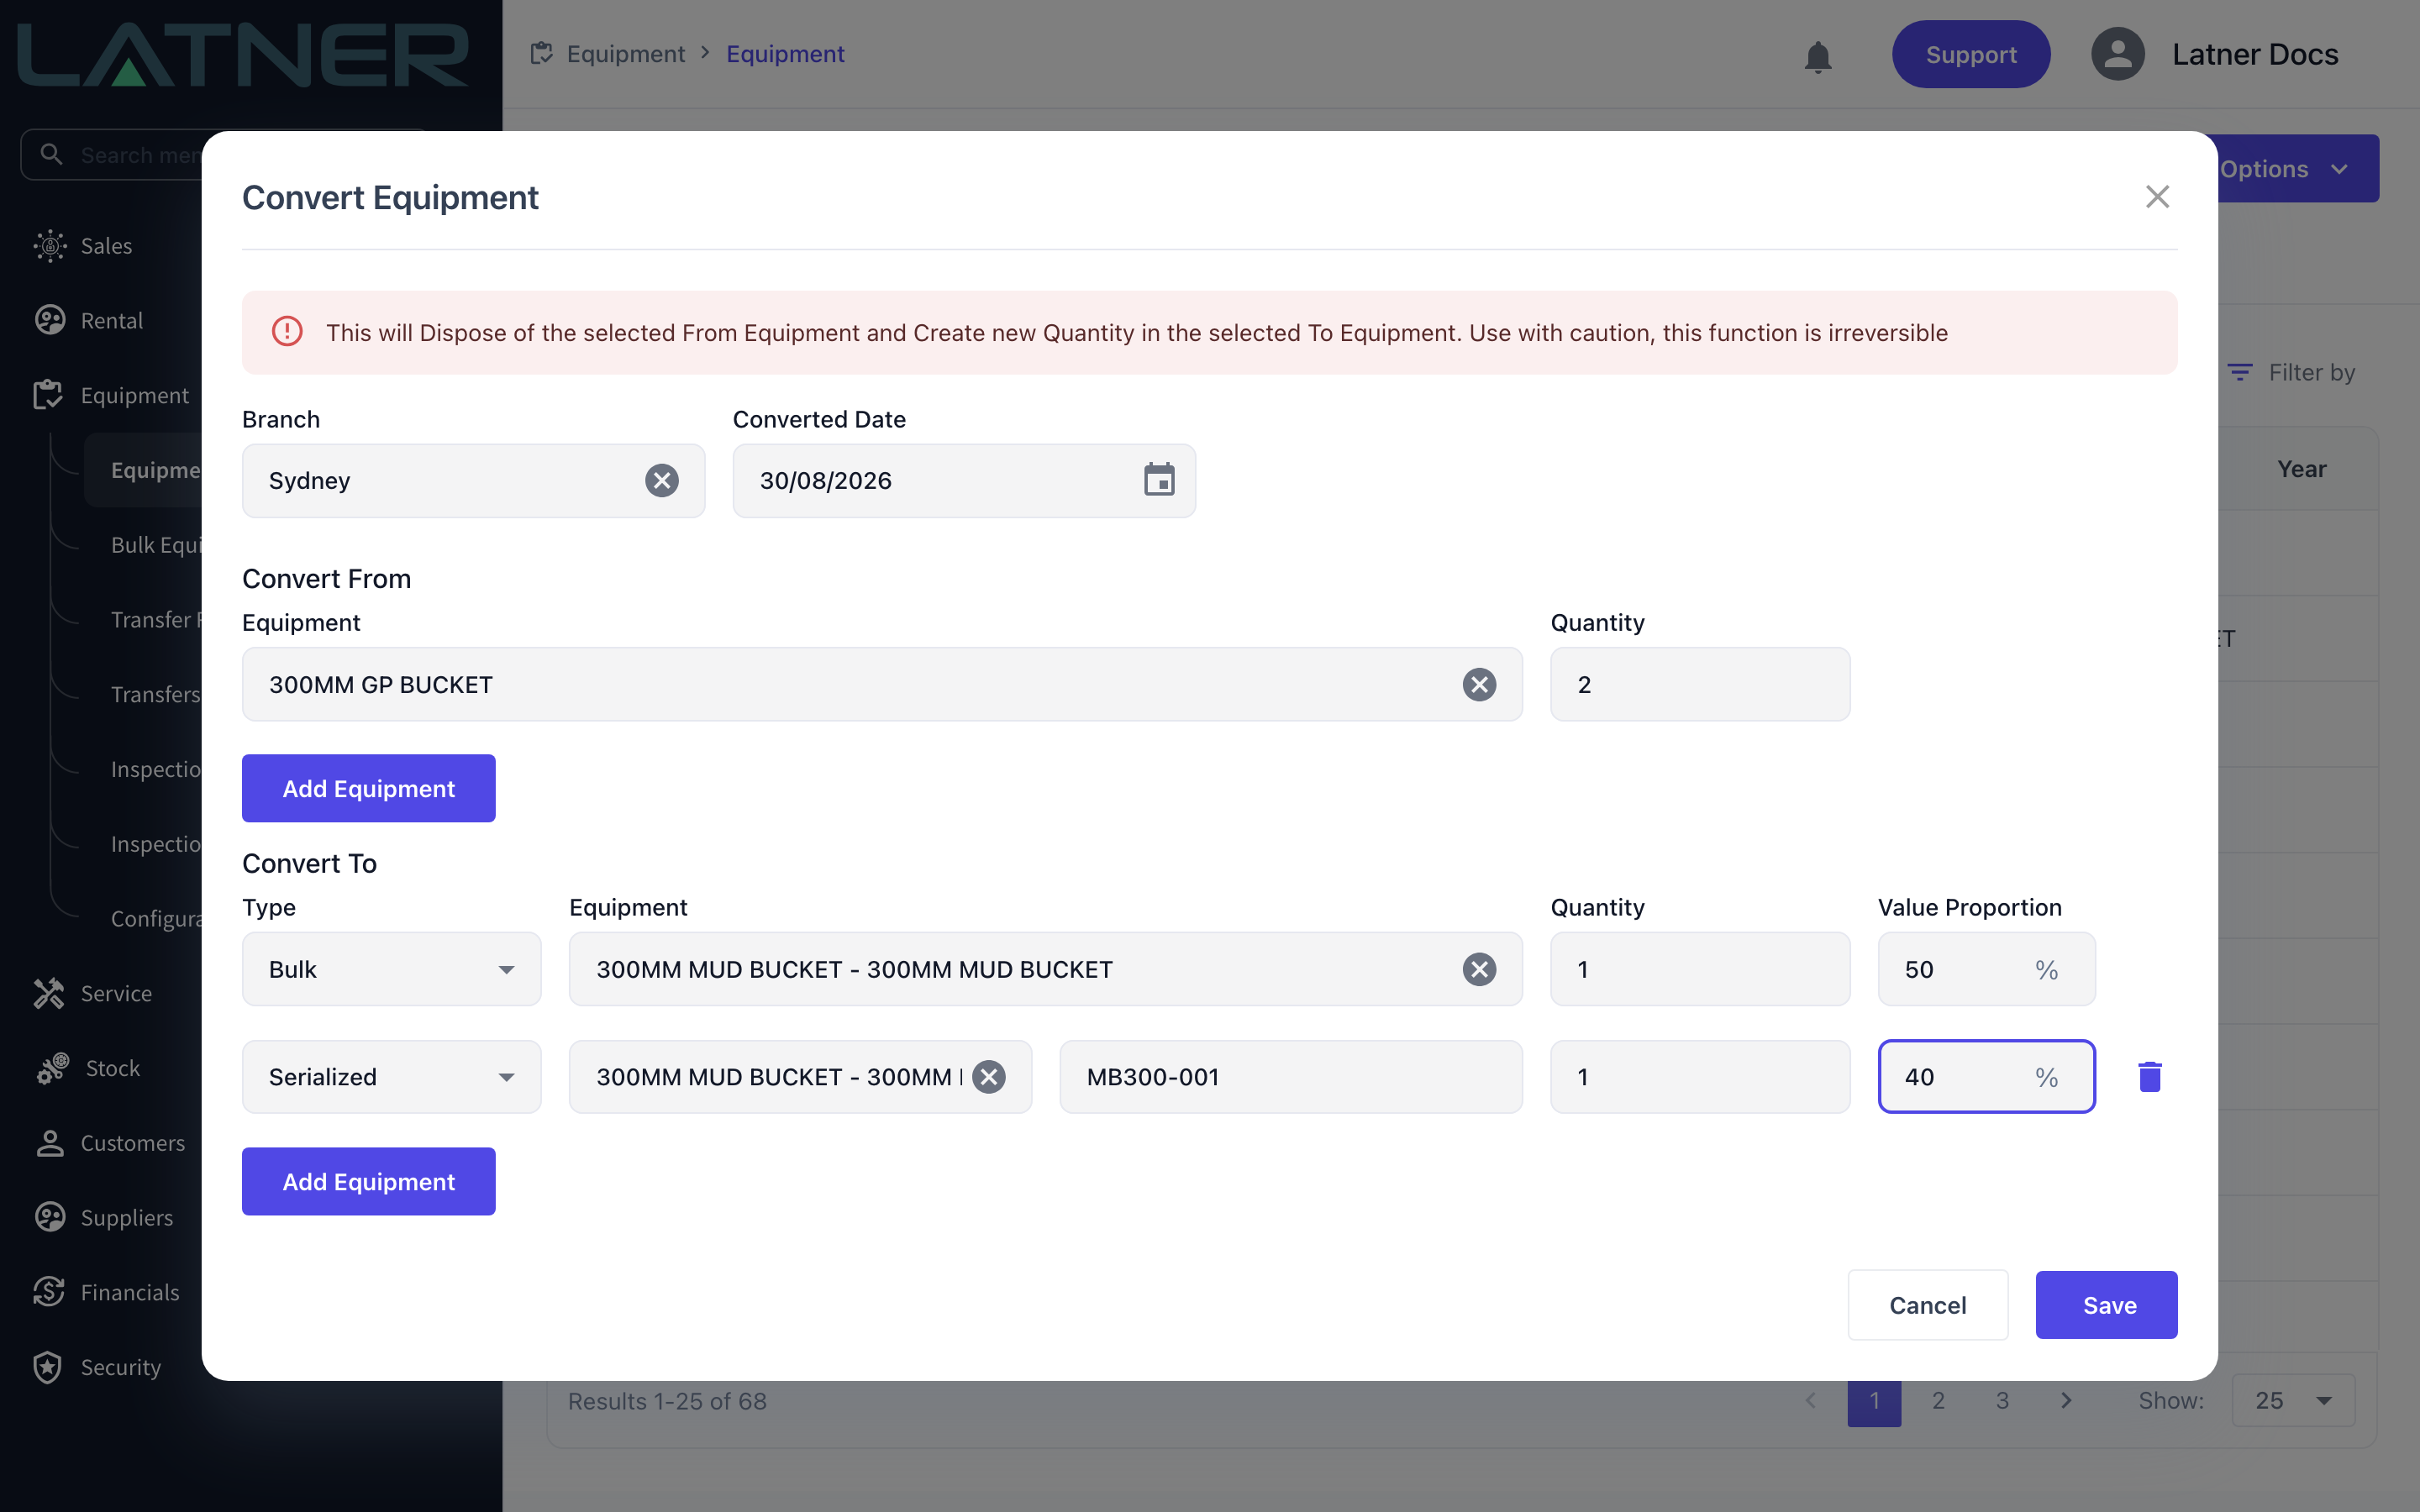
Add up the Value Proportion column before you click Save. Anything over 100% is rejected with Total Value cannot exceed 100%. Anything under 100% is accepted, and the shortfall is treated as scrapped - written off against the outgoing equipment's book value rather than carried into anything new. In the example below, 50% goes to the bulk line and 40% to the new serialized unit, so 10% of the value is scrapped.
Click Save. Latner confirms with Equipment Converted Successfully and refreshes the Equipment list.
After the Conversion
-
Each Convert From line has its quantity moved from available to disposed, and picks up a Converted (From) movement dated the converted date.
-
A serialized machine you converted from has its Rental Status and Service Status set to Converted, drops off the Equipment tab and appears under Archived Equipment. It can no longer be rented, allocated, pre-allocated or put on a work order.
-
Bulk equipment you converted from keeps its status worked out from what's left, so it stays Available while there's still stock at any branch.
-
Each Bulk line under Convert To has its quantity added at the branch and picks up a Converted (To) movement, along with a new asset record holding its share of the value.
-
Each Serialized line under Convert To becomes a new equipment record in Available status at the branch, numbered as you typed and described from the equipment model.
-
Value carries across on the date you set: the outgoing assets are depreciated up to the converted date, each new record takes its Value Proportion of that written-down amount as its book value and tax book value, and its purchase price is the same share of what the originals originally cost. The new asset's purchase date is the earliest purchase date among the equipment you converted from, falling back to the converted date, and its depreciation restarts from the day before the conversion.
-
You can see both sides on the Movement History tab of each equipment record.
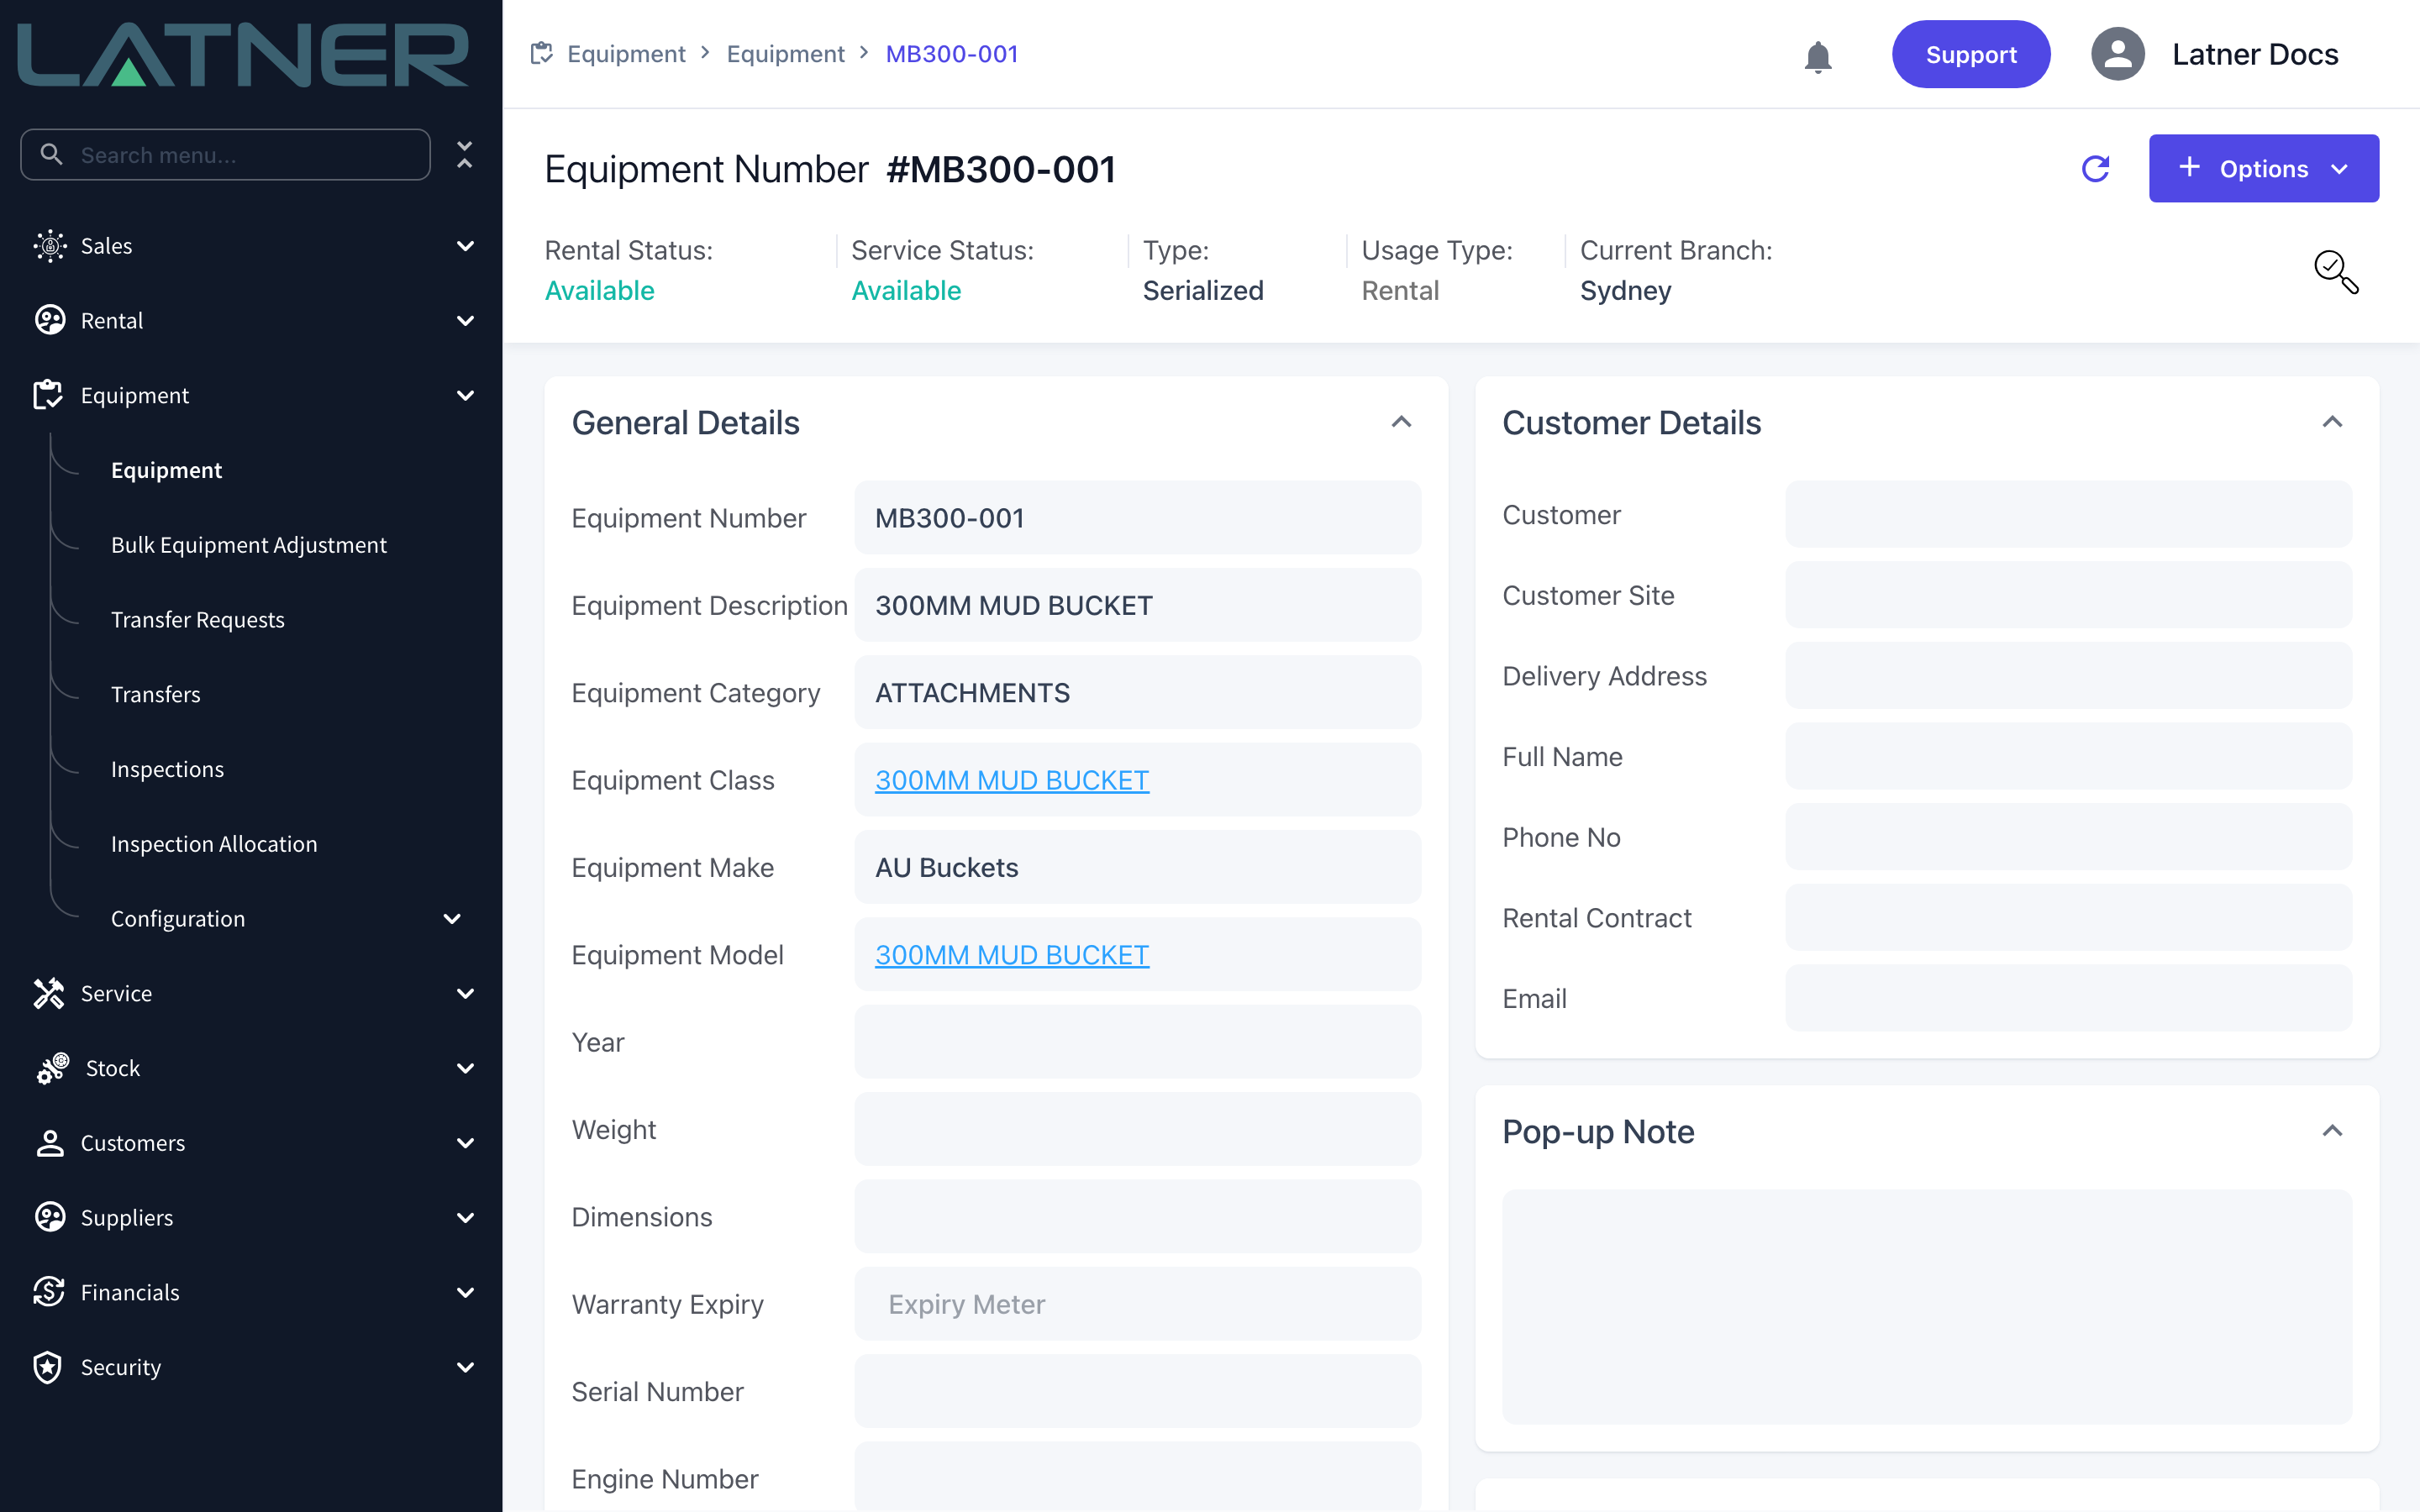
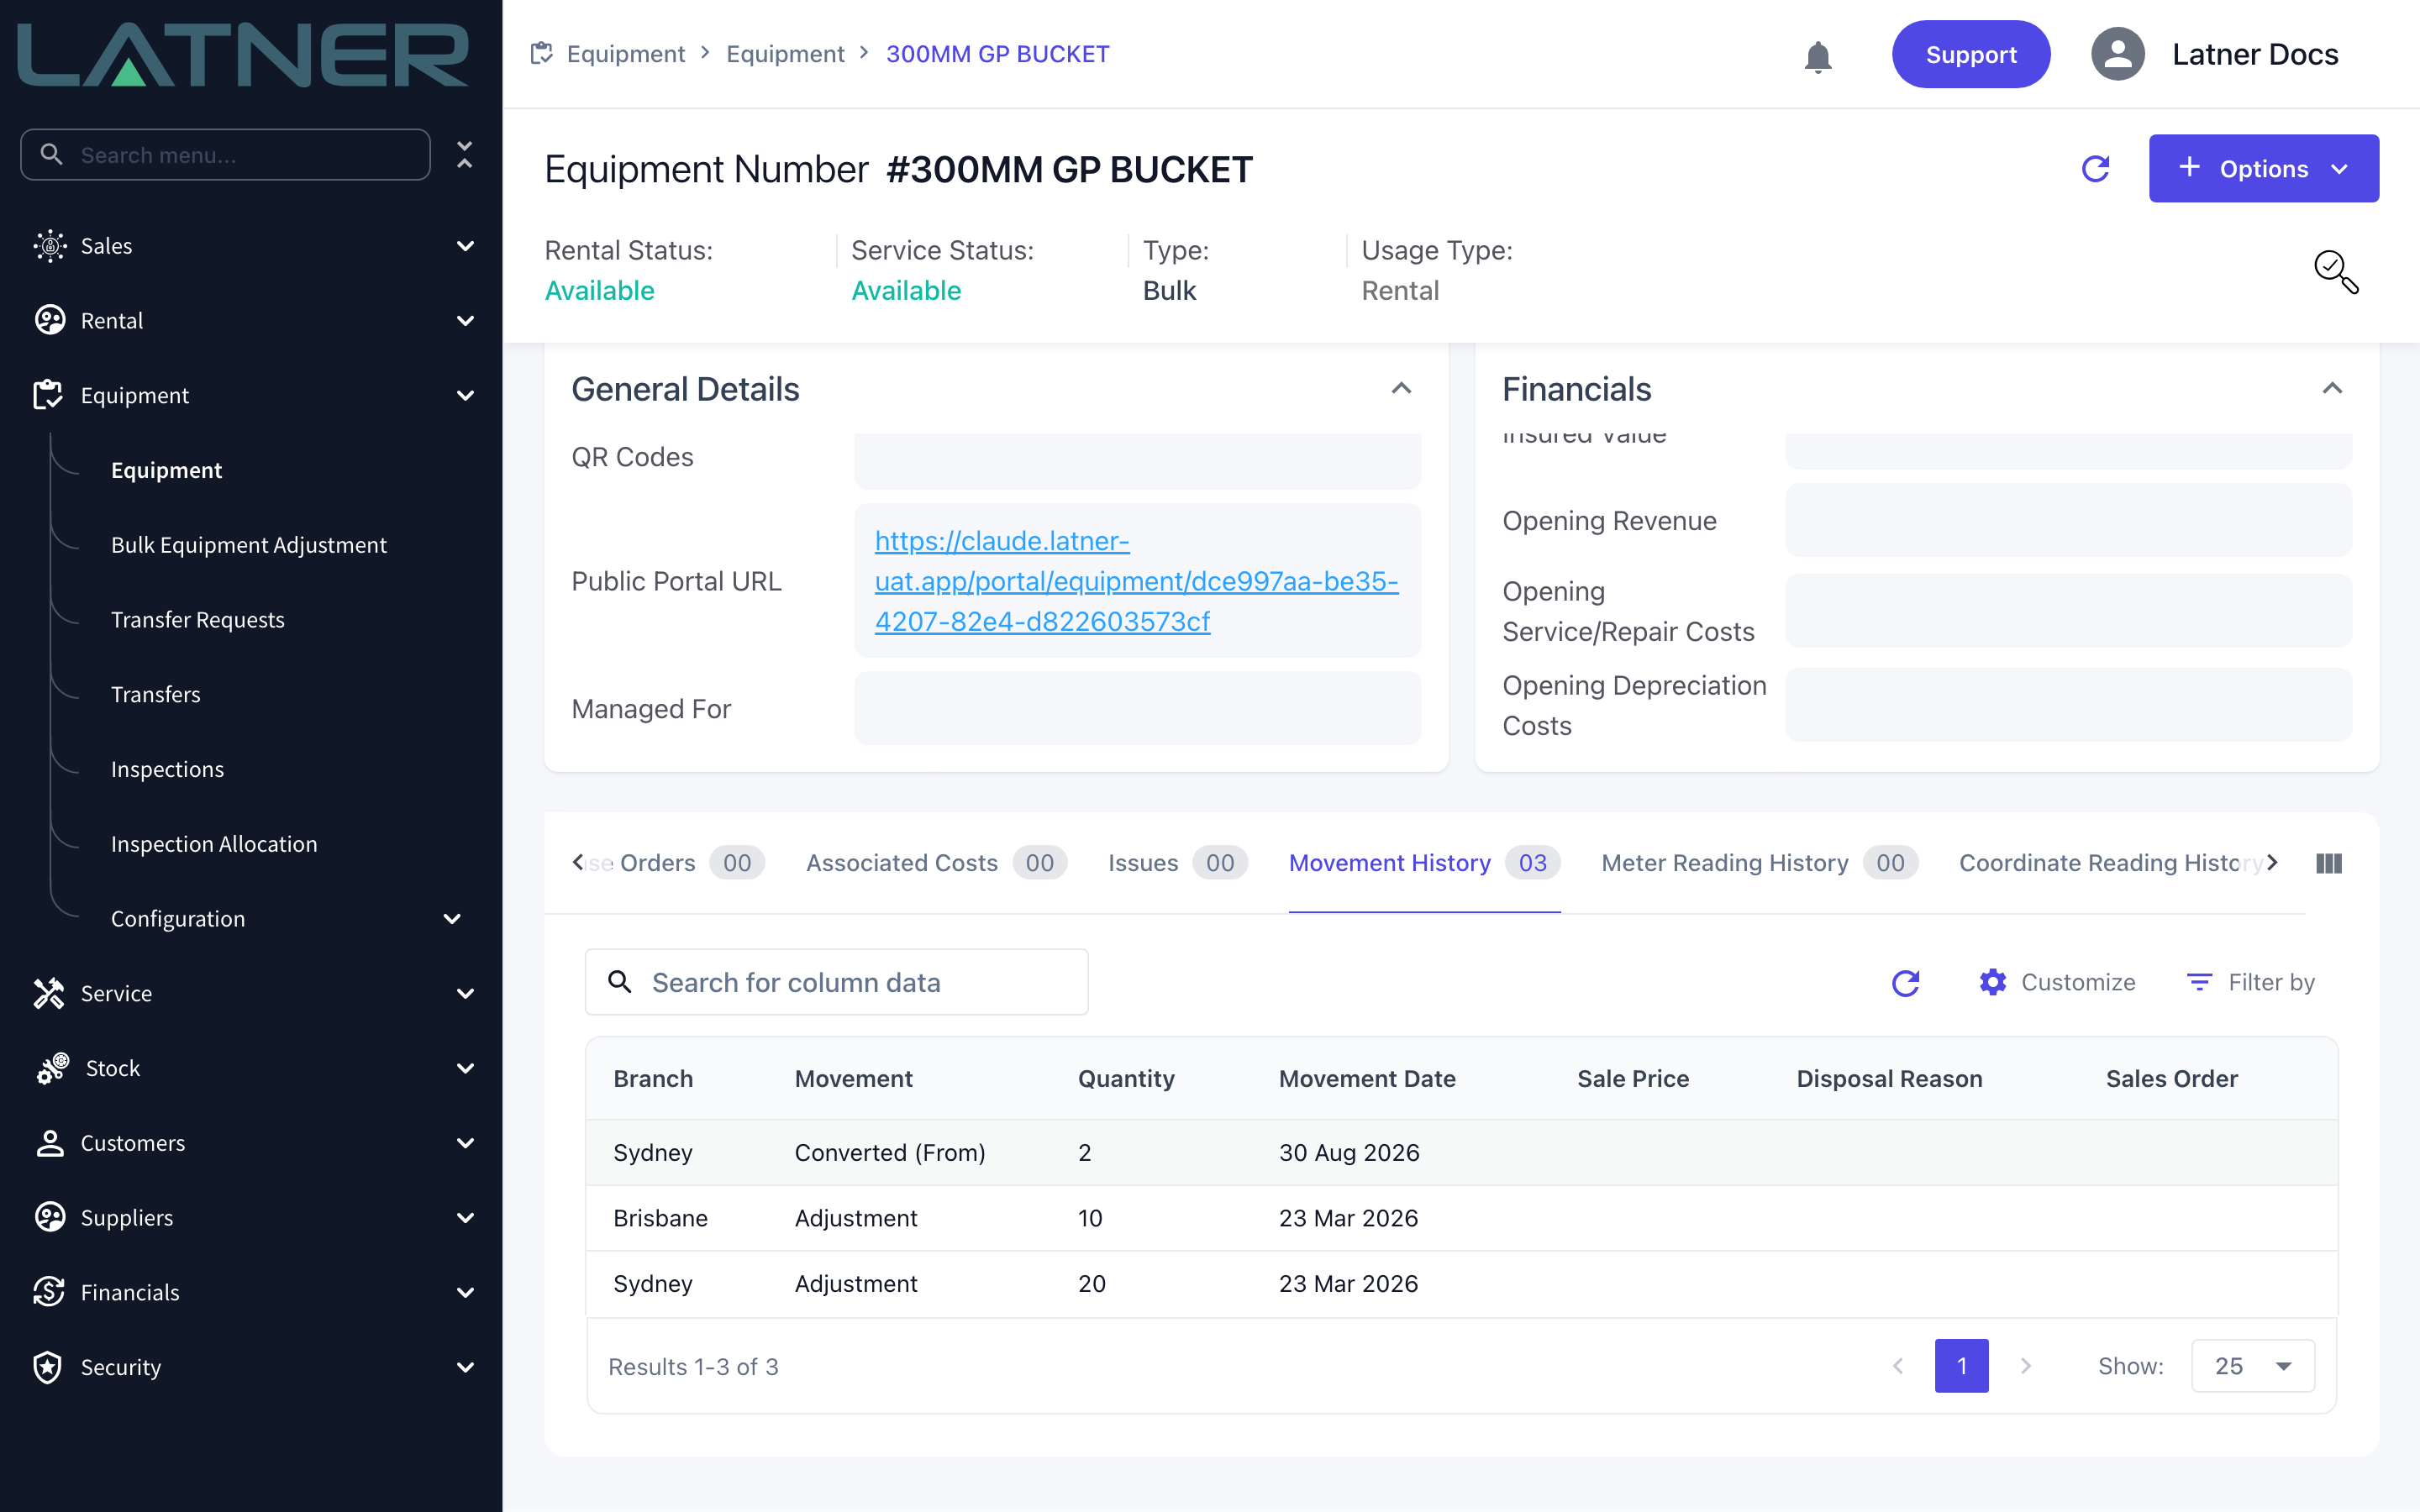
A conversion cannot be reversed. Latner can reverse a sale, but not a conversion, so putting the quantity back means a bulk equipment adjustment and tidying up the records the conversion created by hand. If you're unsure whether an item should leave the fleet at all, use Sell or Dispose Equipment instead - a sale can be reversed.
FAQs
Watch the Demo
Prefer to watch it? Step through the same flow here.
Timesheets Input Type
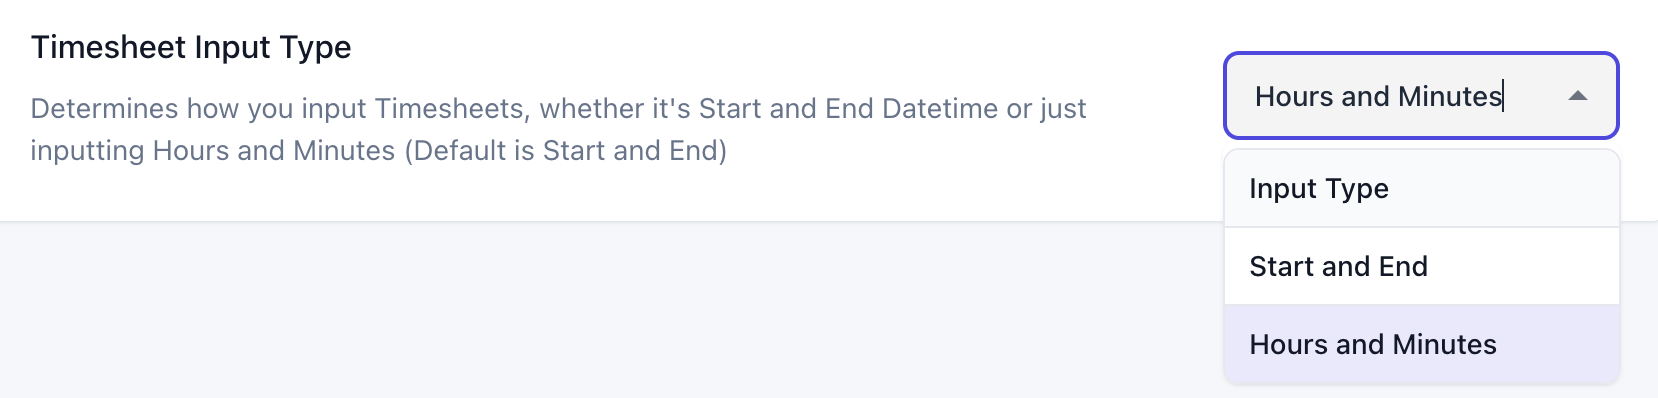
You can now choose how timesheets are entered either by specifying Start and End times or by entering total Hours and Minutes.
The current default is Start and End and should be used when you would like to capture the exact time period when work was completed. E.g. 12th December 2pm - 12th December 4pm
Hours and Minutes allows you to instead capture only the duration and date that work was completed. E.g. 4 hours on 12th December
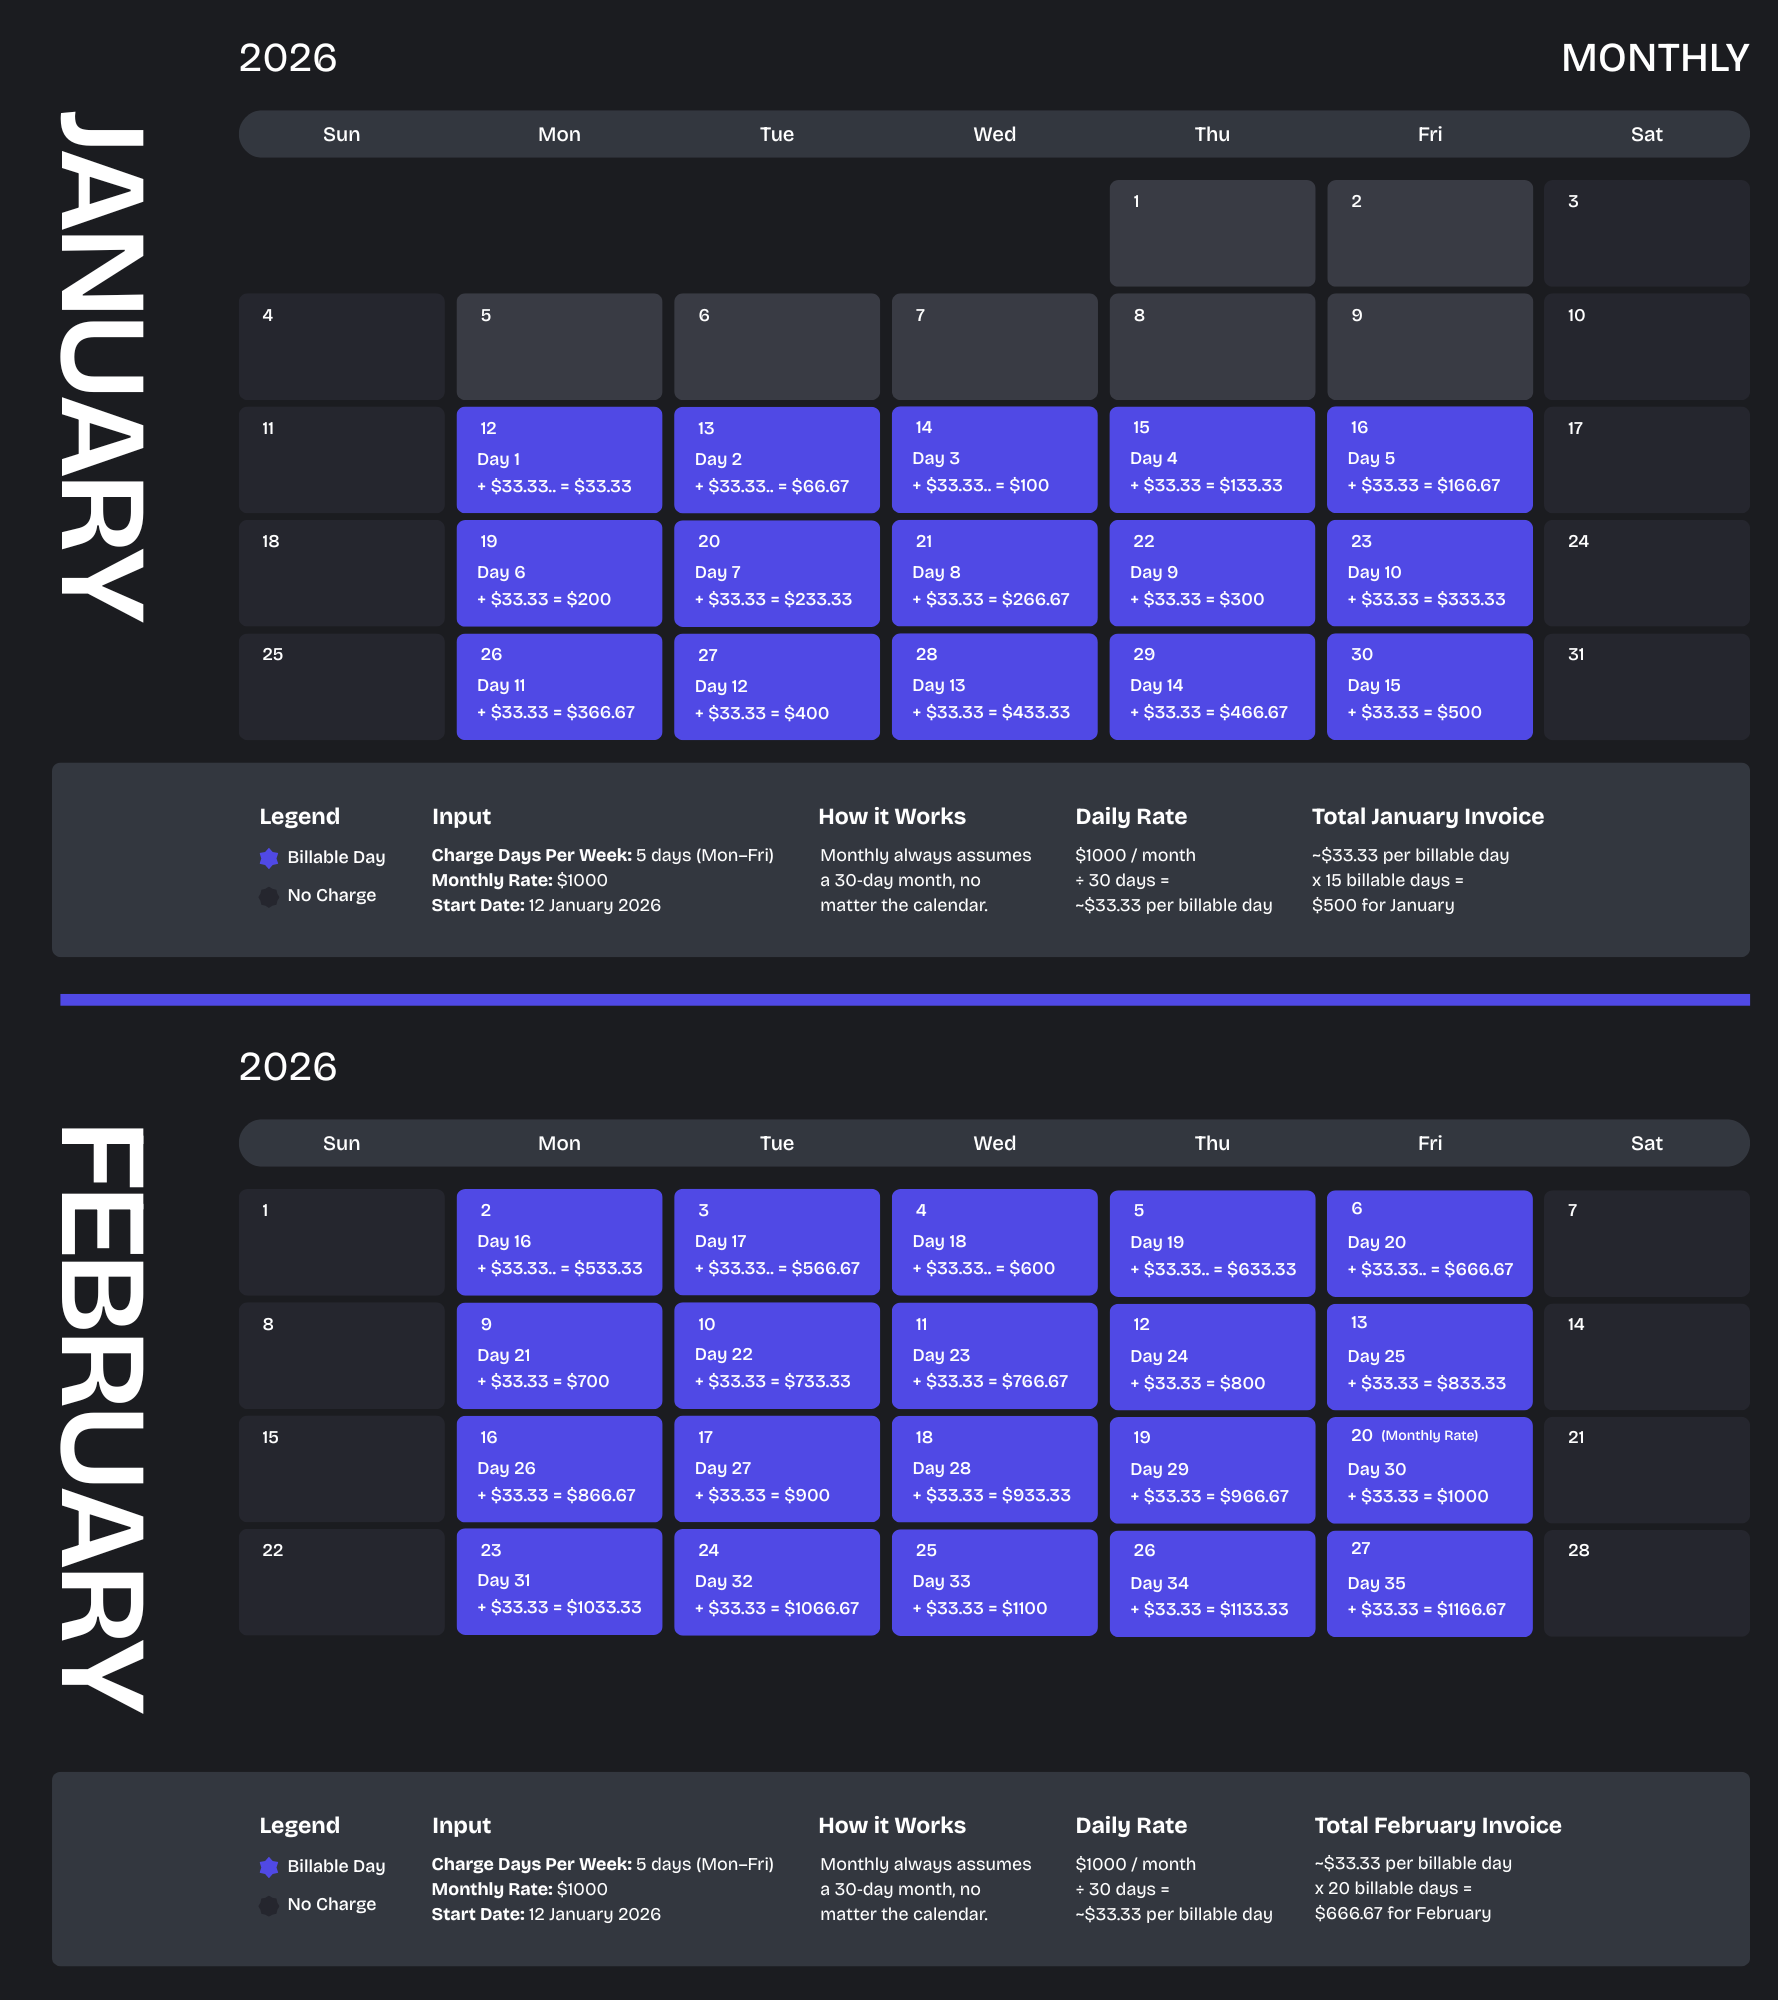
Calendar Month Rate Type
We have added two new rate types Calendar Month and Calendar Month (Annualized).
To help with deciding which rate type is best suited for your needs we have detailed the differences below.
Comparing Monthly, Calendar Month & Calendar Month (Annualized)
The Monthly method treats every billing cycle as a fixed 30‑day month. All billable days - based on your selected charge days per week - are prorated against this 30‑day period.
The Calendar Month method spreads the monthly rate evenly across all billable days in that specific month. The system first determines the total number of billable days in the month (based on your Charge Days Per Week), then prorates the charge by comparing the billable days within the hire period to the total billable days for that month.
The Calendar Month (Annualized) method spreads the annual cost (your monthly rate multiplied by 12) across all billable days within the 365 days of the year. The system calculates how many billable days fall within the hire period and prorates them against the days in the year. The annual total is then applied to that proration, ensuring a consistent daily value across the entire year.
Example
.png?cb=a0fbd2a01a379c7813f124151cdae7f2)
.png?cb=4c41592bd15567c9353fd30b100ea4e5)
Other Updates & Improvements
-
Allow Stand Downs to be cancelled after invoicing
-
Added a tab for Sales Orders to the Customer Screen
-
Supplier Invoices can now be linked to CRM Projects
-
Stand Downs are now supported for Minimum Hours Per Month Rate Types
-
Equipment on Rental Contract Details is now linked and clickable
-
Invoice/Payment syncs now function correctly for Inactive customers
-
Allowed Sales Order Details to be individually fulfilled and invoiced
-
Changed Customer Damage Waiver to be the upper limit when an Equipment Class Damage Waiver is set
-
Plus a range of smaller fixes and performance improvements