
A Purchase Order records what you have ordered from a supplier, what it costs and where it is going, so that receipting, stock costing and supplier invoicing all have something to check against.
Overview
Almost everything you buy passes through a Purchase Order first - a box of filters, a generator for the hire fleet, a freight charge from a carrier. Raising the order in Latner is what turns "we rang the supplier" into a record the yard, the warehouse and Accounts Payable can all work from.
-
Every Purchase Order is raised against one supplier and one of that supplier's sites, for a single branch and warehouse.
-
Latner issues the number for you using the Purchase Order Number Format setting. Numbers are sequential and cannot be edited.
-
The header is created first and the lines are added afterwards, so a brand new Purchase Order is saved with nothing on it.
-
Each line has a Line Type - Stock, Serialized Stock, Asset, Equipment, Expense or Transport - and the rest of the line's fields change with the type you pick.
-
A new Purchase Order starts at status Open. Lines can only be added, changed or deleted while it is Open.
-
Creating the order commits nothing. Stock isn't reserved and the supplier isn't told until you confirm the order, and nothing arrives until you receipt it.
Before You Begin
A few things need to be in place before you can raise an order.
|
Requirement |
Where to Find It |
|---|---|
|
Purchase Orders permission |
Security › Configuration › Permission Groups, under Financial › Screen |
|
Create Purchase Order permission |
Security › Configuration › Permission Groups, under Financial › Option |
|
Add Purchase Order Details permission |
Security › Configuration › Permission Groups, under Financial › Option |
|
Purchase Order Number Format setting |
Security › Settings › Financials |
|
An Active supplier with at least one supplier site |
Suppliers › Suppliers |
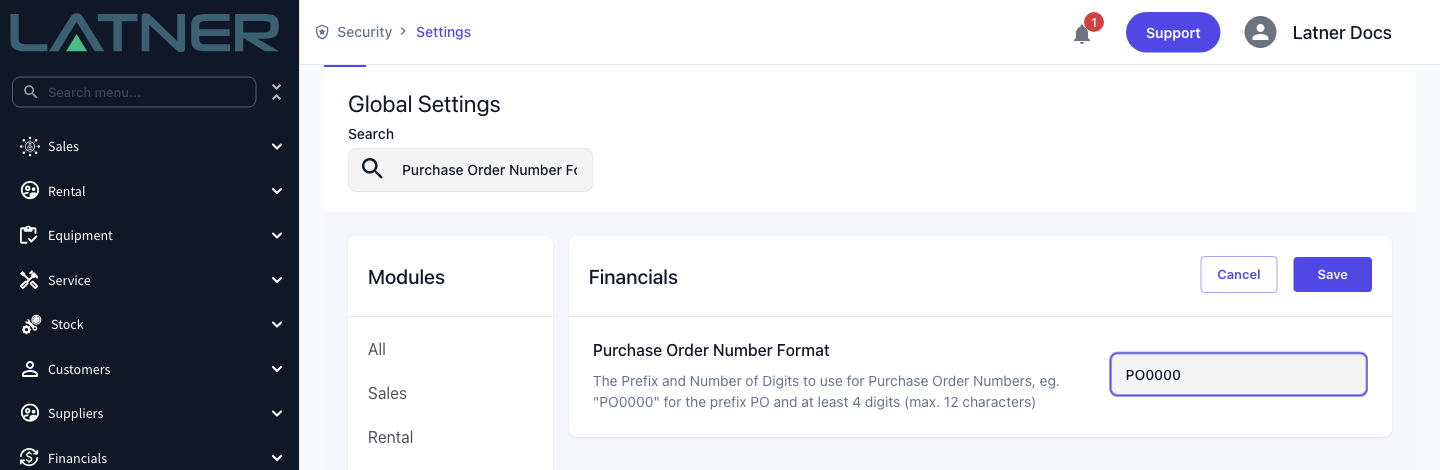
Purchase Order Number Format is optional. Leave it blank and your orders are numbered 1, 2, 3; set it to PO0000 and the same orders read PO0001, PO0002, PO0003. The prefix and digit count together can be at most 12 characters.
You will only see, and can only create, Purchase Orders for the branches your permission groups cover. If the branch you need is missing from the Branch list, it's the permission group that needs changing rather than the order.
Creating the Purchase Order
Step 1 - Open the Purchase Orders screen
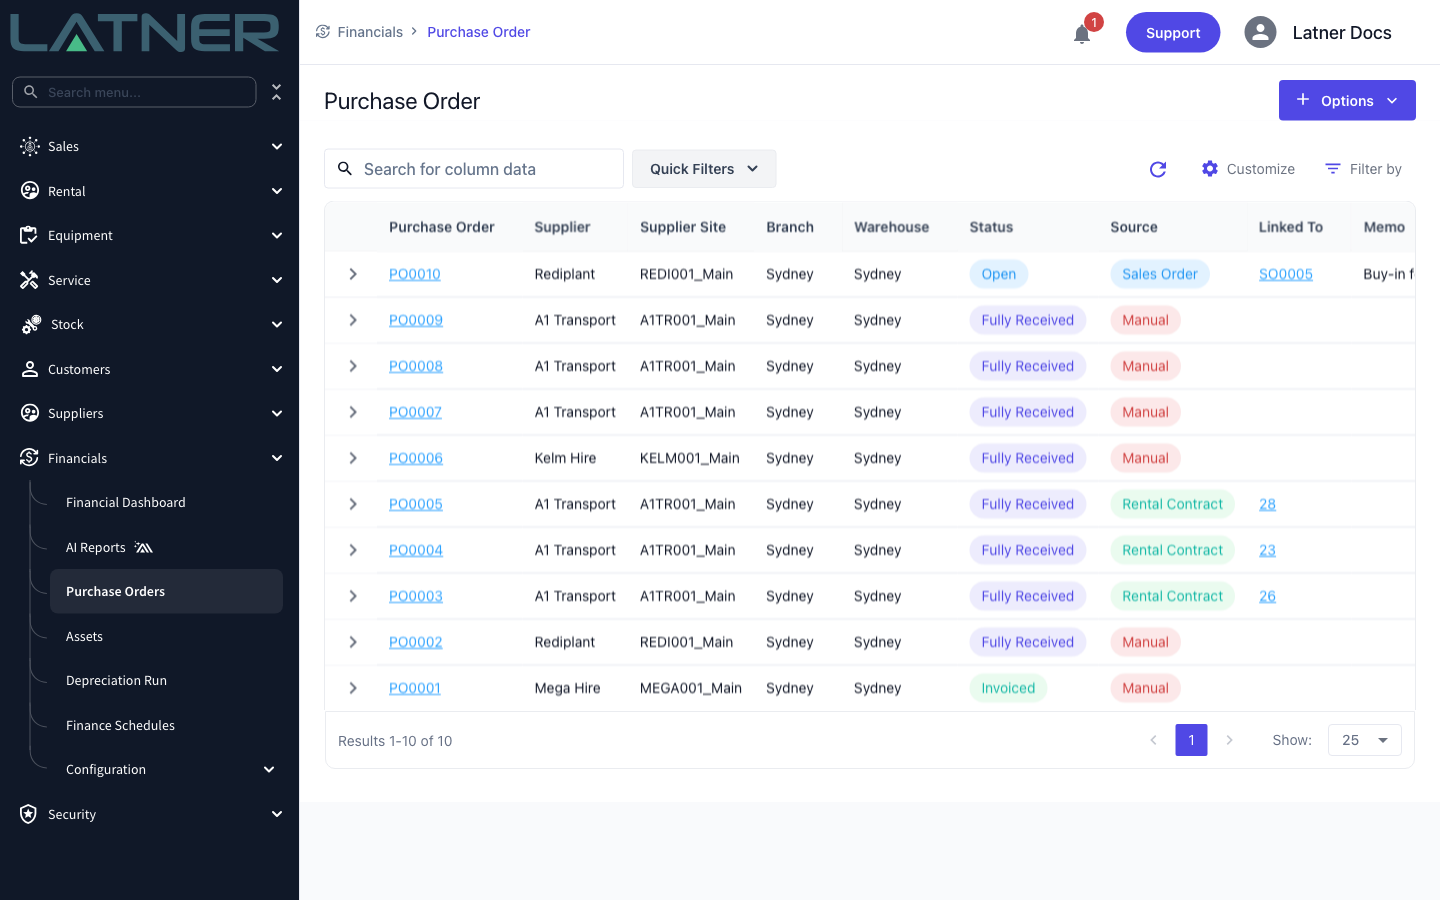
Go to Financials › Purchase Orders. The list shows every order for the branches you have access to, with quick filters for Open, Confirmed, Partly Received, Fully Received, Invoiced and Cancelled.
Step 2 - Start a new Purchase Order
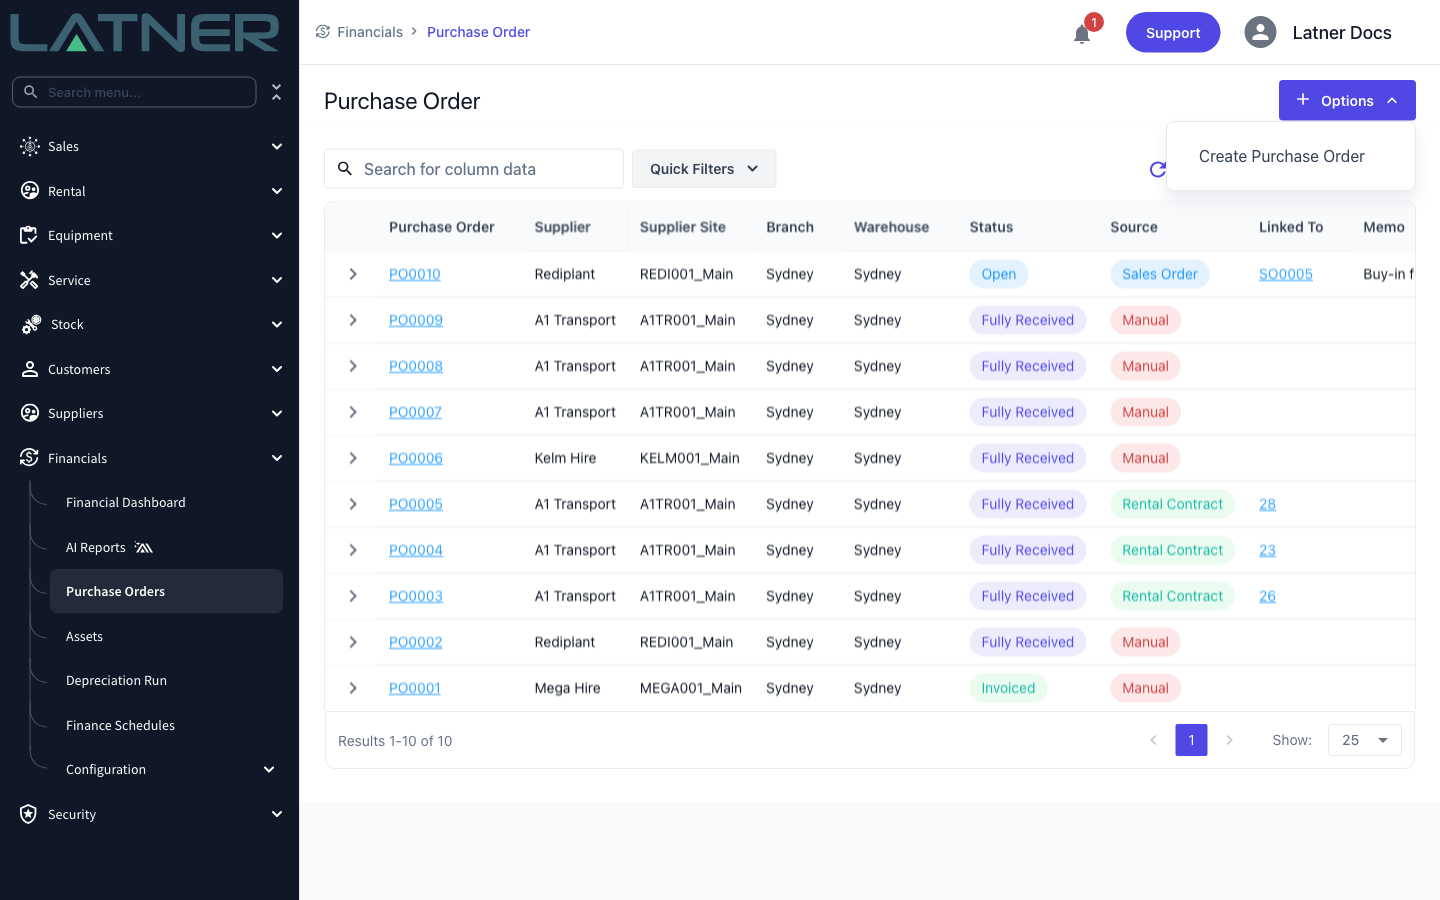
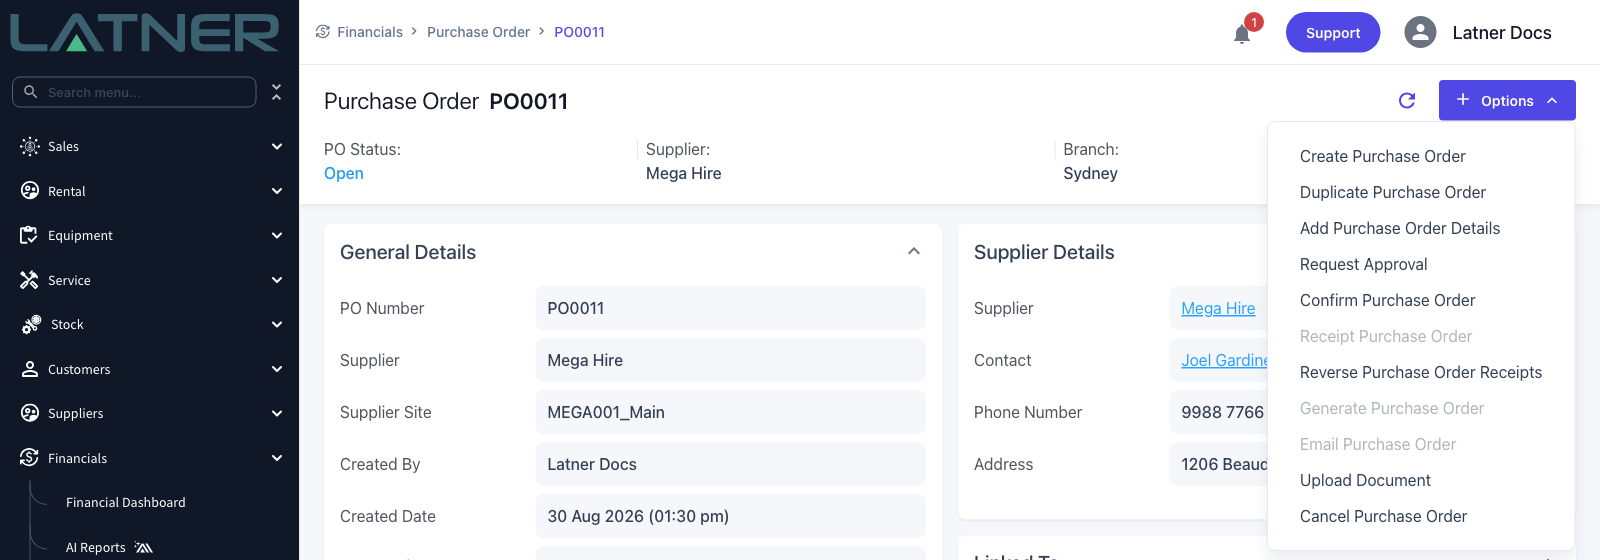
Select Options › Create Purchase Order.
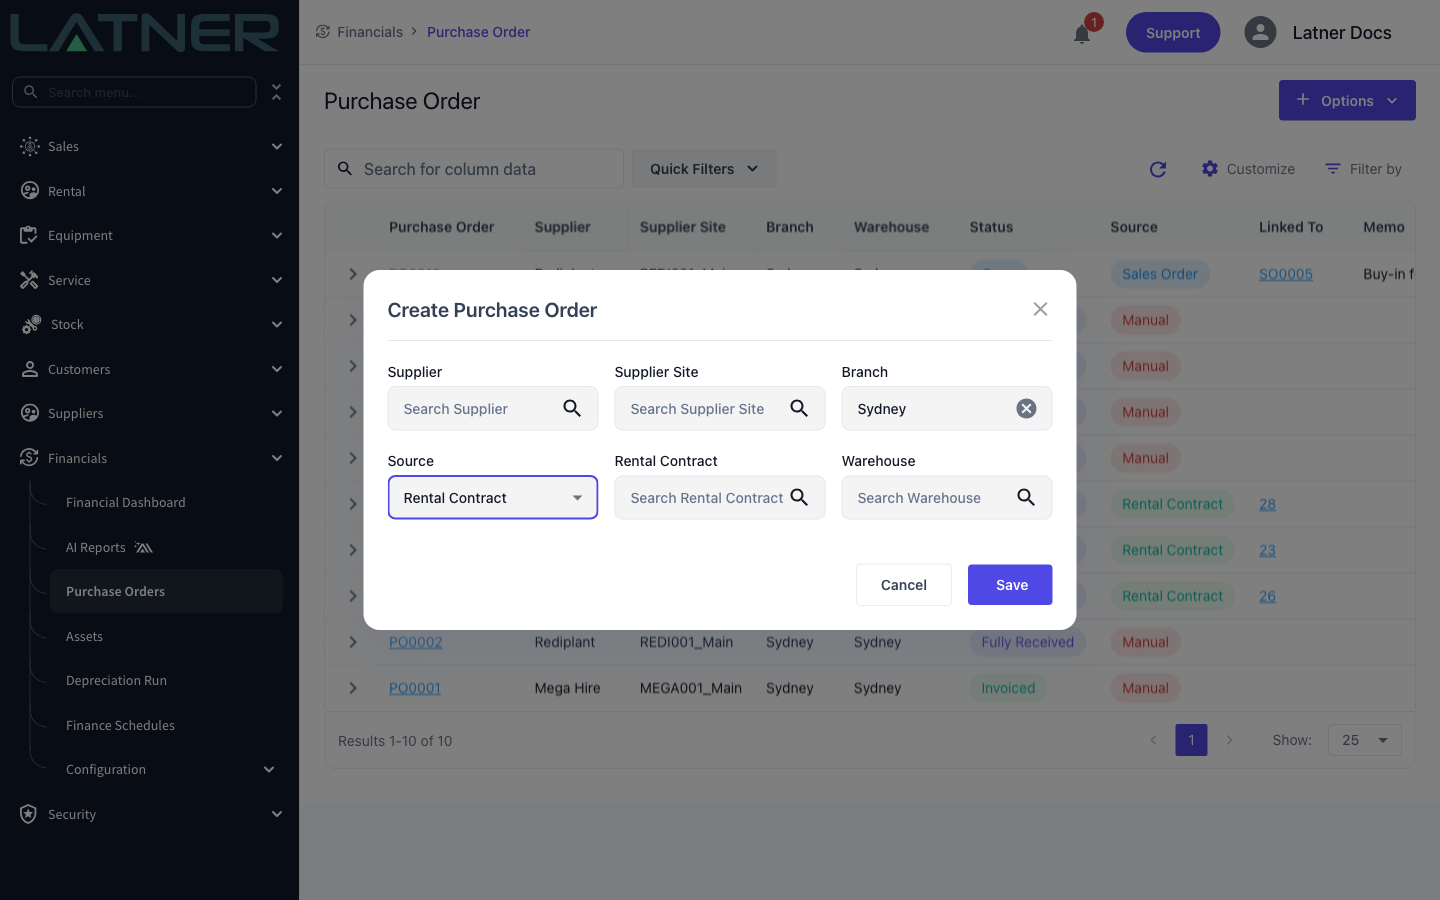
Step 3 - Fill in the header
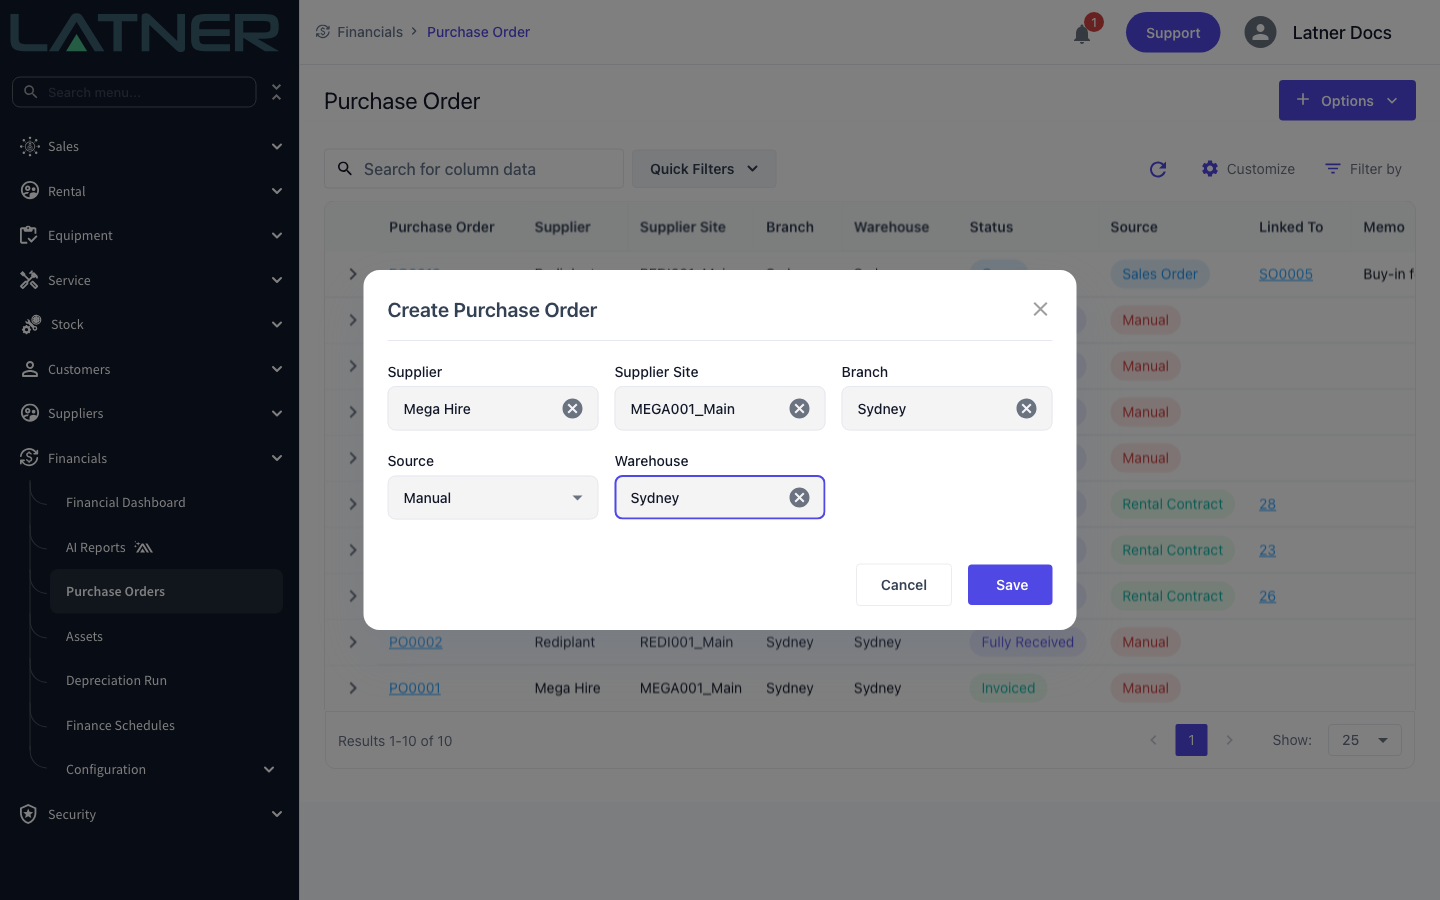
Every field on this form is required.
-
Supplier - only suppliers with a status of Active are listed. Choosing a supplier clears the Supplier Site, so a site from a previous choice can't be left behind.
-
Supplier Site - narrowed to the sites belonging to the supplier you chose. The site carries the tax type that new lines will default to. If you pick a site first, the Supplier is filled in for you.
-
Branch - defaults to your own branch. The order's shipping address defaults to this branch's address.
-
Source - covered in Step 4.
-
Warehouse - narrowed to the warehouses of the branch you chose. Changing the Branch sets the Warehouse to that branch's main warehouse. Because the Branch arrives already filled in, the Warehouse starts blank and you need to choose it yourself.
Step 4 - Choose the source
The Source records what the order was raised for. It is Manual by default, which is what you want for an order that stands on its own. Choosing Rental Contract adds a Rental Contract field, which then has to be filled in; every line on the order is linked to that contract so the spend is costed back to the hire. Work Order only appears when you started the form from a work order, and is locked to that work order.
An order can't be raised against a Rental Contract that is Completed, Cancelled or Lost, or against a Work Order that is Completed or Cancelled. Latner blocks it when you save rather than when you pick it.
Step 5 - Save the header
Select Save. Latner issues the next Purchase Order number, sets the status to Open, copies the branch's address in as the shipping address and the supplier's billing contact in as the contact, then opens the new order with the Add Purchase Order Detail form already showing.
Step 6 - Add the first line
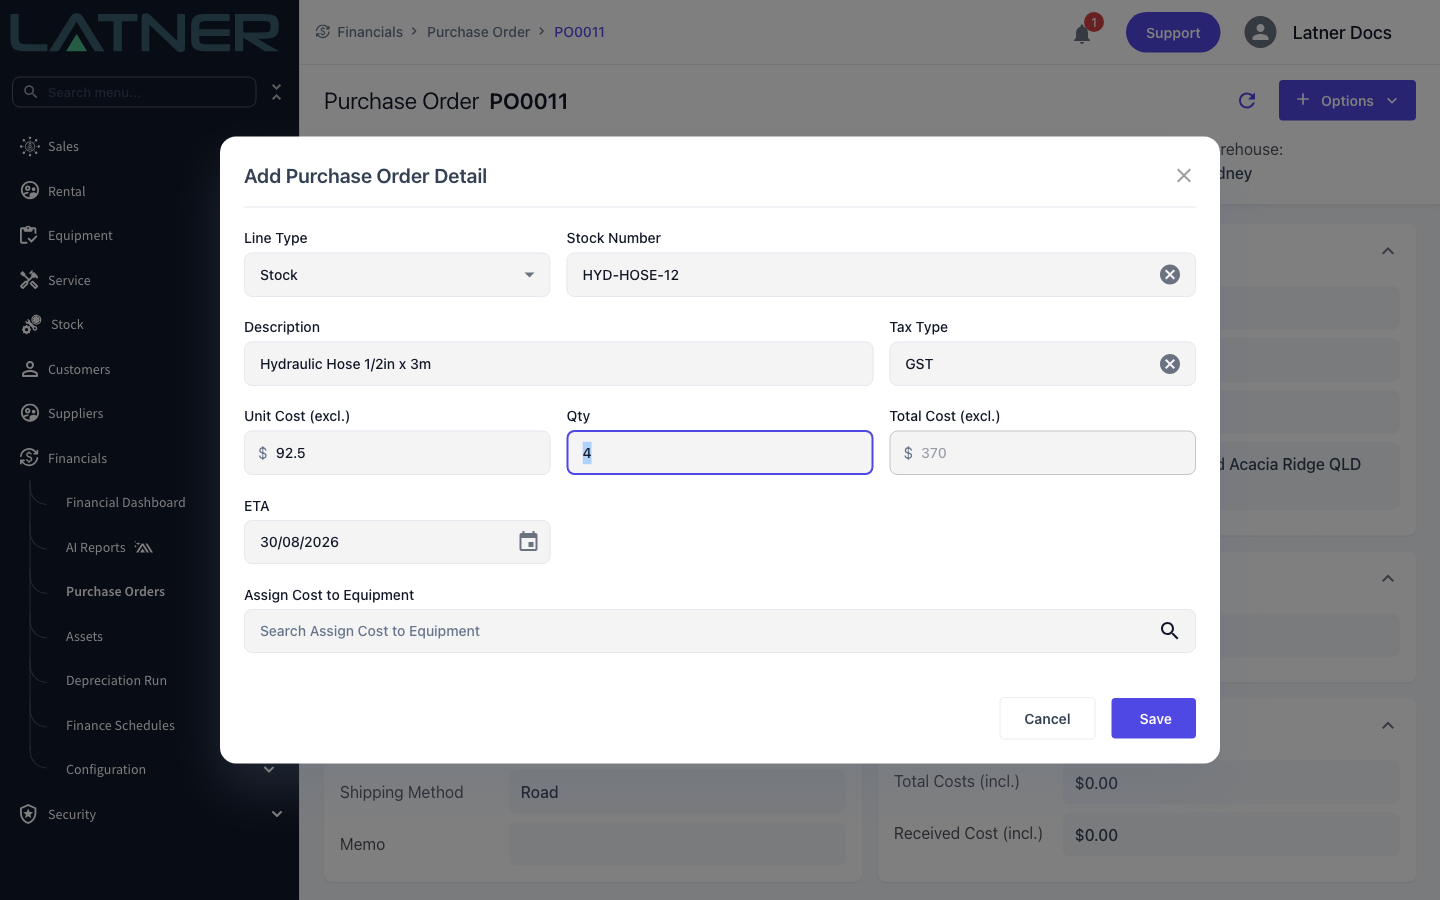
Start with the Line Type, because it decides which of the fields below it you see.
-
Line Type - Stock, Serialized Stock, Asset, Equipment, Expense or Transport. Asset only appears when Asset Management is switched on. The item field underneath changes to match: Stock Number, Serialized Stock Number, Asset Type and Asset Group, Equipment Type with either an Equipment Model or an Equipment Number, Expense Type, or Transport Type.
-
Description - required, and filled in from the item you chose. Edit it however you like.
-
Tax Type - required, defaulted from the supplier site.
-
Unit Cost (excl.) - required. On a Stock line Latner fills in the price recorded for that item against this supplier, if there is one. Stock and Expense lines keep the extra decimal places you type; every other line type is rounded to two.
-
Qty - required, and a whole number for every line type except Expense and Transport.
-
Total Cost (excl.) - calculated from cost and quantity as you type, and read only.
-
ETA - required, defaulted to today in the branch's timezone. Every line carries its own ETA.
-
Assign Cost to Equipment - optional. It only appears on Stock, Transport and Expense lines, only accepts serialized equipment, and is hidden on an order raised from a work order.
-
CRM Project - only appears when Show Link to Project Field When Creating Purchase Order Details is switched on.
Step 7 - Add the remaining lines
Save writes the line, closes the form and updates the order's totals. Use Options › Add Purchase Order Details for the next one.
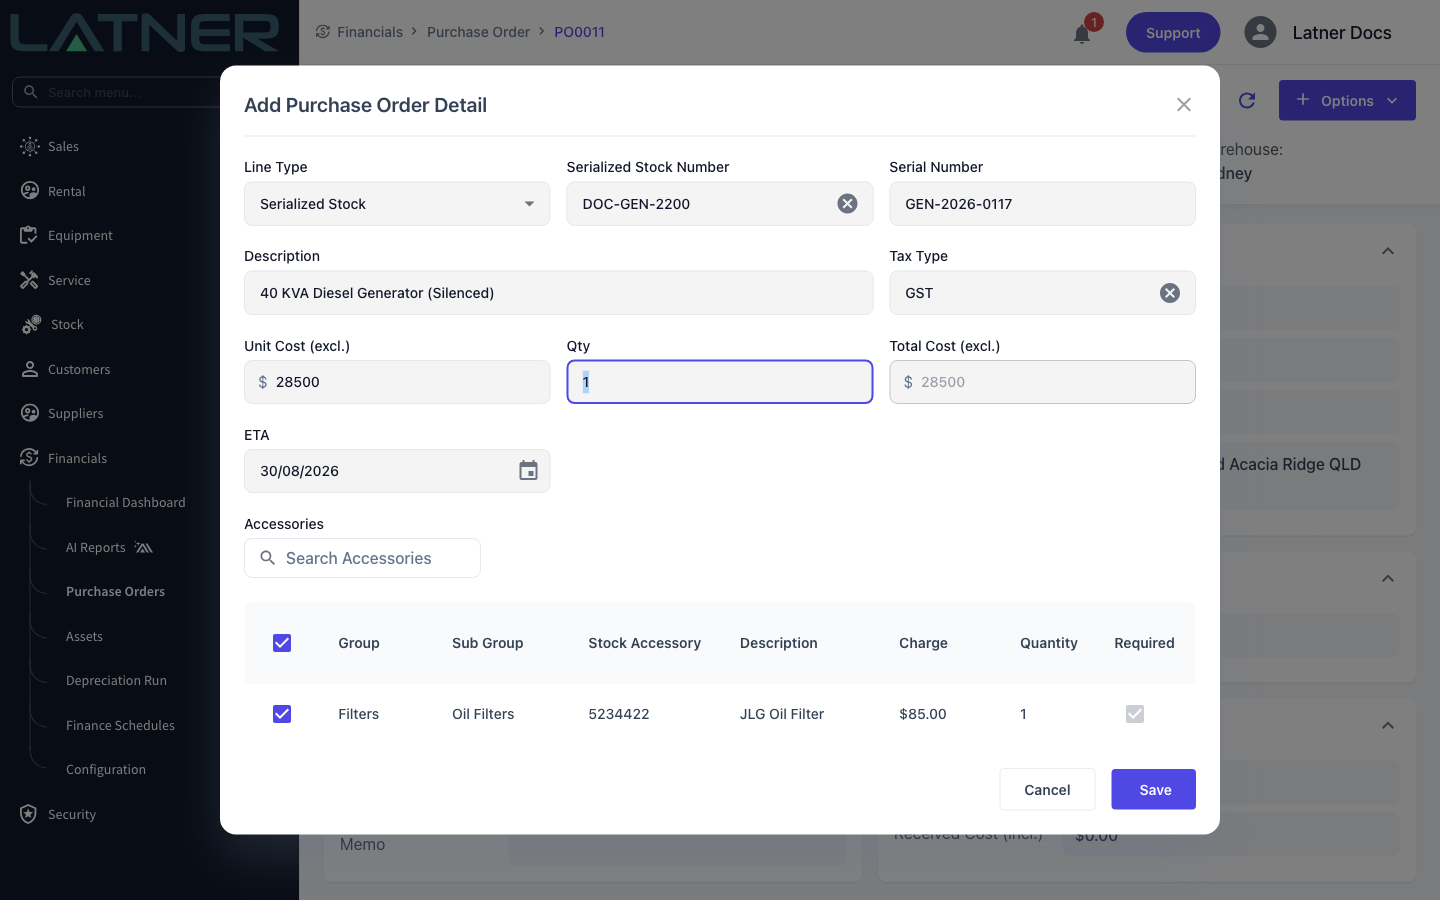
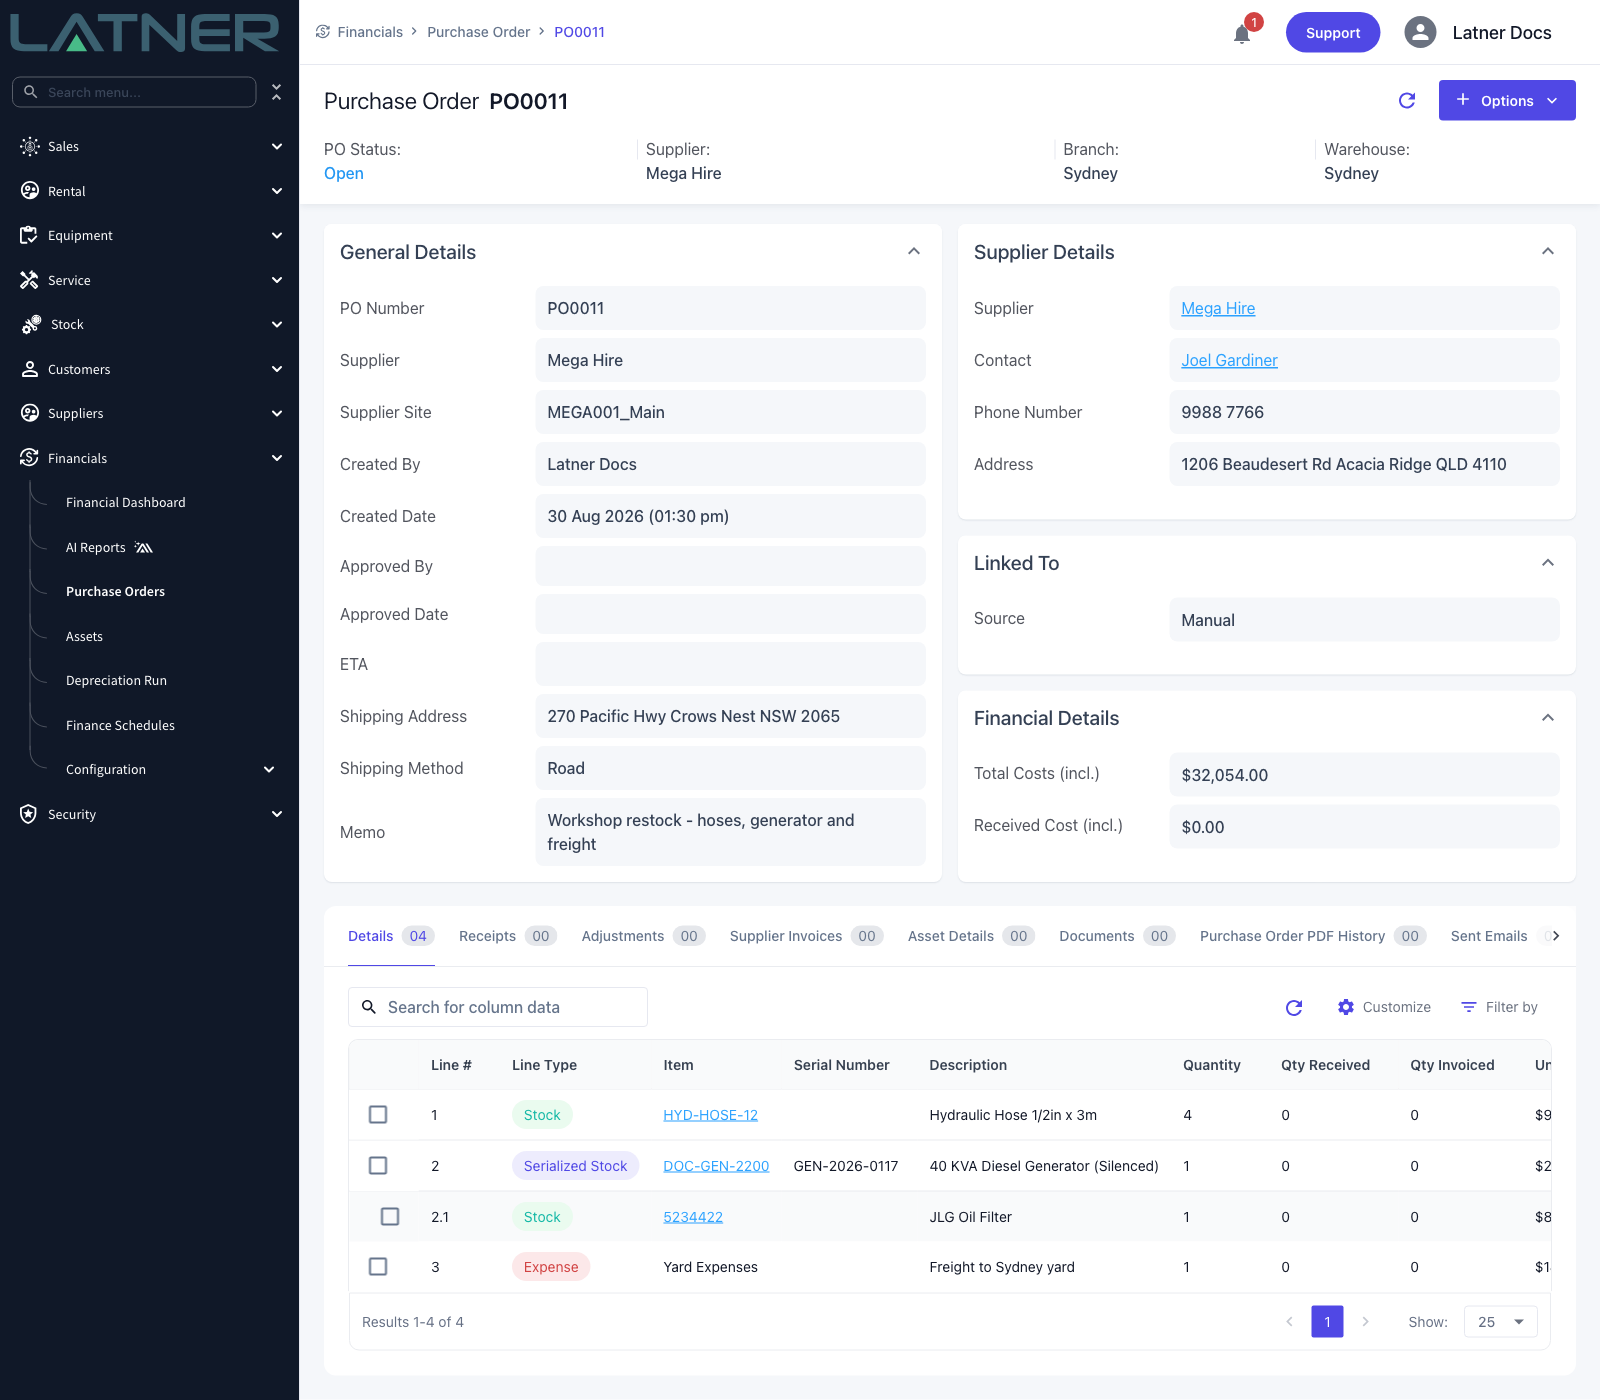
A Serialized Stock line has two extras. Serial Number is optional, but if you enter one the quantity has to be 1. Below the line, the Accessories table lists the accessories set up against that serialized stock item: the ones marked Required are ticked for you, and you can tick any of the others. Each ticked accessory is added as its own Stock sub-line underneath the parent, numbered 2.1, 2.2 and so on.
After Creation
-
The order sits at Open, with its lines on the Details tab and its running totals in the Financial Details card.
-
ETA, Shipping Address, Shipping Method, Memo, Supplier, Supplier Site and Contact all stay editable on the order's cards. The PO Number, Created By and the approval stamps do not.
-
Lines can be edited or deleted while the order is Open. Quantity and Unit Cost lock as soon as it leaves Open, and a line that has been received or invoiced can't be deleted at all.
-
Nothing has reached stock yet. Confirming the order backorders the Stock lines and raises an Ordered serialized stock item for each Serialized Stock line; receipting is what brings the goods in.
-
The next step is Options › Request Approval or Options › Confirm Purchase Order. Both need at least one line on the order.
An Asset or Equipment line creates a brand new asset or equipment record in Latner when the order is receipted, and reversing the receipt will not take that record back out again. Check the line type before you confirm. If all you want is the cost recorded against a machine you already own, use a Stock or Expense line with Assign Cost to Equipment instead.
Other Ways to Create a Purchase Order
A manual order is only one of the routes. Latner can also raise a Purchase Order from the record that caused the spend, which keeps the two linked.
From a Rental Contract
Choose Rental Contract as the Source on the same form and pick the contract. Every line on the order is then tied to that contract.
From a Transport Docket
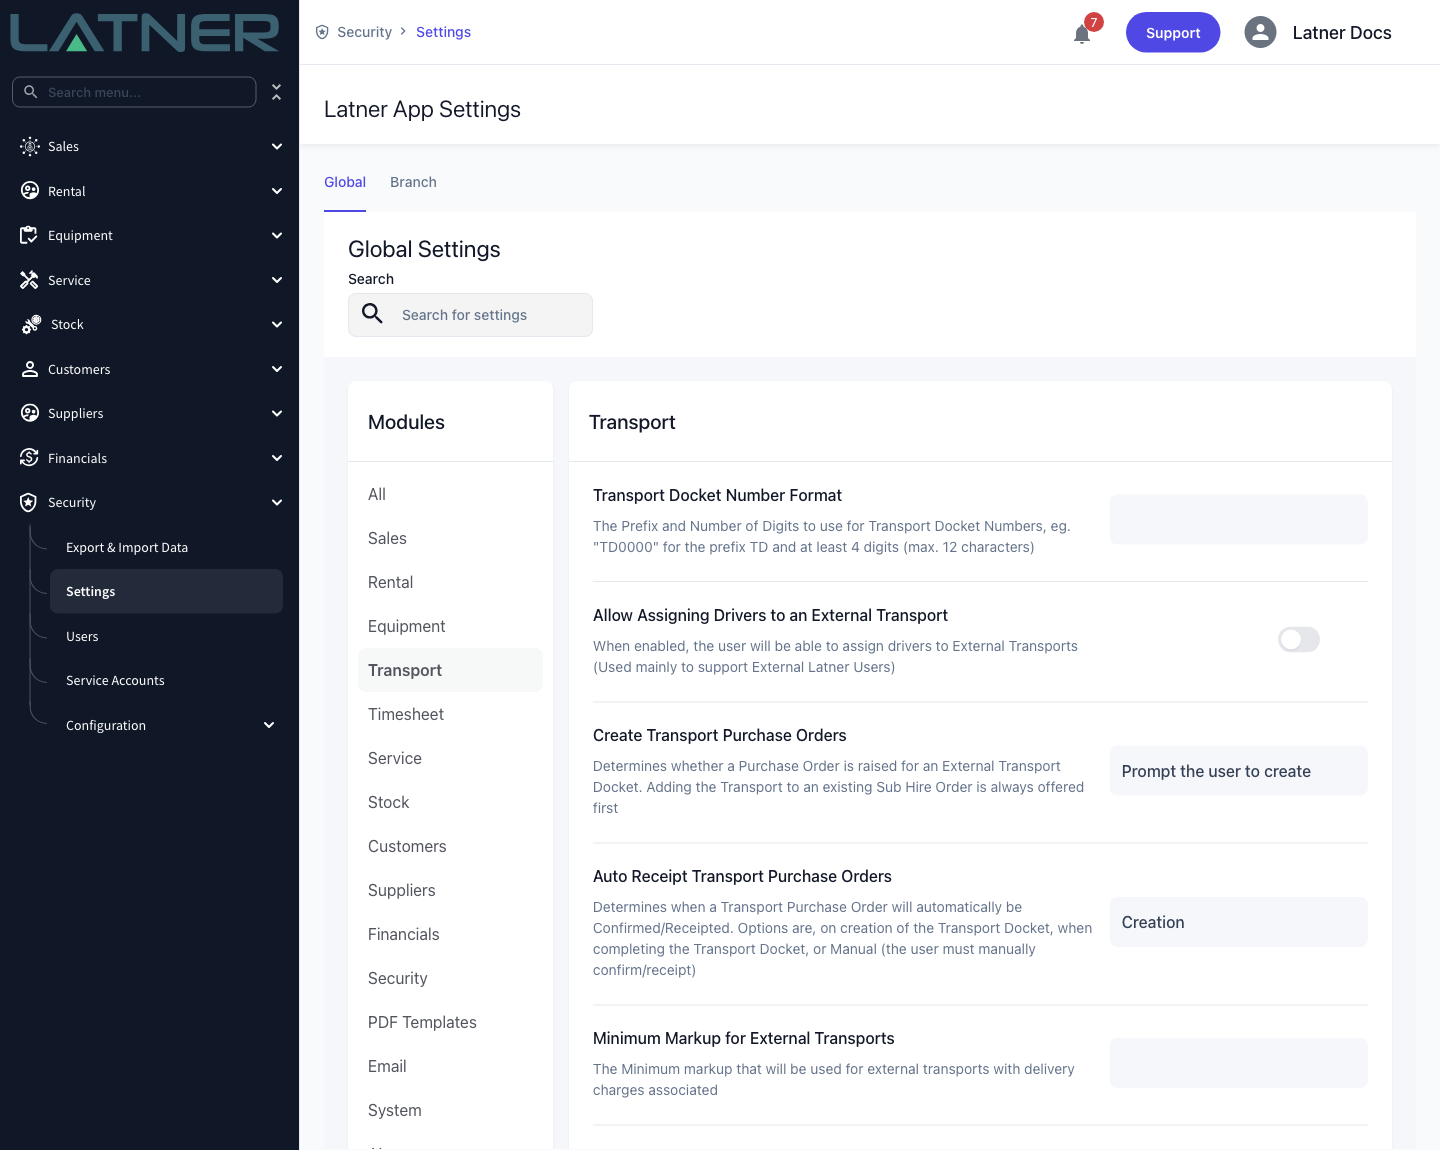
An external transport docket can raise its own Purchase Order for the carrier. Whether it asks you first, does it automatically or never does it is controlled by the Create Transport Purchase Orders setting under Security › Settings › Transport; adding the transport to an existing Sub Hire Order is always offered before a Purchase Order is.
An external delivery docket is how you send reserved equipment out to a customer on a transport supplier's truck, so the job is booked with the carrier, the cost is captured against a Purchase Order, and the delivery charge still follows the equipment onto the customer's invoice.
Overview
Sooner or later the yard runs out of trucks. An external docket is the same delivery job, handed to a carrier instead of one of your drivers - and because someone is now invoicing you for it, Latner asks for two numbers instead of one: what the supplier charges you, and what you charge the customer.
-
An external delivery docket is created exactly where an internal one is - on the rental contract, under Options › Transport › Create Delivery. The only difference is setting Fulfillment to External.
-
Switching to External reveals Supplier and Supplier Delivery Cost, makes the Delivery Charge mandatory, and greys out Driver.
-
The cost has to be less than the charge. Going the other way needs the Allow Transport Cost To Be Greater Than Charge permission, and a tenant can insist on a margin with Minimum Markup for External Transports.
-
Saving asks whether to raise a Transport Purchase Order against the supplier. If the equipment is already sub hired from that same supplier, Latner offers to put the cost on that Sub Hire Order instead - and that offer always comes first.
-
The Purchase Order carries a single Transport line for the cost you entered, and may be confirmed and receipted automatically depending on your settings.
-
Answering No to the prompt isn't final. Options › Create Purchase Order on the docket raises it later.
-
External dockets are the only ones that can produce a Transport Order - the document you send the carrier.
Before You Begin
Nothing has to be switched on to create an external delivery docket, but these permissions decide who can, and these settings decide what happens to the money afterwards.
|
Requirement |
Where to Find It |
|---|---|
|
Create Delivery permission - to see the Transport menu on a rental contract at all |
Security › Configuration › Permission Groups › Rental › Option |
|
Create Purchase Order permission - to raise the Transport Purchase Order, at creation or afterwards |
Security › Configuration › Permission Groups › Financials › Option |
|
Allow Transport Cost To Be Greater Than Charge permission - to save a docket where the supplier costs more than the customer pays |
Security › Configuration › Permission Groups › Rental › Field |
|
Generate Transport Order PDF and Email Transport Order permissions - to send the carrier their order |
Security › Configuration › Permission Groups › Transport › Option |
|
Create Transport Purchase Orders - whether Latner prompts you, always raises the Purchase Order, or never does |
Security › Settings › Transport |
|
Auto Receipt Transport Purchase Orders - when that Purchase Order is confirmed and receipted |
Security › Settings › Transport |
|
Minimum Markup for External Transports - the margin the charge must carry over the cost |
Security › Settings › Transport |
|
Allow Assigning Drivers to an External Transport - whether the Driver field stays available on an external docket |
Security › Settings › Transport |
|
Transport Order PDF Template ID - the template used for the document you send the carrier |
Security › Settings › PDF Templates |
The supplier you pick has to be Active and needs at least one site, because the Purchase Order is raised against a supplier site and takes its purchase tax from there. A supplier with no site is rejected with There are no sites created for the Supplier, and the whole docket fails with it.
Creating the External Delivery Docket
Step 1 - Open the contract and start a delivery
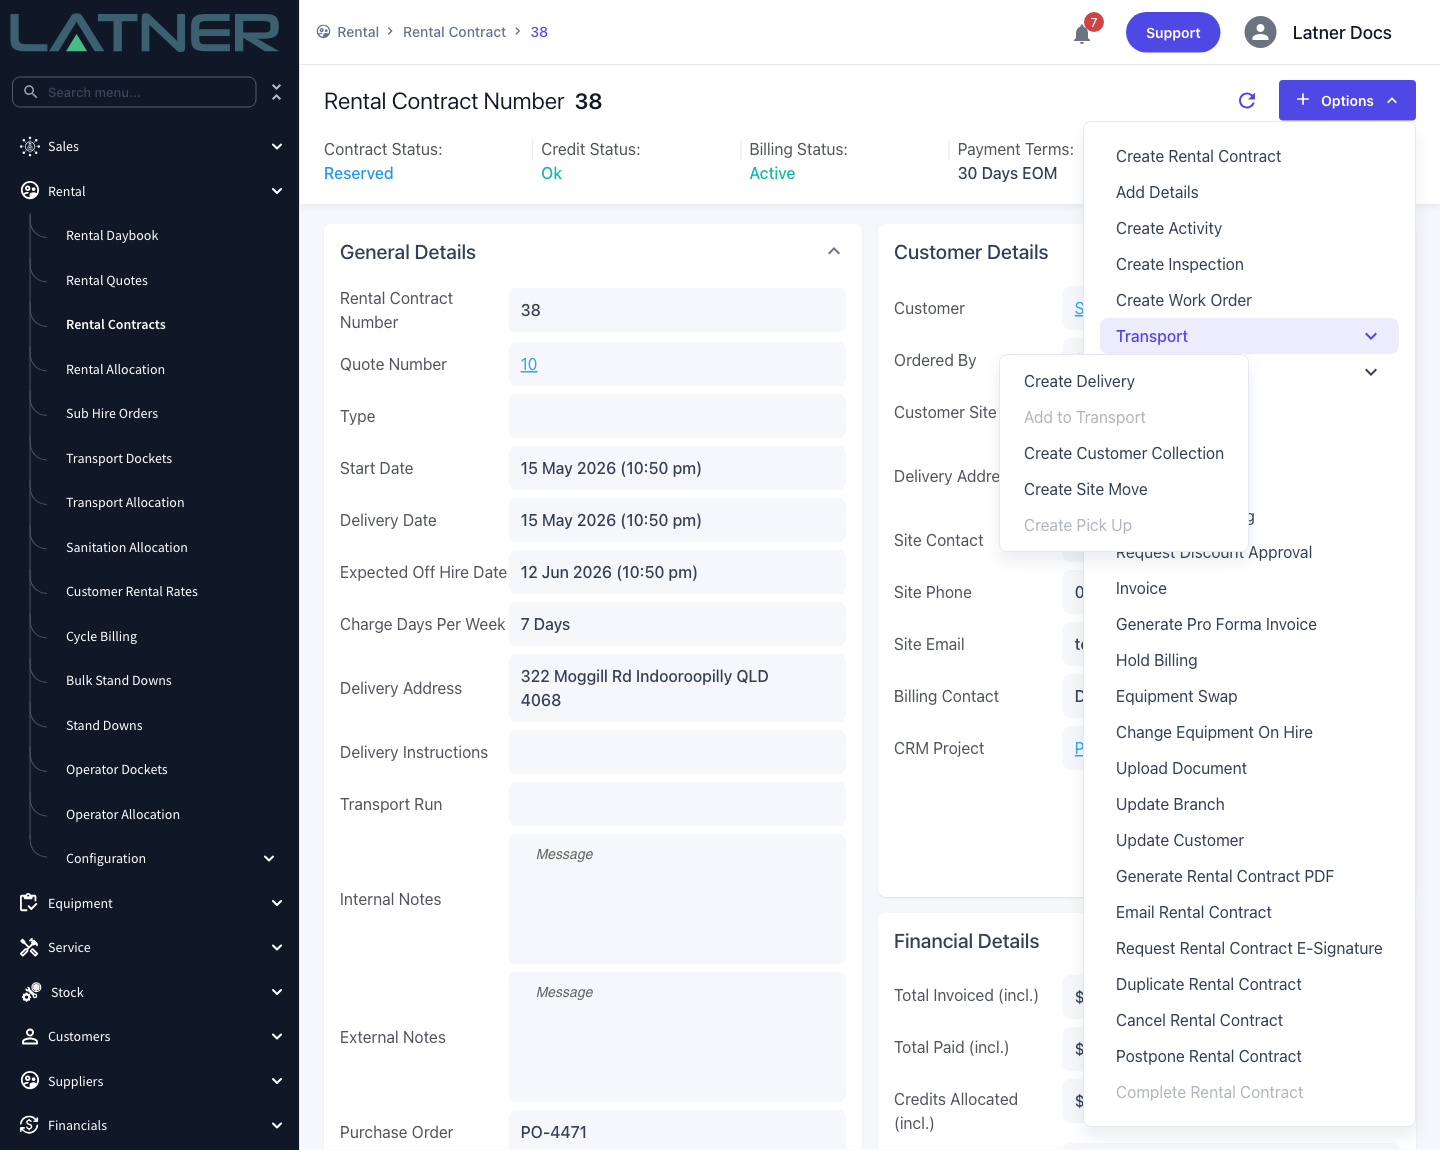
Open the rental contract, then choose Options › Transport › Create Delivery. There is no separate "external" menu item - internal and external are the same form, decided by one field inside it.
The contract needs something to send: if no line is still Reserved or Pre-Allocated, Create Delivery is greyed out with the tooltip Nothing to Deliver.
Step 2 - Switch Fulfillment to External
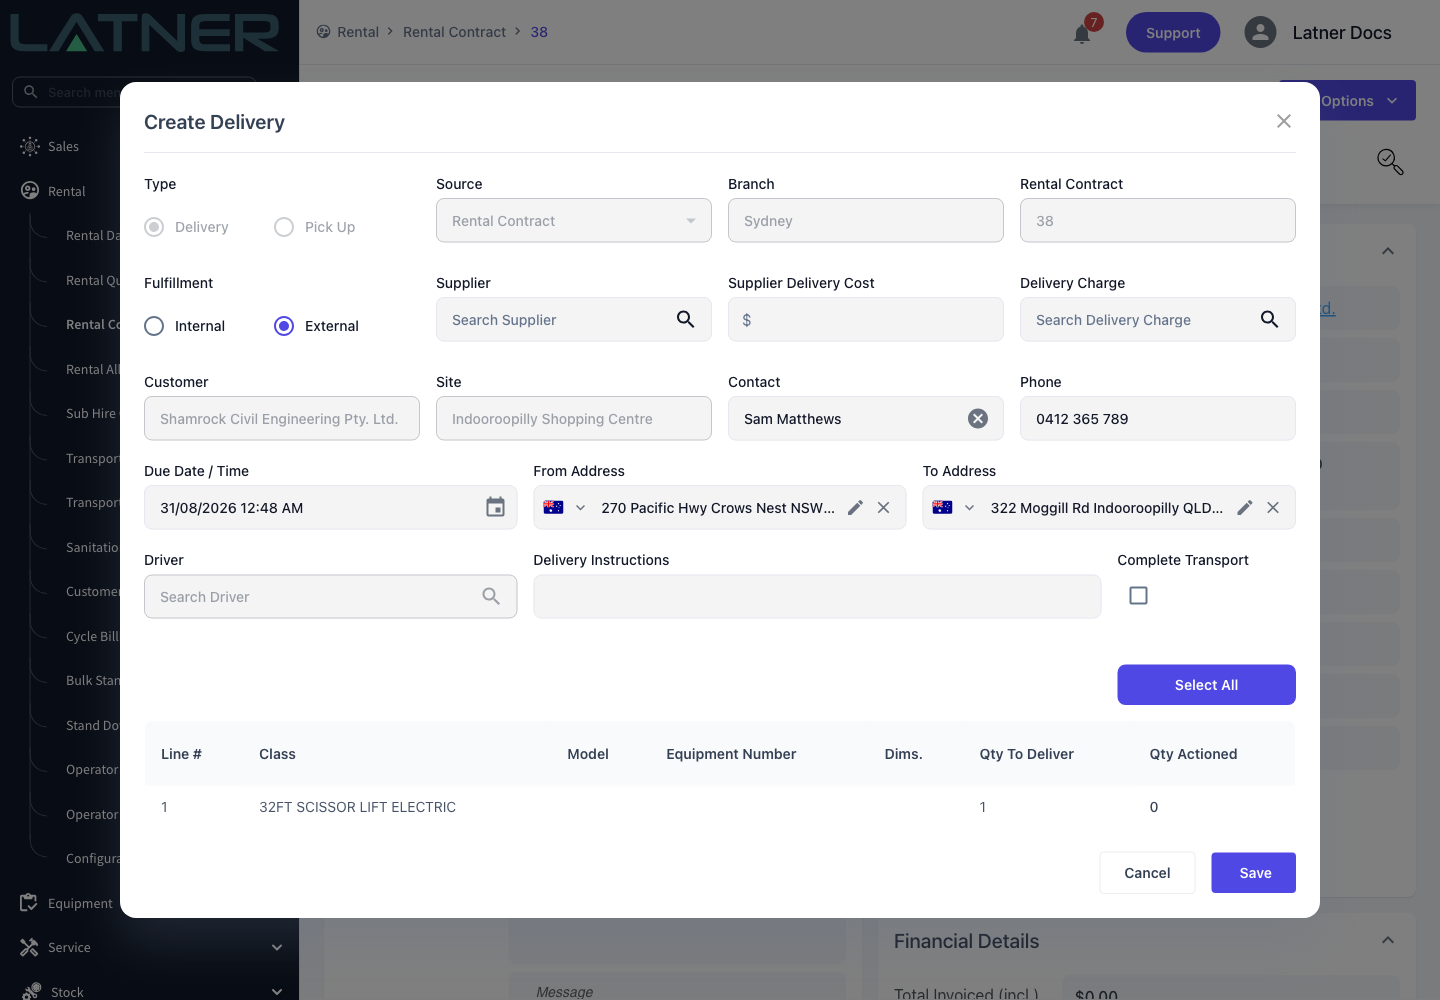
The form opens as Create Delivery with Fulfillment on Internal. Click External and three things change at once.
-
Supplier appears and is required. It only lists suppliers with a status of Active.
-
Supplier Delivery Cost appears and is required. This is what the carrier bills you.
-
Driver greys out with the tooltip Only applicable for Internal transport, unless Allow Assigning Drivers to an External Transport is enabled.
Switching back to Internal clears the supplier again, so pick the fulfillment before you fill anything else in.
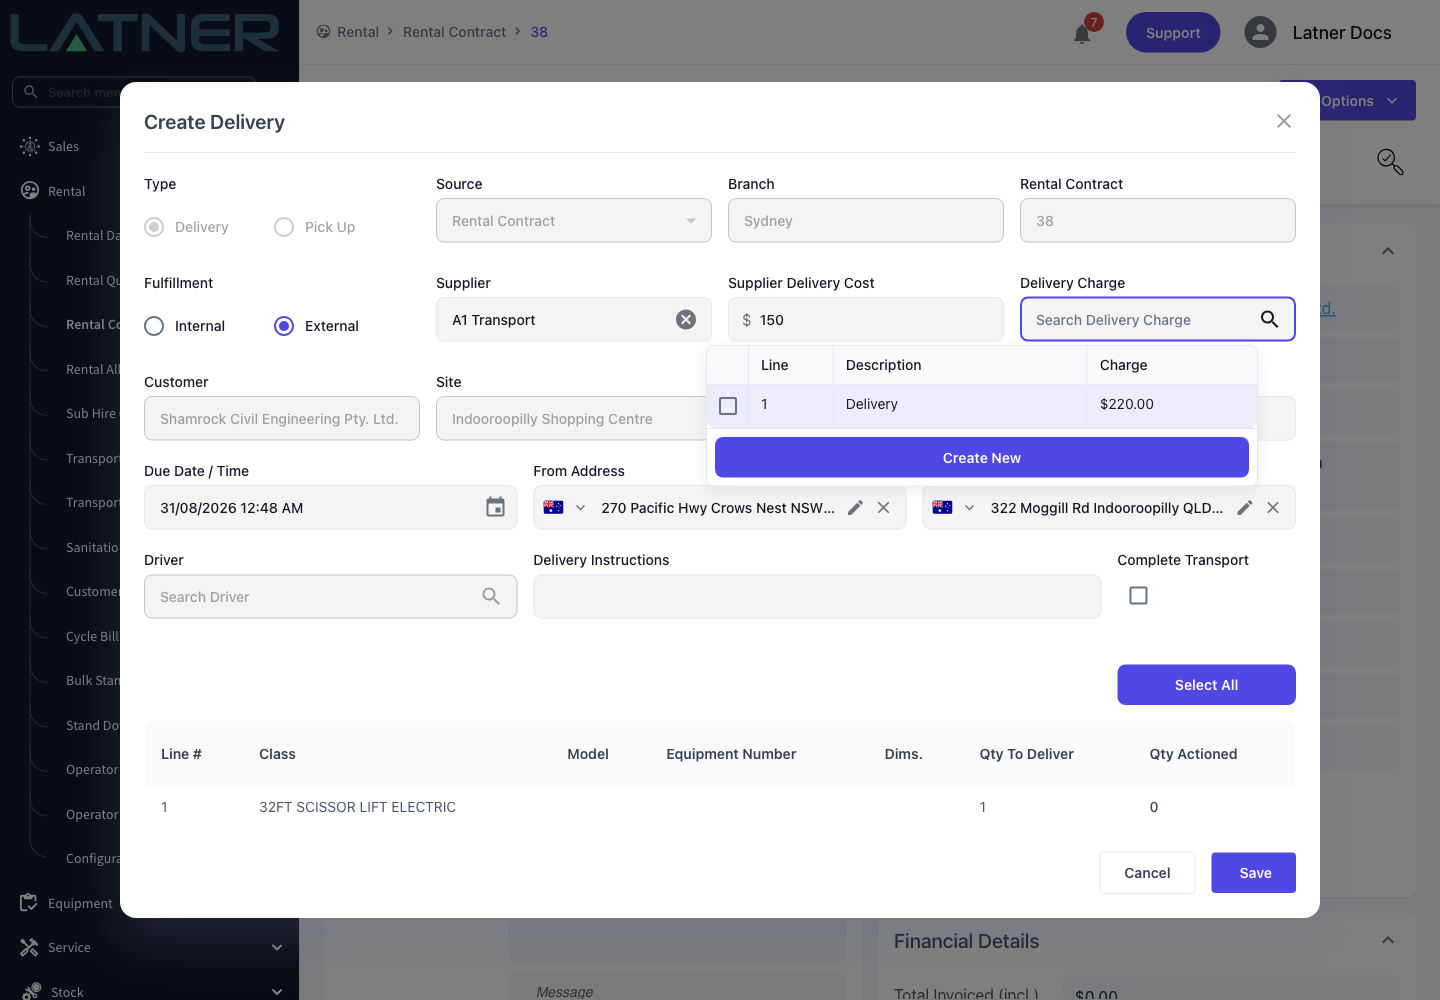
Step 3 - Pick the delivery charge
On a contract docket you don't type the customer's charge in. Click Delivery Charge and tick one of the transport charge lines already sitting on the rental contract - the picker only offers Delivery lines that haven't been used on another docket. If the contract hasn't got one, Create New adds a transport line to the contract without leaving the form.
On an internal docket this is optional. On an external one it isn't: save without a charge and the field is flagged Required.
Step 4 - Enter the supplier's cost
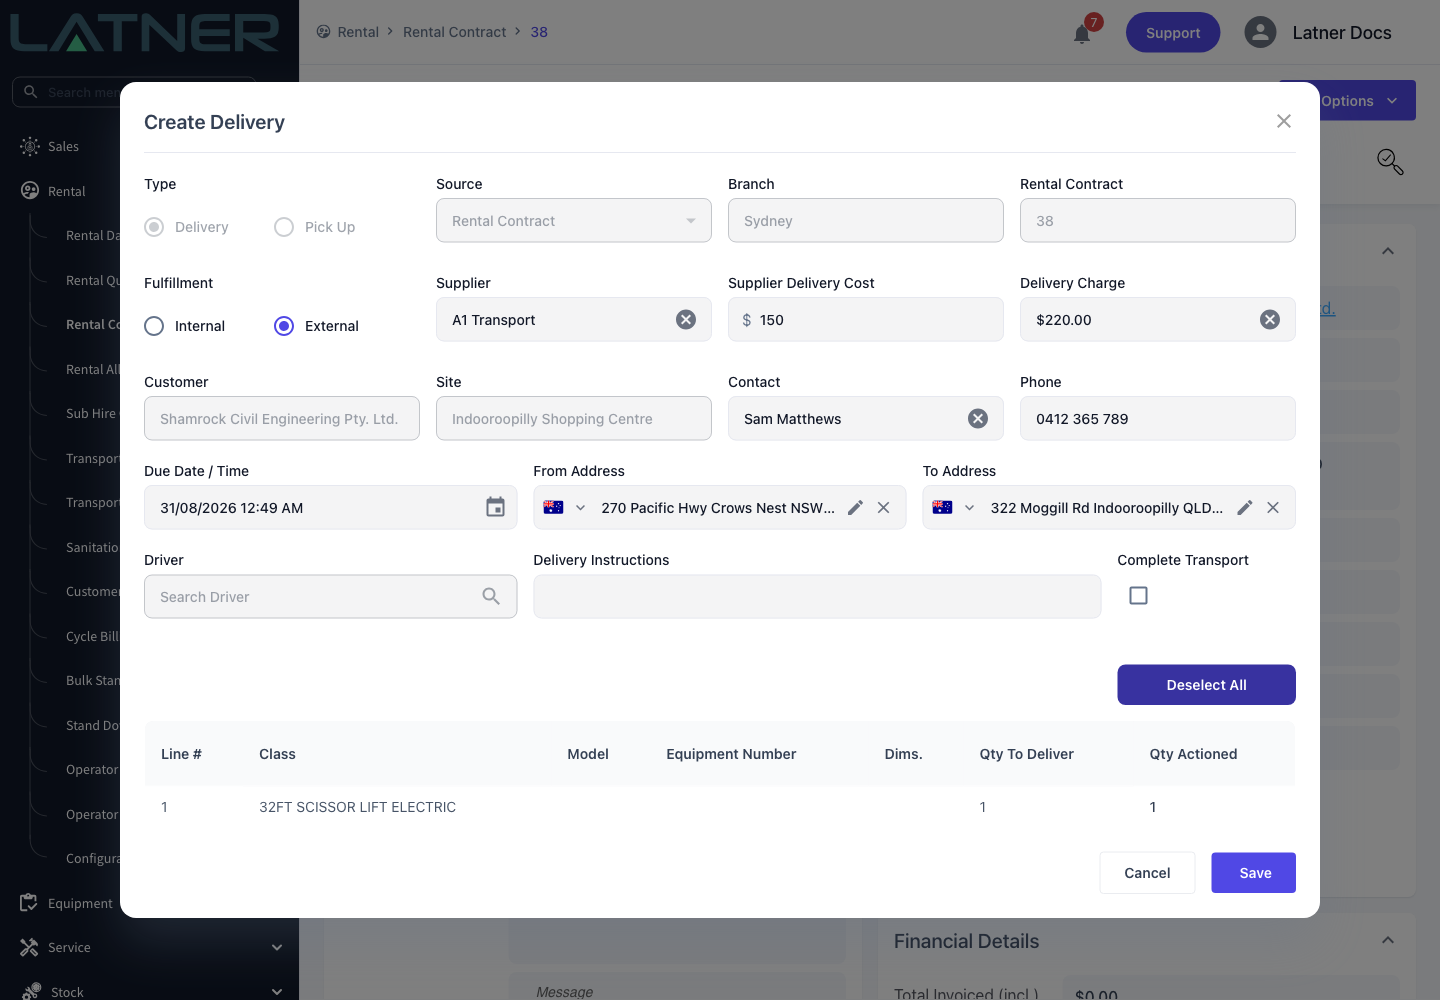
Type what the carrier is charging you into Supplier Delivery Cost. Latner checks it against the delivery charge before it will save.
-
The cost must be less than the charge. A cost that meets or exceeds it flags the field and blocks Save.
-
The Allow Transport Cost To Be Greater Than Charge permission waives that check for people who need it, typically because the delivery is being absorbed.
-
If Minimum Markup for External Transports is set, the margin has to clear it too, and a docket that doesn't is refused with Transport cost does not meet the minimum markup of followed by the percentage. With no markup configured the message is Transport cost cannot be higher than transport charge.
Step 5 - Set the timing, addresses and lines
The rest of the form is the same as an internal docket.
-
Due Date / Time - required, and defaults to the contract's delivery date.
-
From Address and To Address - the branch address and the contract's delivery address. The carrier works from these, so correct them here rather than in a phone call later.
-
Delivery Instructions - copied from the contract and editable.
-
The table at the bottom lists the lines this docket can carry. Give each one a Qty Actioned, or click Select All. Saving with everything at zero is rejected with At least one piece of equipment must be selected for transport.
Step 6 - Answer the Purchase Order prompt
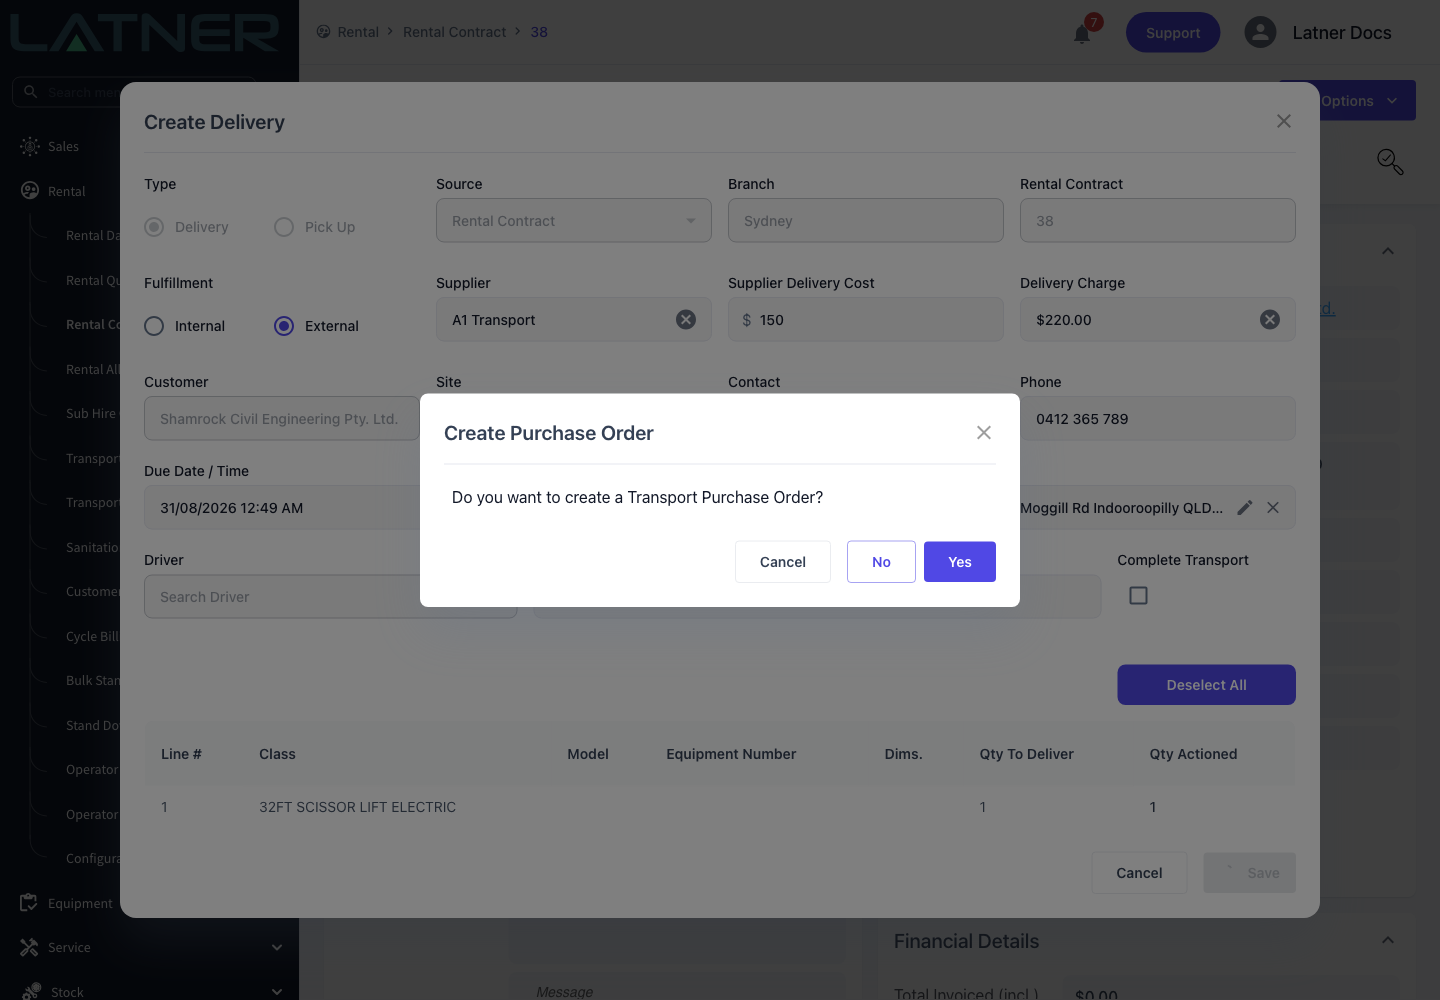
Click Save. Because this is an external docket, Latner asks Do you want to create a Transport Purchase Order? before it commits anything.
-
Yes - creates the docket and raises a Purchase Order against the supplier for the cost you entered.
-
No - creates the docket without one. You can raise it later from the docket.
-
Cancel - abandons the save and leaves you on the form.
The prompt can be turned off for the whole tenant with Create Transport Purchase Orders: Skip prompt and always create answers Yes for you, and Never create answers No.
If any line you selected is already on an Active Sub Hire Order from the same supplier, a different question comes first - Do you want to add this Transport to the existing Sub Hire Order for <supplier>? Answering Yes puts the transport cost on that Sub Hire Order as its own Transport line and no Purchase Order is raised, which keeps the whole sub hire on one order. Answering No falls through to the Purchase Order prompt.
Step 7 - Confirm what was created
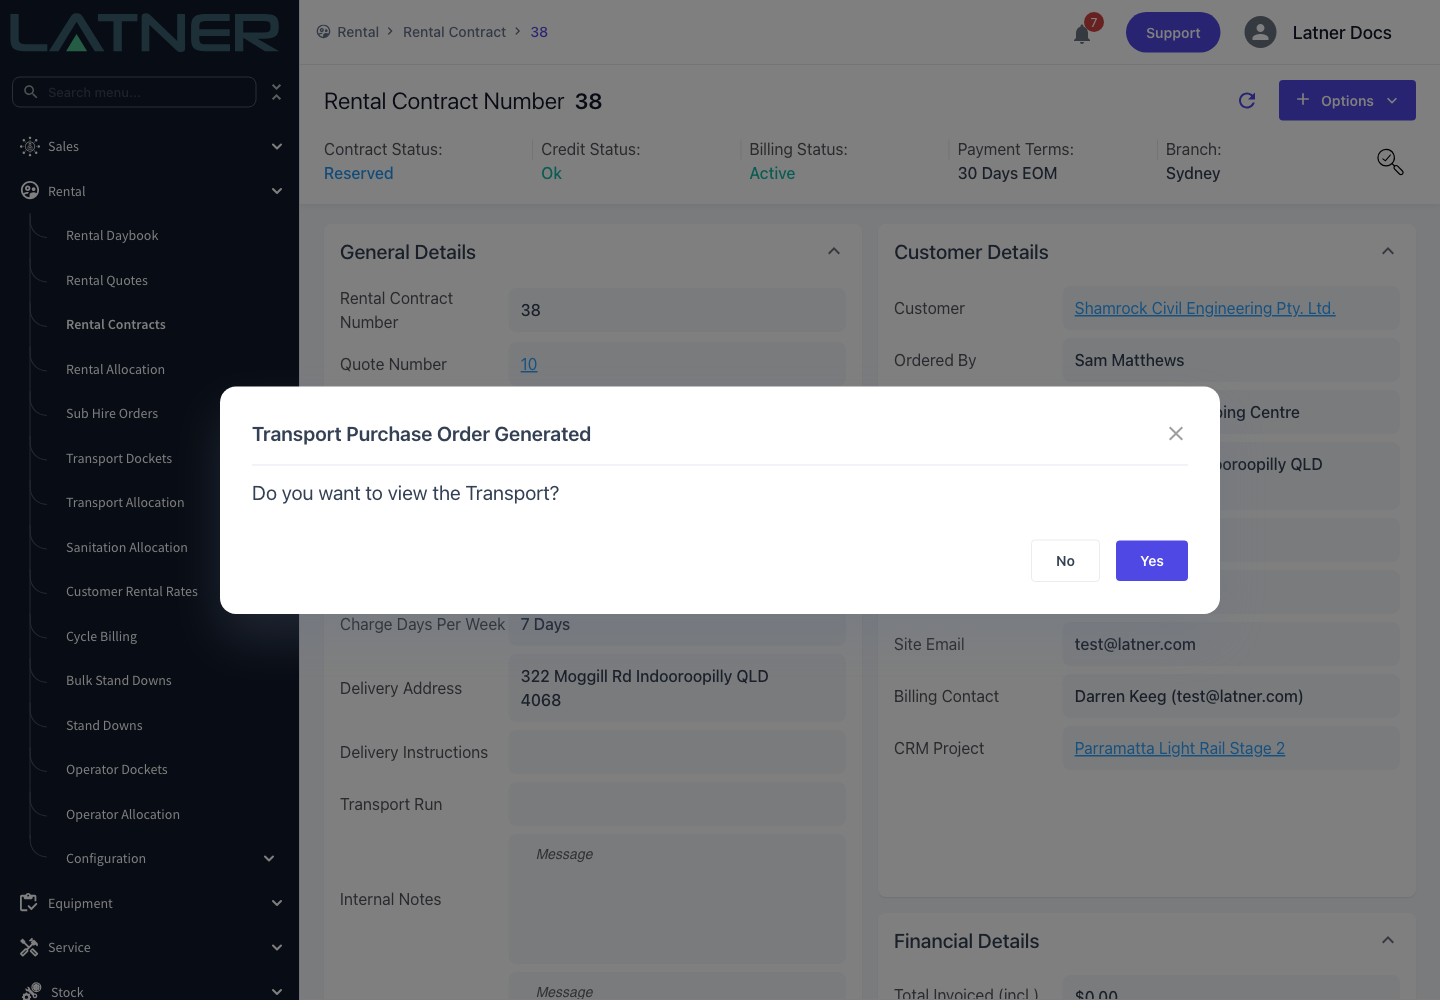
Latner confirms with Transport Purchase Order Generated and offers a link straight to the new docket. If you answered No, or a Purchase Order couldn't be raised, the title reads Transport Order Generated instead - the wording reflects what actually happened, not what you asked for.
After Creation
-
The docket is created with status Open and a Delivery Method of External. Its External Transport panel carries the Supplier, the Transport Cost, and a link to either the Purchase Order or the Sub Hire Order the cost went to.
-
The contract's equipment lines move to Pending Delivery, and the delivery charge line is now attached to this docket and can't be used on another.
-
The Purchase Order is raised against the supplier's site, sourced from the rental contract, with one Transport line described as RC-<contract number> Delivery, quantity 1, at the cost you entered. Its ETA is the docket's due date.
-
Auto Receipt Transport Purchase Orders decides what happens next: Creation confirms and receipts it immediately (so it reads Fully Received straight away), Completion waits until the docket is completed, and Manual leaves it Open for you.
-
The docket appears on Rental › Transport Dockets, and on the Transport Allocation board under the supplier's own lane rather than a driver's.
-
It does not reach the mobile app unless a driver has been assigned to it, so an external docket is normally completed from the desktop once the carrier confirms the job is done.
-
External dockets never ask for a Take 5 checklist - that requirement only applies to internal ones, since it's your driver you're supervising.
-
Completing the docket puts each delivered line On Rent and moves the contract from Reserved to Active.
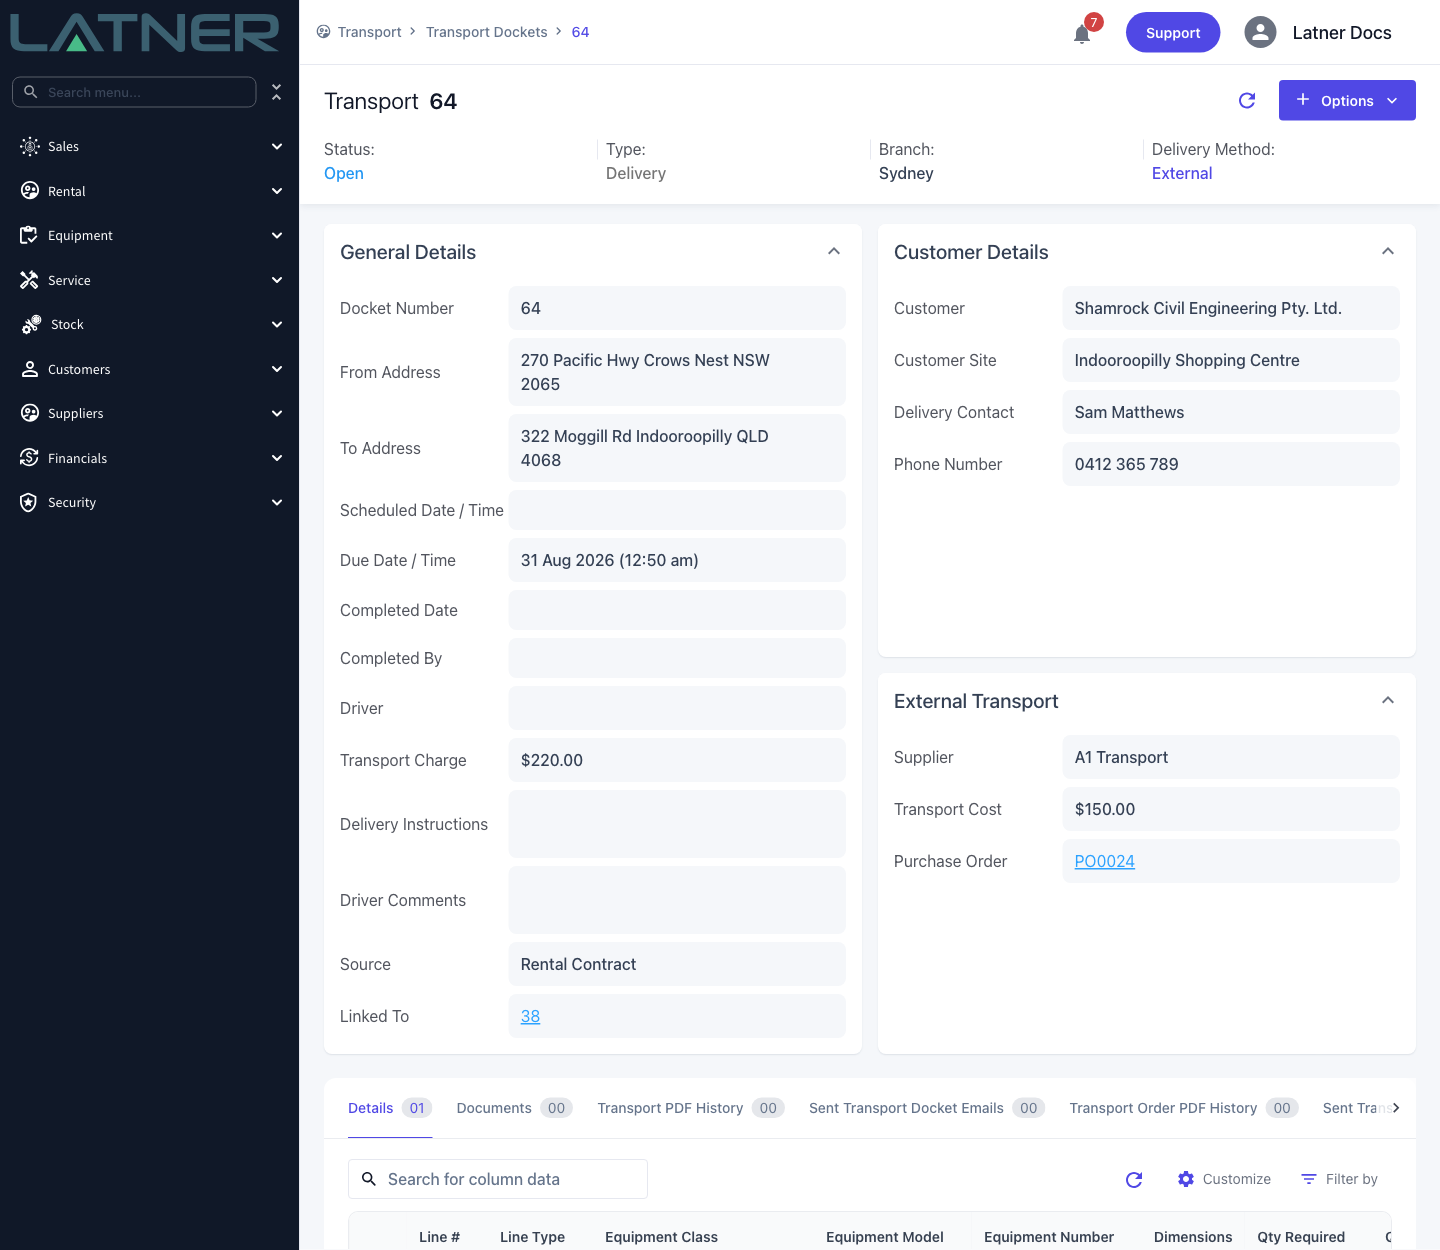
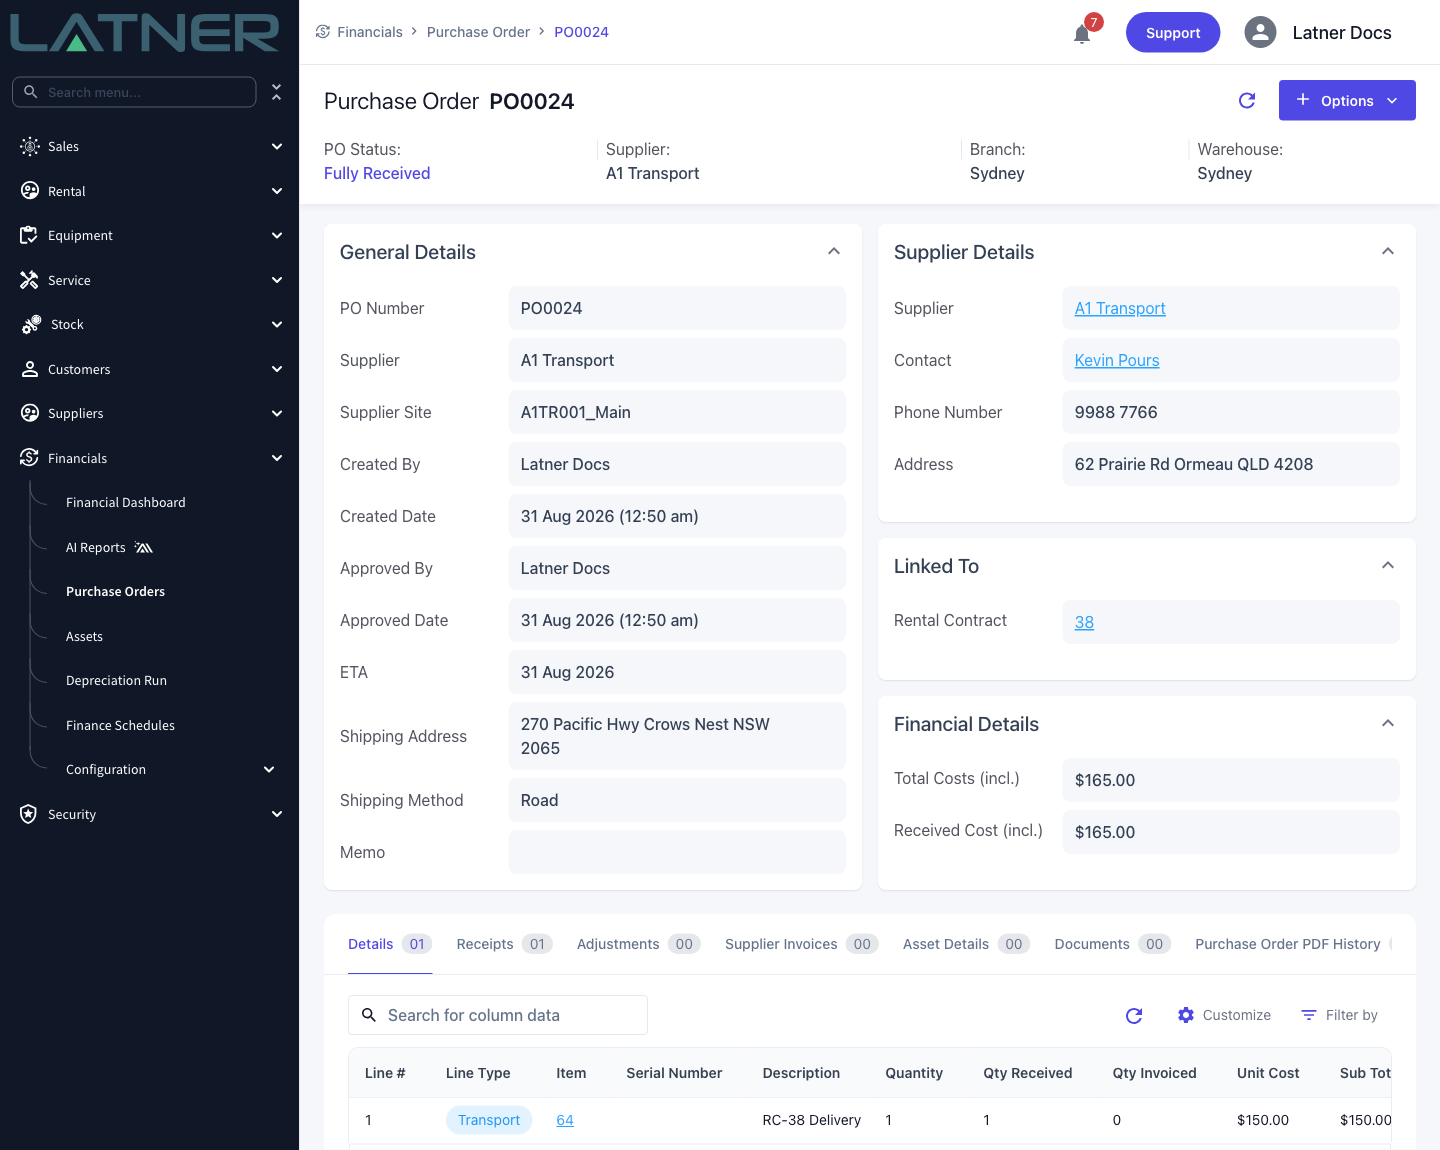
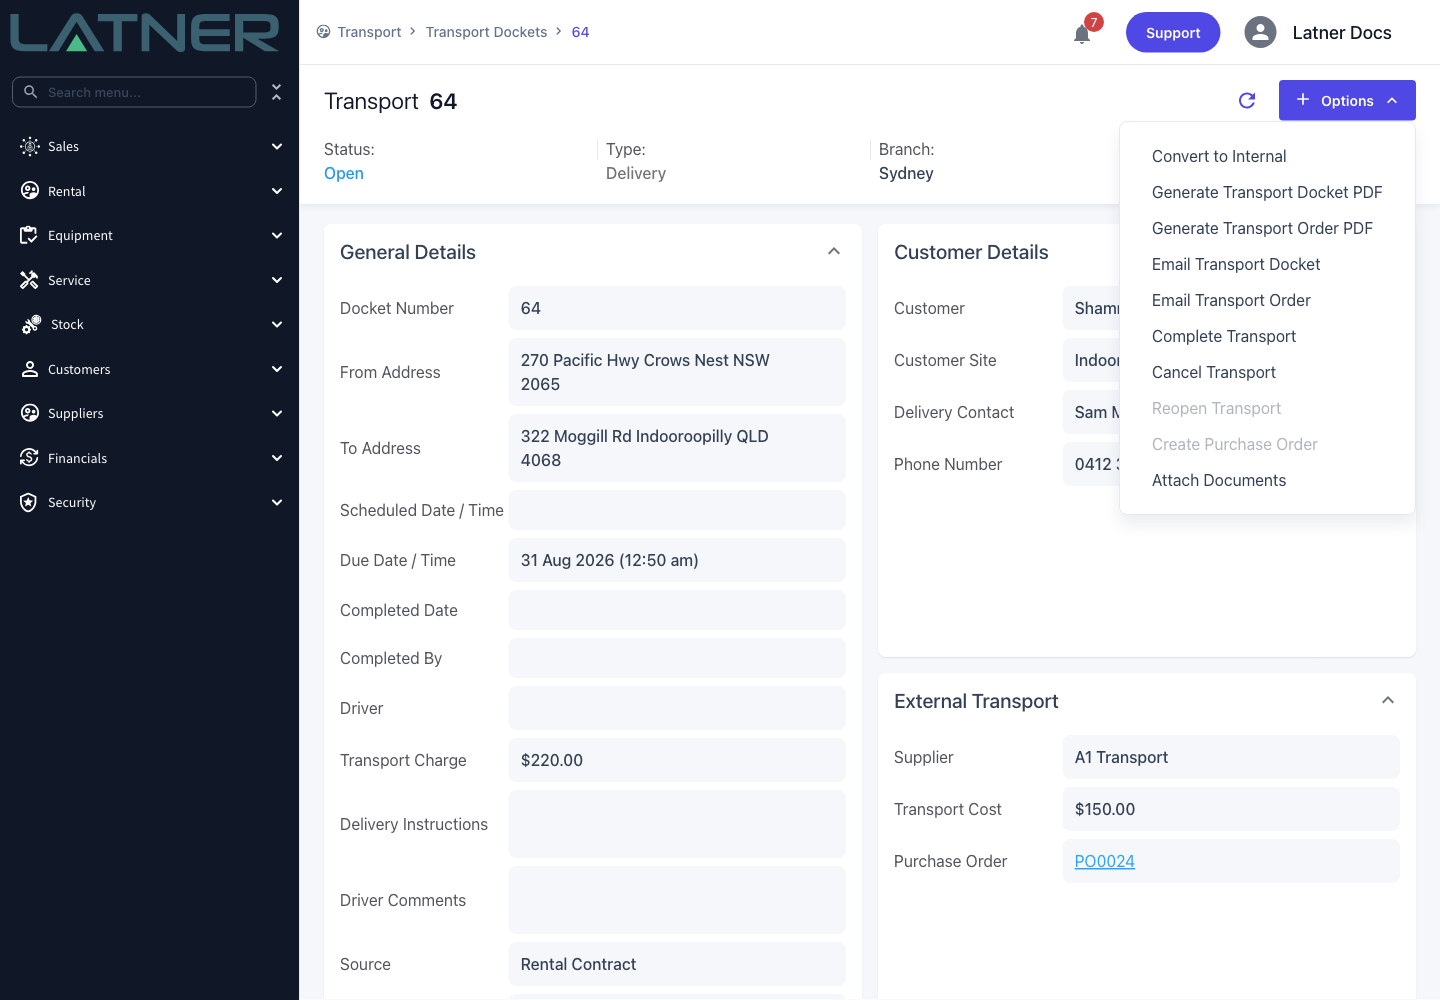
Once the Purchase Order exists, the docket stops being freely editable. Changing the supplier is refused with Cannot Update Transport Supplier as a Purchase Order is already raised, and the cost can only be changed while that Purchase Order is still Open - after it has been receipted you'll get Cannot Update Transport Cost as a Purchase Order is not Open. Get the supplier and the cost right before you answer Yes, or cancel the Purchase Order first if they turn out to be wrong.
FAQs
Watch the Demo
Prefer to watch it? Step through the same flow here.
From a Work Order
Use Options › Create Purchase Order on an Open work order. The Source and the work order itself are locked in, and only Stock and Expense lines can be added - use an expense type for a work order's transport costs rather than a Transport line.
Raising a purchase order from a work order lets you buy the parts and outside services a job needs and have the cost land straight on that work order, so the machine's repair cost stays complete without anyone re-keying it.
Overview
Most repairs eventually need something you don't have on the shelf - a hose, a filter, or a specialist to come and do the bit your workshop doesn't. Raising the purchase order from the work order itself keeps the supplier order and the job tied together for the whole life of both.
-
The purchase order is created from Options › Create Purchase Order on the work order, and the work order link is filled in for you.
-
Source, Work Order and Branch are pre-set from the work order and can't be changed on the dialog.
-
Only Stock and Expense lines can be added to a work order purchase order. The other line types are blocked.
-
Every line you add inherits the work order link automatically - you don't select it per line.
-
When the purchase order is later receipted, Latner adds the matching part and expense lines to the work order's Actuals for you.
-
The option only appears while the work order is Open.
Before You Begin
You'll need the following before you can raise a purchase order from a work order.
|
Requirement |
Where to Find It |
|---|---|
|
Create Purchase Order permission |
Security › Configuration › Permission Groups, Financials module |
|
Add Purchase Order Details permission |
Security › Configuration › Permission Groups, Financials module |
|
Confirm Purchase Order permission |
Security › Configuration › Permission Groups, Financials module |
|
Purchase Orders screen permission |
Security › Configuration › Permission Groups, Financials module |
|
A work order in Open status |
Service › Work Orders |
|
An active supplier with a site and a billing contact |
Suppliers › Suppliers |
|
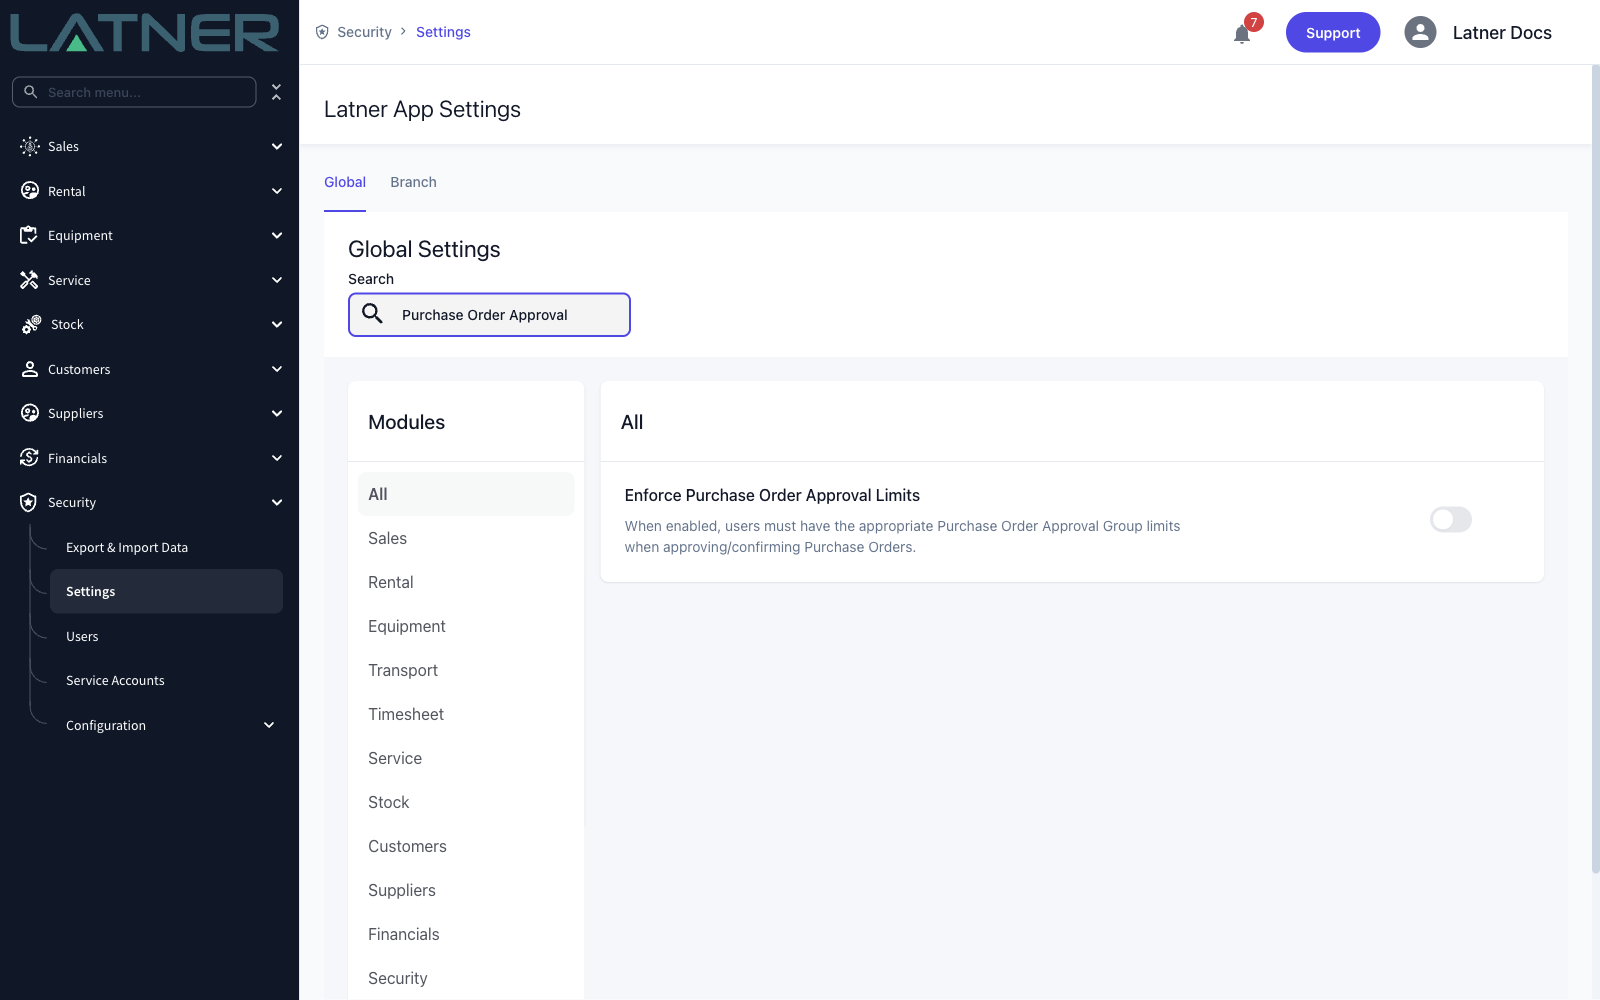
Enforce Purchase Order Approval Limits (optional) |
Security › Settings › Financials |
The purchase order's supplier contact is taken from the supplier's billing contact, and the delivery address defaults to the branch's address. If the supplier has no billing contact set, add one in Suppliers › Suppliers before you start.
Raising the Purchase Order
Step 1 - Open the work order
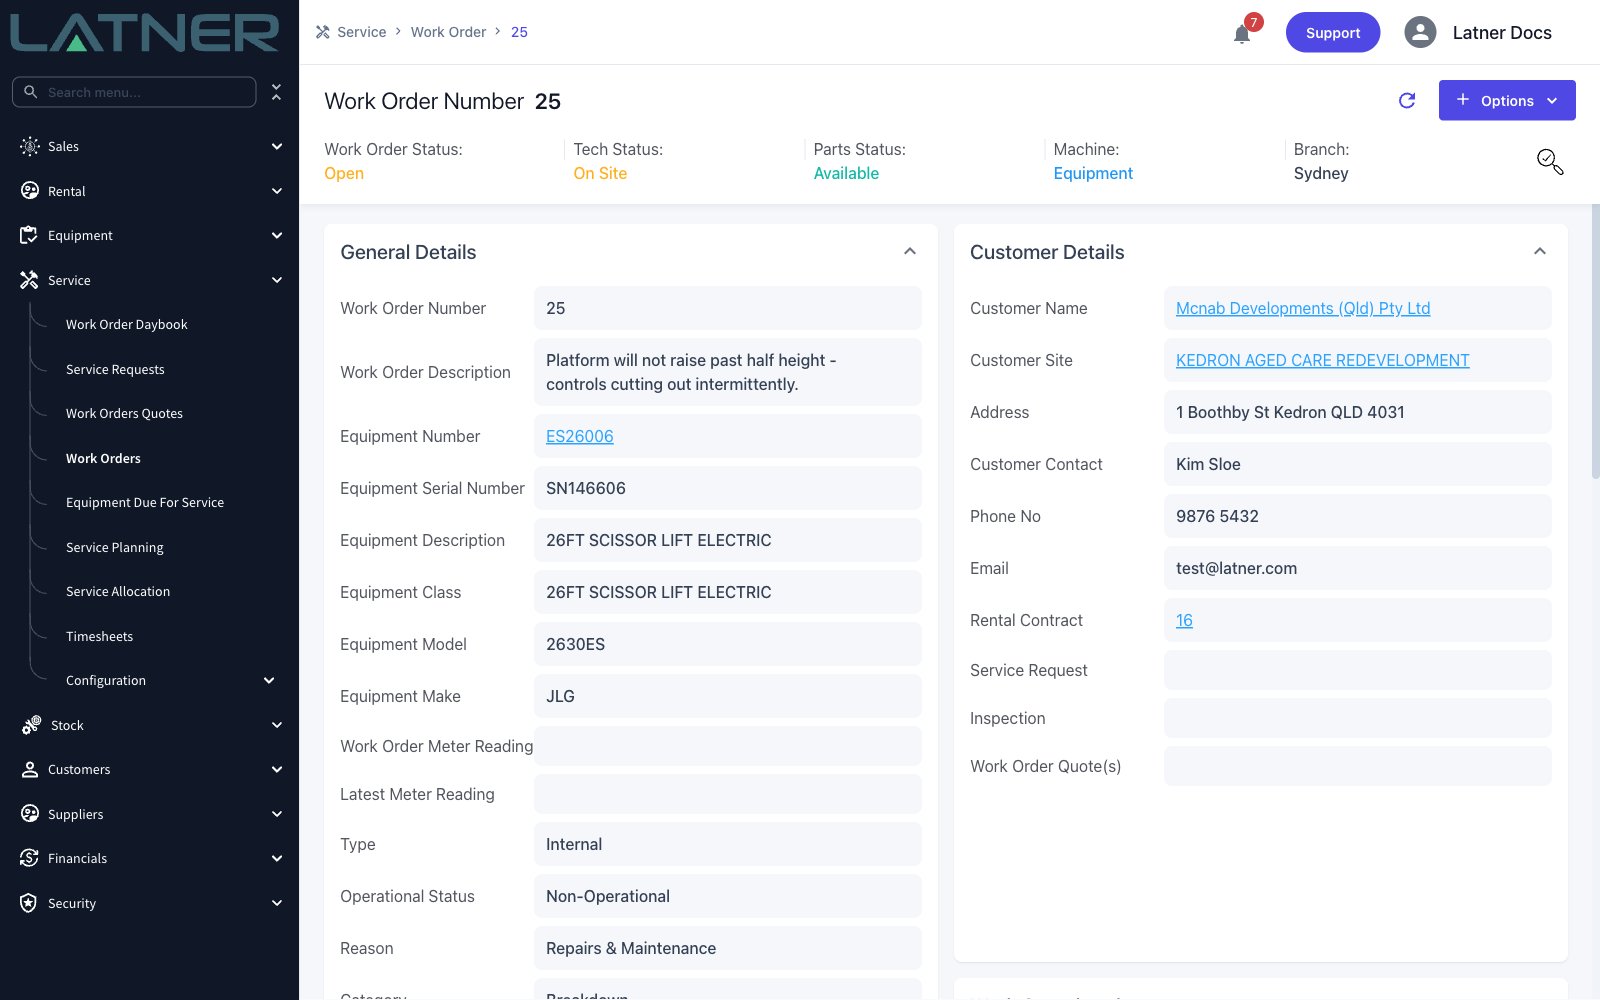
Go to Service › Work Orders and open the work order the parts are for. Check the Work Order Status is Open - the option is hidden on work orders in any other status.
Step 2 - Choose Create Purchase Order
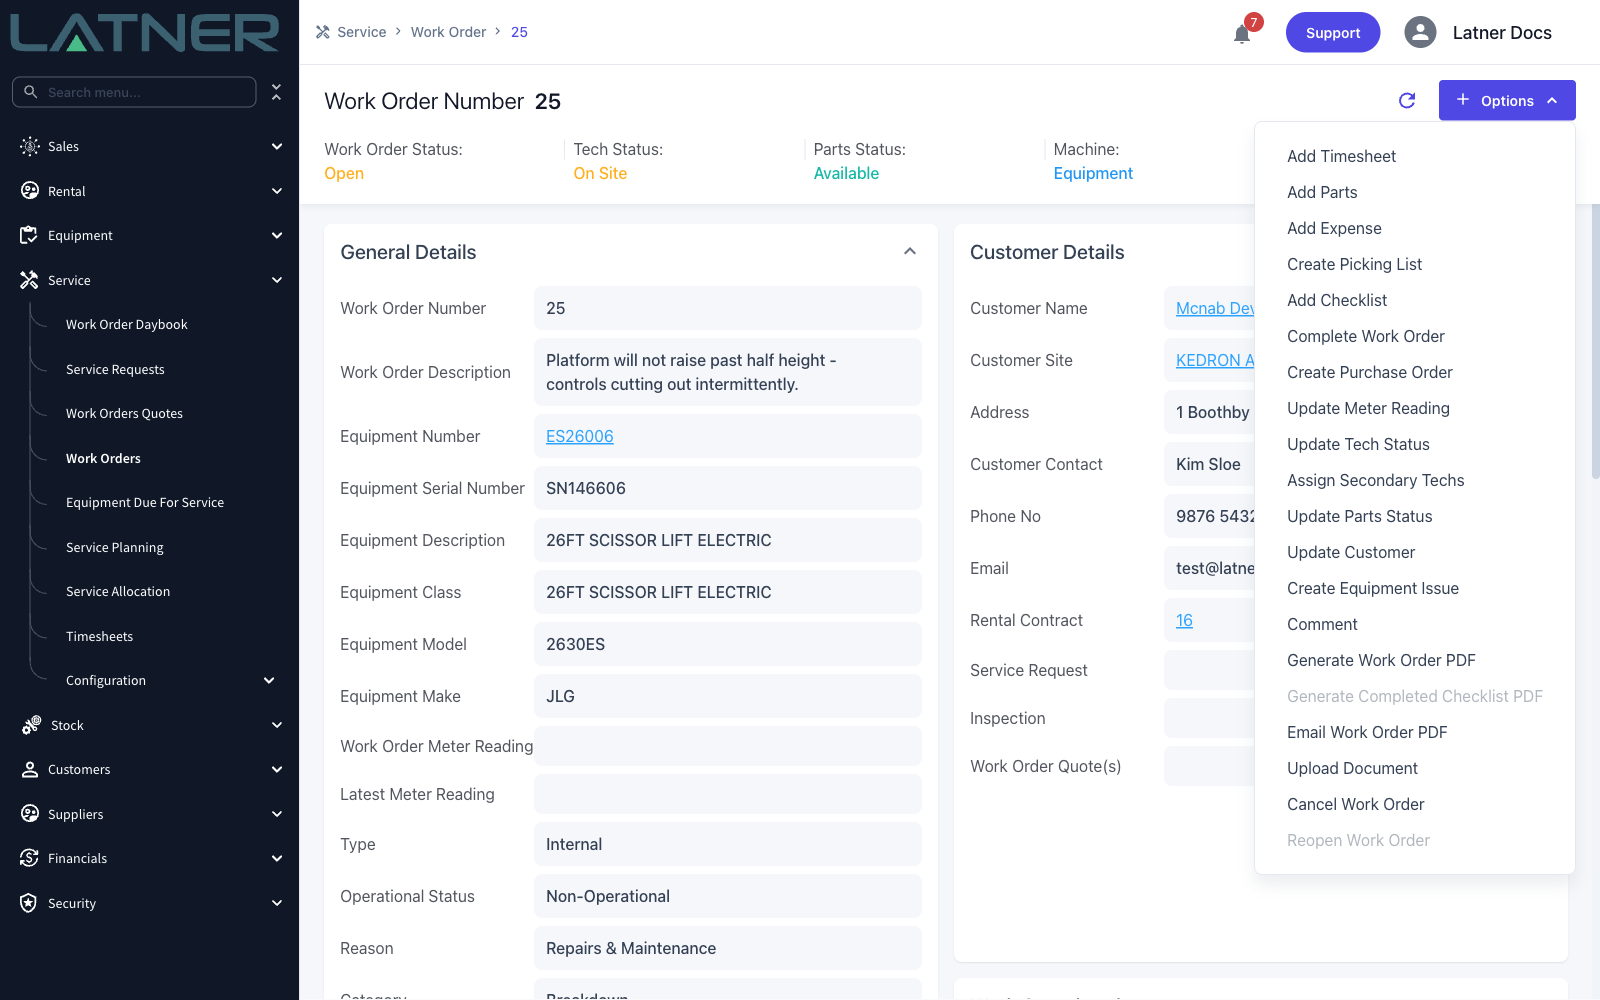
Select Options › Create Purchase Order.
Step 3 - Fill in the supplier and warehouse
The dialog opens with the work order already attached. Three fields are pre-set and locked:
-
Source - fixed to Work Order.
-
Work Order - the work order you came from.
-
Branch - the work order's branch.
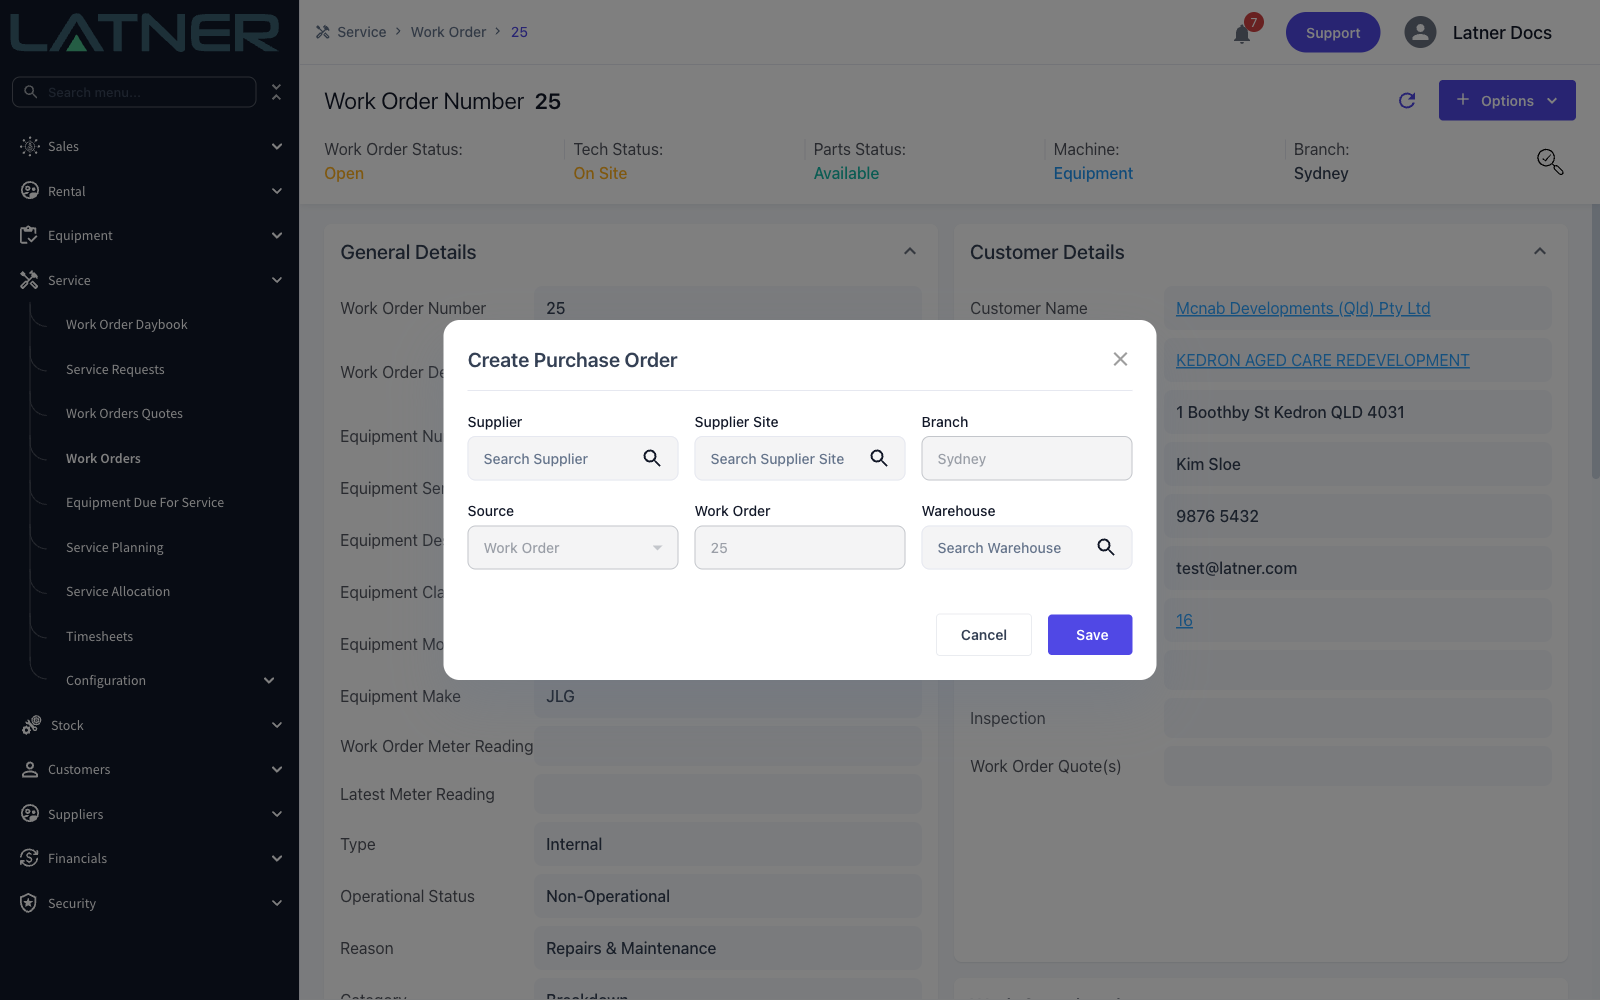
Fill in the rest. All of them are required:
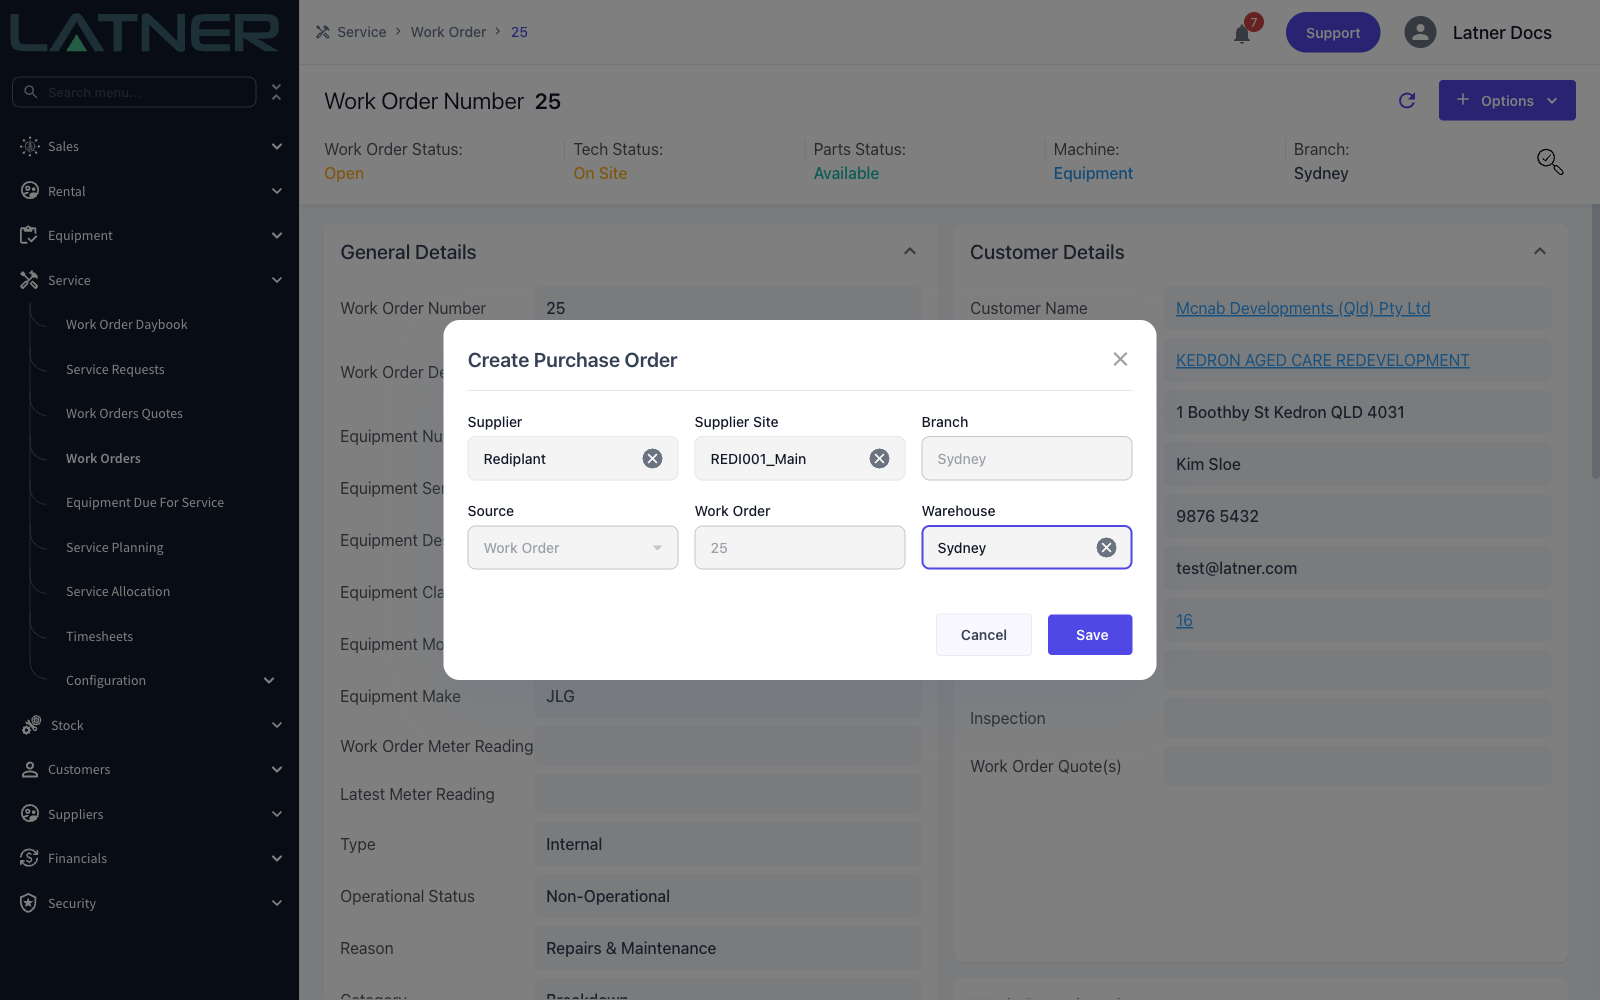
-
Supplier - only active suppliers appear. If the supplier has a popup note, it shows as soon as you pick them.
-
Supplier Site - the list is filtered to the sites of the supplier you chose. Picking a site first will fill in the supplier for you.
-
Warehouse - where the goods are being delivered. The list is filtered to the warehouses of the purchase order's branch.
Select Save.
Step 4 - Add the parts you're ordering
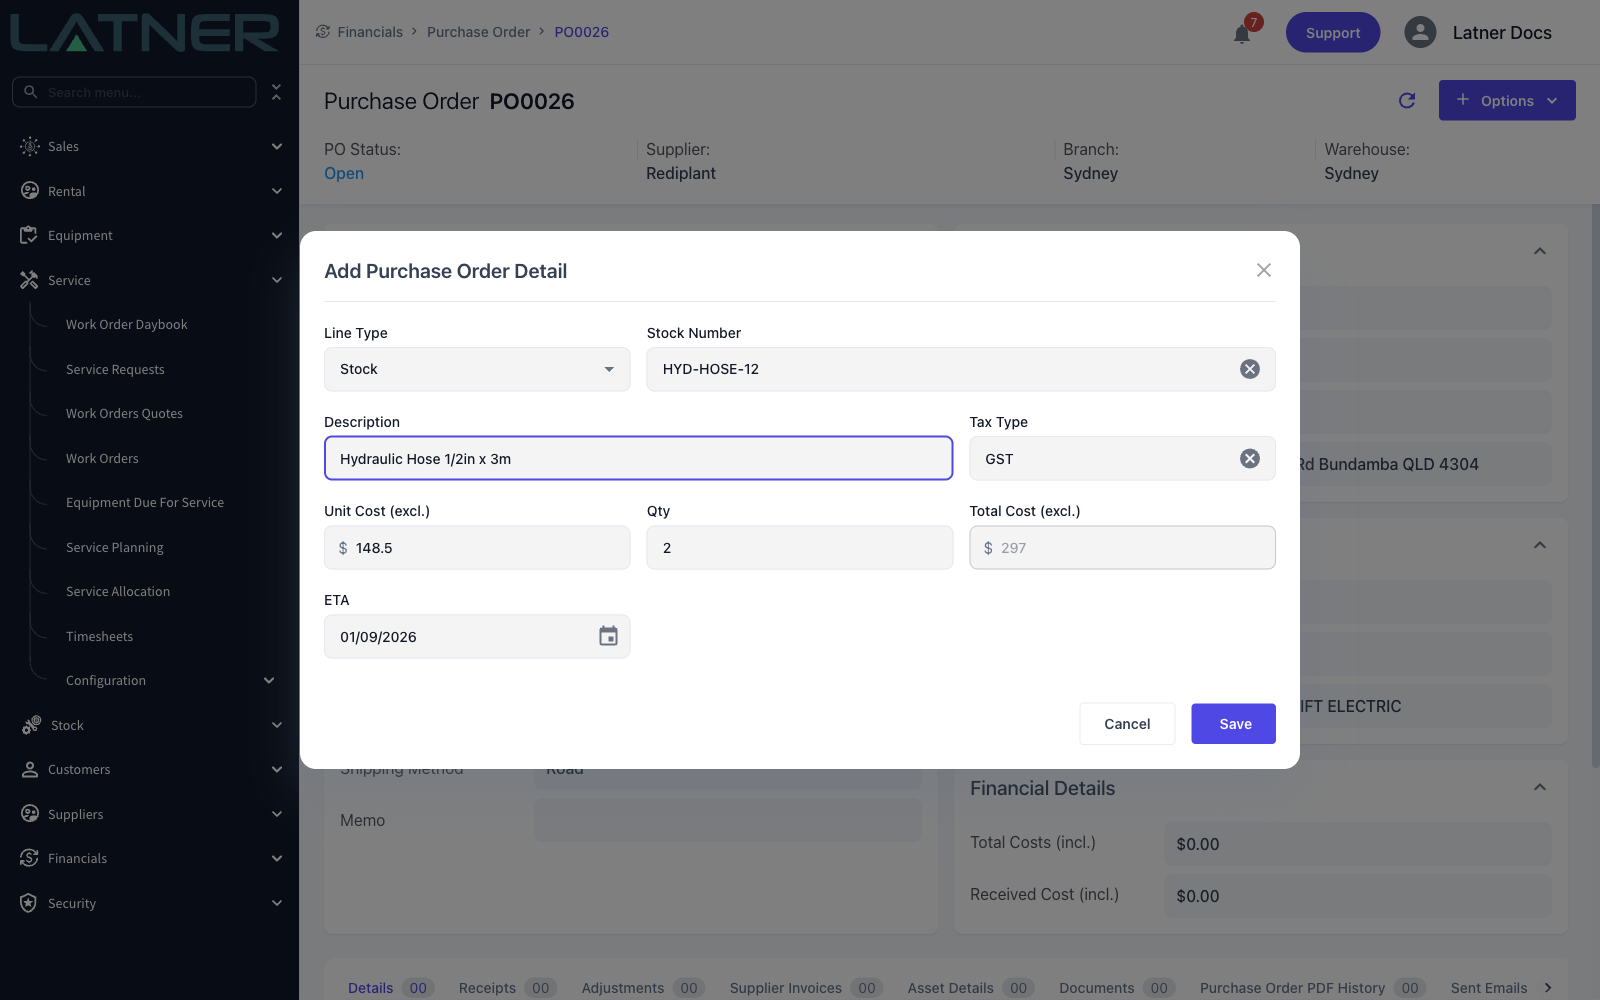
Latner creates the purchase order, takes you to it, and opens Add Purchase Order Detail ready for the first line. Choose Stock as the Line Type and complete:
-
Stock Number - the part you're buying. The description fills in from the stock record.
-
Tax Type - defaults to your standard purchase tax.
-
Unit Cost (excl.) - the cost per unit excluding tax. If you have a supplier price recorded for the part, it's used as the starting figure.
-
Qty - must be a whole number for stock lines.
-
ETA - when you expect it.
Total Cost (excl.) is calculated for you. Select Save, and the dialog stays open so you can add the next line.
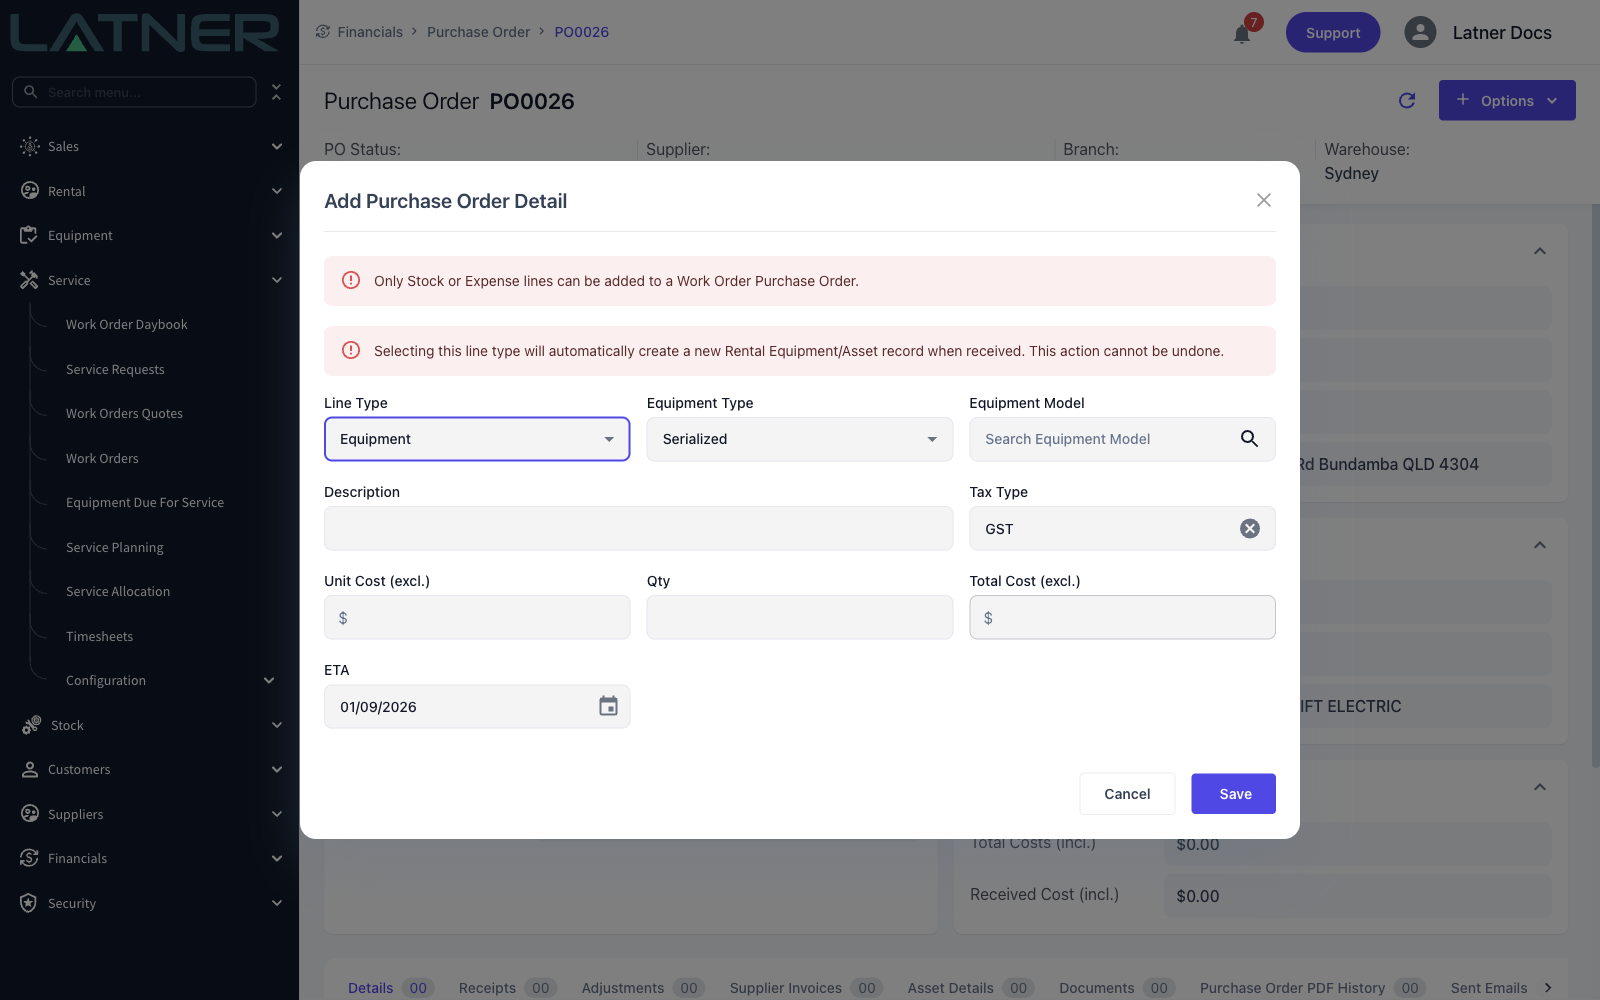
Only Stock and Expense lines can go on a work order purchase order. Pick any other line type and Latner shows an error and refuses to save. Transport is the one people reach for most often - use an Expense line with a freight expense type instead.
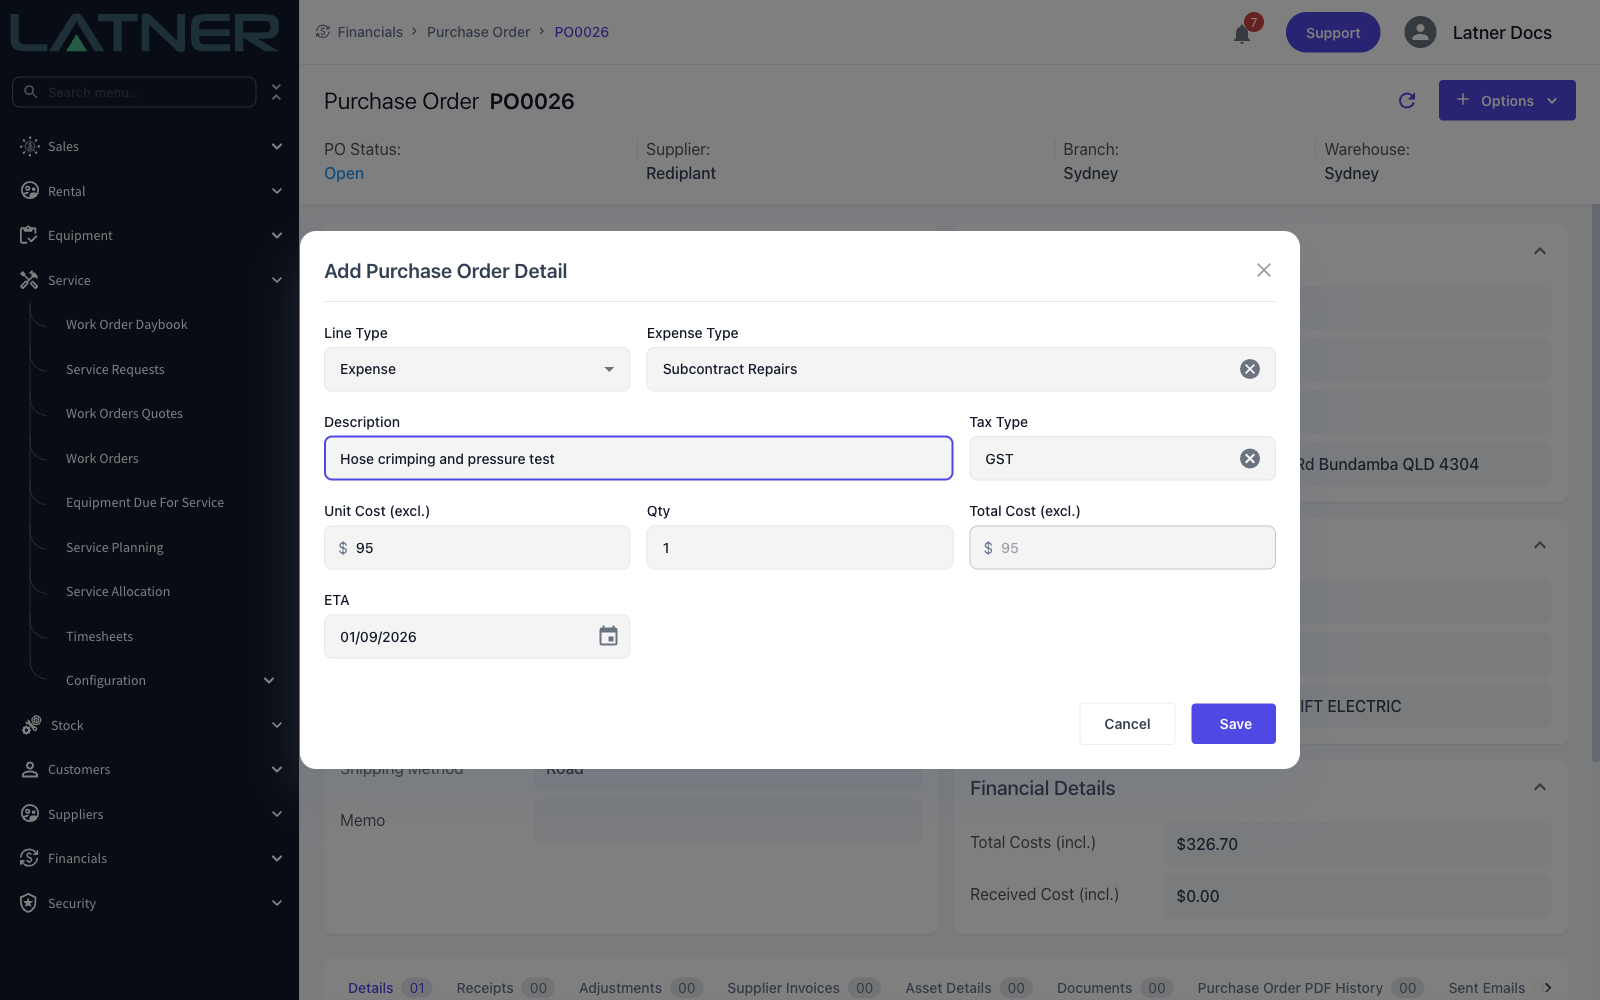
Step 5 - Add any outside services
For work you're buying in rather than goods, change the Line Type to Expense and complete:
-
Expense Type - the category the spend belongs to, which drives where it posts in the general ledger.
-
Description - what you're paying for. This becomes the description on the work order line later.
-
Unit Cost (excl.), Qty and ETA - as for a stock line. Expense lines accept part quantities.
Select Save, then Cancel to close the dialog once you're done adding lines.
Step 6 - Check the purchase order
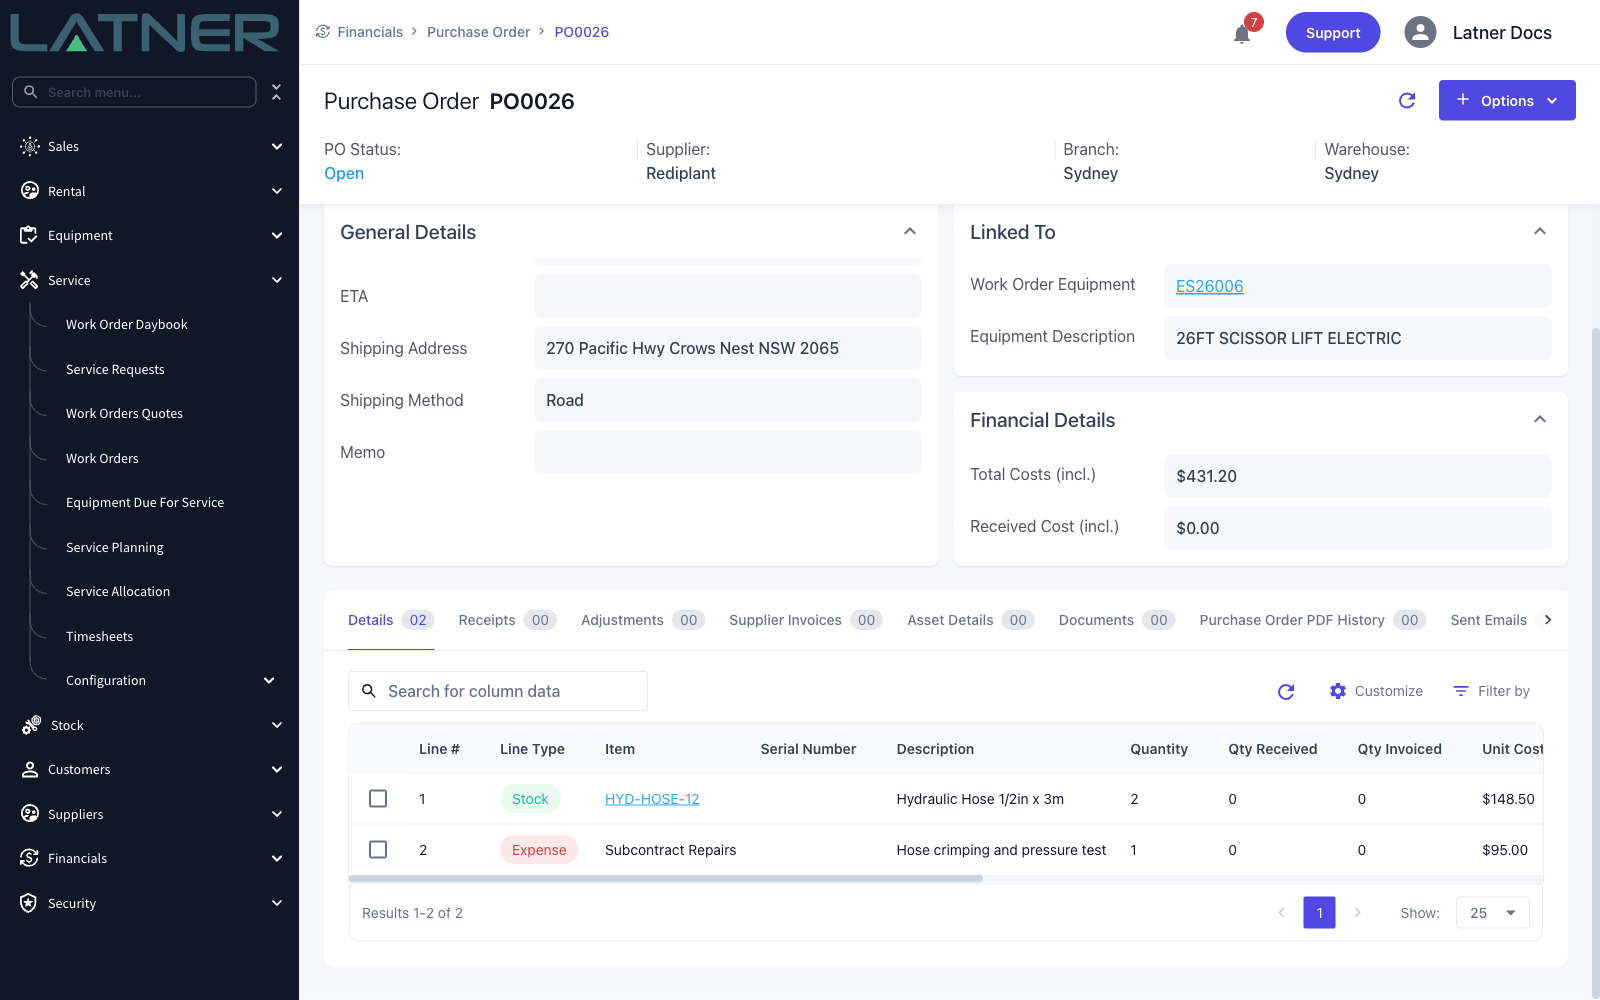
The Linked To panel shows which work order and which machine the order belongs to, and Financial Details totals the lines you've added.
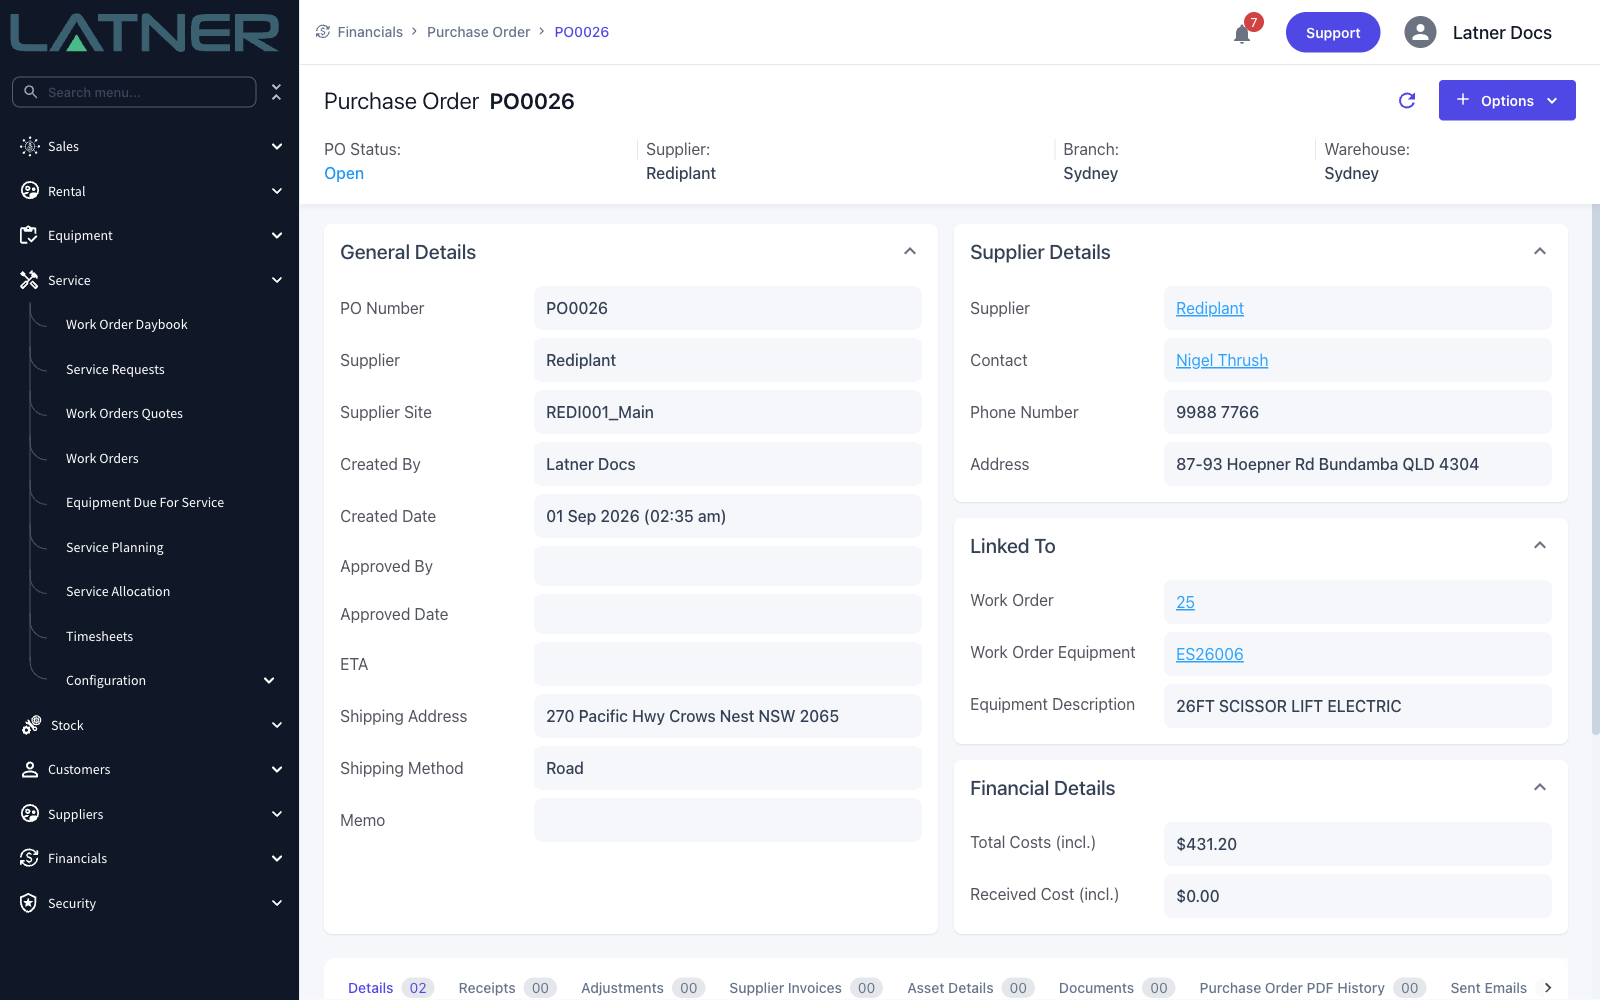
On the Details tab, each line carries the work order link whether you set it or not - Latner stamps it from the header when the line is created.
Step 7 - Confirm the purchase order
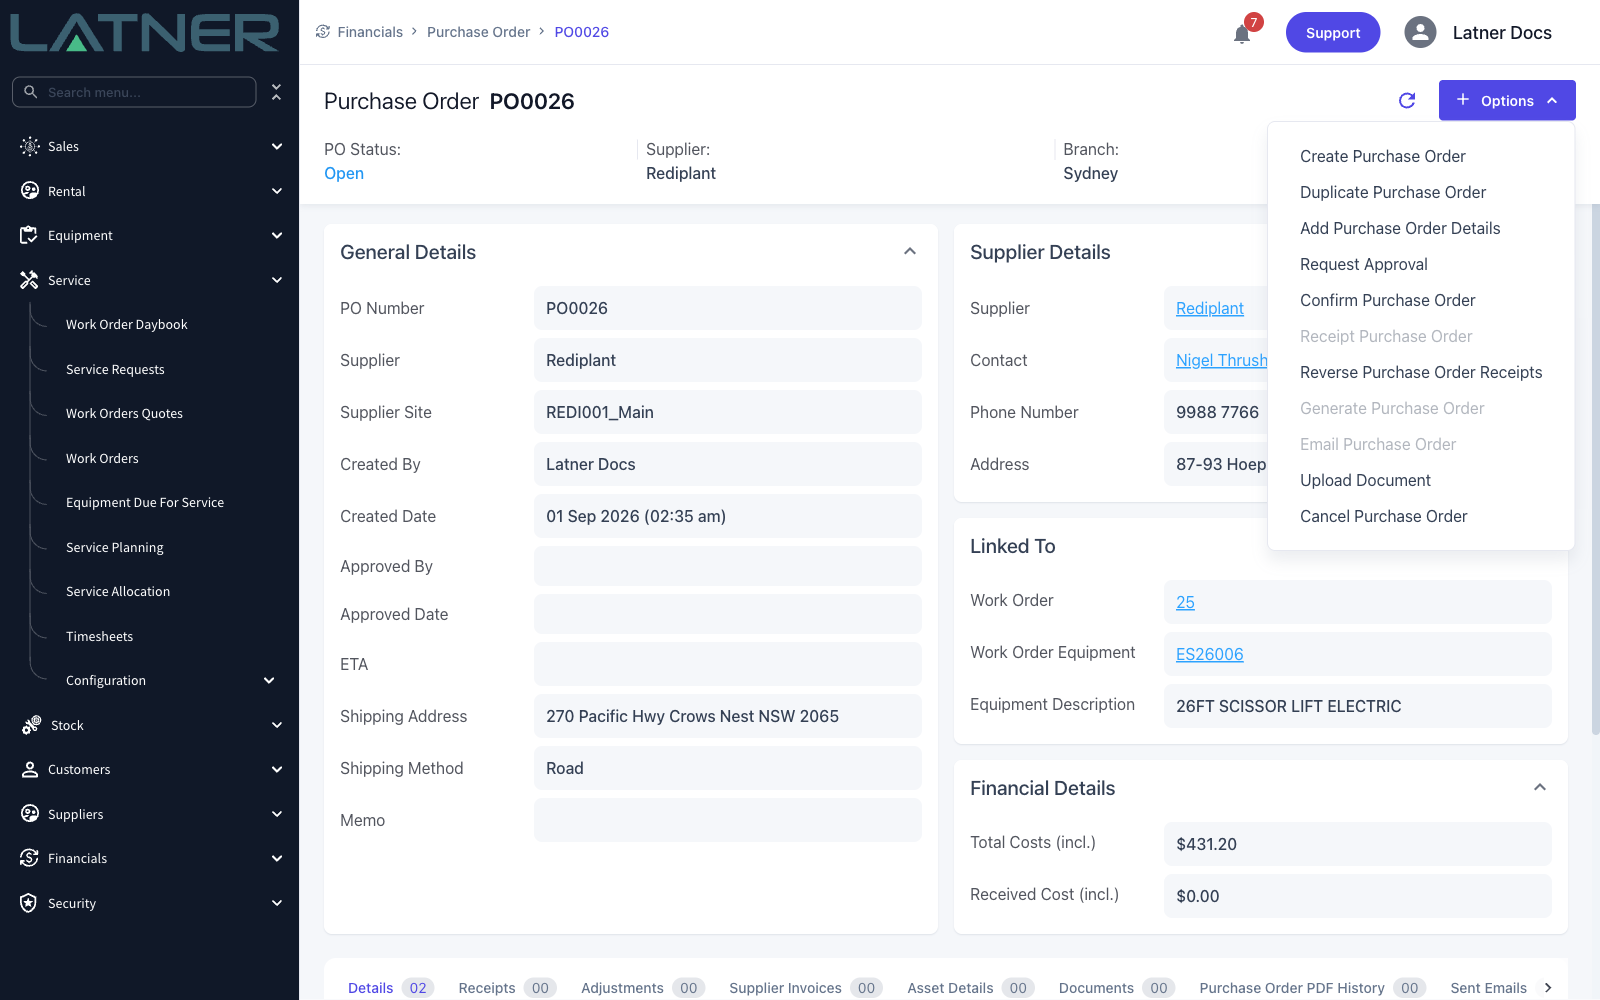
A purchase order sitting in Open status hasn't been placed with anyone yet. To place it, select Options › Confirm Purchase Order. If your business routes orders through an approver first, use Options › Request Approval instead, which moves the order to Pending Approval and notifies the person you nominate.
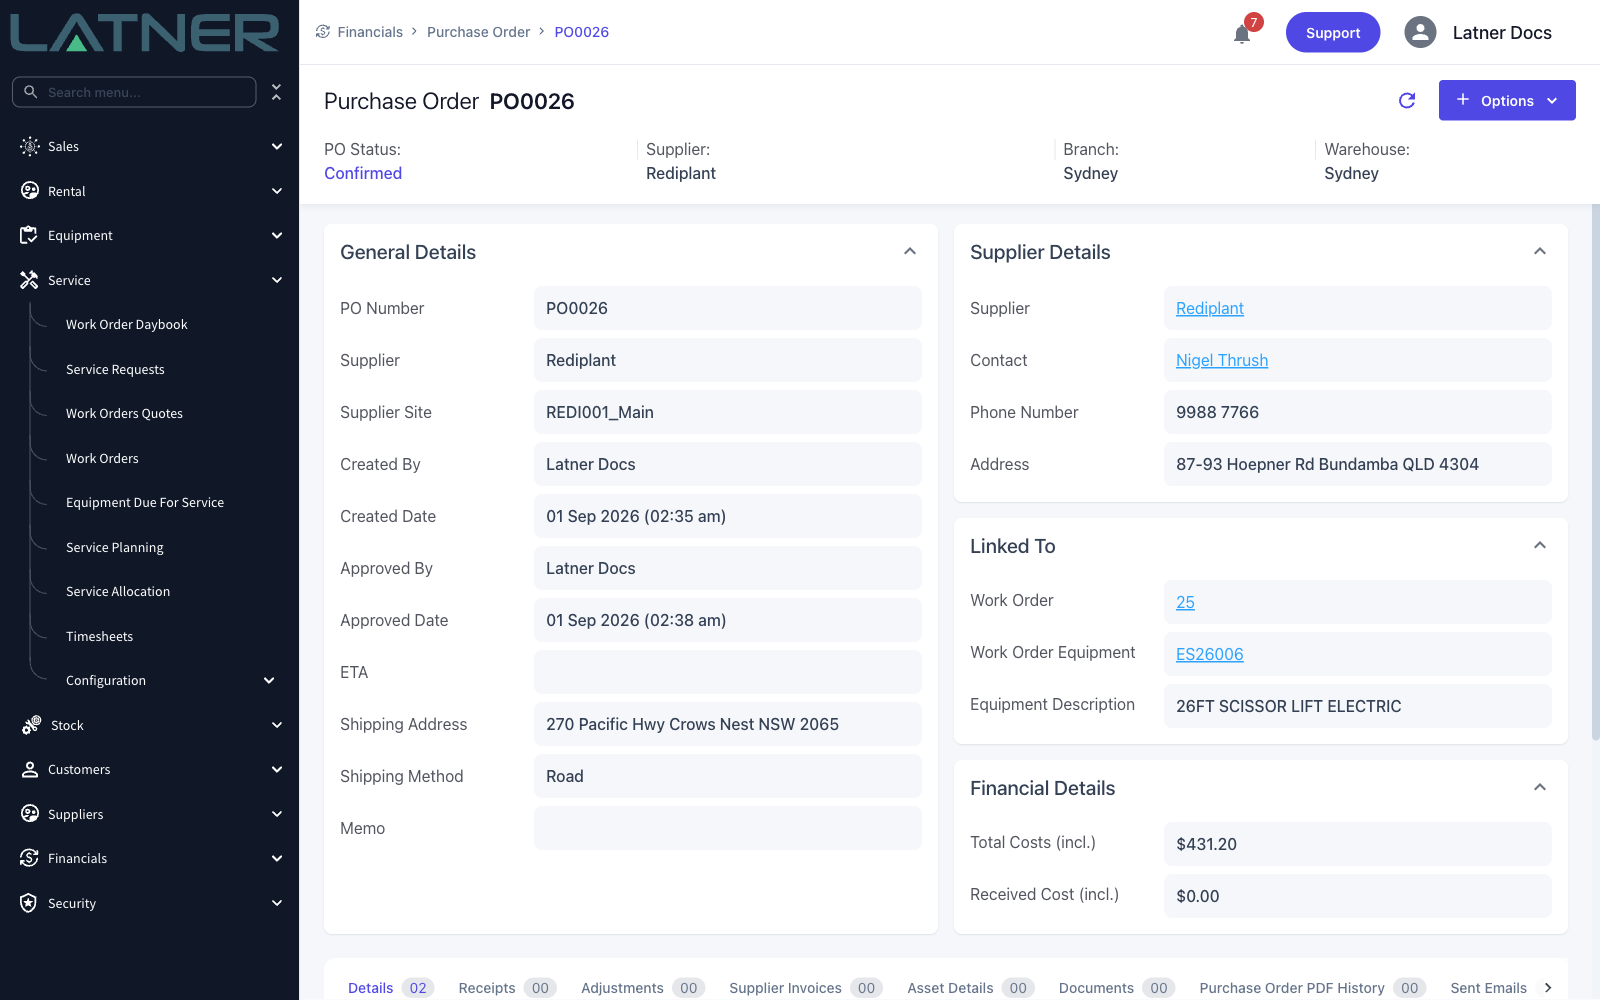
The status changes to Confirmed and your name and the time are recorded against Approved By and Approved Date.
After Creation
-
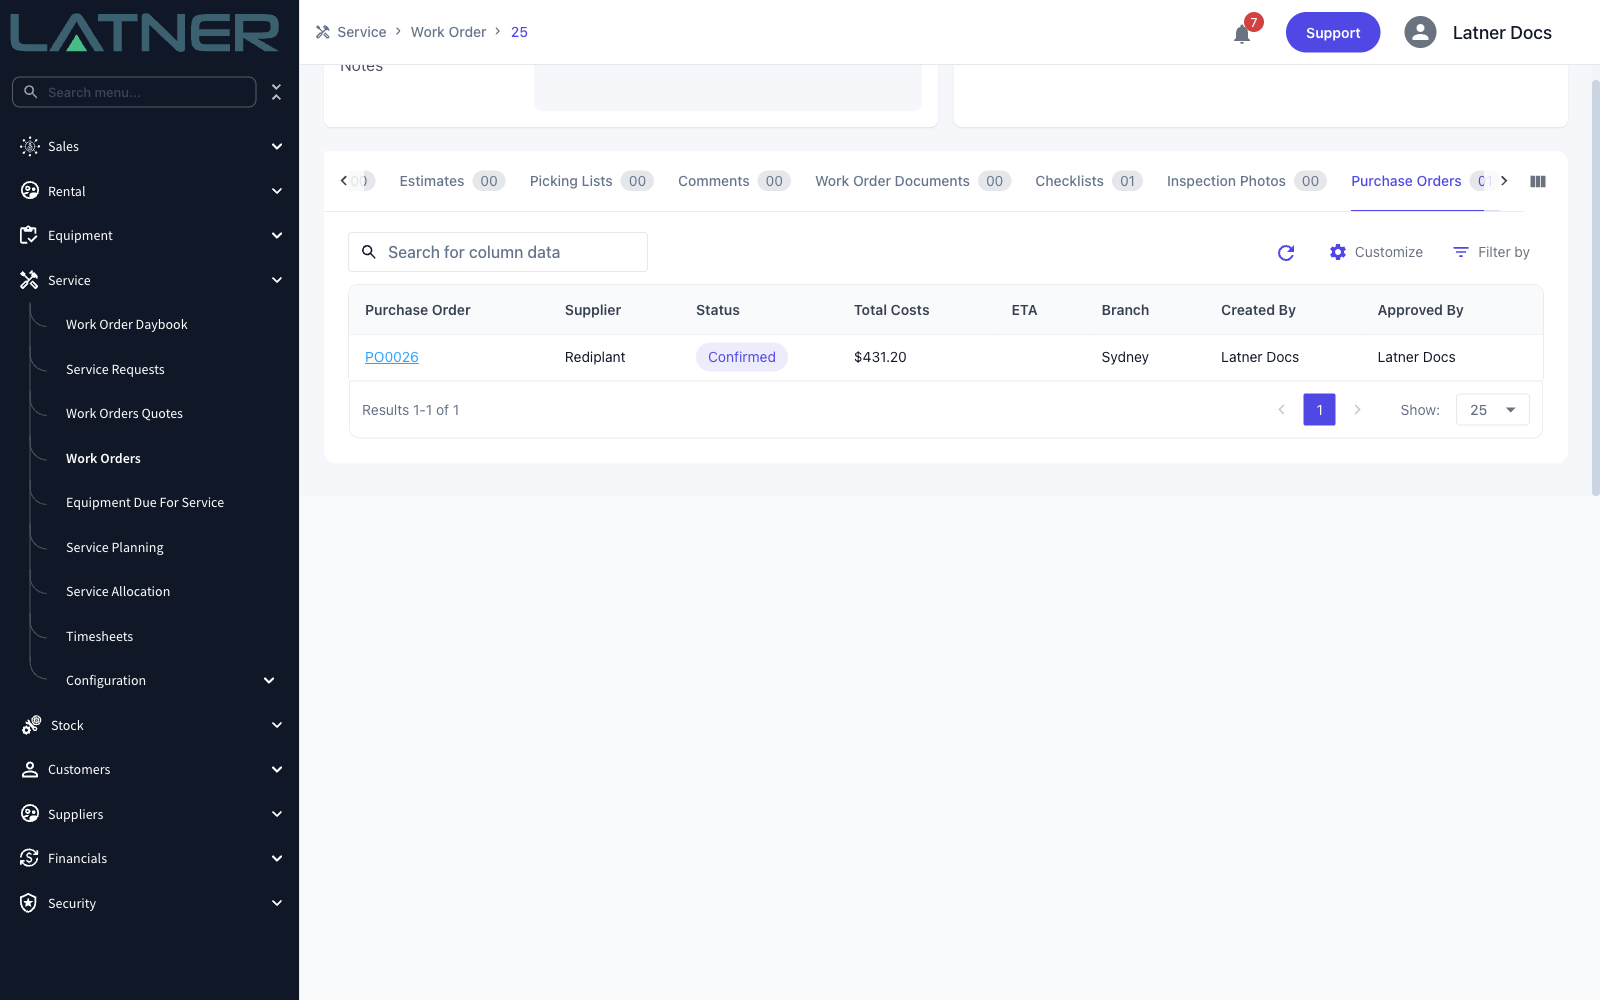
The purchase order appears on the work order's Purchase Orders tab, with its status, total and approver.
-
Confirming the order backorders the stock quantities in the purchase order's warehouse, so the parts show as on order rather than available.
-
Receipting the order adds the lines to the work order's Actuals - stock lines become part lines at the purchase order's unit cost, and expense lines become expense lines with the same description.
-
Reversing a receipt removes the work order lines it created, but only while the work order is still Open.
-
The order can also be found under Financials › Purchase Orders, filtered by work order.
An outstanding purchase order holds the work order open. You can't complete a work order that has a purchase order in Open, Confirmed or Partly Received status, and you can't cancel one that has any purchase order still active. Receipt the order, or cancel the purchase order first, and the work order will close normally.
FAQs
Watch the Demo
Prefer to watch it? Step through the same flow here.
From a Sales Order
Use Options › Raise Purchase Order on a sales order that is Open or Quoted and has at least one line, to buy in what you have just sold.
FAQs
Watch the Demo
Prefer to watch it? Step through creating a manual order here.
And the same flow starting from a rental contract.