
The equipment hierarchy is how Latner groups every machine into Categories, Classes, Makes and Models, so your fleet can be priced, scheduled and reported on consistently.
Overview
Every machine in Latner sits inside a tidy family tree, and getting that tree right is what makes rates, service schedules and reporting fall into place. There are four configuration levels plus the equipment itself.
-
Category is the broad grouping (for example, Excavator or Scissor Lift).
-
Class is a sub-group inside a Category that defines size or function.
-
Make is the manufacturer or brand. It sits alongside the tree rather than inside it - a Make is not tied to any one Category.
-
Model is the specific version of a Make, and it belongs to both a Class and a Make.
-
Equipment is the individual machine, and it points only at a Model.
A few behaviours are worth knowing before you start:
-
An equipment record stores only its Model. Its Category, Class and Make are read from that Model, not held on the equipment itself - so they always stay in step with the Model you choose.
-
Class and Model are the levels that actually drive behaviour: rental rates, service schedules, inspection and checklist defaults, metering, default dimensions, depreciation and equipment numbering all flow down from them.
-
Category is mostly used for grouping and reporting, and Make is a manufacturer label used mainly for searching and filtering.
-
You create and edit every level the same way, from a list screen under Equipment › Configuration.
Here is how the levels fit together, using a few common plant items:
|
Category |
Class |
Make |
Model |
|---|---|---|---|
|
Excavator |
Excavator 1.5T |
Kubota |
KX015-4 |
|
Excavator |
Excavator 3.5T |
Kubota |
KX033-4 |
|
Scissor Lift |
26ft Scissor Lift Electric |
JLG |
2630ES |
|
Lighting Tower |
4000W Light Tower Towable |
Atlas Copco |
HiLight V4 |
Before You Begin
The configuration screens live under Equipment › Configuration. Access is controlled by permissions, which your administrator sets in Security.
|
Requirement |
Where to Find It |
|---|---|
|
Permission to view and search each configuration screen |
Security › Permission Groups, Equipment module - Equipment Category, Equipment Class, Equipment Make and Equipment Model |
|
Permission to create or edit hierarchy records |
Security › Permission Groups, Equipment module - Create Equipment Category, Create Equipment Class, Create Equipment Make and Create Equipment Model |
Creating and editing use the same permission - there is no separate edit permission for these four screens. If you can create a Class, you can also edit and reparent one. Anyone can view a list screen, but the Options button and the Edit action only appear when you hold the matching Create permission.
Creating the Hierarchy
Build the tree from the top down: a Category first, then a Make, then a Class inside that Category, and finally a Model inside that Class and Make.
Step 1 - Open the Equipment Configuration area
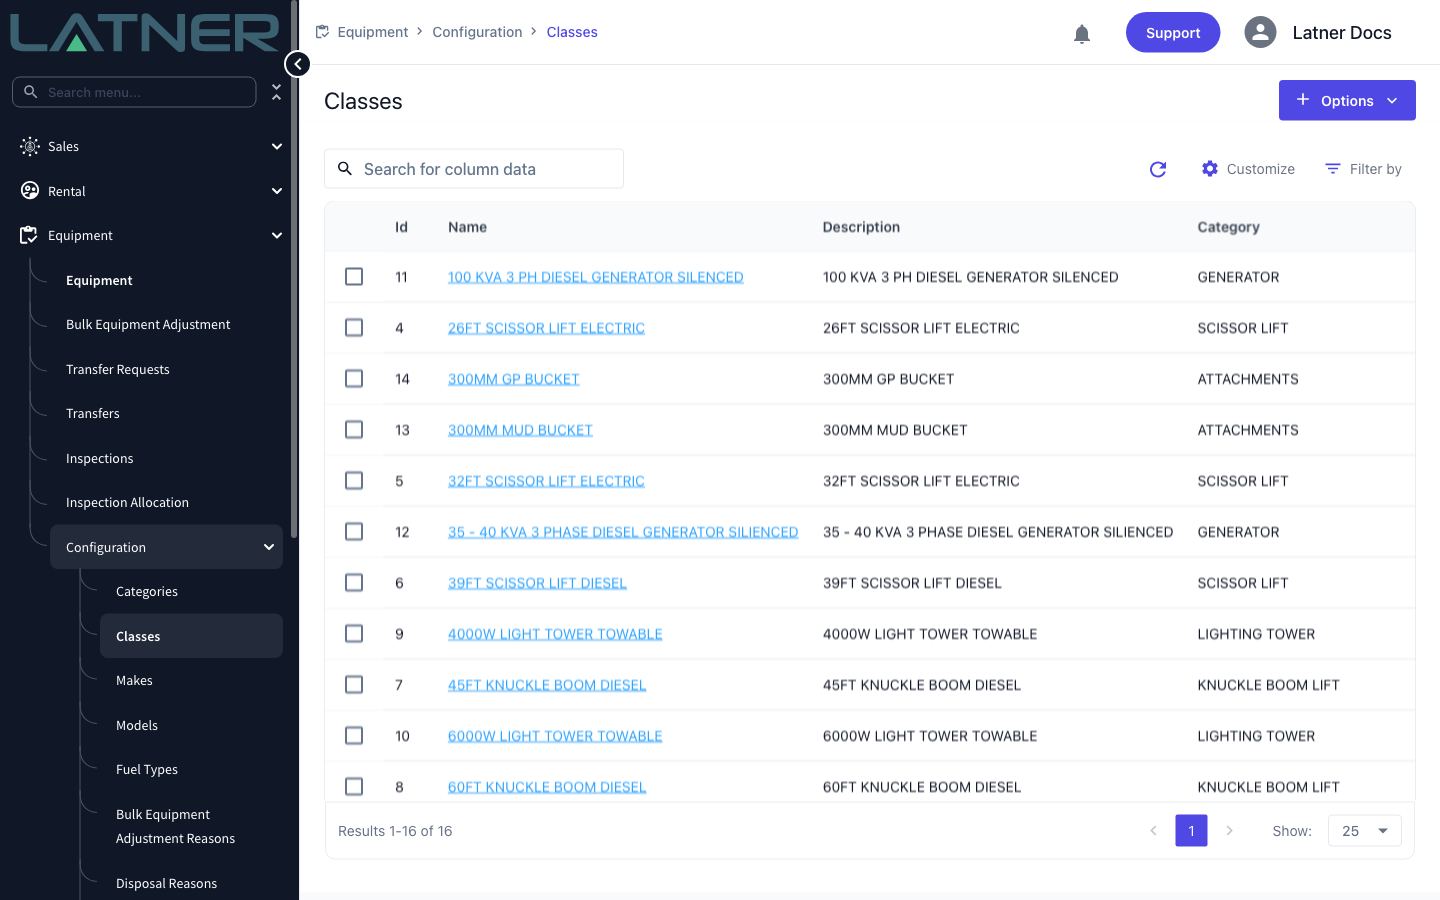
In the left-hand menu, open Equipment › Configuration. You will see a screen for each level - Categories, Classes, Makes and Models - plus related lookups such as Fuel Types.
Step 2 - Create a Category
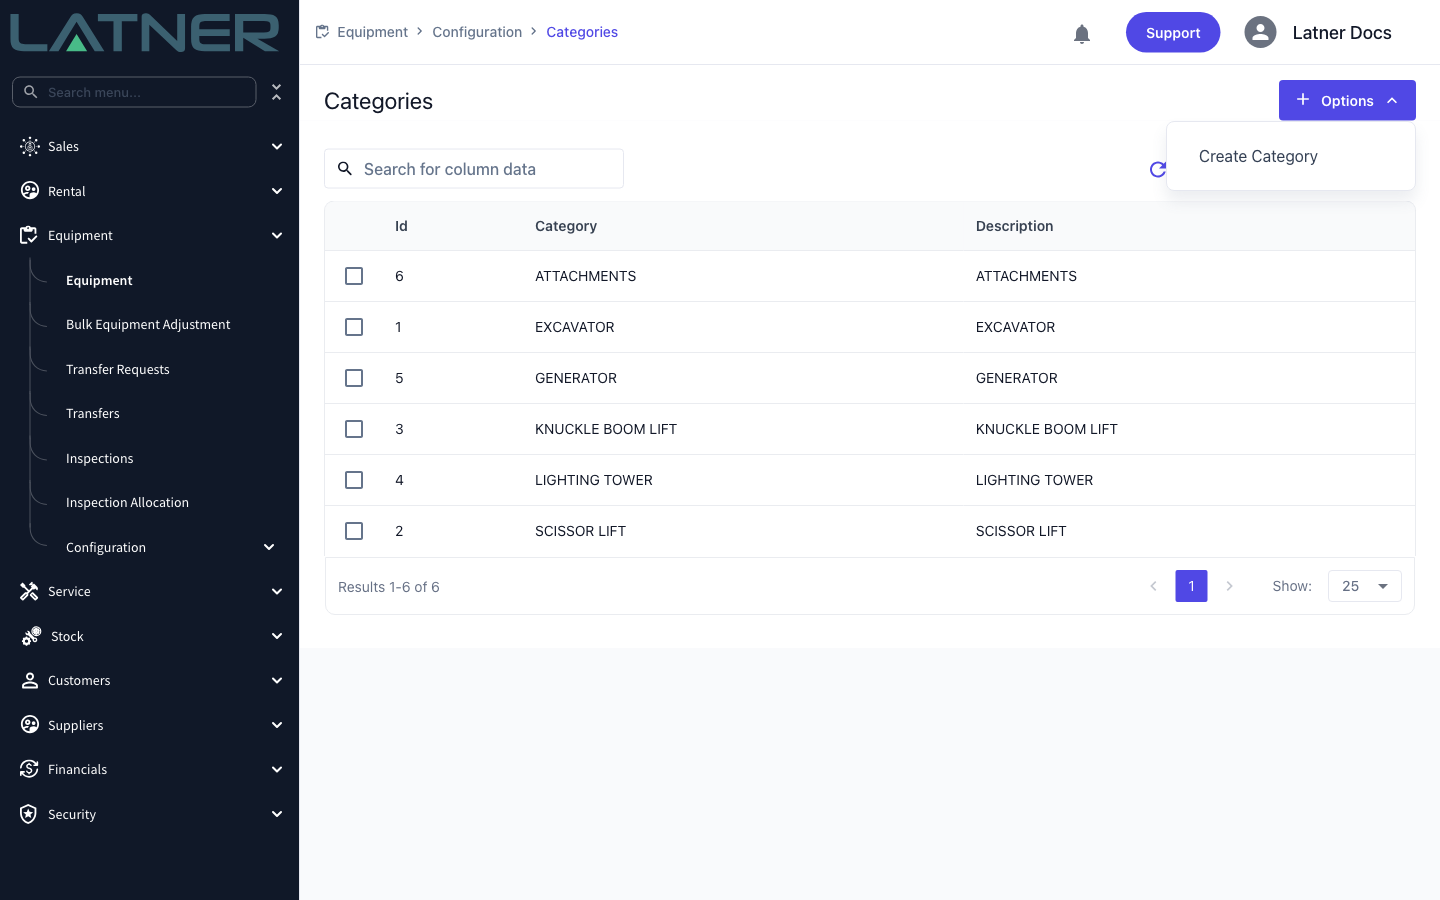
Open Categories, then choose Options › Create Category. Every configuration screen creates records the same way, from this Options button.
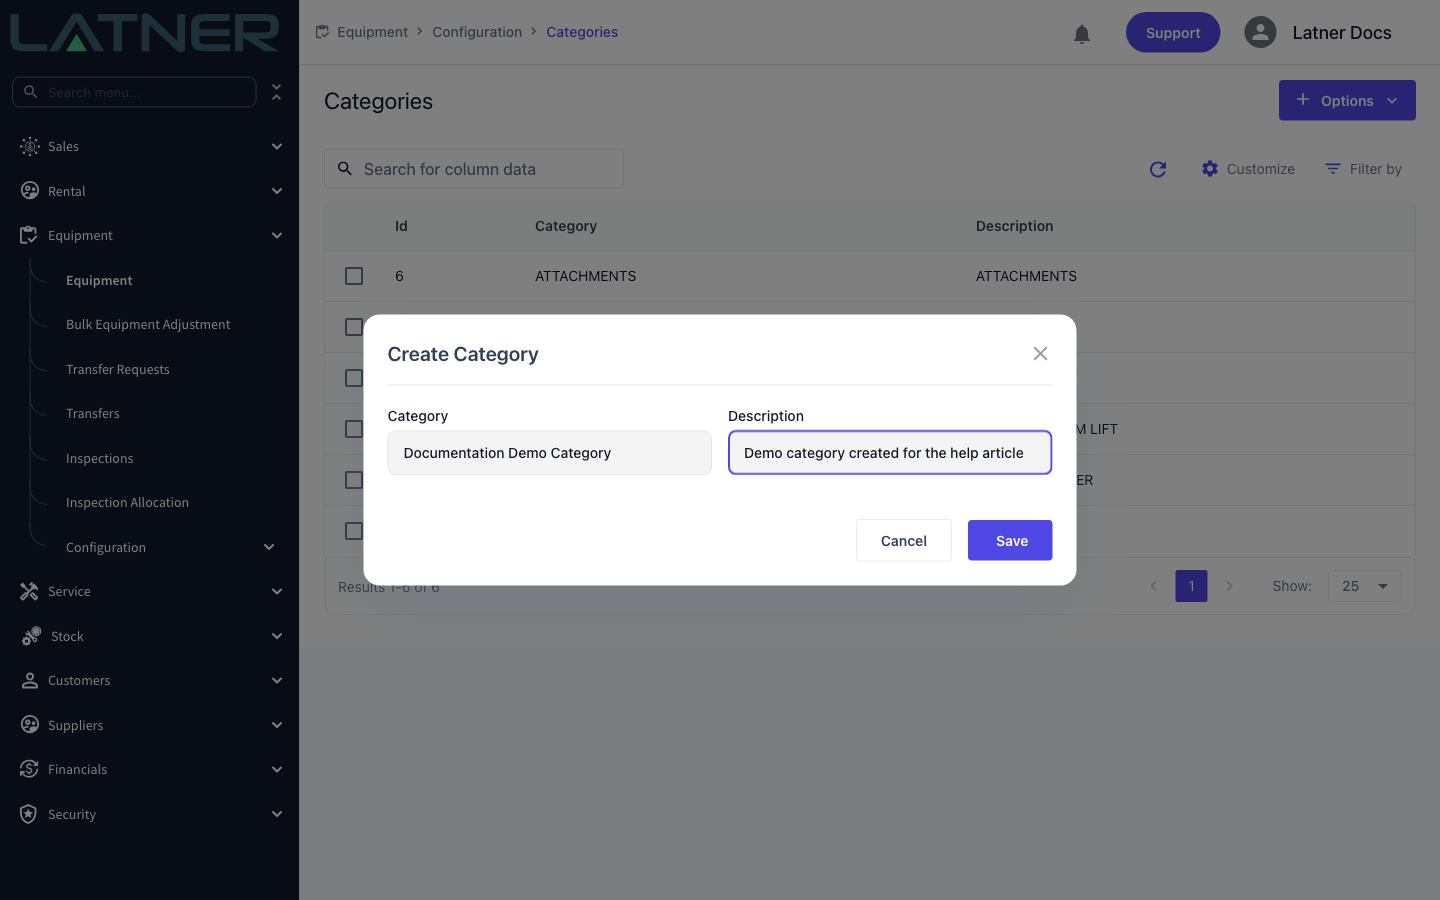
A Category needs only two things, both required:
-
Category - the name (must be unique).
-
Description - a short description.
Fill them in and choose Save.
Step 3 - Create a Make
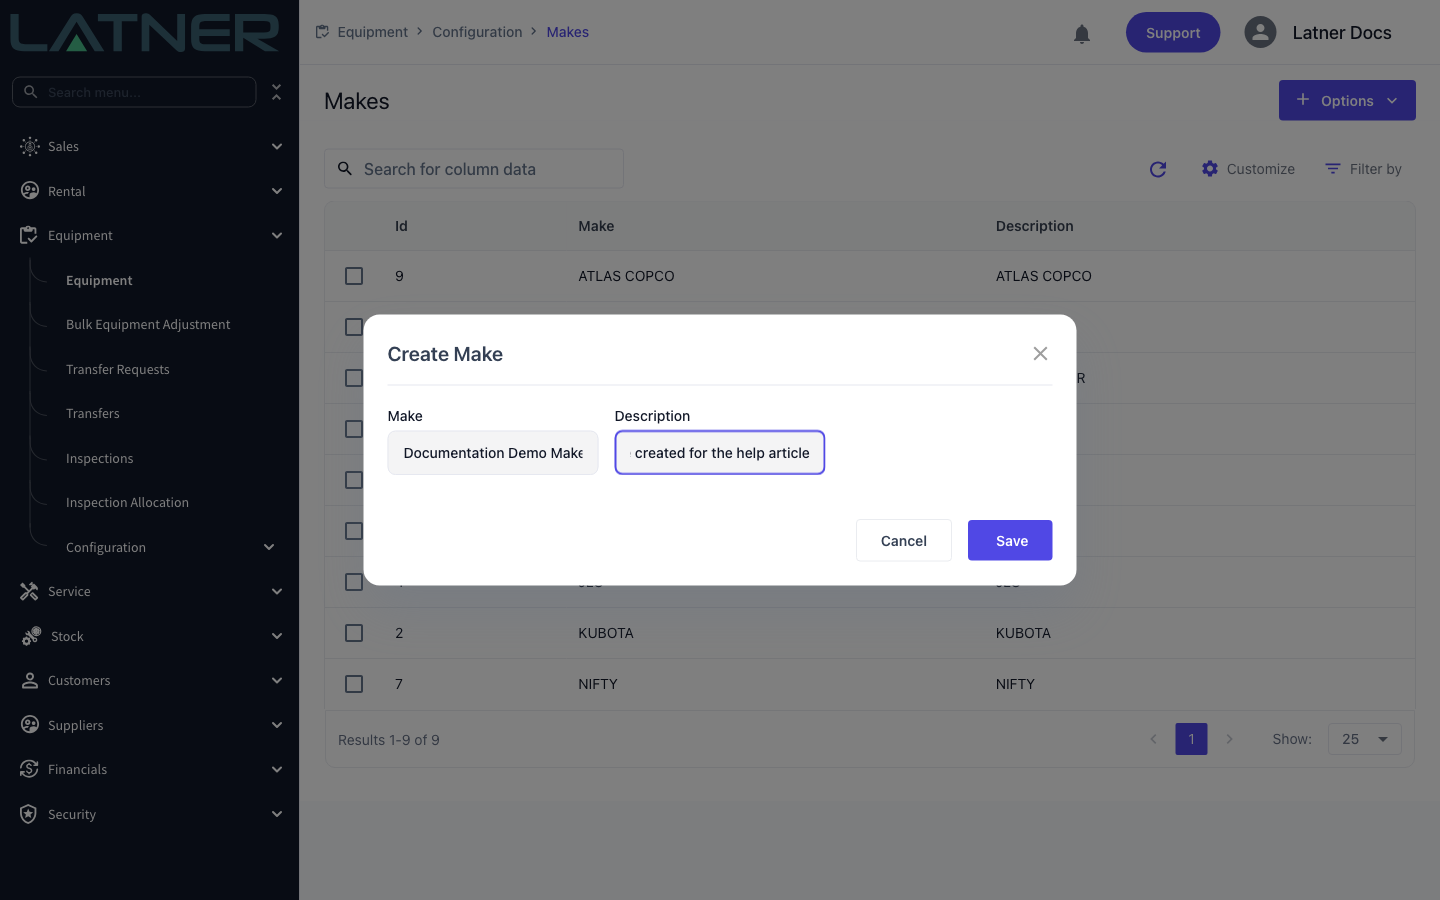
Open Makes and choose Options › Create Make. A Make is the manufacturer or brand and is not tied to a Category, so you can create your Makes at any time. It also needs only a name and a description, both required:
-
Make - the manufacturer name (must be unique).
-
Description - a short description.
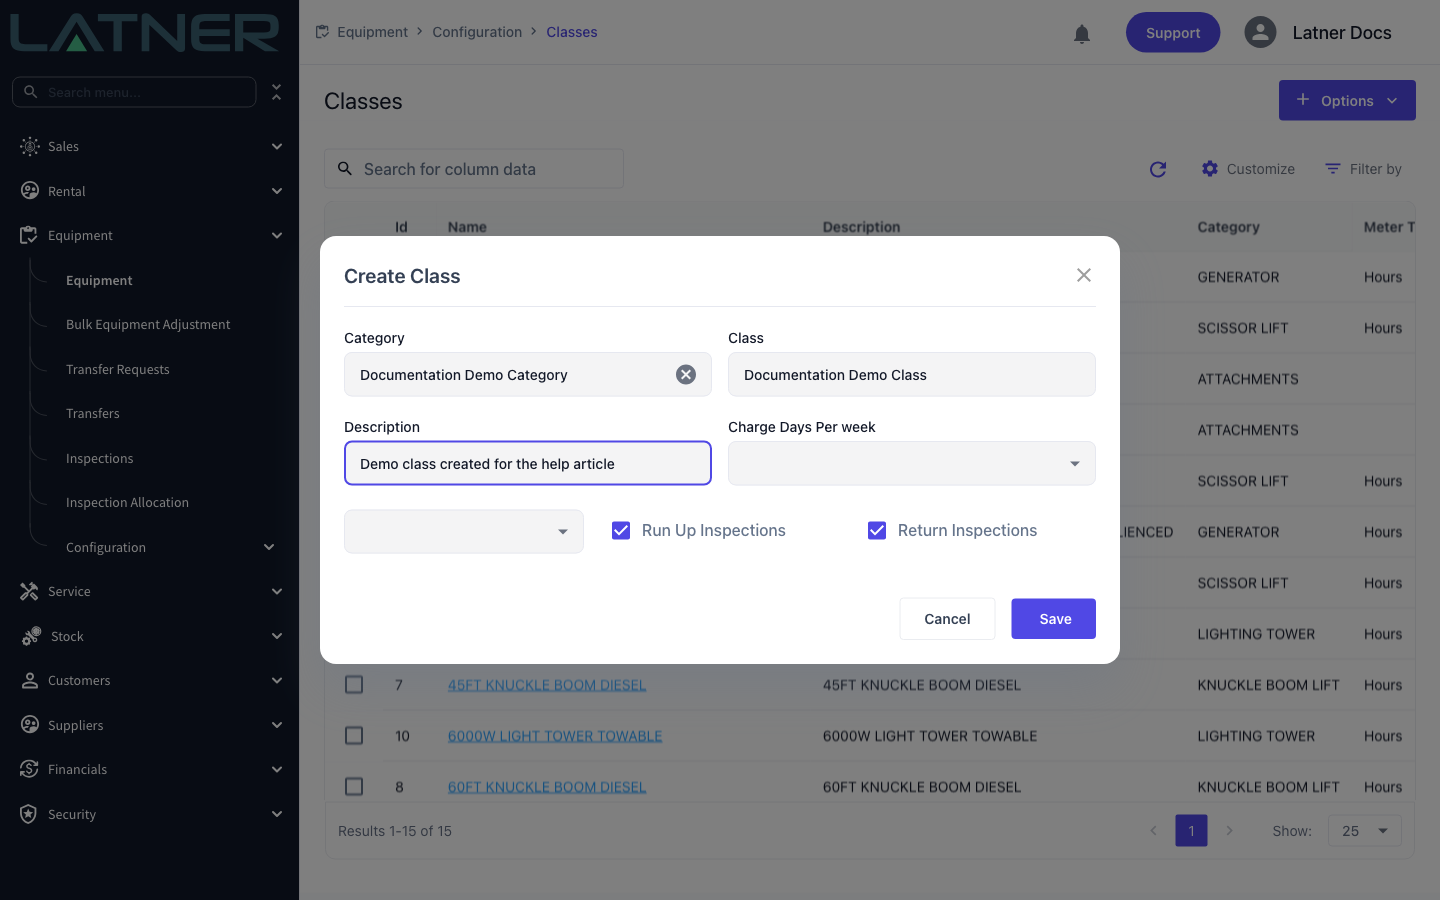
Step 4 - Create a Class
Open Classes and choose Options › Create Class. A Class must sit inside a Category, so that link is required.
Required fields:
-
Category - the parent Category this Class belongs to.
-
Class - the name (must be unique).
-
Description - a short description.
Optional fields let you set class-level defaults that new equipment inherits: Charge Days Per Week, Meter Type, Run Up Inspections and Return Inspections.
Step 5 - Create a Model
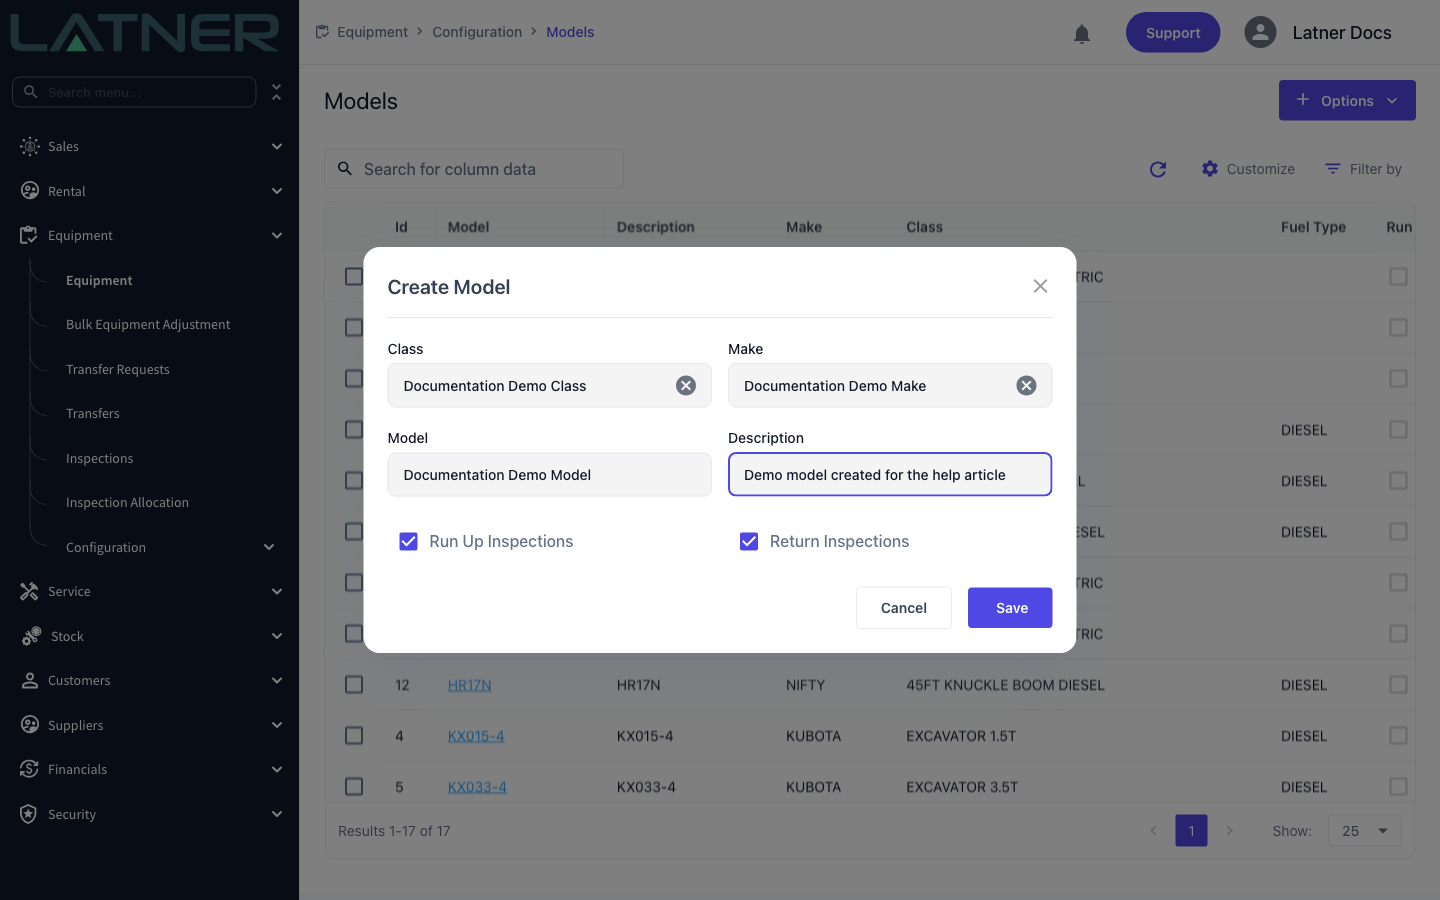
Open Models and choose Options › Create Model. A Model must sit under both a Class and a Make, so both links are required.
Required fields:
-
Class - the parent Class (which in turn sets the Category).
-
Make - the manufacturer of this Model.
-
Model - the name (must be unique).
-
Description - a short description.
If the Class or Make you need does not exist yet, you can create it on the spot from the dropdowns in this dialog, without leaving the Model form.
Reparenting a Class or Model
Sometimes a Model ends up under the wrong Class, or a Class under the wrong Category. You move a record to a new parent by editing it from its list screen - not from its detail page, where the parent is shown but locked.
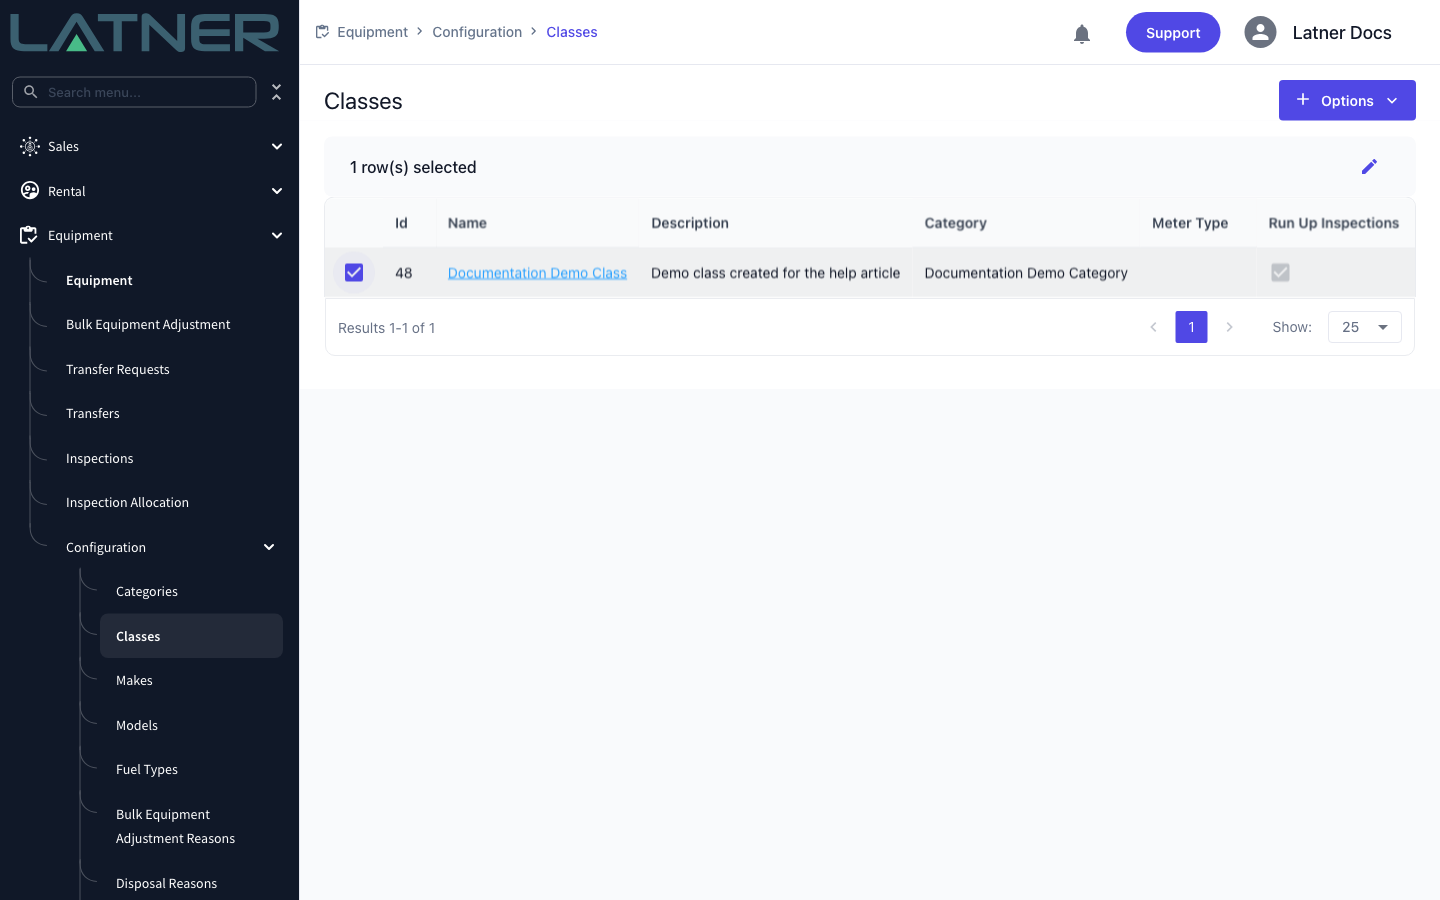
Step 1 - Select the record on its list screen
Open the relevant list (Classes or Models) and tick the checkbox next to the record. An Edit (pencil) action appears at the top of the list.
Step 2 - Change the parent and save
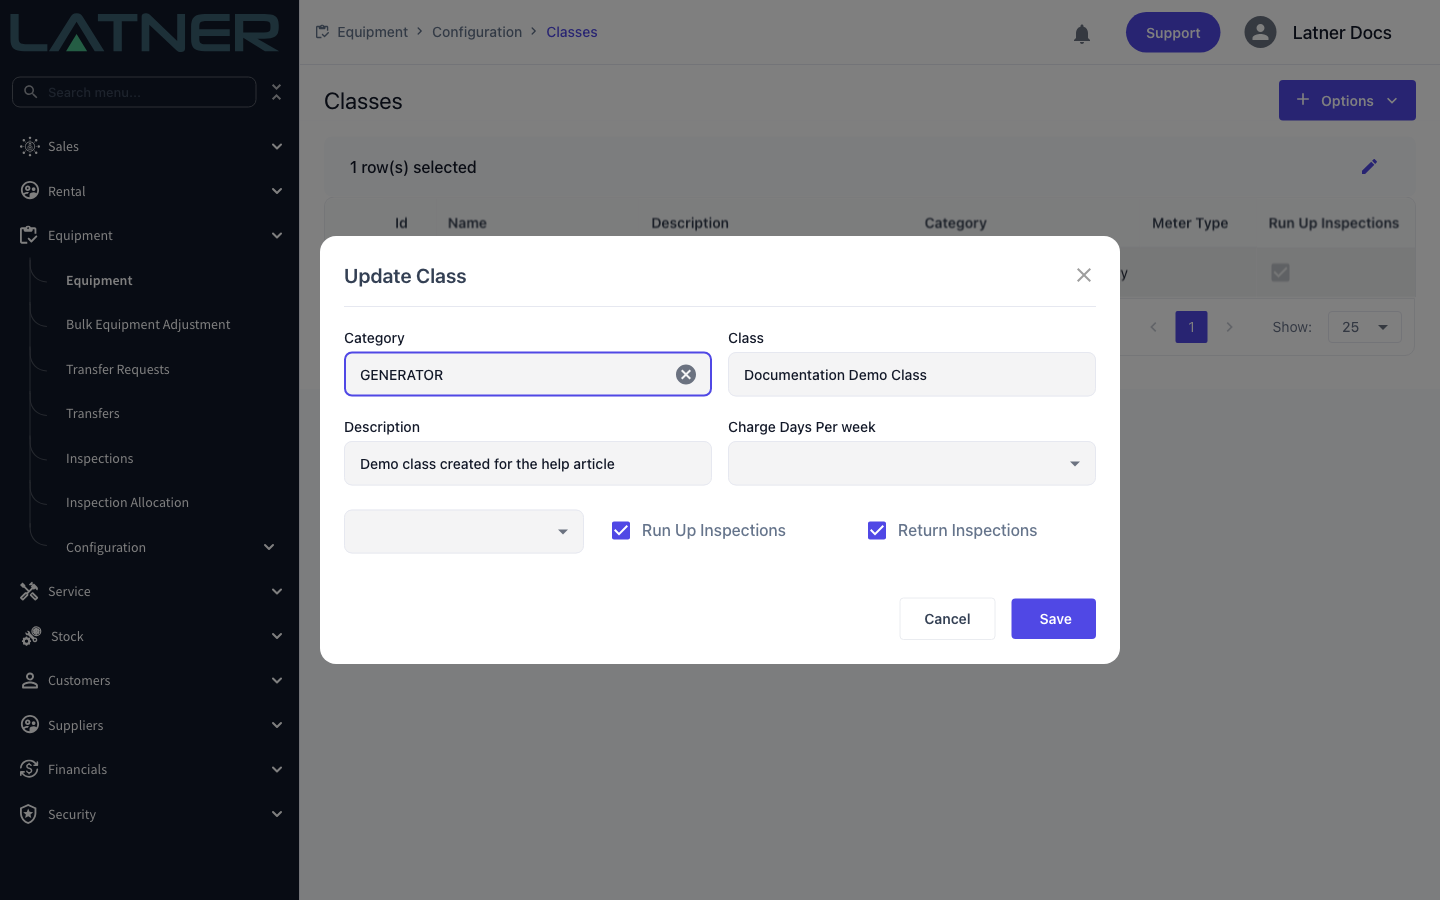
Choose Edit to open the record. For a Class, pick a different Category. For a Model, pick a different Class and/or Make. Choose Save and the record moves to its new parent immediately.
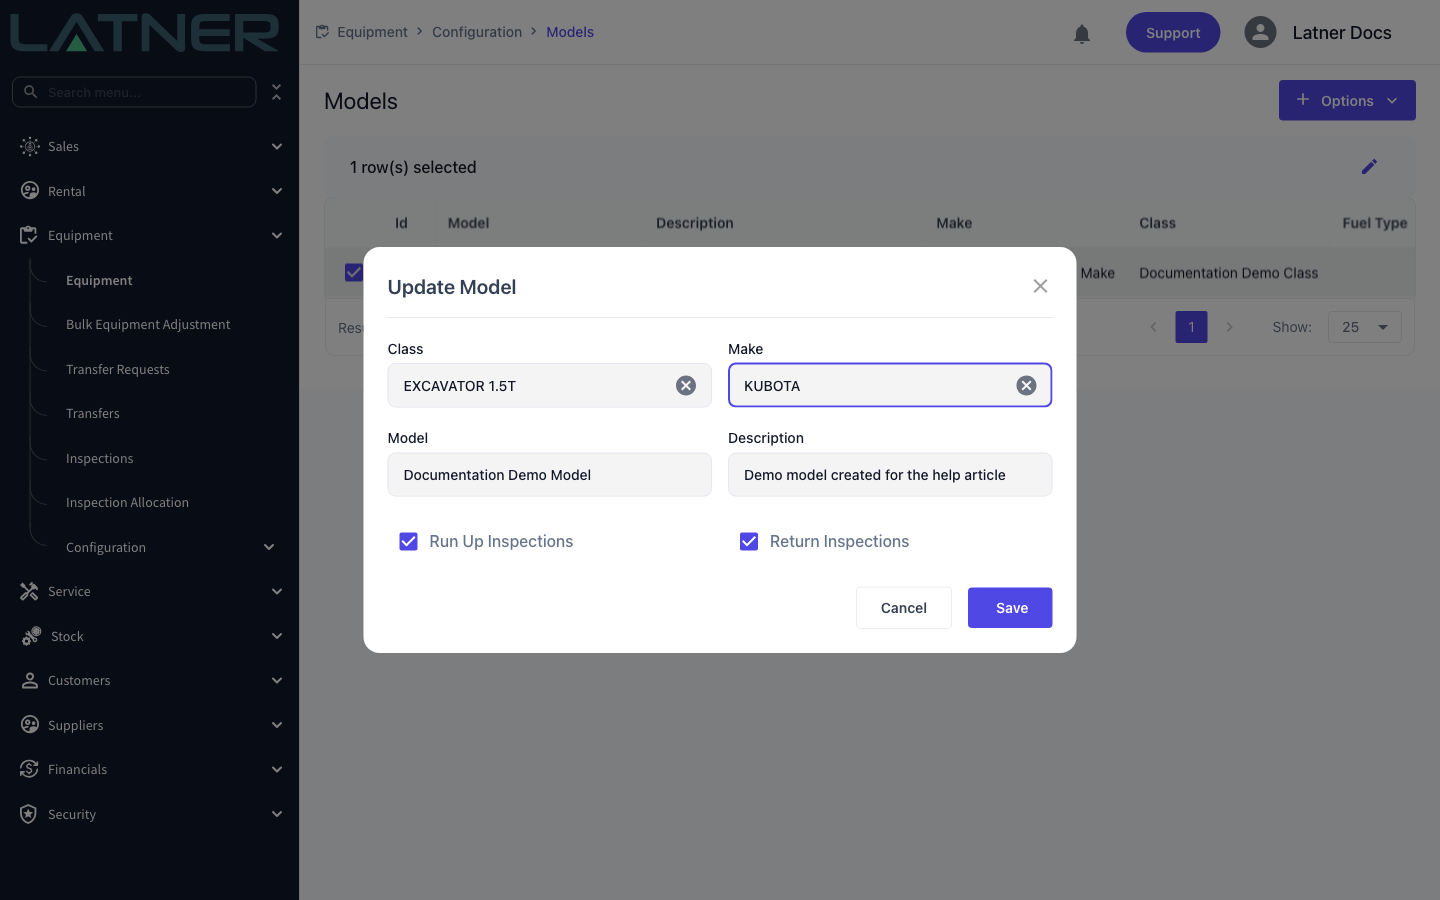
Reparenting is allowed even when equipment already sits under the Class or Model - nothing blocks it. But because Class and Model drive rental rates, service schedules and inspection defaults, moving a record changes which of those apply. Check the class- and model-level rates and schedules after a move so your equipment still prices and services the way you expect.
Changing an Equipment's Model
An individual machine's place in the hierarchy is set entirely by its Model. So to move one machine, you change its Model - you do not (and cannot) change its Category, Class or Make directly on the equipment.
Step 1 - Open the equipment and find Equipment Model
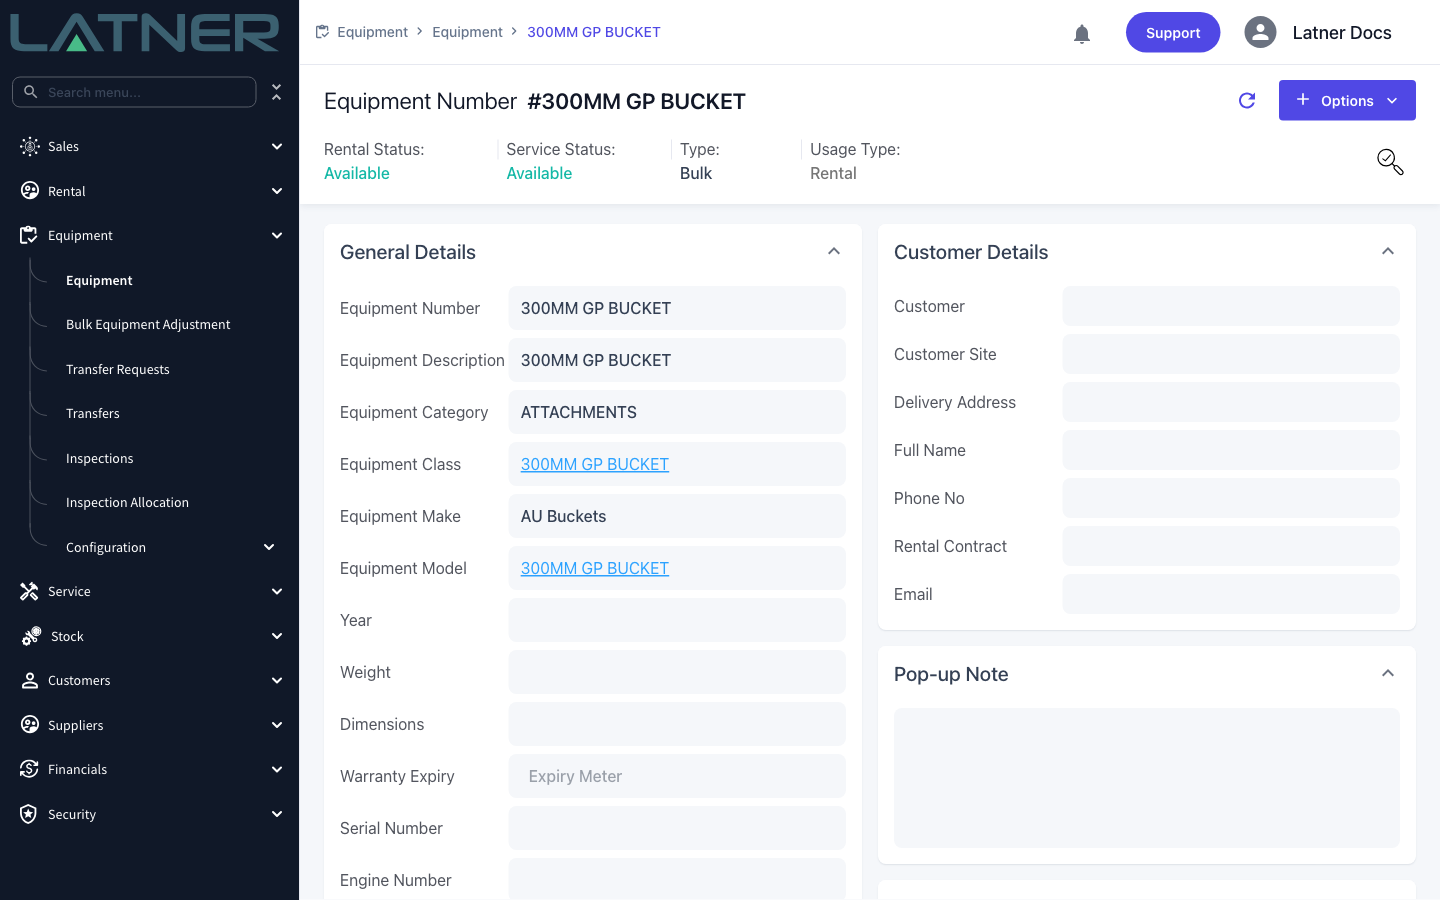
Open the equipment record and look at the General Details panel. Equipment Category, Equipment Class and Equipment Make are read-only here - each carries a tooltip explaining that it is based on the Model selected. Only Equipment Model can be edited.
Step 2 - Edit the Model field
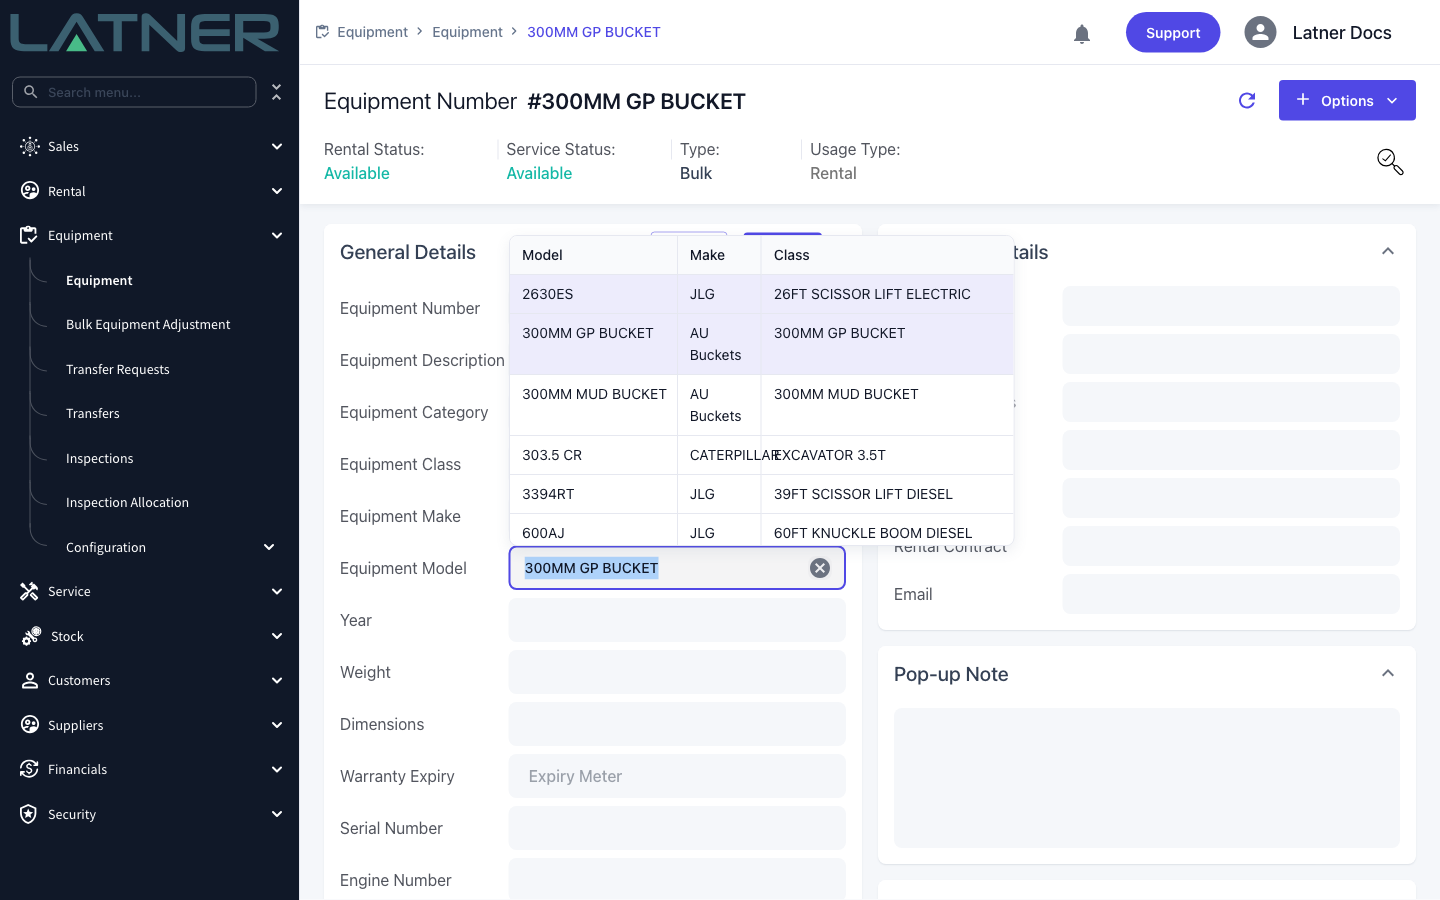
Select the edit (pencil) icon on the Equipment Model field, search for the new Model and choose it. The dropdown shows each model's Make and Class so you can pick the right one. Save the change, and the equipment's Category, Class and Make update automatically to match the new Model.
How the Hierarchy Affects Everything Else
Getting the hierarchy right pays off across the system, because so much configuration is inherited from the Class and Model rather than set on each machine:
-
Rental rates can be set for a whole Class, a single Model, or one machine.
-
Service schedules cascade down: a schedule set on a Class or Model is inherited by every machine under it, and creating one back-fills the equipment that already exists.
-
Inspection and checklist defaults (run-up, return, transfer and pre-start) live on the Class and Model.
-
Metering, default dimensions, depreciation types and the equipment number prefix all come from the Class or Model.
-
Reporting and filtering roll up through Category › Class › Model, so consistent grouping keeps your reports clean.
You cannot delete a Category, Class, Make or Model while anything still depends on it - a Category with Classes, a Class or Make with Models, or a Model with equipment is protected from deletion. If you no longer need a record, first reparent or reassign whatever sits under it, then remove it.