
A service schedule checklist is the list of checks a mechanic works through when a scheduled service comes due, and you assign it by attaching a checklist template to a service schedule on an equipment class, an equipment model or a single piece of equipment.
Overview
Nobody should be servicing a scissor lift from memory. Set the checklist once on the class so every machine of that type is covered, tighten it on the models that need something extra, and add one to a single machine when that machine is the exception.
-
The checklist is attached to a service schedule, not to the class, model or equipment itself. The level is decided by which screen you launch Options › Add Service Schedule from.
-
Only checklist templates whose Checklist Type is Service can be picked. Run Up, Rental Return, Pre Start and Take 5 templates are never offered here.
-
You can either pick a template you already have, or build one inline while you create the schedule by setting Create Checklist to Yes.
-
The levels stack, they don't override. A machine ends up with its own schedules plus every model schedule plus every class schedule. A model schedule does not replace the class one.
-
Saving a class or model schedule immediately adds it to every serialized machine already under that class or model. Bulk equipment is skipped.
-
New serialized equipment inherits every schedule on its class and model the moment it is created, whether it is added by hand, imported or received on a purchase order. This happens once, at creation: moving a machine to a different model or class later does not re-evaluate its schedules.
-
The checklist is read when the work order is raised, so changing the template on a schedule changes every future service under it. Work orders already raised keep the checklist they were given.
-
An inherited schedule can't be edited or deleted from the equipment screen, but it can be switched off for a single machine with Disable Schedule.
-
Deleting a class or model schedule removes it from every machine underneath at once. See Removing a Schedule from a Class below.
Before You Begin
Have these ready before you start.
|
Requirement |
Where to Find It |
|---|---|
|
A checklist template with Checklist Type set to Service |
Equipment › Configuration › Checklist Templates. See How to Create a Checklist Template. |
|
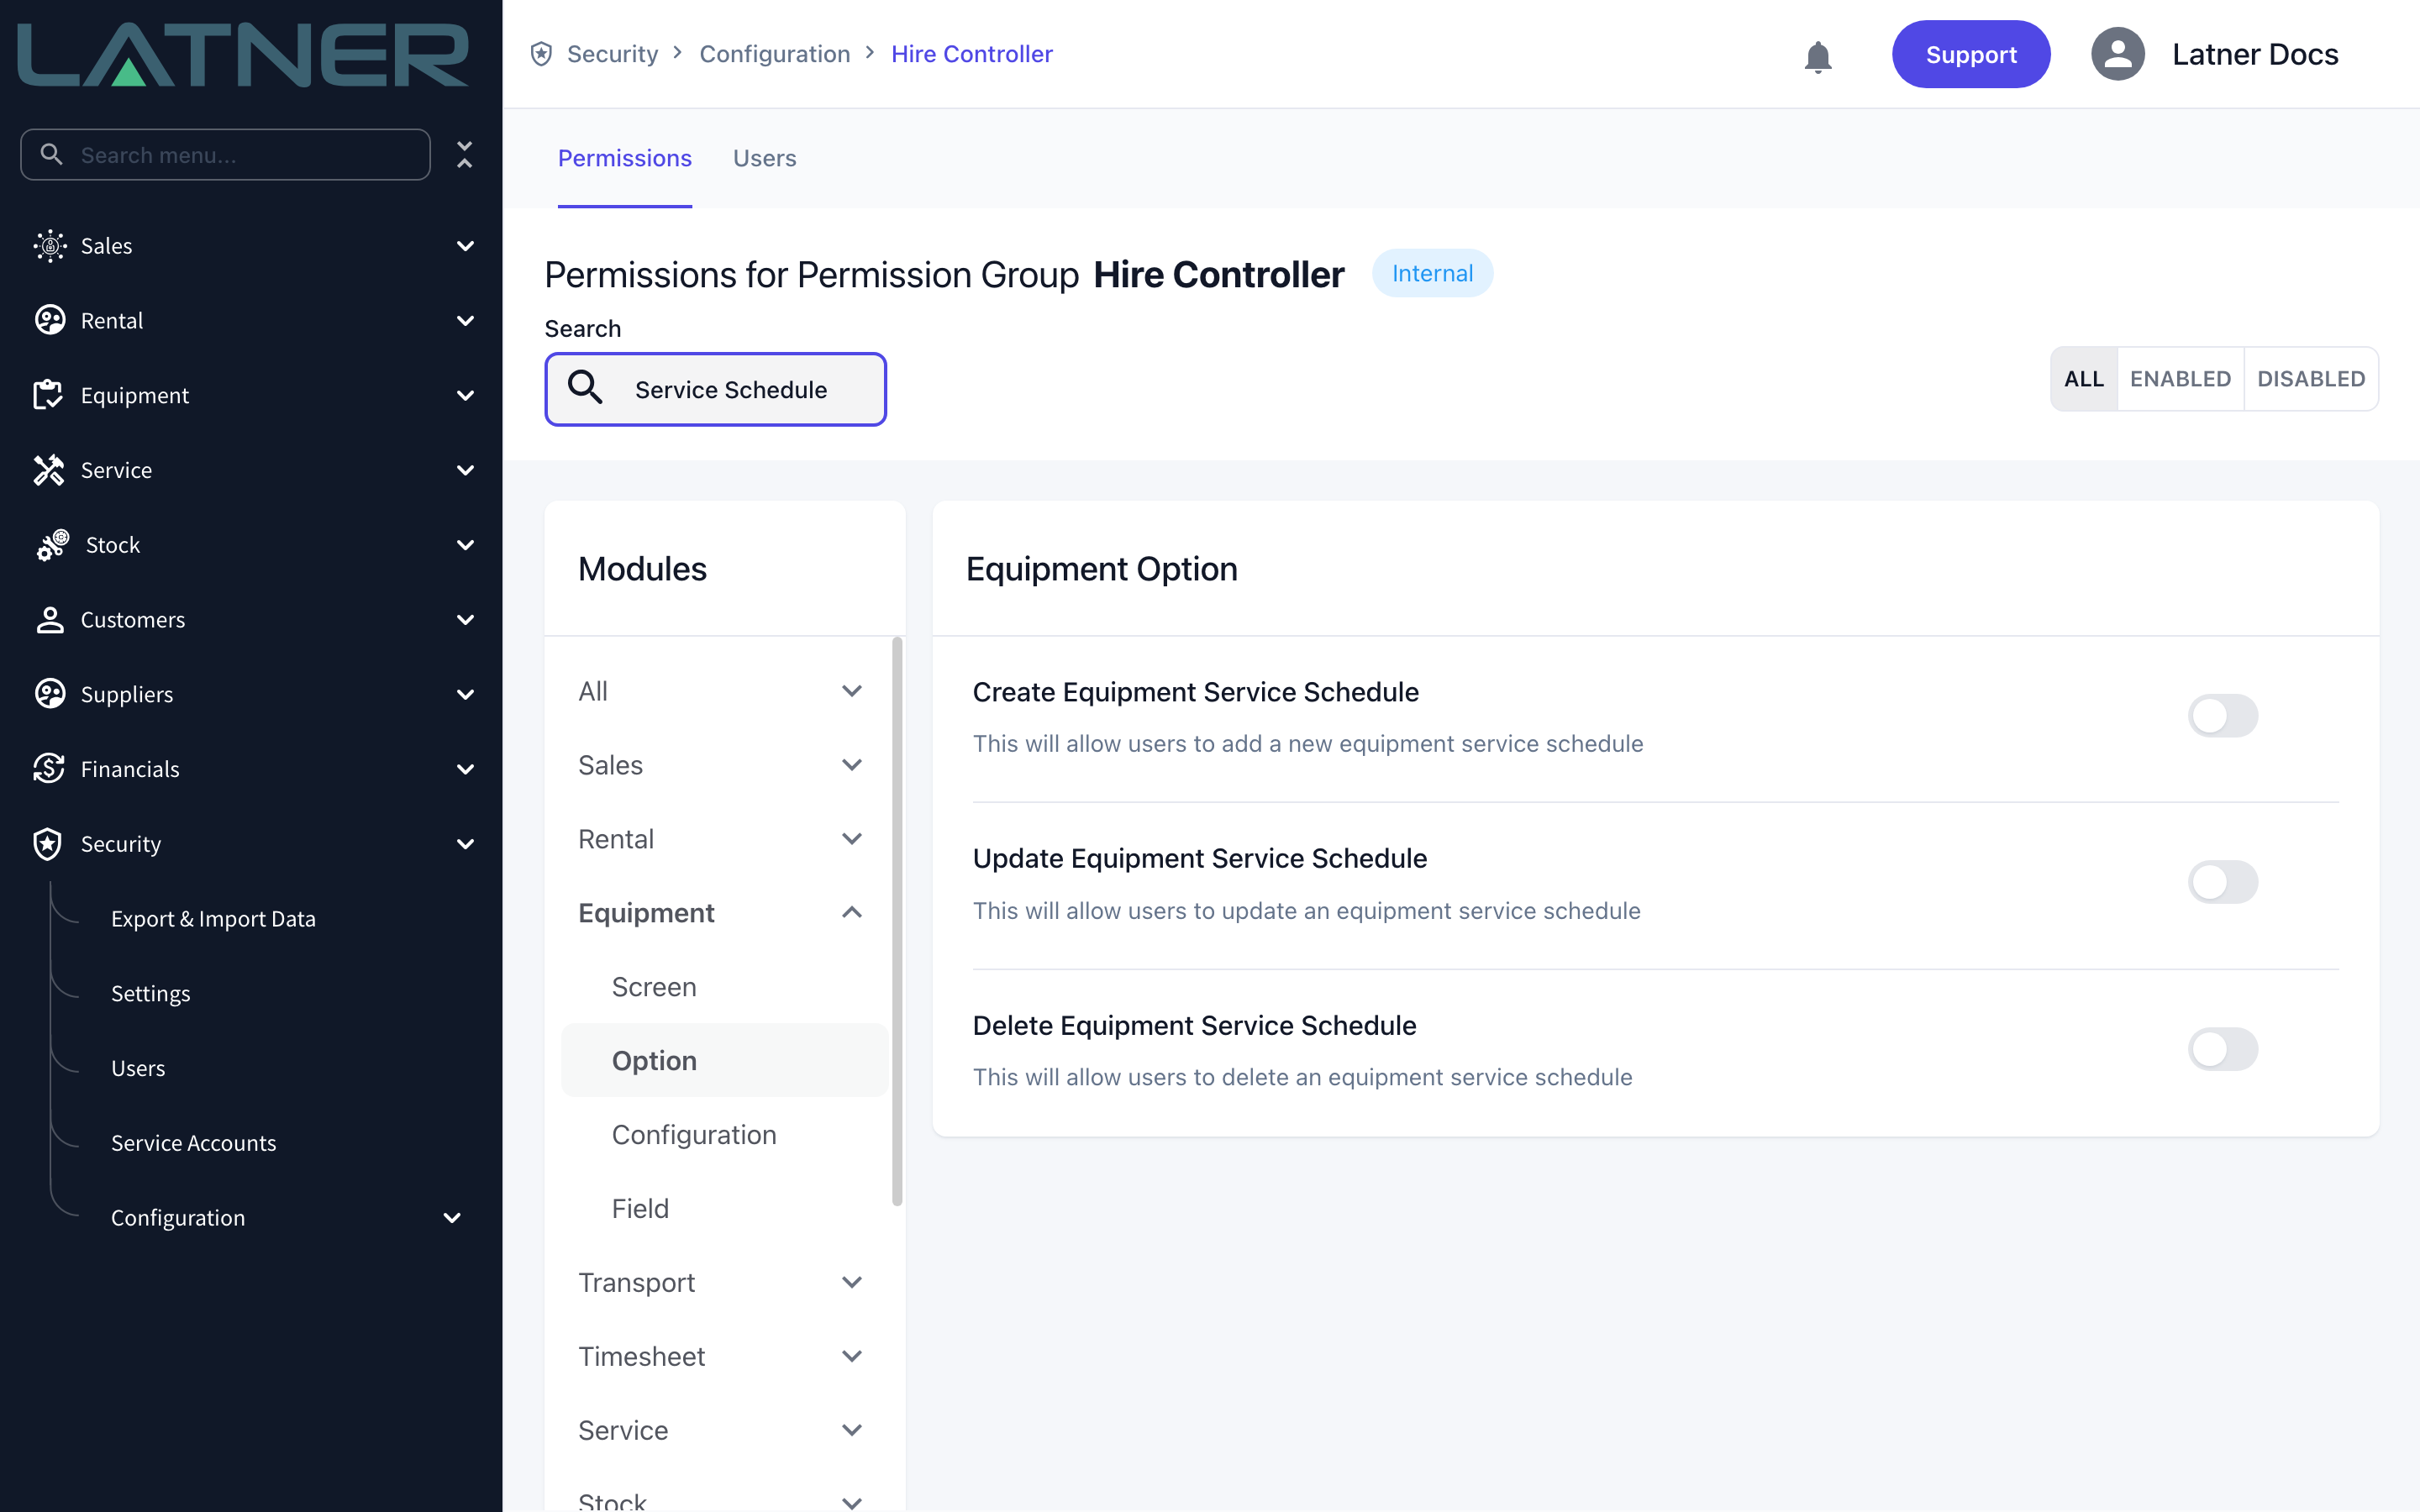
Create Equipment Service Schedule, Update Equipment Service Schedule and Delete Equipment Service Schedule |
Security › Configuration › Permission Groups, under Equipment › Option. |
|
Classes, Models and Checklist Templates screen access |
Security › Configuration › Permission Groups, under Equipment › Configuration. |
|
A Work Order Reason and a Work Order Category to raise the service against |
Service › Configuration. Both are required on every service schedule. |
|
Serialized equipment |
Service schedules only apply to serialized equipment. On a bulk equipment record the Add Service Schedule option is disabled. |
Attaching a checklist doesn't make anyone complete it. If you want the checklist enforced, turn on Completed Checklists Required for Work Orders under Security › Settings › Equipment, which stops a work order being completed while any task is outstanding. Failed Work Order Checklist Points Require Approval sits beside it and moves a work order with a failed check to Pending Approval instead of Completed.
Assigning the Checklist
Step 1 - Check you have a Service template
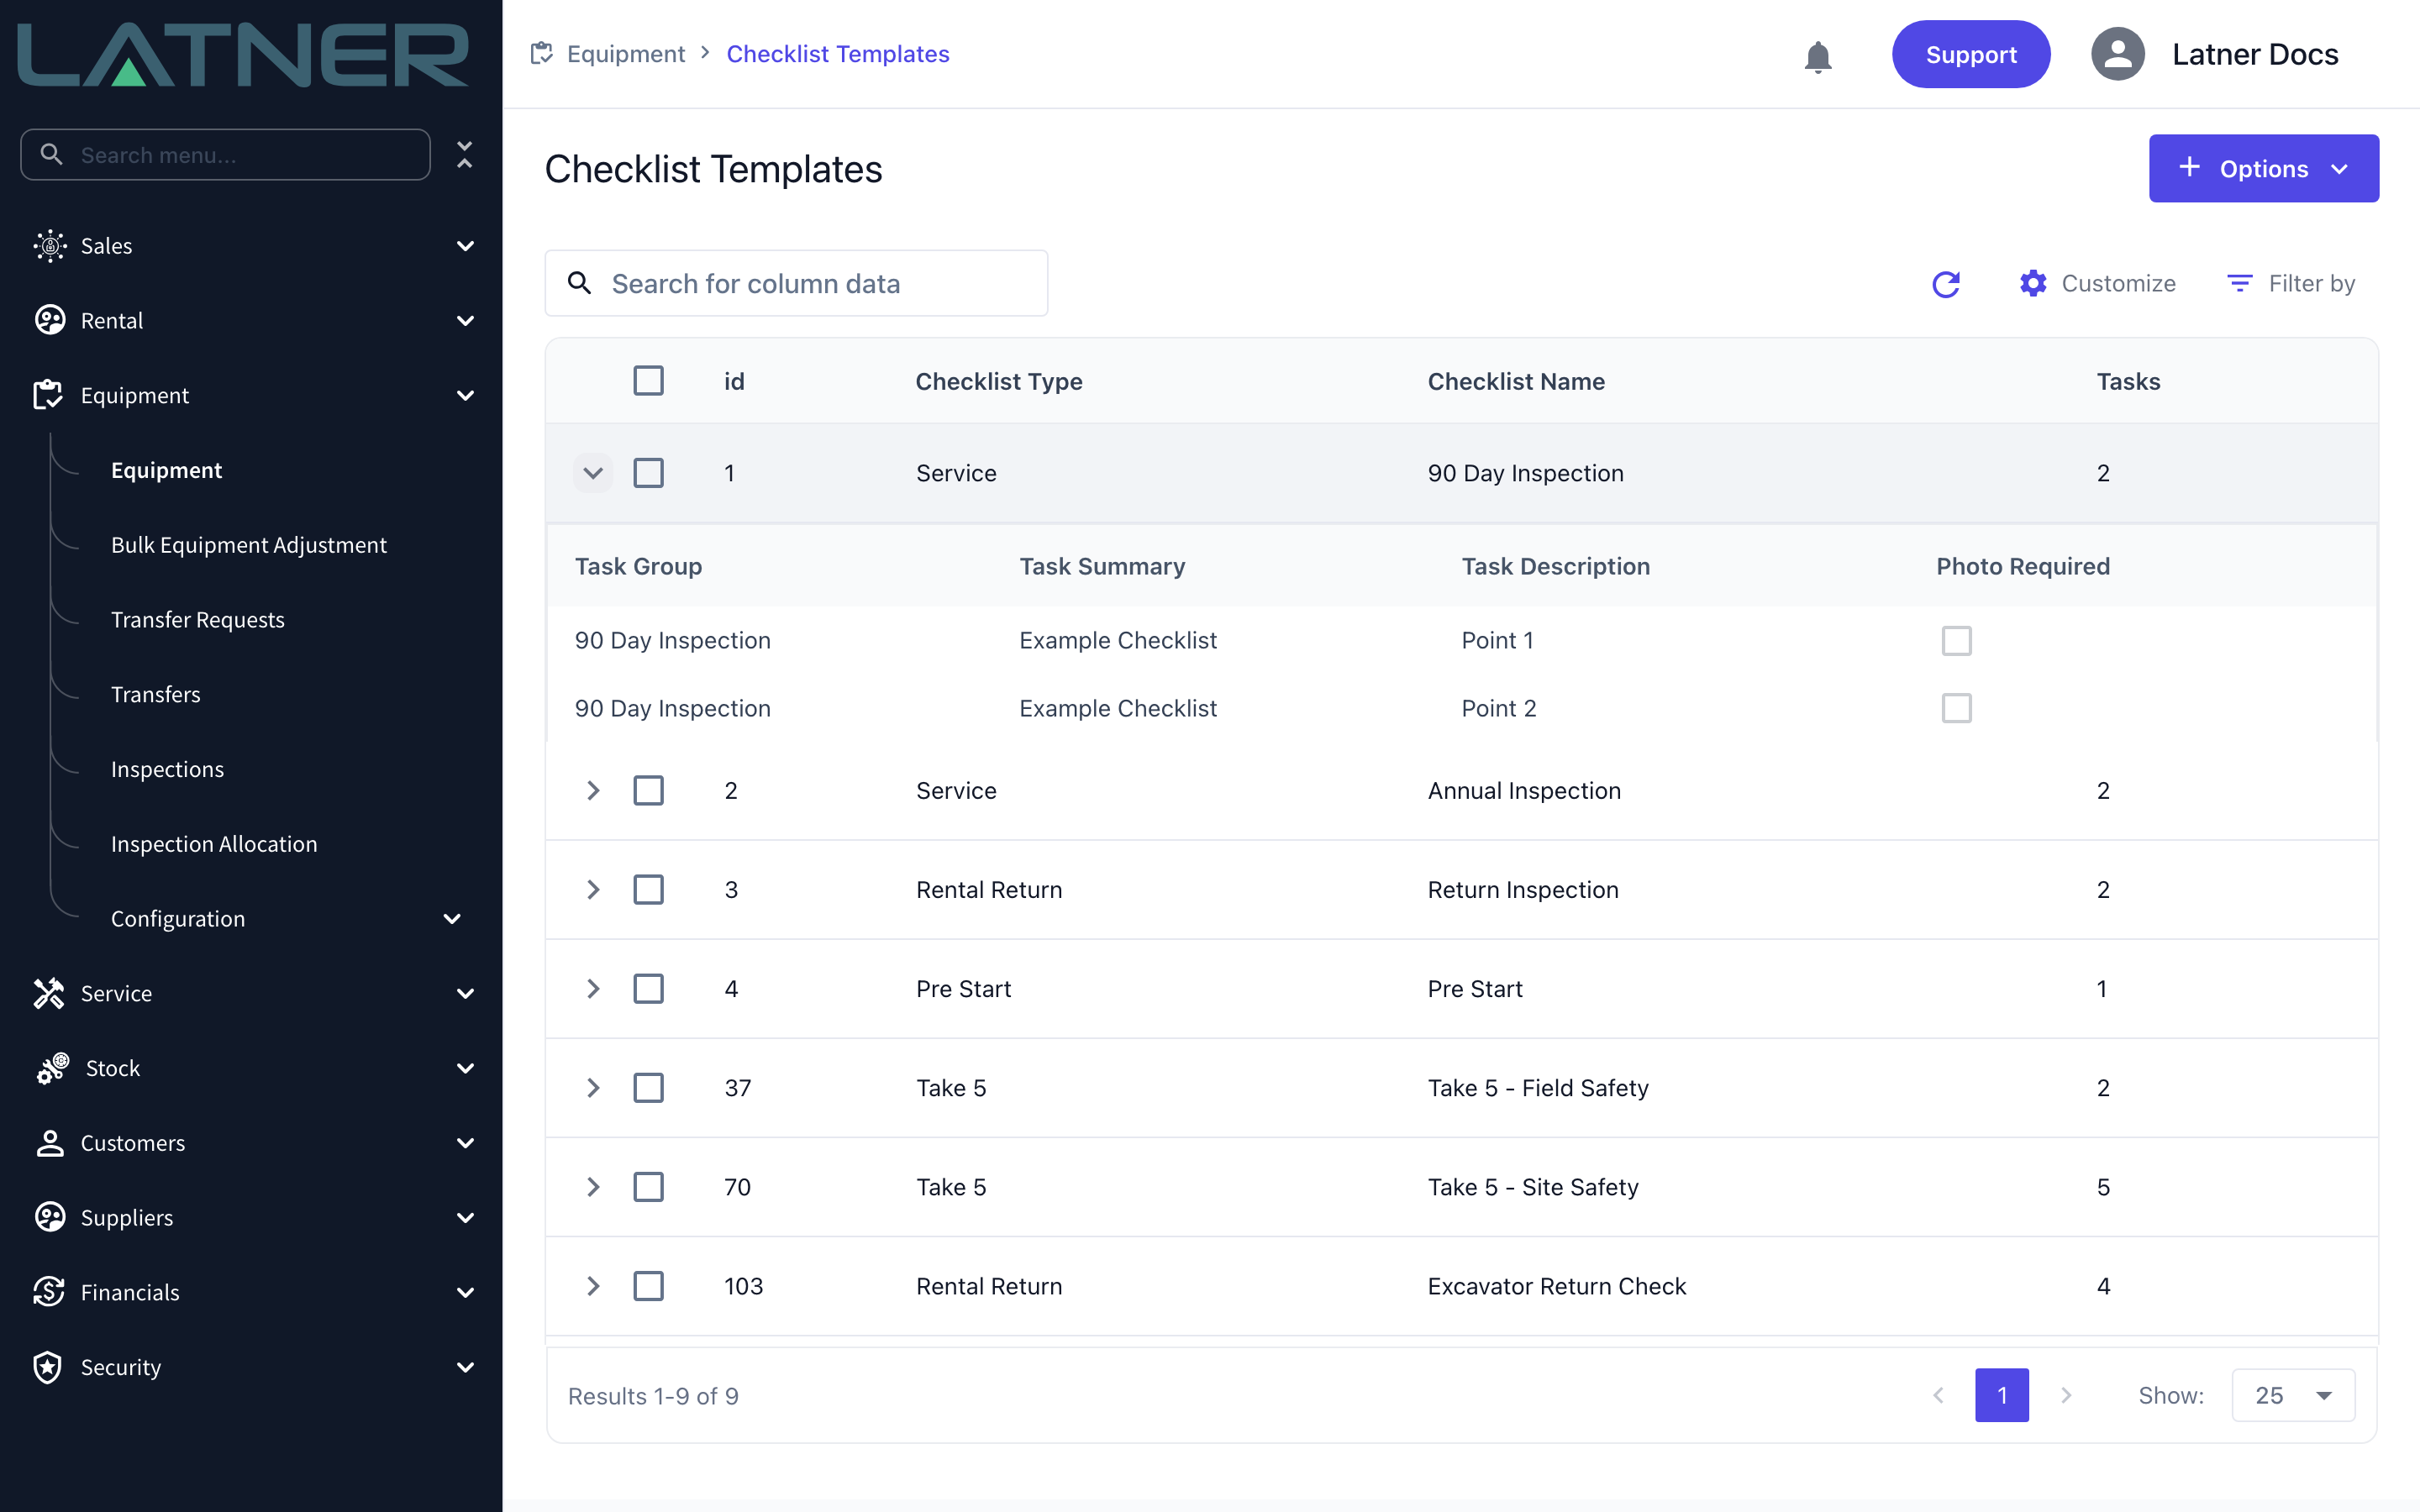
Go to Equipment › Configuration › Checklist Templates and look for a template whose Checklist Type is Service. Expand the row to see its tasks. A template of any other type will not appear in the checklist field on a service schedule.
If you'd rather not leave the schedule form, skip this step. Step 5 shows how to build a template while you create the schedule.
Step 2 - Open the level you want to cover
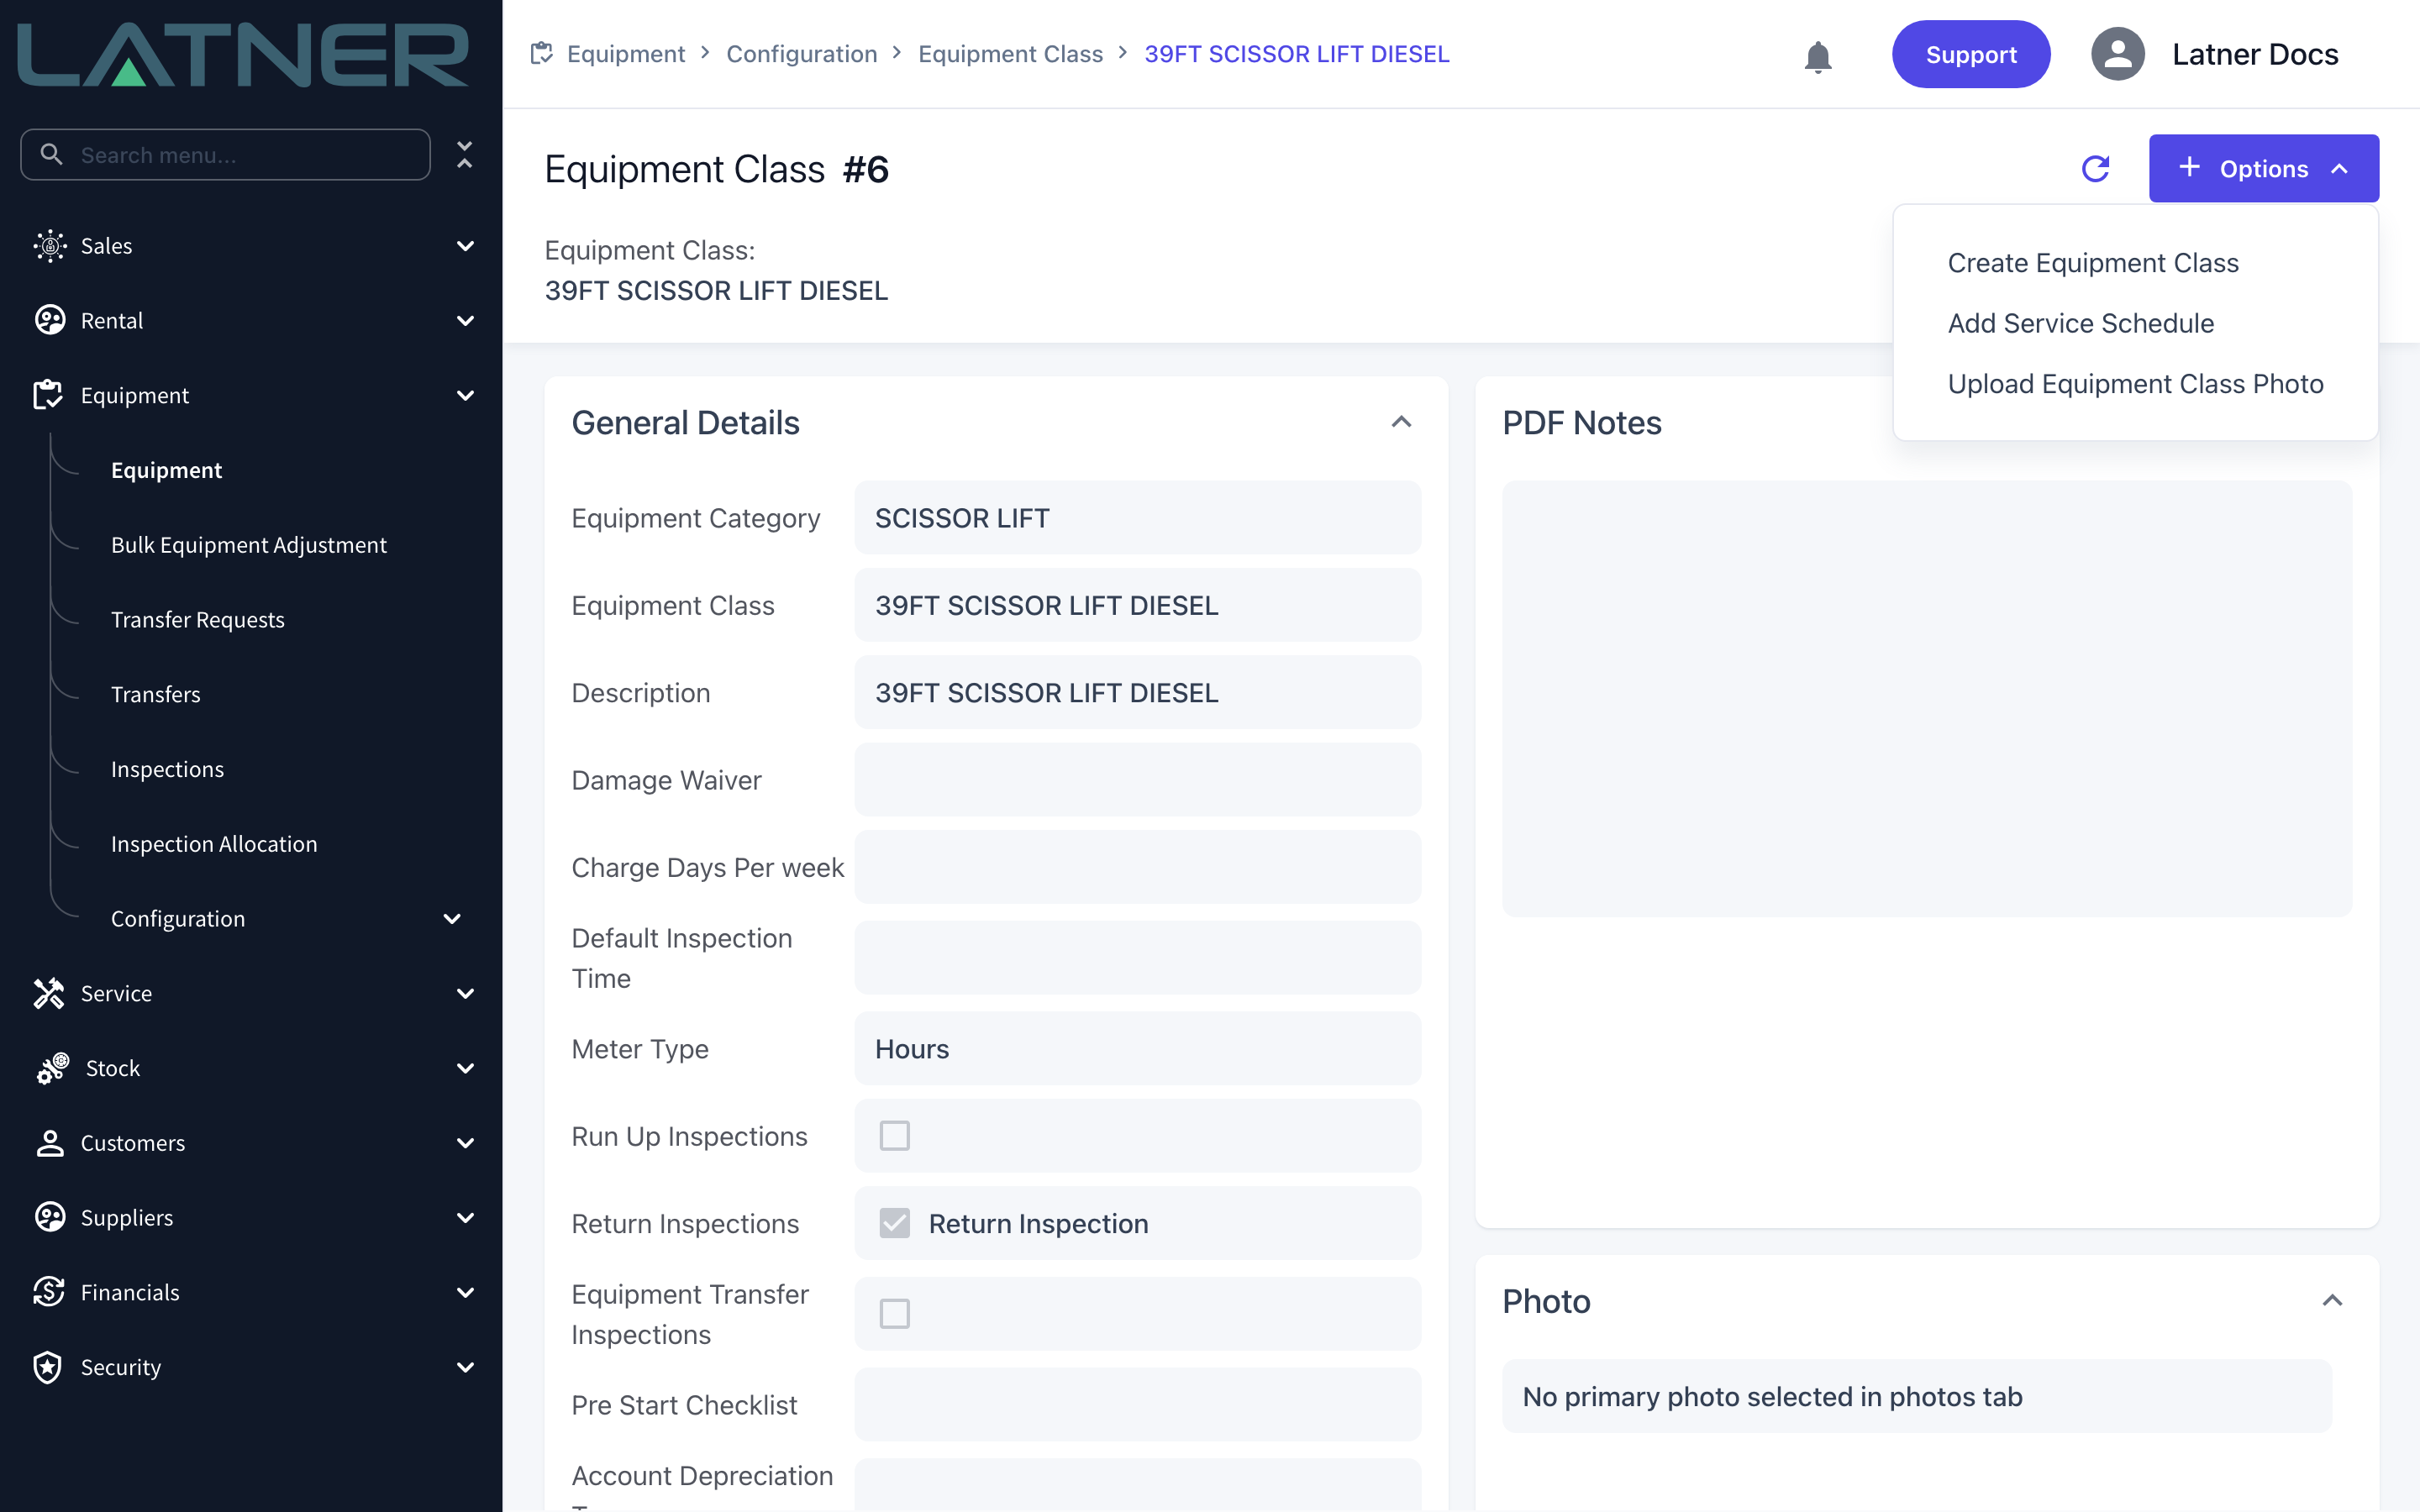
Start at the class, because that covers the most machines for the least work. Go to Equipment › Configuration › Classes, open the class, then choose Options › Add Service Schedule.
The same option sits on the Models screen and on an individual Equipment record. Which screen you launch it from is the only thing that decides the level, so there is nothing to choose on the form itself.
Step 3 - Fill in the schedule and attach the checklist
The Class field at the top is filled in for you and can't be changed. Complete the rest:
-
Name - required. This becomes the description on every work order the schedule raises, so name it the way your mechanics talk about it ("90 Day Inspection", "500 Hour Service").
-
Schedule Start Date - required, and defaults to today. The first service is due this date plus the recurrence.
-
Service Schedule Group - optional. Schedules in the same group supersede each other: complete the longer-interval one and the shorter one is treated as covered and reset. Leave a schedule out of the group, or in a group of its own, if it must never be skipped.
-
Hours / Meter Recurring and Days Recurring - fill in at least one. You can set both, and the service falls due on whichever arrives first.
-
One Off Schedule - tick this if the service should happen once and not repeat.
-
Work Order Reason and Work Order Category - both required. Picking a category fills in its reason, and changing the reason re-filters the categories.
-
Checklist (optional) - the checklist template to attach. Only Service type templates are listed.
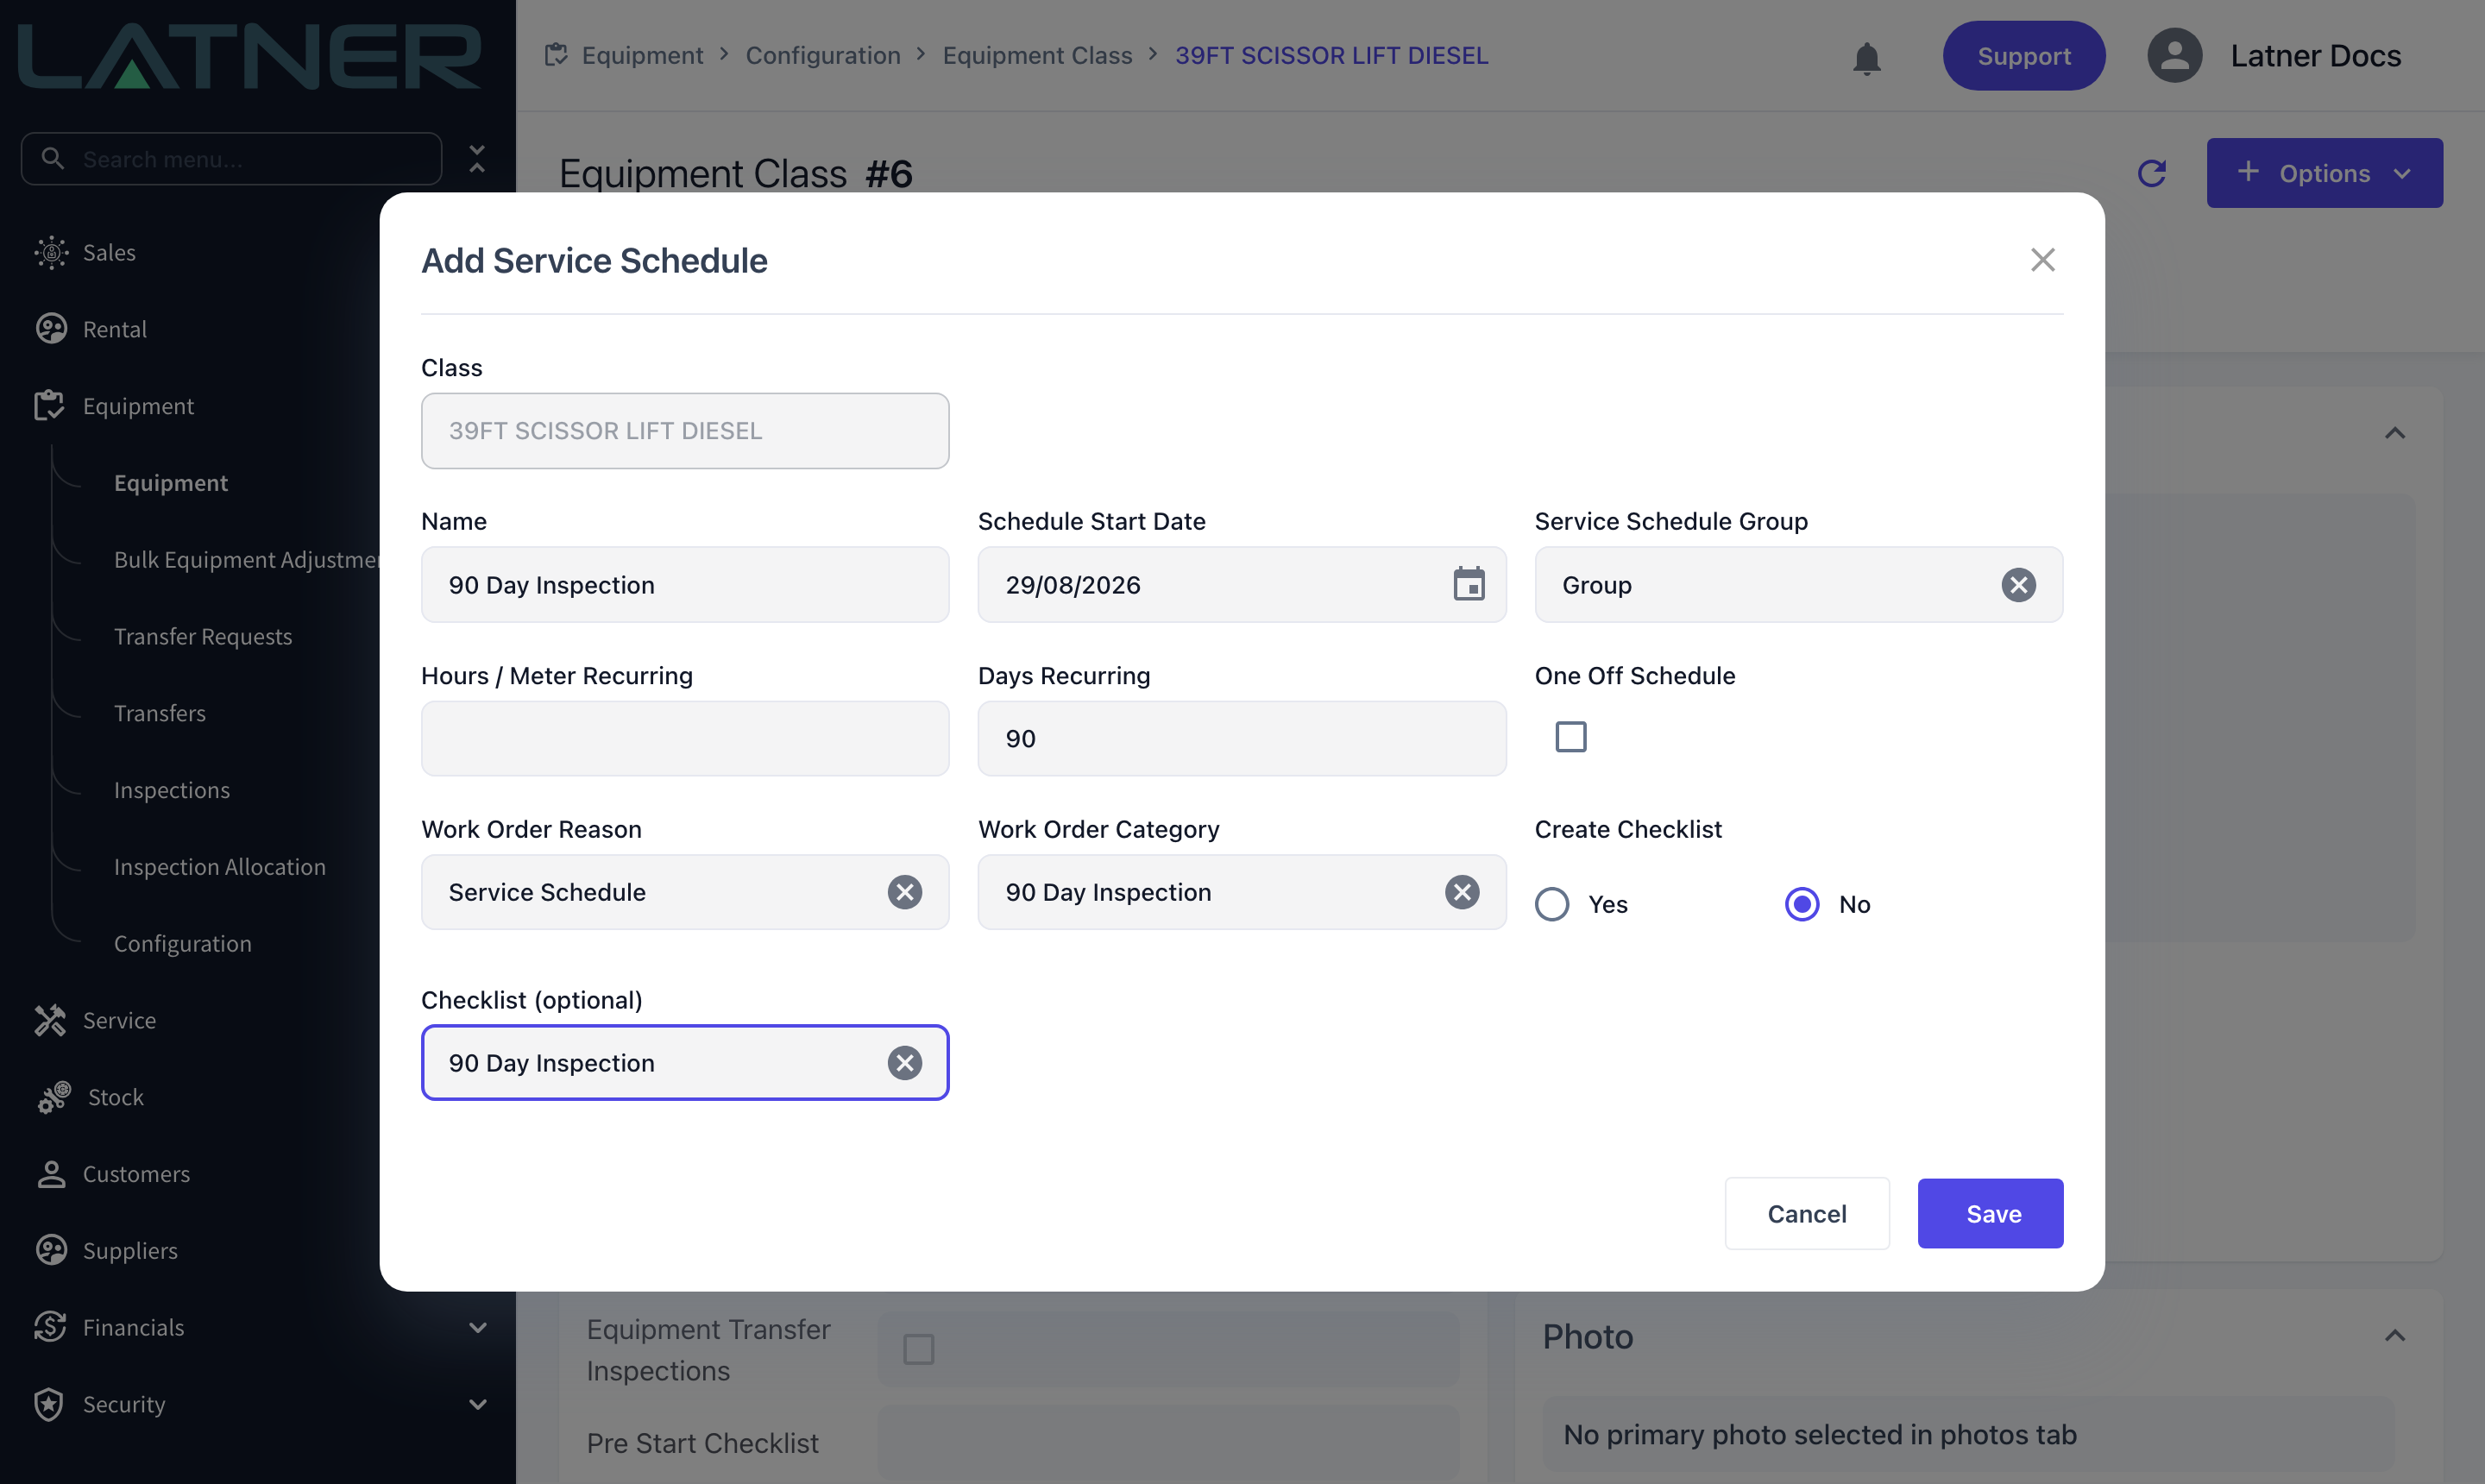
Leave Create Checklist on No when you are picking a template you already have. Click Save.
Step 4 - Confirm it on the Service Schedules tab
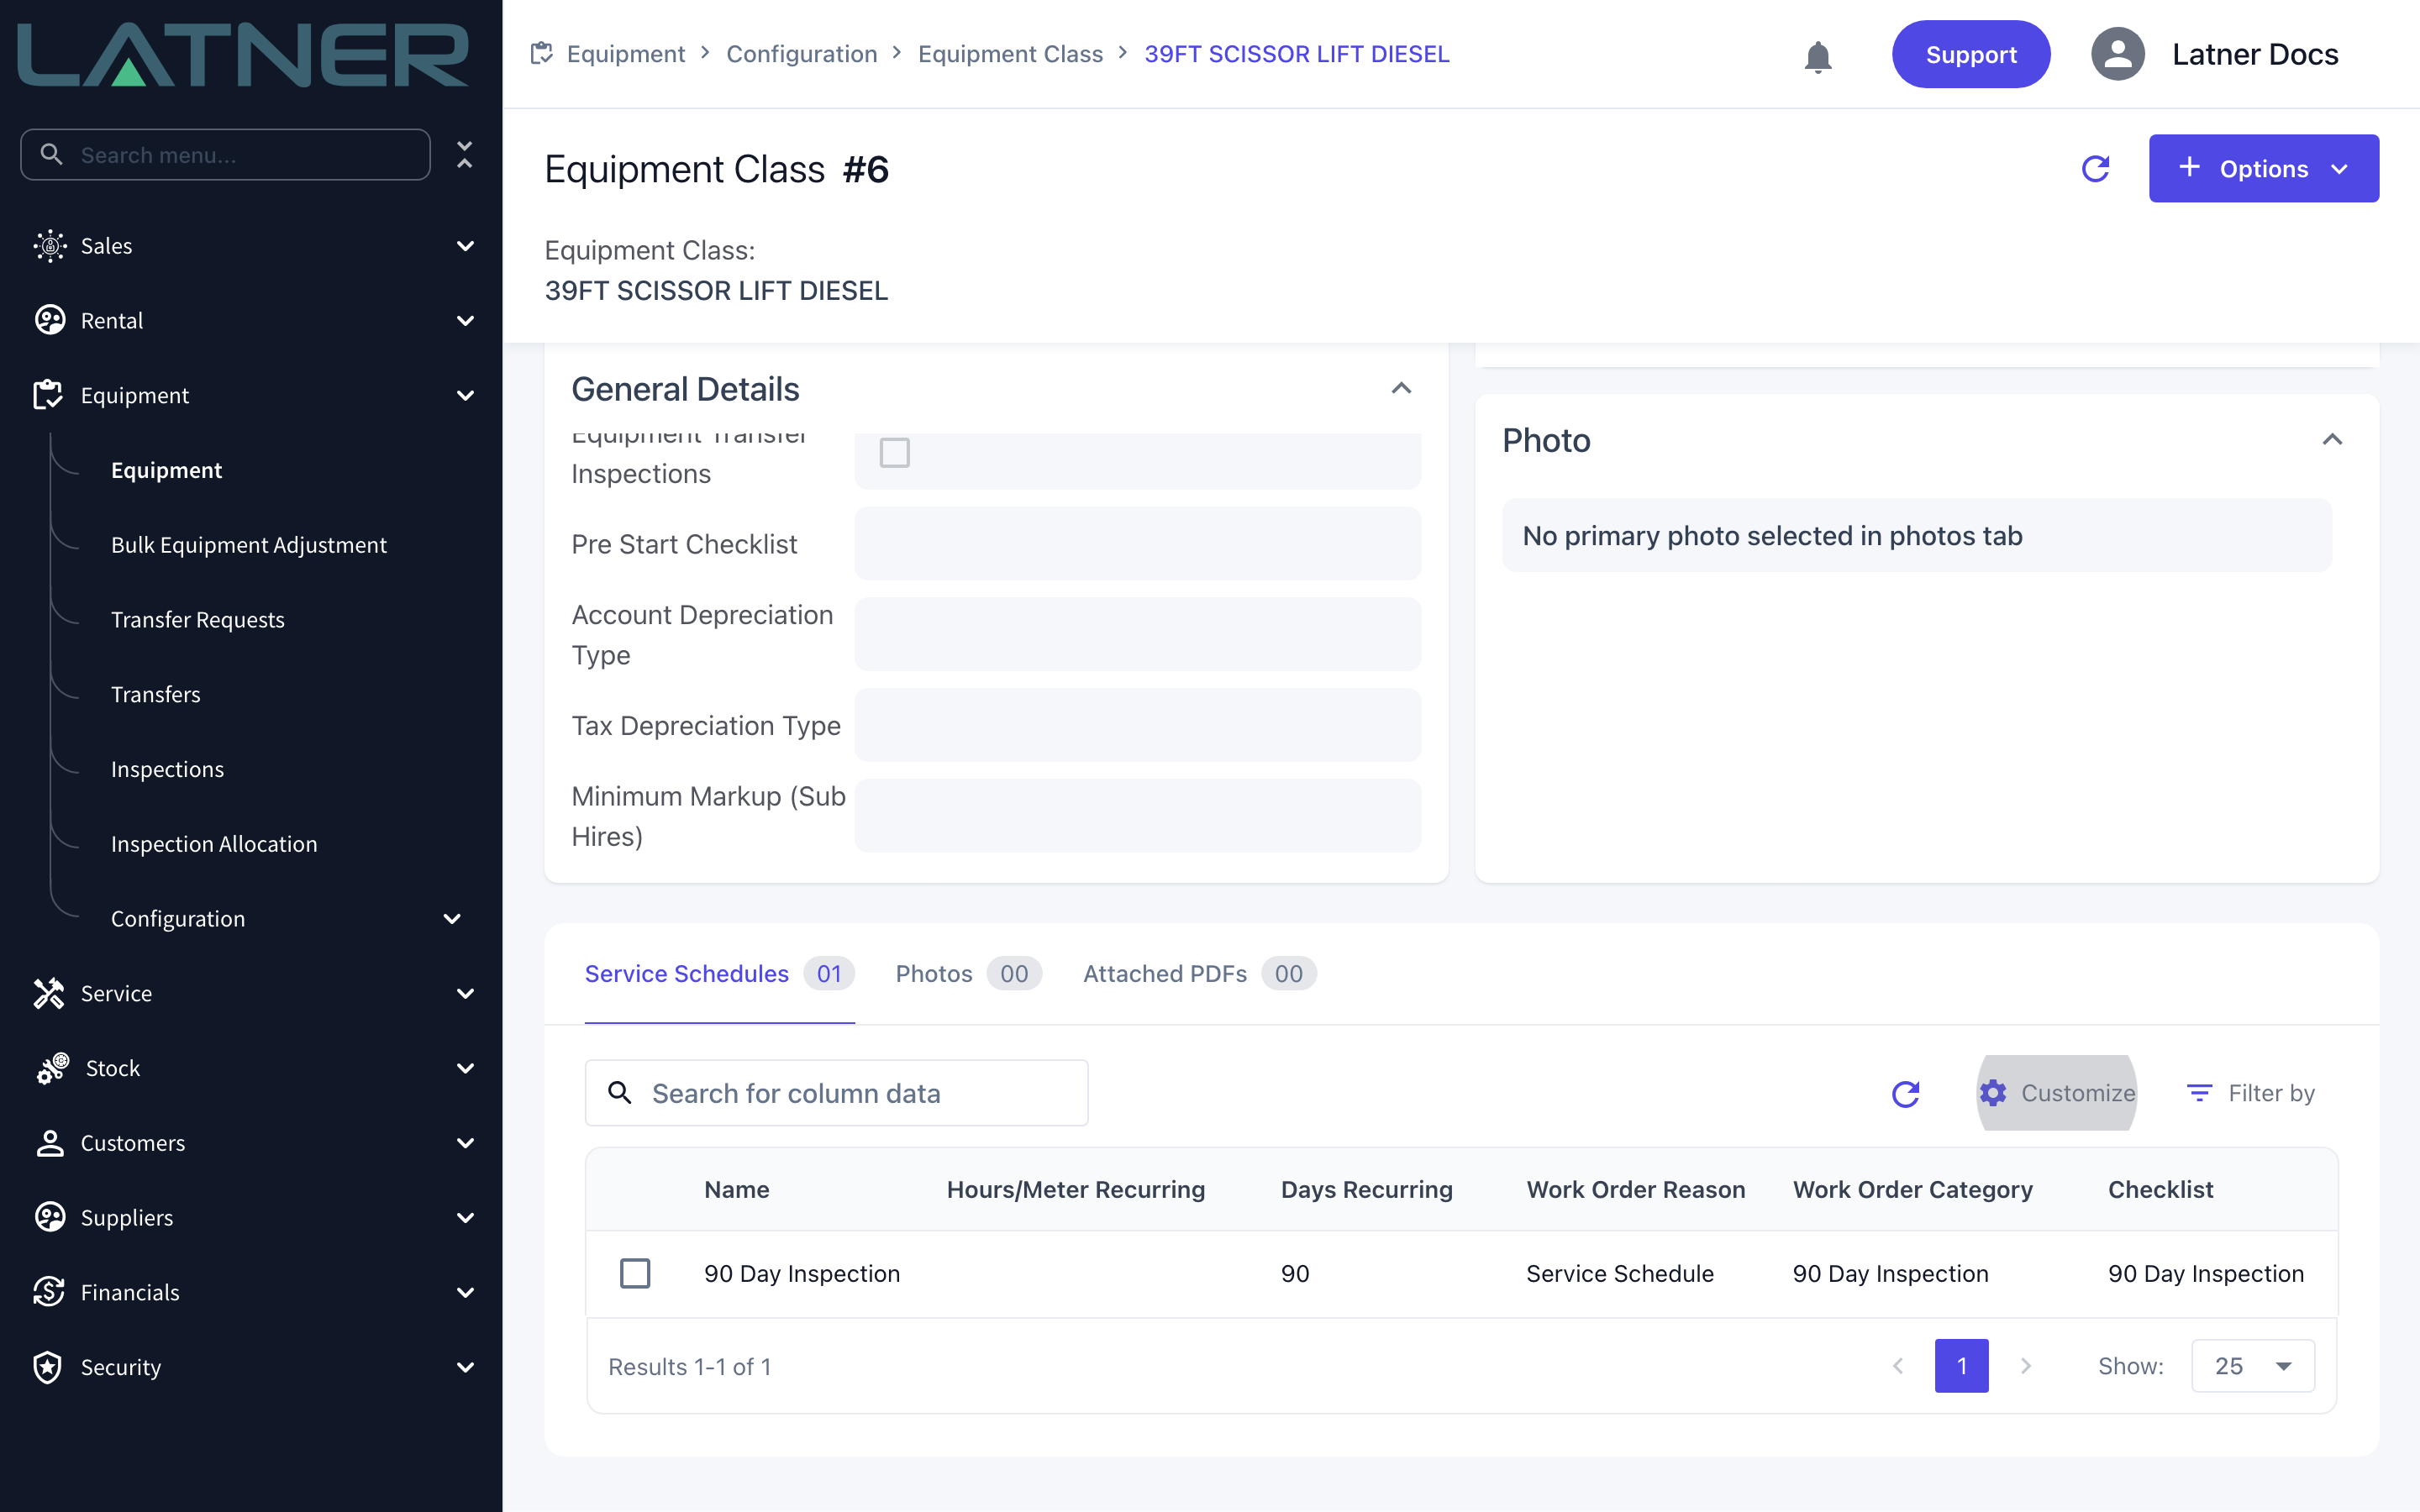
The schedule appears on the Service Schedules tab of the class, with the template you chose in the Checklist column. This tab lists class level schedules only, so it stays readable no matter how many models sit under the class.
Step 5 - Narrow it down at model level
Where one model needs checks the rest of the class doesn't, open Equipment › Configuration › Models, open the model and choose Options › Add Service Schedule. Class and Model are both filled in and locked.
This is a good place to build a template from scratch. Set Create Checklist to Yes and the form swaps the checklist picker for a small builder:
-
Checklist Type - fixed to Service and can't be changed.
-
Checklist Name - must be unique among Service templates.
-
One row per task, each needing a Group, a Task Summary and a Task Description. Use Add Task for more rows and the arrows to reorder them.
The template it creates is a normal checklist template. It shows up on the Checklist Templates screen and can be reused on other schedules.
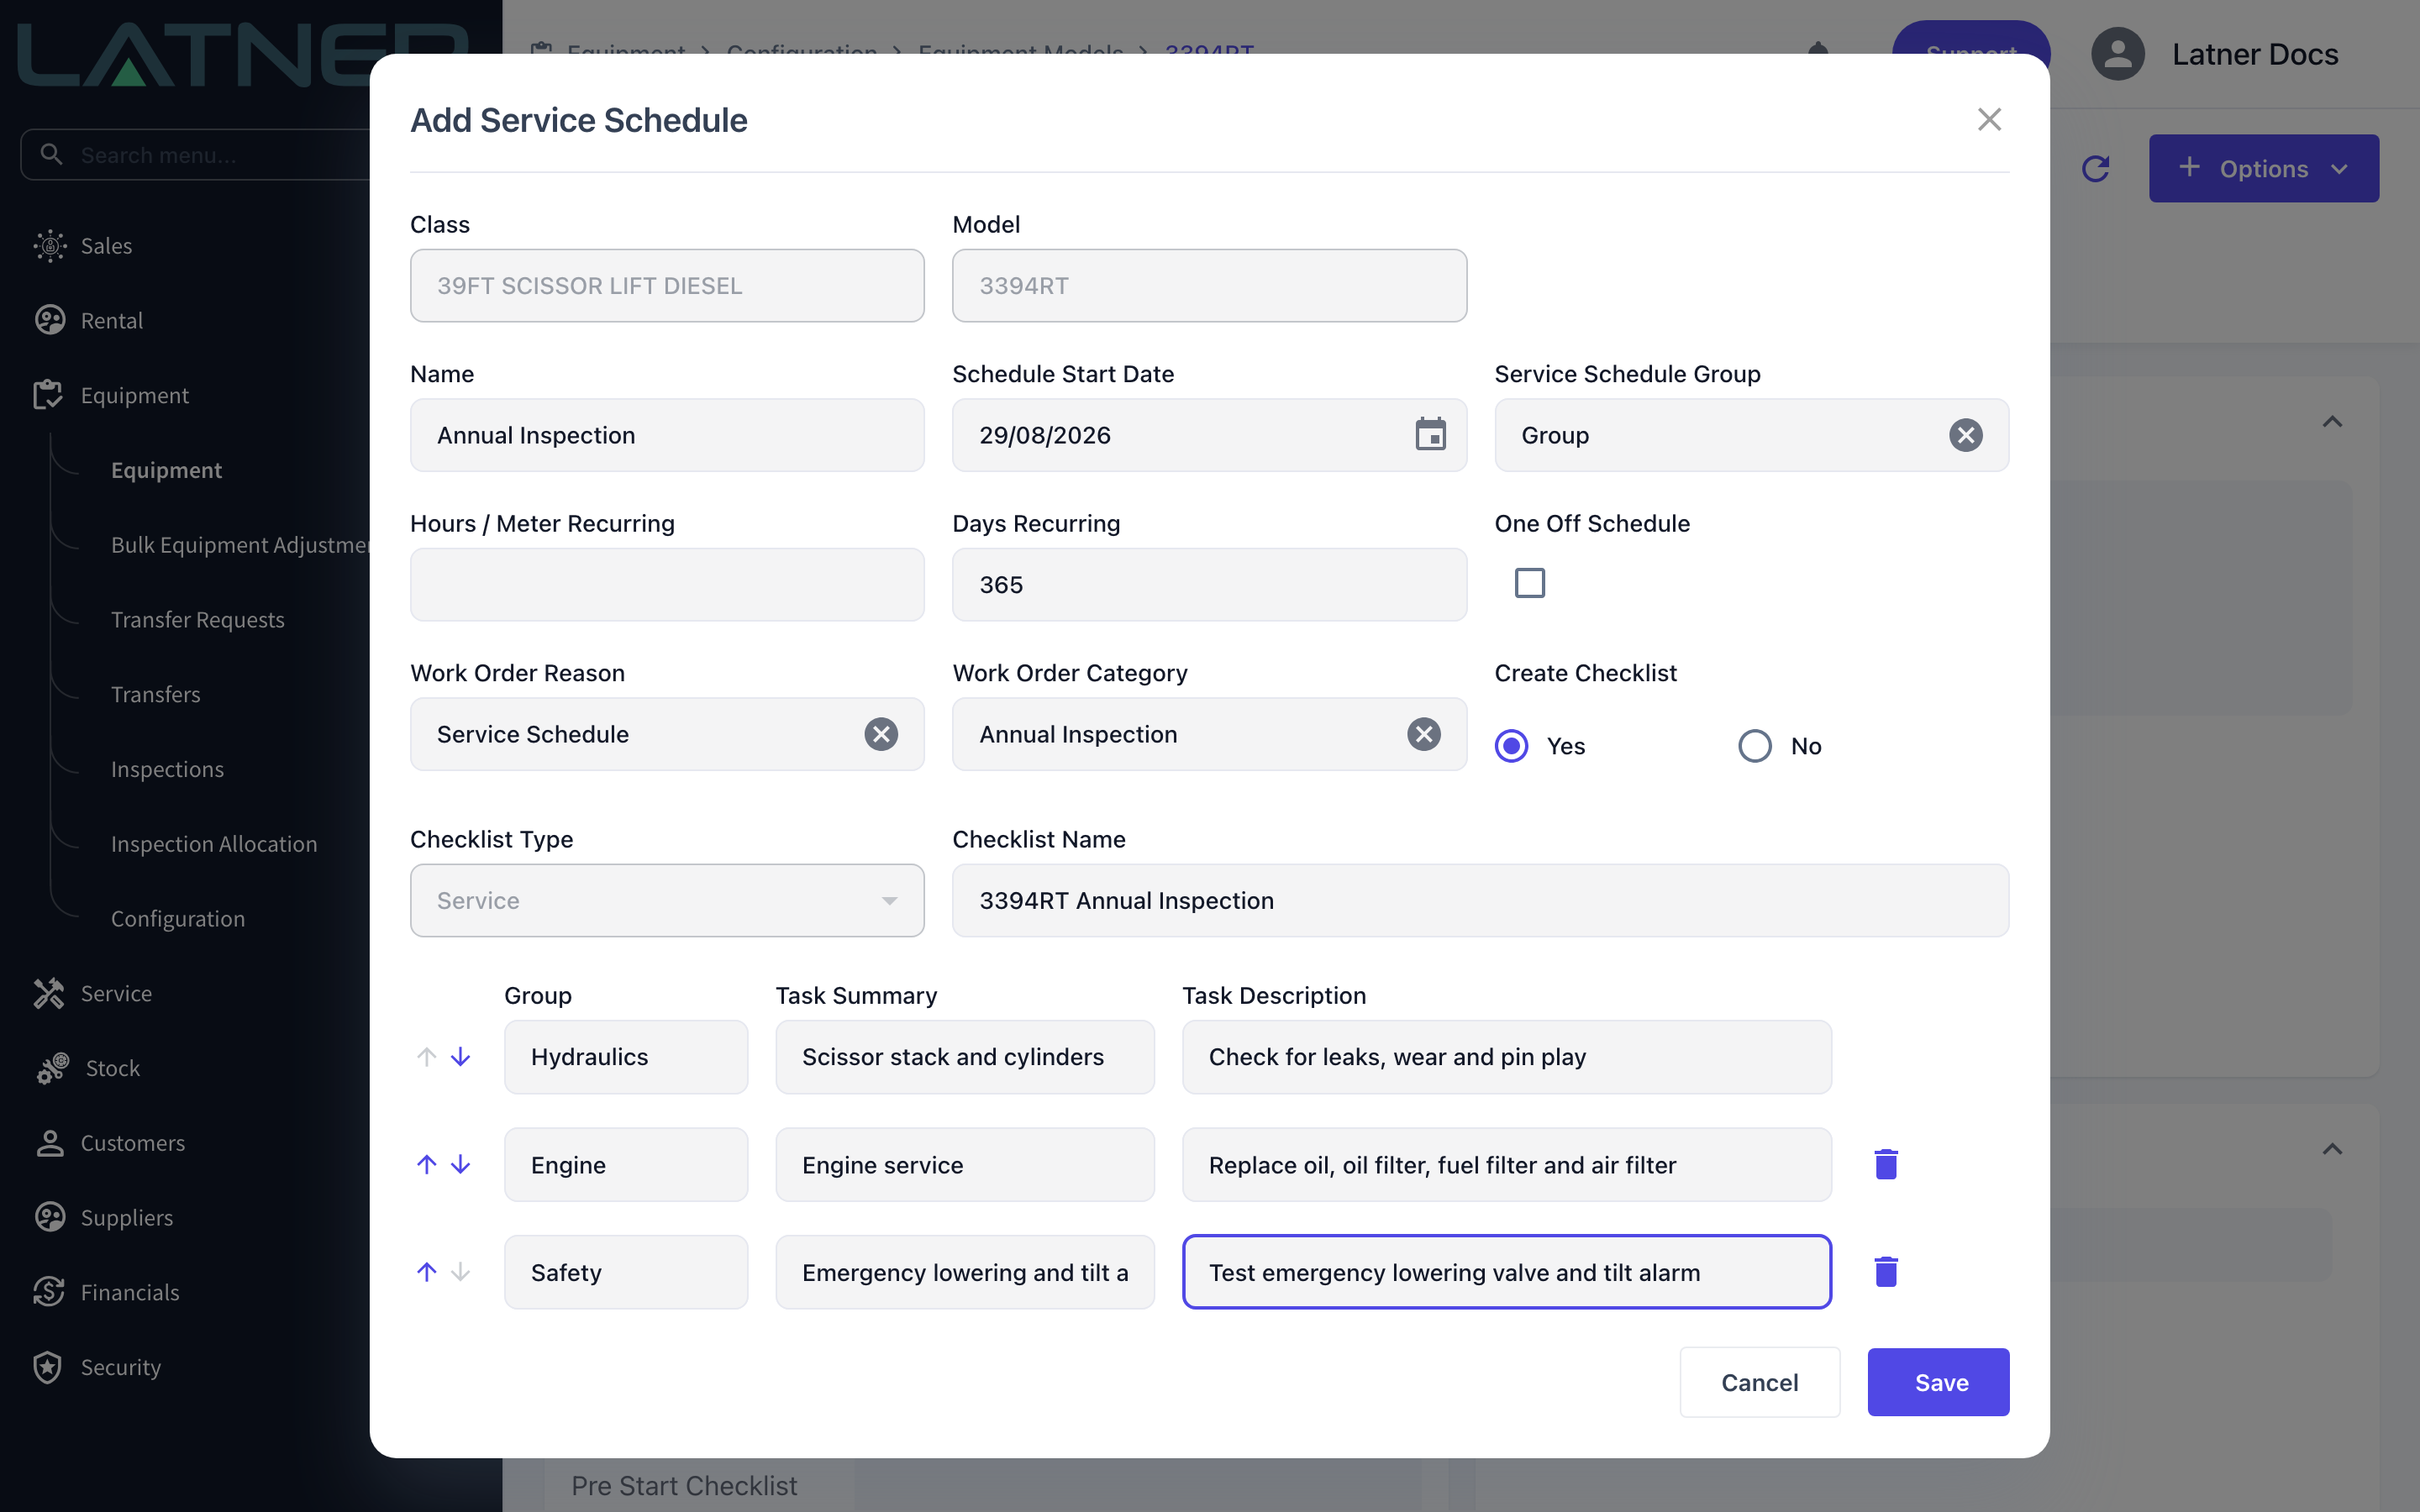
A model schedule is added to the machine, it does not replace the class one. If the model's schedule is meant to be instead of the class schedule rather than as well as it, you will need to disable the class schedule on each machine (Step 7) or remove it from the class.
Step 6 - Add one for a single machine
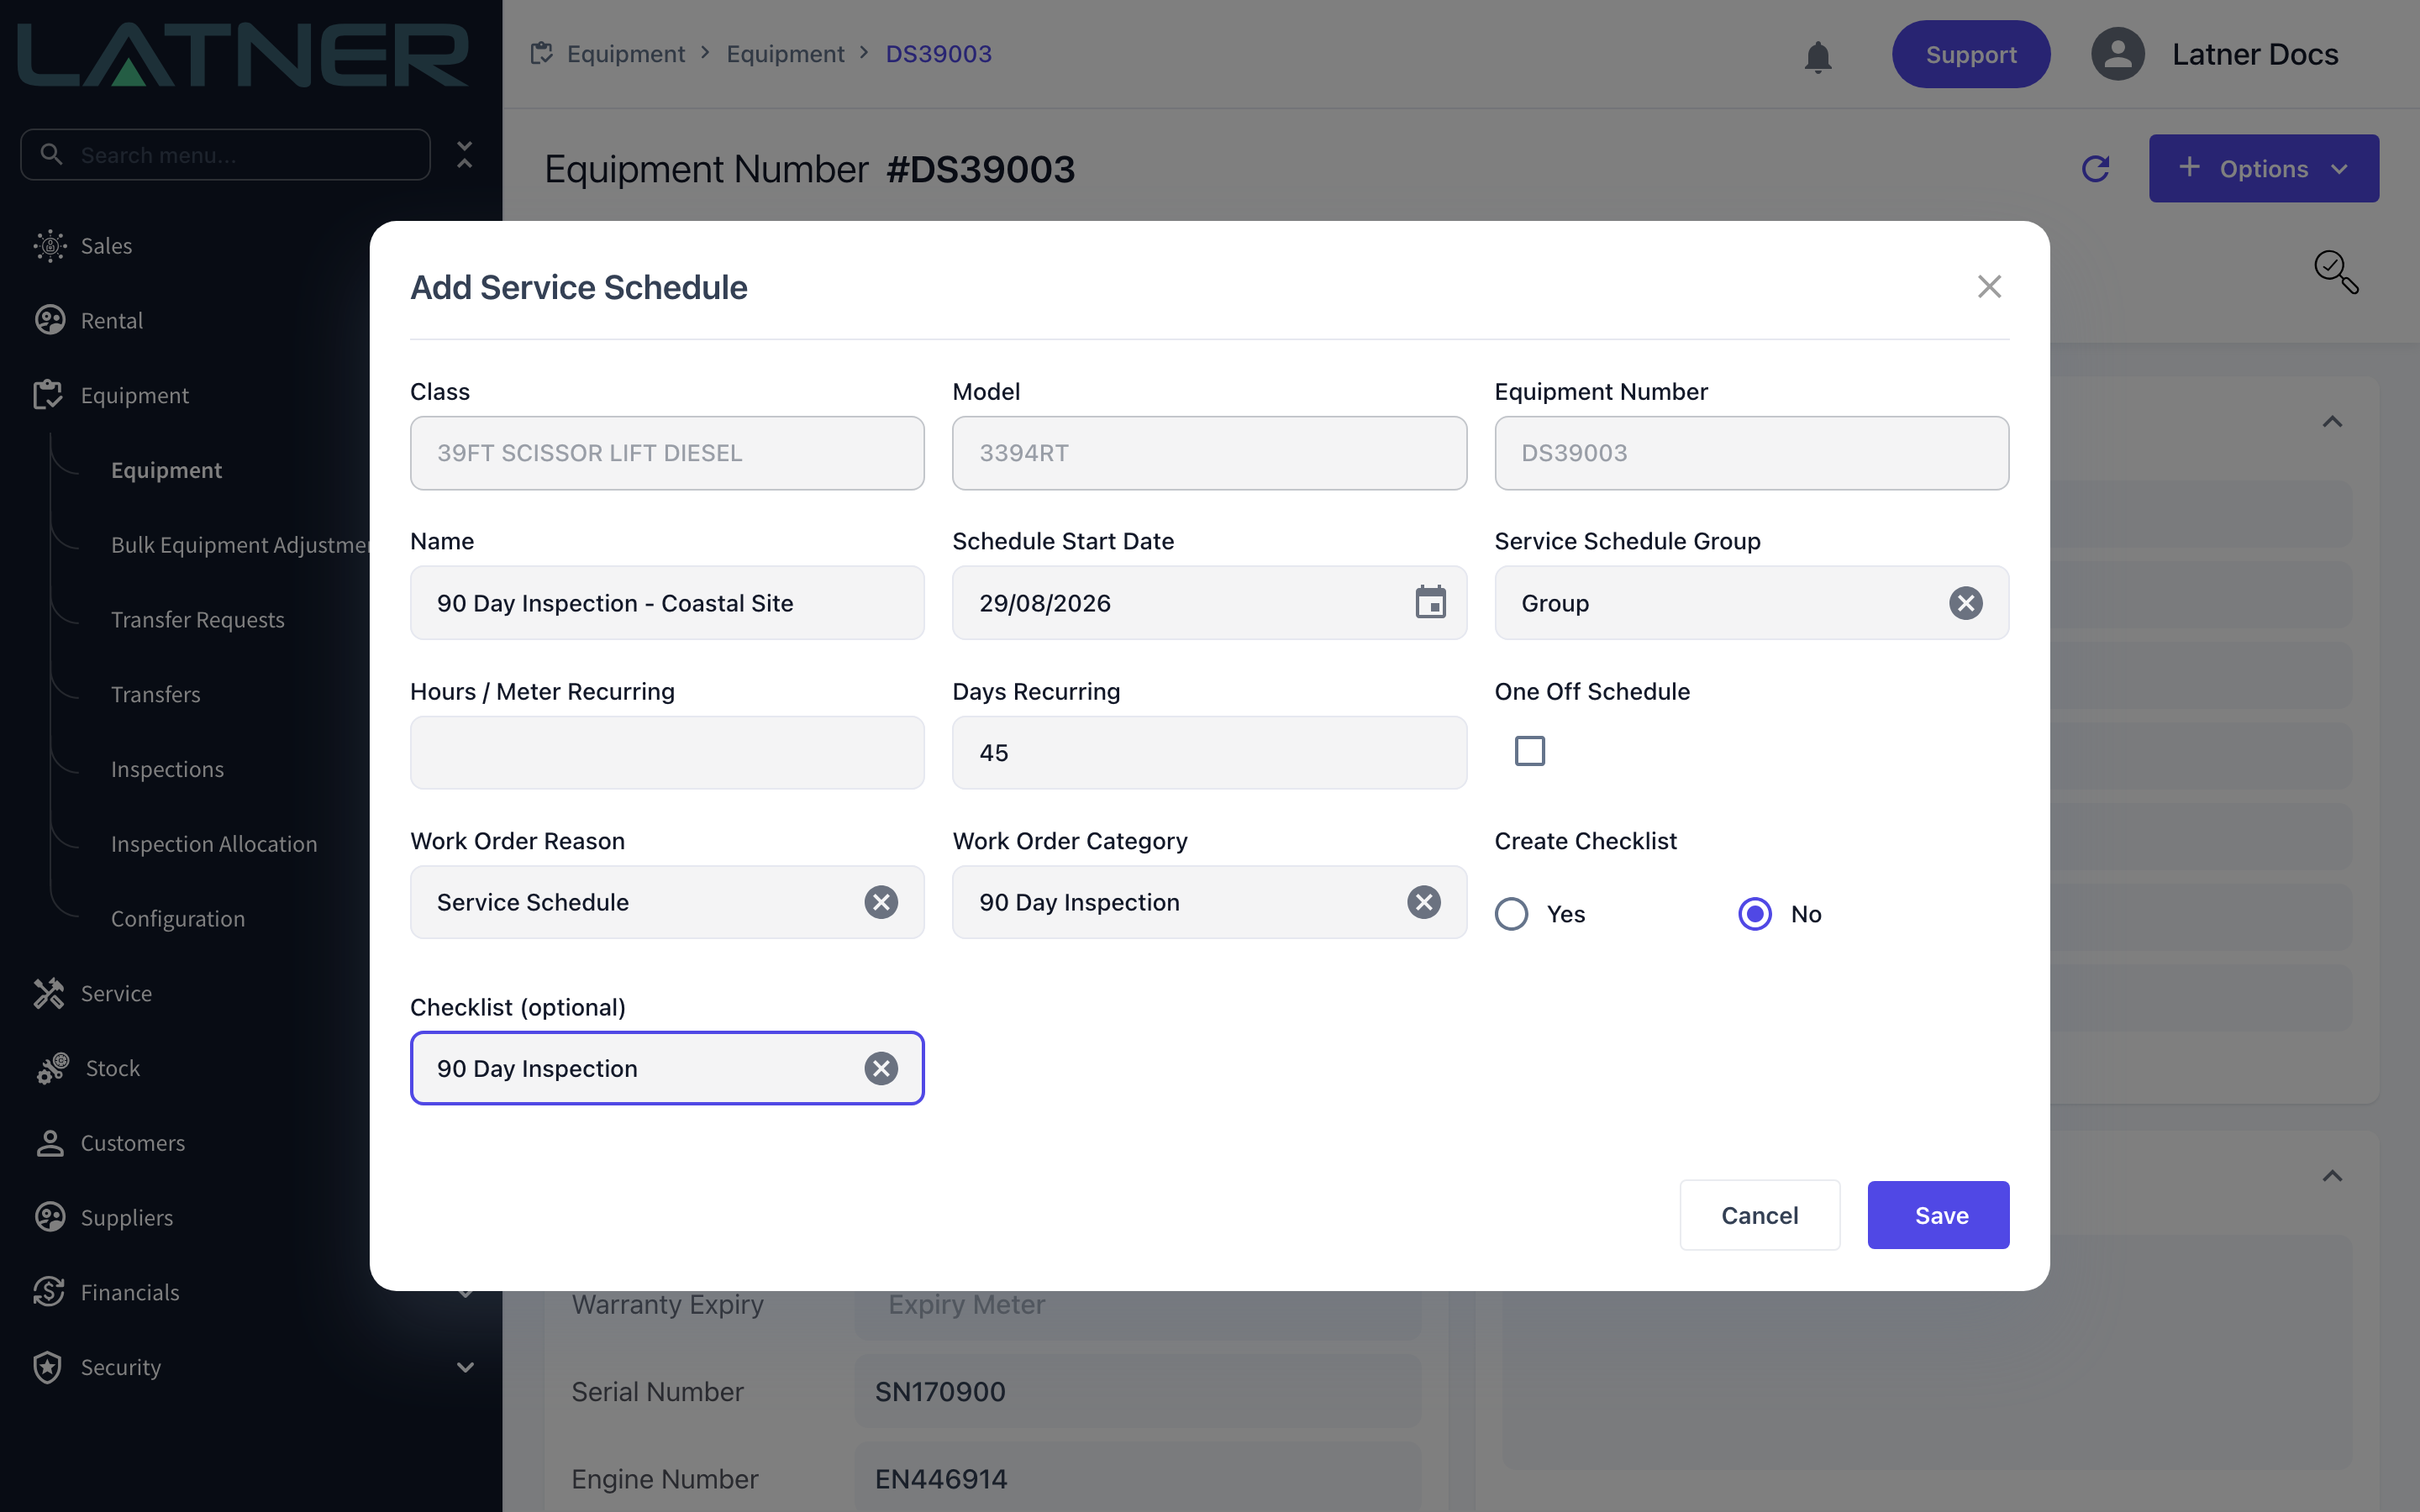
For a machine that is genuinely the exception - working a coastal site, doing double the hours, contracted to a customer with its own requirements - open the equipment record and choose Options › Add Service Schedule. Class, Model and Equipment Number are all filled in and locked.
The form is otherwise identical, including the choice between picking a template and building one.
Step 7 - Check what the machine ends up with
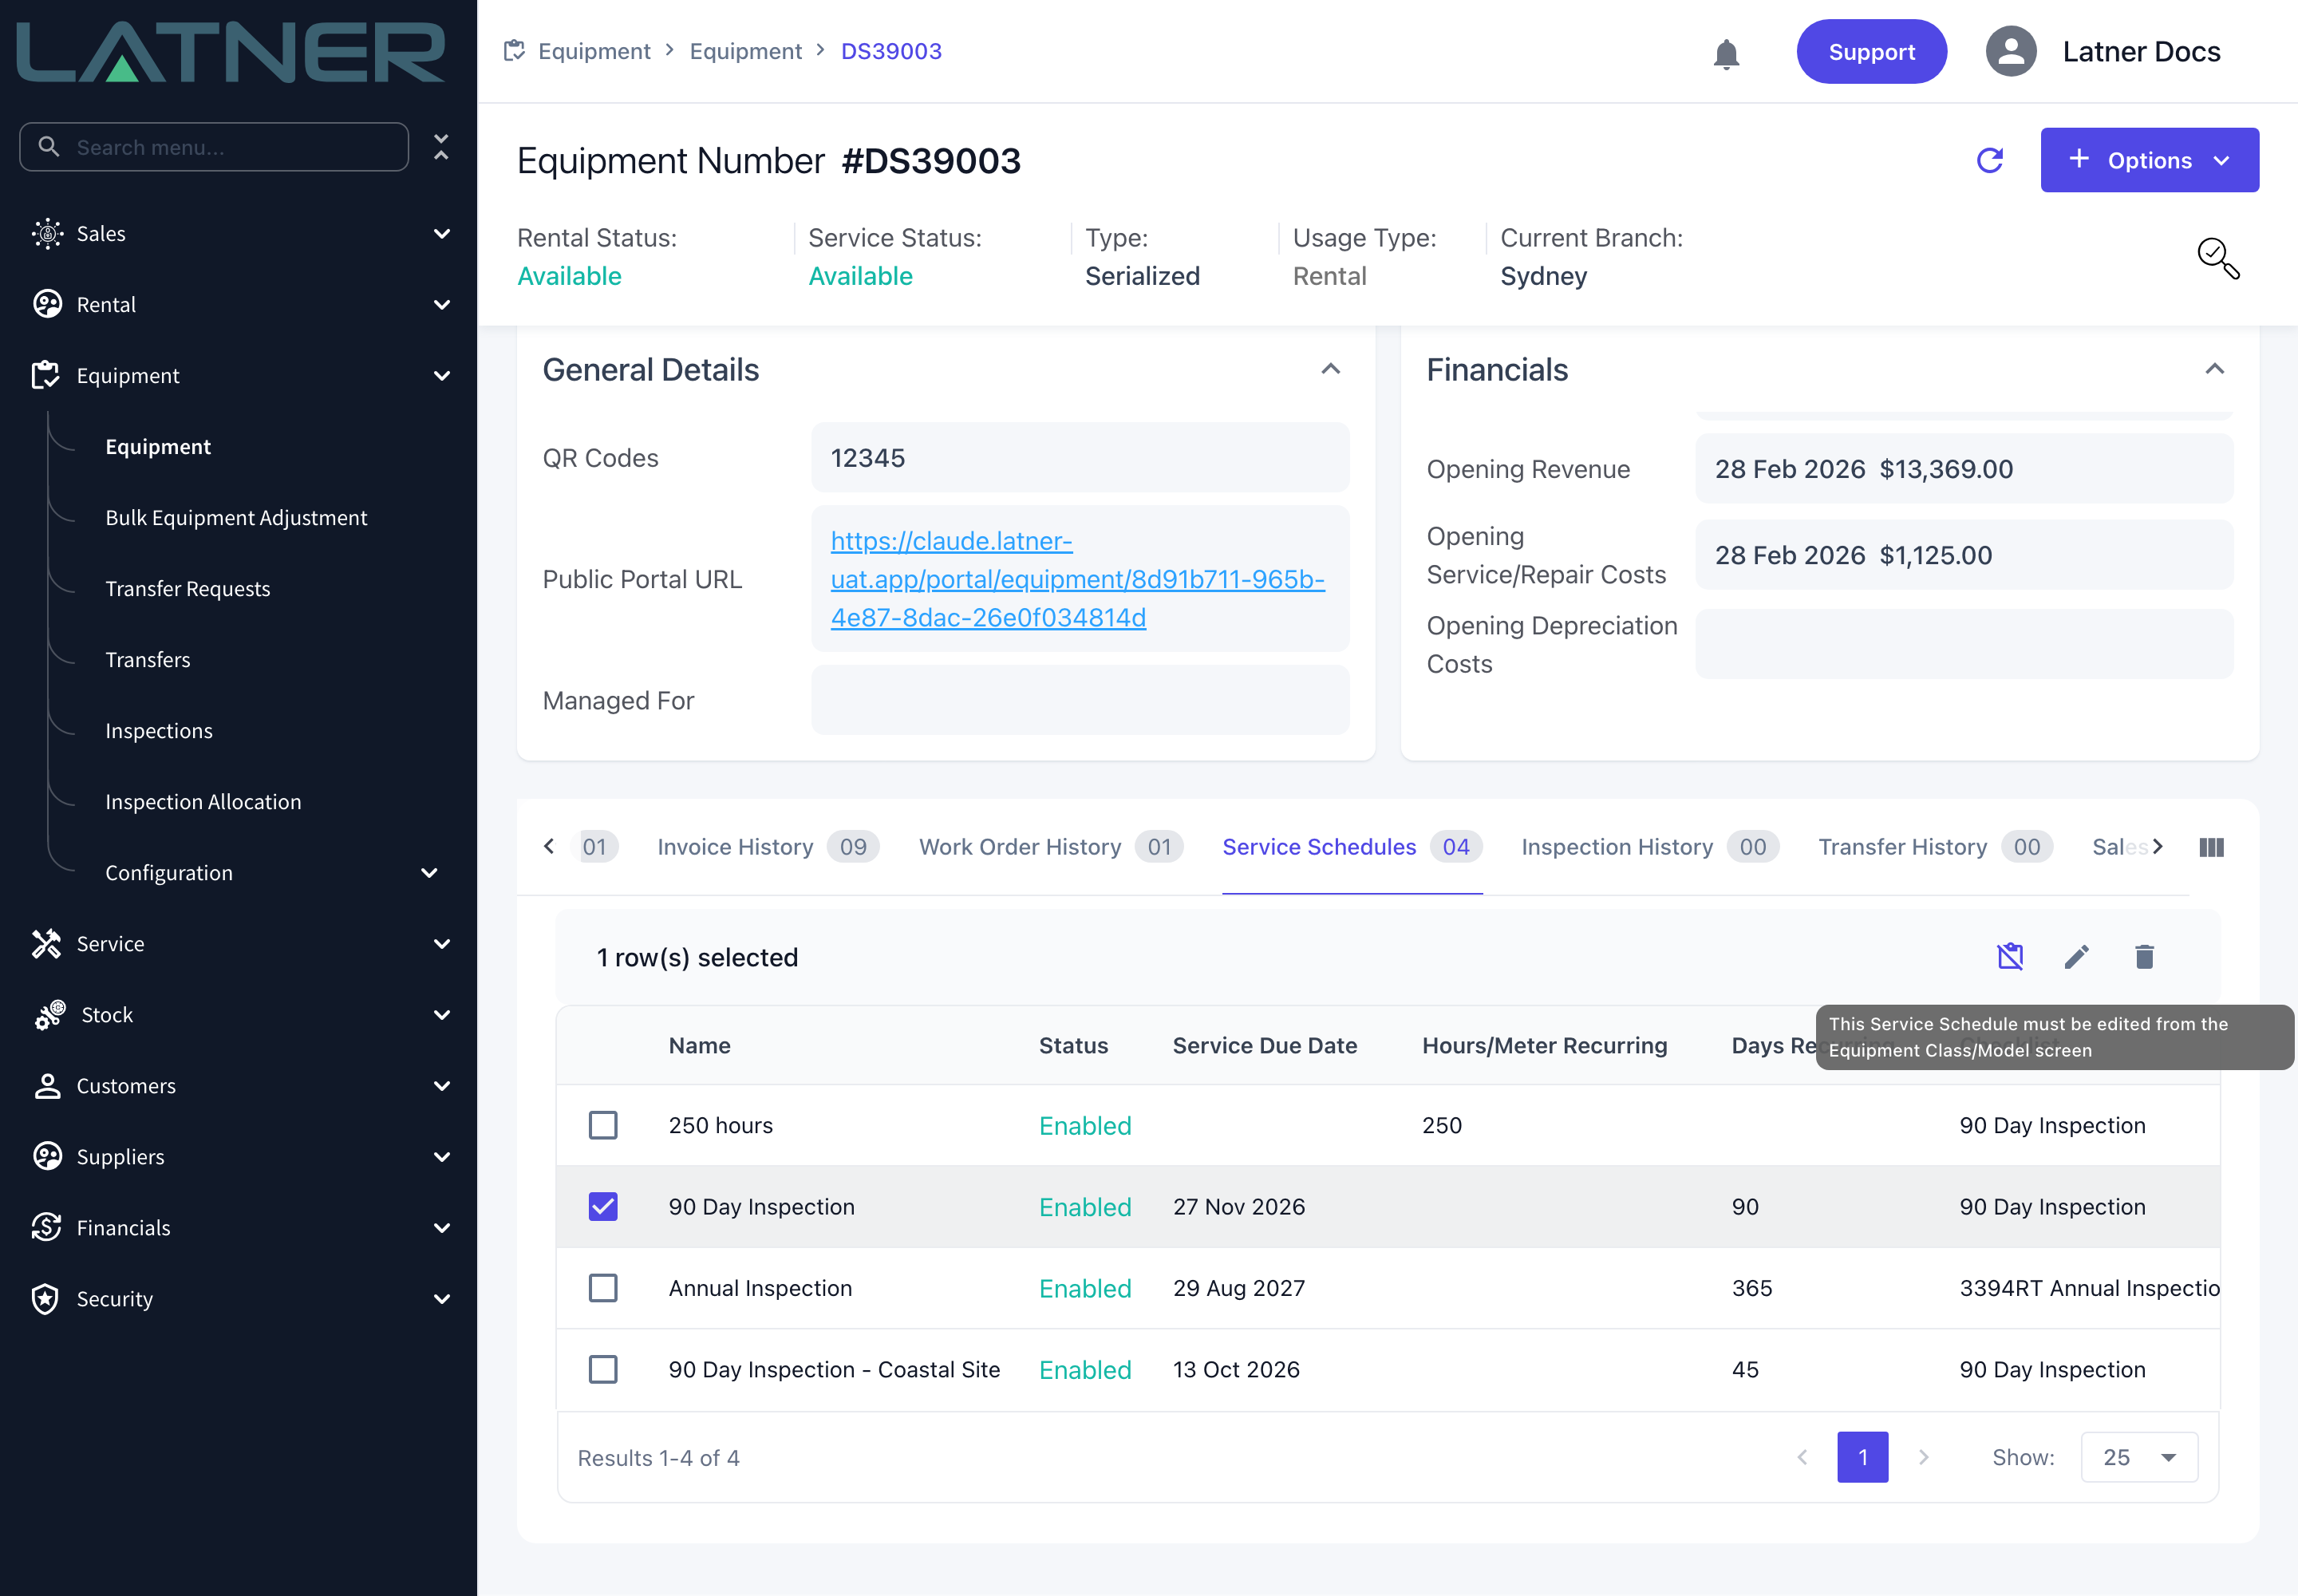
Open the Service Schedules tab on the equipment record. Unlike the class and model tabs, this one shows the flattened result of all three levels together, with the Service Due Date or Service Due Meter/Hours for the next occurrence and the Checklist that will be attached when it comes due.
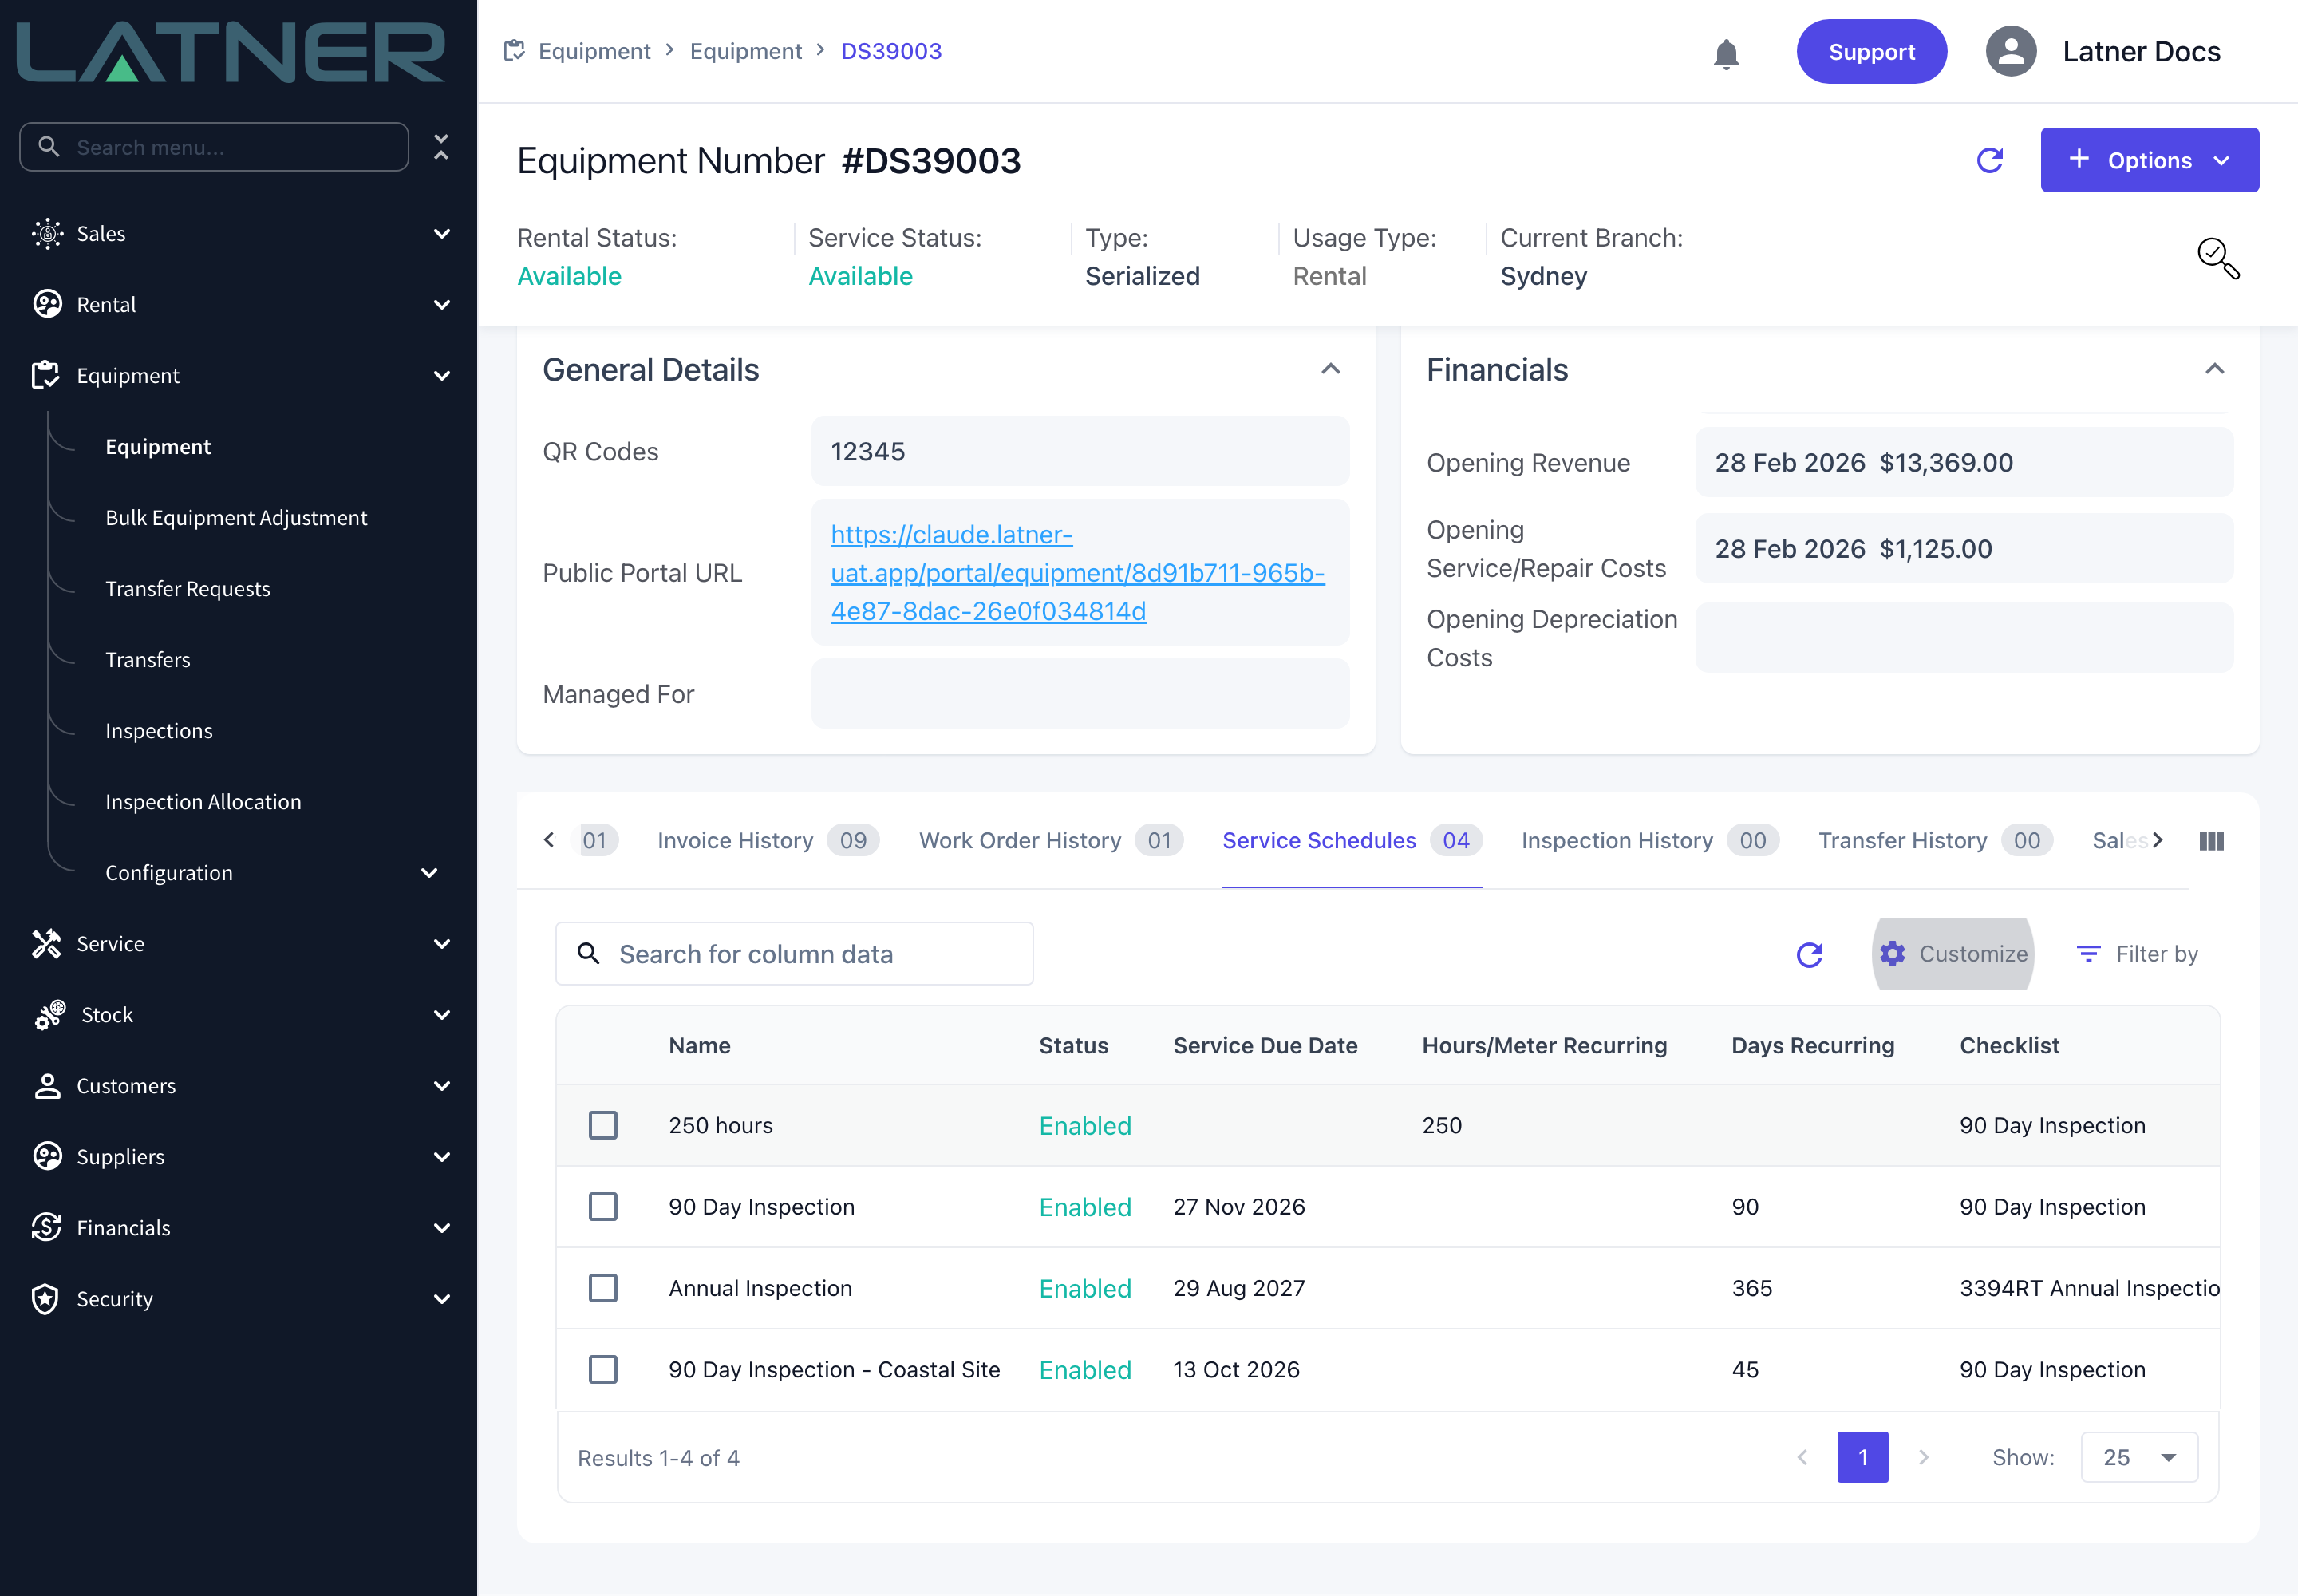
Nothing in this grid says which level a schedule came from. The quickest way to tell is to tick a row: if the edit and delete buttons are greyed out, it's inherited.
After Creation
-
Saving a class or model schedule creates a schedule line straight away on every serialized machine already under it, with the first due date or due meter worked out from the start date and the recurrence. Bulk equipment is skipped.
-
New serialized equipment created later - added by hand, imported or received on a purchase order - picks up its class and model schedules automatically when it is created. The first due date is counted from the day it is created, or from the schedule start date if that is later.
-
Nothing is raised on its own. Services appear on Service › Equipment Due For Service, and you turn them into work orders from there. The checklist is copied onto the work order at that moment.
-
Changing the Checklist (optional) template on a schedule takes effect for every service raised from then on, on every machine the schedule covers. Work orders already raised keep the checklist they were given.
-
Editing the tasks on a template creates a new version of it. New work orders get the new tasks; checklists already in progress keep the version they started with.
-
Schedule Start Date, Hours / Meter Recurring and Days Recurring are locked once the schedule is saved. The Name, group, reason, category and checklist stay editable.
-
An inherited schedule can be switched off for one machine with Disable Schedule on the equipment's Service Schedules tab. It stays on the class or model for everything else, and Enable Schedule puts it back.
Removing a Schedule from a Class
Taking a schedule off a class is how you stop it for every machine of that type in one go, for example when a service is no longer required or is being replaced by a different interval.
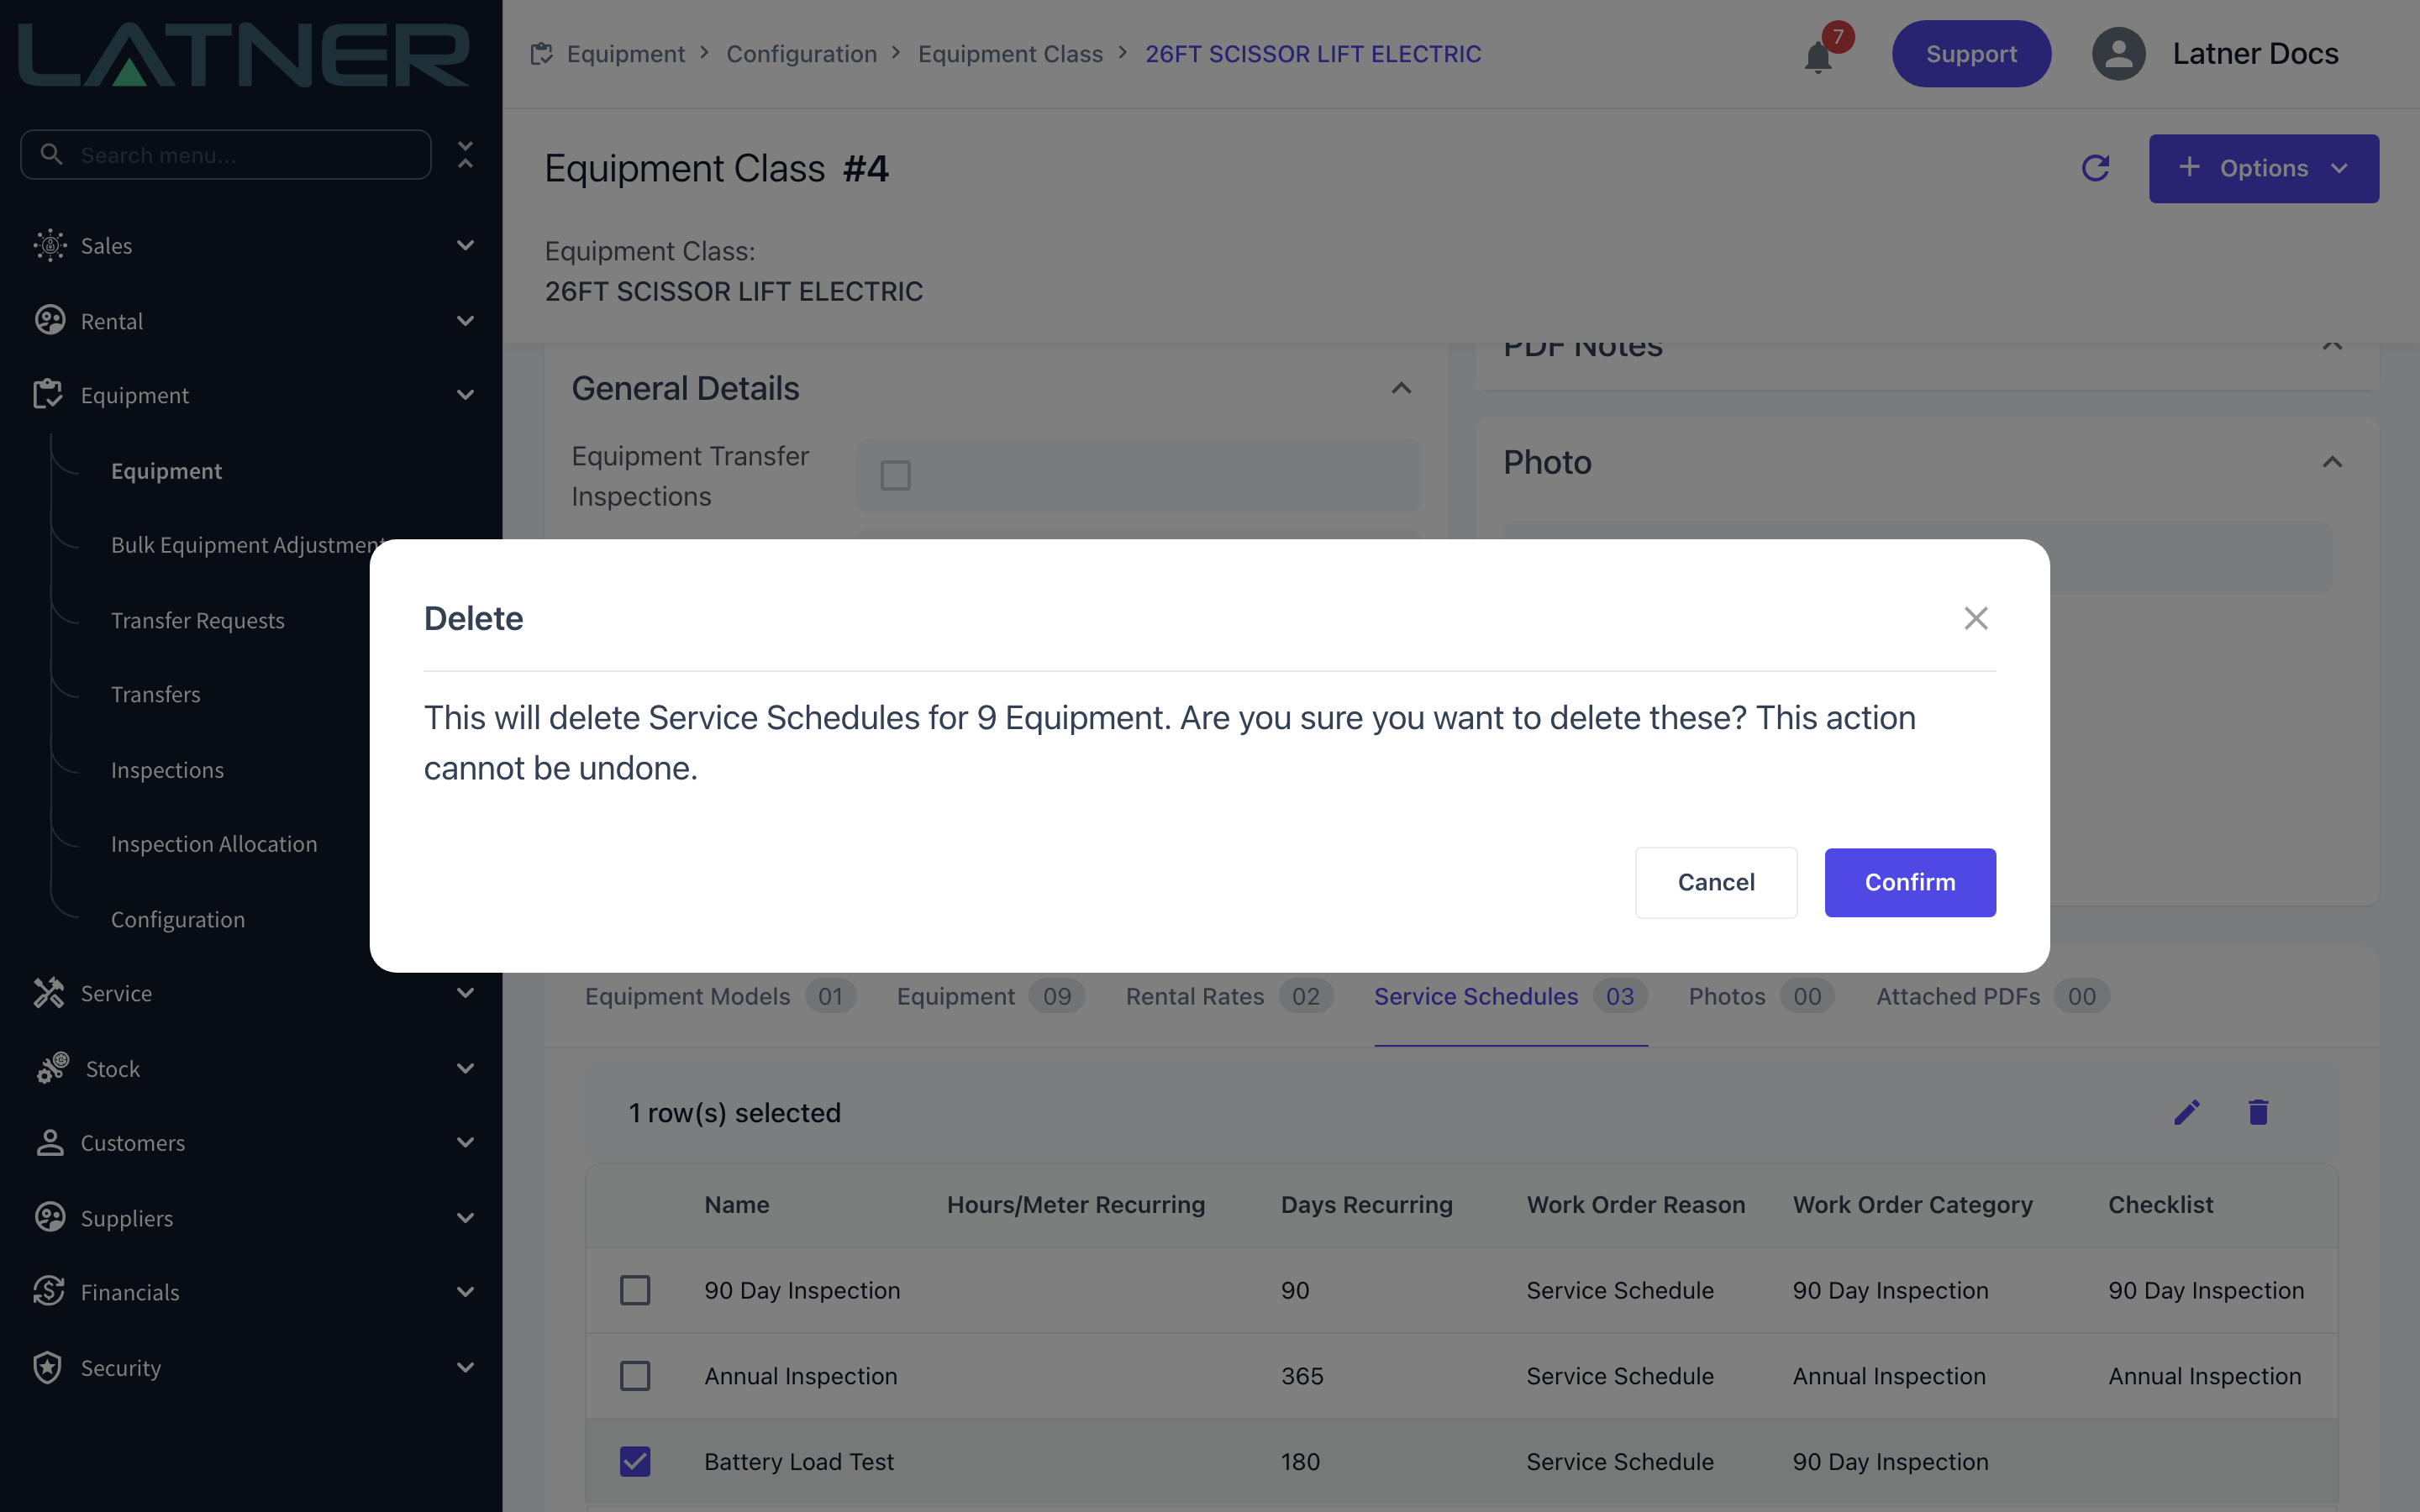
Deleting a schedule from a class removes it from every machine in that class, not just the one you were looking at, and it can't be undone. If you only want it gone from one machine, use Disable Schedule on that machine instead (see Step 4).
Step 1 - Open the class's Service Schedules tab
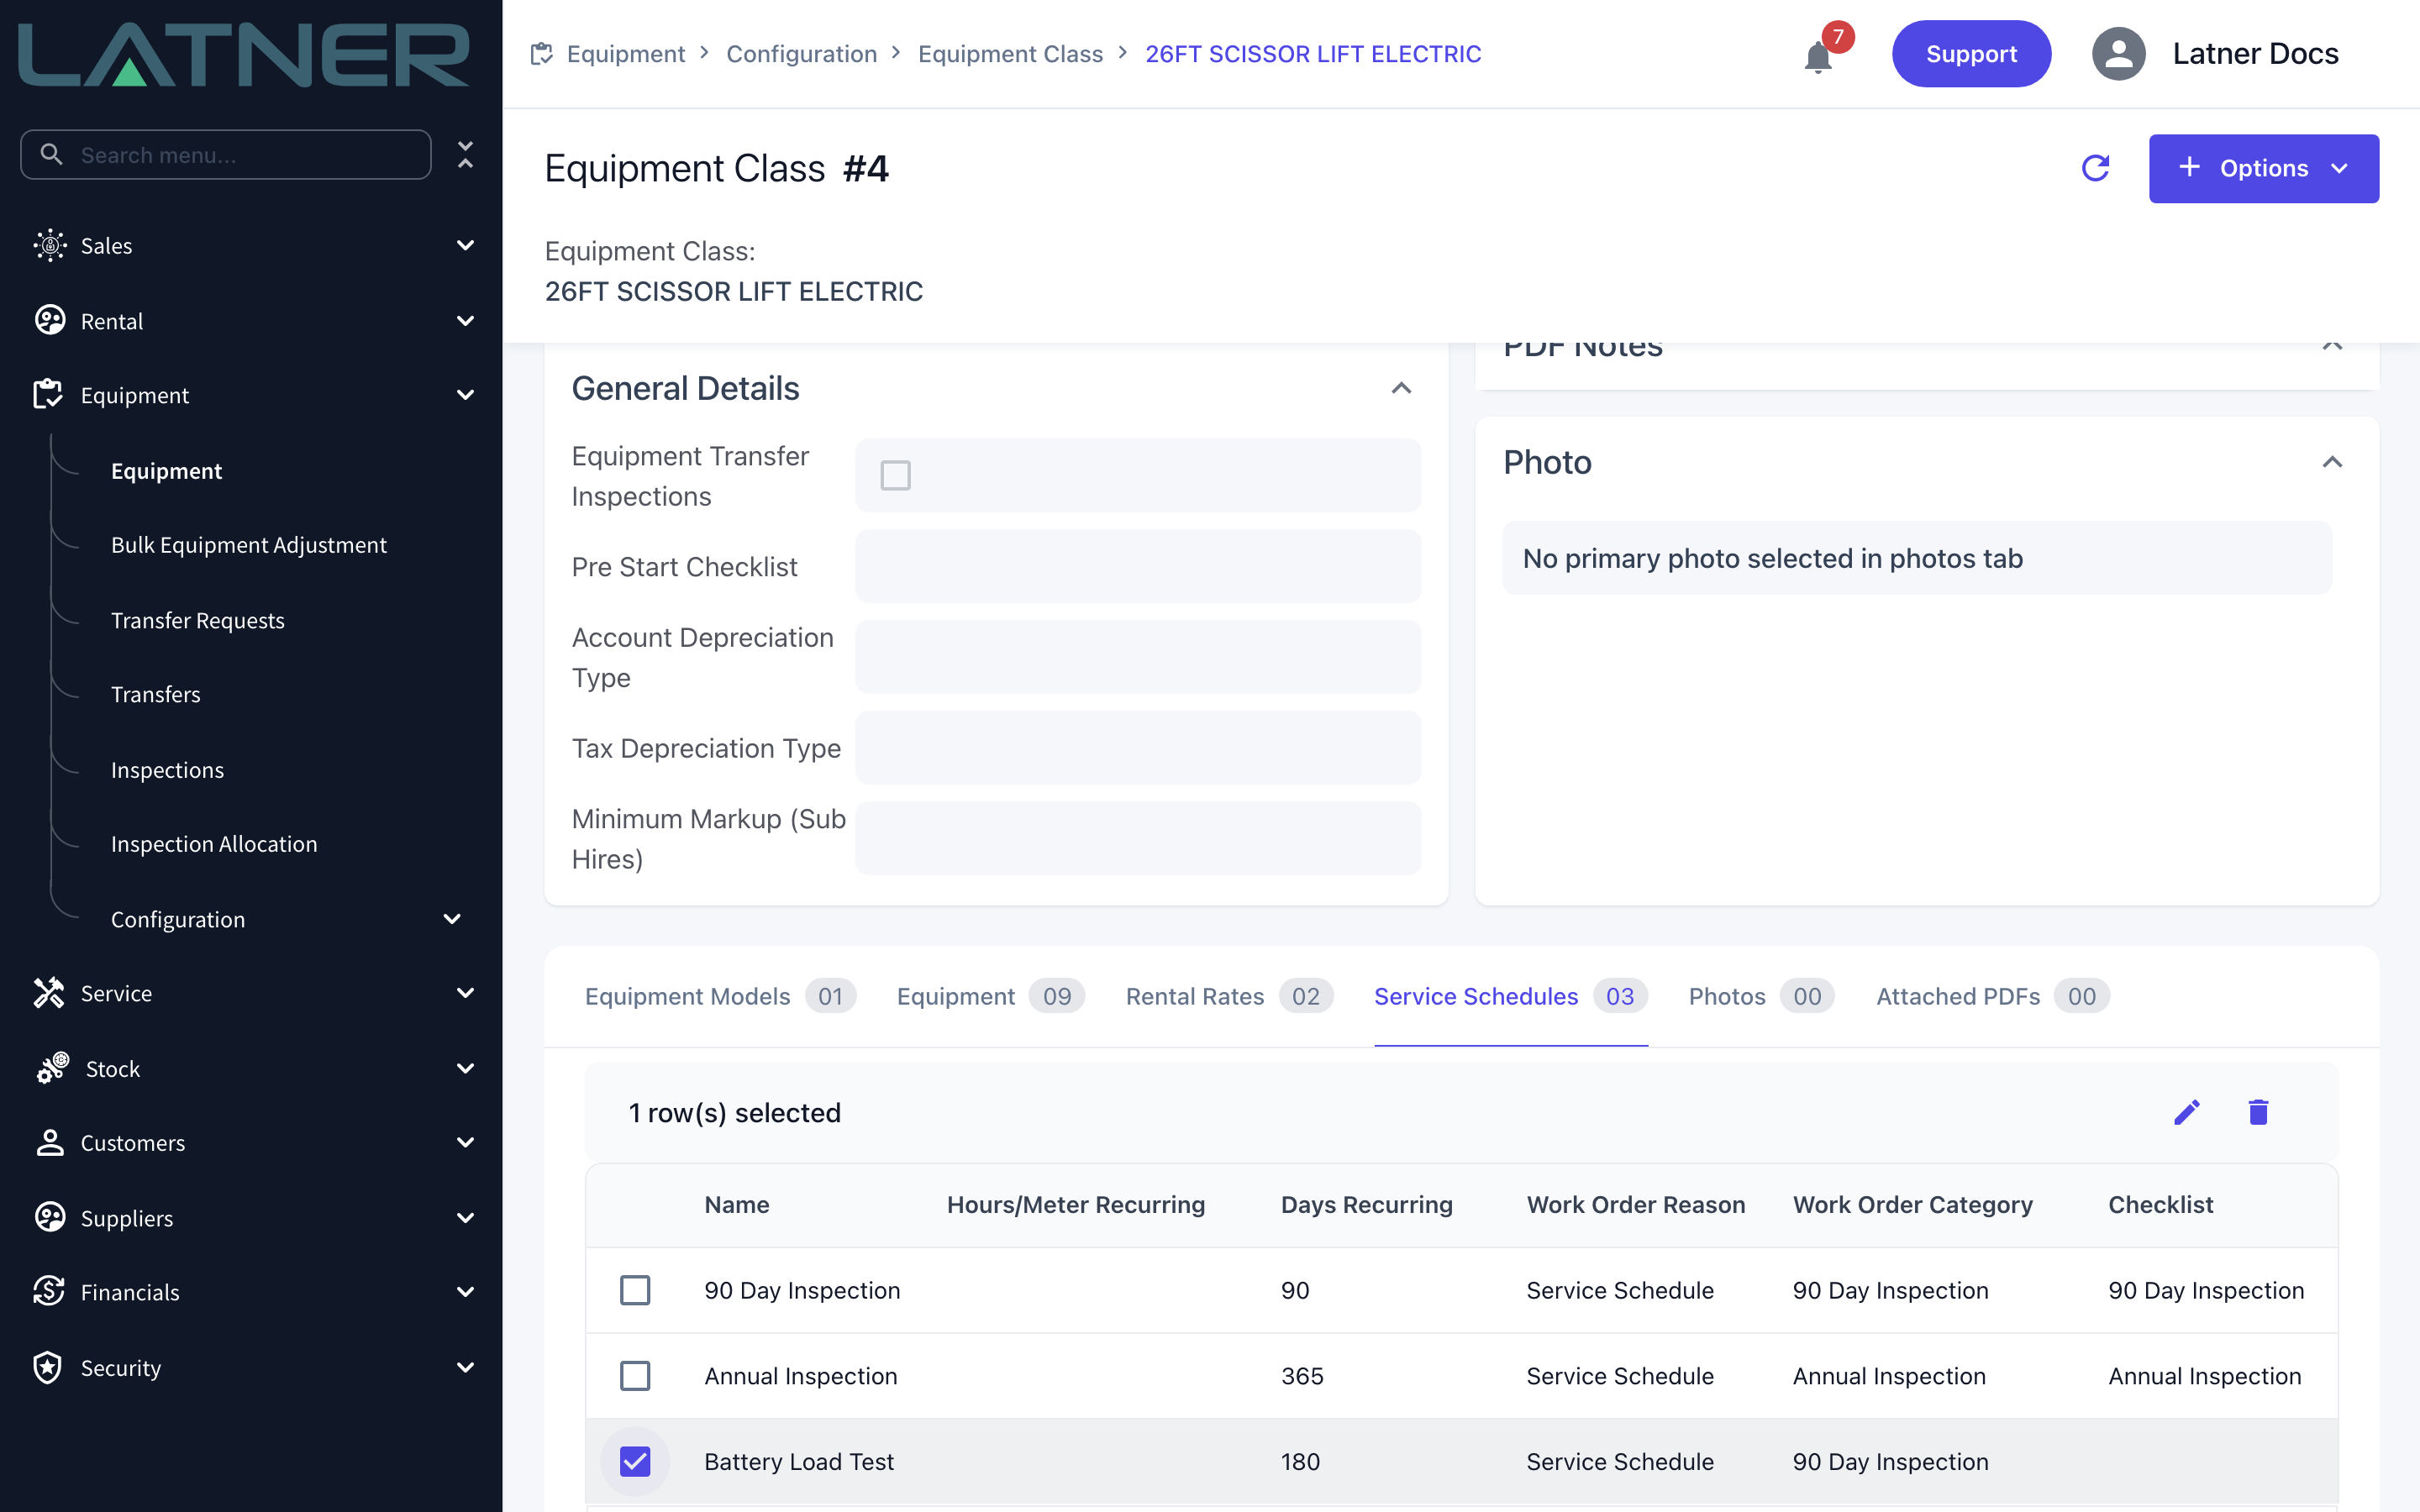
Go to Equipment › Configuration › Classes, open the class and select the Service Schedules tab. Only schedules added at class level are listed here. A schedule that came from a model is removed from that model's Service Schedules tab under Equipment › Configuration › Models, in exactly the same way.
Step 2 - Tick the schedule and click Delete
Tick the line for the schedule you want to remove, then click the bin icon (Delete) at the top right of the table. If the bin is greyed out, your permission group doesn't have Delete Equipment Service Schedule.
Step 3 - Check the count and confirm
The confirmation tells you how many equipment records sit in the class, which is how many machines the schedule is about to be removed from. Click Confirm to delete it, or Cancel if that number is more than you expected.
Once you confirm:
-
The schedule disappears from the class and from the Service Schedules tab of every machine in the class, including machines where it had been disabled.
-
Its upcoming services drop off Service › Equipment Due For Service.
-
Work orders already raised from it are kept, with their checklists, and can still be completed. Completing them no longer schedules a next occurrence, because the schedule is gone.
-
To bring it back, add the schedule to the class again. Every serialized machine gets it fresh, with the first due date counted from the new Schedule Start Date.
Step 4 - Removing it from one machine only
If the schedule is right for the class but wrong for one machine, leave the class alone. Open the equipment from Equipment › Equipment, go to its Service Schedules tab, tick the schedule and choose Disable Schedule. It stops falling due on that machine and stays in place on every other machine in the class. Enable Schedule turns it back on.
FAQs
Watch the Demo
Prefer to watch it? Step through the same flow here.