
A manual customer credit note lets you credit a customer for charges that aren't tied to one particular invoice, so you can correct a billing error, record a goodwill adjustment or write off a bad debt without unwinding work that has already been billed.
Overview
Not every credit starts life attached to an invoice. Sometimes you just need to put an amount back on a customer's account and decide later where it lands. That's what a manual credit note is for.
-
You create it from Customer Invoices, and Latner records it with a Type of Credit Note and a Source of Manual.
-
It's created in Open status, so you can build up the lines before anything is finalised.
-
Credit lines use the same line types as an invoice - Admin, Equipment, Stock, Fuel, Labour, Transport, Sanitation and the rest.
-
Amounts are entered as positive values. Latner treats the whole document as a credit; you don't type minus signs.
-
Completing it turns the total into available credit that you can allocate against a completed invoice or refund to the customer.
-
It's also how you write off an uncollectable invoice as a bad debt. Credit the amount against a dedicated Admin Charge mapped to your bad debt account, then allocate it to the invoice - see the FAQs below.
-
It gets its own number, taken from the Customer Credit Note Number Format setting, so credit notes and invoices never share a number sequence.
Before You Begin
Make sure the following are in place before you start.
|
Requirement |
Where to Find It |
|---|---|
|
Create Credit Note permission |
Security › Configuration › Permission Groups, under the Customer module's Options section |
|
An Active customer with at least one customer site |
Customers › Customers |
|
Customer Credit Note Number Format - the prefix and number of digits for credit note numbers |
Security › Settings › Customers |
|
Enforce Credit Note Approval Limits - optional, and only if your business wants approval limits policed |
Security › Settings › Customers |
|
A Credit Note Approval Group with line type limits, needed only when the setting above is enabled |
Customers › Configuration › Credit Note Approval Groups |
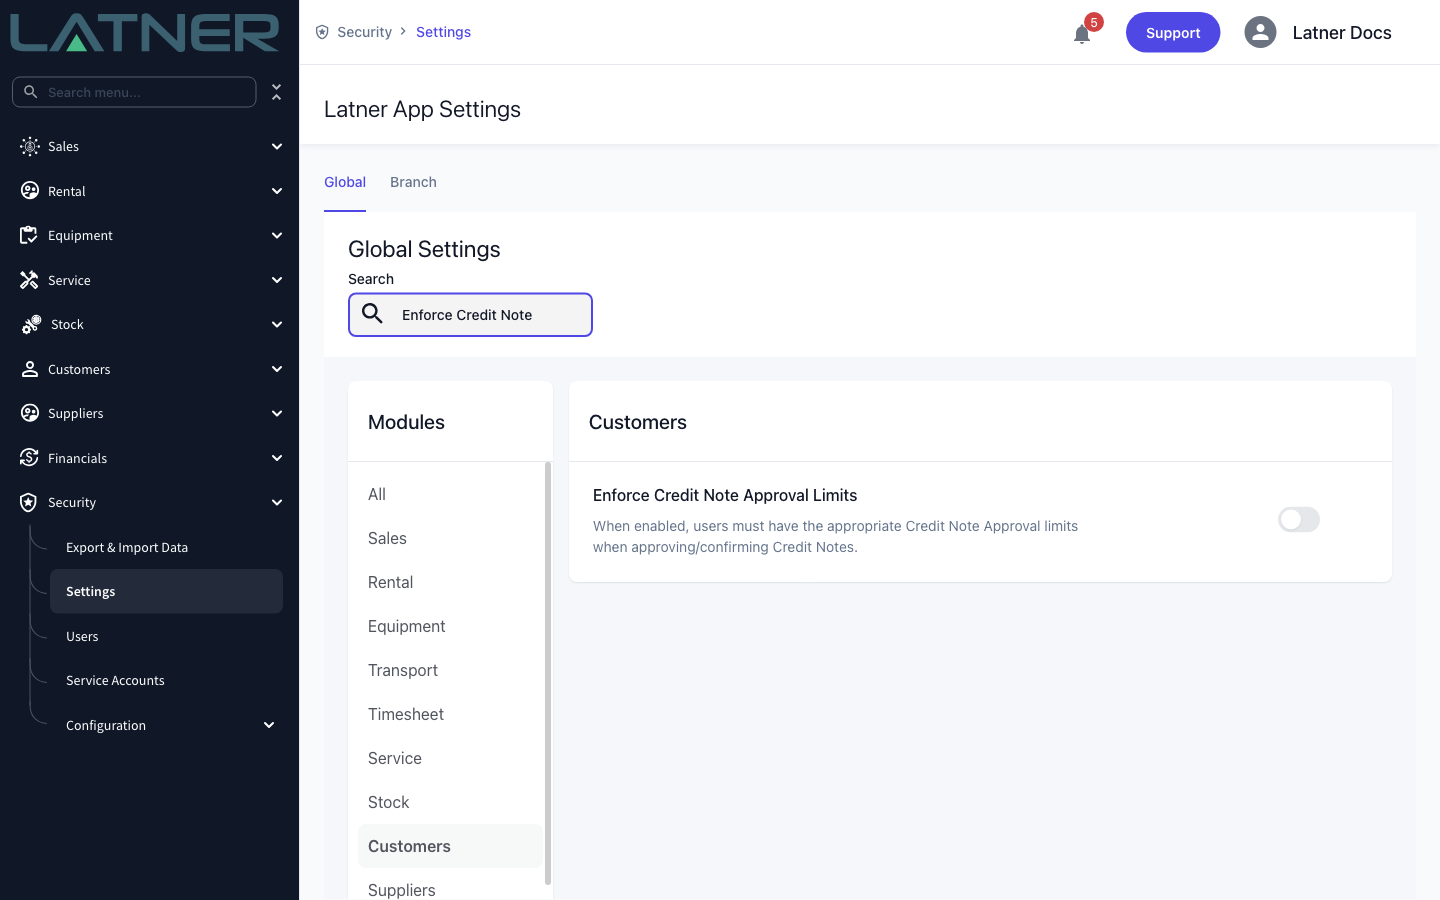
With Enforce Credit Note Approval Limits switched on, whoever completes the credit note must belong to a Credit Note Approval Group that carries a limit for every line type on it. Latner compares each line type's combined sub total against the user's highest limit for that line type, so a $900 credit made up of $500 of Admin and $400 of Fuel needs a limit against both. Leave the setting off and any user with the Create Credit Note permission can complete one.
Creating the Credit Note
Step 1 - Open the Customer Invoices screen
Go to Customers › Customer Invoices and choose Options › Create Credit Note. Credit notes live on this same screen alongside invoices - filter the Type column by Credit Note to see only credits.
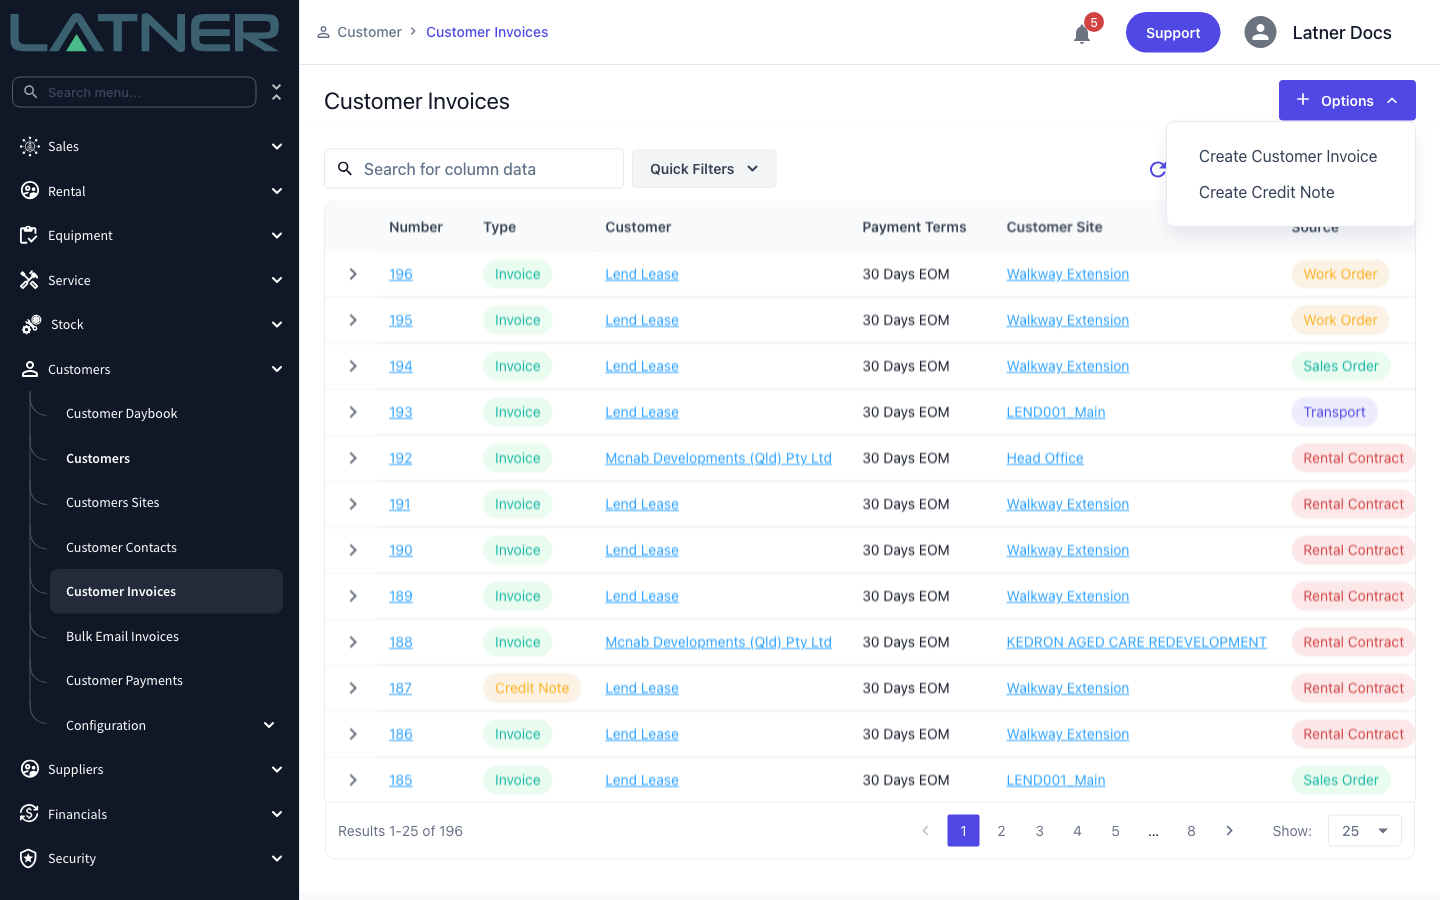
You'll also find the same action as Options › Create Manual Credit Note on any existing credit note, which is handy when you're already looking at one and need another.
Step 2 - Fill in the credit note header
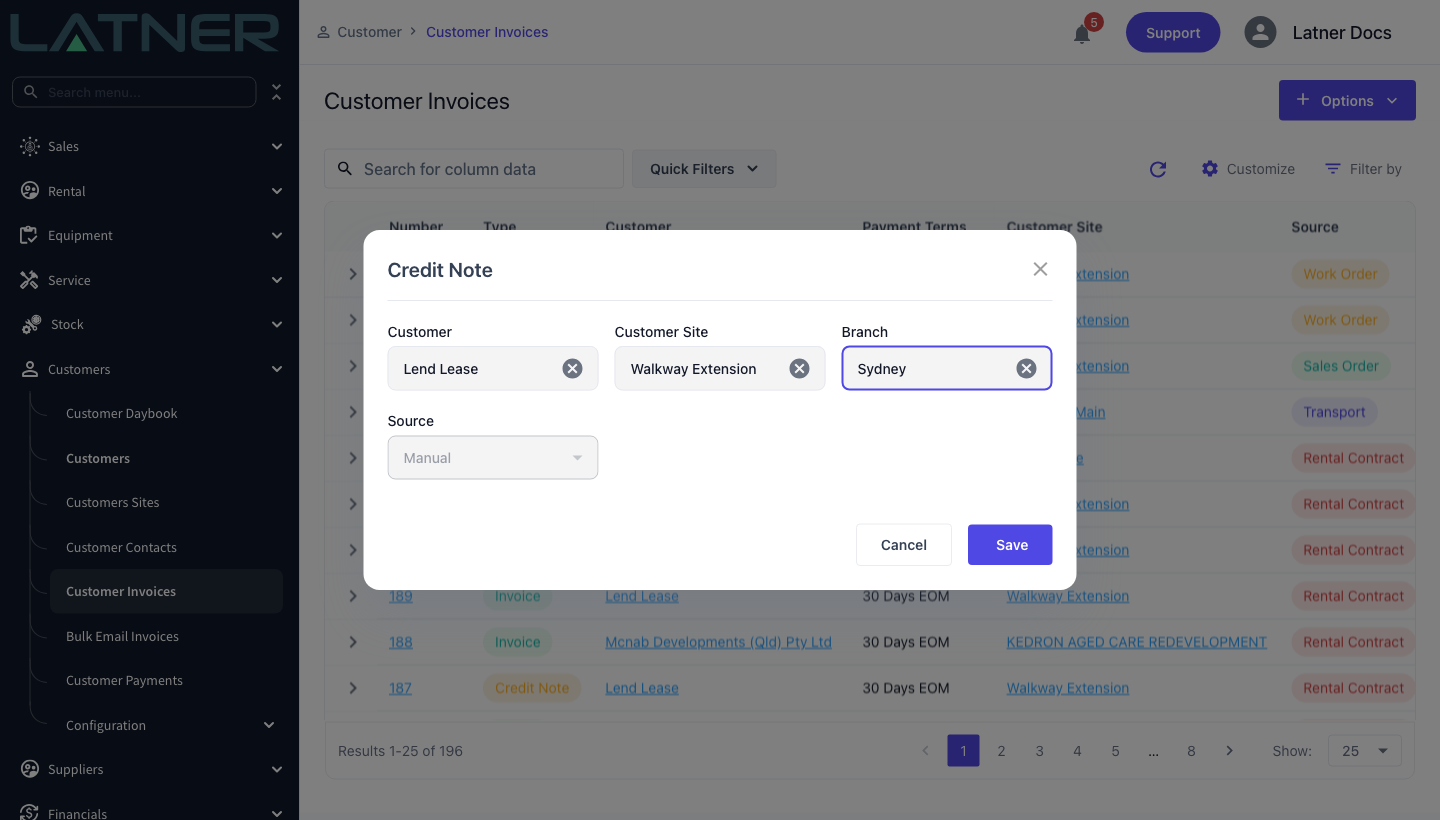
The Credit Note dialog only asks for what Latner can't work out for itself.
-
Customer - required. Only Active customer accounts appear; prospects and suppliers are excluded.
-
Customer Site - required. Once you pick a customer the list narrows to that customer's sites, and choosing a site on its own fills the customer in for you.
-
Branch - required. The branch owns the credit note for reporting and drives the dates it stamps.
-
Source - fixed to Manual and read-only. It's shown so the document's origin is obvious later.
Step 3 - Save
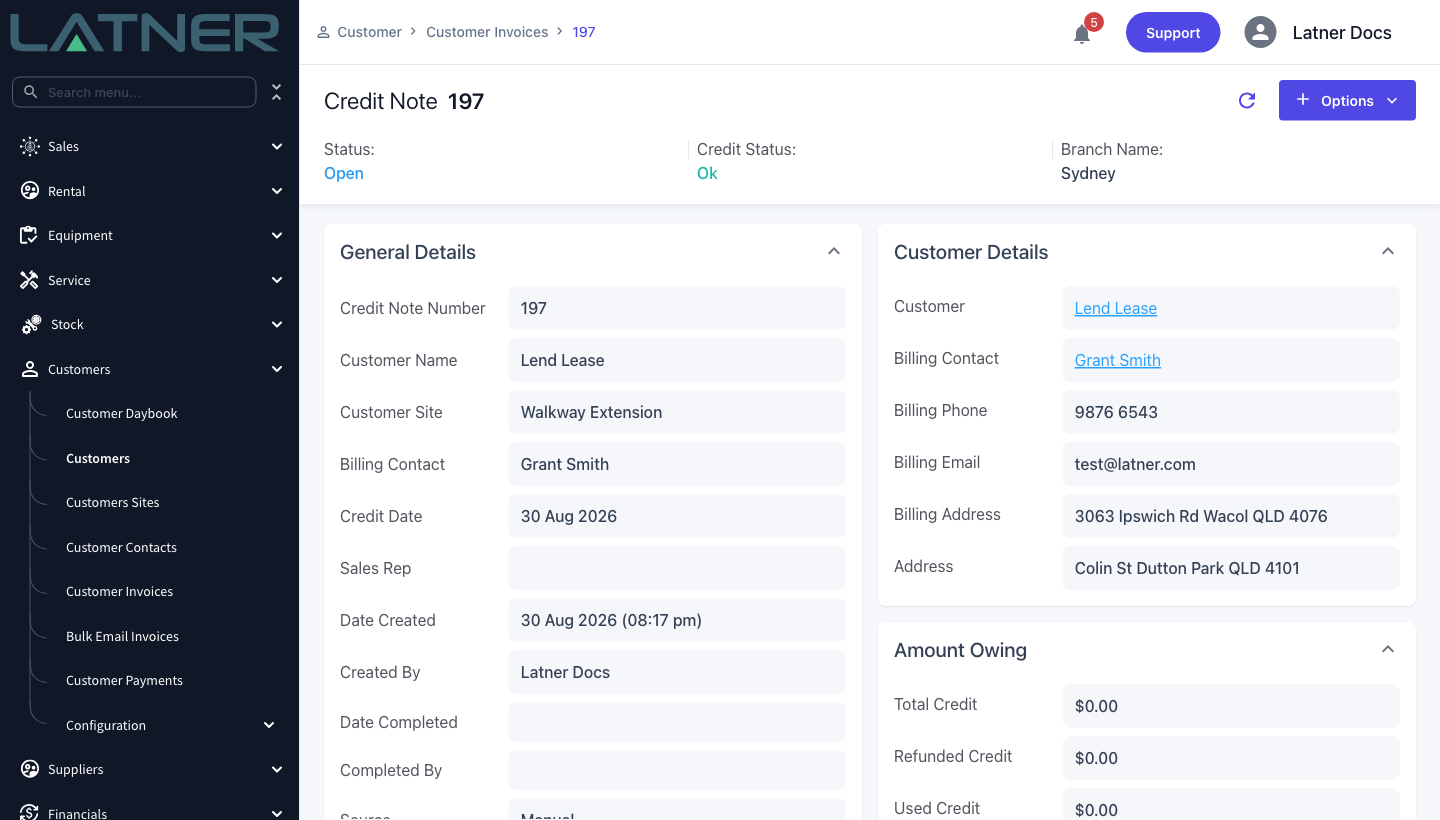
Select Save and Latner opens the new credit note. It fills in the rest from the records you chose: the billing contact comes from the customer site, falling back to the customer's own billing contact; the billing address comes from the customer; the credit date is today in the branch's timezone; and the payment terms come from the customer, or from the Default Payment Term setting when the customer has none.
The credit note is created in Open status with a total of $0.00, ready for its lines.
Step 4 - Add the credit lines
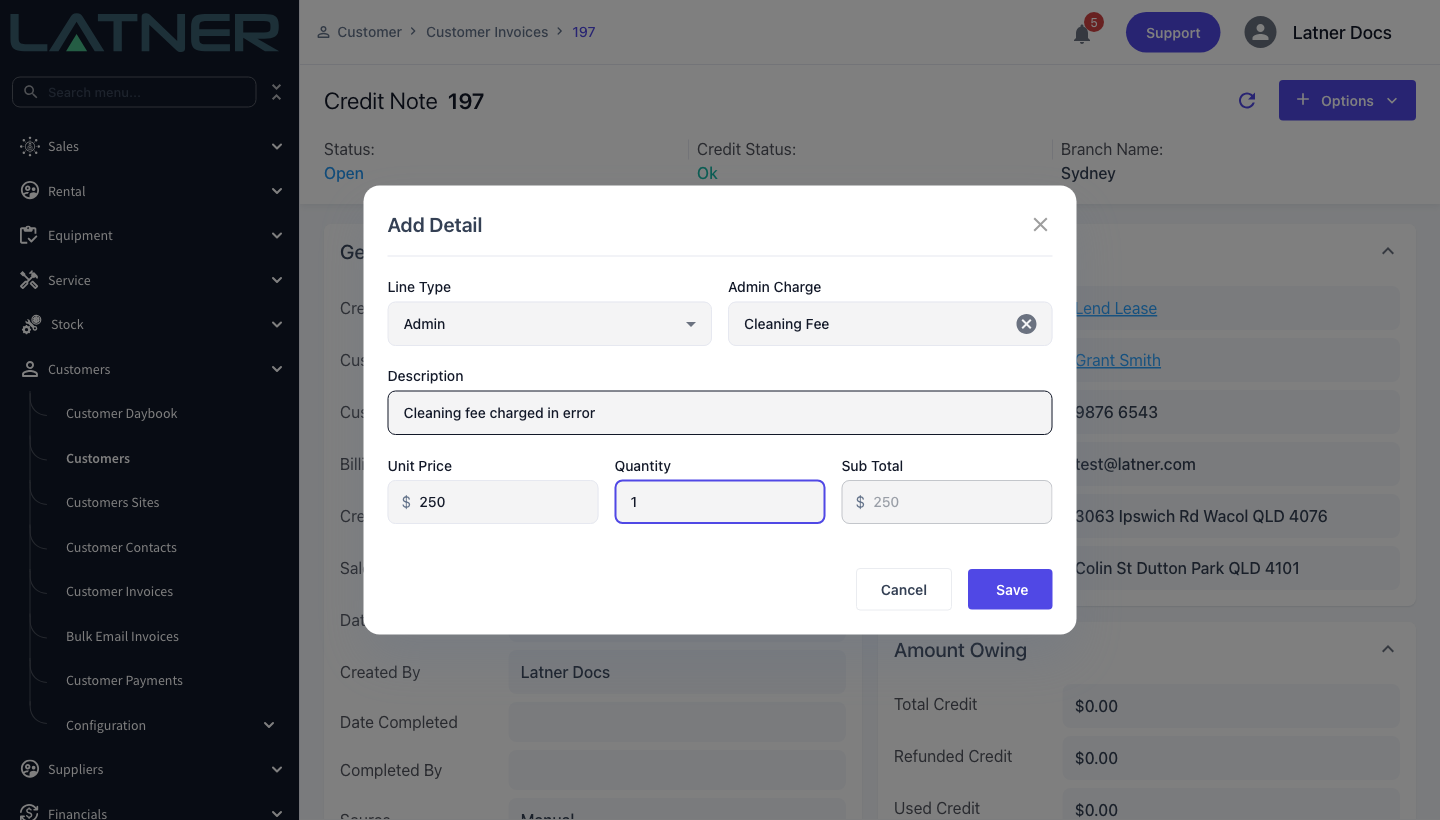
Choose Options › Add Credit Note Detail. This action is only offered while the credit note is Open.
-
Line Type - required, and pick it first. The field beside it changes to match your choice, asking for a Stock Number, Equipment, an Admin Charge, an Expense Type, a Transport Type, a Fuel Type, a Line Sub-Type or a Sanitation Service.
-
Description - prefilled from the record you selected. Overwrite it with something the customer will understand, because this is what prints on the credit note.
-
Unit Price - prefilled where the selected record carries a price (an admin charge's default charge, a fuel type's retail price, a stock item's retail price). Enter it as a positive amount.
-
Quantity - required.
-
Sub Total - read-only. It previews unit price times quantity, and Latner recalculates the real sub total, tax and total on save using the credit note's tax rate.
Repeat for each thing you're crediting. Lines are numbered in the order you add them.
Step 5 - Check the lines and the totals
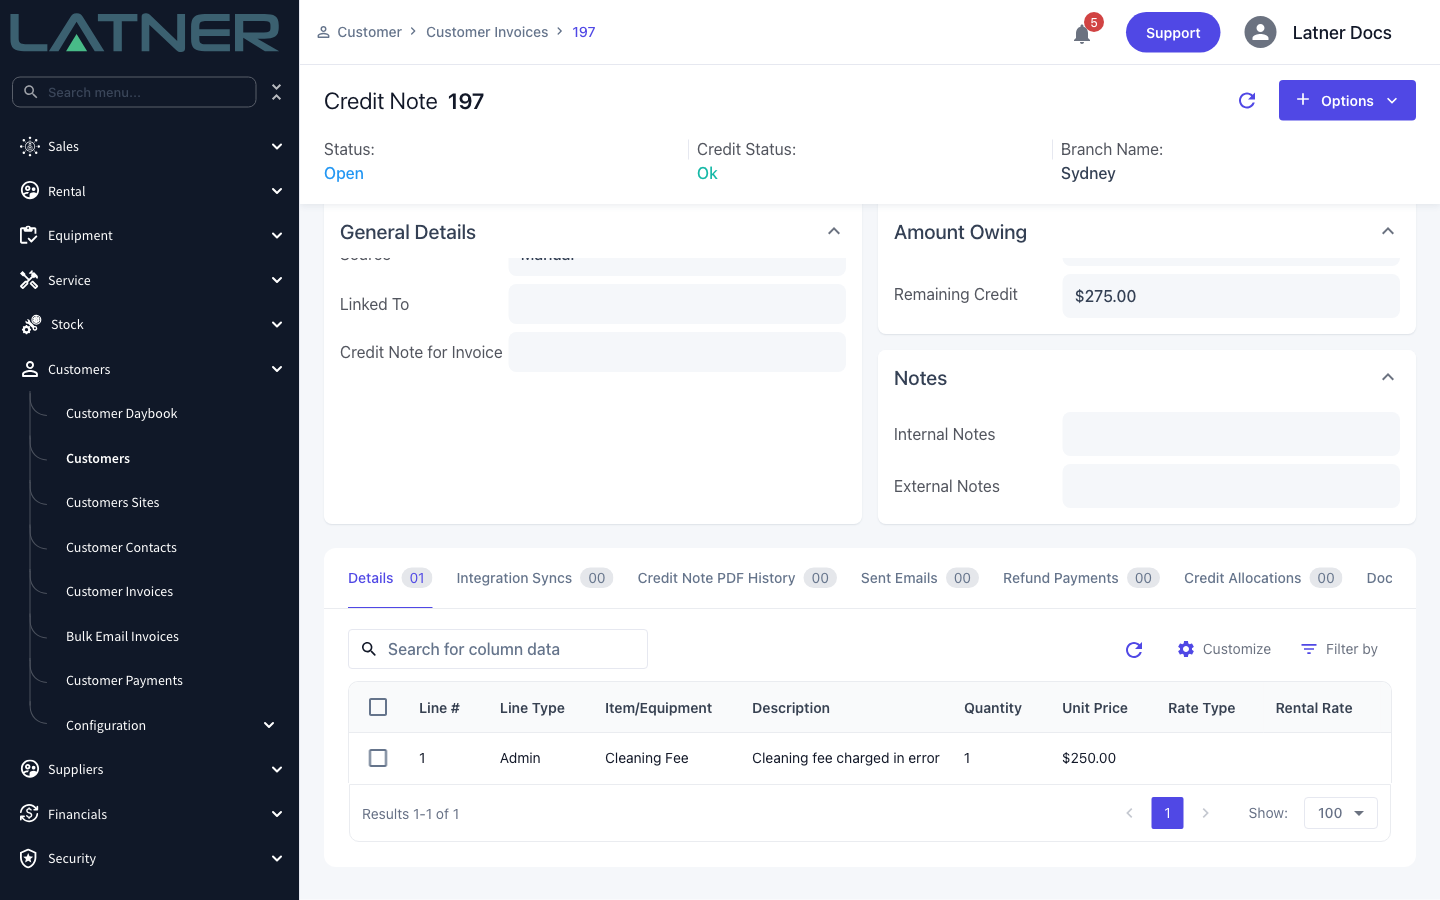
The Details tab lists every line, and the Amount Owing card adds them up as Total Credit, Refunded Credit, Used Credit and Remaining Credit. Tick a line to edit or delete it. Deleting a line, and changing anything other than its Description, is only possible while the credit note is Open, and the line type of an existing line can't be changed.
Step 6 - Complete the credit note
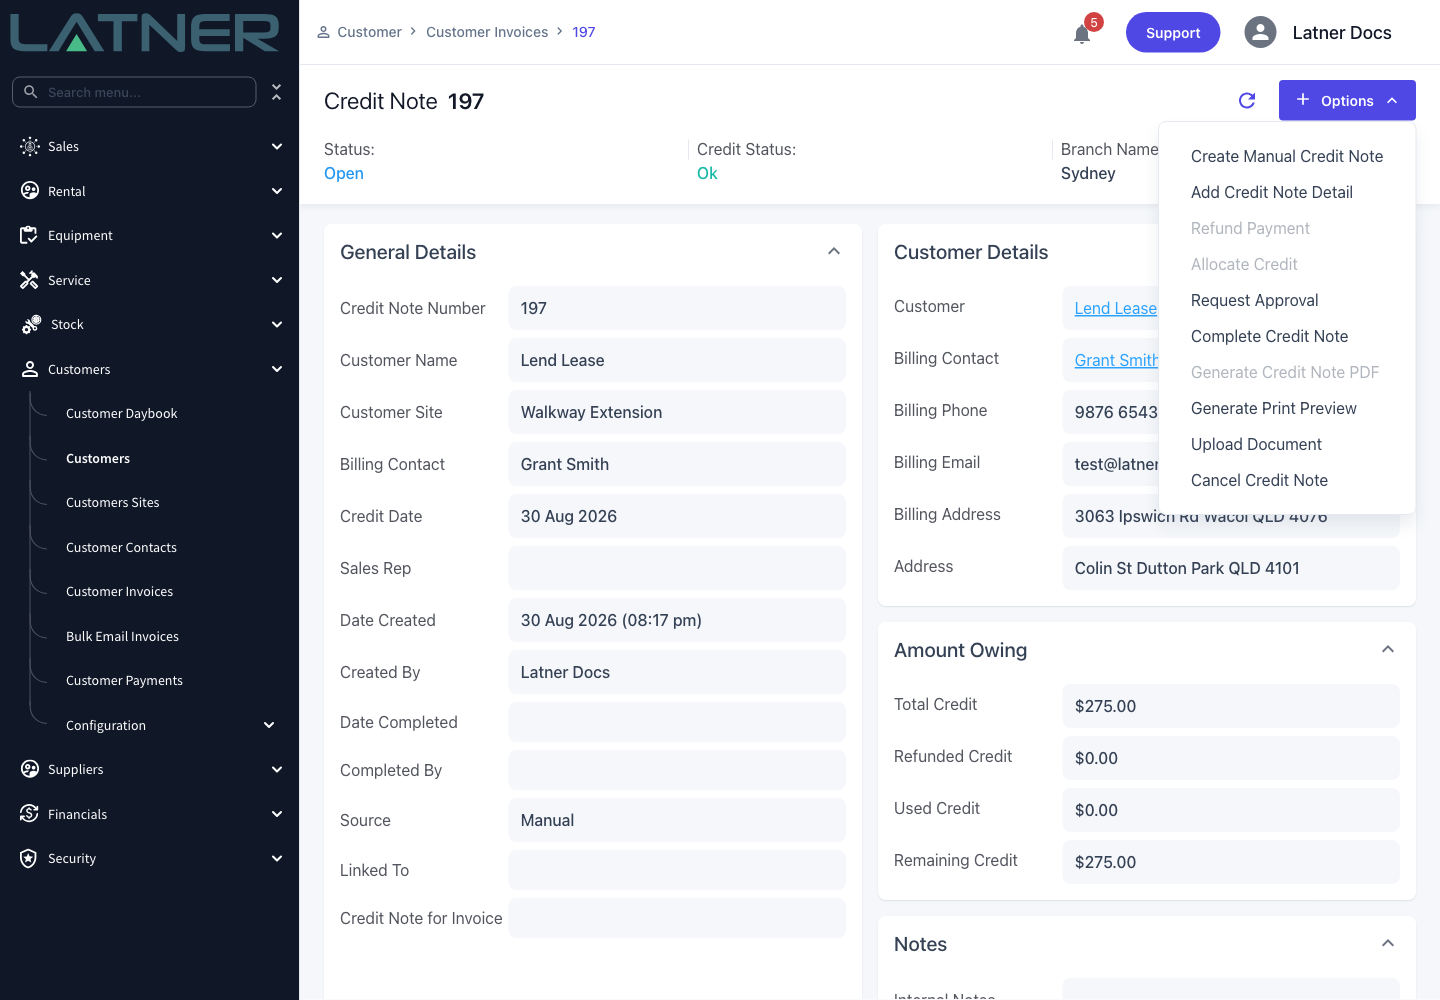
Choose Options › Complete Credit Note. The action stays greyed out until the credit note has at least one detail line.
If your business routes credits past someone else first, use Options › Request Approval instead. That moves the credit note to Pending Approval, assigns it to the user you nominate and notifies them. On their screen the action reads Approve Credit Note, and Reject Credit Note puts it back to Open for more work.
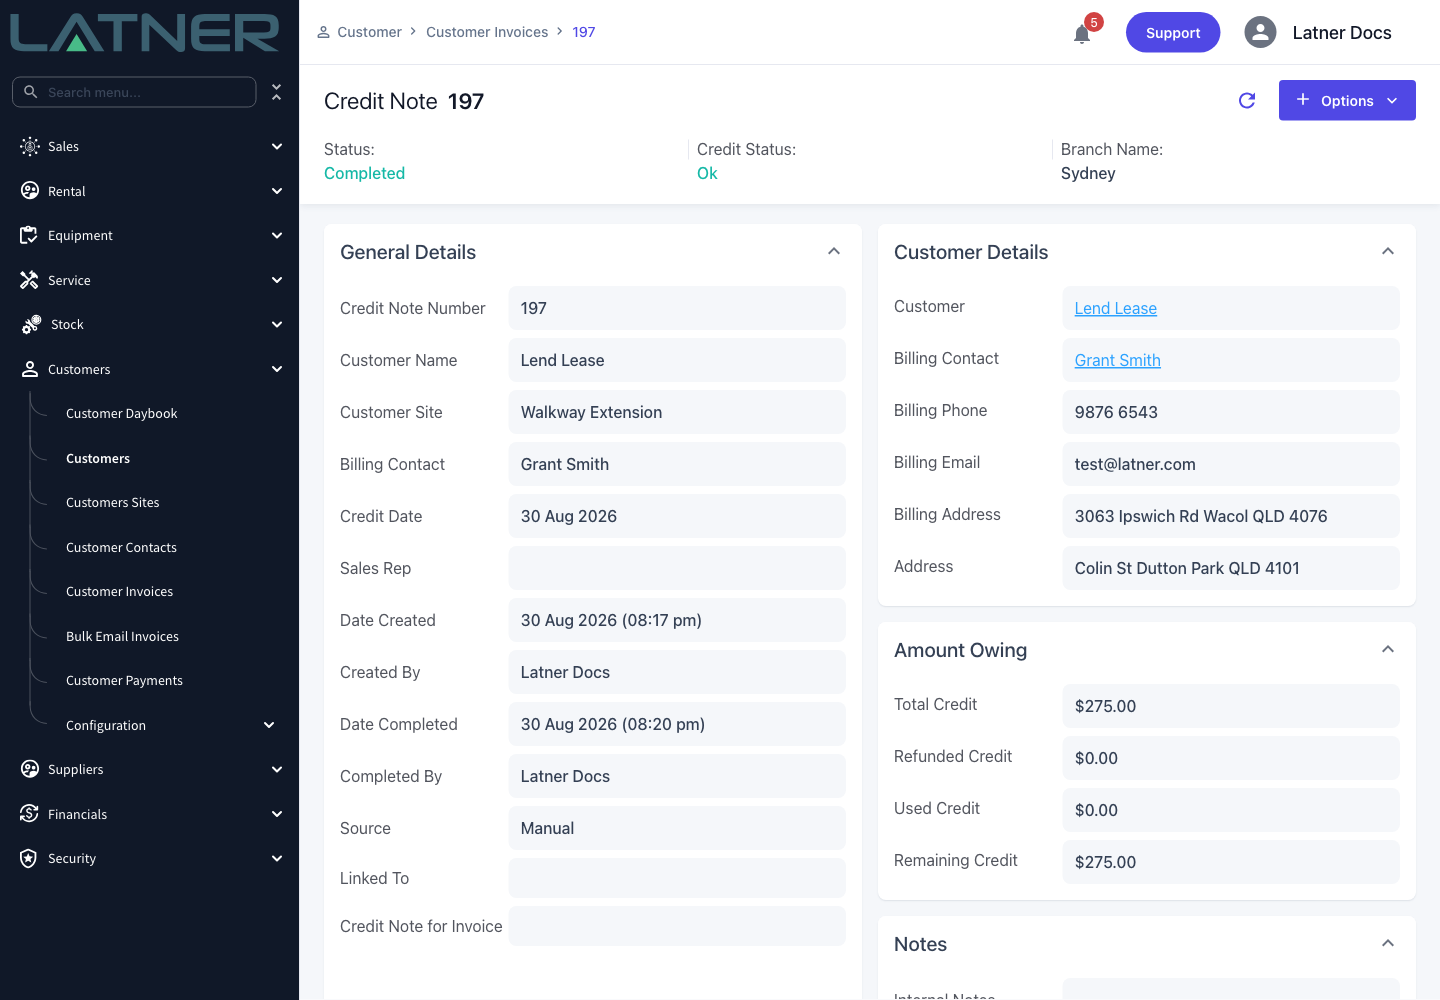
Once completed, the status changes and Latner stamps who completed it and when.
After Creation
-
The credit note is pushed to any active accounting integration, and each attempt is recorded on the Integration Syncs tab.
-
Options now offers Allocate Credit, Refund Payment, Generate Credit Note PDF, Email Credit Note, Mark Credit Note as Sent and Change Credit Note Date.
-
Allocate Credit applies the credit to a completed invoice for the same customer, for no more than the smaller of the invoice's outstanding balance and the credit note's remaining credit.
-
Refund Payment pays the credit back to the customer instead, again capped at the remaining credit.
-
When the remaining credit reaches zero through allocations or refunds, the credit note's status becomes Paid.
-
The credit note appears in the Customer Invoices list with a Type of Credit Note, and on the customer's daybook.
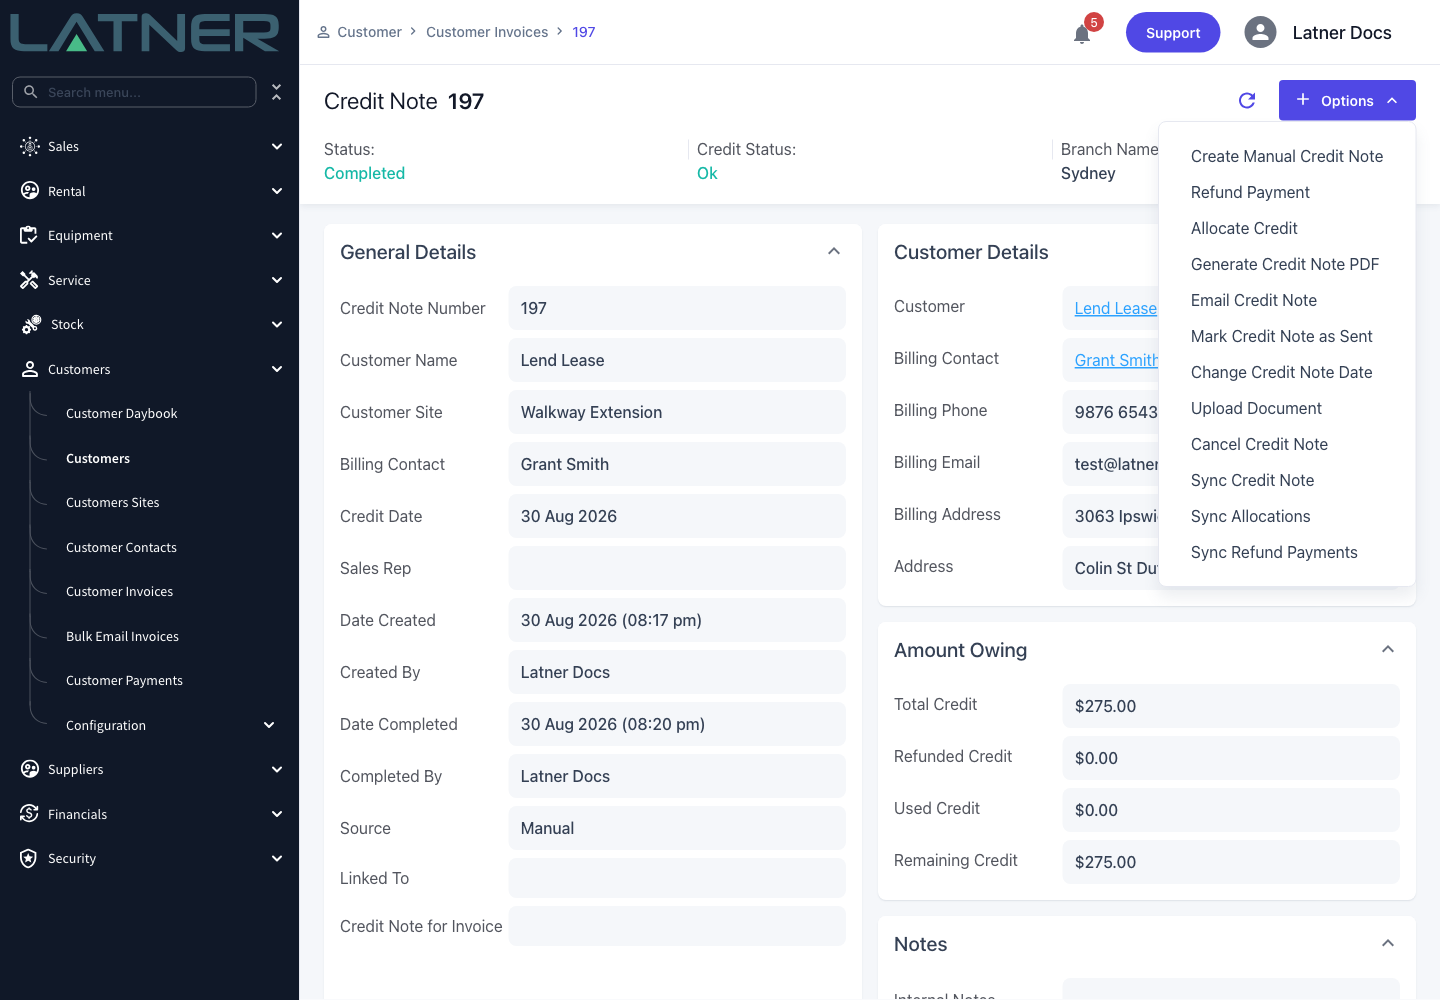
Completing a credit note locks it. You can no longer add or delete lines or change their amounts - only a line's Description can still be corrected - and the customer, site, billing contact and credit date on the General Details card become read-only. If you completed one by mistake, use Options › Cancel Credit Note (this needs the Cancel Customer Invoice permission) and raise a fresh one. If only the date is wrong, Change Credit Note Date fixes that without cancelling anything.
FAQs
How do I write off a bad debt or give a customer satisfaction credit?
When an invoice is uncollectable, write it off with a manual credit note that uses a dedicated Admin Charge, then allocate the credit to the invoice. The same approach works for a customer satisfaction (goodwill) credit. Because each Admin Charge can have its own account code, the write off posts to your bad debt account instead of reducing the revenue account the original charges went to.
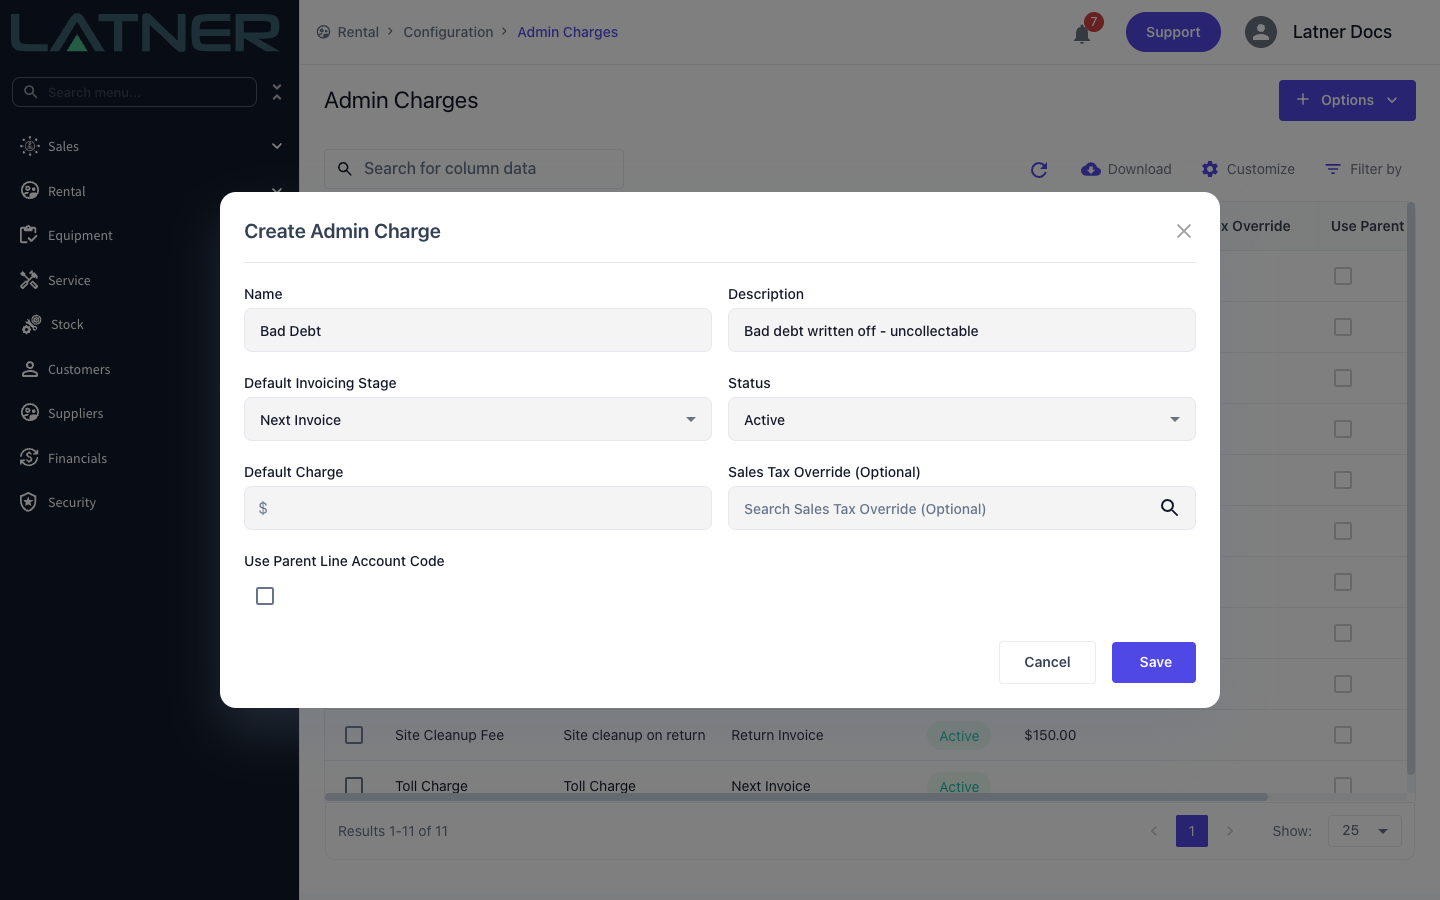
1. Create an Admin Charge for each reason. Go to Rental › Configuration › Admin Charges and choose Options › Create Admin Charge. Create one for each reason you want to report on separately - for example Bad Debt and Customer Satisfaction.
-
Name and Description - required. The description is copied onto the credit line, and you can change it there.
-
Default Invoicing Stage - required. It only matters when the charge is added to a rental contract, so either option is fine here.
-
Status - set it to Active. Credit note lines only offer Active Admin Charges.
-
Default Charge - leave it blank so you enter the amount for each write off.
-
Use Parent Line Account Code - leave it unticked so the charge uses its own account code.
2. Map each Admin Charge to your bad debt account. Go to Financials › Configuration › Accounting Integration and click Configure on your connected integration. Open the Revenue Accounts Configuration tab and click Assign Account Code. Set Scope to Admin Charge, choose the Admin Charge, then pick your bad debt account as the Account Code. Repeat for each reason. For the full walkthrough, see How to Set Up Accounting Integration Account Codes.
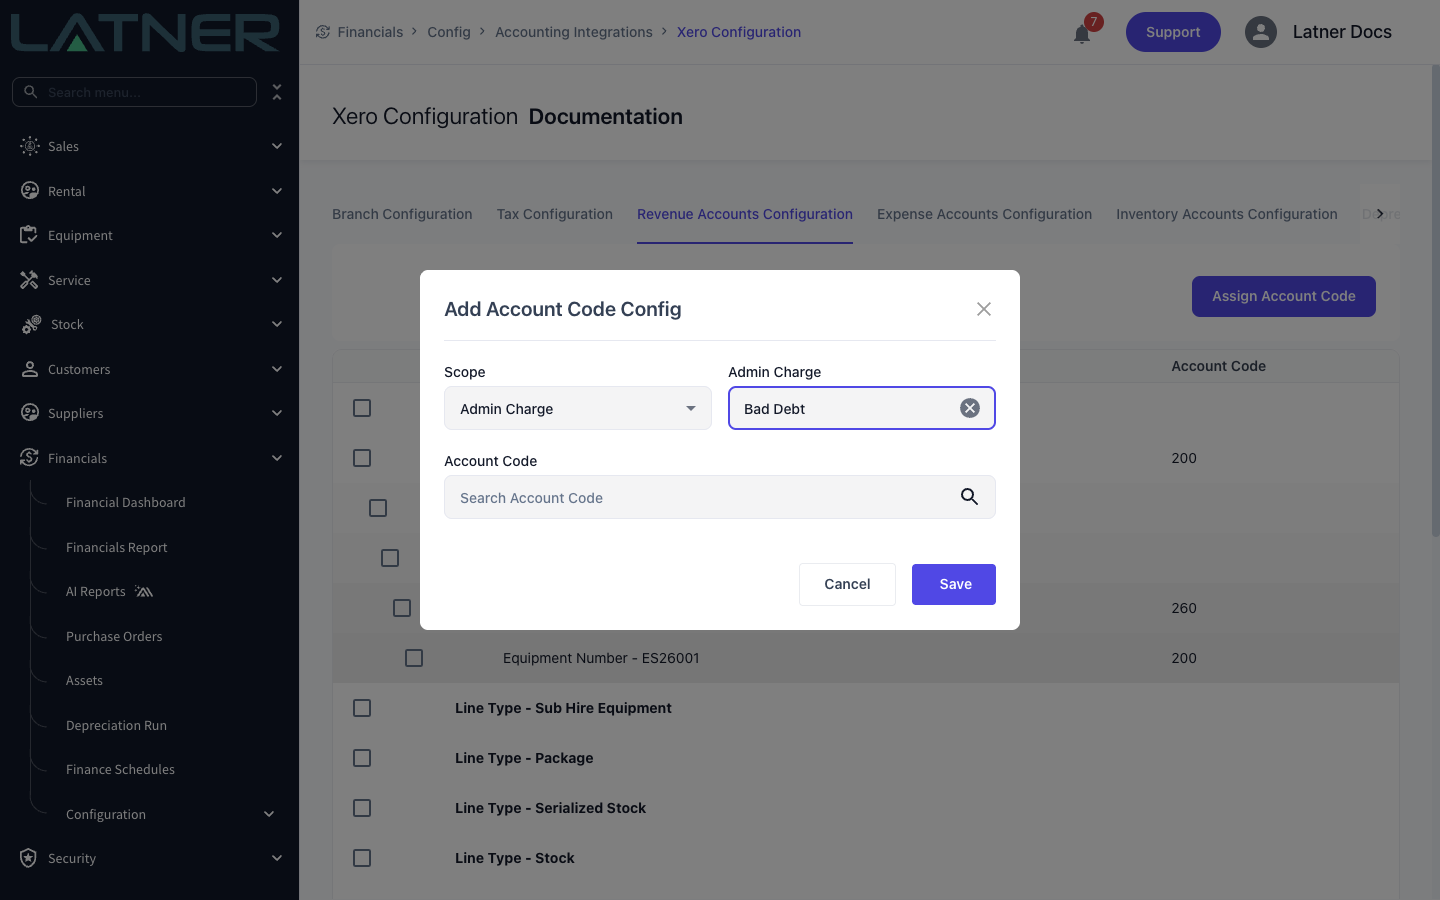
Do this before you raise the credit note. Latner records the account code on each line when the line is added, so a mapping you create afterwards won't change lines that already exist. With Xero or MYOB, the Account Code list on this tab only shows revenue (income) accounts. If your bad debt account doesn't appear, check its account type in your accounting system with your accountant.
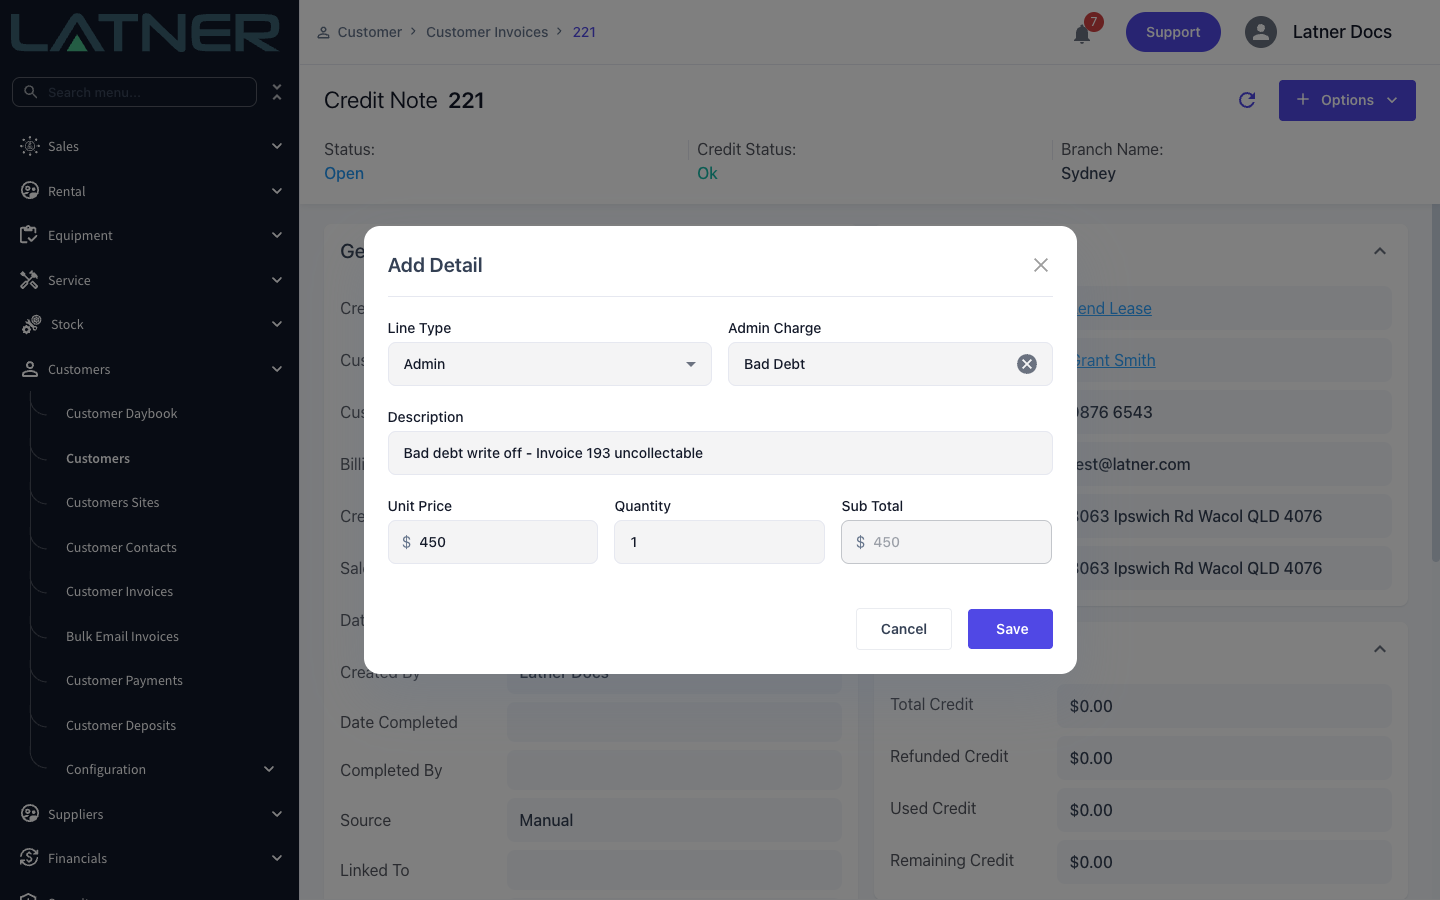
3. Raise the credit note with an Admin line. Create a manual credit note for the customer as described in Steps 1 to 3 above. In Step 4, set Line Type to Admin, choose the Bad Debt (or Customer Satisfaction) Admin Charge, and enter the amount as a positive Unit Price with a Quantity of 1. The Unit Price excludes tax, and Latner adds the tax when it saves the line. To write off a whole invoice, check that the credit note's total matches the invoice's outstanding balance. To write off only part of an invoice, enter just that part - the rest stays outstanding.
4. Complete the credit note. Choose Options › Complete Credit Note. This locks the lines and sends the credit note to your accounting integration. You can't allocate credit until the credit note is completed.
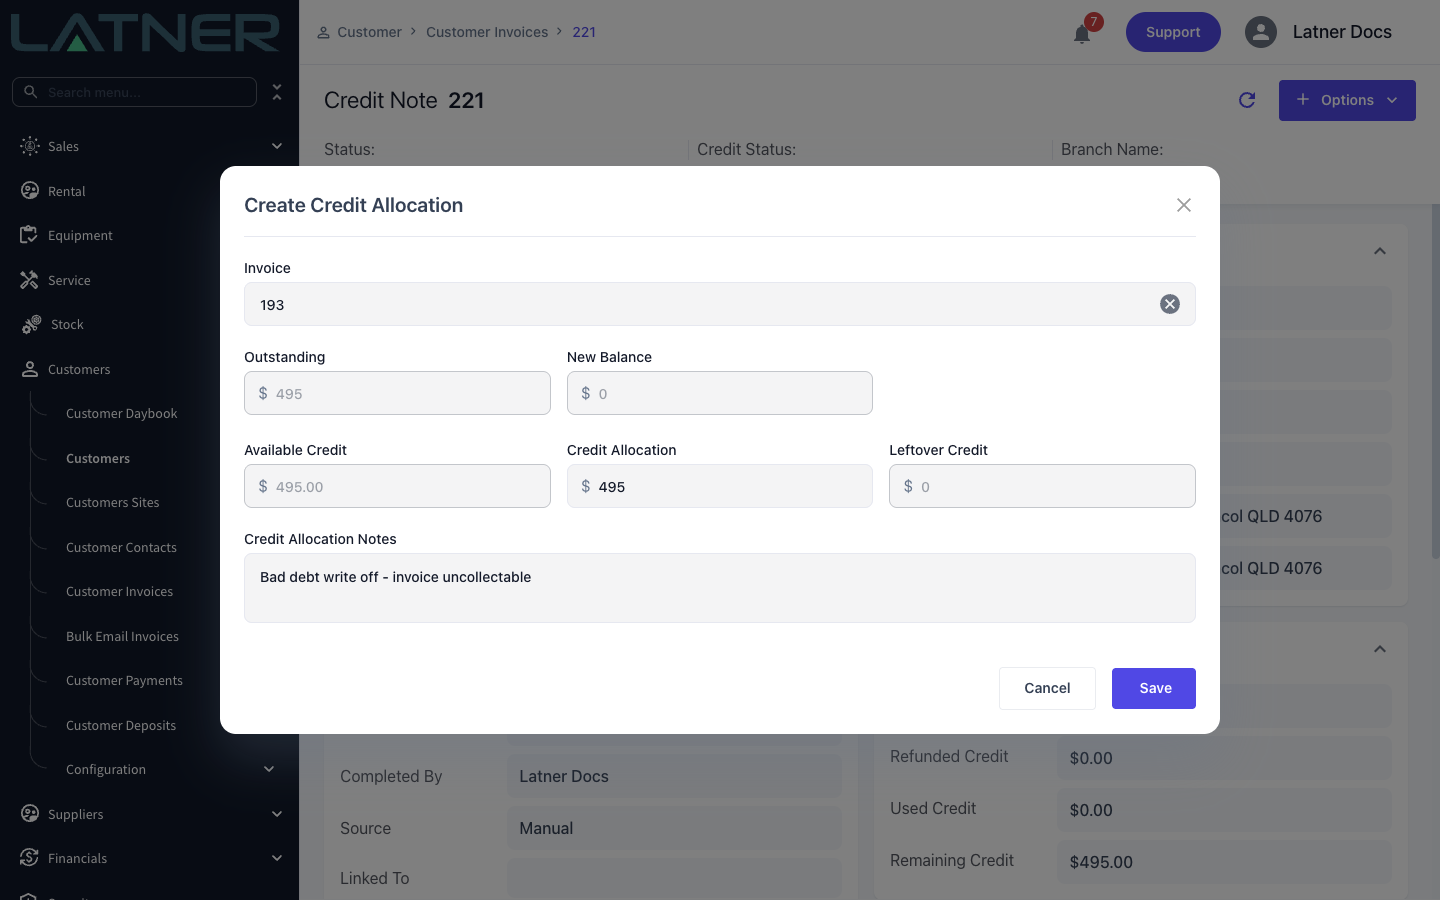
5. Allocate the credit to the invoice. Choose Options › Allocate Credit. In the Create Credit Allocation dialog, pick the uncollectable Invoice. Only this customer's Completed invoices are listed. Enter the Credit Allocation amount and add Credit Allocation Notes if you want a record of why. The amount can't be more than the invoice's outstanding balance or the credit note's remaining credit. When the invoice's balance reaches zero, it changes to Paid. The credit note also changes to Paid once all of its credit has been used.
6. Sync the allocation. Allocating credit doesn't send the allocation to your accounting system automatically. To push it, choose Options › Sync Allocations on the credit note. For Xero, Enable Sync Xero Payments must also be switched on in the Xero integration settings.
Watch the Demo
Prefer to watch it? Step through the same flow here.