
The Bulk Email Invoices screen lets you email completed customer invoices to your customers in one batch, track how each send went, and follow up on invoices that have already gone out, so you can get invoices to customers quickly without opening them one at a time.
Overview
Chasing invoices one by one is slow work. The Bulk Email Invoices screen gathers every invoice that is ready to send into a single list, so you can tick the ones you want, email them together, and watch the results come back.
-
Lists Completed and Paid invoices that have not yet been sent, on the Unsent tab.
-
Emails each invoice as a PDF to the customer's billing contact, using your Customer Invoice email template.
-
Lets you send a copy to a Latner user instead, so you can preview the email before it reaches a customer.
-
Records every batch as a bulk run on the Sending/Sent tab, with a per-invoice breakdown and delivery status.
-
Can mark invoices as sent without emailing them, for invoices you have sent some other way.
-
Keeps a Follow Up tab for invoices that have been sent but are still unpaid.
Before You Begin
A few things need to be in place before a bulk send will work.
|
Requirement |
Where to Find It |
|---|---|
|
Bulk Email Invoices permission (to open the screen) |
Granted per permission group under Security › Users |
|
Email Customer Invoice permission (to email or mark invoices as sent) |
Granted per permission group under Security › Users |
|
Customer Invoice Email - From Email, - Subject and - Body settings |
Security › Settings, then search for Customer Invoice Email |
|
Working email delivery (SendGrid) for your branch |
Security › Settings, then search for SendGrid |
The subject and body are templates. They can include placeholders such as {{customer.name}}, {{number}} and {{due_date}}, which are filled in for each invoice when the email is sent - see Placeholders You Can Use below for the full list.
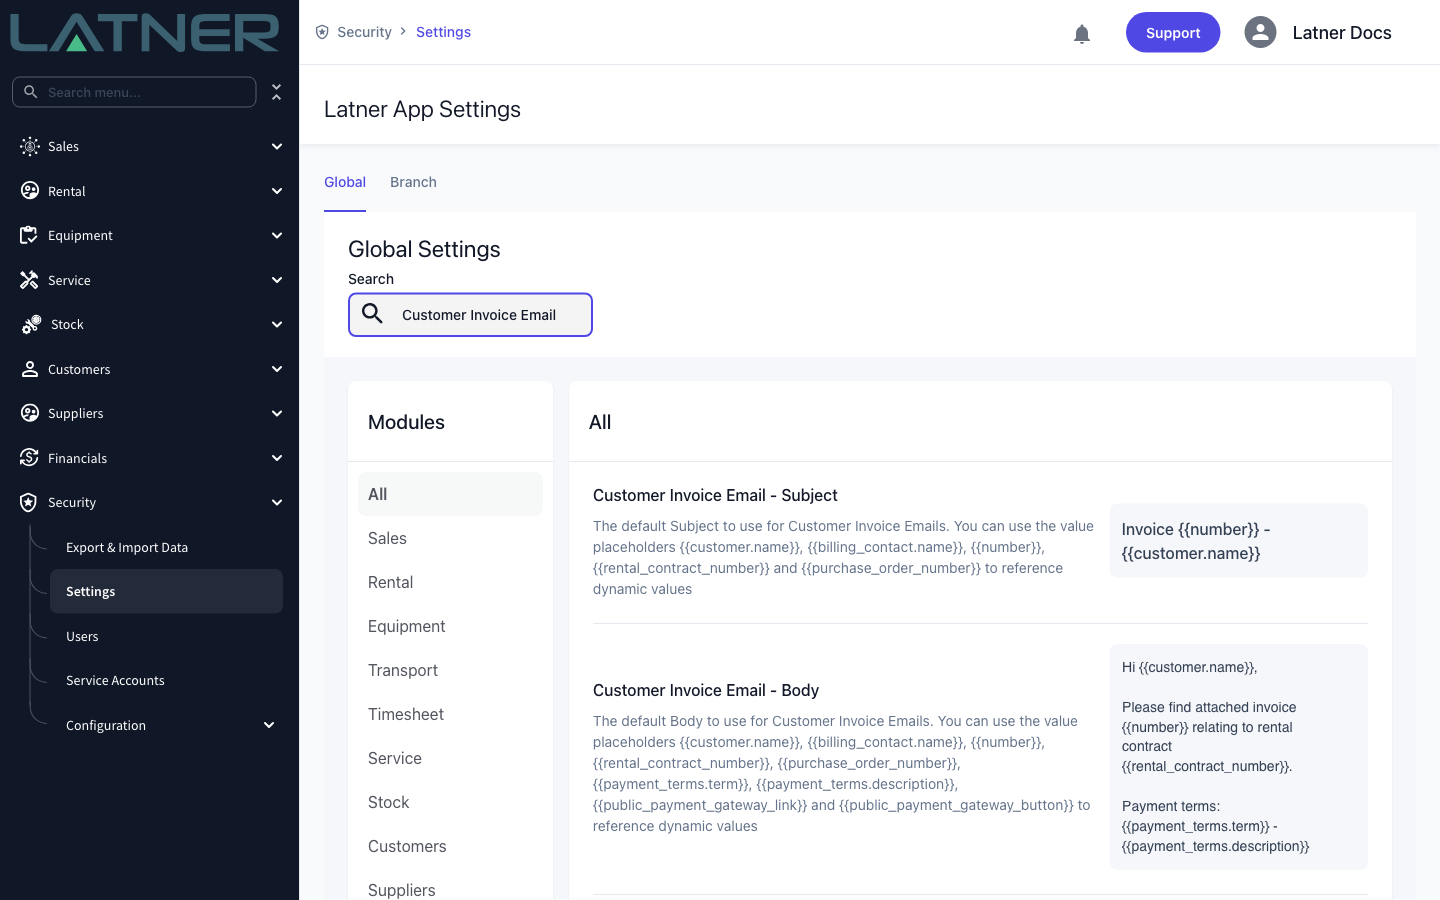
If the From Email, Subject or Body setting is empty, the send is stopped before it starts and you will see a message such as "The Customer Invoice Email - From Email setting has not been configured yet". Set the three settings once and every future bulk send uses them.
Placeholders You Can Use
The subject and body of your invoice emails are templates. Wherever you type a placeholder (also called a merge field), Latner swaps in that invoice's own value as each email is sent, so one template works for every invoice in the batch. The same placeholders work in both sets of settings under Security › Settings › Email:
-
Customer Invoice Email - Subject and - Body - used by Email Invoices on the Unsent tab, and when you email a single invoice from the invoice itself.
-
Resend Customer Invoice Email - Subject and - Body - used by Resend Invoices on the Follow Up tab.
In the subject or the body:
-
{{customer.name}}- the customer's name -
{{billing_contact.name}}- the name of the invoice's billing contact -
{{number}}- the invoice number -
{{rental_contract_number}}- the rental contract the invoice was raised from -
{{purchase_order_number}}- the customer's purchase order number on the invoice -
{{due_date}}- the invoice's due date, for example 14/10/2026 (when you email a single invoice from the invoice itself, it reads 14 Oct 2026) -
{{payment_terms.term}}and{{payment_terms.description}}- the invoice's payment terms
In the body only:
-
{{public_payment_gateway_link}}- the web address where the customer can pay the invoice online -
{{public_payment_gateway_button}}- a Pay Now link to the same payment page
For example, an overdue reminder in the Resend Customer Invoice Email - Body could open with:
Invoice {{number}} was due on {{due_date}} and is now overdue.
Each invoice in the run is filled in with its own number and due date, so a batch of twenty overdue invoices sends twenty correctly worded reminders.
Type placeholders exactly as shown, double curly braces included - they are case sensitive. The setting descriptions on the Settings screen don't list every placeholder: {{due_date}} works even though it isn't mentioned there. The payment link placeholders only produce a link when an online payment gateway (such as eWay) is set up and the invoice has a payment link. If an invoice has no value for a placeholder - no purchase order number, say - it comes out blank or as a filler such as N/A, so word the sentence so it still reads well either way.
Credit notes are emailed with their own Credit Note Email settings, so this list is for invoice emails.
Emailing Invoices in Bulk
Step 1 - Open the Bulk Email Invoices screen
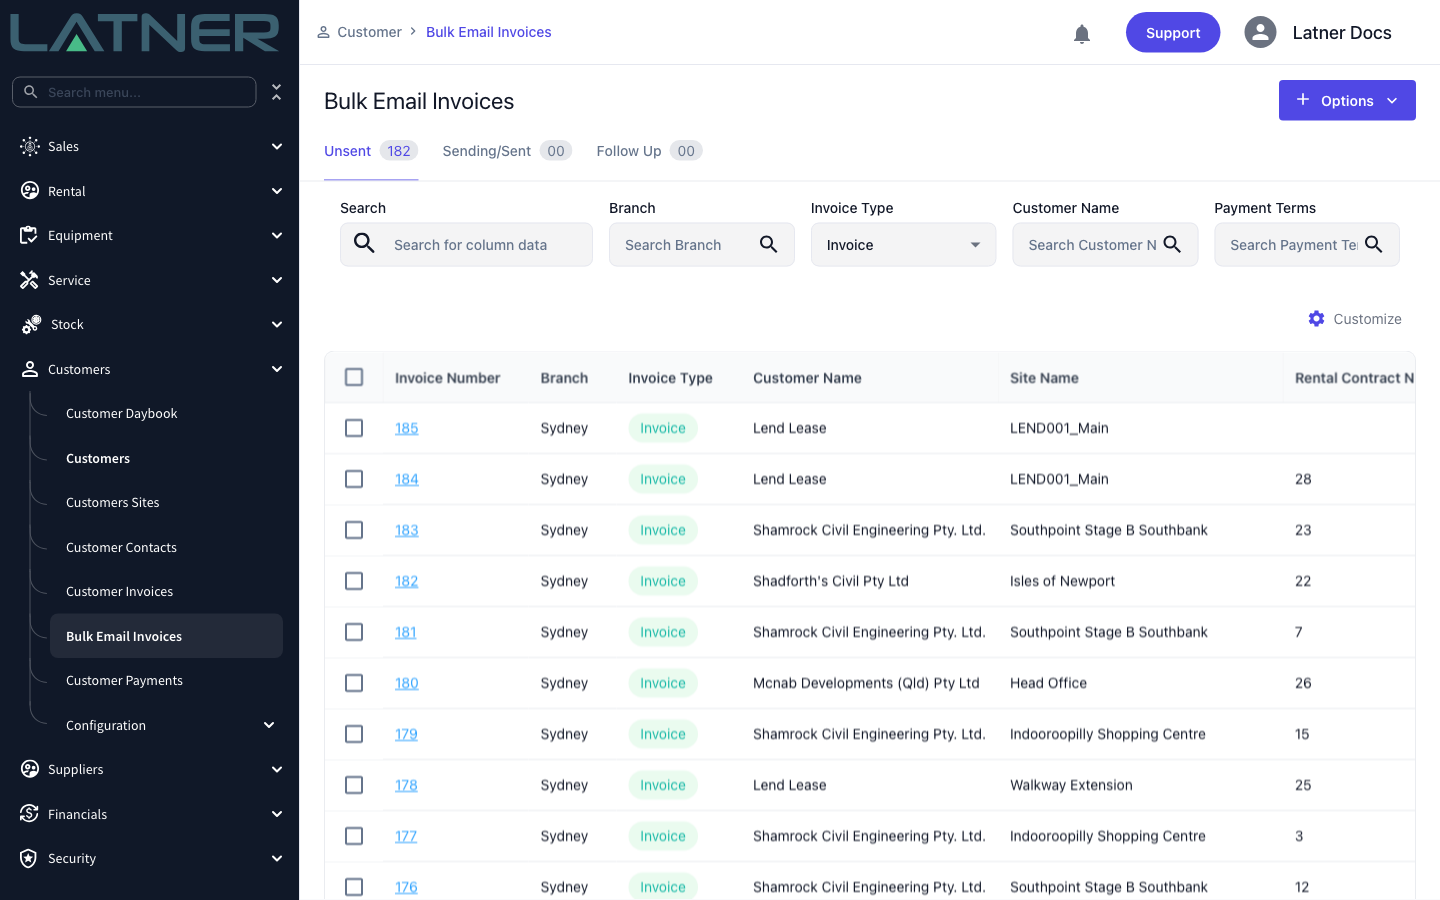
Go to Customers › Bulk Email Invoices. The screen opens on the Unsent tab, which lists every Completed or Paid invoice that has not yet been emailed. The count next to each tab tells you how many invoices are waiting.
Use the Branch, Invoice Type, Customer Name and Payment Terms filters, or the search box, to narrow the list down to the invoices you want to send.
Step 2 - Select the invoices to send
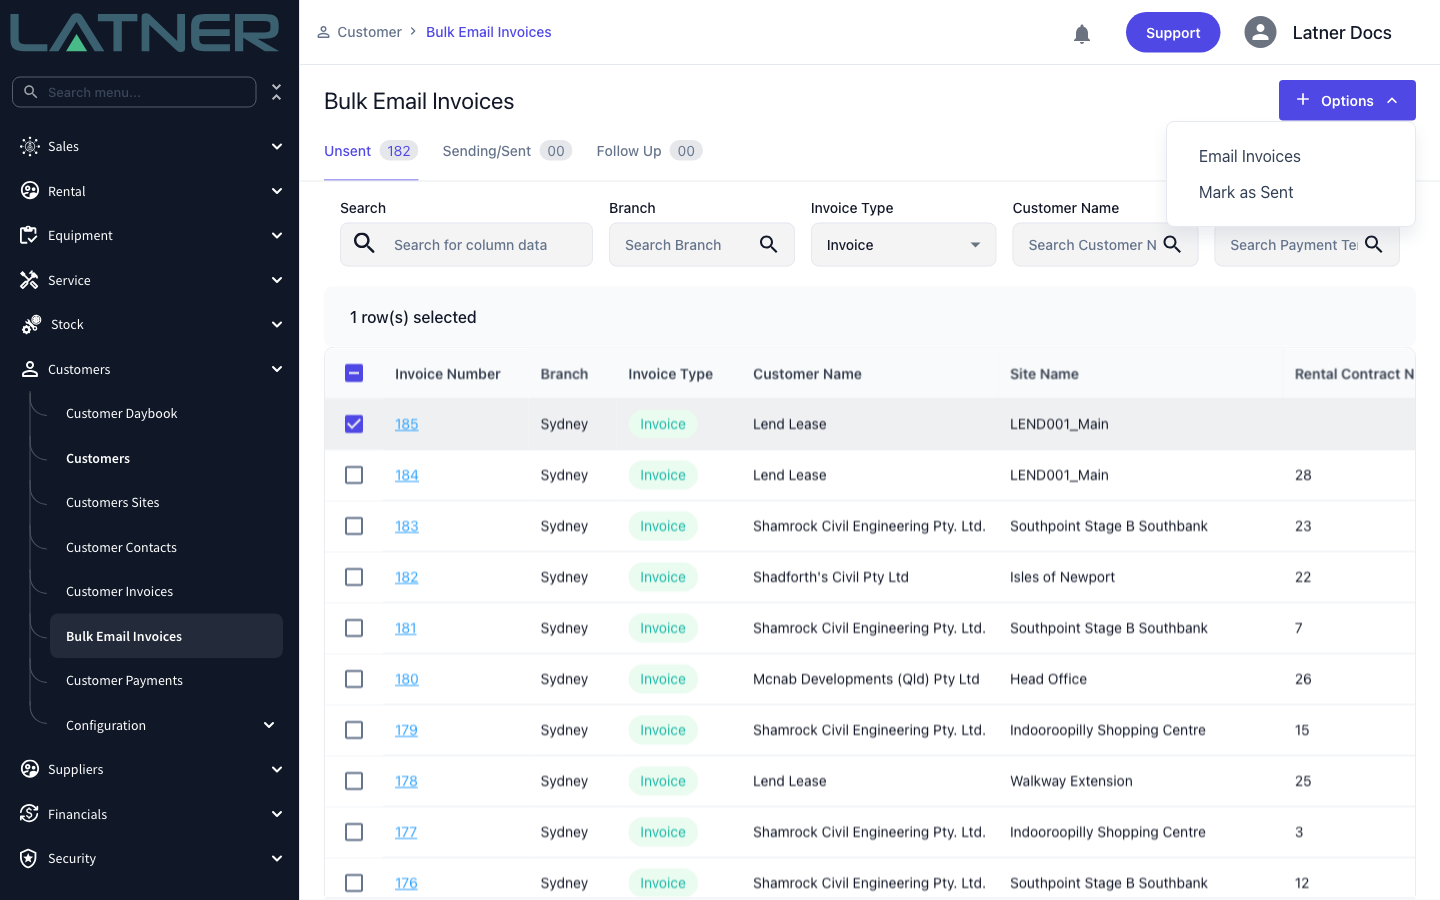
Tick the checkbox on each invoice you want to email. To send the whole filtered list, tick the checkbox in the table header - this selects every matching invoice, not just the ones on the current page.
With at least one invoice selected, open the Options menu in the top right. On the Unsent tab it offers Email Invoices and Mark as Sent.
Step 3 - Choose the recipient
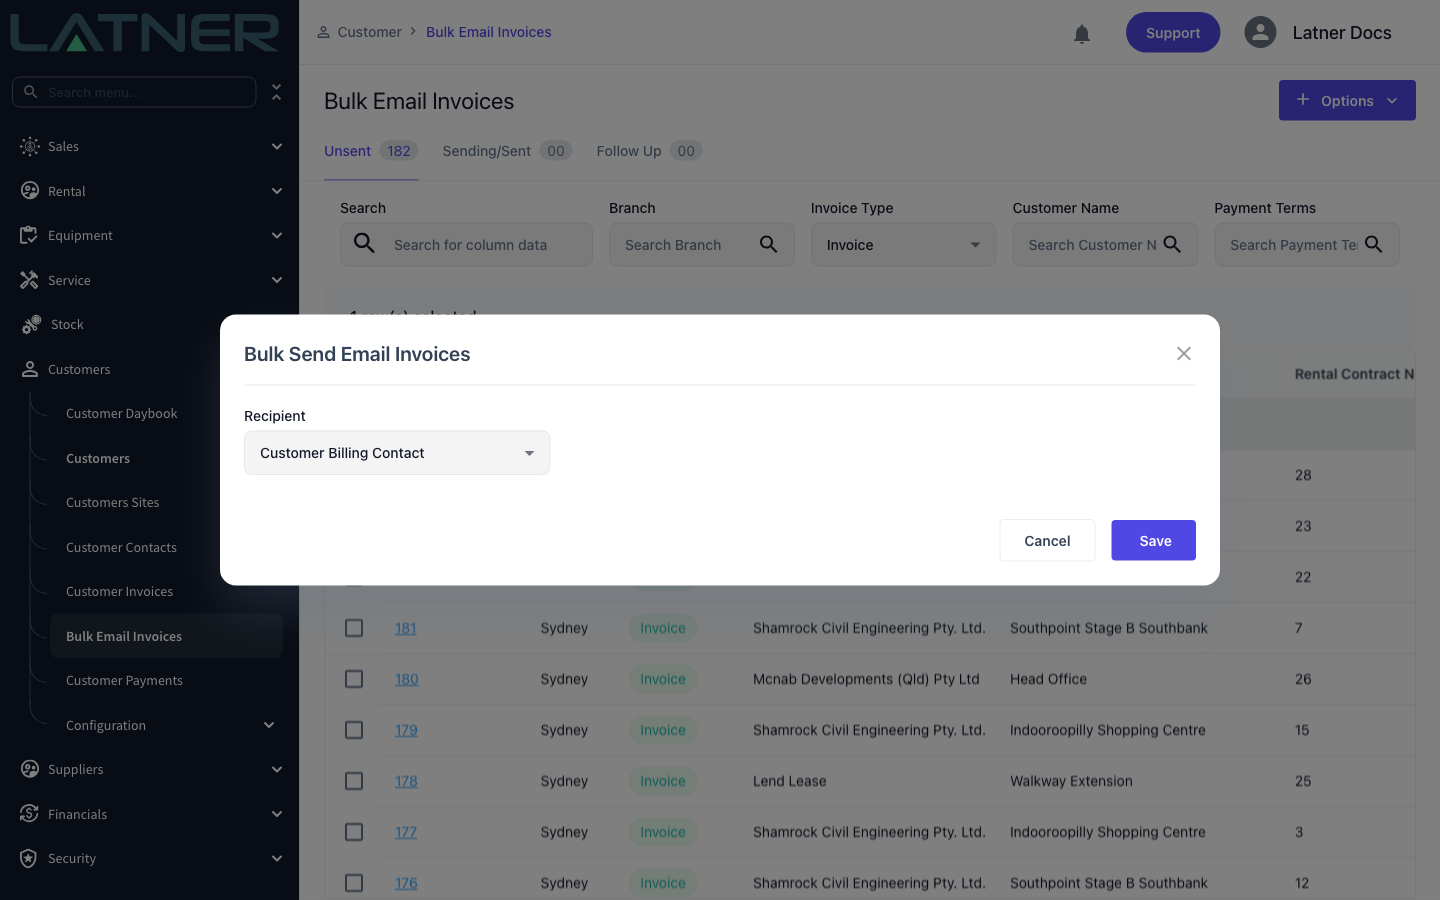
Select Email Invoices to open the Bulk Send Email Invoices dialog. The only field to start with is Recipient:
-
Customer Billing Contact - emails each invoice to the billing contact recorded against that invoice. This is the normal choice for sending to customers. That is the site's Billing Contact when the invoice was raised against a site that has one, otherwise the customer's, and every address on the contact receives the invoice. See How to Set Up Billing Contacts for Customers and Sites.
-
Latner User - sends every selected invoice to one of your own Latner users instead of the customer. Use this to preview the email and PDF before a customer sees it.
Step 4 - Set the extra options for a Latner user (if needed)
When you choose Latner User, two more fields appear:
-
User - search for and select the Latner user who should receive the copies. This field is required.
-
Mark Invoice as Sent? - leave this unticked to keep the invoices on the Unsent tab (a true preview), or tick it if you want the invoices treated as sent once the copy goes out.
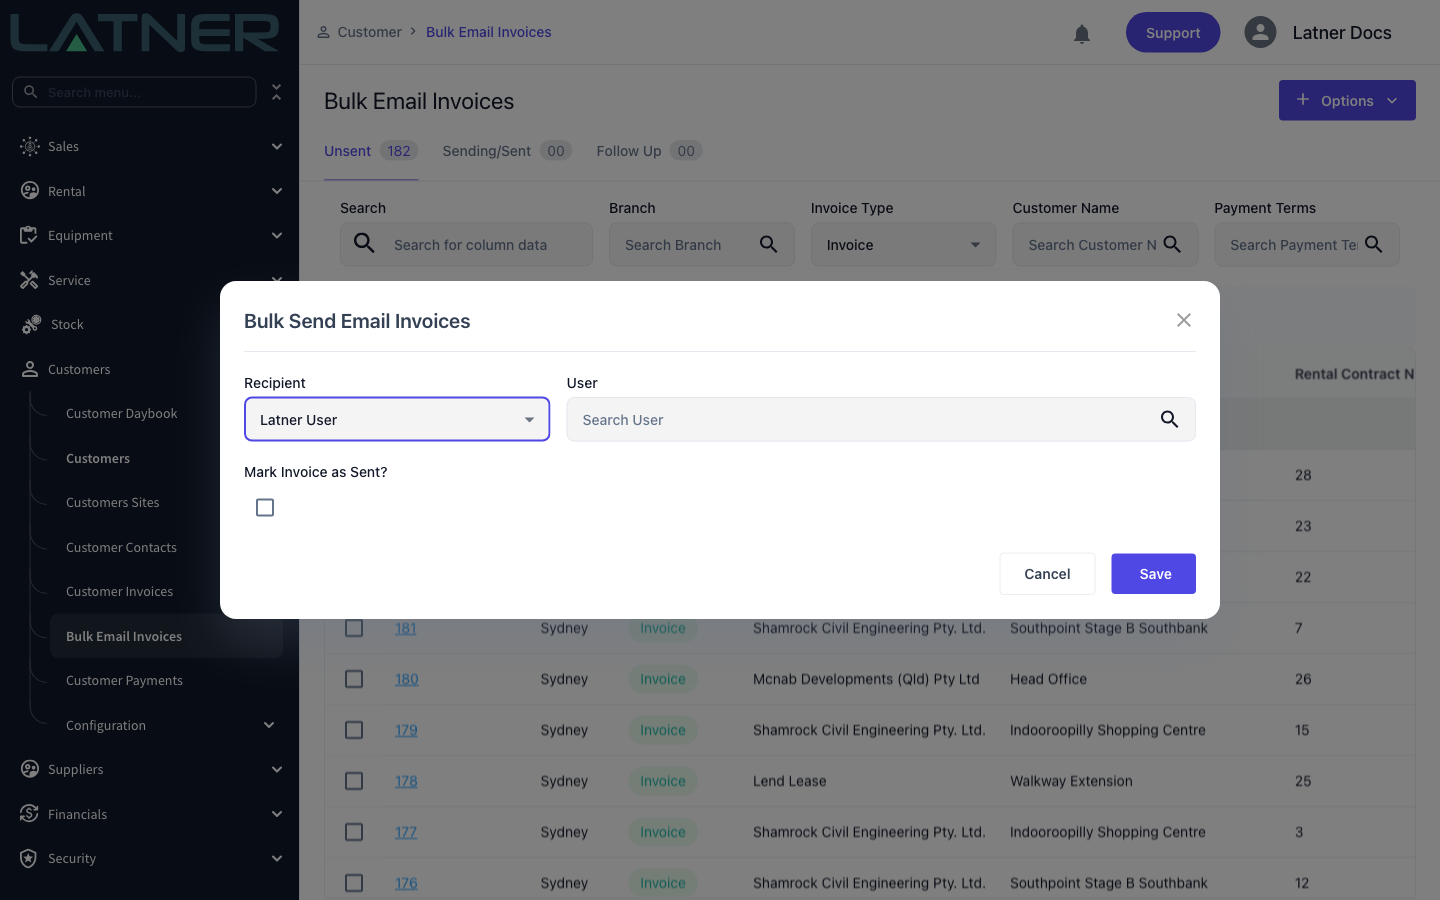
When you send to the Customer Billing Contact, each invoice is marked as sent automatically as its email goes out, and it moves off the Unsent tab. Sending to a Latner user does not mark invoices as sent unless you tick Mark Invoice as Sent?.
Step 5 - Send
Select Save to start the send. Latner creates a bulk run in the background - it generates a PDF for each invoice and emails it - and moves you to the Sending/Sent tab so you can watch progress. The invoices you sent to their billing contact drop off the Unsent tab as they complete.
Alternative - Mark invoices as sent without emailing
If you have already delivered an invoice another way (for example, posted it or emailed it by hand), select the invoices and choose Options › Mark as Sent. Latner asks you to confirm, then stamps those invoices as sent and moves them off the Unsent tab. No email is sent.
Marking invoices as sent cannot be undone. Only use it for invoices you really have delivered - otherwise they disappear from the Unsent tab and will not be picked up by a later bulk email.
Monitoring the Send
The Sending/Sent tab lists every bulk run. Each row shows the run's Send Status (Pending, Running, Completed or Failed), the Total number of invoices, how many Completed and Failed, who sent it, and the timestamps.
Expand a run to see one row per invoice, with a link to the generated PDF, the To Email address, the email Subject, and that invoice's own send status. If an invoice's status is Failed, select it to read the reason it did not send.
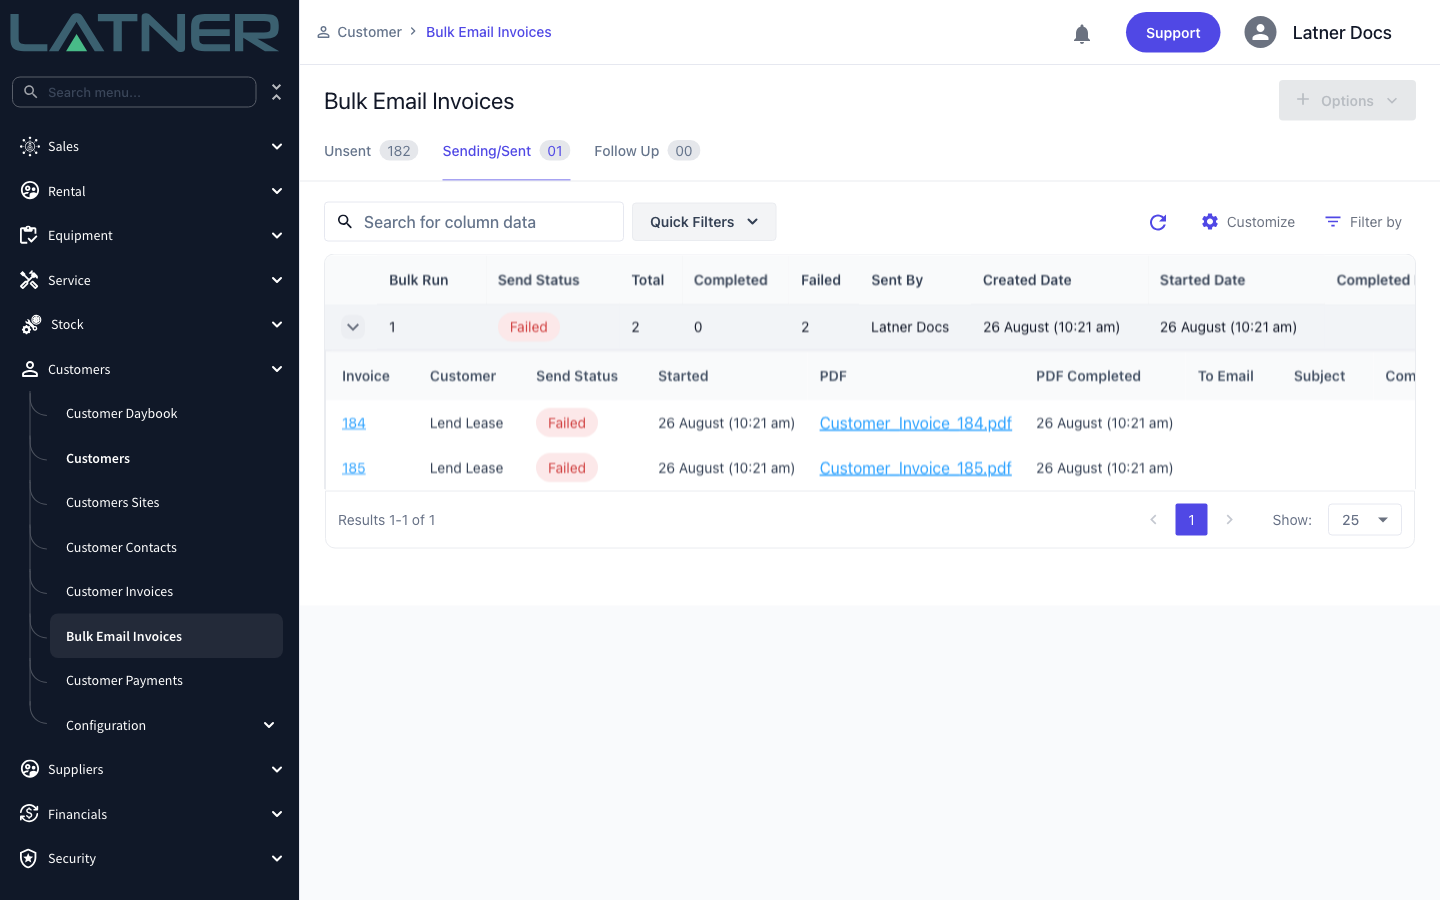
Use the Failed quick filter to jump straight to runs that had a problem. A common cause is a billing contact with no email address, or email delivery (SendGrid) not being set up for the branch.
Following Up on Unpaid Invoices
The Follow Up tab lists invoices that have already been sent but are still unpaid, with a Due Date column and a Due Before filter so you can focus on overdue accounts. Selecting invoices there and choosing Options › Resend Invoices emails them again using your Resend Customer Invoice Email settings, which take the same placeholders - including {{due_date}} for an overdue reminder. For the full follow-up workflow, see How to Bulk Follow Up Emailed Customer Invoices.