
Latner provides multiple ways to generate invoices, depending on the type of transaction or workflow you’re managing. This flexibility ensures that all billing scenarios are covered, from rentals to services to ad‑hoc charges.
Below are the available invoicing methods:
Rental Contract Invoice
For more details, see the Rental Department processes.
A Progress Invoice bills a rental contract for everything that has fallen due since the last invoice, so you can charge a long hire in stages instead of waiting for the equipment to come back.
Overview
Most hires outlast a billing cycle. A machine that goes out in July and comes back in November shouldn't sit uninvoiced for four months, and the Progress Invoice is how you keep that money moving without touching the contract itself.
-
Bills each equipment line from its Last Billed To Date up to the Bill To date you choose, then moves the Last Billed To Date forward so the next invoice carries on from there.
-
Picks up everything else that is waiting for the next invoice: transport charges, fuel, sanitation dockets, labour, damage, admin charges and any outstanding manual billing lines.
-
Skips lines whose Invoicing Stage is set to Return Invoice - those charges are held back until you raise a Return or Final Invoice.
-
Leaves the hire running. The contract stays Active, the equipment stays on rent, and you can raise the next Progress Invoice whenever the customer's cycle falls due.
-
Always shows you a preview before it commits, so you can see exactly what will be charged and untick anything you aren't ready to bill.
Before You Begin
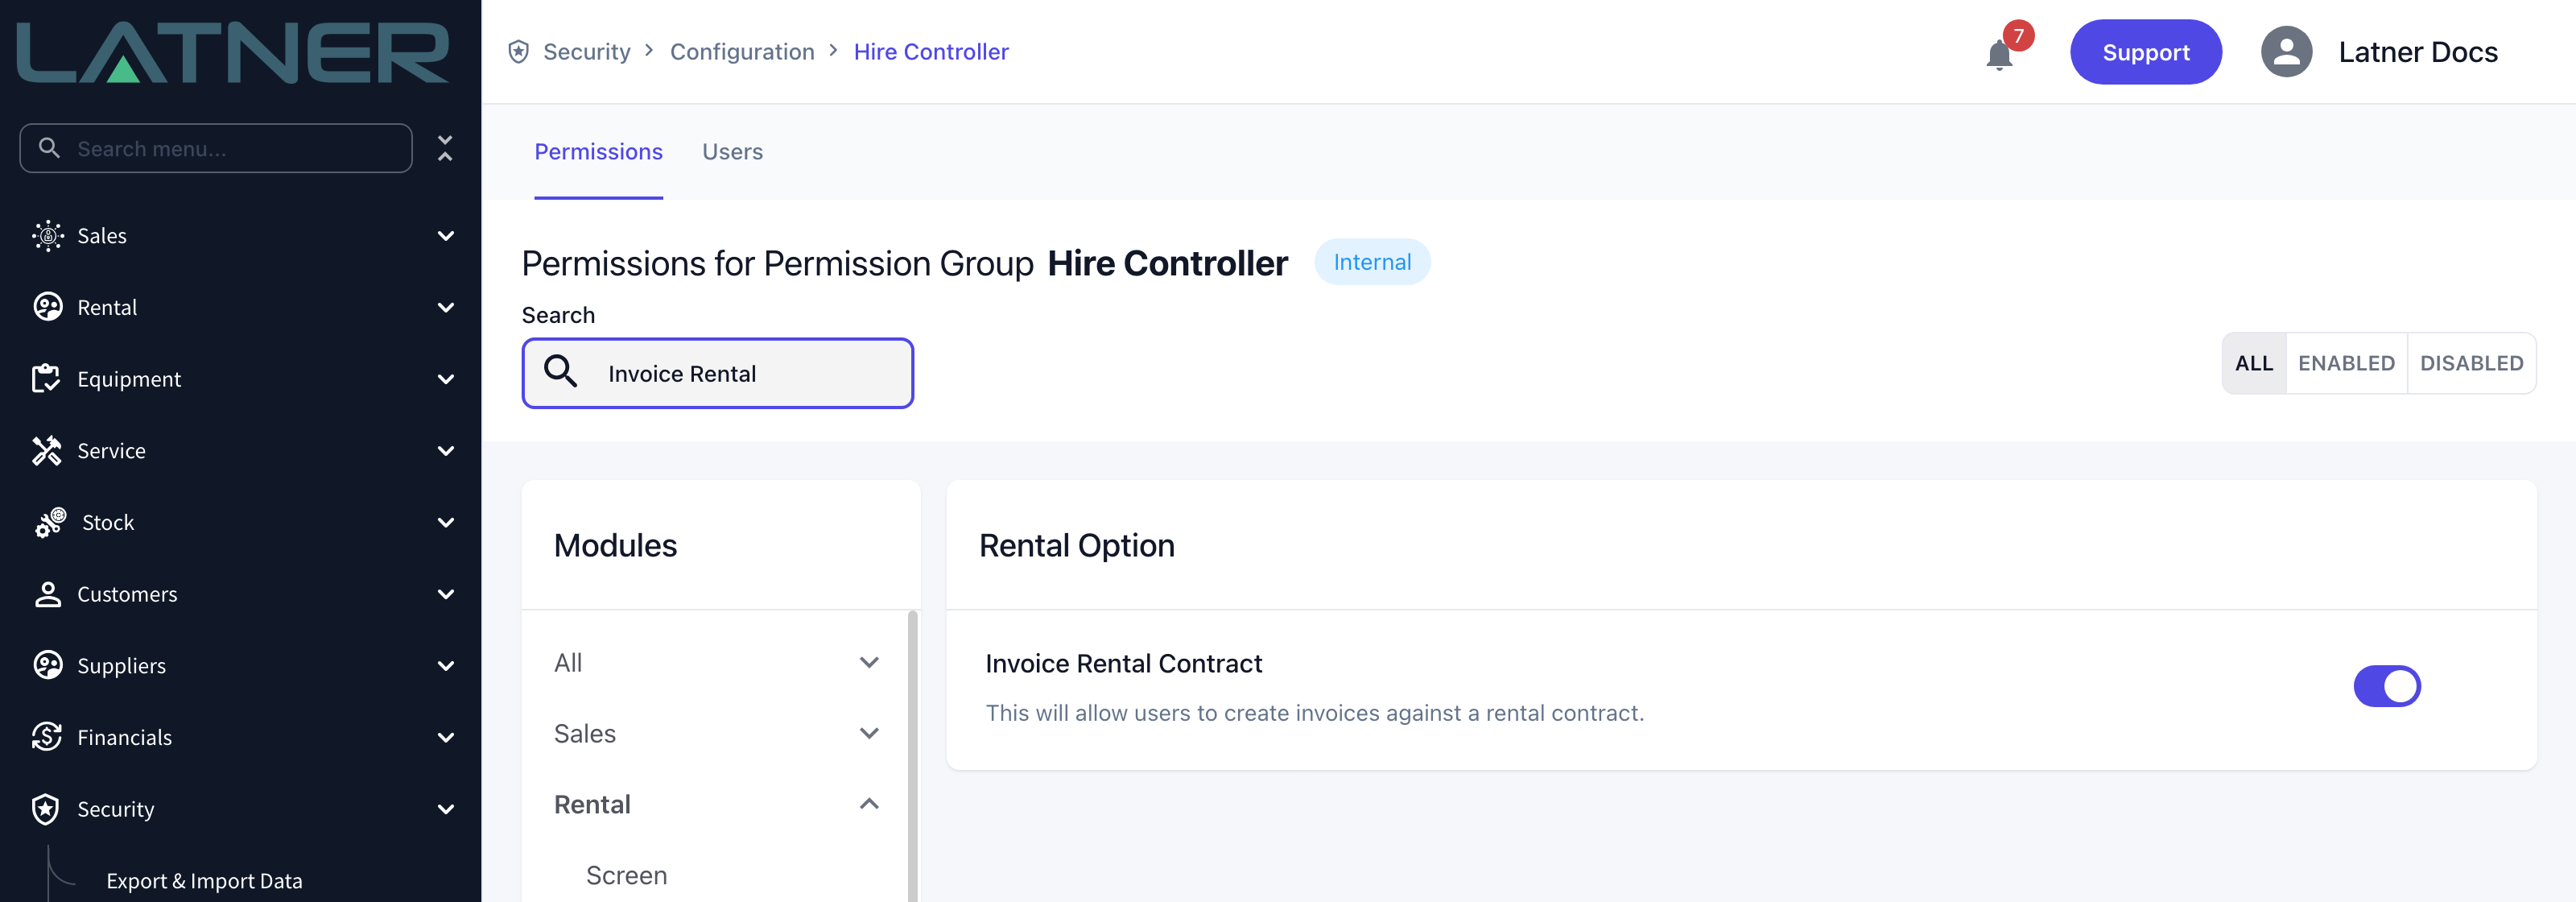
You need one permission and a contract with something left to bill.
|
Requirement |
Where to Find It |
|---|---|
|
Invoice Rental Contract permission |
Security › Configuration › Permission Groups › your group › Rental › Option |
|
A rental contract that is Active or Reserved |
Rental › Rental Contracts - check the Contract Status at the top of the contract |
|
At least one line with time or charges left to bill |
The contract's Details tab - check Last Billed To Date |
|
Credit Card Surcharge Percentage setting (only if you tick Credit Card Surcharge?) |
Security › Settings › Financials |
The Invoice option is greyed out once a contract is Completed, Cancelled or Lost. A billing hold does not block it - Hold Billing only takes the contract out of Cycle Billing, so you can still invoice a held contract on its own from the contract itself.
Creating the Progress Invoice
Step 1 - Check what is outstanding
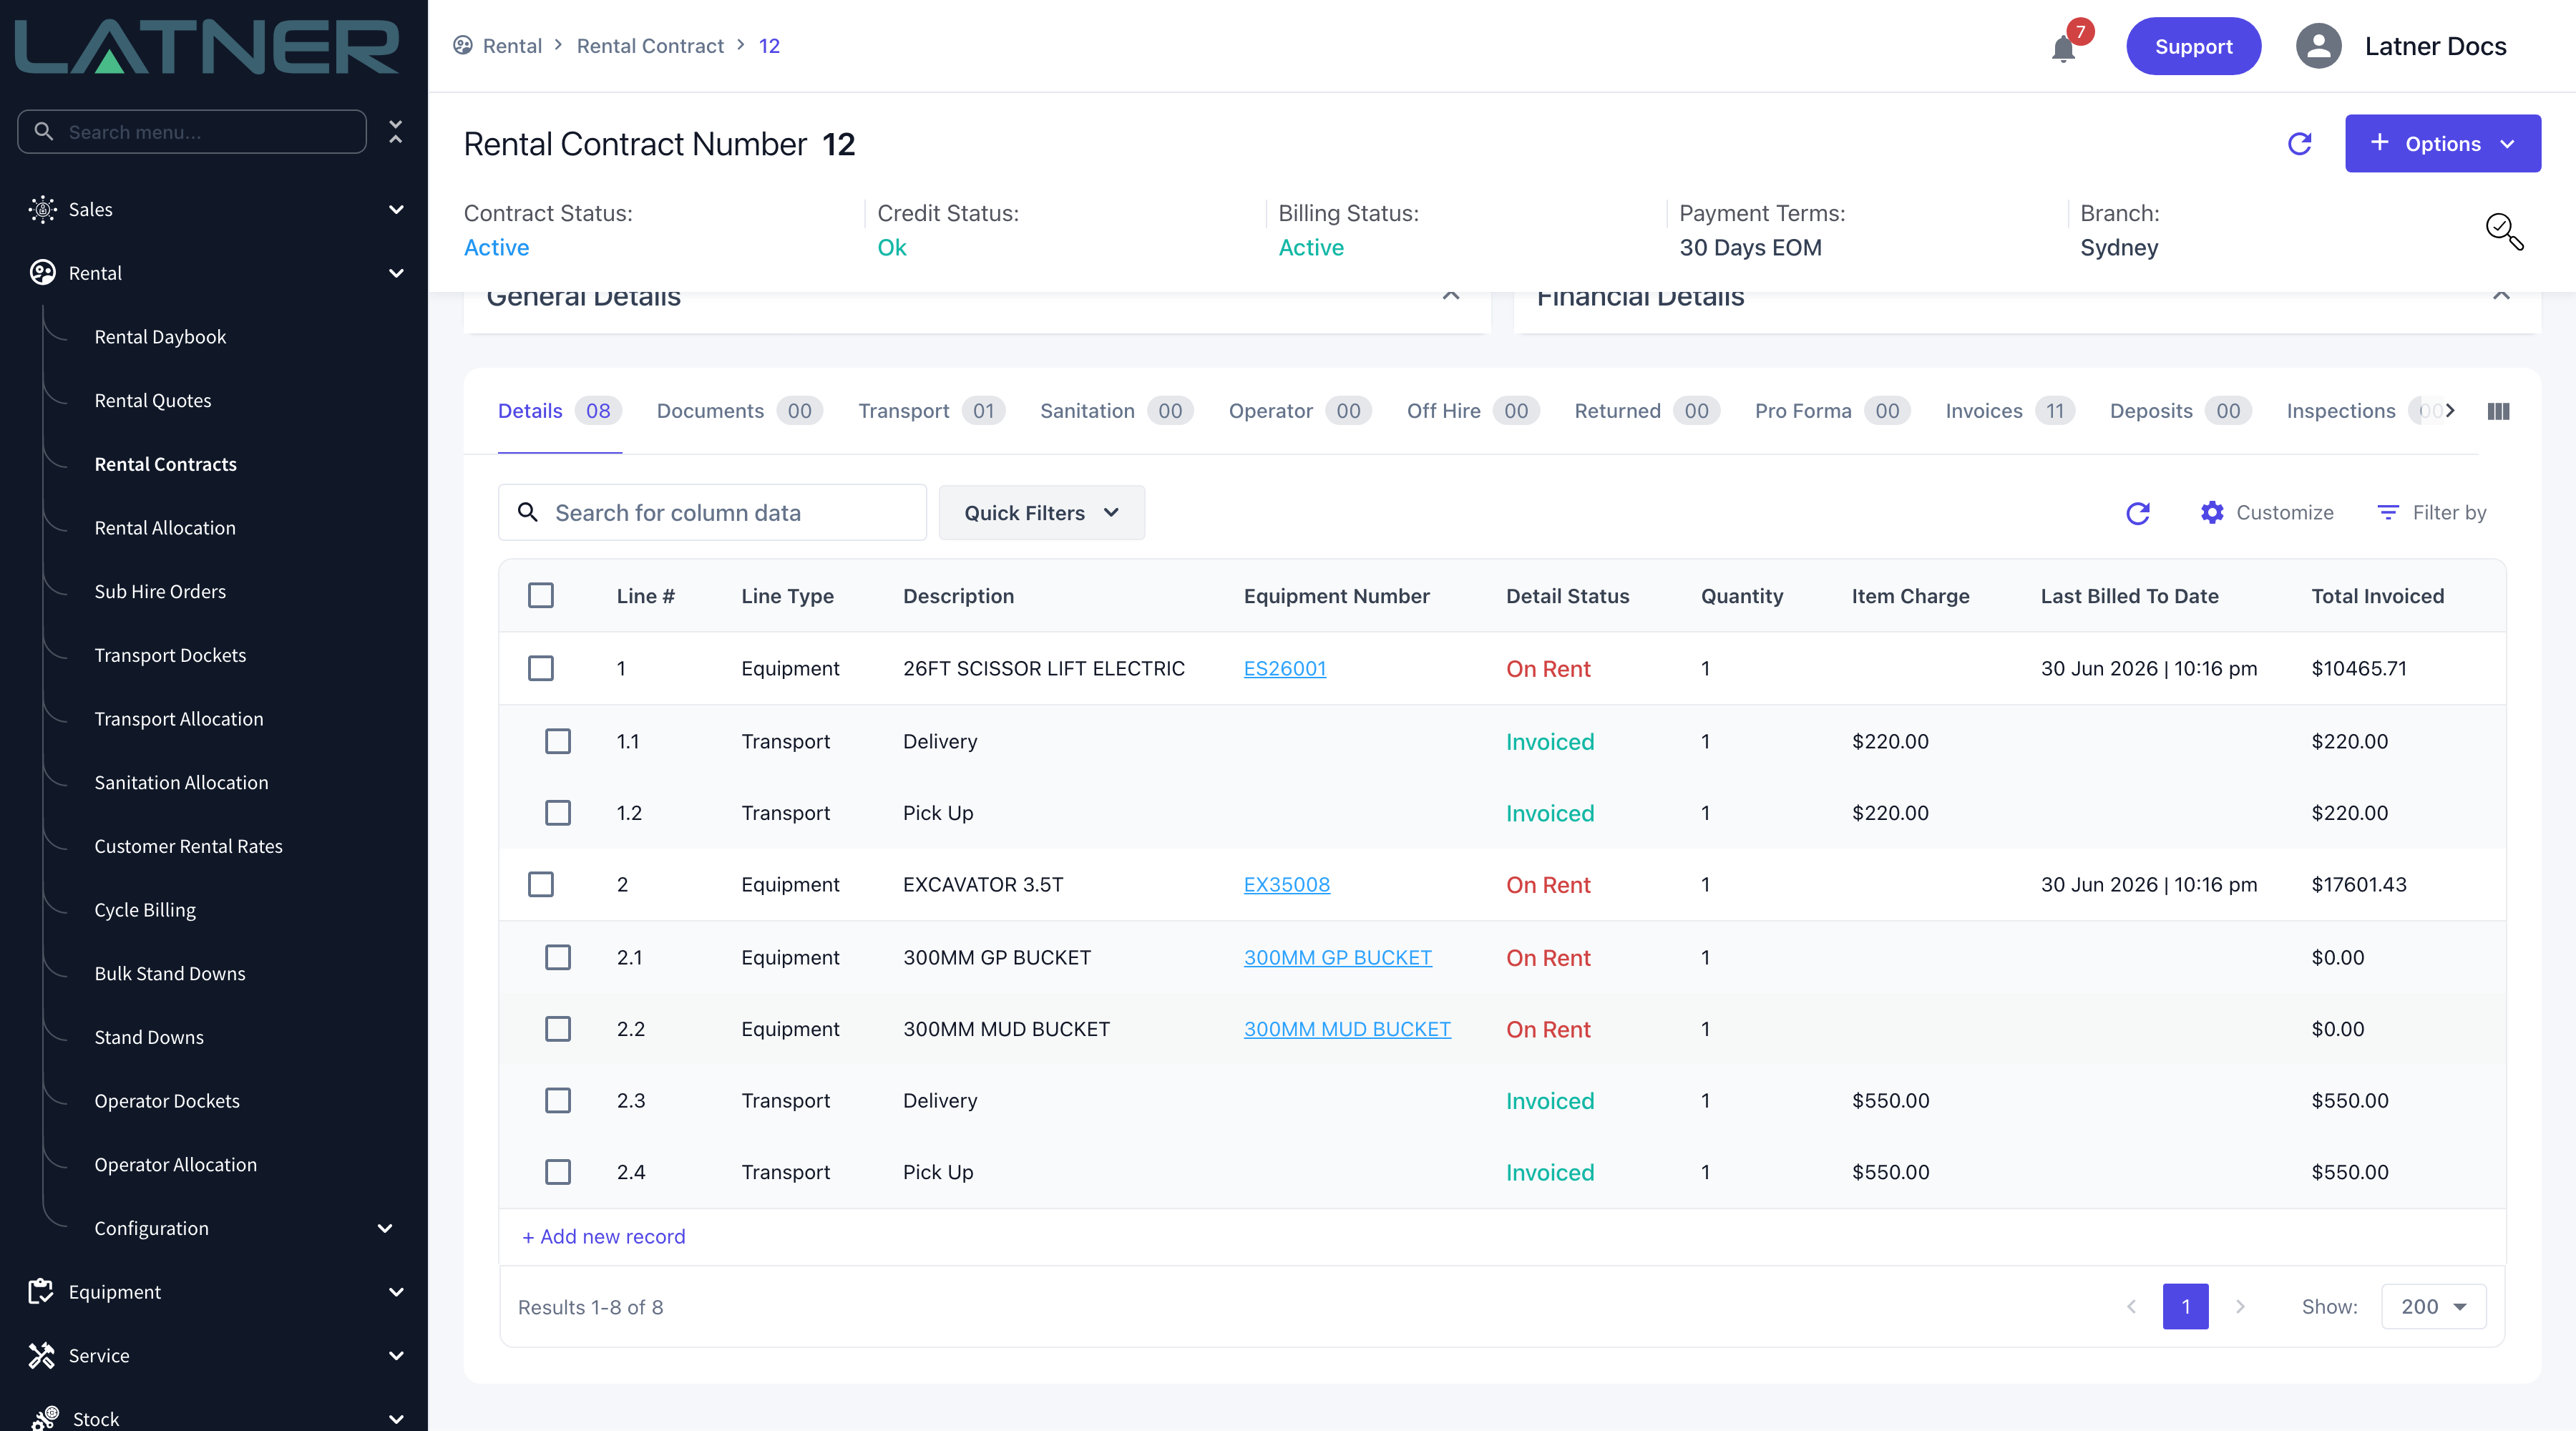
Open the contract from Rental › Rental Contracts and look at the Details tab. The Last Billed To Date column tells you where each equipment line stopped last time; anything after that date is still to charge. If the column isn't showing, add it from Customize.
Step 2 - Open the invoice dialog
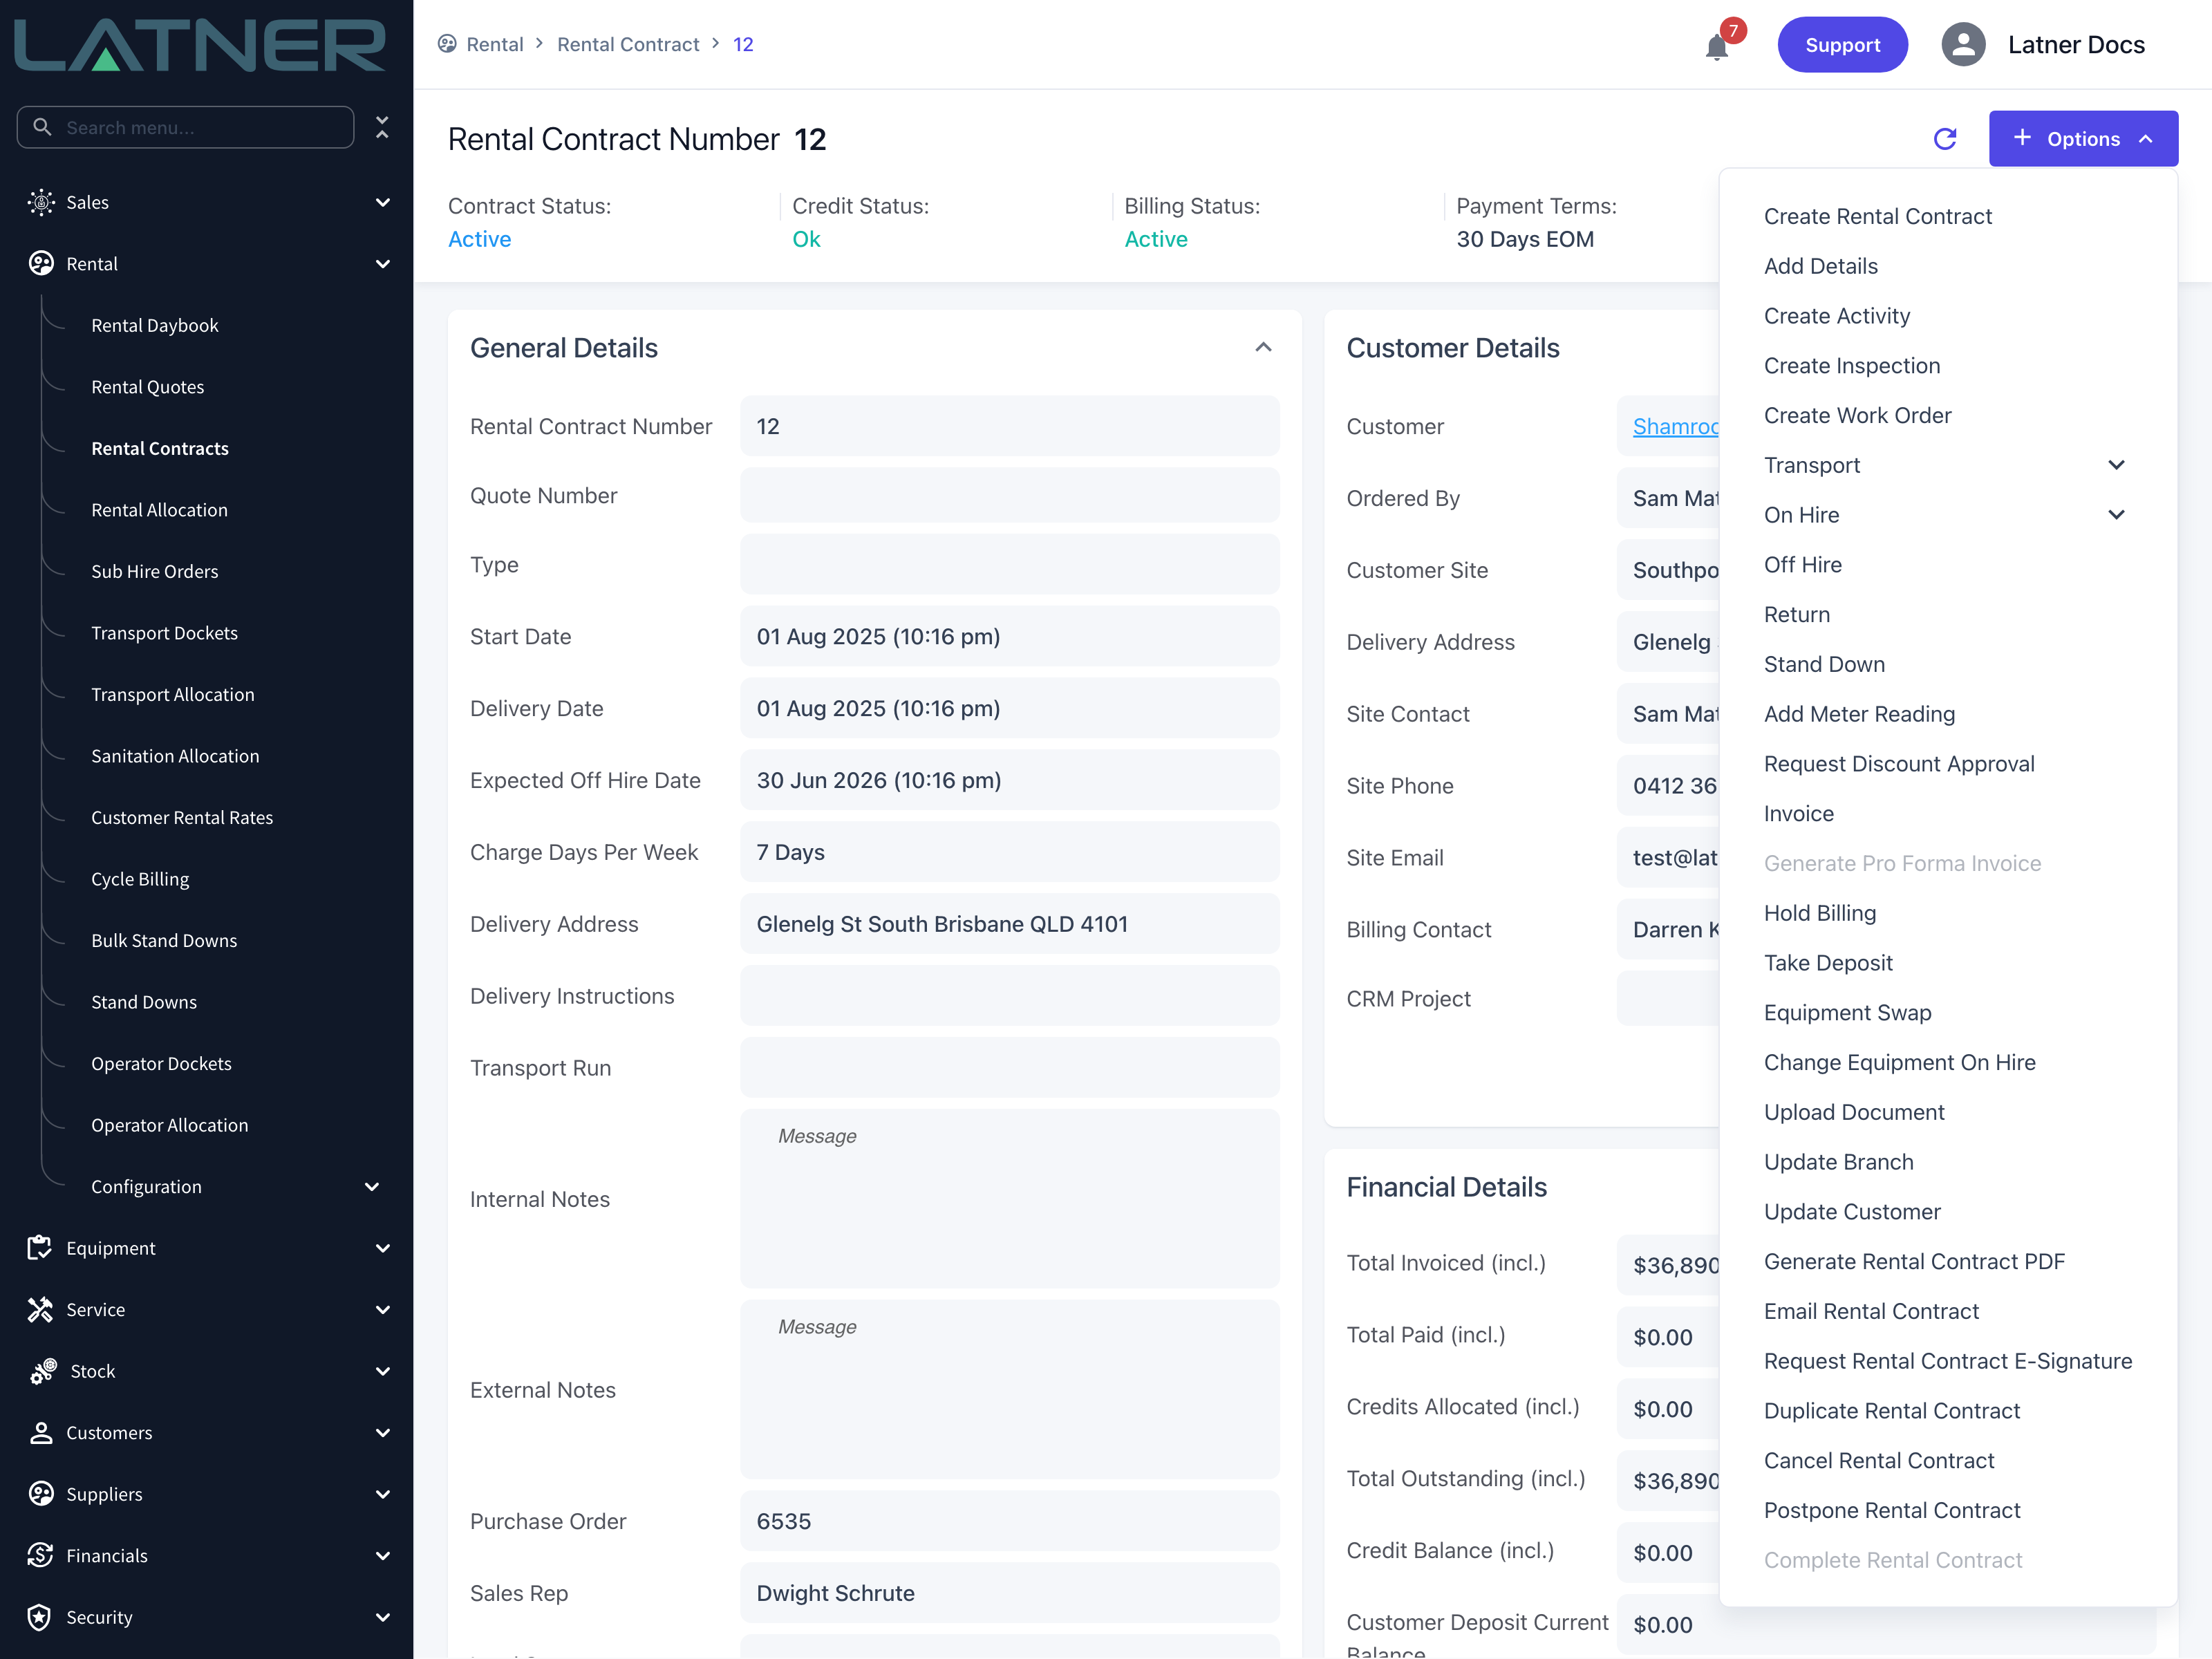
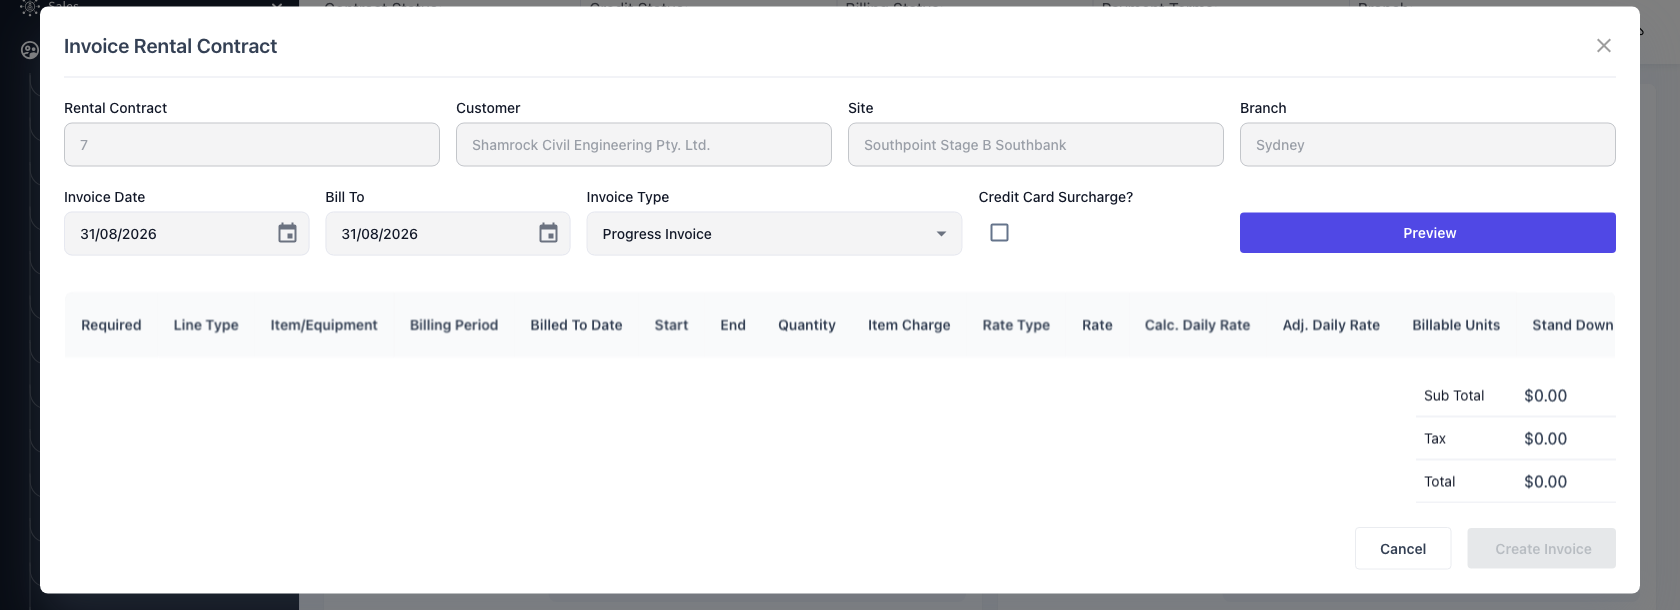
Choose Options › Invoice. The Invoice Rental Contract dialog opens with the contract, customer, site and branch already filled in and read only.
Step 3 - Set the dates
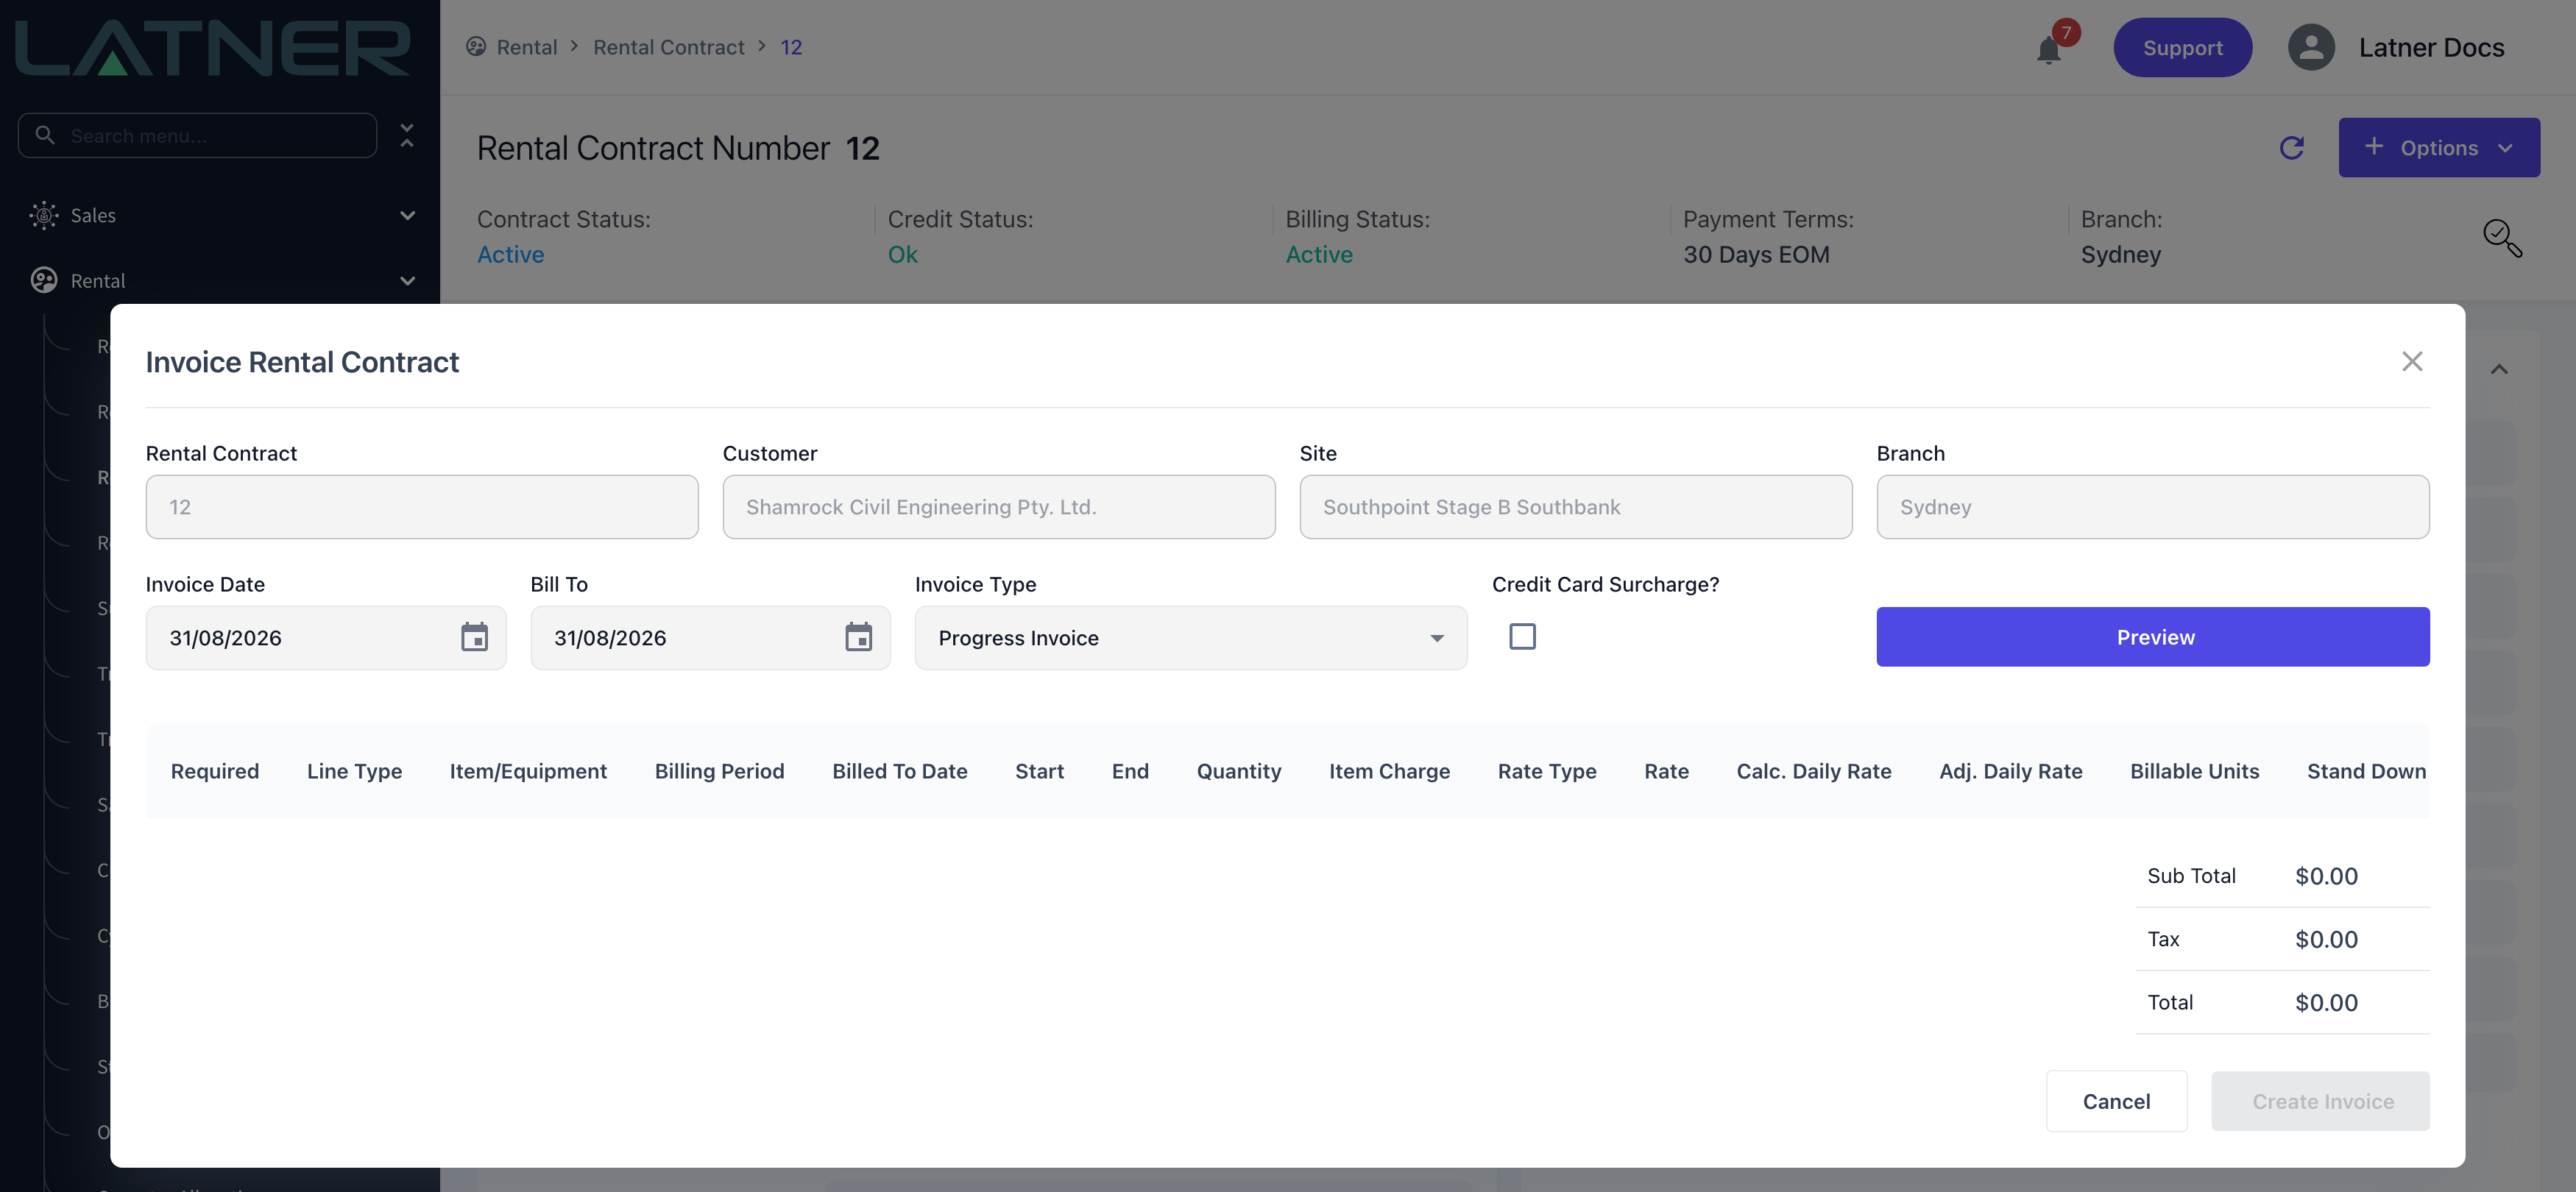
Two dates drive the invoice, and they do different jobs.
-
Invoice Date - required. The date shown on the invoice and the date the due date is calculated from. Defaults to today.
-
Bill To - required. The date to bill the rental contract up until. This is the one that decides how much hire time goes on the invoice. Defaults to today, except for cash on delivery customers, where it defaults to the contract's expected off hire date when that date is still in the future.
-
Credit Card Surcharge? - optional. Adds a credit card surcharge line to the invoice. It is ticked automatically for cash on delivery customers when the Credit Card Surcharge Percentage setting has a value. (Credit card surcharge ban comes into effect on the 1st October 2026)
Step 4 - Choose the invoice type
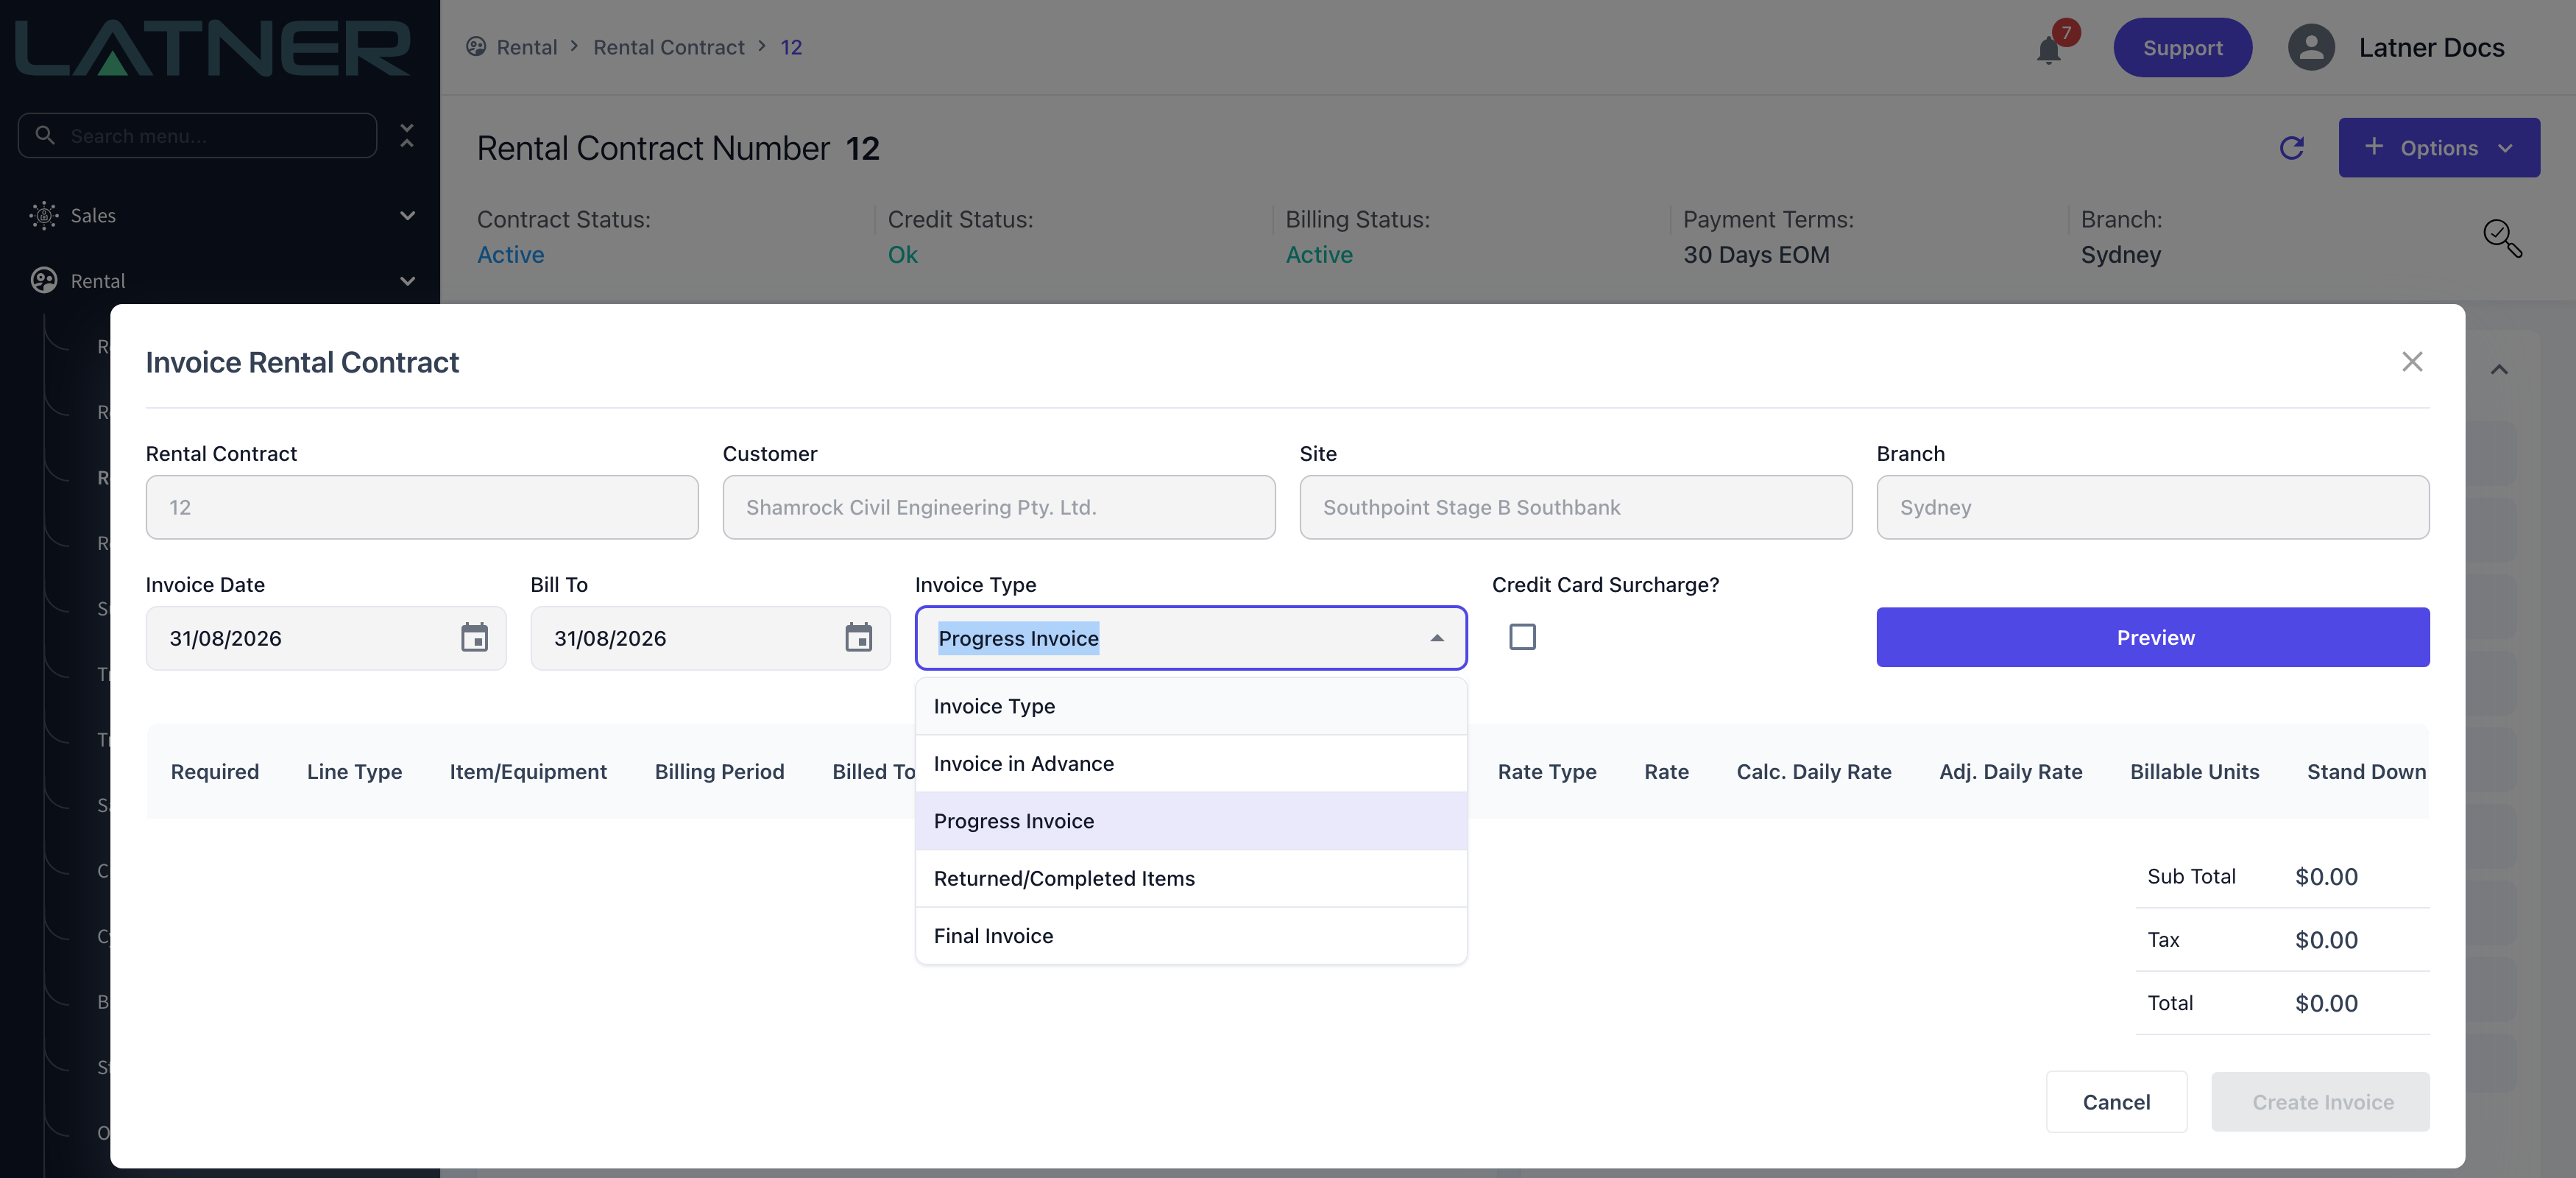
Invoice Type already defaults to Progress Invoice, so most of the time you can leave it alone. The four choices decide which lines are eligible.
-
Invoice in Advance - bills every line up front, whether or not it has gone out yet.
-
Progress Invoice - bills what has fallen due since the last invoice on lines that are already on hire.
-
Returned/Completed Items - bills only lines whose equipment has come back.
-
Final Invoice - bills everything that is left, including the charges held back for the end of the hire.
Step 5 - Preview what will be billed
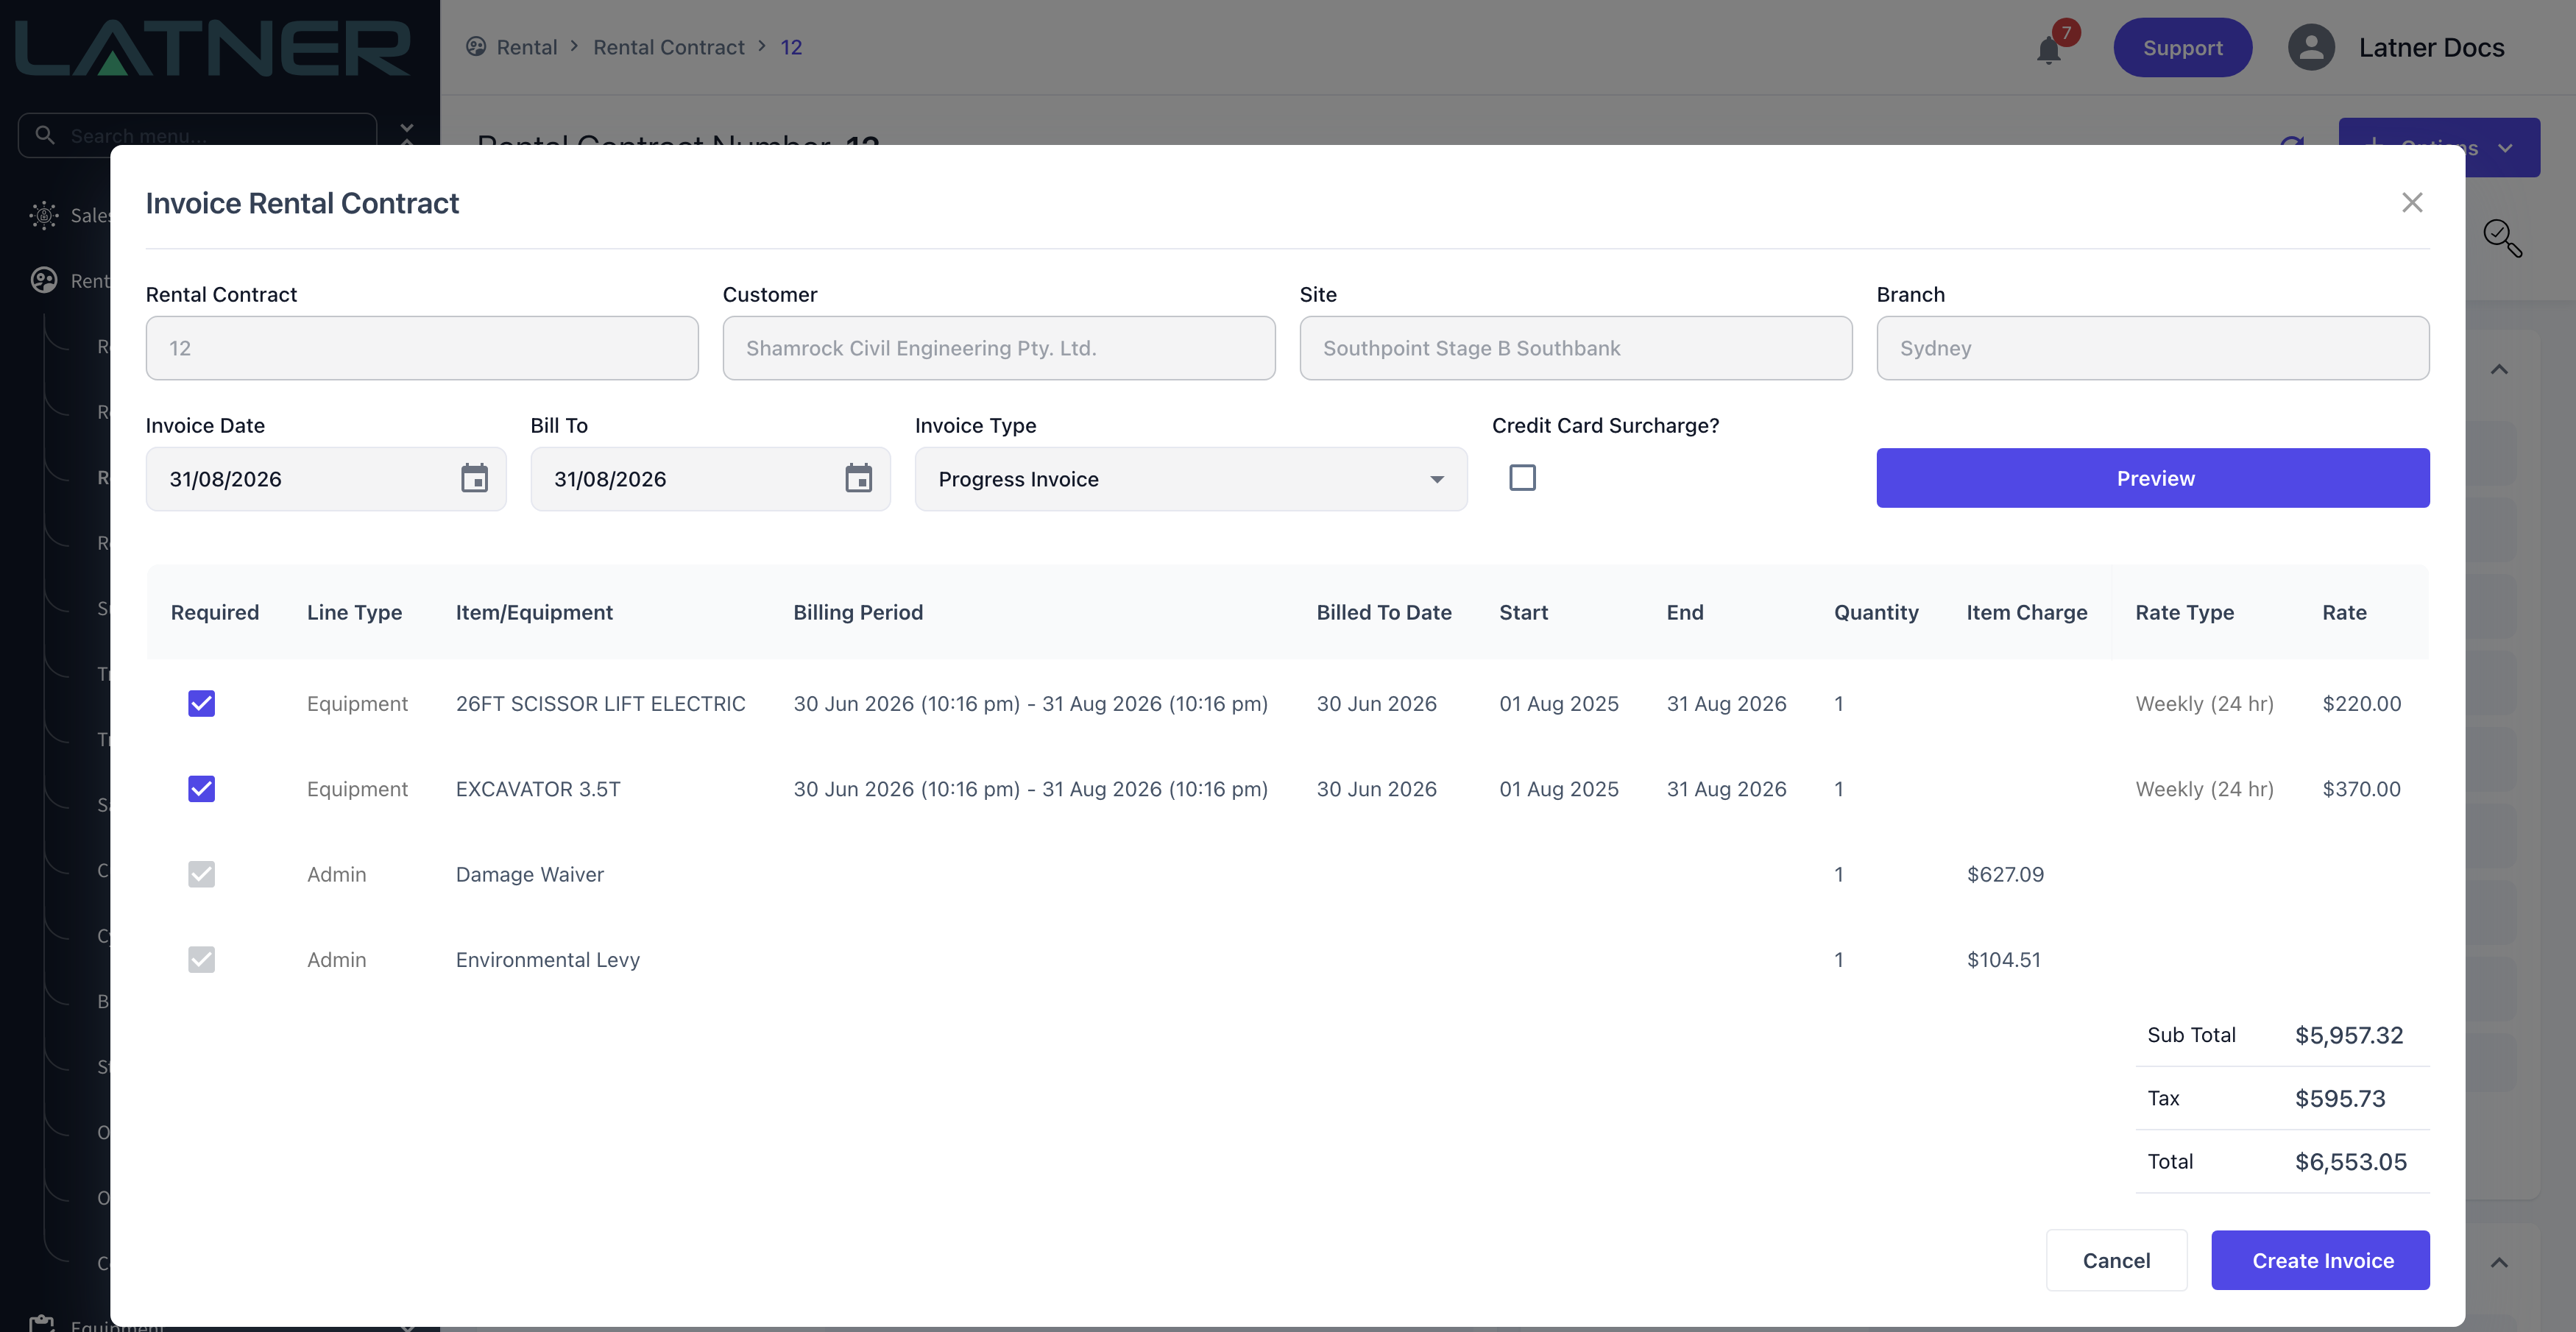
Click Preview. Latner works out the charges and lists one row per line it intends to invoice, with the running Sub Total, Tax and Total underneath.
-
Billing Period - the exact window being charged on that line, from where the last invoice finished up to your Bill To date.
-
Billed To Date - where the line was billed to before this invoice. Blank means the line has never been billed.
-
Rate Type, Rate, Calc. Daily Rate, Adj. Daily Rate and Billable Units - how the charge was worked out, so you can see why a line came to what it did.
-
Required - untick a line to leave it off this invoice. The totals recalculate straight away, and the line stays on the contract for a later invoice.
Some rows can't be unticked. Damage waiver and levy style charges are derived from the lines you are billing rather than being contract lines of their own, so they carry the tooltip "Cannot deselect related lines"; operator docket lines carry "Cannot deselect operator docket lines".
If the preview comes back empty you'll see a Nothing to Invoice message. That means nothing on the contract has fallen due as at your Bill To date - it is not an error. Try a later Bill To date, or check whether the charges you are expecting are set to invoice at the end of the hire.
Step 6 - Create the invoice
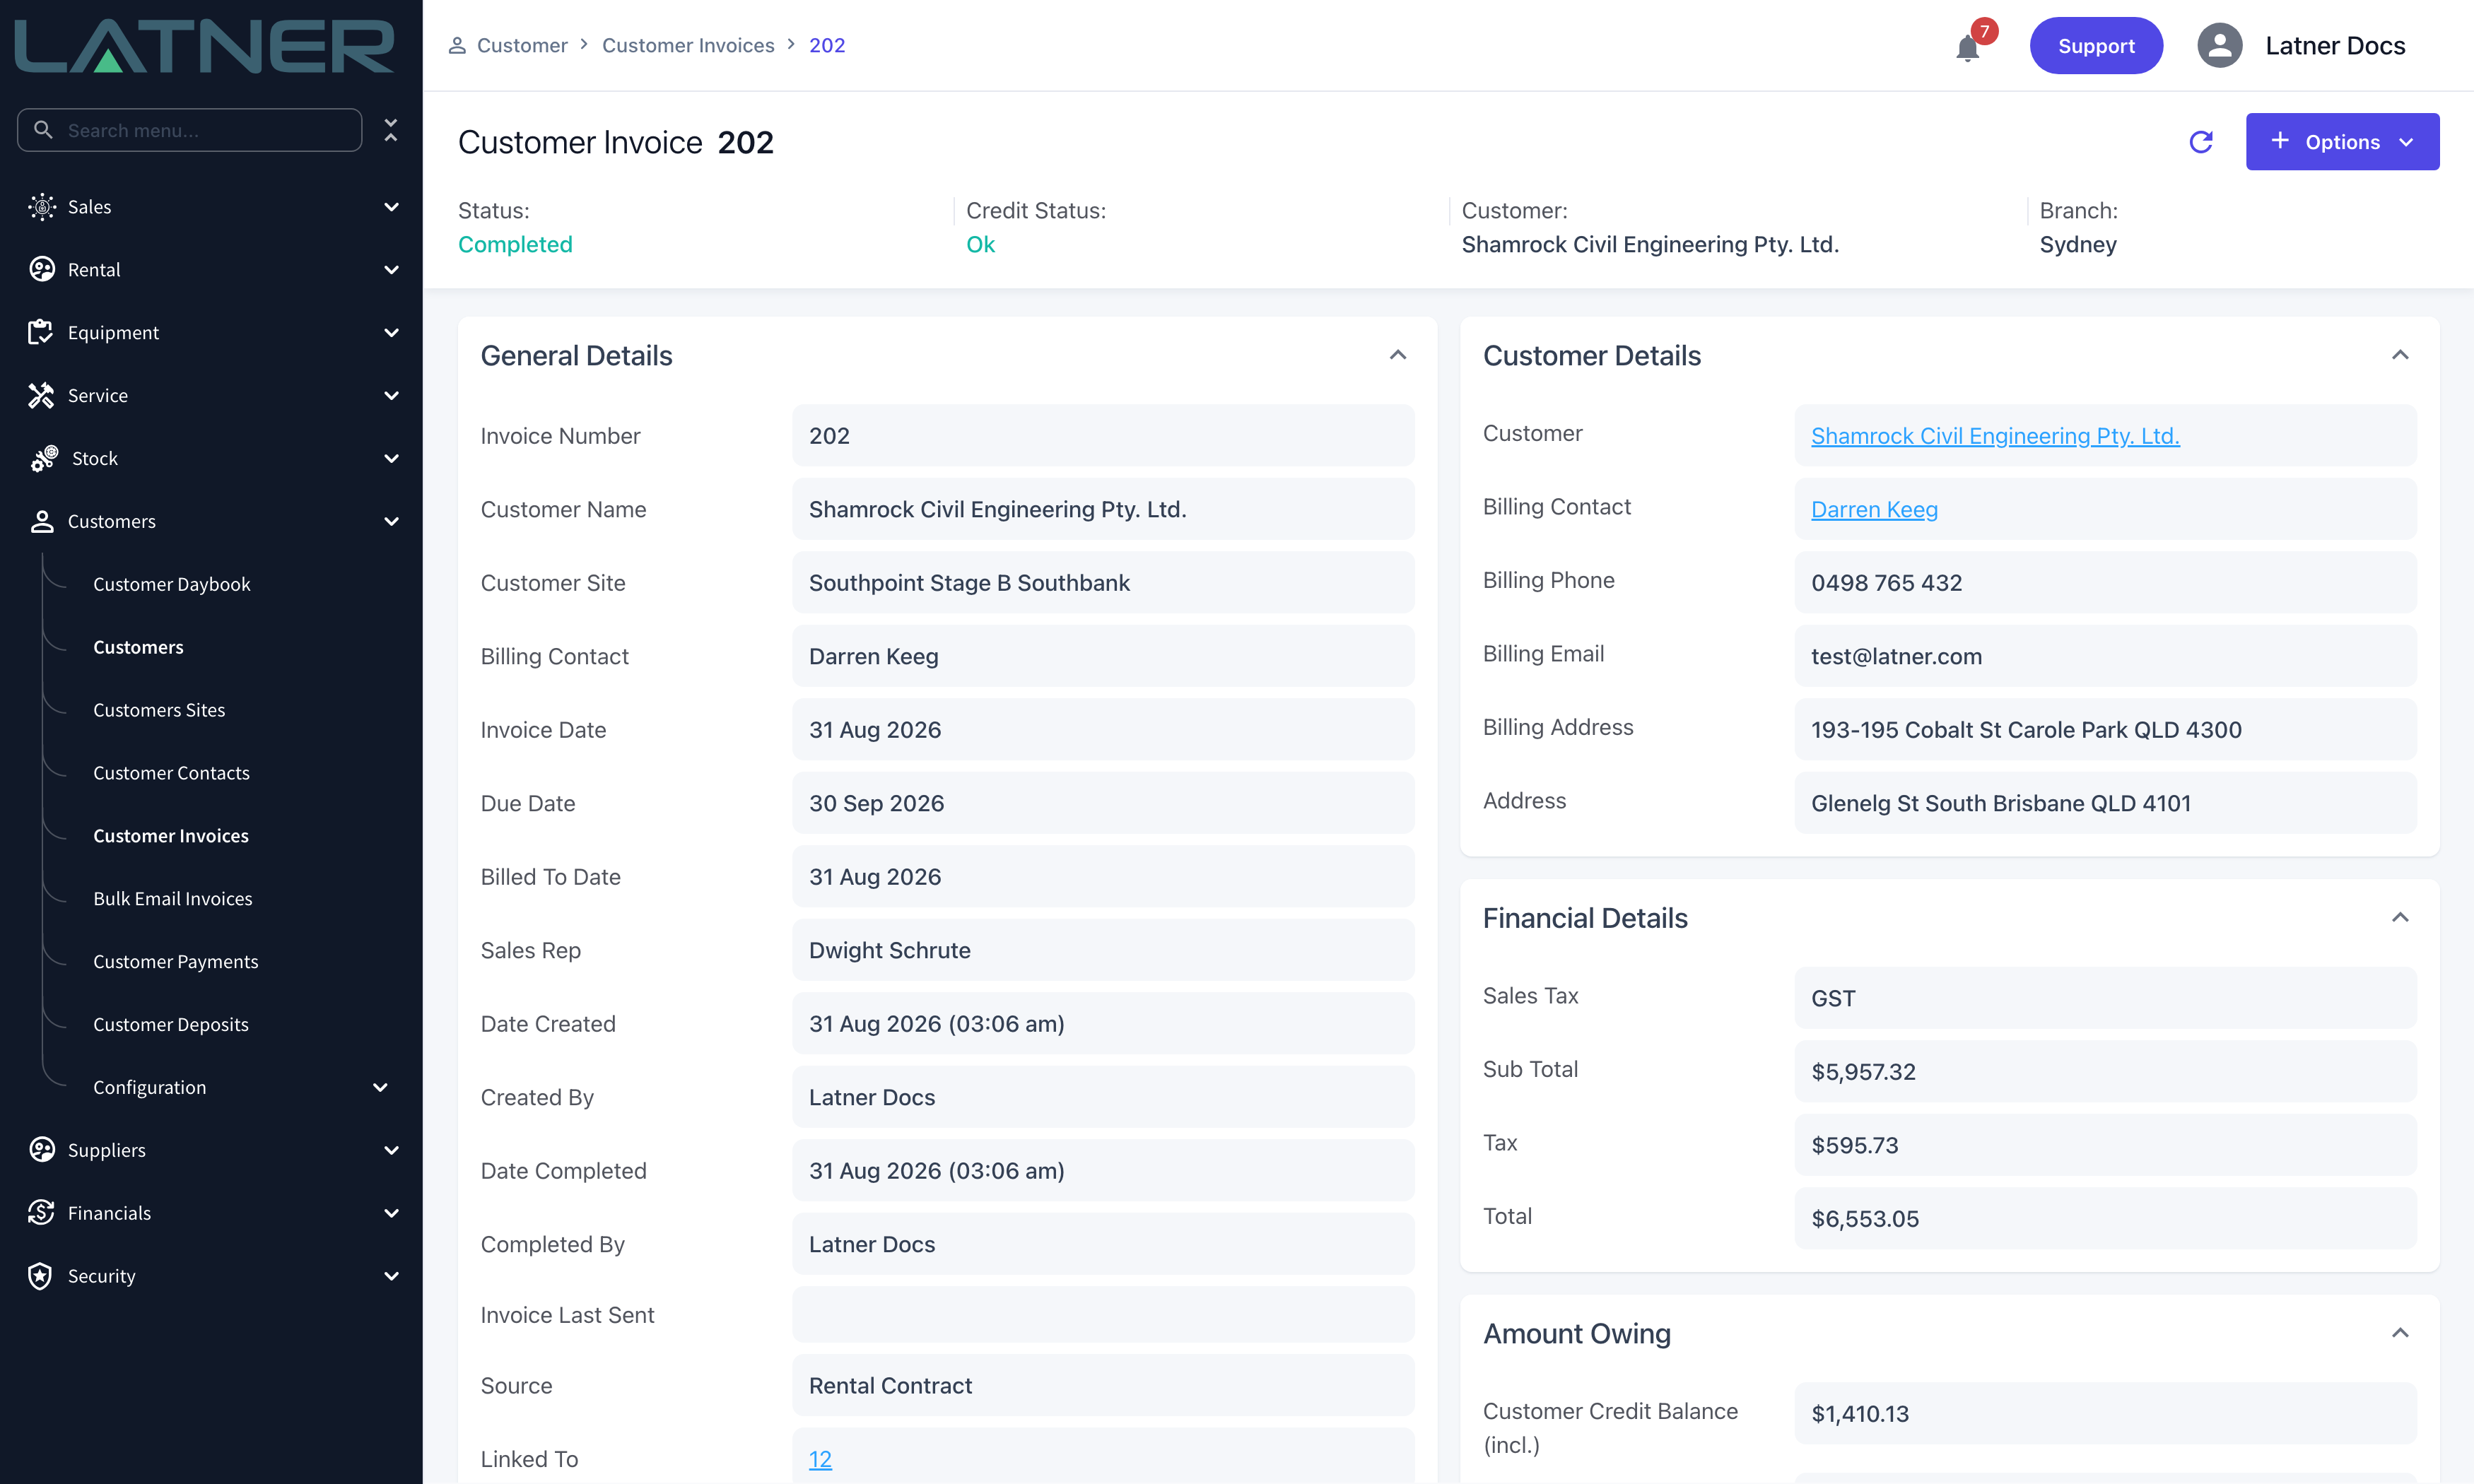
Click Create Invoice. Latner creates the customer invoice and shows a confirmation with a link straight to it. If the lines happen to net to a negative total the button reads Create Credit Note instead, and you'll get a credit note rather than an invoice.
After Creation
-
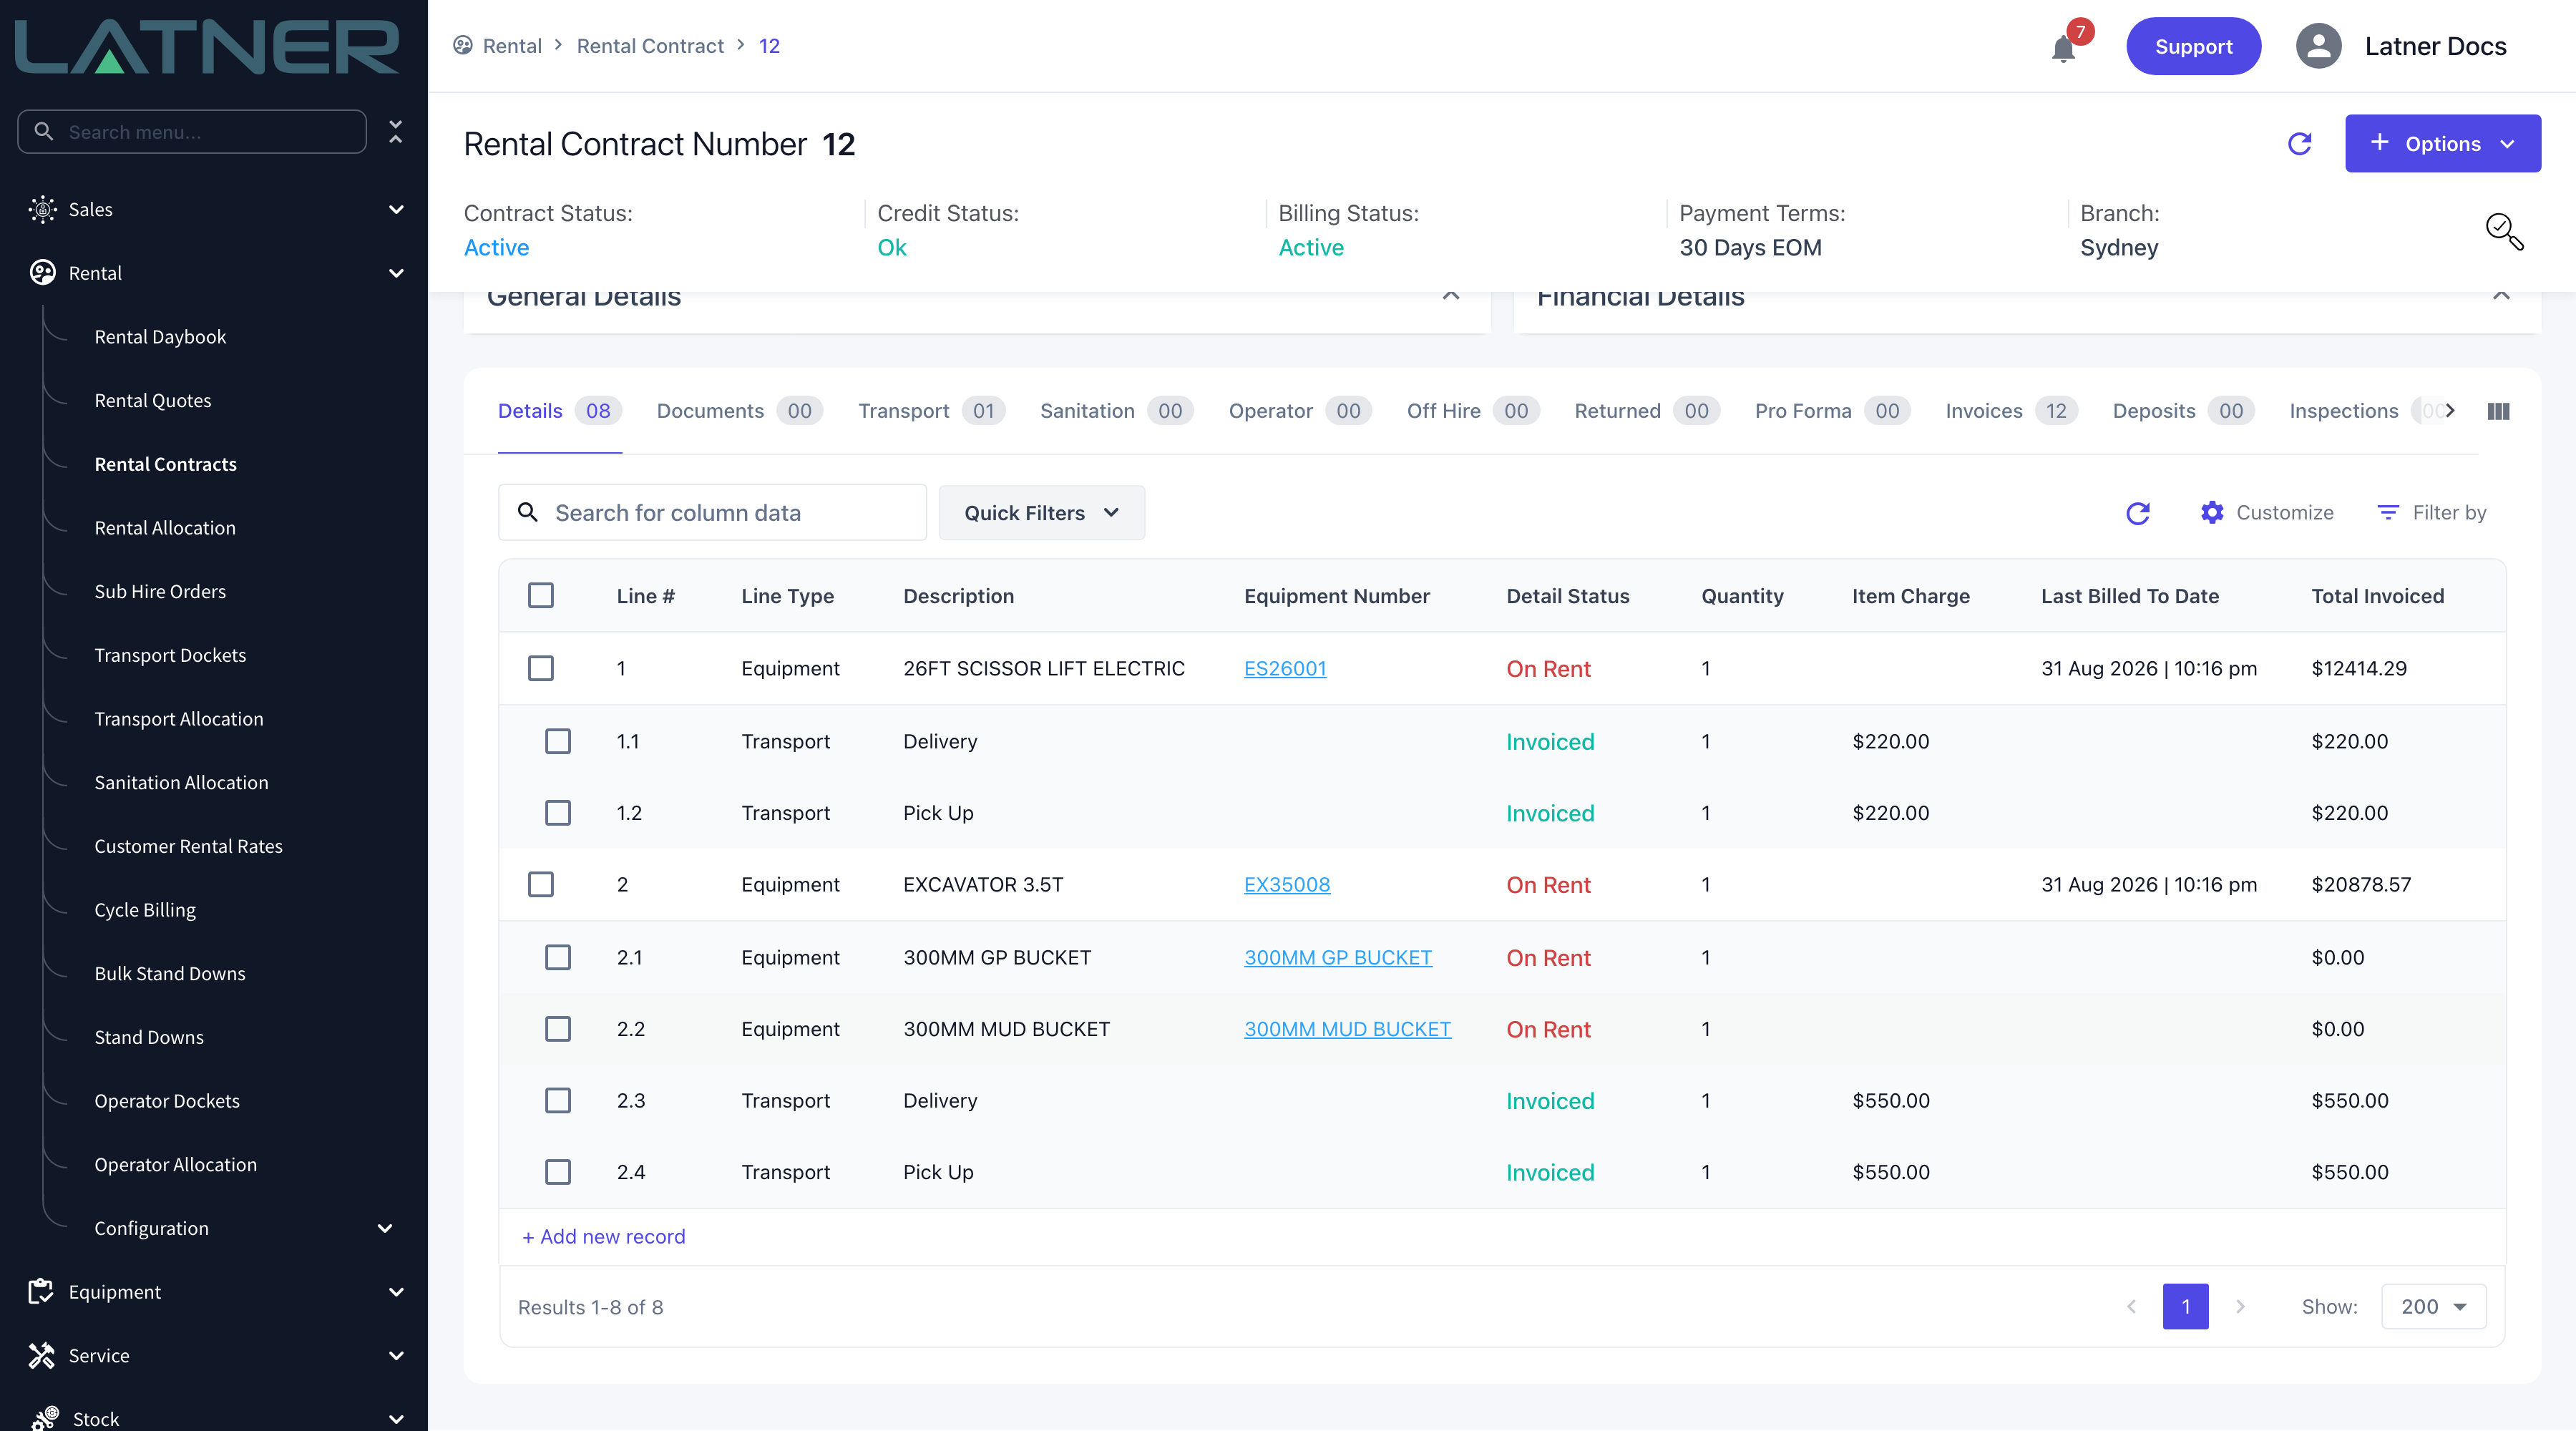
Last Billed To Date moves to your Bill To date on every equipment line that was billed, so the next Progress Invoice starts from there.
-
Transport, admin and other one-off lines that were Pending or Applied change to Invoiced.
-
The invoice appears on the contract's Invoices tab and under Customers › Customer Invoices, with Rental Invoice Type set to Progress Invoice.
-
The due date comes from the customer's payment terms, or from the Default Payment Term setting when the customer has none.
-
The invoice is created Open, unless Default Rental Contract Customer Invoices to Completed is switched on under Security › Settings › Customers, in which case it is created Completed.
-
If Auto Update Expected Off Hire Datetime based on Rental Billing is on under Security › Settings › Rental, the contract's expected off hire date is pushed out to your Bill To date whenever you bill past it.
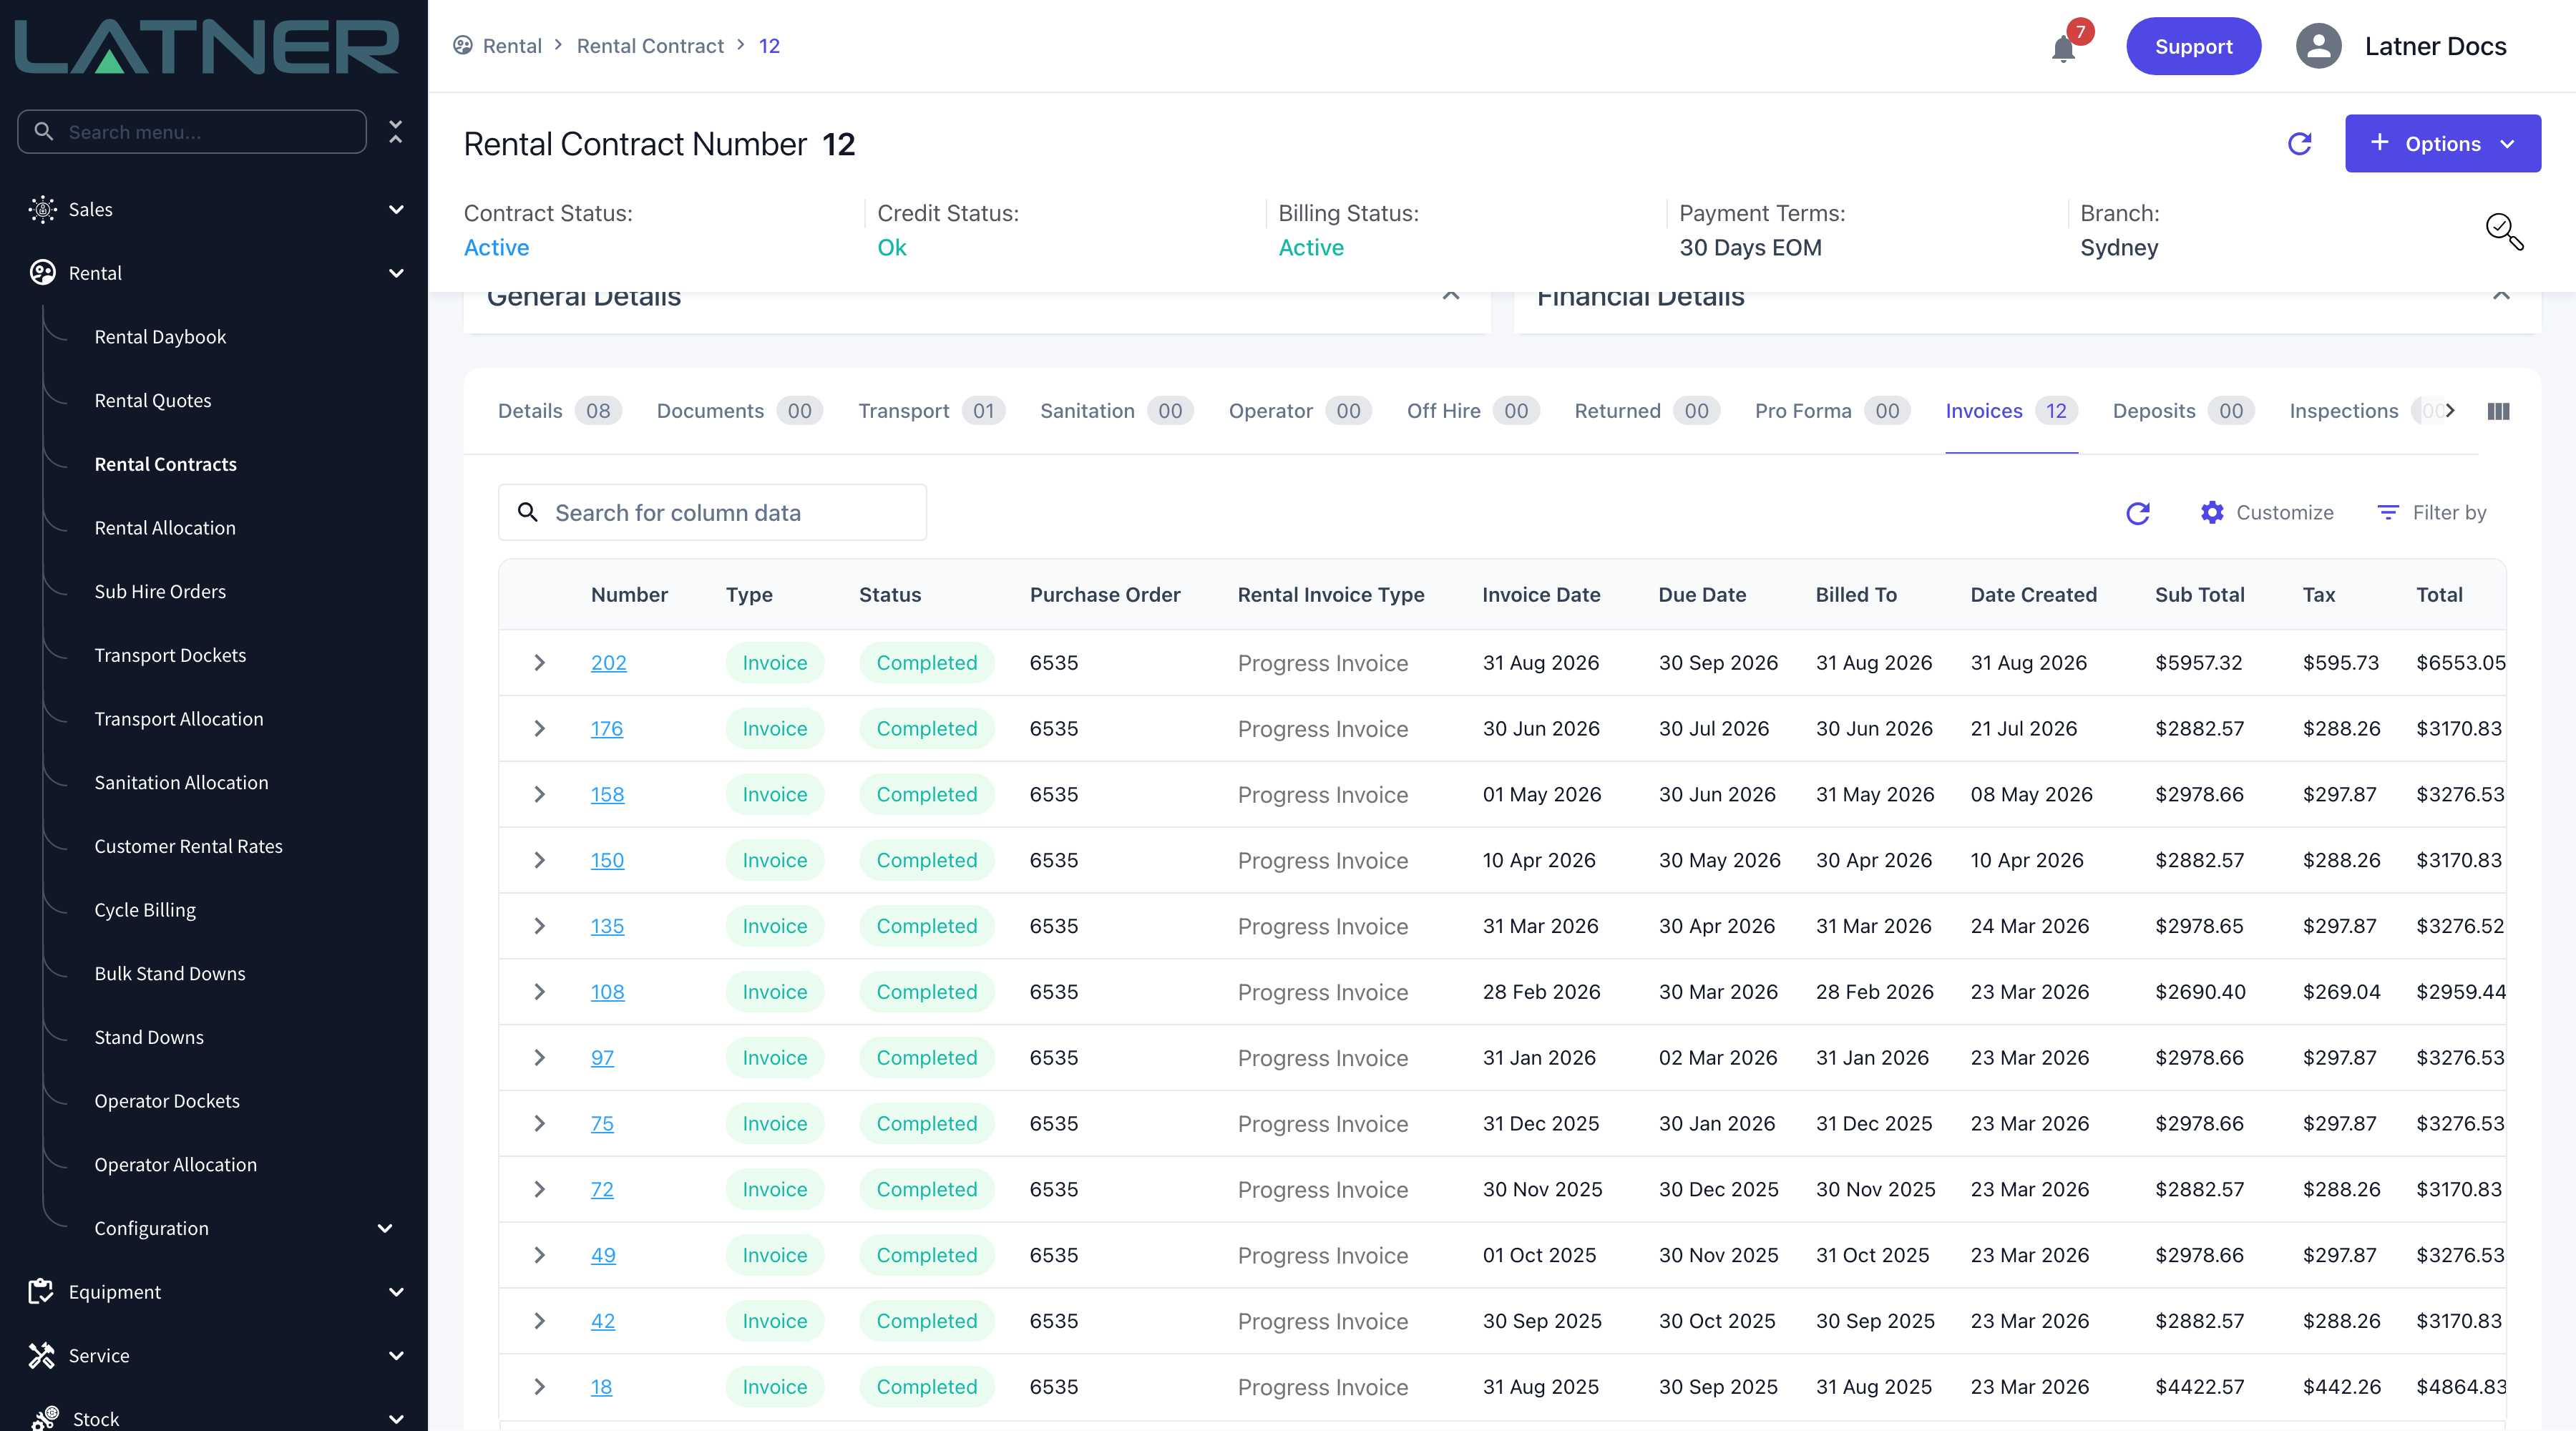
Creating a Progress Invoice moves the contract's billing forward, so you can't simply delete it if the dates were wrong. Use Options › Cancel Customer Invoice on the invoice instead - it rolls the Last Billed To Date back to where it was, returns the invoiced lines to their pre-invoice status, and asks you for a note explaining the cancellation. A Paid invoice can't be cancelled at all; raise a credit note against it.
FAQs
Watch the Demo
Prefer to watch it? Step through the same flow here.
A Return Invoice bills a rental contract for the equipment that has come back, so you can charge out a returned machine as soon as it lands in the yard instead of waiting for the whole hire to finish.
Overview
Long hires rarely end all at once. Gear trickles back a machine at a time, and the Return Invoice is how you bill each piece as it arrives without disturbing whatever is still out on site. One thing to know before you start: on the Invoice Type list it is called Returned/Completed Items - there is no entry named "Return Invoice".
-
Bills only the lines whose equipment status is Returned. Lines still on hire are left out entirely, and so are lines that have only been off hired.
-
Charges each returned line up to its actual off hire date and time, not up to the Bill To date you type. Return a machine on the 20th and invoice on the 31st and the customer is still only charged to the 20th.
-
Brings the charges that came back with the equipment along with it - pick up transport, fuel, damage, sanitation and admin lines attached to the returned line.
-
Leaves the hire running. The contract stays Active, and the lines still on rent carry on progress billing as normal.
-
Credits back instead of charging when a line was billed past its off hire date, which is what happens when equipment comes home earlier than expected.
-
Always shows you a preview before it commits, so you can see exactly what will be charged and untick anything you aren't ready to bill.
Before You Begin
You need one permission, a contract that is still open, and at least one line that has actually been returned.
|
Requirement |
Where to Find It |
|---|---|
|
Invoice Rental Contract permission |
Security › Configuration › Permission Groups › your group › Rental › Option |
|
A rental contract that is Active or Reserved |
Rental › Rental Contracts - check the Contract Status at the top of the contract |
|
At least one line whose equipment has been returned |
The contract's Details tab - check the Detail Status column. If the gear is back but the line isn't, use Options › Return first |
|
Enables Crediting of a Rental Contract setting (only when the return has to credit an over billed line) |
Security › Settings › Rental |
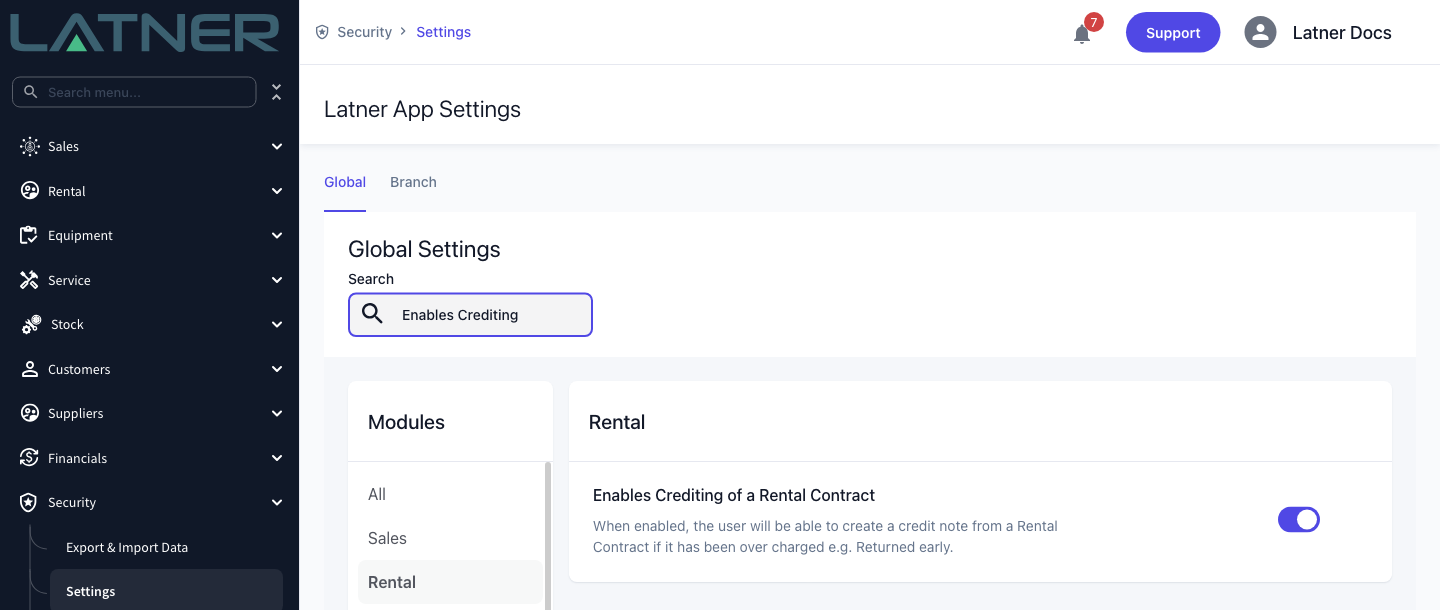
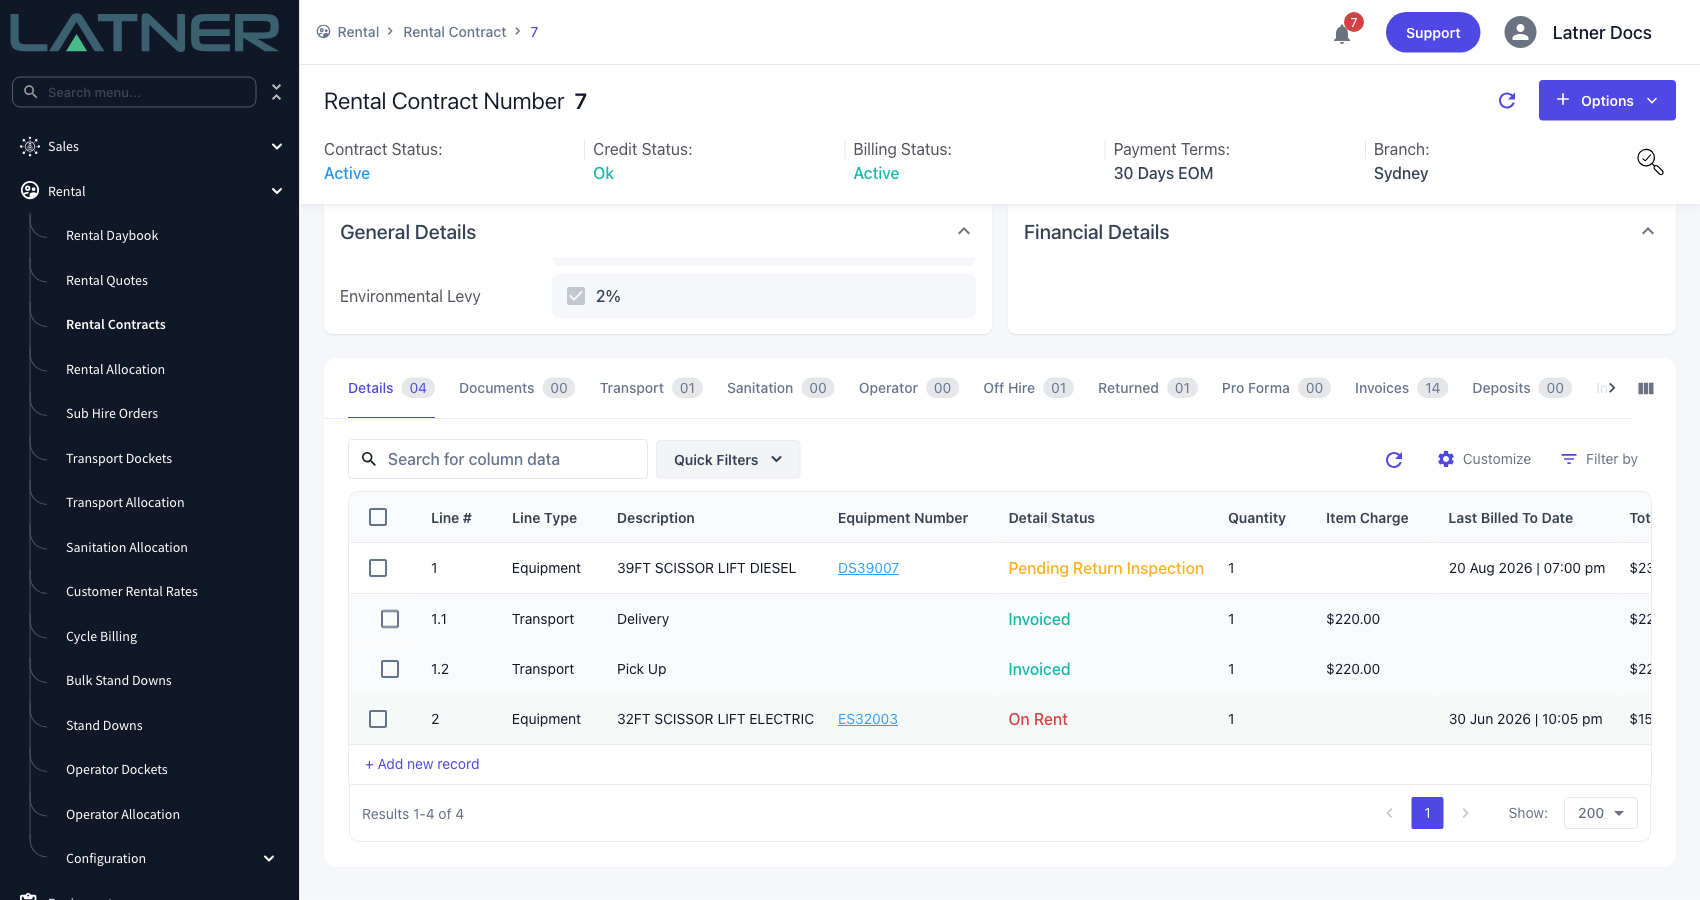
Off hiring is not the same as returning. Off Hire stops the clock; Return is what actually brings the equipment back into your fleet, and only a returned line is eligible for this invoice. An open return inspection does not block it, though - a line showing Pending Return Inspection can still be billed.
Creating the Return Invoice
Step 1 - Check which lines have come back
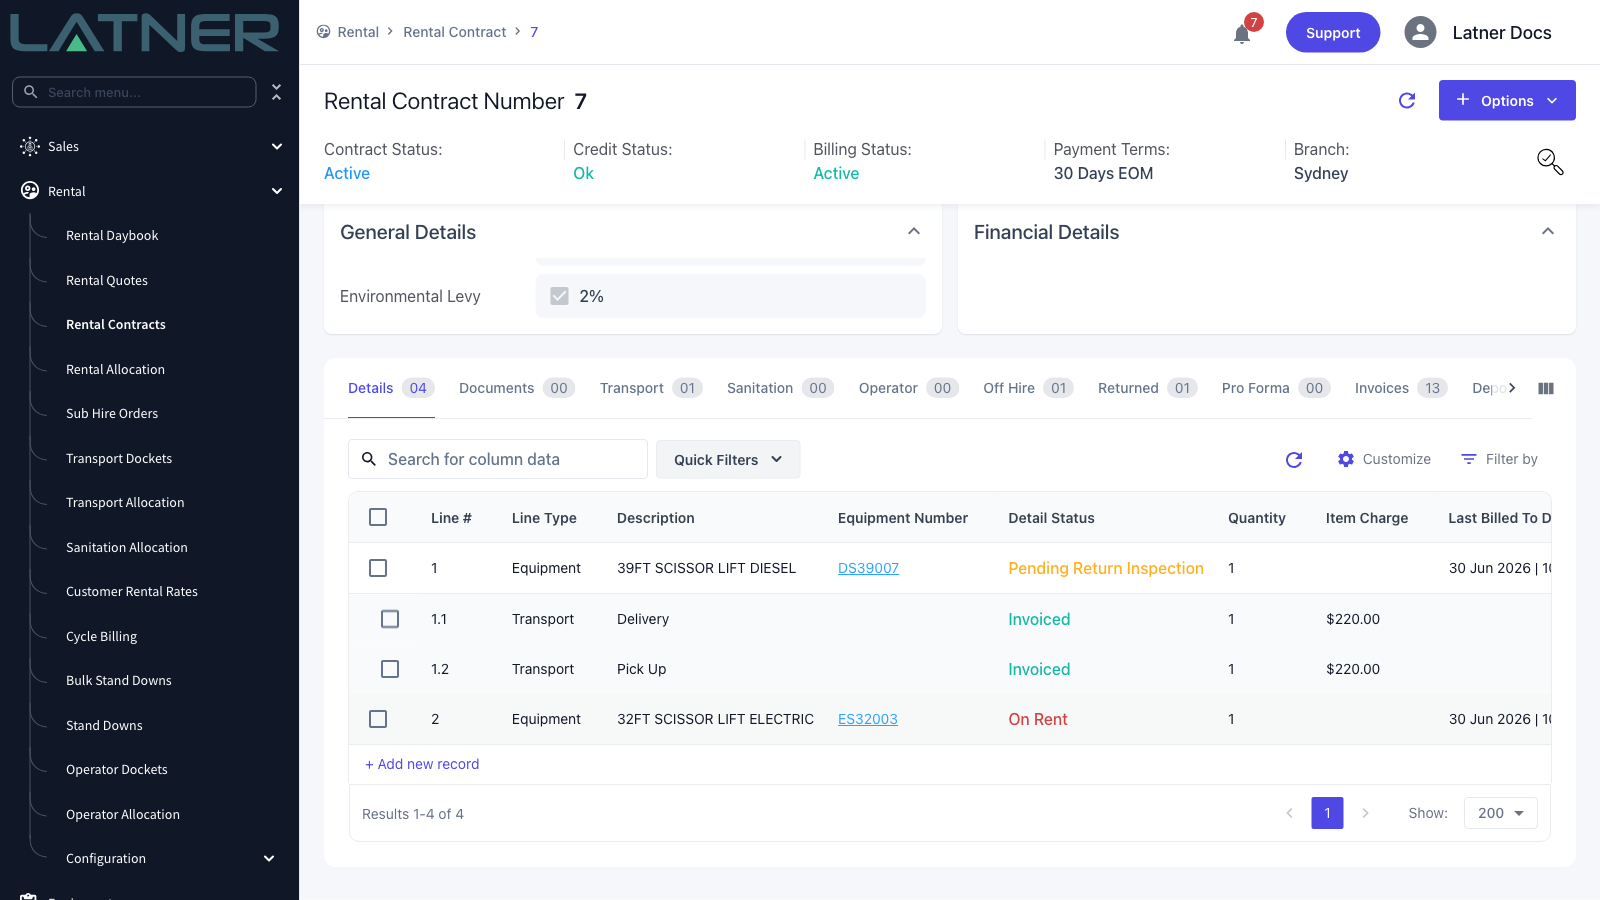
Open the contract from Rental › Rental Contracts and look at the Details tab. The Detail Status column shows Returned - or, when Show Rental Sub Statuses is switched on under Security › Settings › Rental, the more specific sub status:
-
Pending Return Inspection - the equipment is back but a return inspection is still open.
-
Pending Final Invoice - the equipment is back, the inspection is done, and the line has not yet been billed up to its off hire date.
Either way the line is waiting for a Return Invoice. Last Billed To Date tells you where that line stopped last time; everything between that date and the off hire date is still to charge.
Step 2 - Open the invoice dialog
Choose Options › Invoice. The Invoice Rental Contract dialog opens with the contract, customer, site and branch already filled in and read only. The option is greyed out once the contract is Completed, Cancelled or Lost.
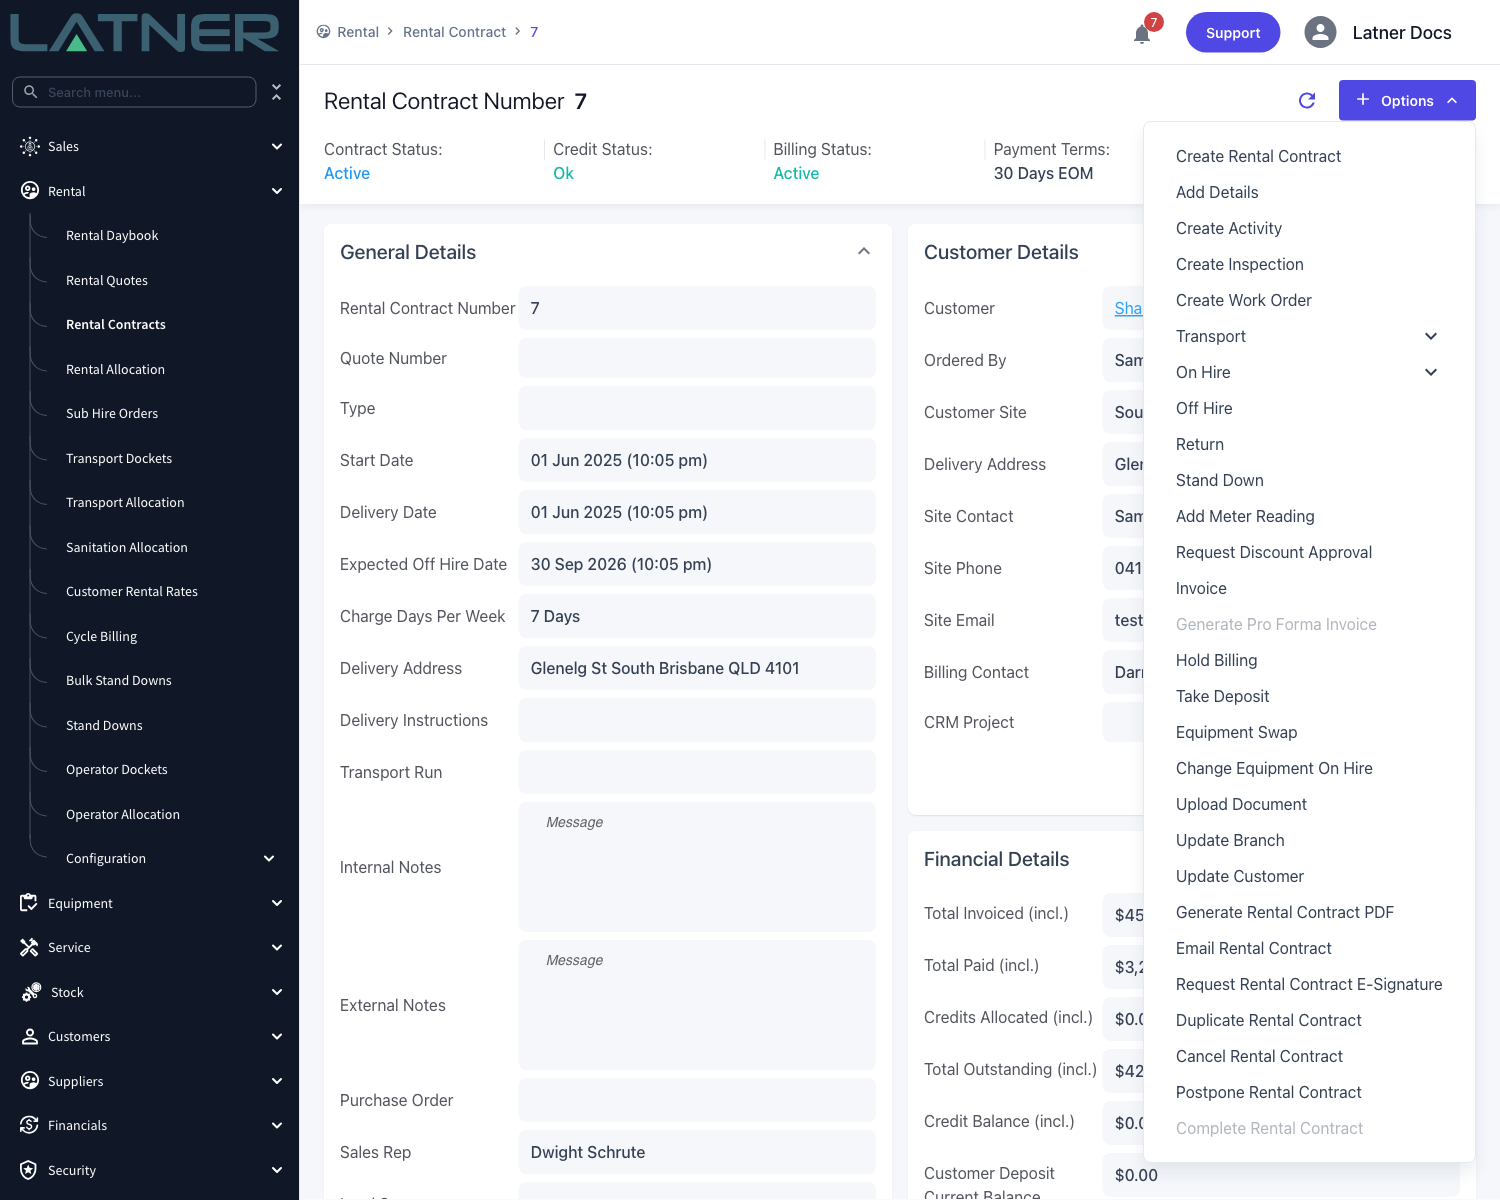
Step 3 - Set the dates
Two dates drive the invoice, and they do different jobs.
-
Invoice Date - required. The date shown on the invoice and the date the due date is calculated from. Defaults to today.
-
Bill To - required. The date to bill the contract up until. Defaults to today. Set it on or after the off hire date of the lines you are billing - a returned line is never charged past its own off hire date, so a later Bill To costs you nothing.
-
Credit Card Surcharge? - optional. Adds a credit card surcharge line. It is ticked automatically for cash on delivery customers when the Credit Card Surcharge Percentage setting has a value.
Step 4 - Choose Returned/Completed Items
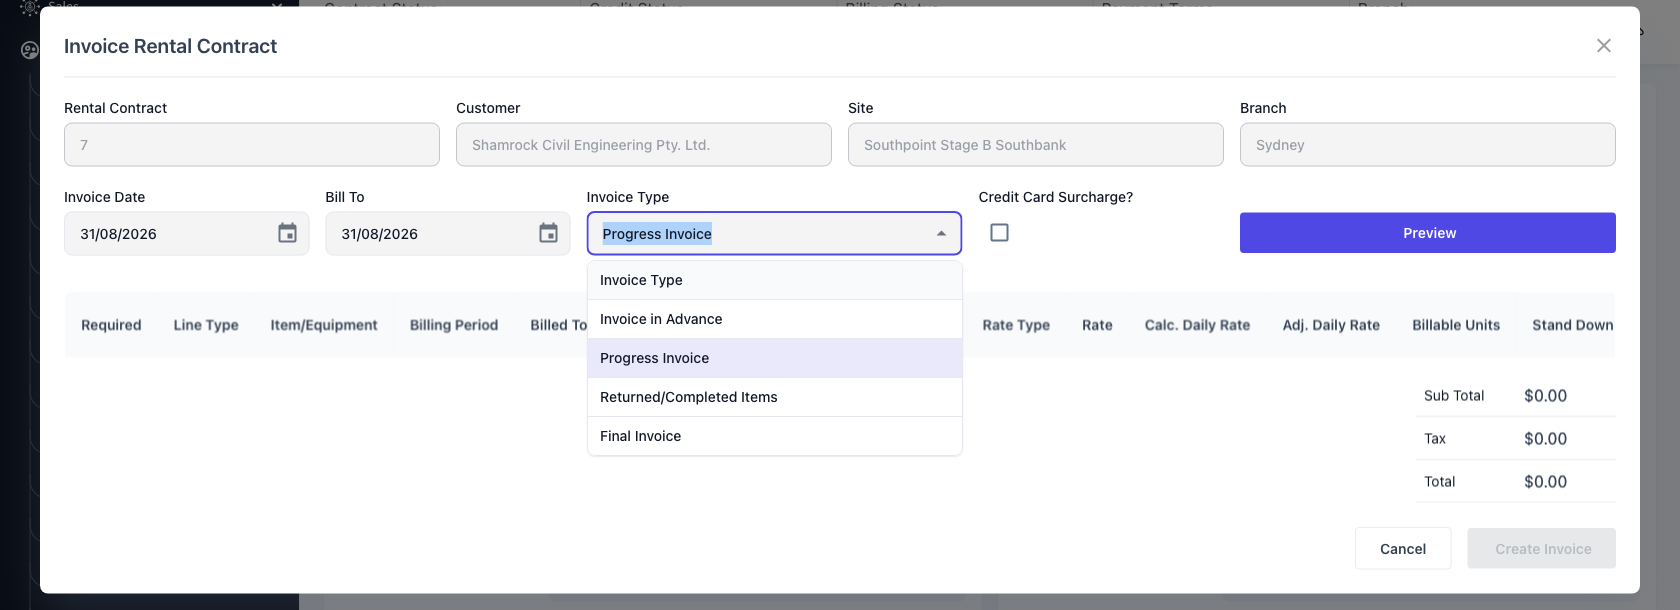
Open Invoice Type and pick Returned/Completed Items. That is the Return Invoice. The four choices decide which lines are eligible:
-
Invoice in Advance - bills every line up front, whether or not it has gone out yet.
-
Progress Invoice - bills what has fallen due since the last invoice on lines that are already on hire.
-
Returned/Completed Items - bills only the lines whose equipment has come back.
-
Final Invoice - the same returned lines, plus every remaining charge on the contract, including the ones deliberately held back for the end of the hire.
Step 5 - Preview what will be billed
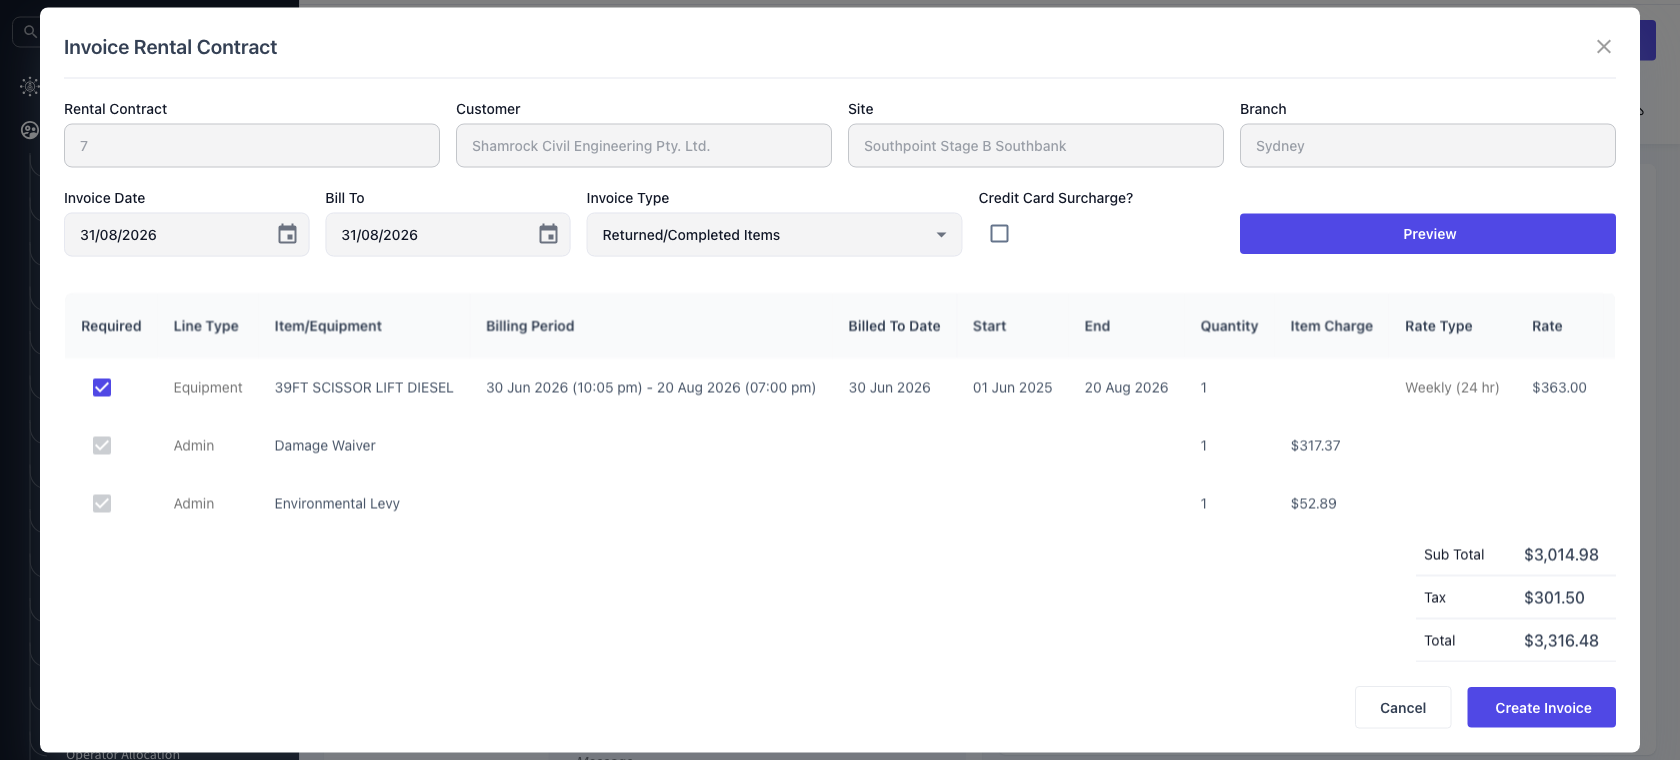
Click Preview. Latner works out the charges and lists one row per line it intends to invoice, with the running Sub Total, Tax and Total underneath. This is the step where the difference from a Progress Invoice becomes obvious - the lines still on hire simply aren't there.
-
Billing Period and End - the window being charged. The End date is the line's off hire date, not the Bill To date you entered.
-
Billed To Date - where the line was billed to before this invoice. Blank means the line has never been billed.
-
Rate Type, Rate, Calc. Daily Rate, Adj. Daily Rate and Billable Units - how the charge was worked out, so you can see why a line came to what it did.
-
Required - untick a line to leave it off this invoice. The totals recalculate straight away and the line stays on the contract for a later invoice.
Some rows can't be unticked. Damage waiver and levy style charges are worked out from the lines you are billing rather than being contract lines of their own, so they carry the tooltip "Cannot deselect related lines"; operator docket lines carry "Cannot deselect operator docket lines".
If the preview comes back empty you'll see a Nothing to Invoice message. On a Return Invoice that usually means nothing on the contract has actually been returned yet, or the returned lines are already billed up to their off hire date. It is not an error.
Step 6 - Create the invoice
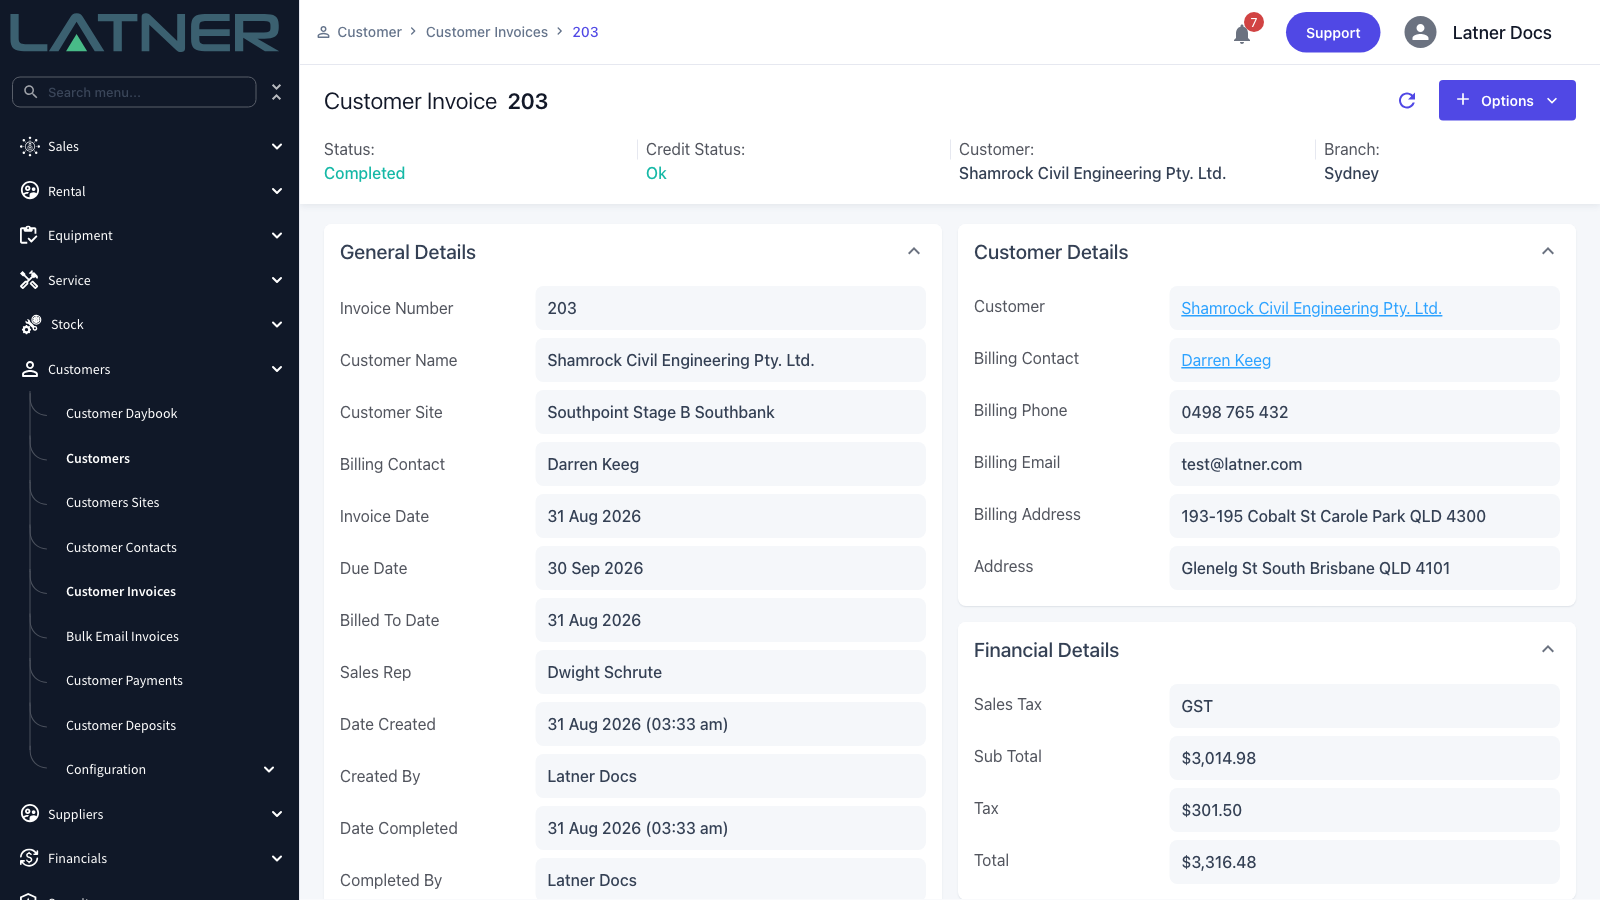
Click Create Invoice. Latner creates the customer invoice and shows a confirmation with a link straight to it. If the previewed lines happen to net to a negative total the button reads Create Credit Note instead, and you'll get a credit note rather than an invoice.
After Creation
-
Last Billed To Date on each returned line moves to that line's off hire date - not to the Bill To date you chose.
-
Transport, admin and other one-off lines that were Pending or Applied change to Invoiced.
-
Lines still on hire are untouched. Their Last Billed To Date does not move and you carry on progress billing them as usual.
-
Once the return inspection on a billed line is closed, its sub status becomes Invoiced.
-
The invoice appears on the contract's Invoices tab and under Customers › Customer Invoices, with Rental Invoice Type showing Returned/Completed Items.
-
The due date comes from the customer's payment terms.
-
The invoice is created Open, unless Default Rental Contract Customer Invoices to Completed is switched on under Security › Settings › Customers, in which case it is created Completed.
-
The contract stays Active. A Return Invoice never offers to complete the contract for you - that prompt only follows a Final Invoice, and only once every line has been returned.
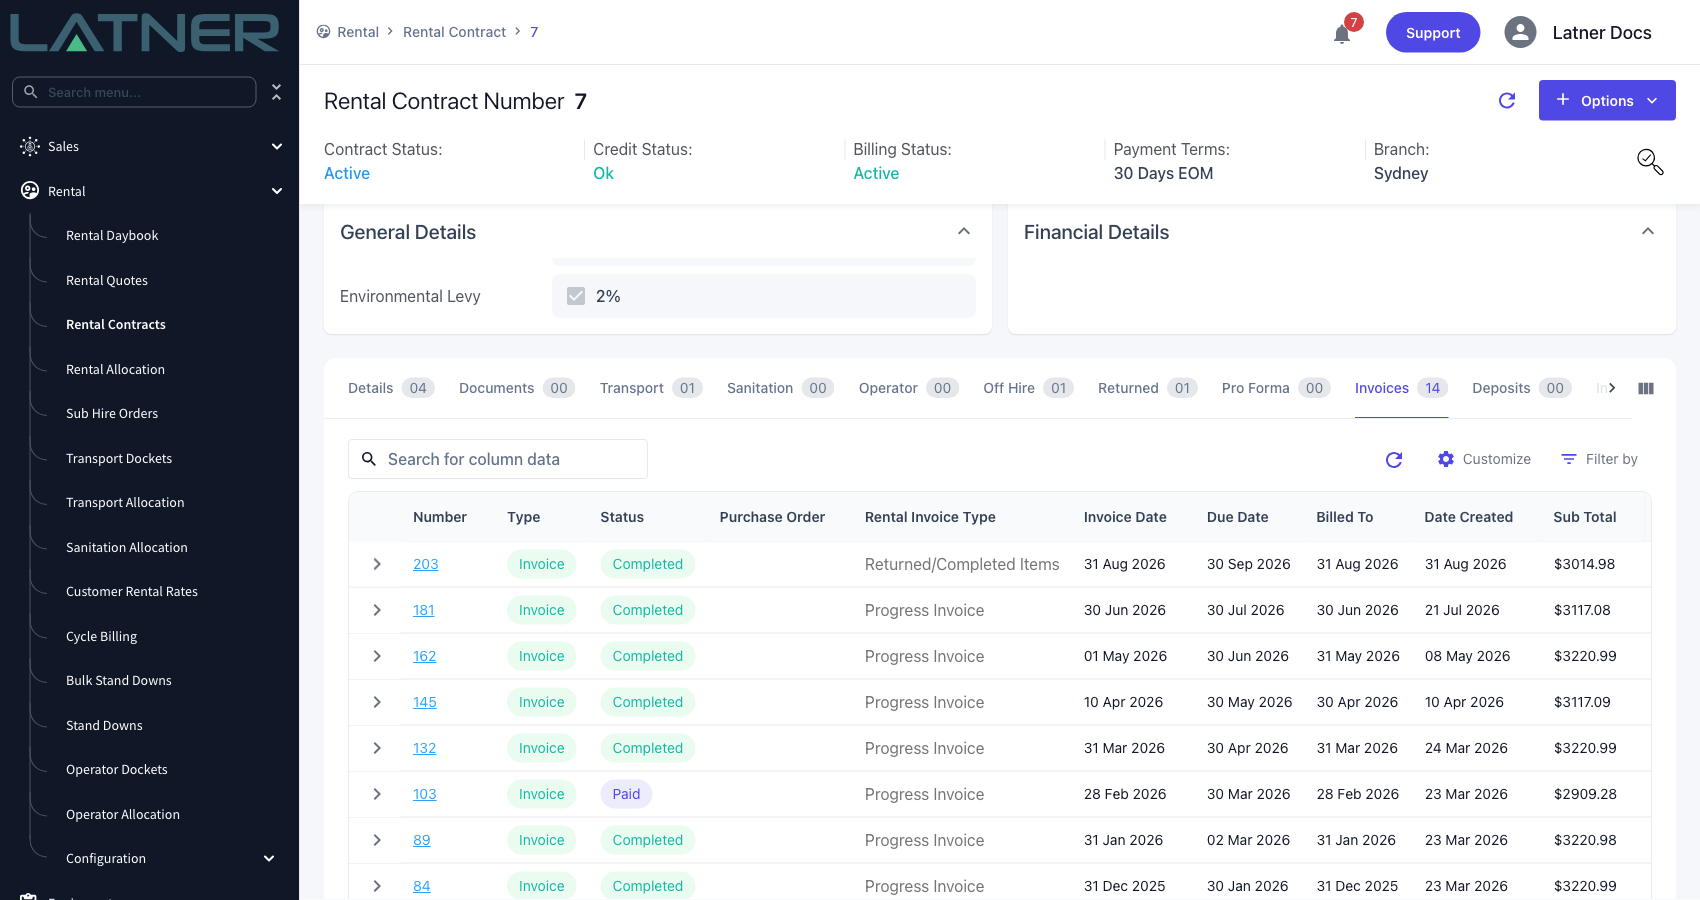
A Return Invoice moves that line's billing forward, so you can't simply delete it if the dates were wrong. Use Options › Cancel Customer Invoice on the invoice instead - it rolls Last Billed To Date and Total Invoiced back to where they were and returns the invoiced lines to their pre-invoice status. It asks for a note explaining the cancellation. A Paid invoice can't be cancelled, and neither can one linked to a completed rental contract; raise a credit note against it instead.
FAQs
Watch the Demo
Prefer to watch it? Step through the same flow here.
A Final Invoice bills out everything left on a rental contract in one go, so you can close a finished hire knowing nothing is still sitting unbilled against it.
Overview
Every hire ends the same way. The last machine comes off the truck, someone signs it back in, and then a handful of odds and ends are left scattered down the contract - the rental up to the day it went off hire, the pick up that hasn't been charged yet, the fuel, the damage the return inspection turned up. The Final Invoice is the one that sweeps the lot into a single invoice and leaves the contract ready to close.
-
Bills each returned equipment line up to its actual off hire date and time. Equipment that is still on hire is left out entirely, exactly as it is on a Returned/Completed Items invoice.
-
Sweeps up every other charge still sitting on the contract - transport, fuel, sanitation, damage, labour, stock and admin lines - as long as it hasn't already been invoiced.
-
Ignores the Invoicing Stage on those charges. A line set to Return Invoice comes through on a Final Invoice even when it isn't attached to a machine that has come back, which is the main thing that separates the two invoice types.
-
Credits back rather than charging when a line has already been billed past its off hire date, so an early return still balances out.
-
Shows you a preview before it commits anything, and lets you untick lines you aren't ready to bill.
-
Clears the way to close the hire. Once every line is billed and every machine is back, Complete Rental Contract goes through.
Before You Begin
You need one permission, an open contract, and the gear back in the yard.
|
Requirement |
Where to Find It |
|---|---|
|
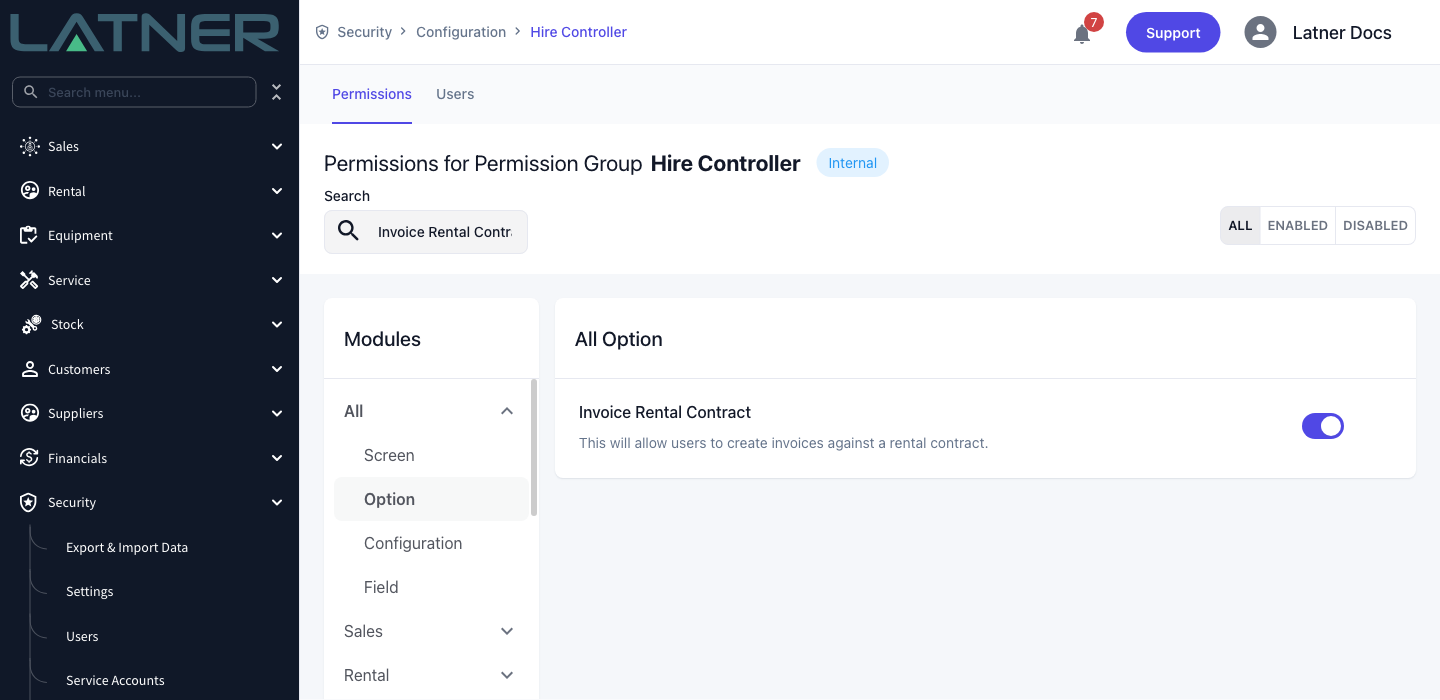
Invoice Rental Contract permission |
Security › Configuration › Permission Groups › your group › Rental › Option |
|
A rental contract that is Active or Reserved |
Rental › Rental Contracts - check Contract Status at the top of the contract |
|
Every equipment line Returned, if you want to close the hire afterwards |
The contract's Details tab - check the Detail Status column. Anything still out needs Options › Return first |
|
No open inspections, when Block Completing Rental Contract with Open Inspection is enabled |
Security › Settings › Rental - the contract's Inspections tab shows what is still open |
|
Enables Crediting of a Rental Contract setting, but only when the invoice has to credit an over billed line |
Security › Settings › Rental |
You can raise a Final Invoice while equipment is still on hire, and Latner won't stop you. It just won't bill that equipment, and the contract will stay Active afterwards. If the hire really is finished, return everything first so the whole thing goes out on one invoice.
Creating the Final Invoice
Step 1 - Check what is left on the contract
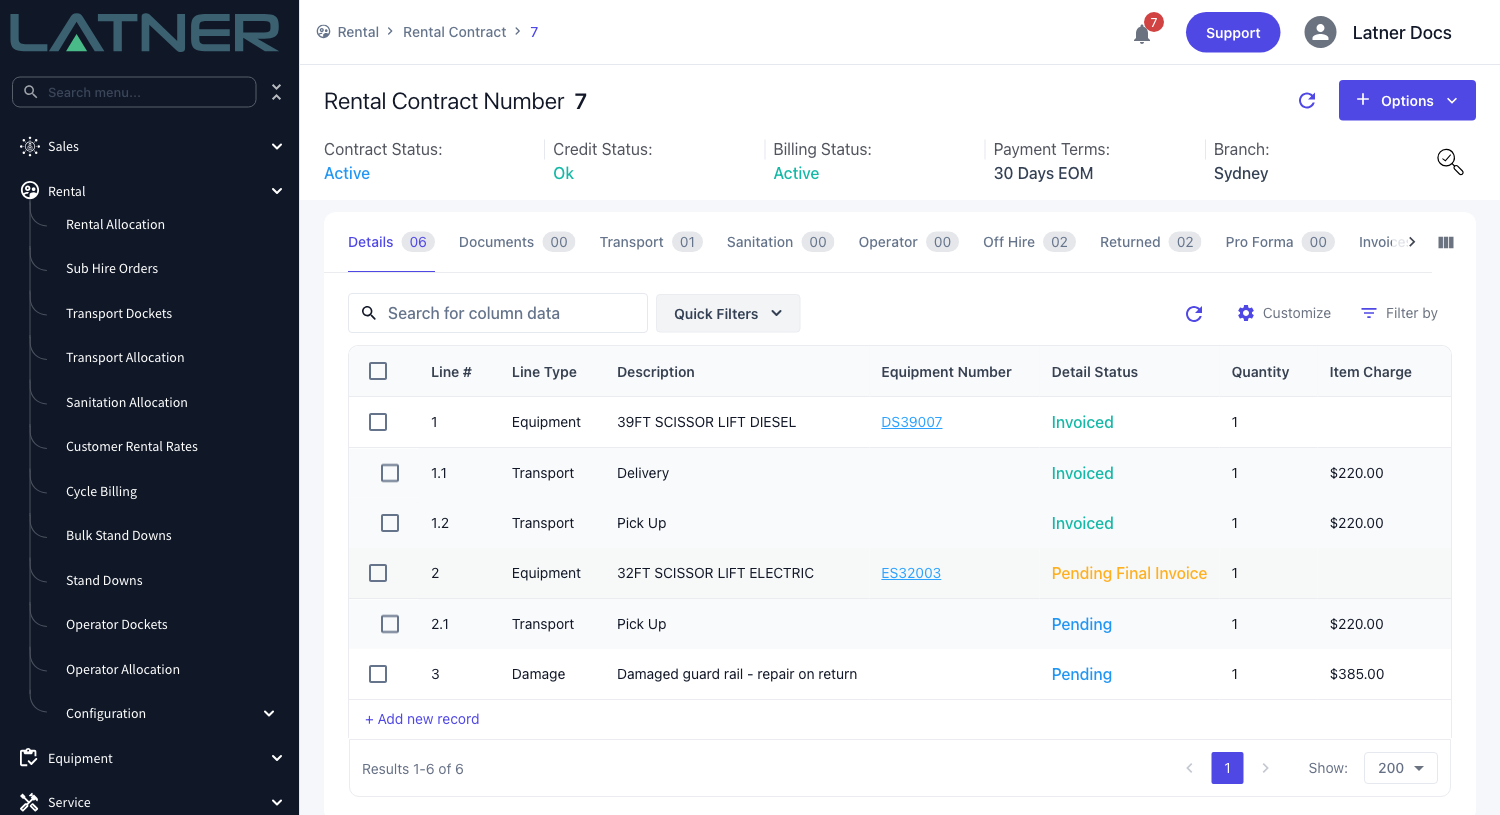
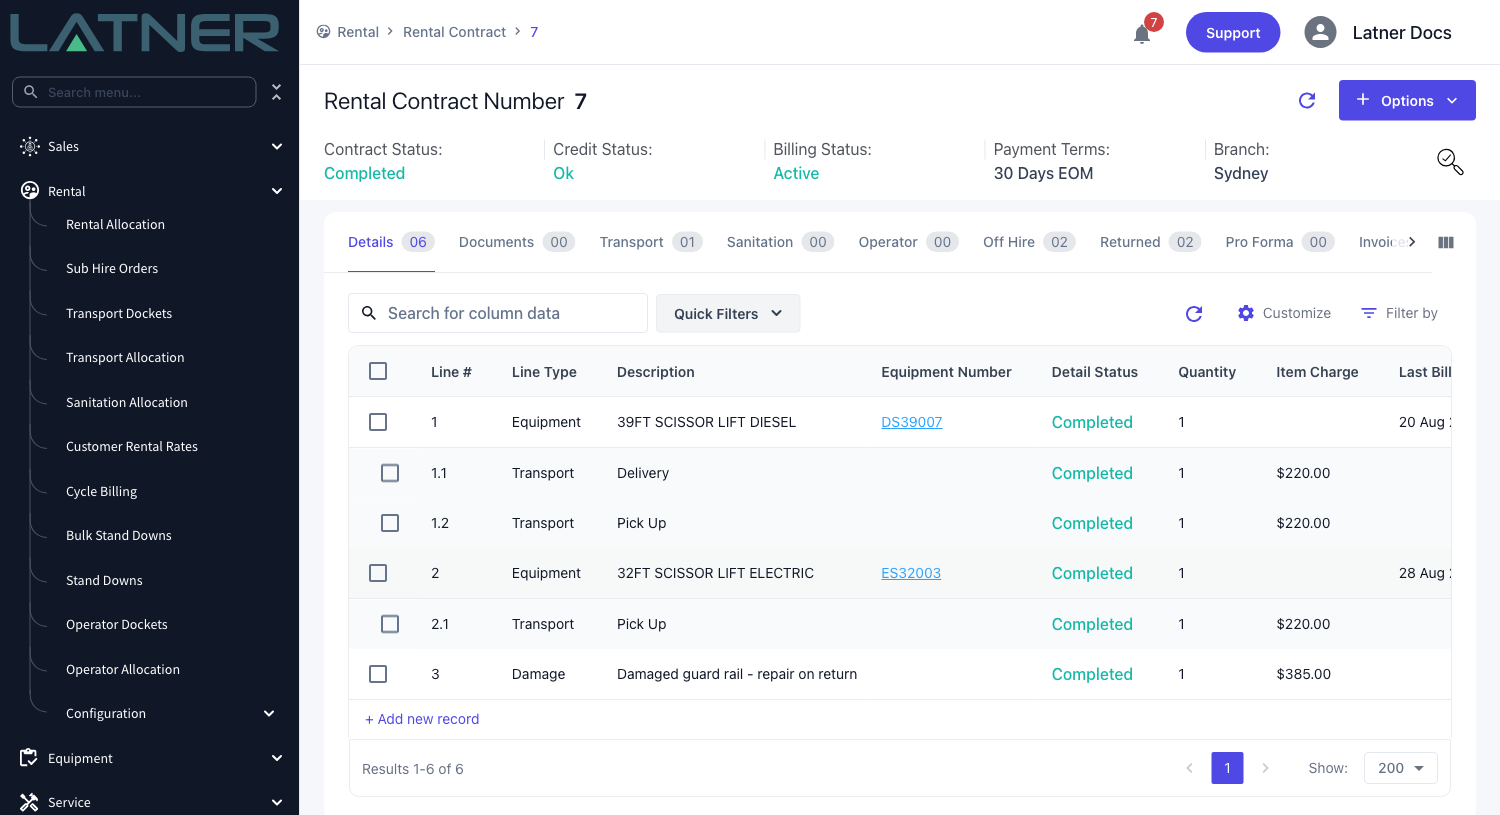
Open the rental contract and look at the Details tab. You are checking two things: that every Equipment line reads Returned in the Detail Status column, and what else is still unbilled. Lines already charged show as Invoiced; anything reading Pending is a charge that hasn't been billed yet and will land on this invoice.
A returned equipment line that still has rental to charge shows the sub status Pending Final Invoice - that is Latner telling you the machine went off hire after the date it was last billed to.
Step 2 - Open the invoice dialog
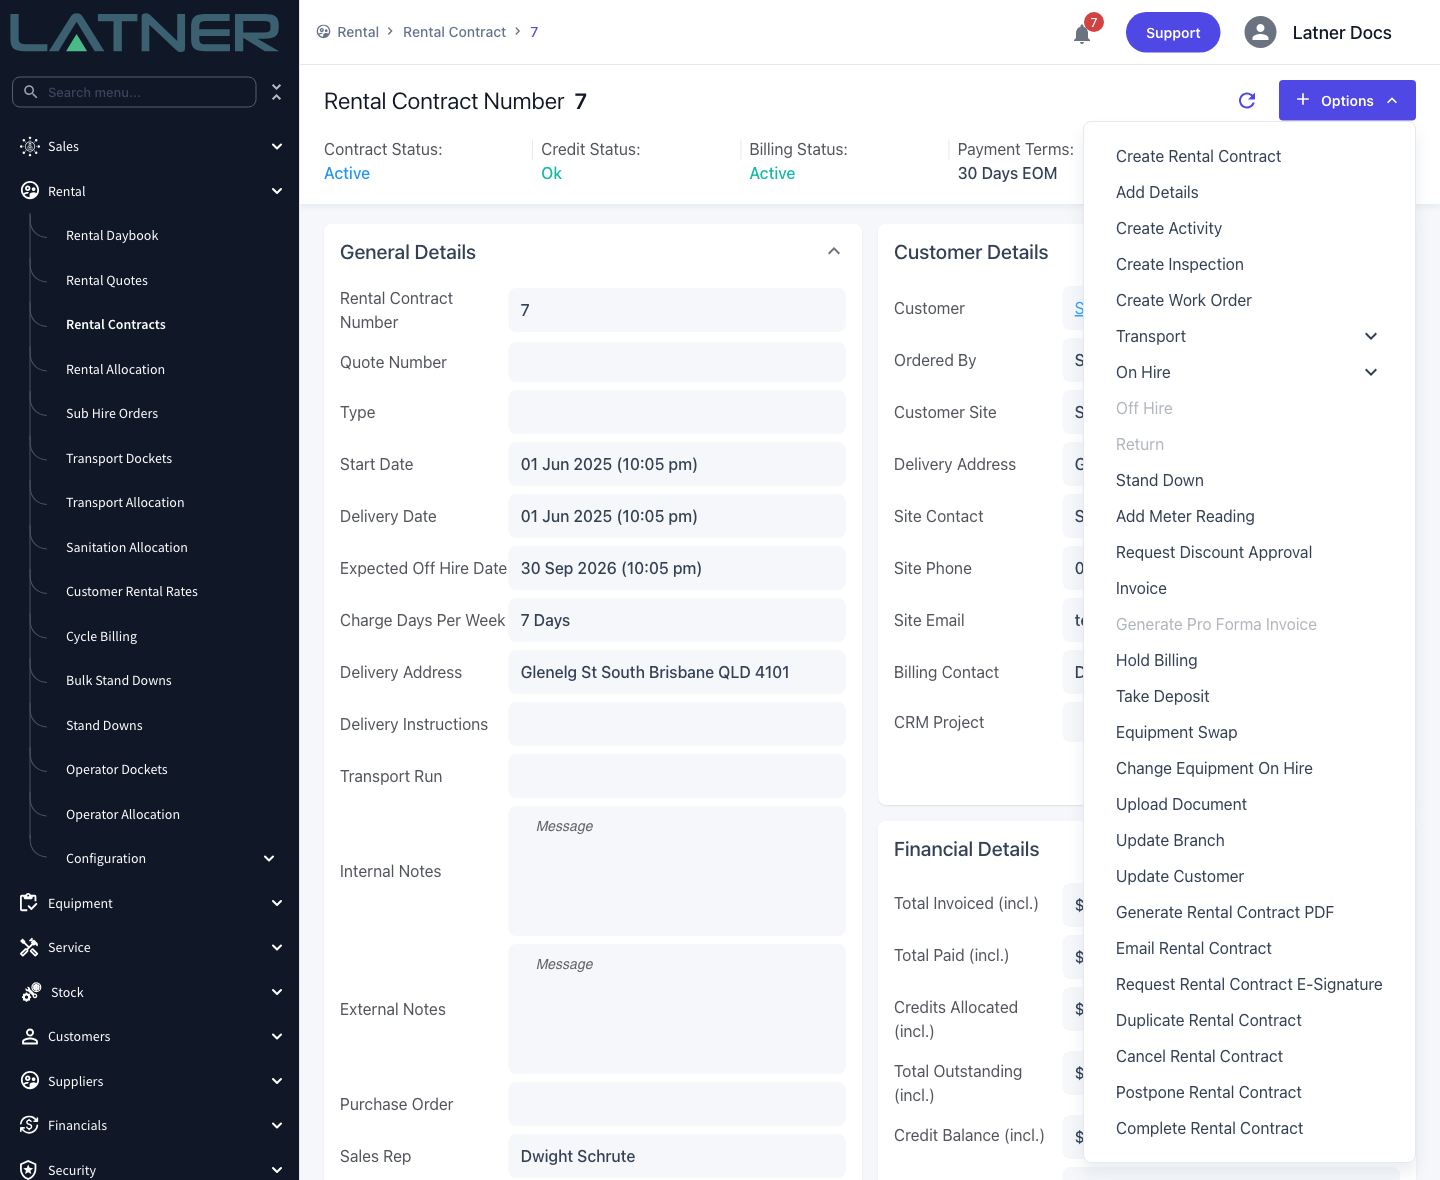
Choose Options › Invoice. It is the same dialog used for every rental invoice type - the invoice type is a field inside it, not a separate menu item.
Step 3 - Set the dates and choose Final Invoice
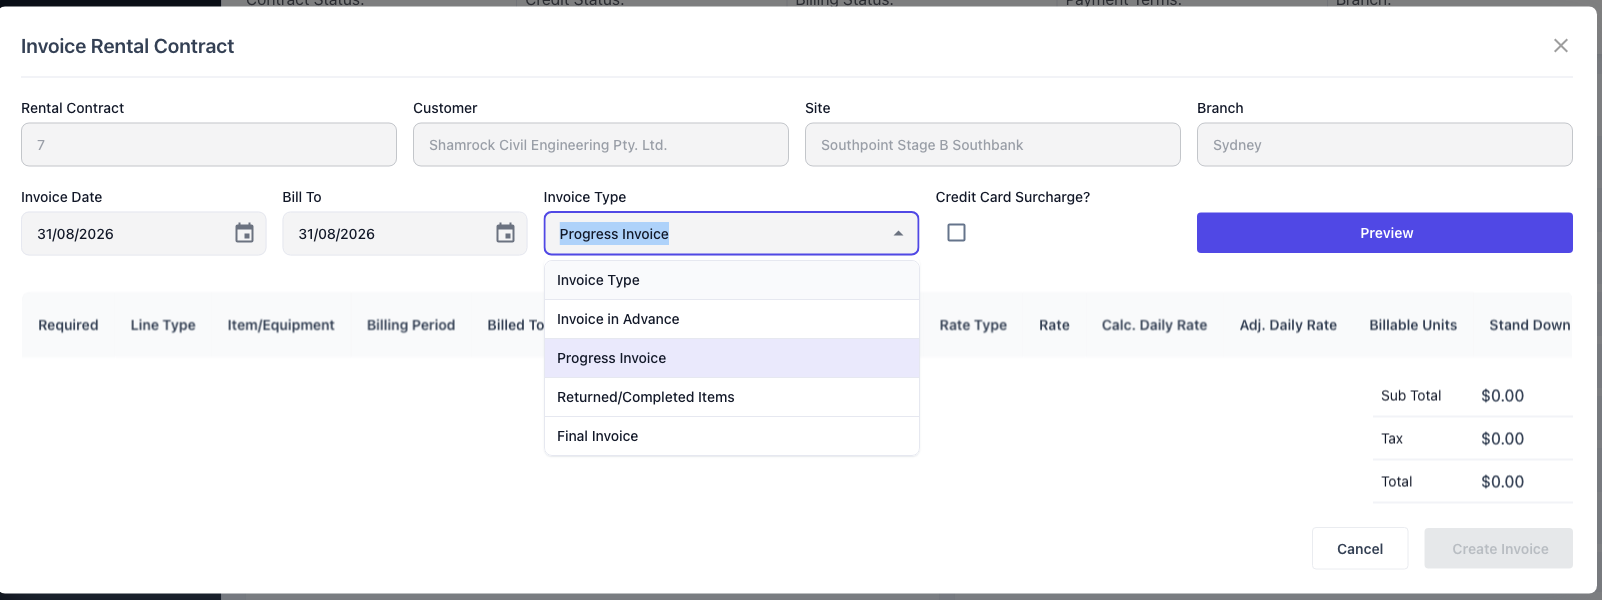
Four fields matter at the top of the dialog. The customer, site and branch are filled in from the contract and can't be changed here.
-
Invoice Date - the date printed on the invoice, and the date the due date is calculated from. Defaults to today.
-
Bill To - the date to bill the contract up until. Defaults to today. Returned equipment is capped at its own off hire date regardless of what you put here, so this mostly matters when something is still on hire.
-
Invoice Type - change this from Progress Invoice to Final Invoice. This is the field that does the work; leave it on the default and you get an ordinary progress invoice.
-
Credit Card Surcharge? - tick this only if the customer is paying by card and your organisation adds a surcharge. It is pre-ticked for cash on delivery customers.
Step 4 - Preview what will be billed
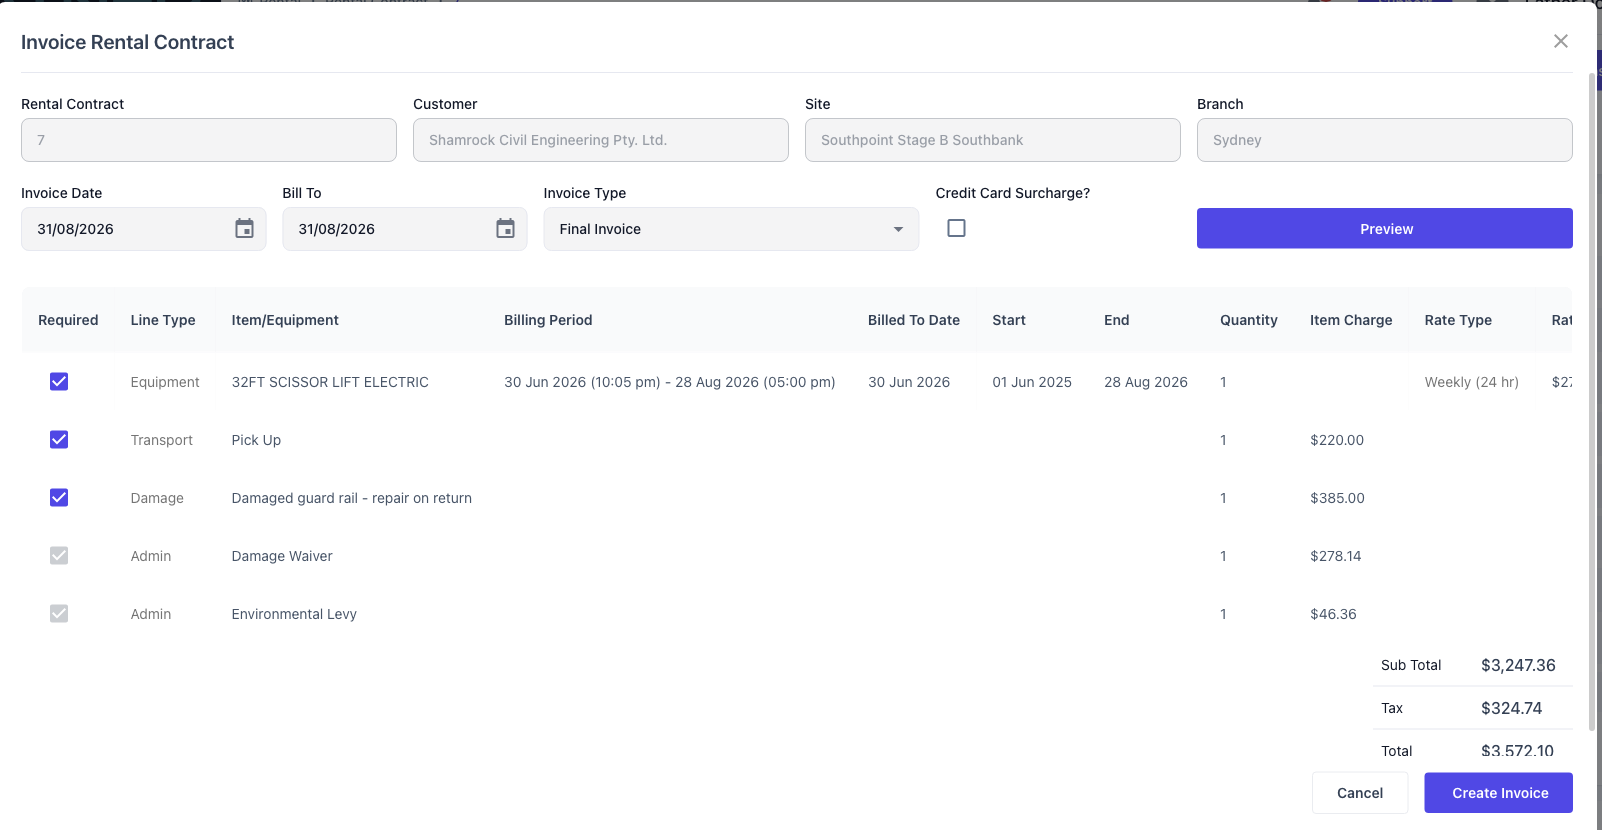
Click Preview. Nothing is committed by this - it works out the invoice and shows you every line it intends to charge, with the billing period, the rate and the totals. Read it before you go any further, because this is your only chance to change what goes on the invoice.
Untick the Required box on any line you don't want to bill yet. Two kinds of line can't be unticked: operator docket lines, and related lines that aren't tied to a contract detail of their own - the Damage Waiver and Environmental Levy lines are calculated from everything else on the invoice, so they come along whether you like it or not.
If the equipment line stops at an earlier date than your Bill To, that is correct. It is billed to the day the machine actually went off hire.
Step 5 - Create the invoice
Click Create Invoice. Latner creates the customer invoice, links it to the rental contract, and takes you to it from the confirmation message. If your organisation has Default Rental Contract Customer Invoices to Completed enabled, it arrives already Completed; otherwise it arrives Open for someone to check first.
When every machine on the contract has been returned, Latner then asks A Final Invoice has been created. Do you want to complete this Rental Contract? Answer Yes and it completes the contract for you. Answer No and the contract stays open - you can always close it later with Options › Complete Rental Contract.
After Creation
-
Every line that was billed moves to Invoiced, and each equipment line's Last Billed To Date moves to its off hire date.
-
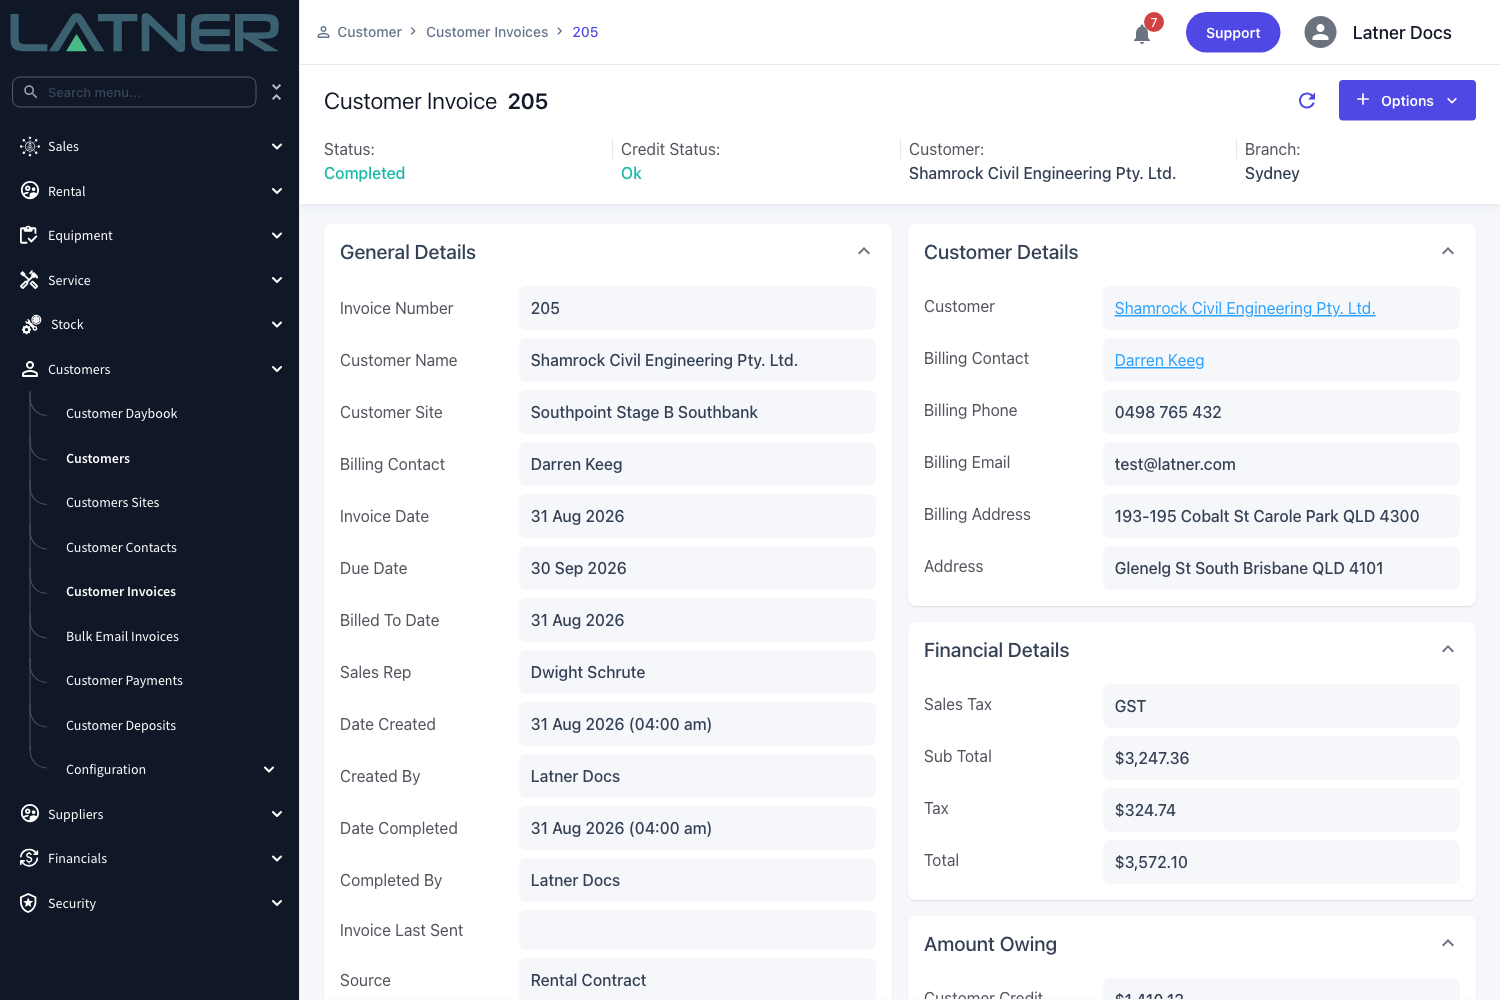
The invoice appears on the contract's Invoices tab and under Customers › Customer Invoices, with Source set to Rental Contract.
-
Completing the contract moves it to Completed and every detail line to Completed. The equipment is released and the contract drops off Cycle Billing and the rental daybook.
-
If your organisation syncs to an accounting package, the invoice is queued for its next push.
Completing a contract is the end of the road for it, and an invoice attached to a Completed contract can no longer be cancelled. If you are not certain the billing is right, answer No to the prompt, check the invoice, and come back to Options › Complete Rental Contract once you are happy. A contract closed too early can be brought back with Options › Reopen Rental Contract.
FAQs
Can I raise Final Invoices for a lot of contracts at once?
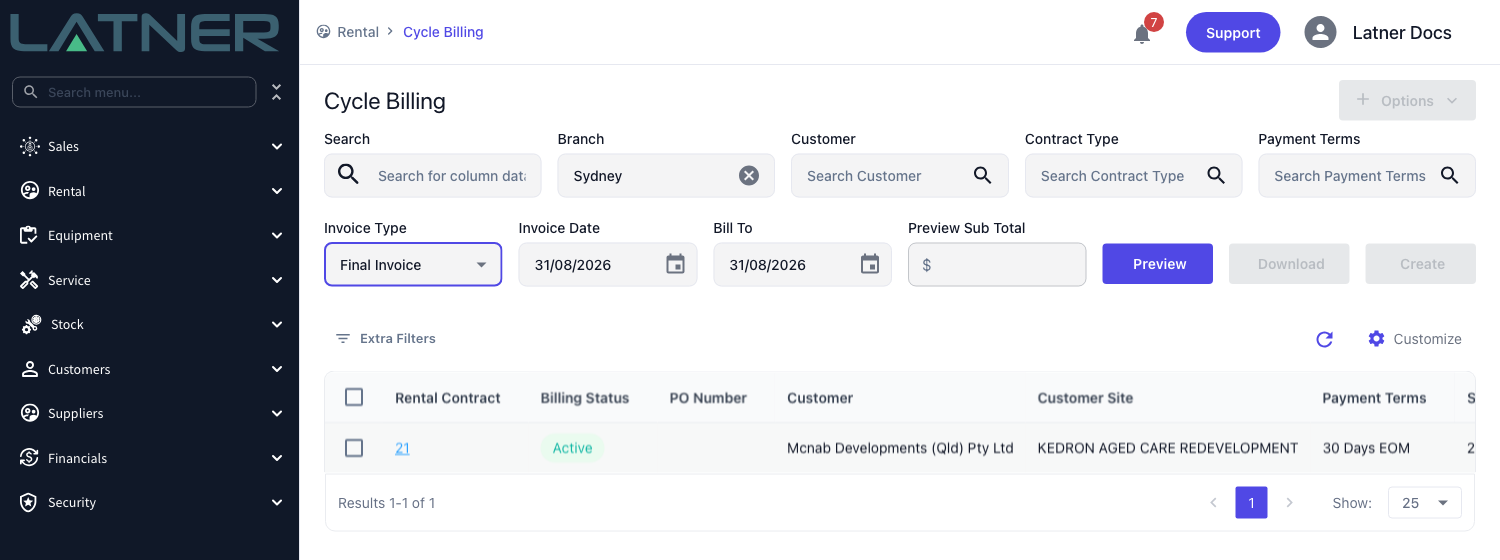
Yes. Go to Rental › Cycle Billing and set Invoice Type to Final Invoice. Doing that filters the list down to contracts where every piece of equipment has been returned, which is a quick way to find the hires that are ready to close. Select the contracts, use Preview to check the run, then Create. Cycle Billing goes one step further than the single-contract route: it completes each contract for you where it can, without asking. Contracts on billing hold are skipped.
Watch the Demo
Prefer to watch it? Step through the same flow here.
Work Order Invoice
For more details, see the Service Department processes.
Invoicing a Work Order turns a job's charges into a customer invoice, so a repair or service can be billed - once the work is done, or up front from an approved quote - without re-keying a single line.
Overview
A chargeable job accumulates charges as it goes: a mechanic's timesheet, the parts issued from the store, an expense for the call out. Invoicing the work order collects those lines, lets you decide which ones the customer actually pays for, and creates the invoice for you.
-
You choose whether to charge the customer the Actuals (what the job really used) or the Estimates (the lines that came across from a Work Order Quote).
-
You tick the individual lines to bill, so a work order can be invoiced in stages rather than all at once.
-
You don't have to wait for the job to finish. A Chargeable or Customer Damage work order can be invoiced while it is still Open, before any work has been done - for example, to bill an approved damage quote up front from its Estimates. When you complete the work order later, lines that are already invoiced aren't invoiced again.
-
Latner creates a customer invoice linked back to the work order, and each invoice line stays linked to the work order line it came from.
-
Once a work order has been invoiced from one source, every later invoice on it must use the same source.
-
A chargeable work order can't be completed while non-zero charges are still uninvoiced.
Before You Begin
Invoicing only becomes available once the work order is in the right shape.
|
Requirement |
Where to Find It |
|---|---|
|
Invoice Work Order permission |
Security › Configuration › Permission Groups › your group › Service › Option |
|
Work order Type is Chargeable or Customer Damage |
The work order's General Details card |
|
Work order status is Open, Completed or Pending Approval |
Work Order Status in the page header |
|
A Customer and Customer Site, and the customer is not on credit hold |
The work order's Customer Details card |
|
At least one charge line that hasn't been invoiced |
The Actuals or Estimates tab |
|
Tax Rounding Method (optional, affects how tax is totalled) |
Security › Settings › Financial |
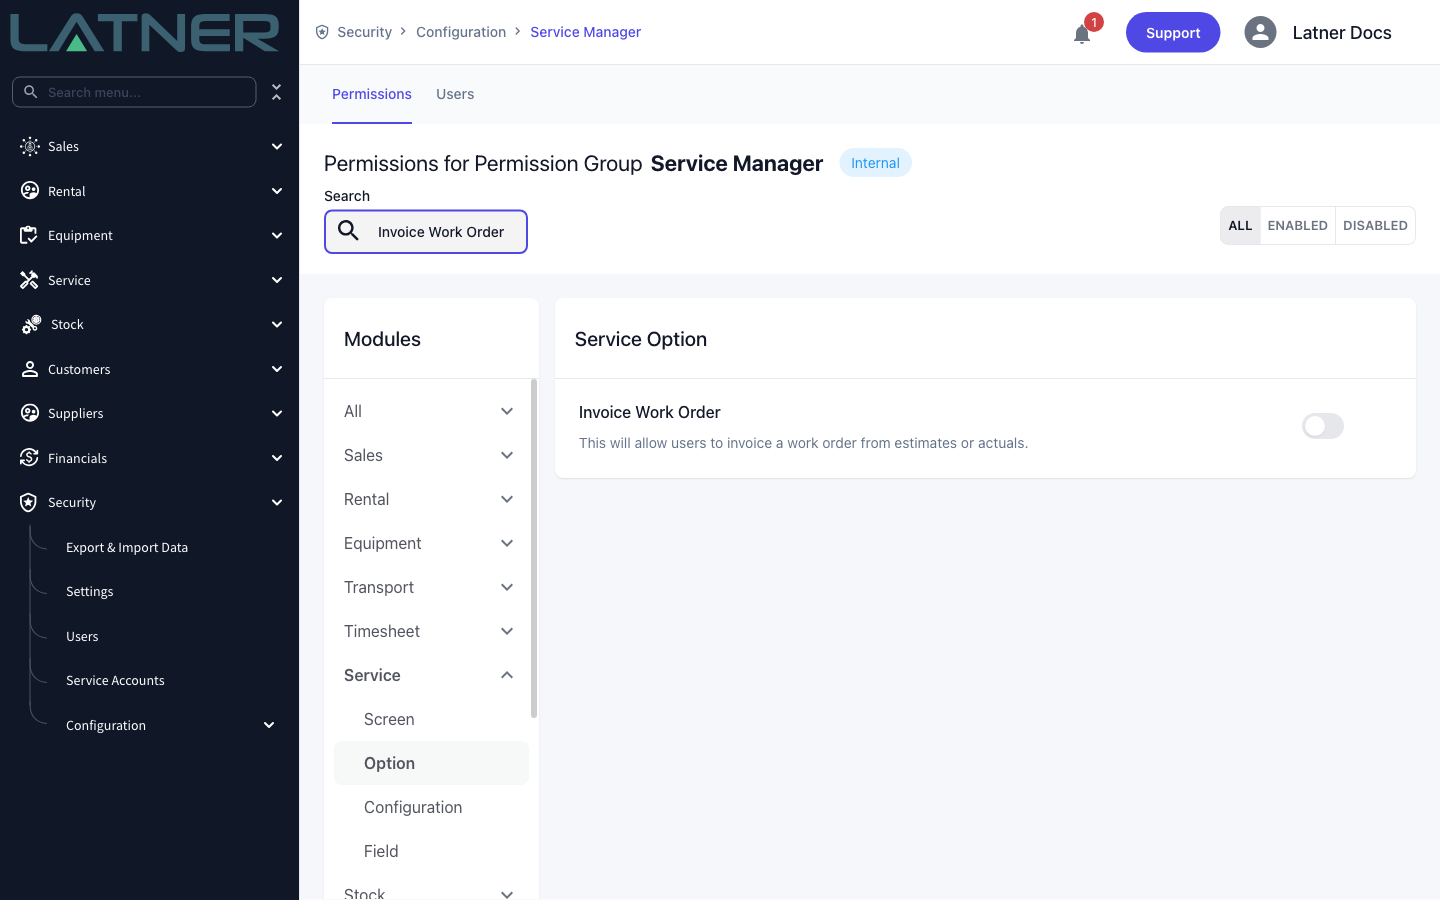
If Invoice Work Order isn't in the Options menu, the work order is either not a chargeable type, has been cancelled, or has nothing left to invoice. Latner hides the option in all three cases rather than showing it greyed out.
Invoicing the Work Order
Step 1 - Open the work order
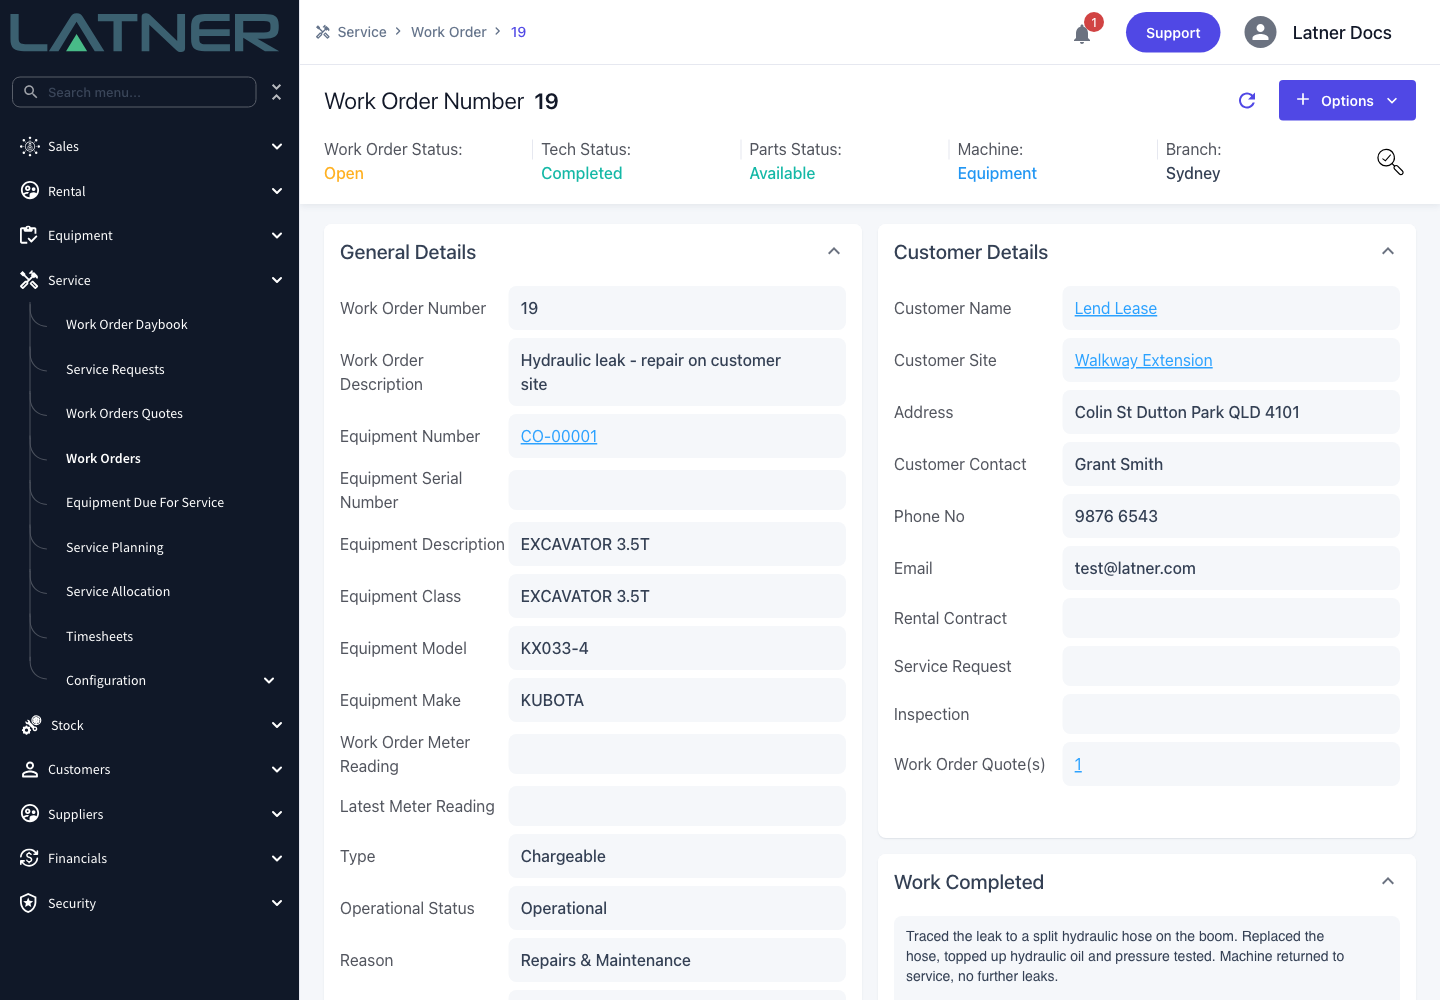
Go to Service › Work Orders (or the Work Order Daybook) and open the job you want to bill. Check the Actuals tab holds the charges you expect - every timesheet, part and expense you want on the invoice needs to be on the work order first.
Step 2 - Choose Invoice Work Order
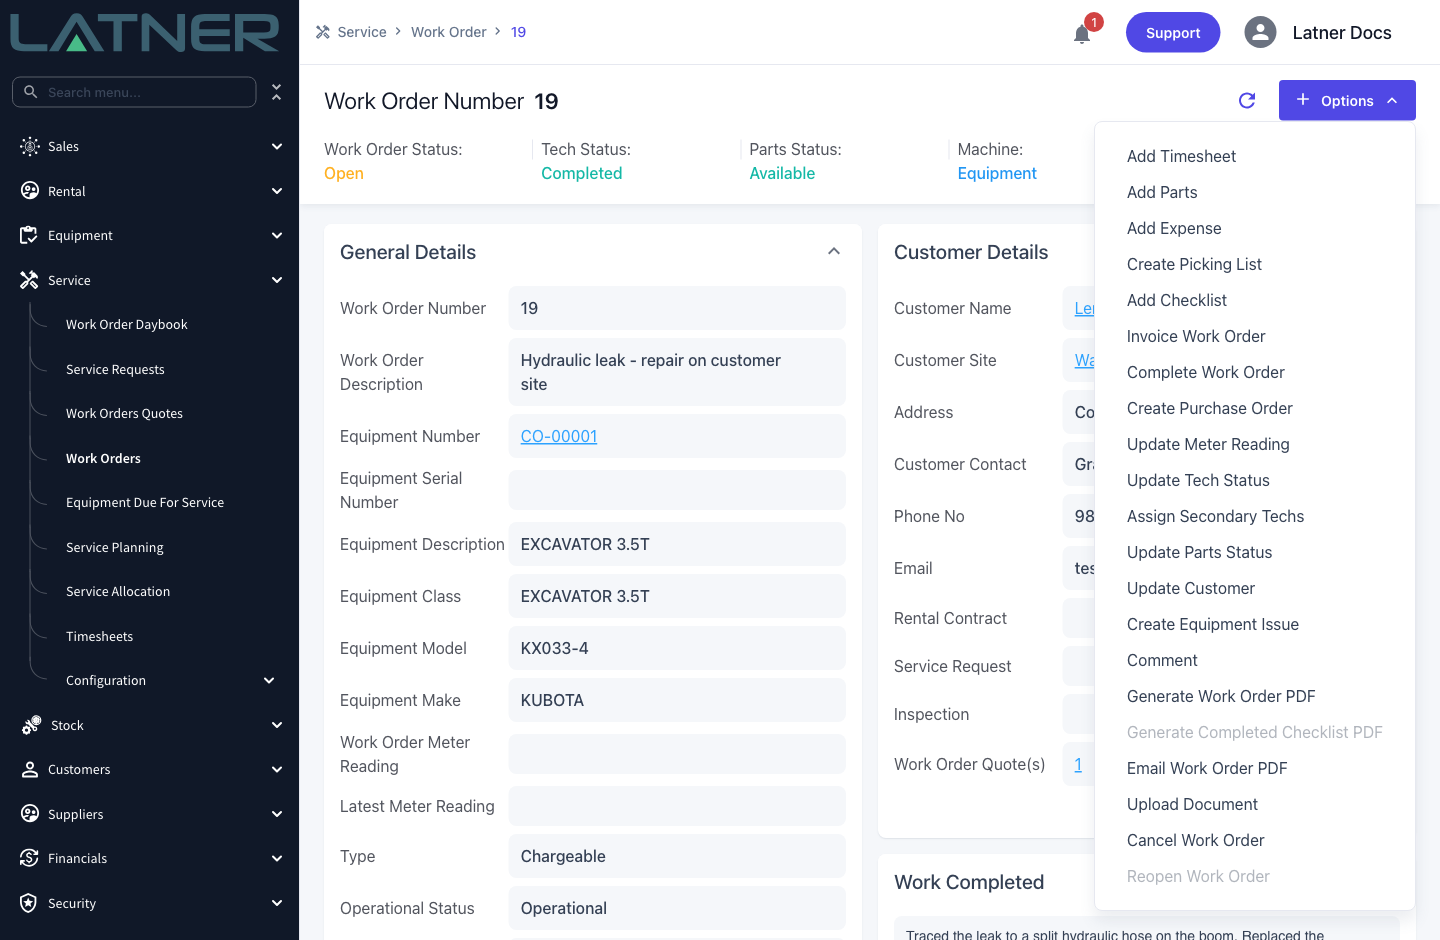
Click Options at the top right and choose Invoice Work Order.
Step 3 - Choose what to charge
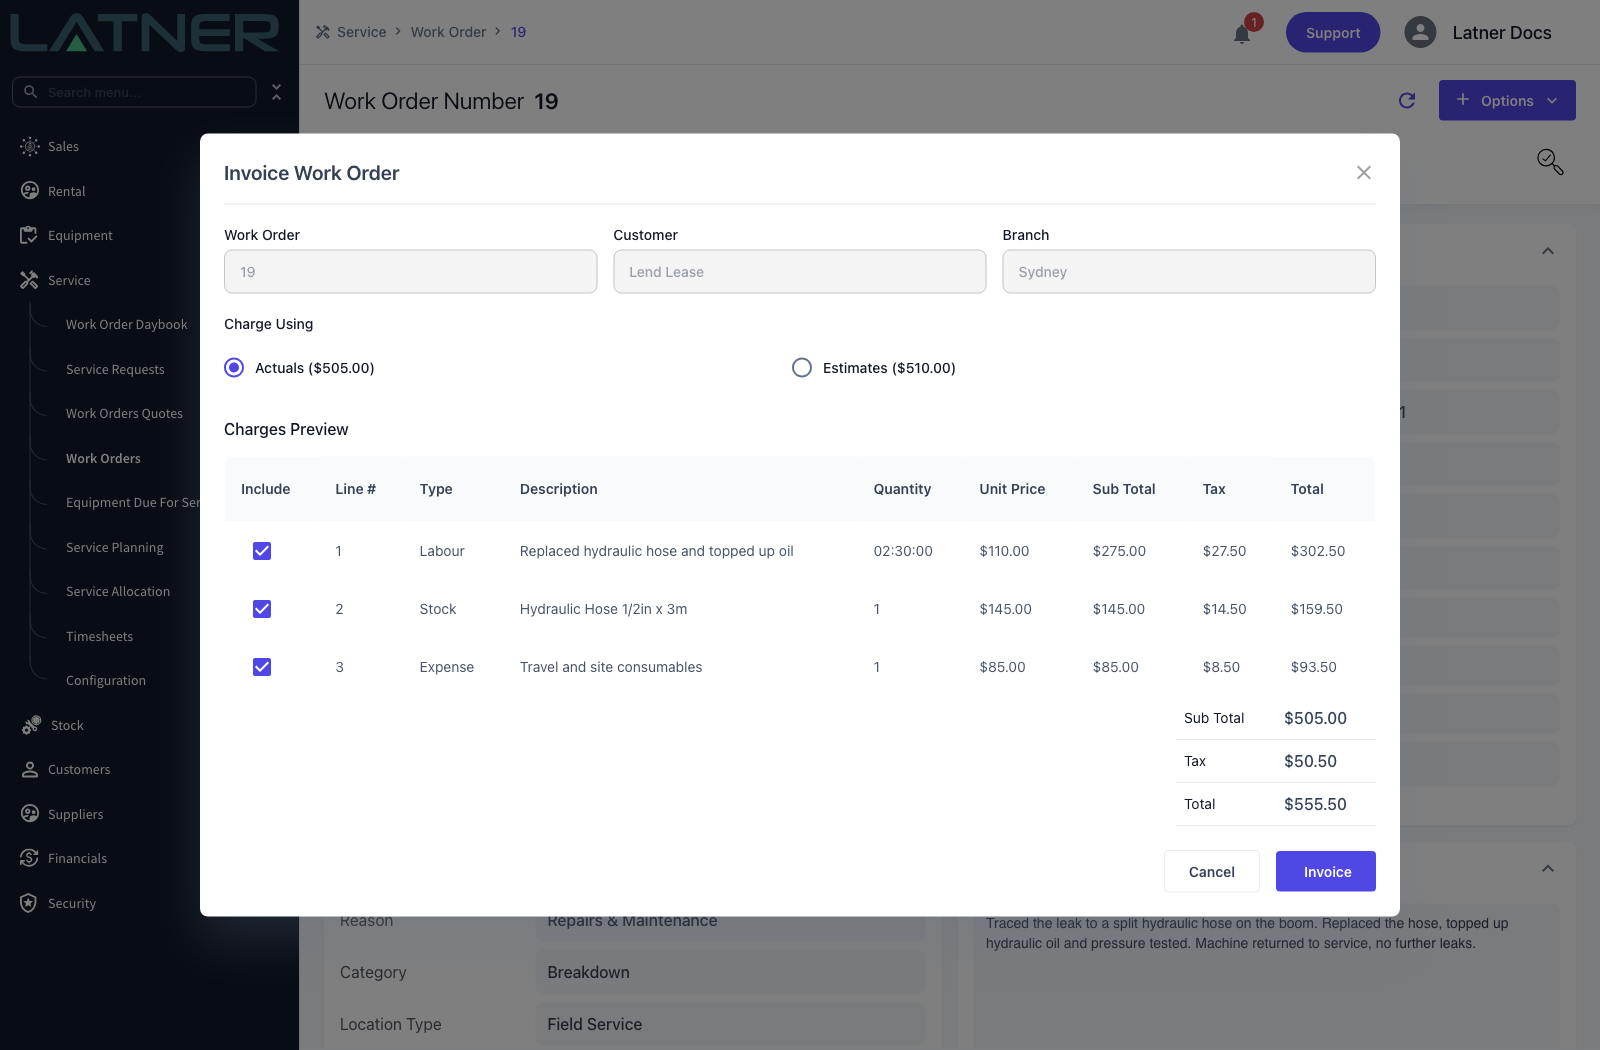
The dialog opens with the work order, customer and branch shown read only, and a Charge Using choice:
-
Actuals - the timesheets, parts and expenses recorded against the work order.
-
Estimates - the lines that came from a Work Order Quote converted into this work order.
Each option shows its own total, so you can see at a glance what the two approaches would bill. An option is greyed out when there are no lines of that kind left to invoice.
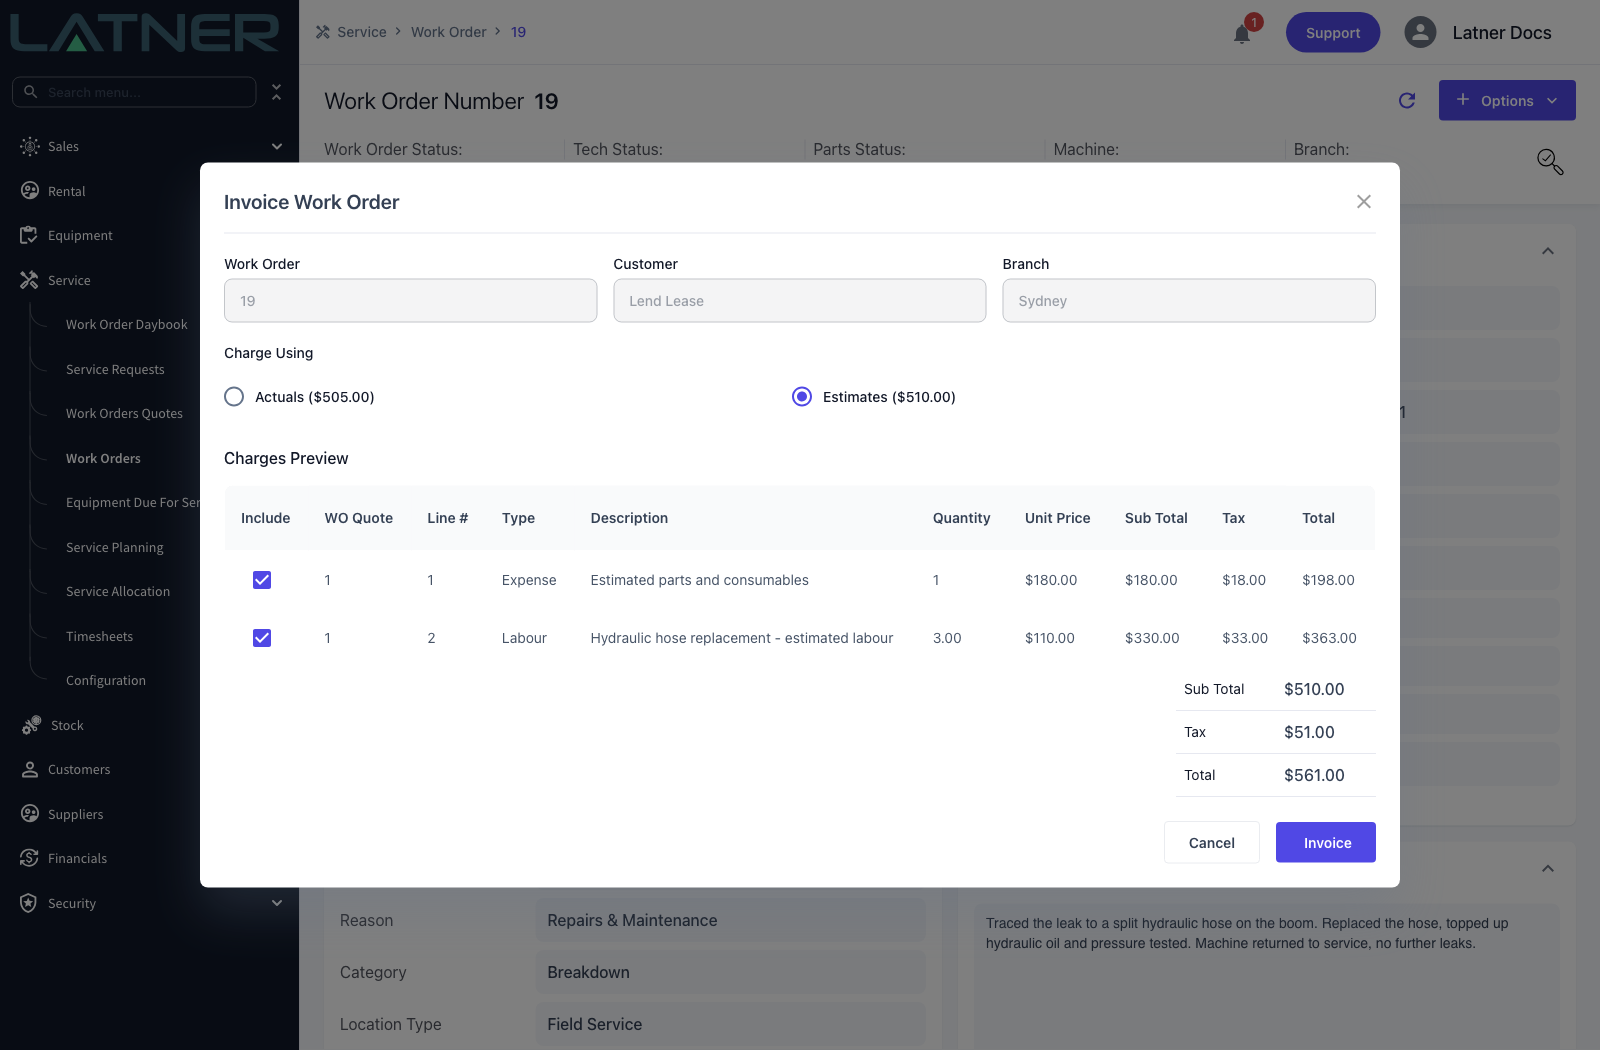
Switching to Estimates replaces the preview with the quoted lines and adds a WO Quote column, so you can tell which quote each line came from when more than one has been converted into the work order.
Step 4 - Pick the lines to bill
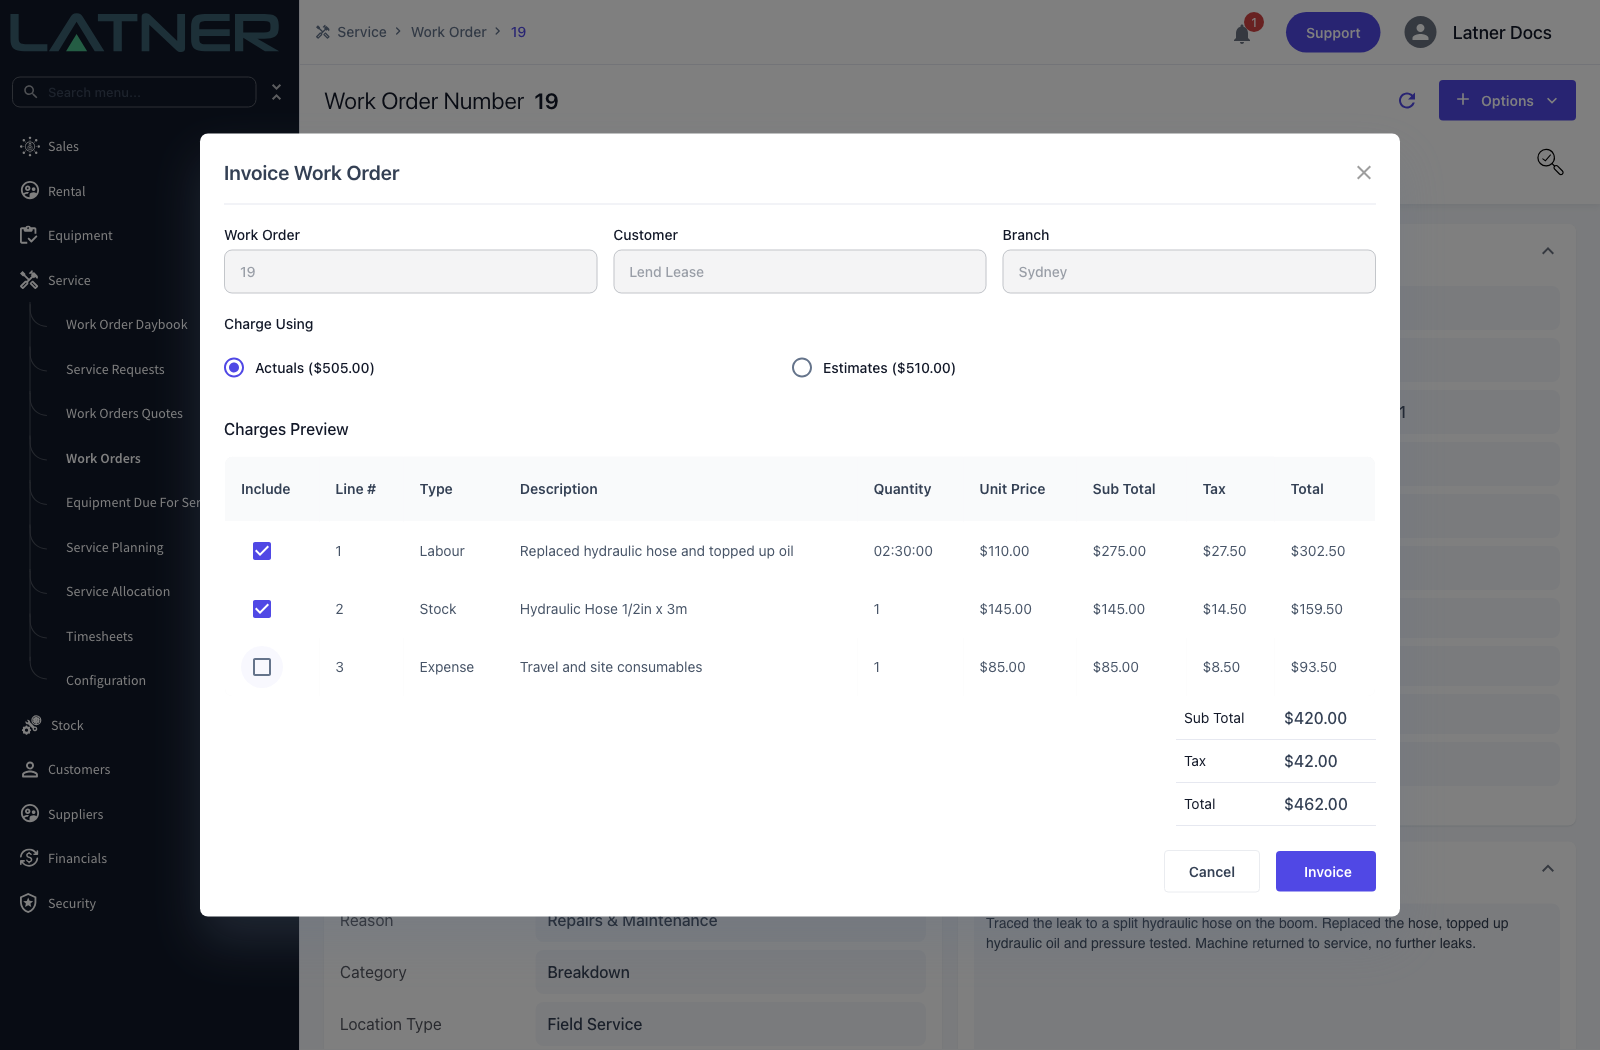
The Charges Preview table has an Include tick box on every line. Lines worth more than $0.00 are ticked for you; $0.00 lines start unticked, so goodwill and no-charge work stays off the invoice unless you deliberately add it. Untick anything you're not billing yet and the totals at the bottom update straight away.
Step 5 - Create the invoice
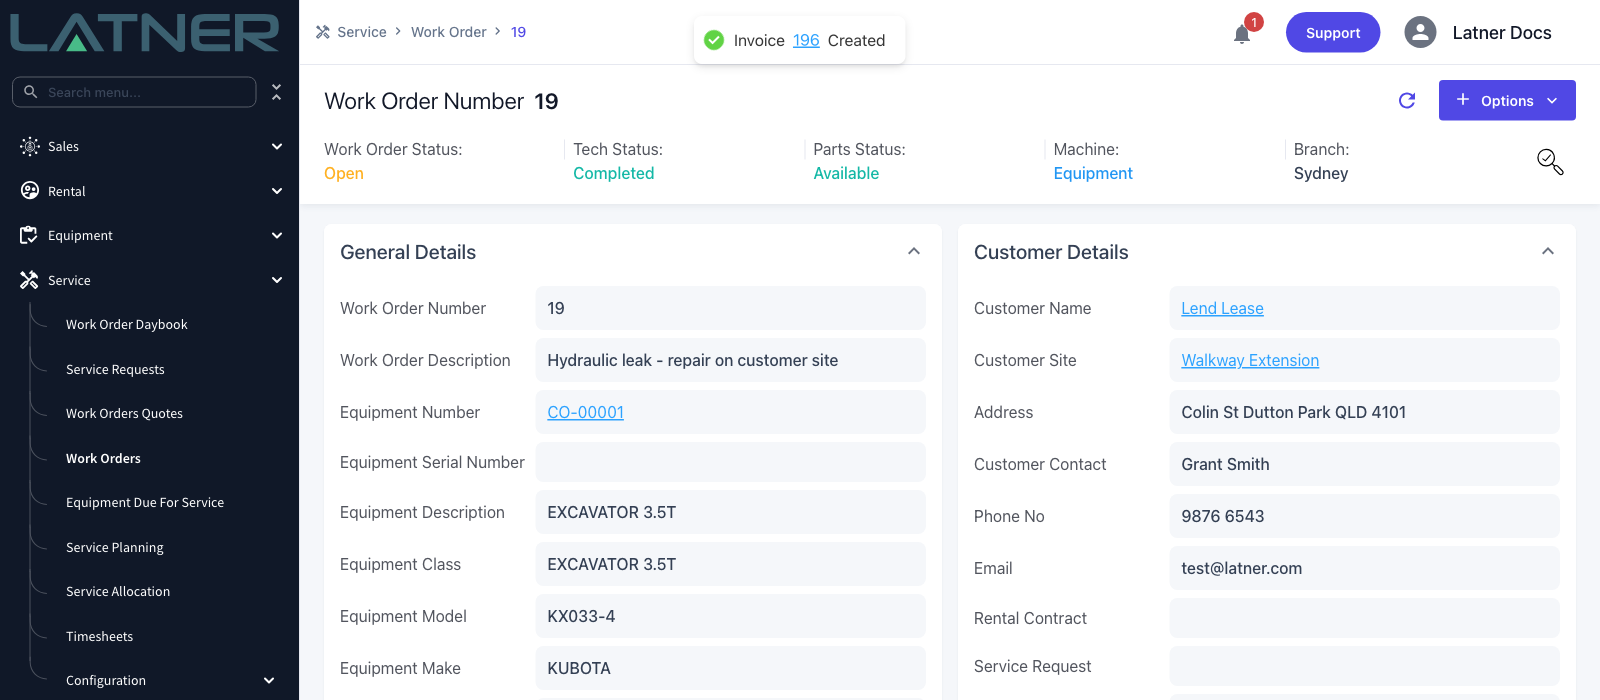
Click Invoice. The button stays disabled until at least one line is ticked. Latner creates the customer invoice and shows a confirmation with a link straight to it.
After You Invoice
-
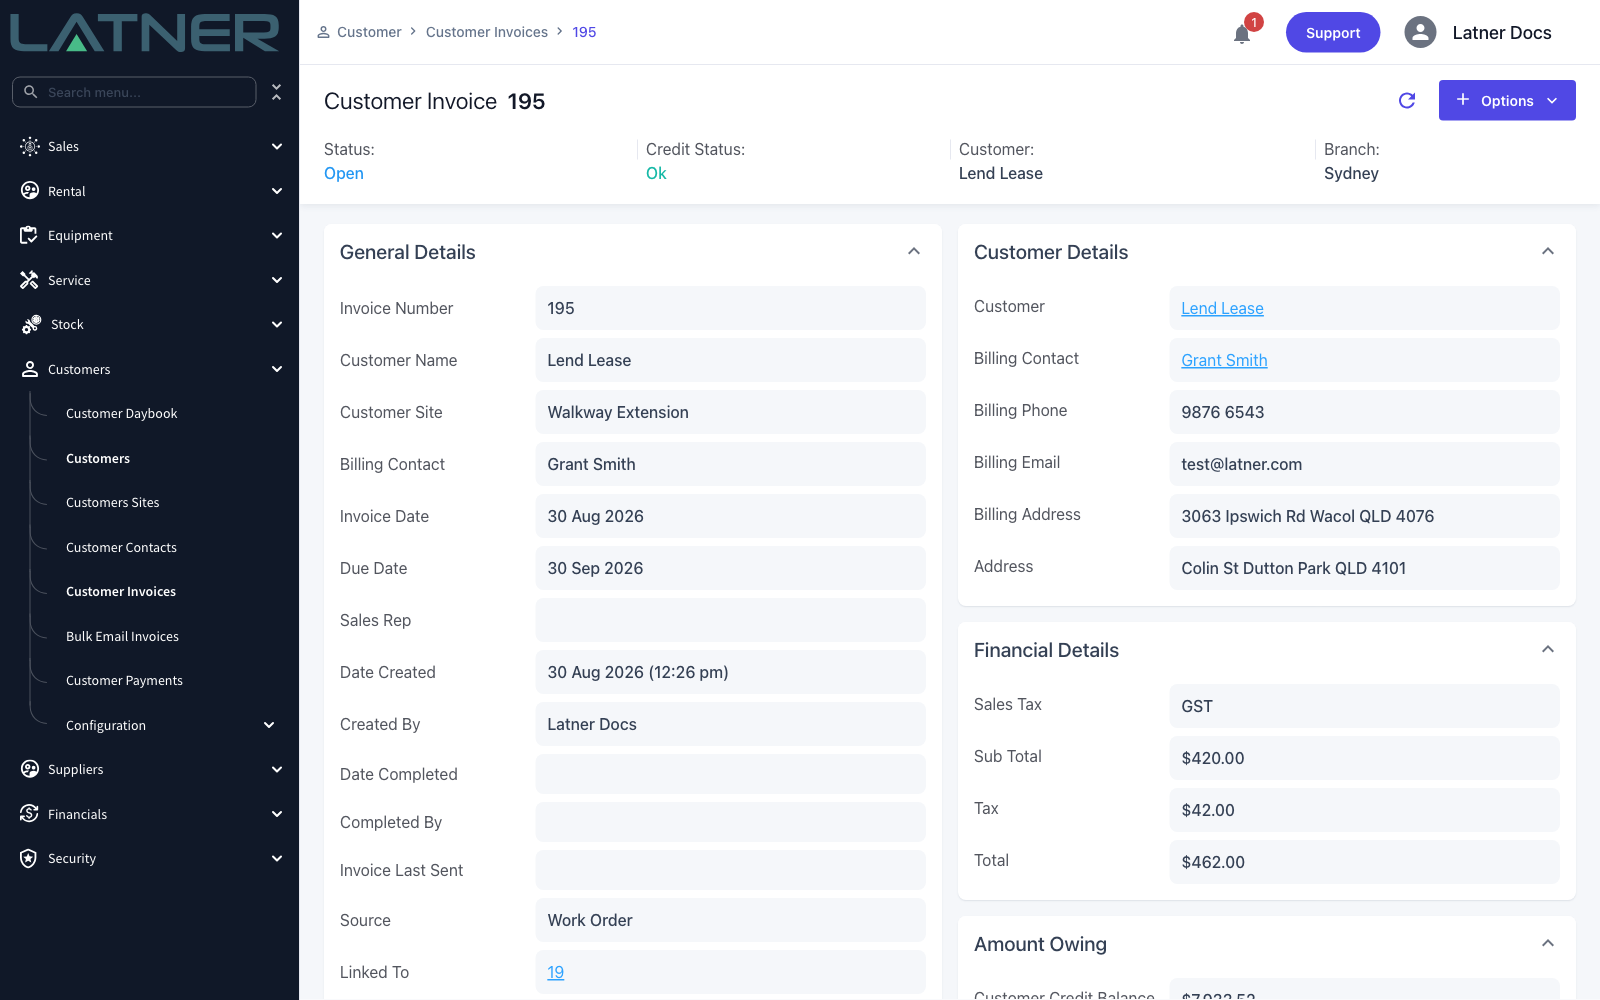
A customer invoice is created with a Source of Work Order and a Linked To link back to the work order. It is dated today in the branch's timezone and picks up the work order's purchase order number.
-
Every invoice line keeps its link to the work order line, and shows as a Work Order Labour, Work Order Stock or Work Order Expense line type.
-
The work order's Invoice Status changes to Invoiced (Actuals) or Invoiced (Estimates), and the invoice appears on the work order's Invoices tab - expand a row there to see the lines that were billed.
-
The invoice is created in Open status, so it still needs to be emailed, paid and synced like any other customer invoice.
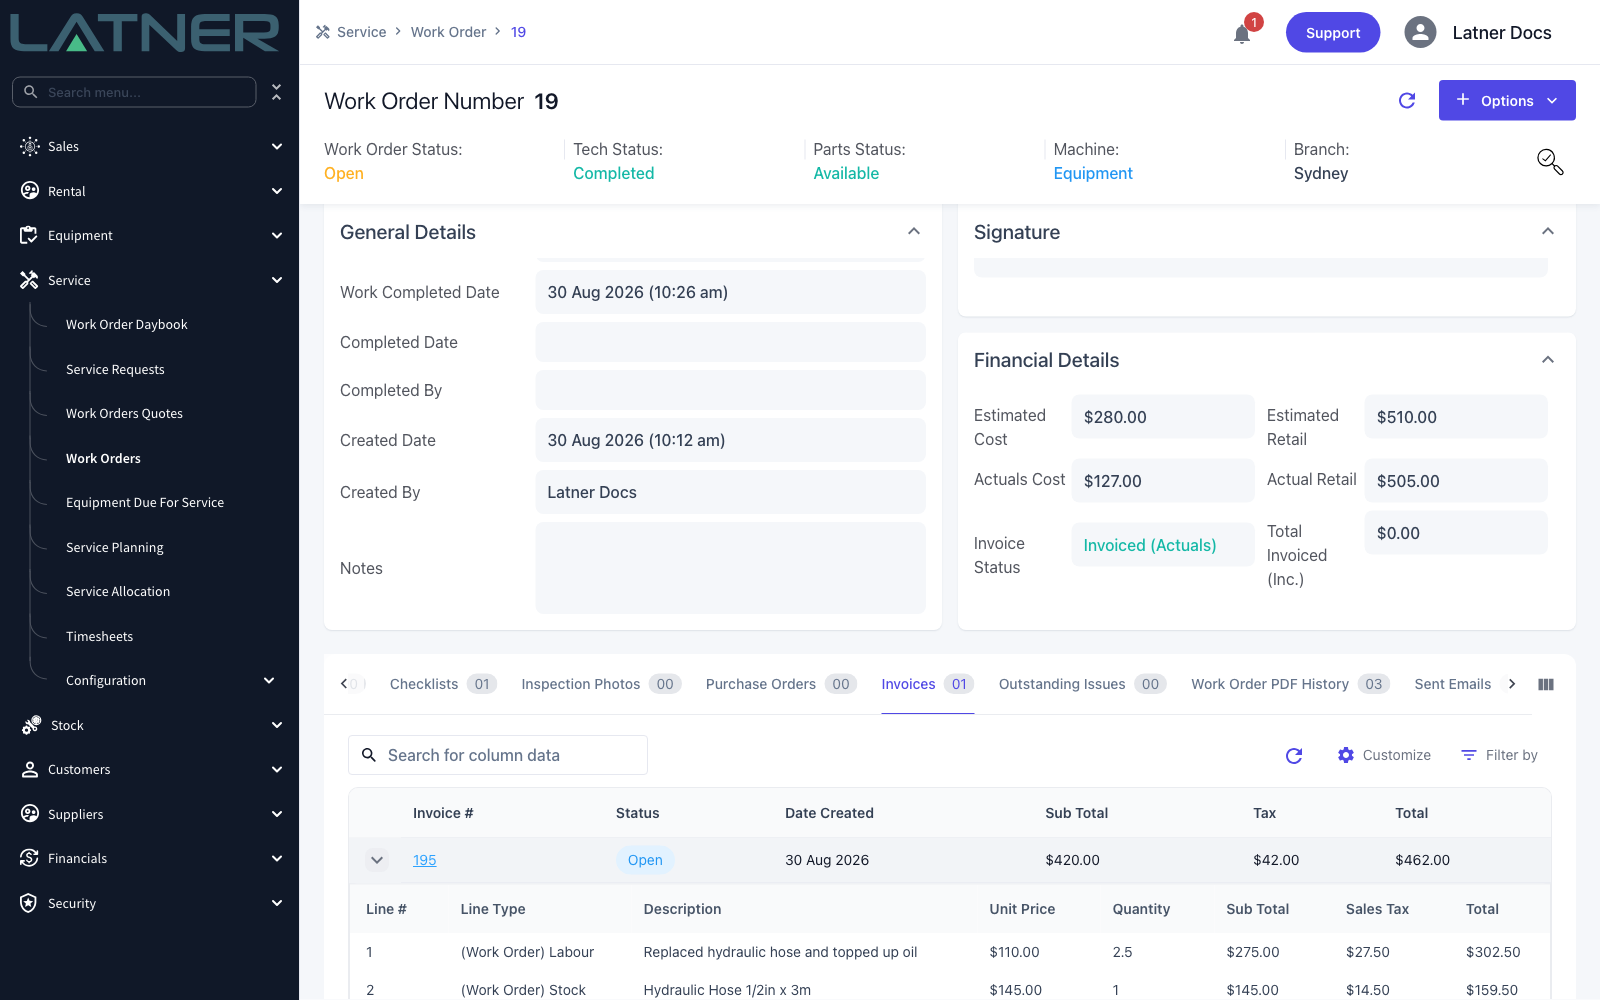
Invoice Status tells you the work order has been invoiced, not that it has been invoiced in full. A part-billed work order still reads Invoiced (Actuals) while lines remain outstanding - the reliable check is whether Invoice Work Order is still in the Options menu.
Invoicing the Rest Later
If you left lines off the first invoice, run Invoice Work Order again. The dialog now splits into two tables: Already Invoiced, which is read only and shows what has been billed, and To Invoice, which holds what is left. The Charge Using option you used the first time is now locked, and the other one is greyed out with a tooltip explaining why.
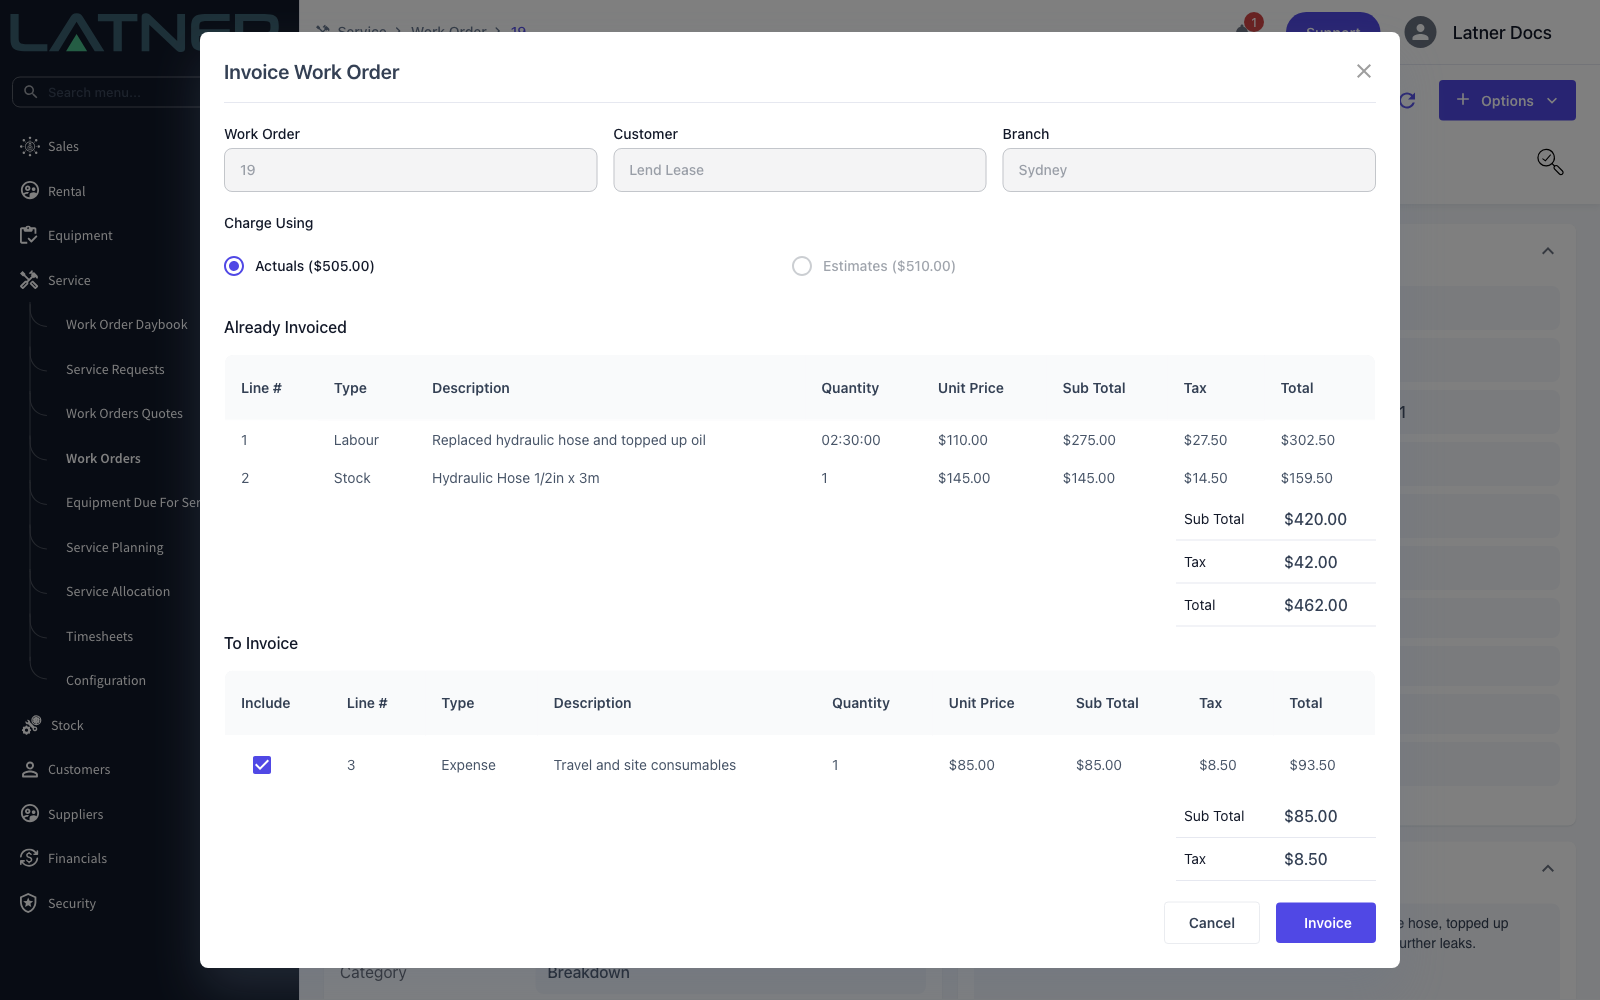
Once every line has been invoiced, Invoice Work Order disappears from the Options menu and the work order is ready to complete.
You don't have to invoice as a separate step. Complete Work Order shows the same charges preview, and its button reads Invoice Actuals & Complete or Invoice Estimates & Complete when lines are ticked, so the last invoice and the completion happen in one action.
FAQs
Watch the Demo
Prefer to watch it? Step through the same flow here.
Sales Order Invoice
Coming soon…
Transport Invoice
A manual transport docket with a charge on it turns into a customer invoice the moment you complete the docket, so a one-off delivery or pick up gets billed without anyone having to key an invoice by hand.
Overview
Transport that belongs to a rental contract is billed with the contract. Transport that doesn't belong to anything - a customer's own machine shifted across town, a load dropped at a site, a competitor's unit dragged back to your yard - has nowhere to hang a charge. That's what the charge on a manual docket is for, and completing the docket is what bills it.
-
Only Manual dockets invoice this way. A docket raised from a rental contract carries its charge as a transport line on the contract, and that line is billed with the contract.
-
The trigger is completion, not creation. A manual docket with a charge greater than zero raises a customer invoice as soon as it is completed, whether that happens on the desktop or on the driver's phone.
-
The invoice is for exactly one line: quantity 1 at the docket's charge, with the docket's type (Delivery, Pick Up, Collection or Site Move) as the item.
-
A charge needs somebody to bill, so the docket must have a Customer and a Customer Site. A manual docket with no charge, or a charge of zero, completes without raising anything.
-
The invoice arrives as Open unless Default Transport Customer Invoices to Completed is switched on, and it is linked back to the docket both ways.
-
Once the invoice exists the docket can't be reopened until the invoice is cancelled, so it is worth getting the charge right before you complete.
Before You Begin
Nothing has to be turned on for a charged docket to invoice itself, but one setting decides what state the invoice lands in, and a couple of permissions decide who can see and finish it.
|
Requirement |
Where to Find It |
|---|---|
|
Default Transport Customer Invoices to Completed - off means the invoice arrives as Open, on means it arrives Completed |
Security › Settings › Customers |
|
Transport Dockets permission - to open the docket at all |
Security › Configuration › Permission Groups › Rental › Screen |
|
Customer Invoices permission - to open the invoice the docket raises |
Security › Configuration › Permission Groups › Customers › Screen |
|
Cancel Customer Invoice permission - only needed if you have to undo an invoice and re-charge the docket |
Security › Configuration › Permission Groups › Customers › Option |
|
Reopen Transport Docket permission - only needed if you have to correct a charge after completion |
Security › Configuration › Permission Groups › Transport › Option |
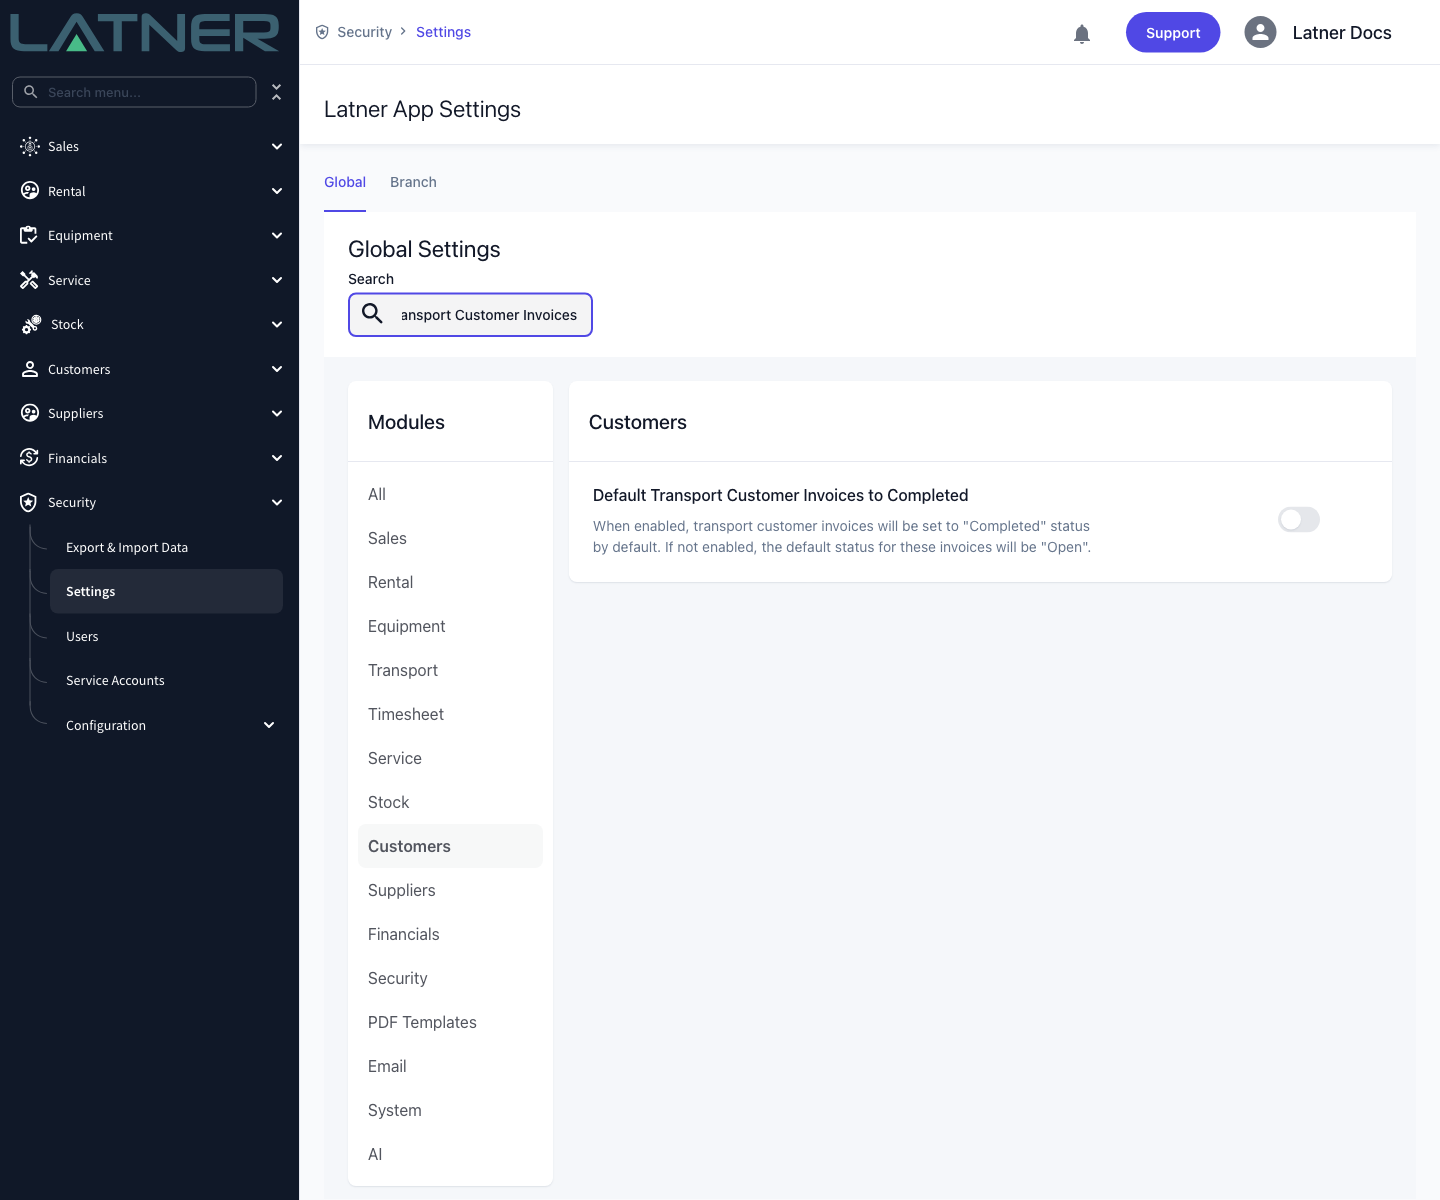
The setting is read at the moment the invoice is created, so changing it later has no effect on invoices that already exist. It applies to transport invoices only - rental contract, sales order and work order invoices each have their own equivalent setting in the same list.
Invoicing the Docket
Step 1 - Check the charge before you complete the docket
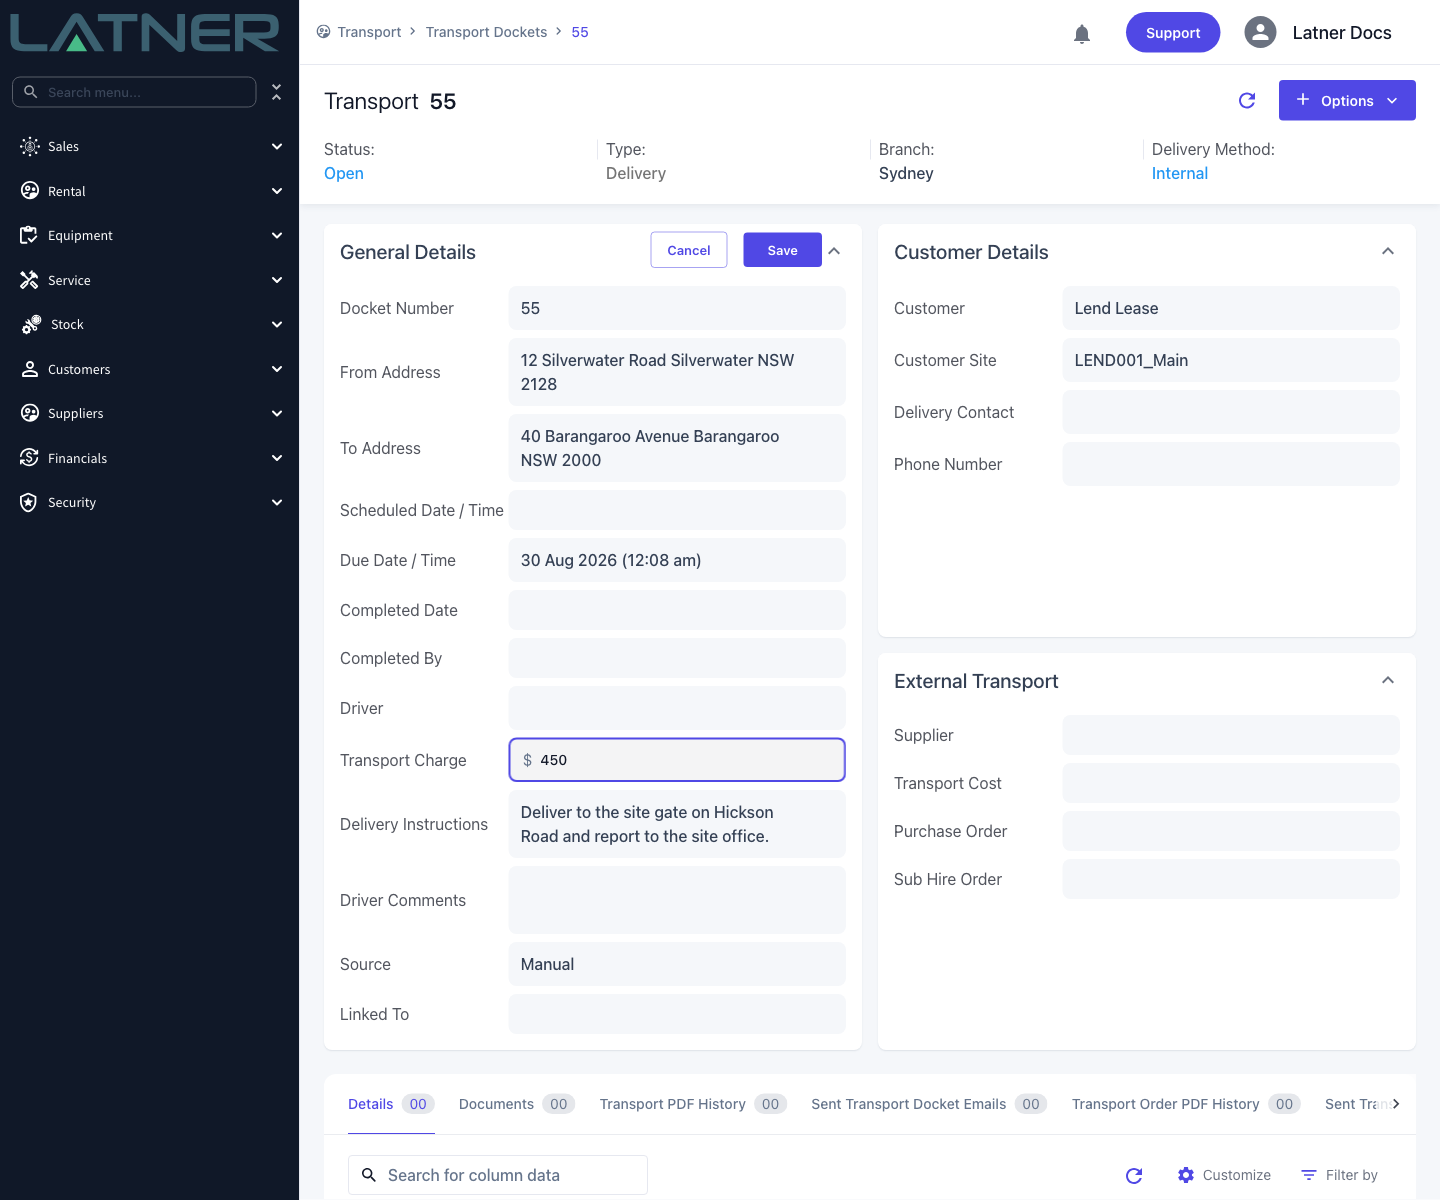
Open the docket from Transport › Transport Dockets and look at Transport Charge under General Details. While the docket is Open you can click straight into the field and change it, then use Save at the top of the card.
-
Transport Charge - what the customer pays for the job, excluding tax. This is the whole invoice, so it needs to be the full price of the delivery or pick up, not a rate.
-
Customer and Customer Site - both required as soon as there is a charge. Without a customer the save is rejected with Cannot have Transport Charge if Transport is not linked to a Customer, and a customer without a site is rejected with Cannot have Customer without Customer Site selected.
The field is only editable on a Manual docket that is still Open. On a docket that came from a rental contract it is read-only, with a tooltip pointing you at the contract's transport line instead.
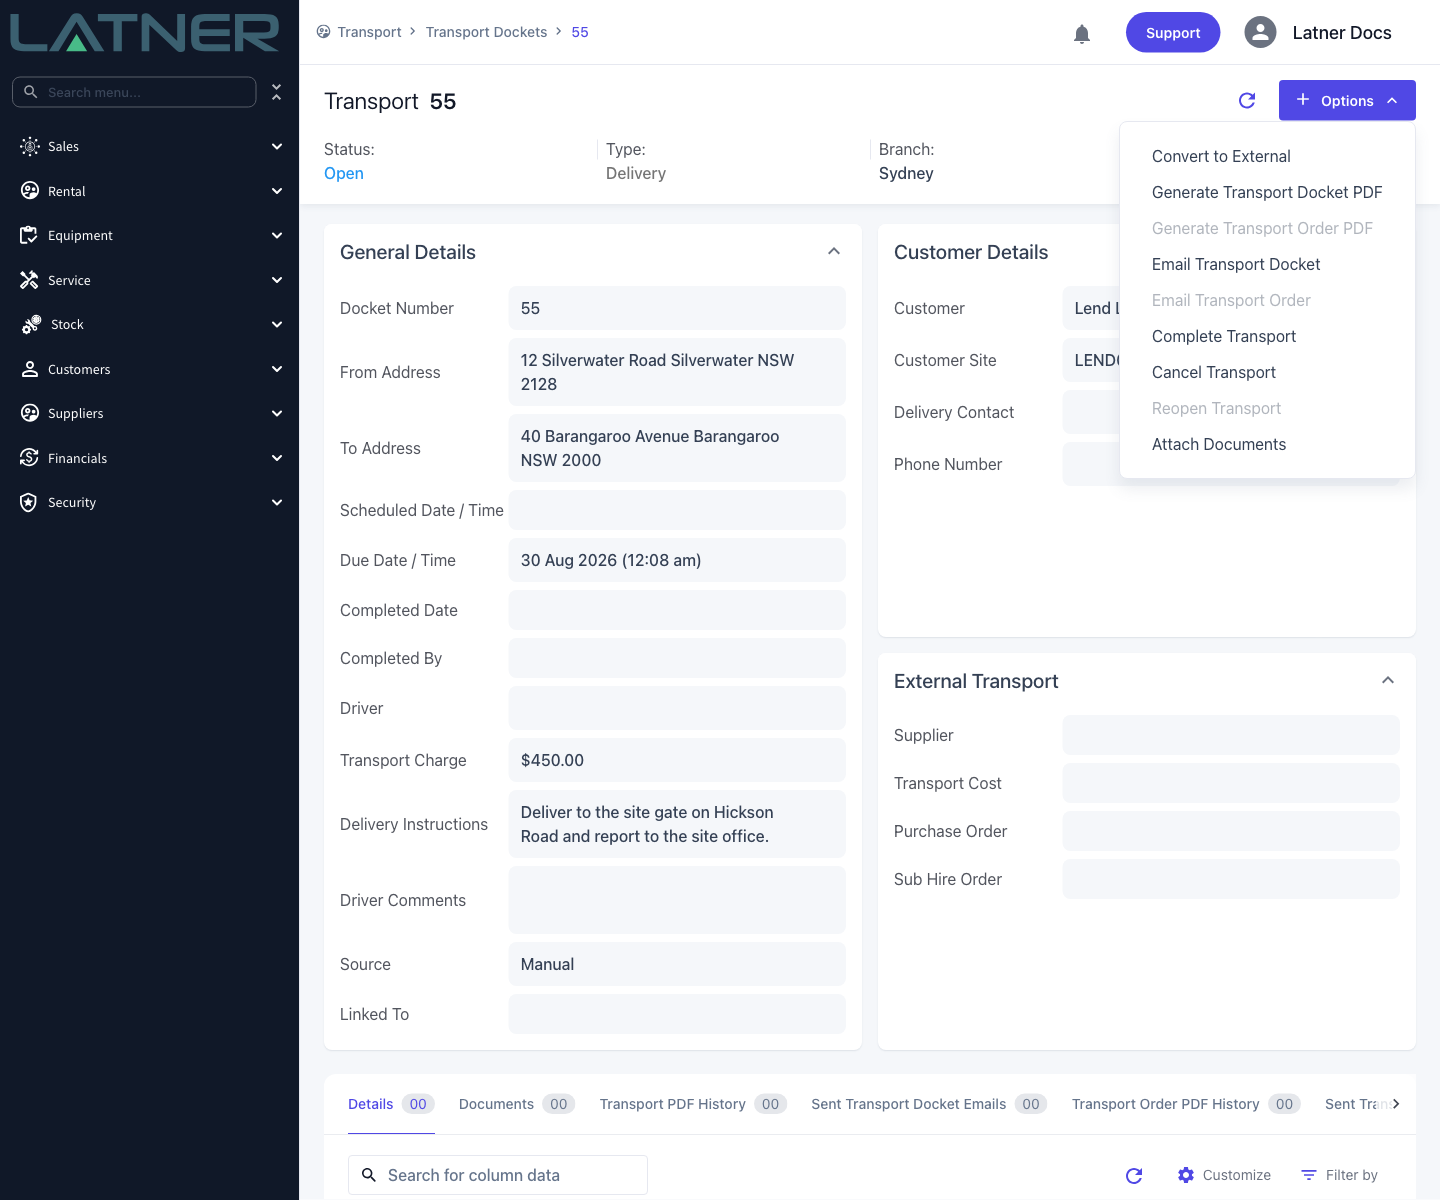
Step 2 - Complete the docket
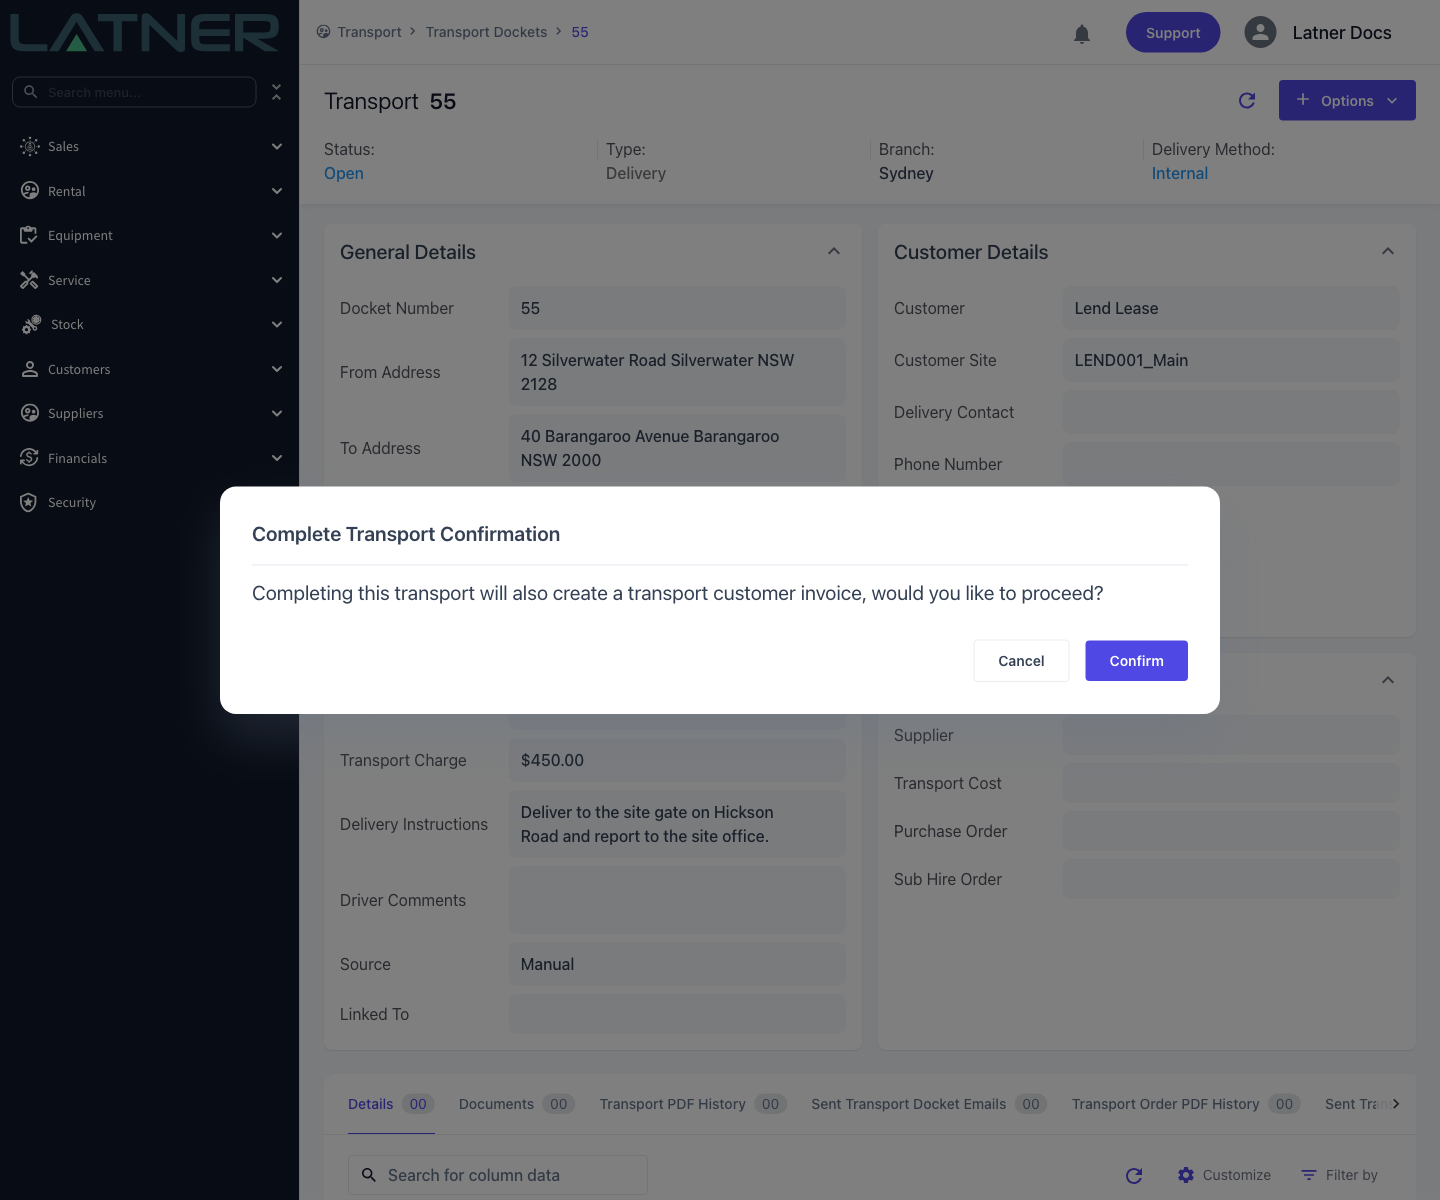
Choose Options › Complete Transport. Because the docket is manual and carries a charge, Latner asks you to confirm before it goes any further.
The confirmation reads Completing this transport will also create a transport customer invoice, would you like to proceed? Choose Confirm to carry on. This prompt only appears for a manual docket with a charge above zero, so if you don't see it, check the charge actually saved.
Step 3 - Fill in the completion details
The Complete Transport dialog opens with the customer, site, contact, phone and due date already filled from the docket and greyed out. Two fields are yours:
-
Completed Date - required, and defaults to now in the branch's timezone. Set it back if the job was actually done earlier.
-
Driver - optional, and useful when a driver was never allocated to the docket in the first place.
The equipment table below is empty on a manual docket, because a manual docket has no equipment lines. That's expected - unlike a contract docket, you don't have to tick anything off before Complete will go through.
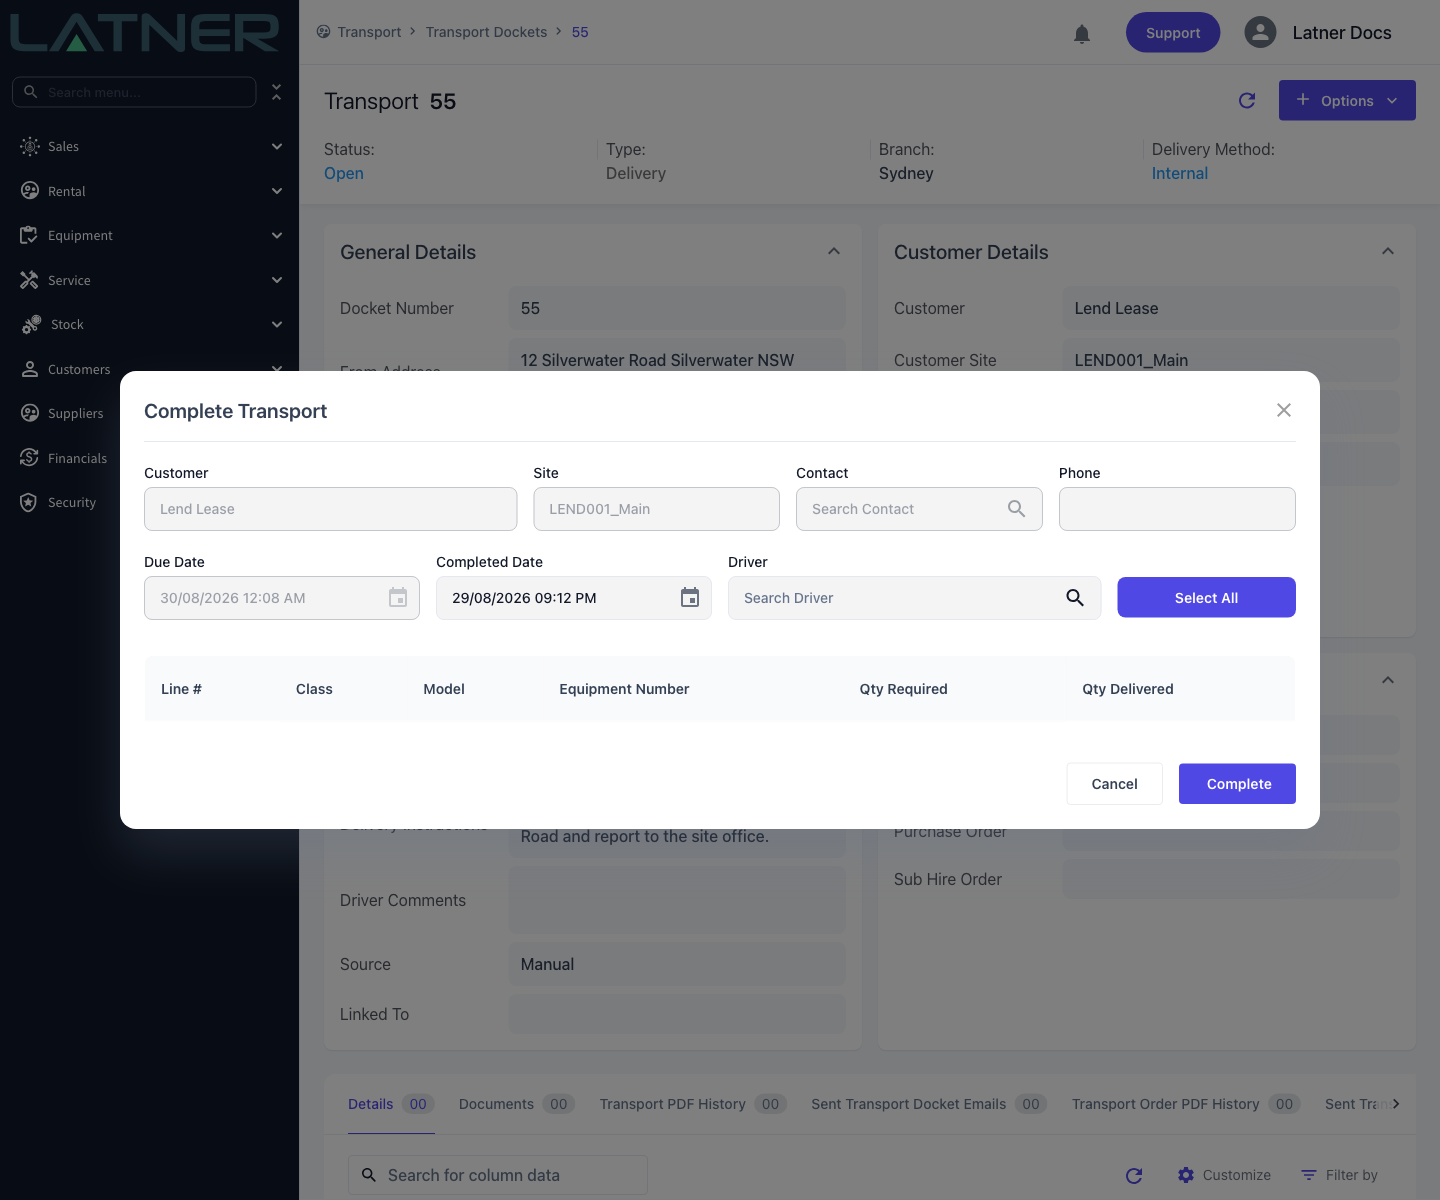
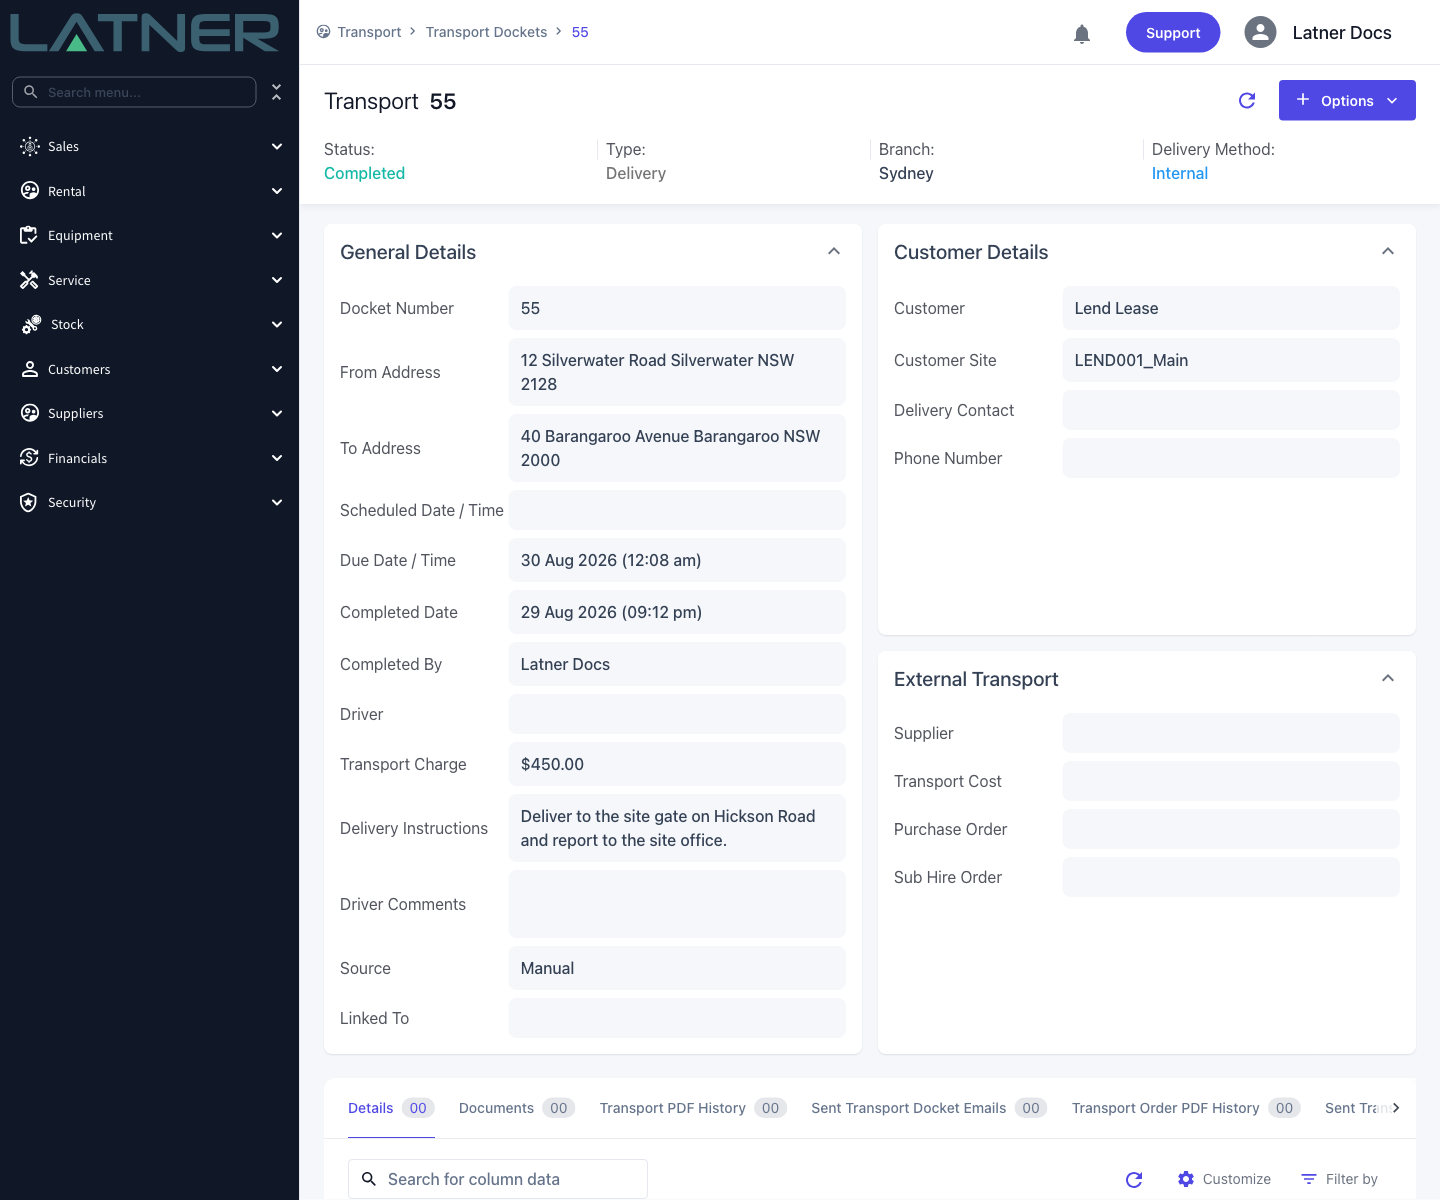
Once you click Complete, the docket moves to Completed, Completed Date and Completed By fill in, and the charge becomes read-only.
Step 4 - Find the invoice on the docket
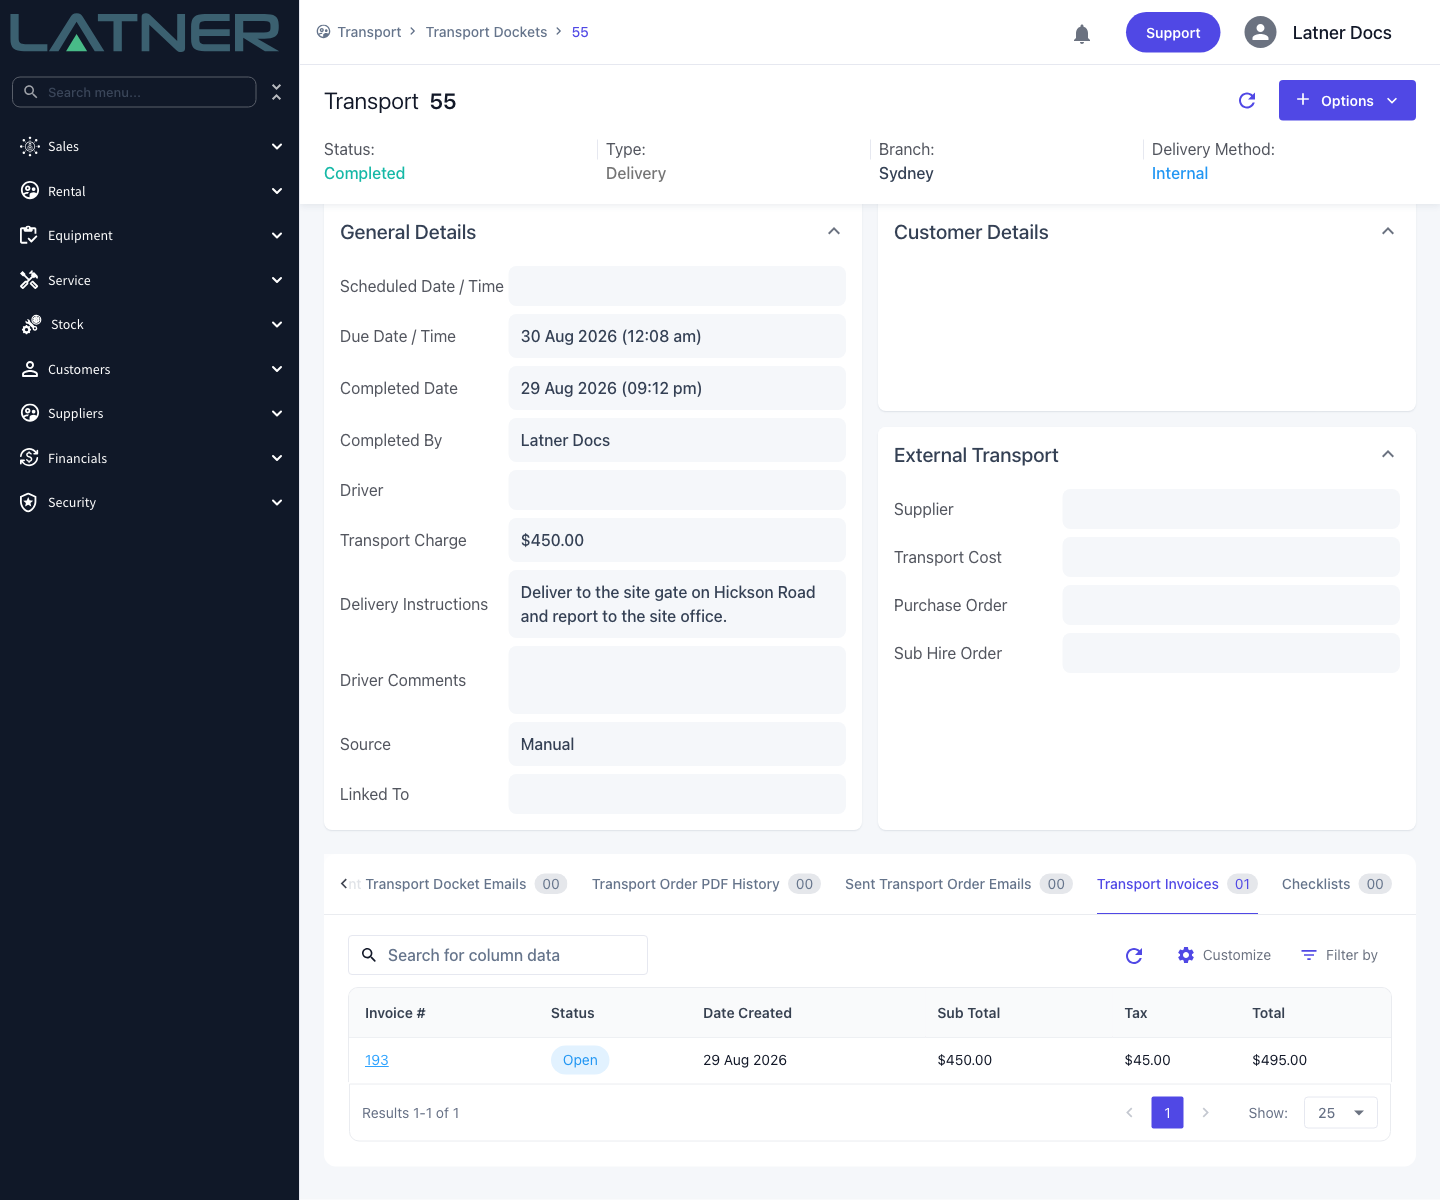
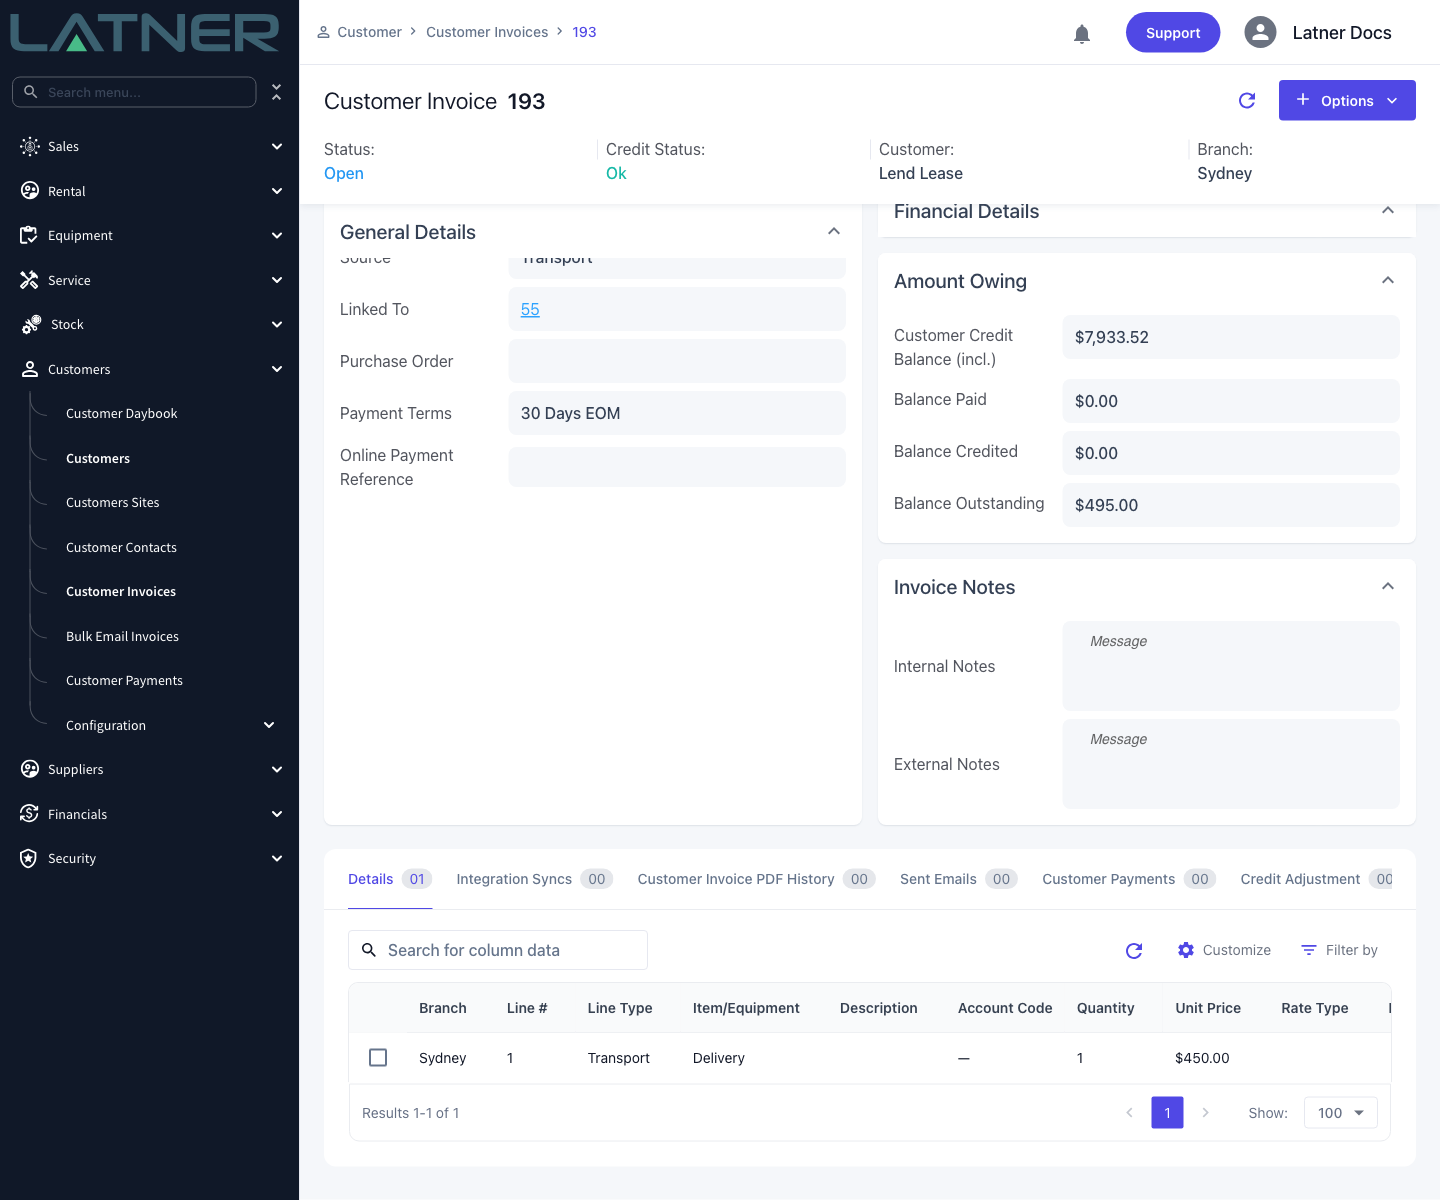
Scroll to the tab strip at the bottom of the docket and open Transport Invoices. Every invoice raised from this docket is listed there with its status and totals, and the invoice number is a link straight through to it.
Step 5 - Check the invoice
Open the invoice and check it reads the way you expect before you send it. Everything on it comes from the docket and the customer:
-
Source - Transport, and Linked To is the docket number, so you can get back to the job from the invoice.
-
Branch, Customer Name and Customer Site - copied from the docket.
-
Invoice Date - today's date in the branch's timezone, which is the day you completed the docket, not the day the job was done.
-
Payment Terms and Due Date - the customer's payment terms, or the global default term when the customer has none.
-
Billing Contact and Billing Address - the site's billing contact if it has one, otherwise the customer's.
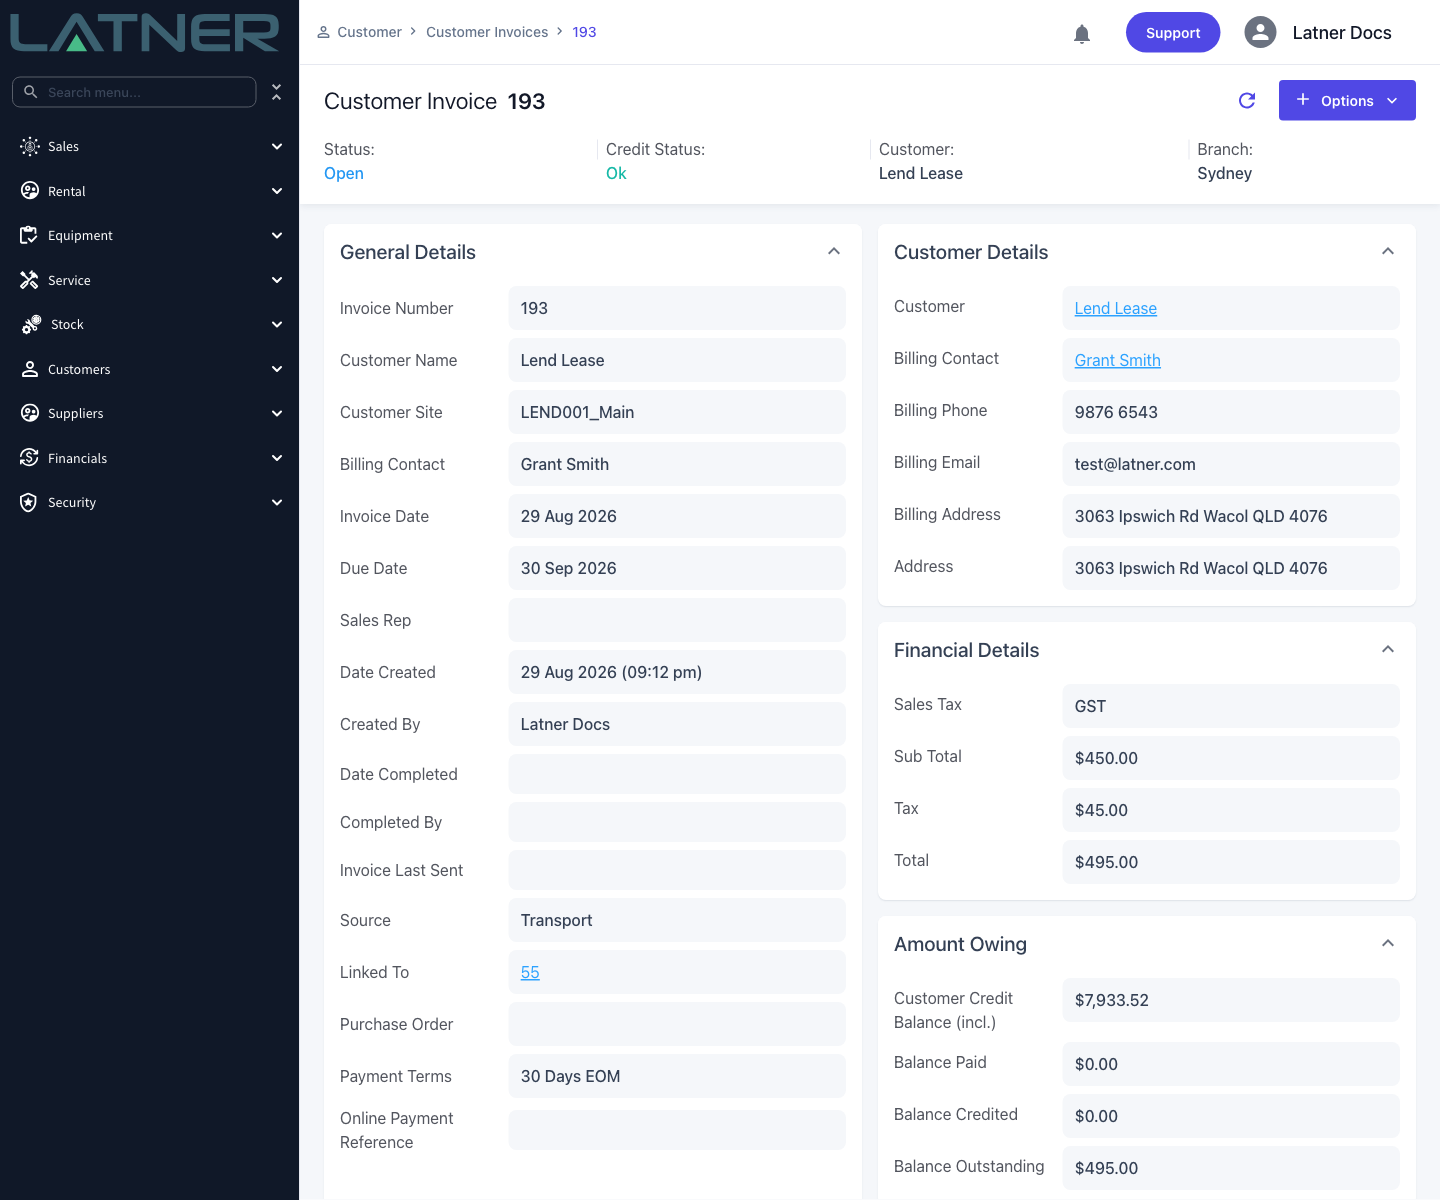
On the Details tab there is exactly one line: Line Type Transport, the docket's type as the item, quantity 1, and the charge as the unit price. Tax is calculated at the customer's tax rate.
Step 6 - Complete the invoice
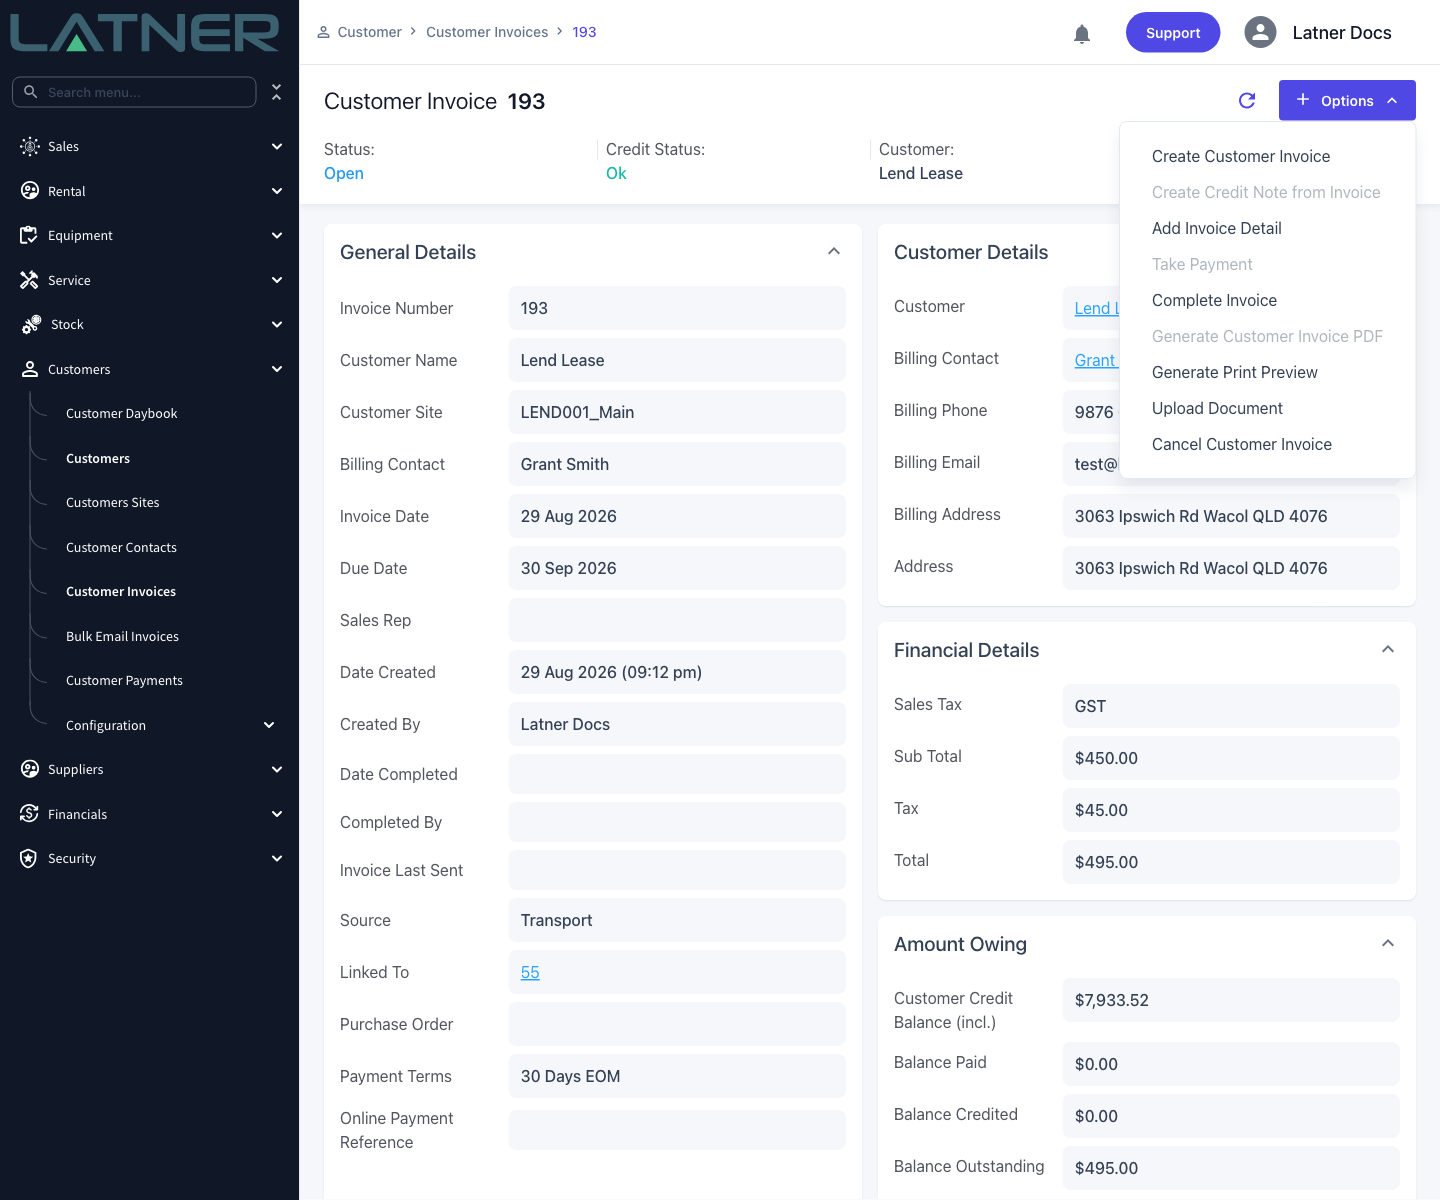
An Open invoice is still a draft. While it is Open you can add lines to it with Options › Add Invoice Detail - handy when the same job also earned a waiting-time charge - and you can look at it with Generate Print Preview, but Generate Customer Invoice PDF, Email Invoice, Mark Invoice as Sent and Take Payment are all unavailable until it is finished.
Choose Options › Complete Invoice when you're happy with it.
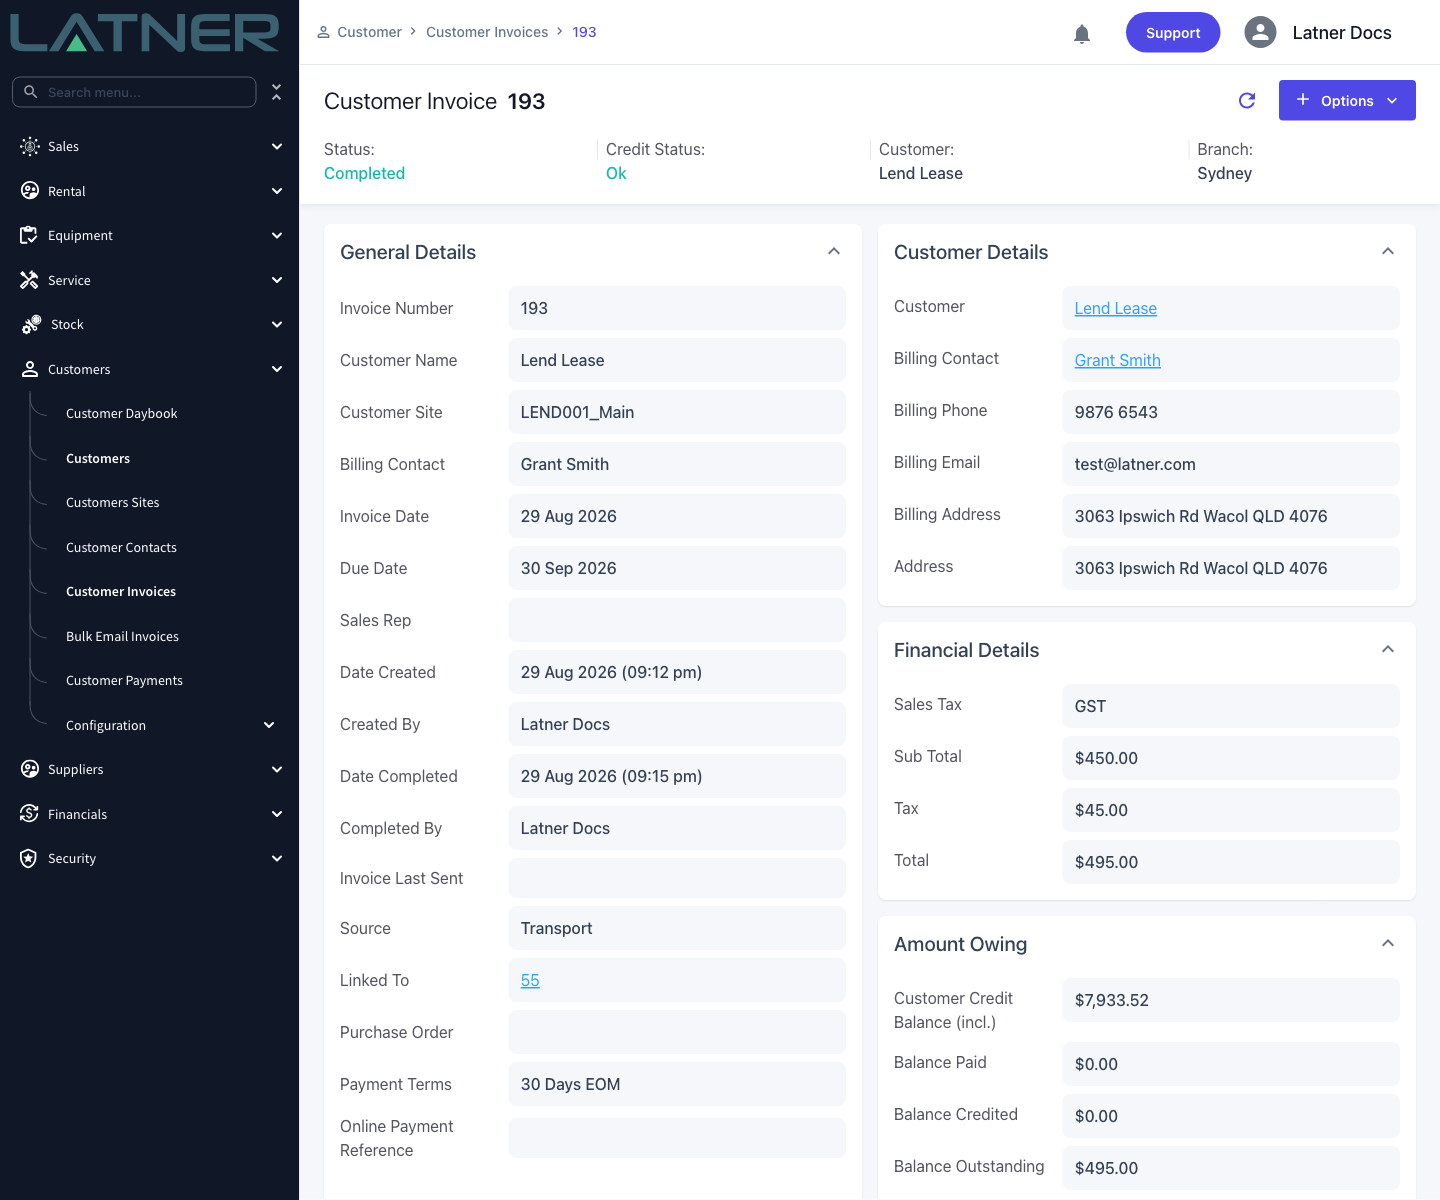
The status moves to Completed, Date Completed and Completed By fill in, and the PDF, email and payment options become available.
After Invoicing
-
The invoice appears in Customers › Customer Invoices alongside every other customer invoice, and on the customer's own record, with Transport as its source.
-
It also stays on the docket's Transport Invoices tab, so the job and the money it earned never get separated.
-
The line's revenue is reported under the Transport line type, and can be broken down by transport type where that grouping is offered.
-
Where an accounting integration is active, the line's revenue account is resolved from your account code configuration and stamped onto the invoice, so what gets synced is what you can see.
-
A completed docket can't be completed a second time, so the same job can't be double-billed by accident. A second invoice only ever comes from reopening the docket or from a new docket.
An invoiced docket can't simply be reopened. Latner refuses with Cannot reopen Transport with Invoice(s) attached to it: Please Cancel the Invoice(s) first. If the charge was wrong, cancel the invoice first, then reopen the docket, correct the charge and complete it again - which raises a fresh invoice for the corrected amount.
FAQs
Watch the Demo
Prefer to watch it? Step through the same flow here.
Manual Invoice
Editing Invoice Details
However an invoice was created, you can change its details afterwards on the invoice itself. Open it from Customers › Customer Invoices, then edit the General Details (for example the Purchase Order number, Billing Contact or Due Date) or the Invoice Notes.
Editing invoice details needs the Create Customer Invoice permission, the same one that creates manual invoices (credit notes use Create Credit Note instead). Without it you can see the details but not change them. The standard Finance Receivable, Finance Manager and Branch Manager groups already have it, so an administrator can give you access under Security › Users: open your user, then Options › Assign Permission Group. The permission is checked against the invoice's branch, so a group assigned to a single branch only lets you edit that branch's invoices.
Customer Name, Customer Site, Billing Contact and Invoice Date can only be changed while the invoice is Open, and the customer and site of a rental contract invoice can't be changed at all. The Purchase Order number can still be updated after the invoice is completed.