
Account Codes tell Latner which account in your accounting system each line of revenue, expense, inventory movement and depreciation journal should be posted to, so the figures that arrive in Xero, MYOB or Sage Intacct land in the right place without anyone re-coding them by hand.
Overview
Latner knows a lot about what it just invoiced - that this line was a scissor lift on hire, that one was a delivery, that one was a bag of consumables off a work order. Account Code configuration is where you turn that knowledge into your chart of accounts.
-
Account Codes are configured per accounting integration, on the integration's Configure screen.
-
Each account area has its own tab: Revenue, Expense, Inventory, Depreciation Expense and Accumulated Depreciation.
-
Within a tab, the top level is always the Line Type - the kind of thing being charged. Under each Line Type you can go narrower - all the way down to a single Equipment Number, or to a Stock Sub Group, an Admin Charge and so on.
-
The most specific Account Code that matches a line always wins, and the Line Type acts as the catch-all if nothing narrower is configured.
-
The Account Code that gets used is stored on the invoice line at the time it is resolved, so later configuration changes don't rewrite invoices you have already raised.
Before You Begin
You need an accounting integration connected before there is anything to map to.
|
Requirement |
Where to Find It |
|---|---|
|
A connected accounting integration (Xero, MYOB or Sage Intacct) |
Financials › Configuration › Accounting Integration |
|
The Accounting Integration permission |
Security › Permission Groups › Financial › Configuration |
|
A chart of accounts set up in your accounting system |
Xero, MYOB or Sage Intacct |
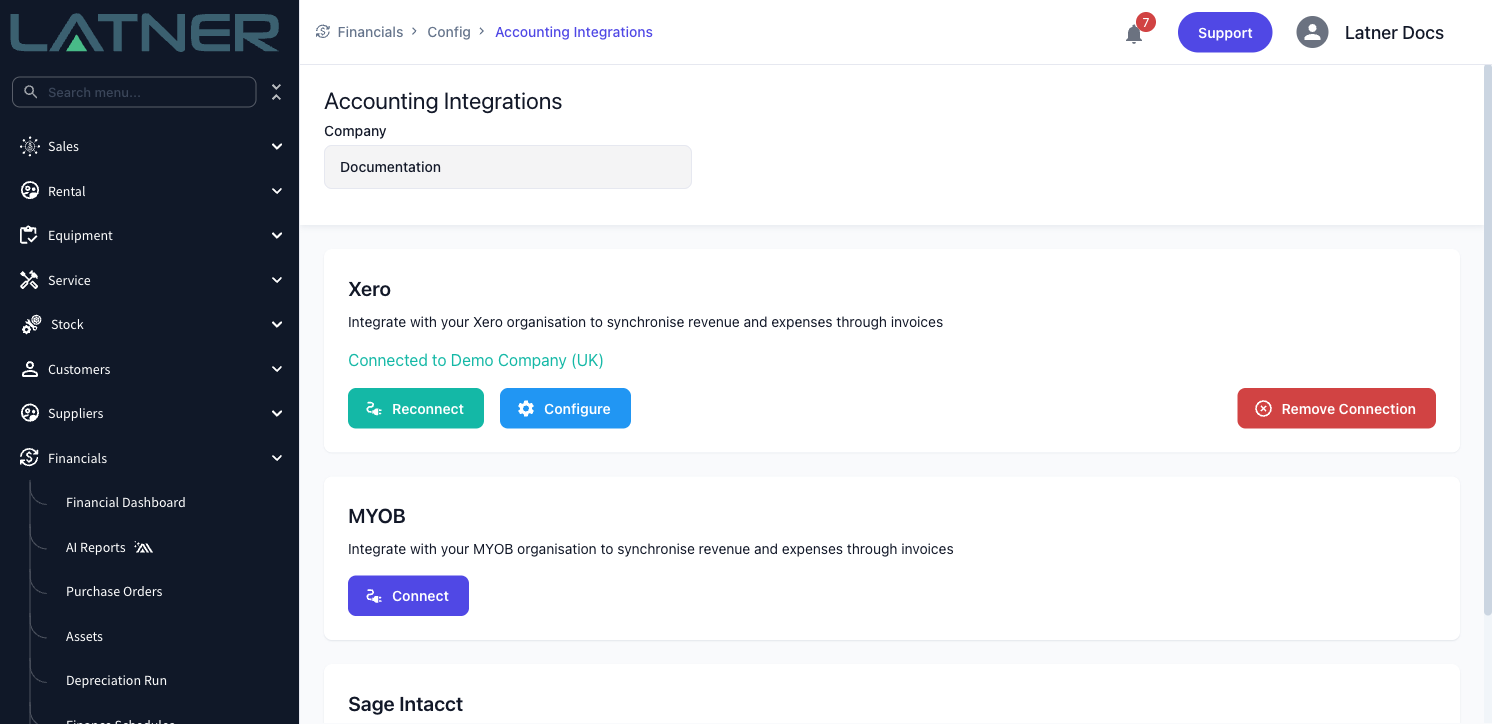
A Company can only have one active accounting integration at a time. If you try to activate a second one, Latner blocks it so that the Account Code stored against an invoice line always points unambiguously at a single accounting system.
The Five Account Areas
Each tab covers a different kind of posting, and each has its own set of Line Types.
-
Revenue Accounts Configuration - where the money you invoice customers is recognised. Driven by Customer Invoice line types.
-
Expense Accounts Configuration - where costs from Supplier Invoices are posted. Driven by Supplier Invoice line types.
-
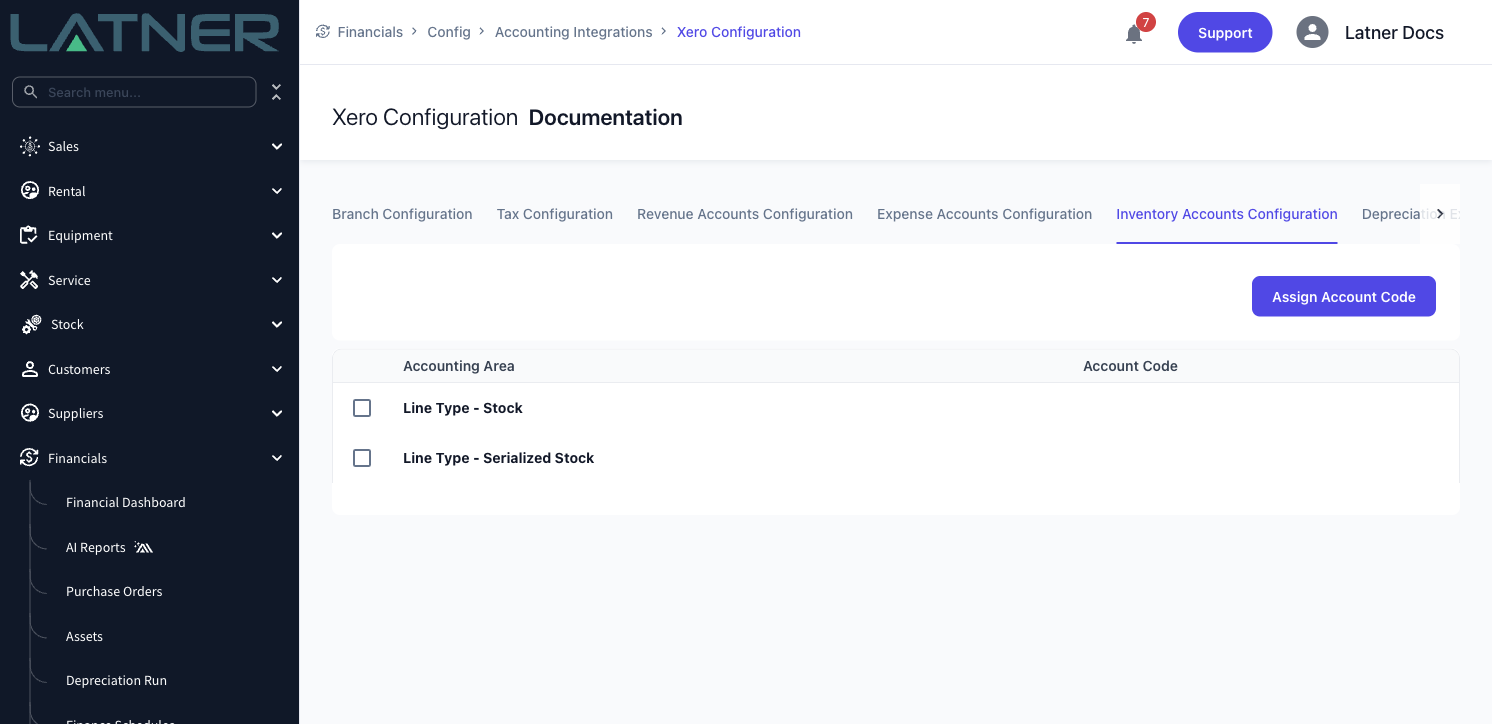
Inventory Accounts Configuration - the stock-on-hand (balance sheet) accounts used when you run perpetual inventory. Only Stock and Serialized Stock apply.
-
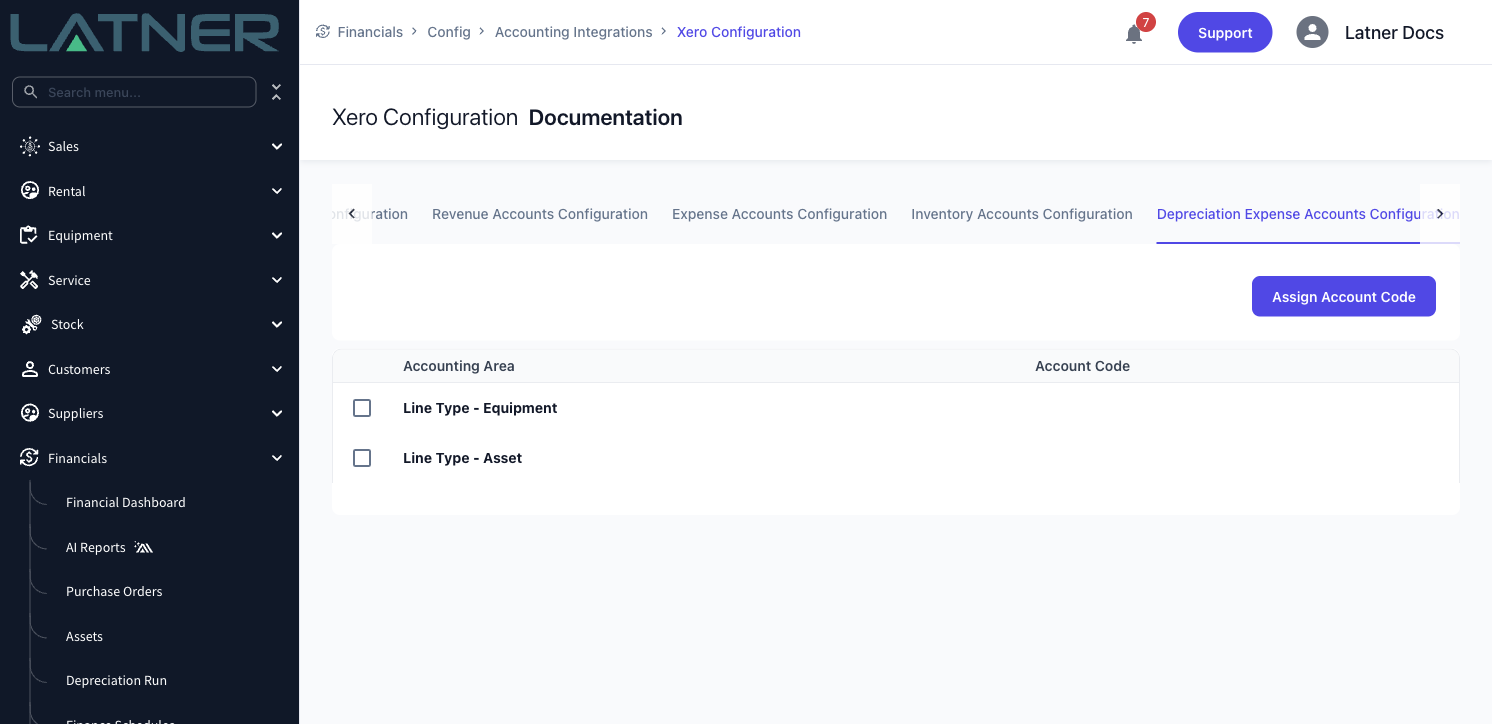
Depreciation Expense Accounts Configuration - the expense side of a depreciation journal.
-
Accumulated Depreciation Accounts Configuration - the accumulated depreciation (contra asset) side of the same journal.
The account picker is filtered to sensible accounts for the tab you are on. On the Revenue tab you'll only see Revenue accounts; on the Expense tab you'll see Asset and Expense accounts. The Depreciation tabs are not filtered, so you can pick whichever accounts your accountant uses.
What the Line Types Mean
The Line Type is the single most important thing to get right, because everything else hangs off it. These are the Line Types on the Revenue tab.
-
Asset - selling an asset out of your fleet.
-
Equipment - hiring out equipment you own.
-
Sub Hire Equipment - hiring out equipment you have sub hired in from a supplier.
-
Stock - selling stock items.
-
Serialized Stock - selling a serialized stock product.
-
Transport - delivery and pick up charges.
-
Admin - Admin Charges such as damage waiver or an environmental levy.
-
Fuel - fuel charged back to the customer.
-
Damage - damage charged to the customer. This is not damage waiver, which is an Admin Charge.
-
Labour - Labour Services charged on a Rental Contract.
-
Sanitation - Sanitation Services.
-
Package - package lines.
-
(Work Order) Stock - stock consumed on a Work Order and charged out.
-
(Work Order) Labour - labour booked to a Work Order and charged out.
-
(Work Order) Expense - expenses booked to a Work Order and charged out.
-
Operator Docket - operated hire billed through Operator Dockets.
The Expense tab uses the Supplier Invoice line types instead - Stock, (Work Order) Stock, Serialized Stock, Transport, Sub Hire, Equipment, Asset, Expense, (Work Order) Expense, Operator Docket and the three finance schedule repayment types - Principal Repayment, Interest Repayment and Finance Schedule Repayment. The Inventory tab has just Stock and Serialized Stock. Both Depreciation tabs have just Equipment (for assets that are a piece of equipment) and Asset (for everything else).
Assigning an Account Code
Step 1 - Open the account area you want to configure
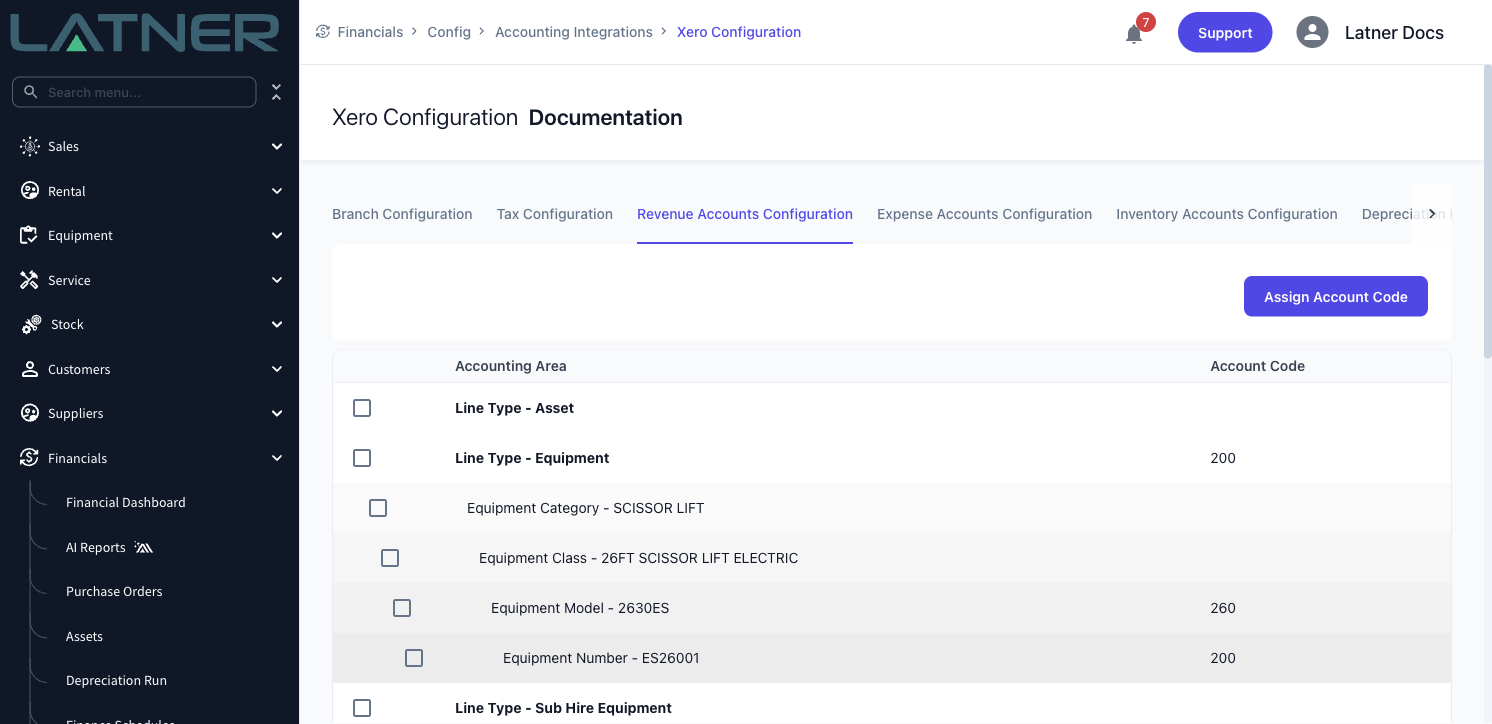
Go to Financials › Configuration › Accounting Integration, click Configure on the connected integration, then pick the tab you want: Revenue Accounts Configuration, Expense Accounts Configuration, Inventory Accounts Configuration, Depreciation Expense Accounts Configuration or Accumulated Depreciation Accounts Configuration.
The table lists the Accounting Area on the left and the Account Code currently assigned on the right. Anything without a code yet is simply blank.
Step 2 - Click Assign Account Code
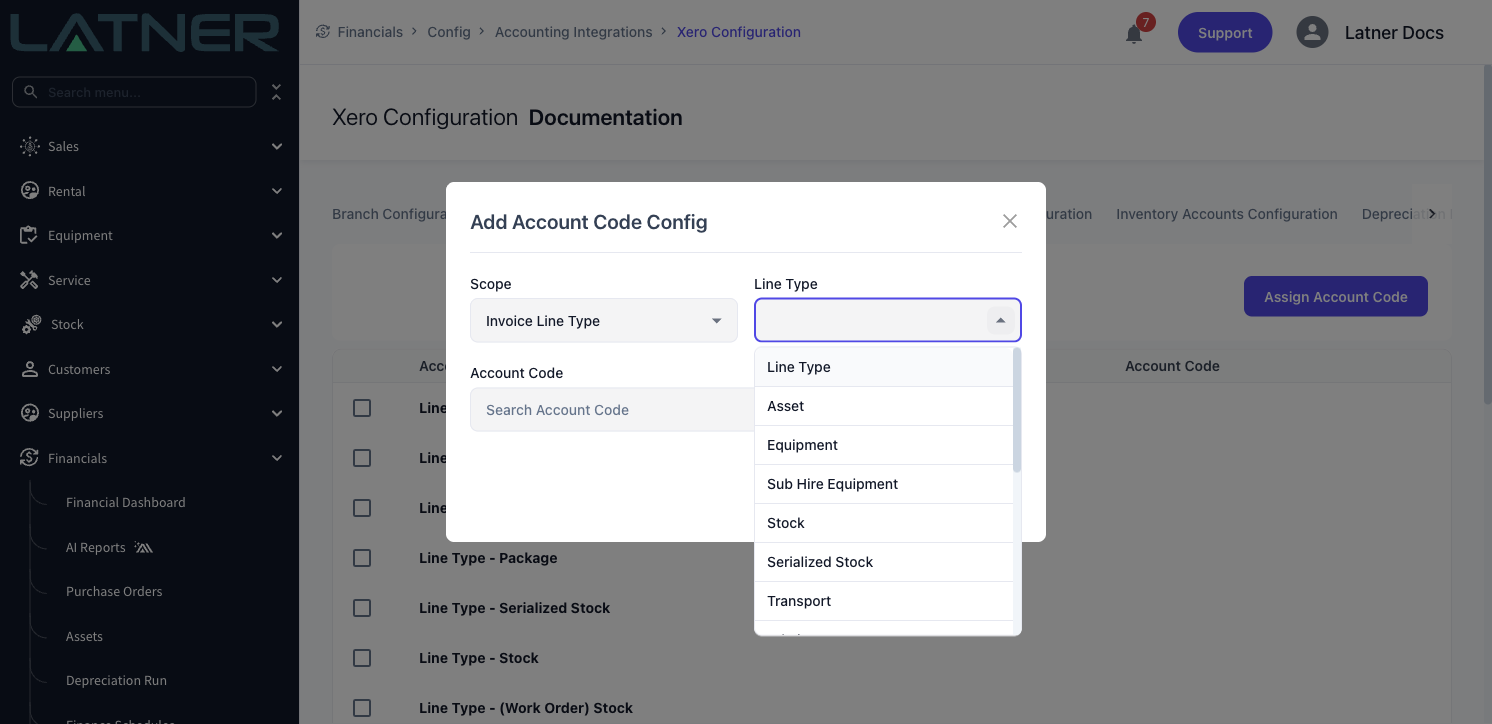
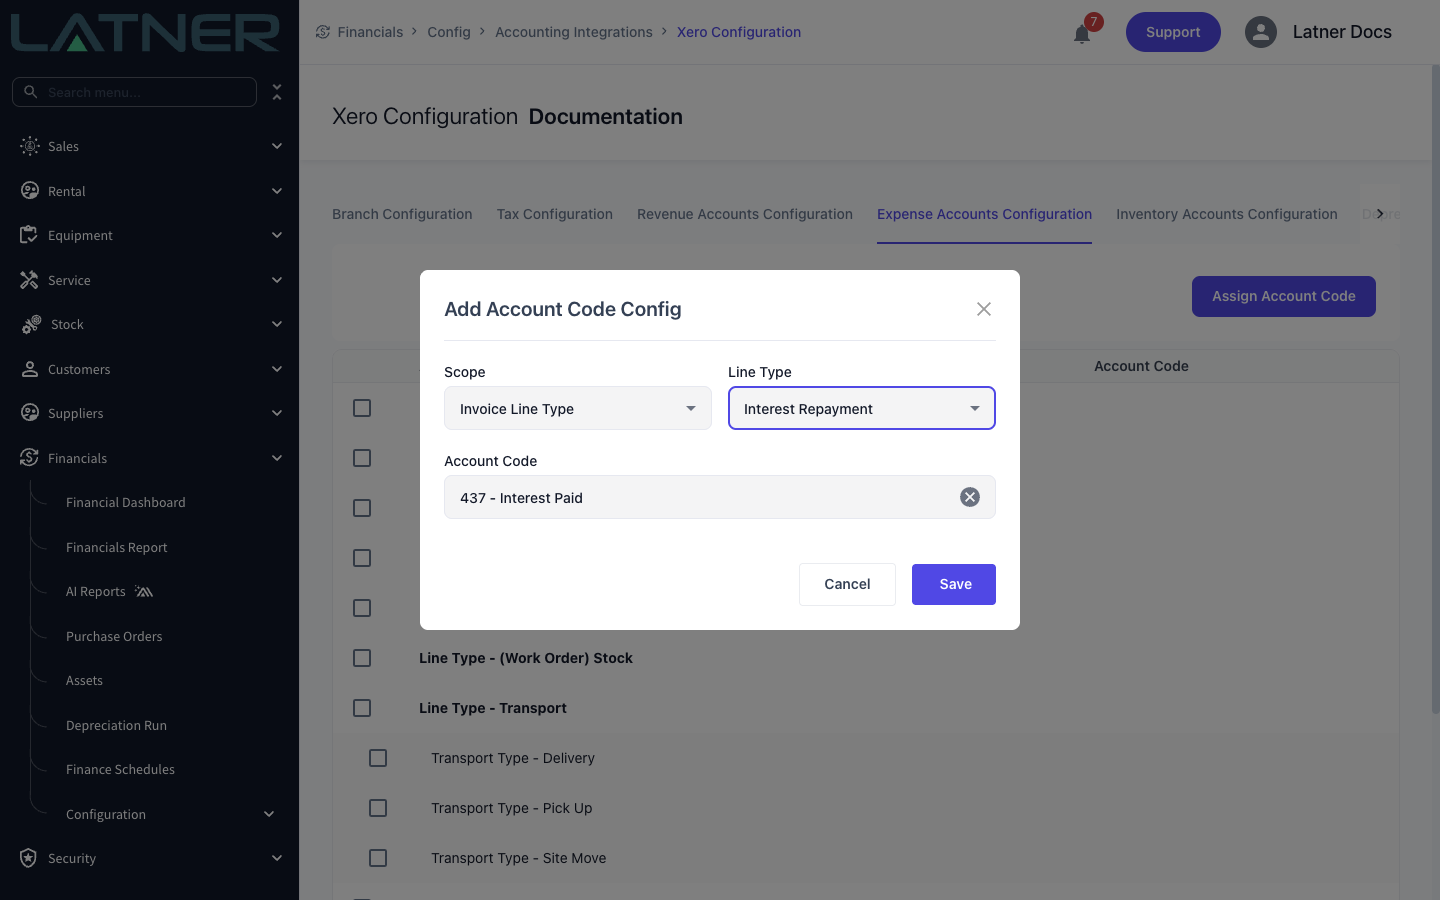
The Add Account Code Config dialog opens with three fields. Leave Scope on Invoice Line Type to set a catch-all for a whole Line Type.
-
Scope - how narrowly this Account Code applies. Required.
-
Line Type - which kind of charge. Required, and only shown when the Scope is Invoice Line Type.
-
Account Code - the account in your accounting system. Required.
Step 3 - Choose the account
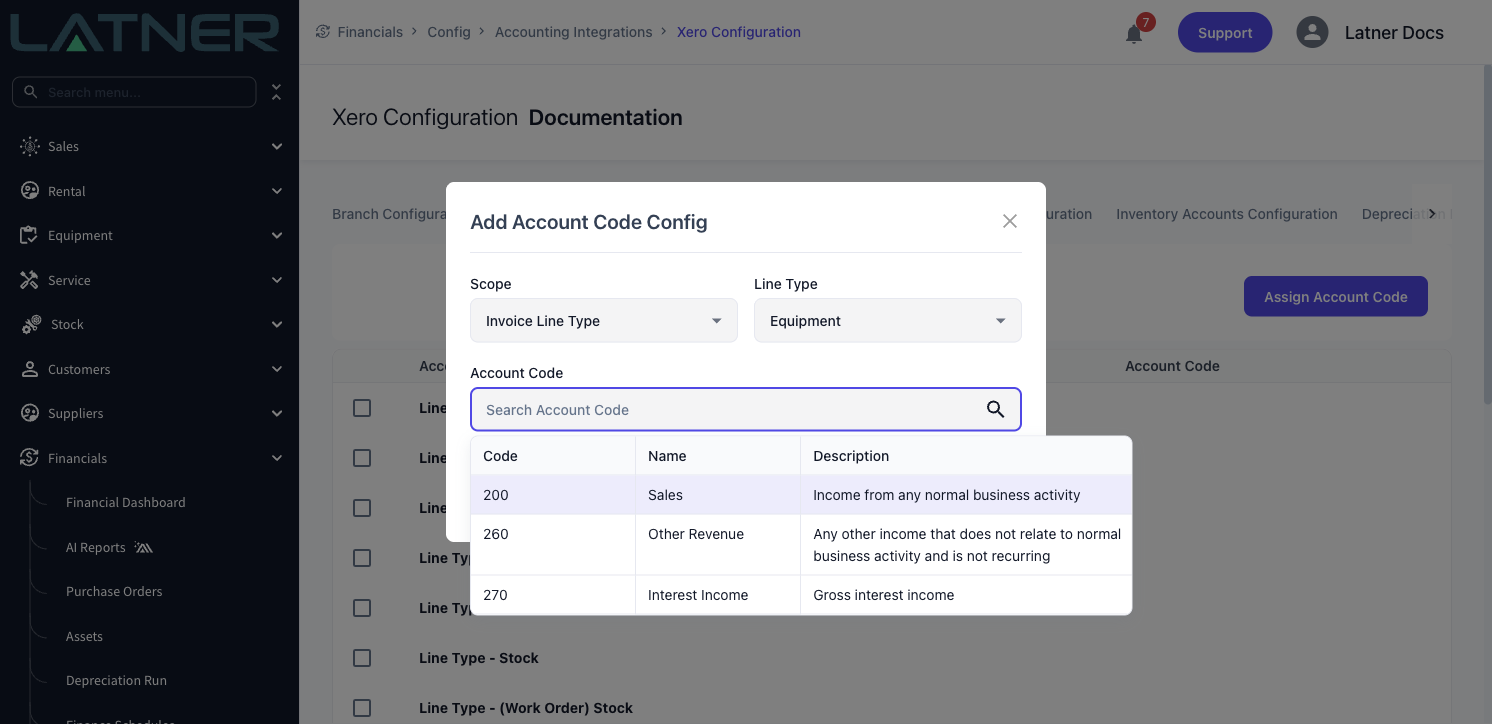
The Account Code field searches your accounting system's chart of accounts live, showing the Code, Name and Description of each account so you can tell two similarly named accounts apart.
Step 4 - Save
Click Save. The new row appears in the table straight away. To change an Account Code later, double-click its row, or tick it and use the toolbar options to update or delete it.
When you edit an existing Account Code the Scope, Line Type and record fields are locked - only the Account Code itself can be changed. If you picked the wrong scope, delete the row and add a new one.
Assigning at a More Specific Level
A single account for all equipment hire is fine to start with, but most businesses want to split revenue further. Change the Scope and the dialog swaps the Line Type field for a picker for that record instead.
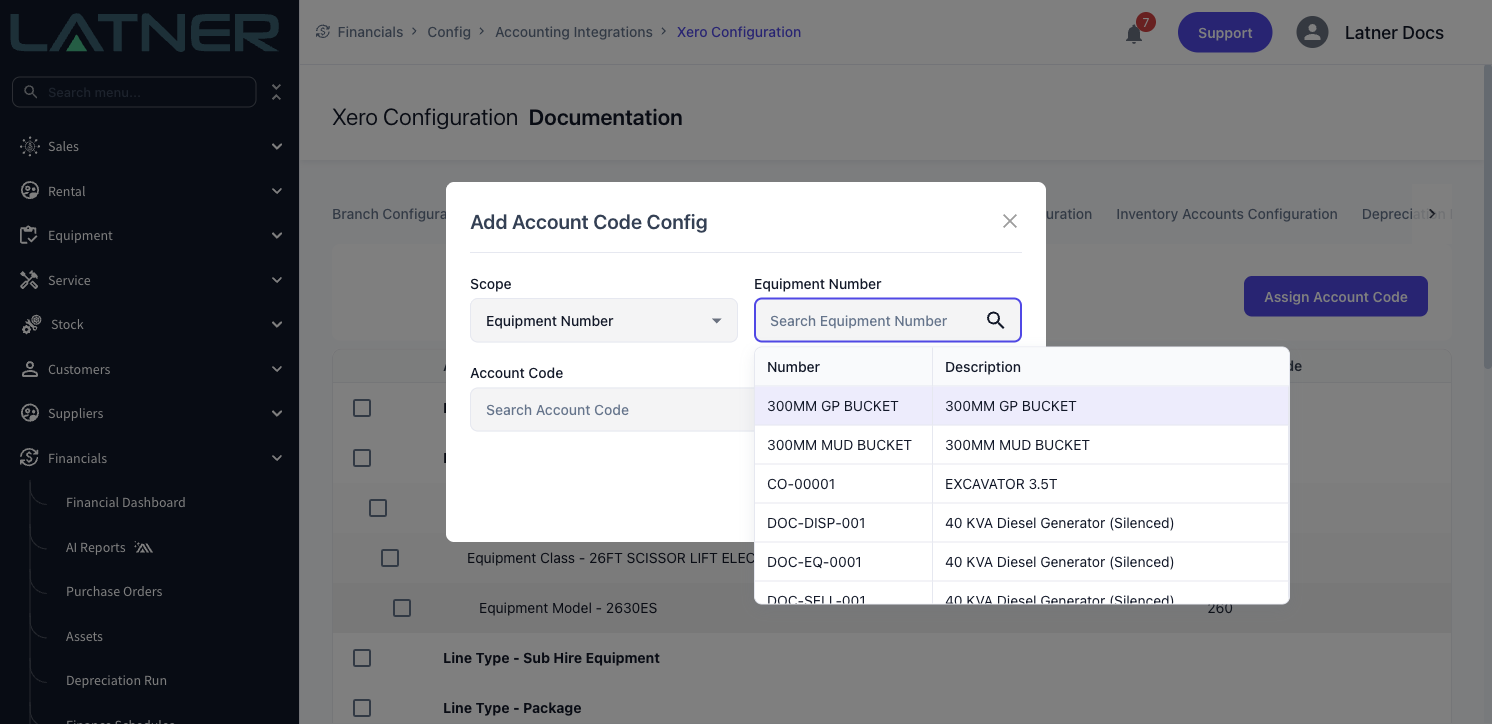
Each Line Type has its own chain of scopes, listed here from narrowest to broadest. Latner walks down the chain and uses the first one that has an Account Code against it.
-
Equipment - the individual Equipment Number, then Equipment Model, then Equipment Class, then Equipment Category, then the Equipment Line Type.
-
Sub Hire Equipment - Sub Hire Class, then Sub Hire Category, then the Line Type.
-
Serialized Stock - the individual Serialized Stock product, then Serialized Stock Model, Class and Category, then the Line Type.
-
Stock - Stock Sub Group, then Stock Group, then the Line Type.
-
Transport - Transport Type within a fulfilment, then Transport Fulfillment (internal or external), then the Line Type.
-
Admin - the parent line's Account Code if the Admin Charge has Use Parent Line Account Code ticked (see below), then the specific Admin Charge, then the Line Type.
-
Fuel - Fuel Type, then the Line Type.
-
Labour - Labour Service, then the Line Type.
-
Sanitation - Sanitation Service, then the Line Type.
-
Operator Docket - Equipment Number, then Equipment Model, Class or Category (or Sub Hire Class and Category when the docket is against sub hired equipment), then the Line Type.
-
Asset, Package and Damage - Line Type only.
Equipment Number is the narrowest scope there is, and it applies to Revenue only. Reach for it when one machine needs to be recognised somewhere different to the rest of its model - a unit on a particular contract, say, or one bought into a different revenue stream. The Expense, Inventory and Depreciation tabs stop at Equipment Model.
The Work Order line types add a second dimension. (Work Order) Stock, (Work Order) Labour and (Work Order) Expense can each be split by Work Order Type, so a rebuild can post somewhere different to a routine service even when the same stock item is used.
Billing an Admin Charge to Its Parent Line
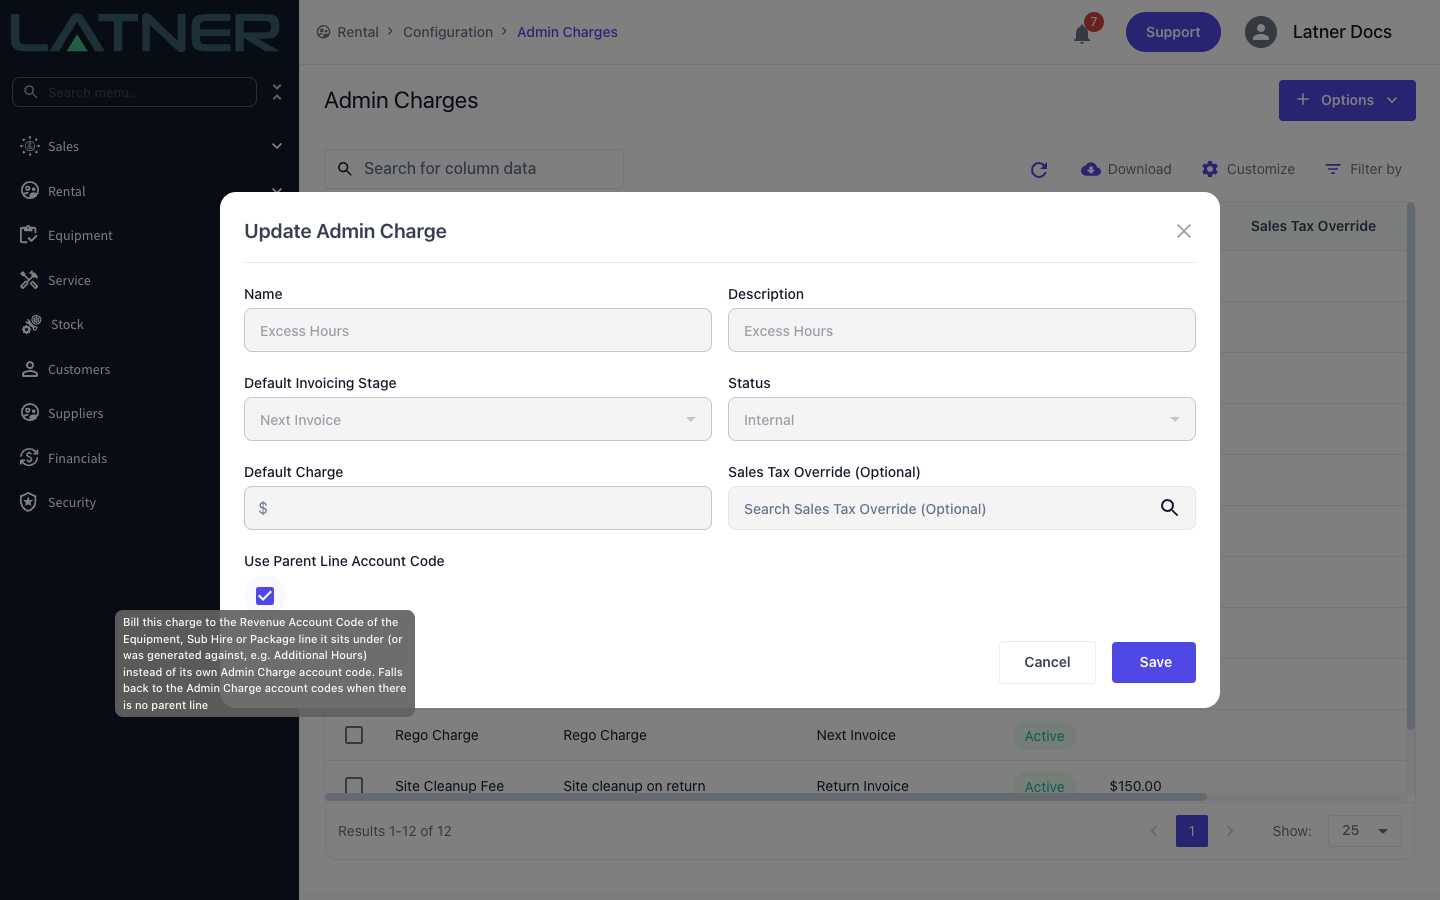
Some Admin Charges are really part of the hire - excess hours on a machine, say - and belong in the same revenue account as the equipment they were charged against. Tick Use Parent Line Account Code on the Admin Charge (Rental › Configuration › Admin Charges, double-click the charge) and Latner codes it to the Revenue Account Code of the line it belongs to instead of an admin account.
-
The parent line is the Equipment, Sub Hire Equipment or Package line the charge sits under on the Rental Contract, or the line it was generated against at billing time (such as Excess Hours).
-
The parent line's code is found the usual way - for equipment, Equipment Number down to the Equipment Line Type - so the charge follows wherever that machine's hire revenue goes.
-
If the charge has no parent line, or nothing is configured anywhere in the parent line's chain, it falls back to the Admin Charge's own Account Code, then the Admin Line Type.
-
Internal system Admin Charges such as Excess Hours can be opened too, but only Sales Tax Override and Use Parent Line Account Code can be changed on them.
-
This applies to the Revenue tab only.
On the Depreciation tabs the chain is Equipment Model, then Equipment Class, then Equipment Category, then Asset Group, then the Line Type - so you can depreciate a category of machines to one account and everything else to another.
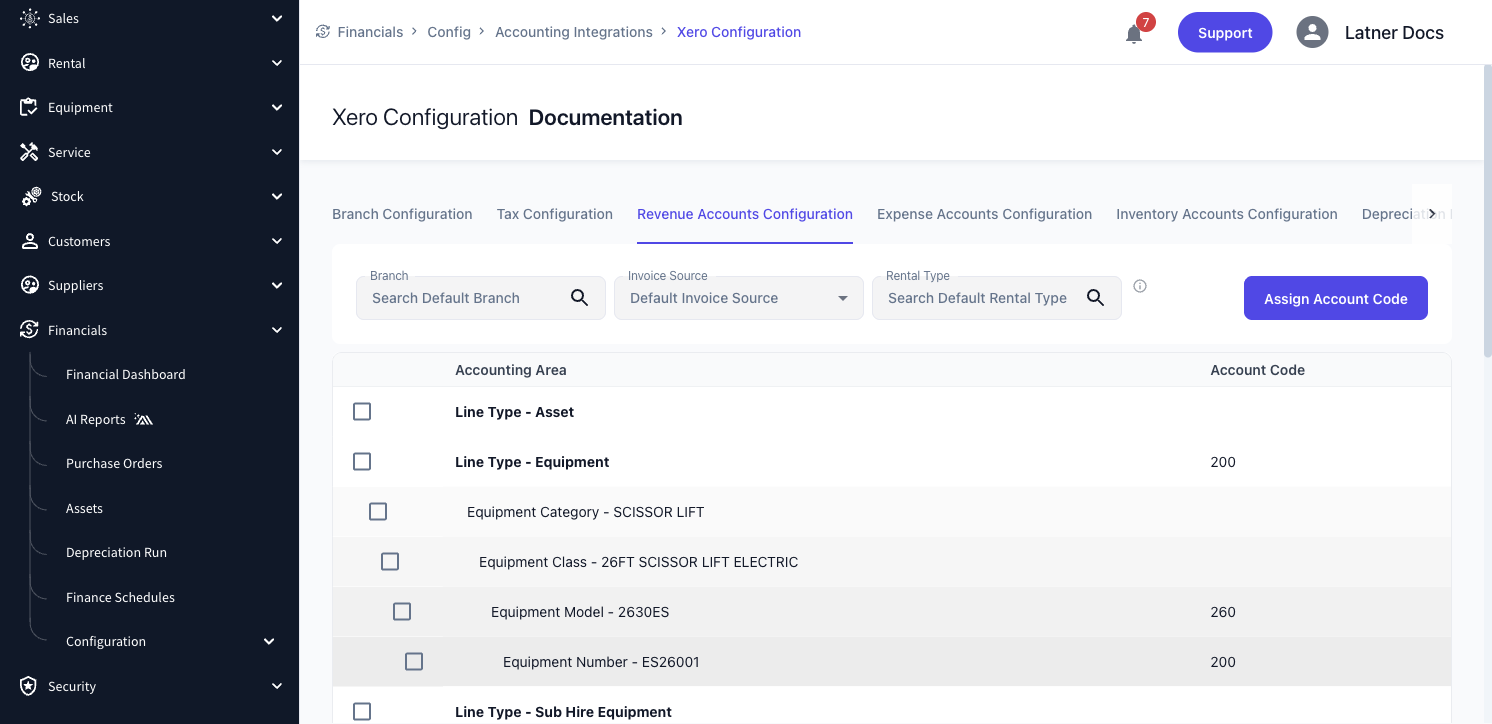
The table only shows the narrower rows you have actually configured, plus their parents. That's deliberate - listing every Equipment Model and Stock Sub Group in your business would make the screen unusable. Use Assign Account Code to add the ones you need.
Splitting by Branch, Invoice Source and Rental Type
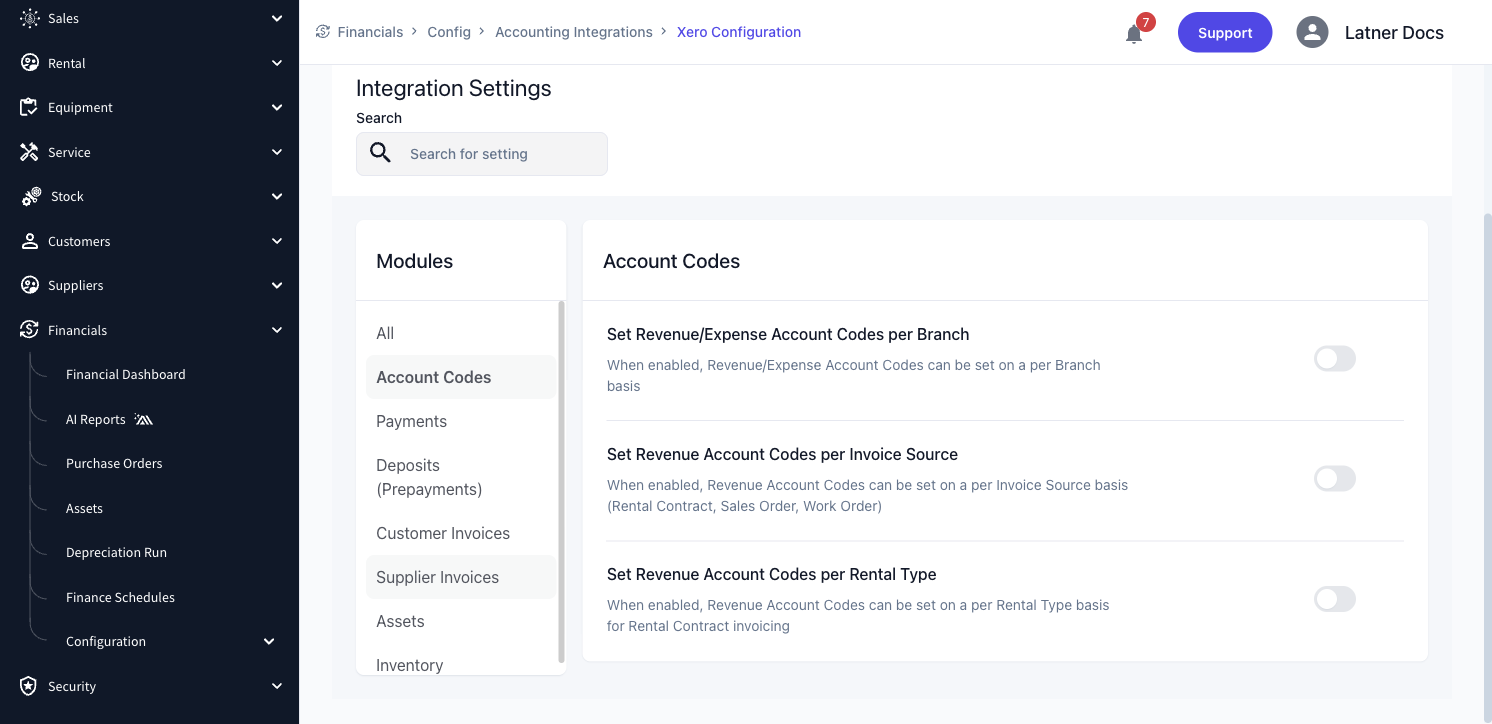
Three optional settings add extra dimensions on top of the scope hierarchy. They all live on the Integration Settings tab, under the Account Codes module.
-
Set Revenue/Expense Account Codes per Branch - when enabled, Revenue and Expense Account Codes can be set on a per Branch basis.
-
Set Revenue Account Codes per Invoice Source - when enabled, Revenue Account Codes can be set on a per Invoice Source basis (Rental Contract, Sales Order, Work Order).
-
Set Revenue Account Codes per Rental Type - when enabled, Revenue Account Codes can be set on a per Rental Type basis for Rental Contract invoicing.
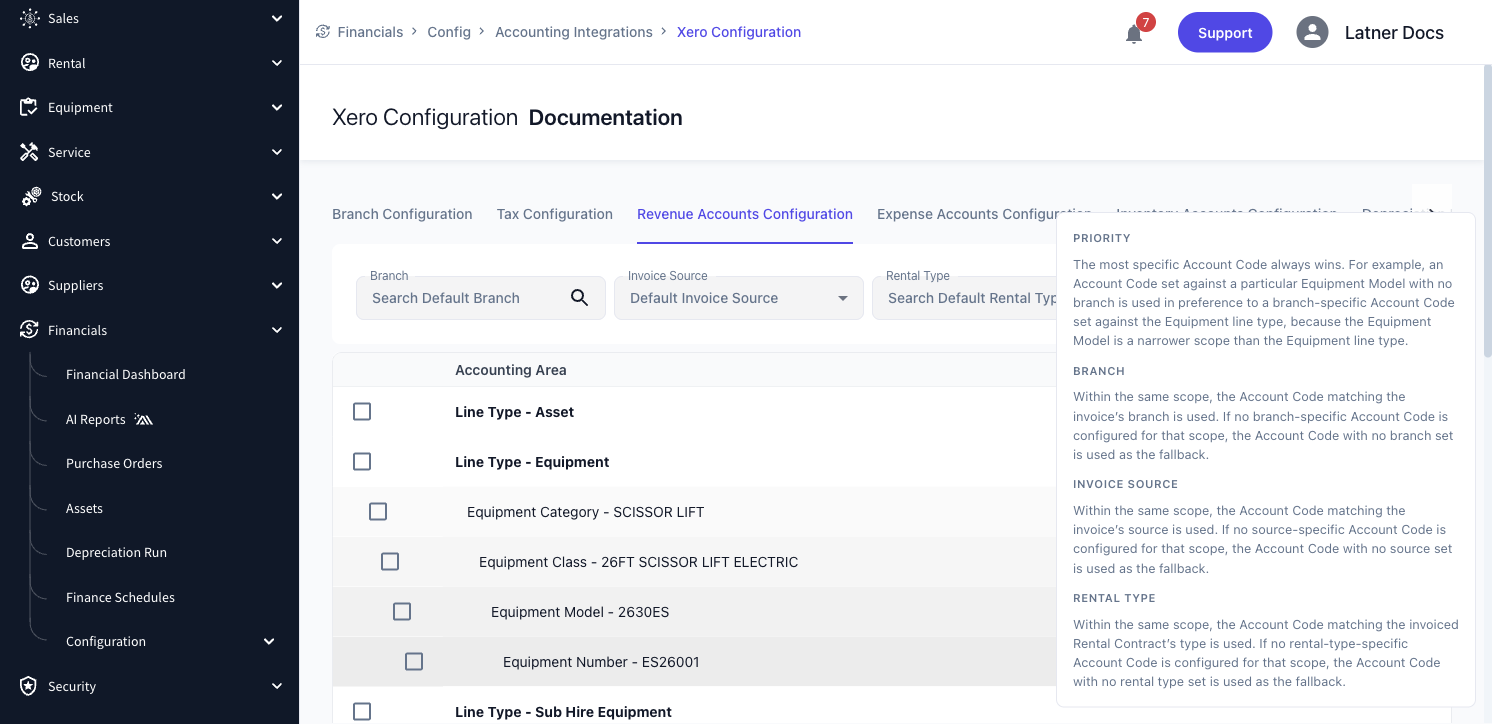
Once any of them is enabled, the matching Branch, Invoice Source and Rental Type selectors appear above the Account Code table. Pick a combination and you are now looking at - and adding to - the codes for it. Leave them empty and you are looking at the default codes that apply when nothing more specific matches.
How Latner Picks the Account Code
Two rules decide which of your Account Codes ends up on an invoice line, and they apply in this order.
-
The most specific scope always wins. An Account Code set against a particular Equipment Model with no branch is used in preference to a branch-specific Account Code set against the Equipment Line Type, because the Equipment Model is a narrower scope than the Line Type.
-
Within the same scope, the most specific dimension wins. The Account Code matching the invoice's branch is used; if no branch-specific code is configured for that scope, the code with no branch set is the fallback. Invoice Source and Rental Type work the same way, Rental Type matching the type of the Rental Contract being invoiced.
The same explanation is available in the app - click the information icon beside the selectors.
The Other Account Areas
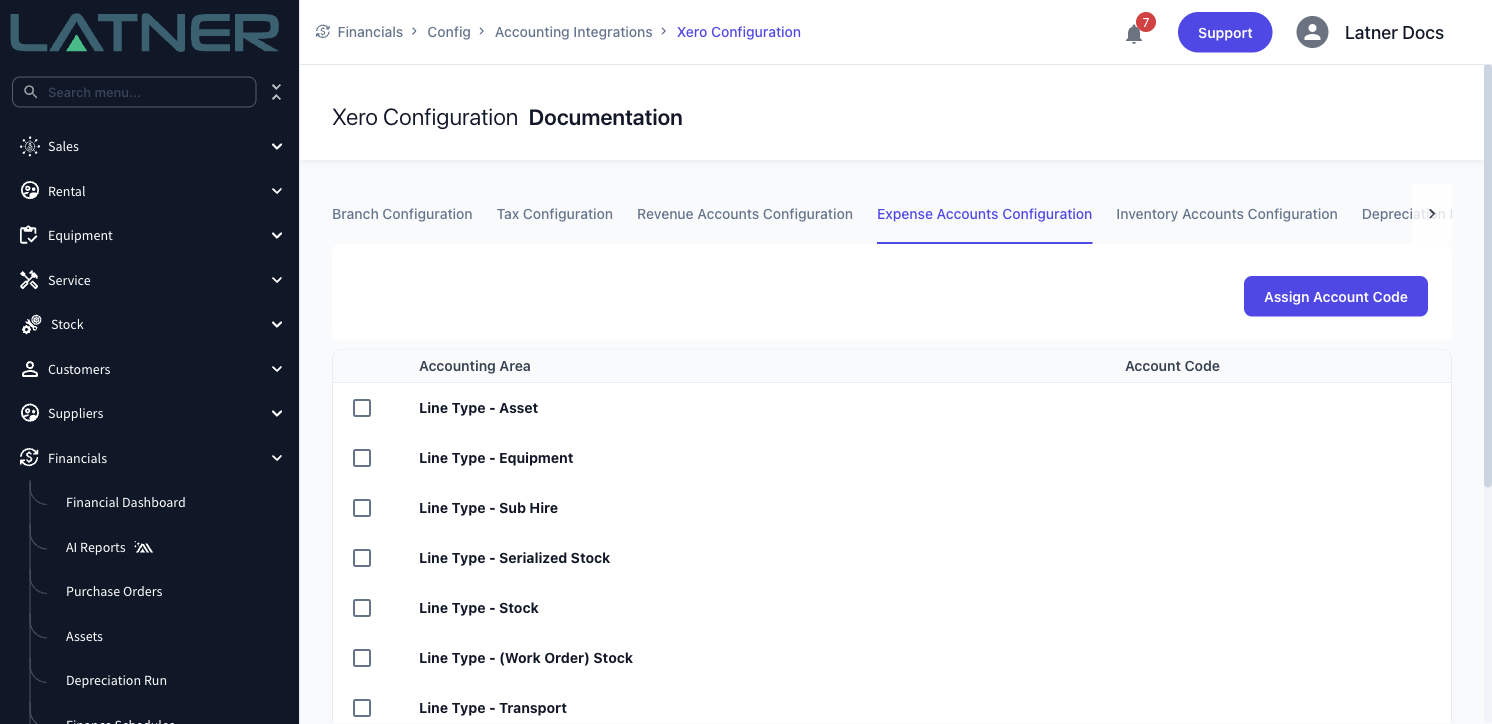
Expense, Inventory and Depreciation work exactly the same way - Assign Account Code, choose a Scope, choose an account - only the Line Types and the available scopes differ.
How Expense Lines Are Coded
On the Expense tab each Supplier Invoice line walks its own chain of scopes, narrowest first, the same way Revenue does.
-
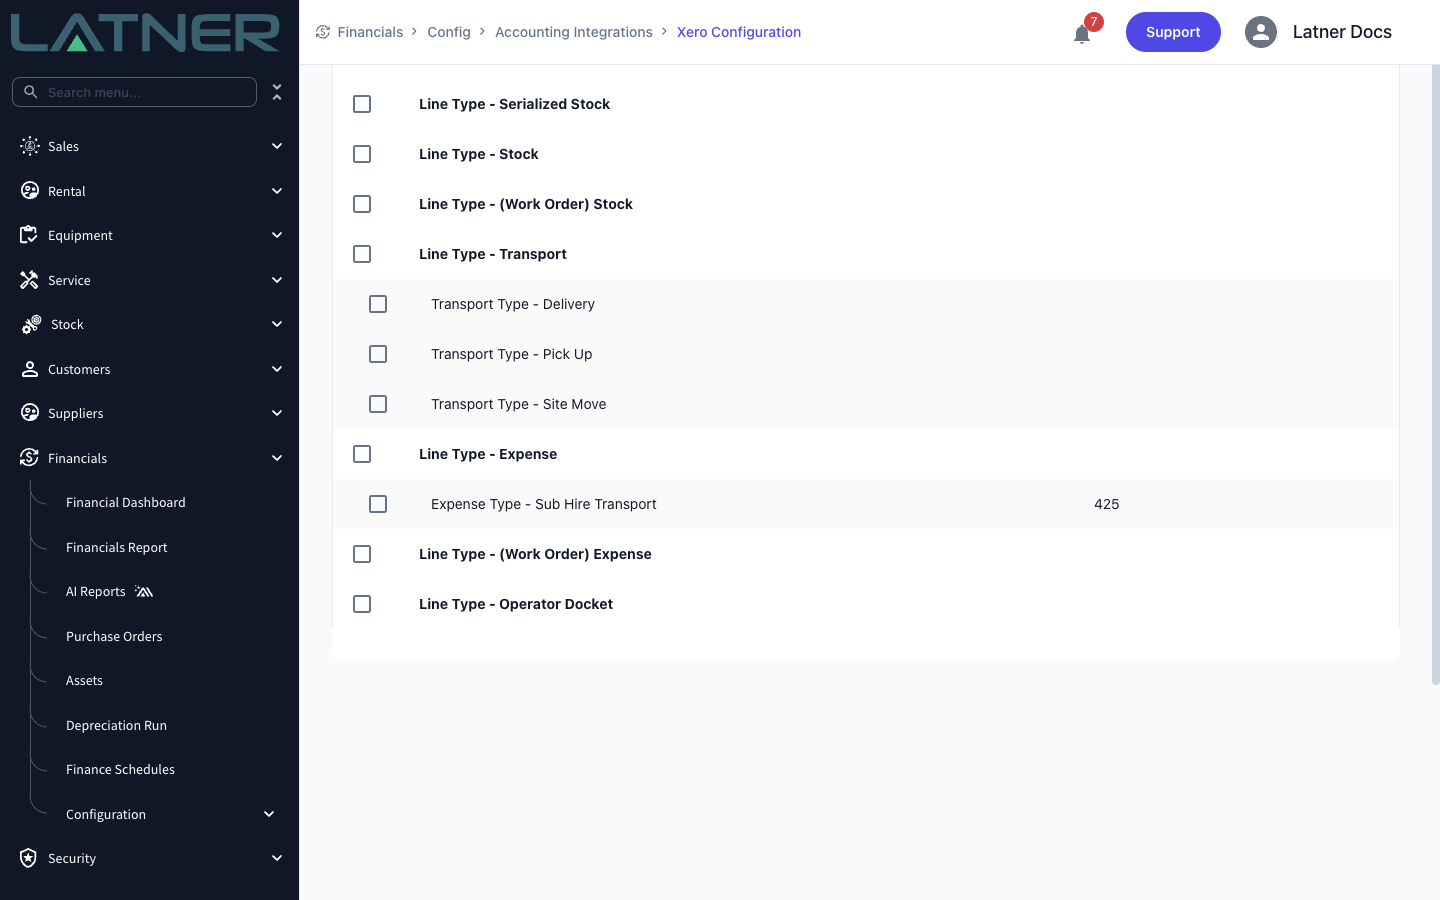
Expense - an Account Code assigned with the Scope Expense Type for the line's Expense Type wins. If that Expense Type has no Account Code of its own, the Expense Line Type applies.
-
(Work Order) Expense - (Work Order) Expense Type split by Work Order Type, then (Work Order) Expense Type, then the Line Type split by Work Order Type, then the Line Type.
-
Transport - Transport Type (Delivery, Pick Up, Site Move and so on), then the Line Type.
-
Sub Hire - Sub Hire Class, then Sub Hire Category, then the Line Type.
-
Equipment - Equipment Model, then Equipment Class, then Equipment Category, then the Line Type.
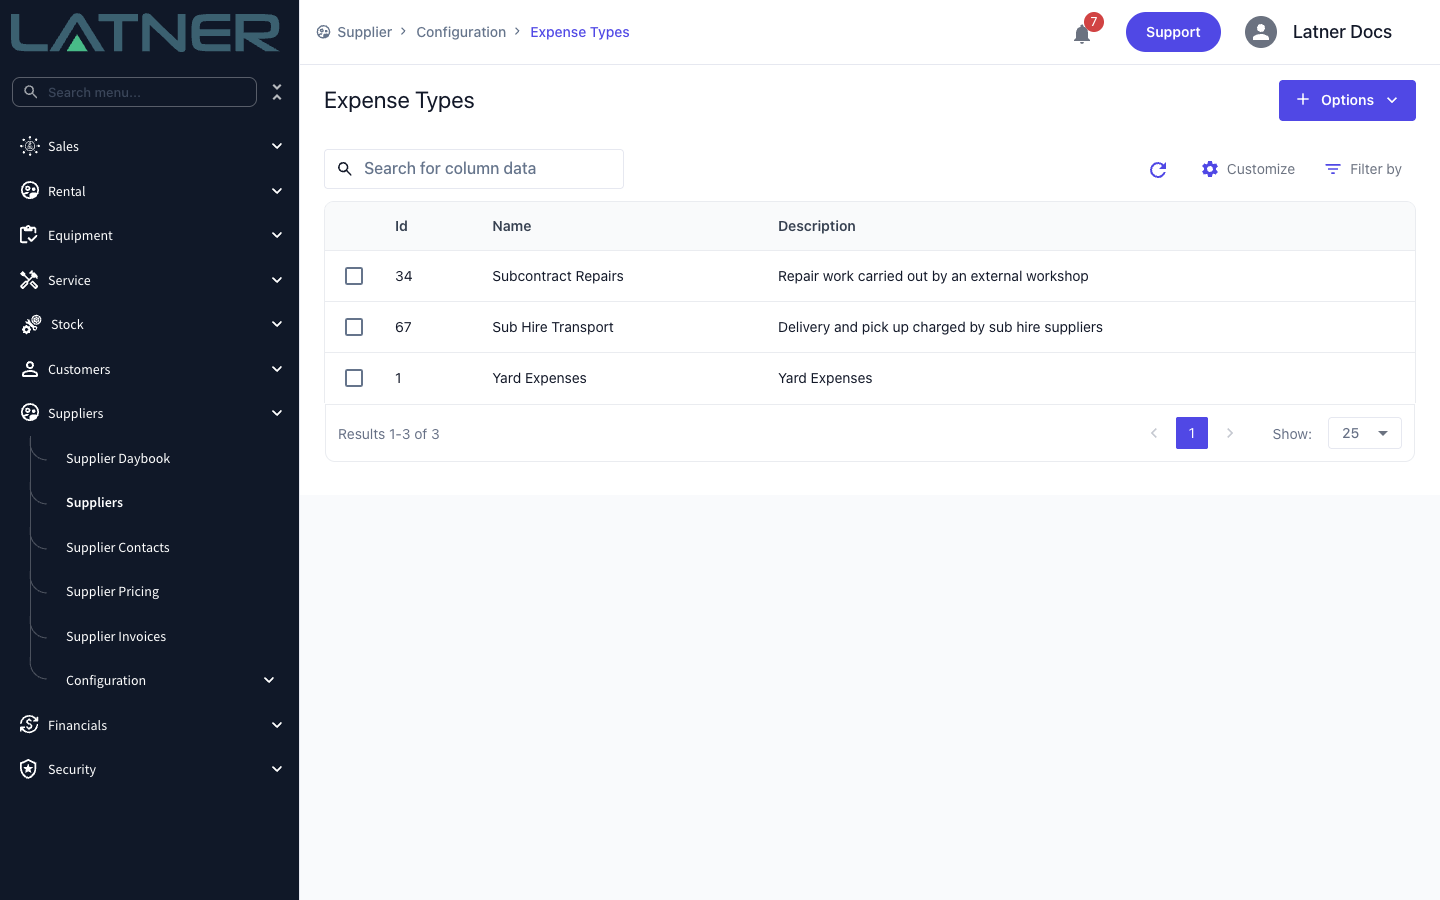
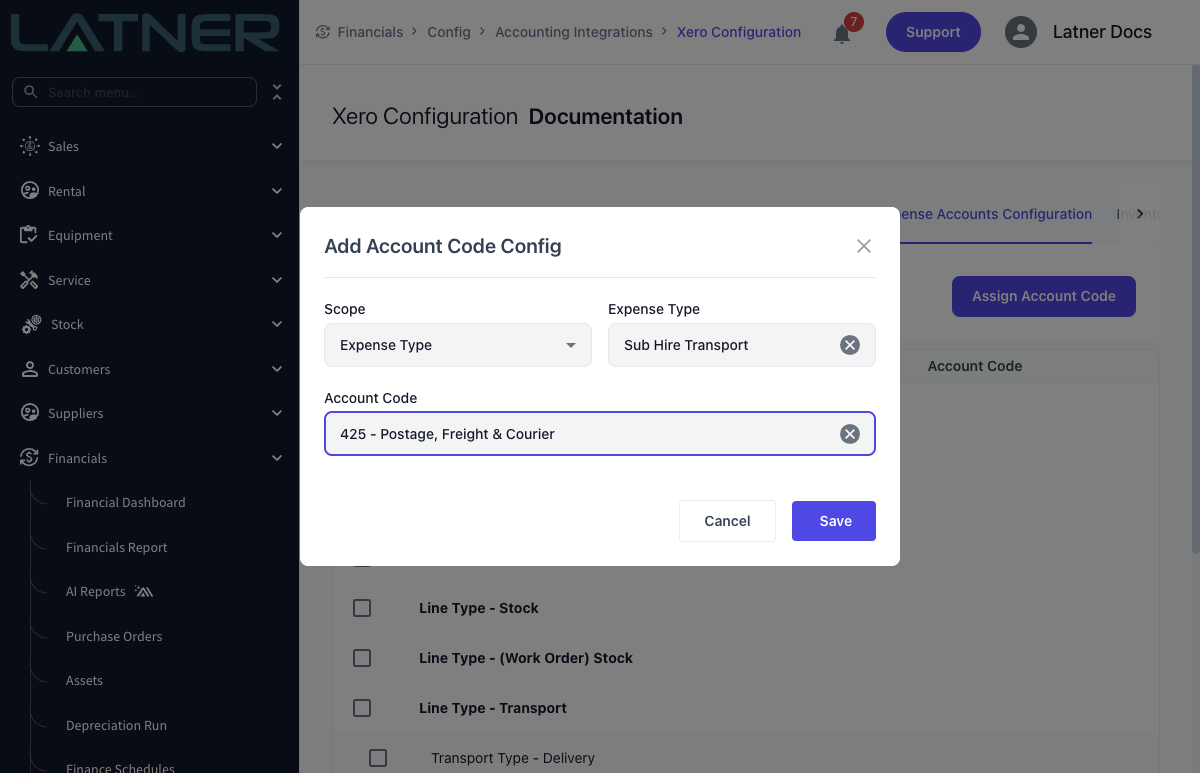
The Expense Type is the handle for sending one kind of cost to its own account. Expense Types live under Suppliers › Configuration › Expense Types - give the cost an Expense Type of its own there, then assign an Account Code to it. Keep the Expense Line Type pointed at your general expenses account to catch every Expense Type you haven't coded.
Sub Hire Orders
A Sub Hire Order can hold three kinds of line, and when the supplier invoice is raised each one is coded by its own Supplier Invoice line, not by the order it came from.
-
Sub Hire Equipment lines become Sub Hire lines - Sub Hire Class, then Sub Hire Category, then the Sub Hire Line Type.
-
Transport lines become Transport lines - Transport Type, then the Transport Line Type.
-
Expense lines become Expense lines - the line's Expense Type, then the Expense Line Type.
The Sub Hire Line Type covers only the sub-hired equipment itself. A delivery or other charge on the same Sub Hire Order does not follow it - it posts wherever your Transport or Expense Type codes point. Transport Type codes are shared with every supplier transport charge, so if sub hire transport needs an account of its own, charge it as an Expense line with a dedicated Expense Type.
Finance Schedule Repayments
Finance schedules raise a supplier invoice for each repayment, so their lines are coded on Expense Accounts Configuration like any other supplier cost. Which line types appear depends on how the schedule was generated.
-
Principal Repayment - the principal portion of a repayment on a standard schedule.
-
Interest Repayment - the interest portion of a repayment on a standard schedule.
-
Finance Schedule Repayment - the single line raised by a schedule generated with Simple Schedule ticked, which doesn't split repayments into principal and interest.
Map each one with Assign Account Code, leaving the Scope on Invoice Line Type and picking the line type. There's no narrower scope for these lines, so each line type has one Account Code. If you have both standard and simple schedules, map all three.
The Inventory tab is only used when perpetual inventory is switched on for the integration (Enable Inventory Control (Stock on Hand) and Enable Serialized Inventory Control (Stock on Hand) on the Integration Settings tab). With it on, stock and serialized stock purchases post to the inventory account you nominate here rather than straight to expense, and the cost is released when the stock is sold.
The two Depreciation tabs are the two sides of the same journal, so configure them as a pair. Anything you code on Depreciation Expense should have a matching entry on Accumulated Depreciation.
After You Have Configured Account Codes
-
While an accounting integration is active, each new invoice line resolves its Account Code as the line is created, and the code is stored on the line. A line that has no code yet resolves one when the invoice is synced.
-
Because the code is stored, changing your configuration later does not change lines that already carry a code - whether or not the invoice has been synced yet.
-
A single line can be re-coded without touching the configuration, using Override Account Code on the invoice line. For a customer invoice that has already synced, Latner pushes just the new account code across to Xero, and to MYOB for invoices (MYOB credit notes and Sage Intacct pick it up the next time the invoice is synced). For a supplier invoice that has already synced, run Options › Sync Invoice afterwards to send the new code.
-
If a line type has no Account Code anywhere in its chain, the sync will fail with an error about the missing account. Check the Integration Syncs tab at the bottom of the invoice for the message.
Removing the connection to an accounting integration deletes all of its configuration, Account Code mappings included. If you are troubleshooting a connection, use Reconnect rather than removing and re-adding it.