
An internal delivery docket is how you send reserved equipment out to a customer on your own truck, so the job reaches the driver, the equipment goes on rent when it lands, and the delivery charge follows it onto the invoice.
Overview
A rental contract is a promise, not a movement. Reserving equipment holds it back from everyone else, but nothing has actually left the yard until a delivery docket says so. Creating the docket is the step that turns a reservation into a job someone can drive.
-
A delivery docket is created from the rental contract it belongs to, under Options › Transport › Create Delivery - not from the Transport Dockets screen, which only makes manual dockets.
-
Internal means your own driver and your own truck. External means a transport supplier, which brings in a supplier, a cost and (optionally) a Purchase Order. Everything else on the form is the same.
-
Only lines that are Reserved or Pre-Allocated can go on a delivery docket, and only those on the same branch as the docket.
-
Creating the docket moves those lines to Pending Delivery. Completing it puts them On Rent and makes the contract Active.
-
The Delivery Charge isn't typed in. It's picked from the transport charge lines already on the rental contract, and you can add one from the picker if there isn't one.
-
A driver is optional at this point. Leave it blank and the docket waits on the Unallocated tab until someone allocates it.
Before You Begin
Nothing has to be switched on to create an internal delivery docket, but these permissions decide who can, and these settings shape what happens next.
|
Requirement |
Where to Find It |
|---|---|
|
Create Delivery permission - to see the Transport menu on a rental contract at all |
Security › Configuration › Permission Groups › Rental › Option |
|
Complete Transport on Delivery/Pick Up Dockets permission - only needed to tick Complete Transport on the form |
Security › Configuration › Permission Groups › Transport › Field |
|
Complete Transport without Take 5 permission - waives the Take 5 checklist on an internal docket |
Security › Configuration › Permission Groups › Transport › Field |
|
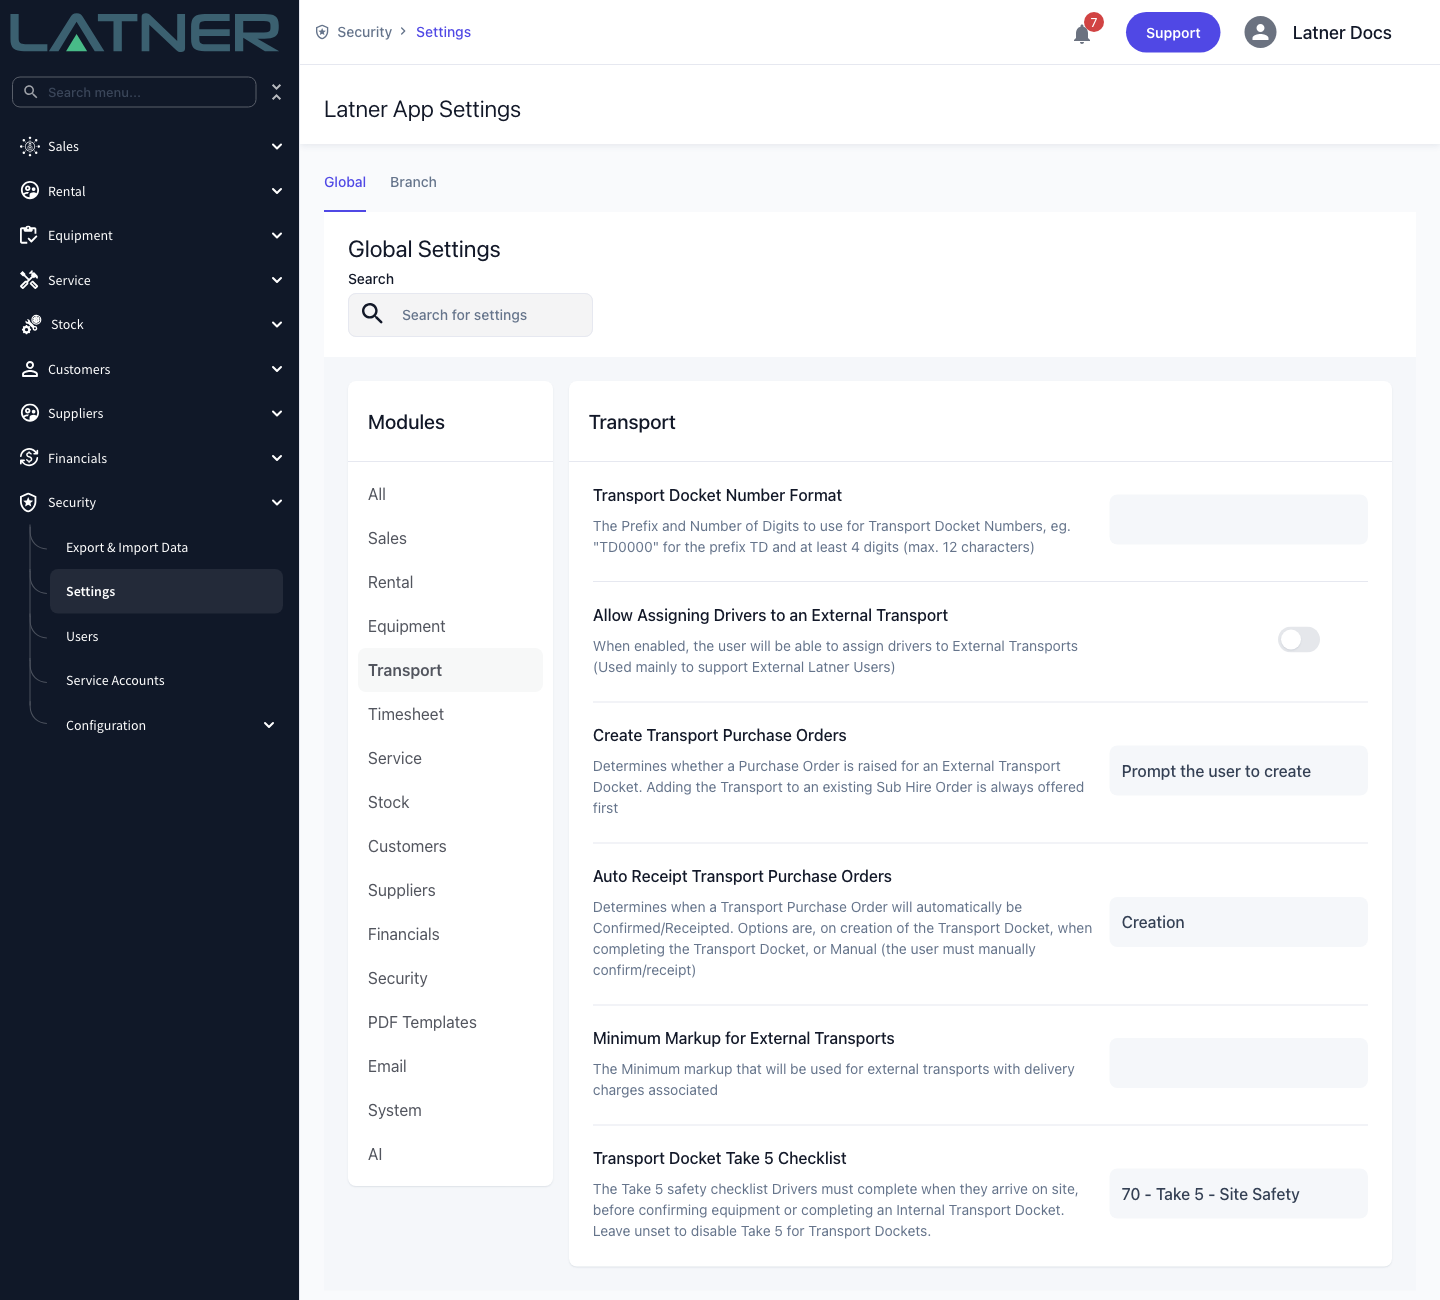
Transport Docket Number Format - the prefix and digits used for the docket number |
Security › Settings › Transport |
|
Transport Docket Take 5 Checklist - the safety checklist your drivers must complete on site before an internal docket can be completed |
Security › Settings › Transport |
|
Allow Equipment Rentals from Different Branches - whether you can change the Branch on the docket |
Security › Settings › Rental |
|
Allow Create Transports for unpaid COD Rental Contracts - whether a cash-on-delivery contract can be delivered before it's paid |
Security › Settings › Rental |
Two things about the customer will stop a delivery before it starts. A customer on credit hold is refused with Cannot create Transport for customer on credit hold, and a customer flagged as requiring a purchase order is refused with Purchase Order is required before creating Transport for this Customer until the contract has one. Both rules are specific to deliveries - a pick up is always allowed, so you can go and collect your equipment either way.
Creating the Internal Delivery Docket
Step 1 - Open the contract and start a delivery
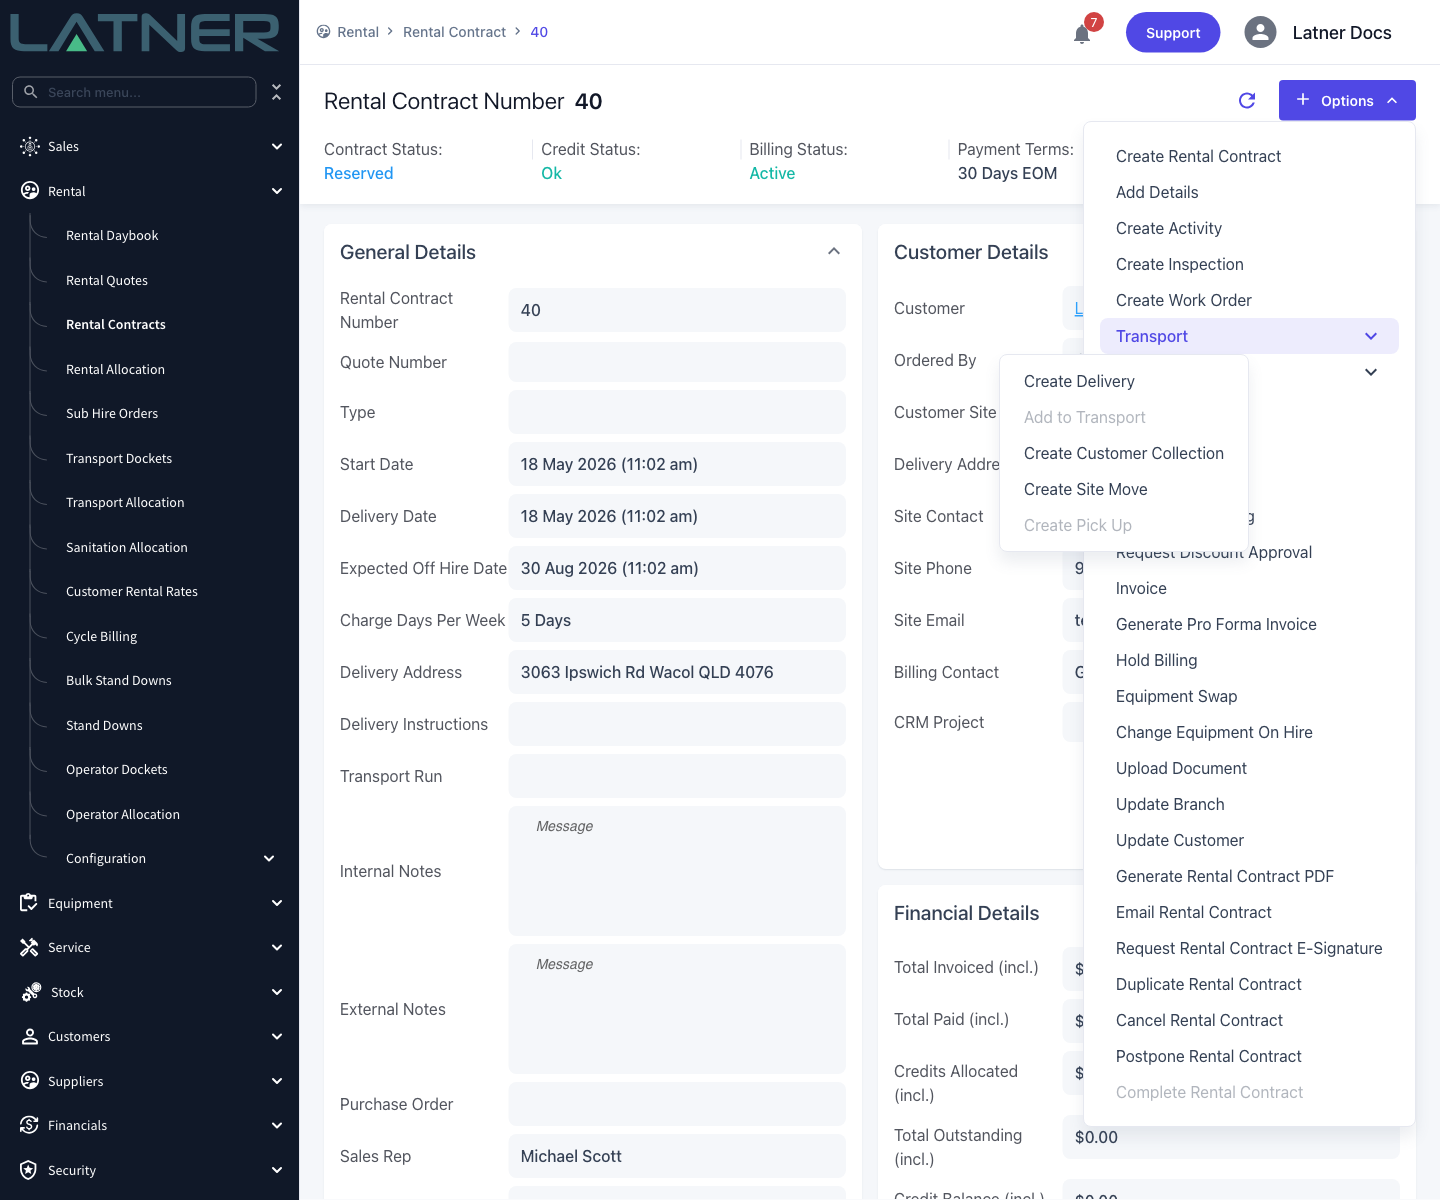
Open the rental contract, then choose Options › Transport › Create Delivery. The contract has to have something to deliver: if every line is already on a docket or on rent, Create Delivery is greyed out with the tooltip Nothing to Deliver.
-
Create Delivery - starts a new docket for this contract.
-
Add to Transport - puts these lines onto an existing open docket instead, and is only available while the contract has one.
-
Create Customer Collection - for when the customer comes and picks the gear up themselves.
Step 2 - Check what Latner has filled in for you
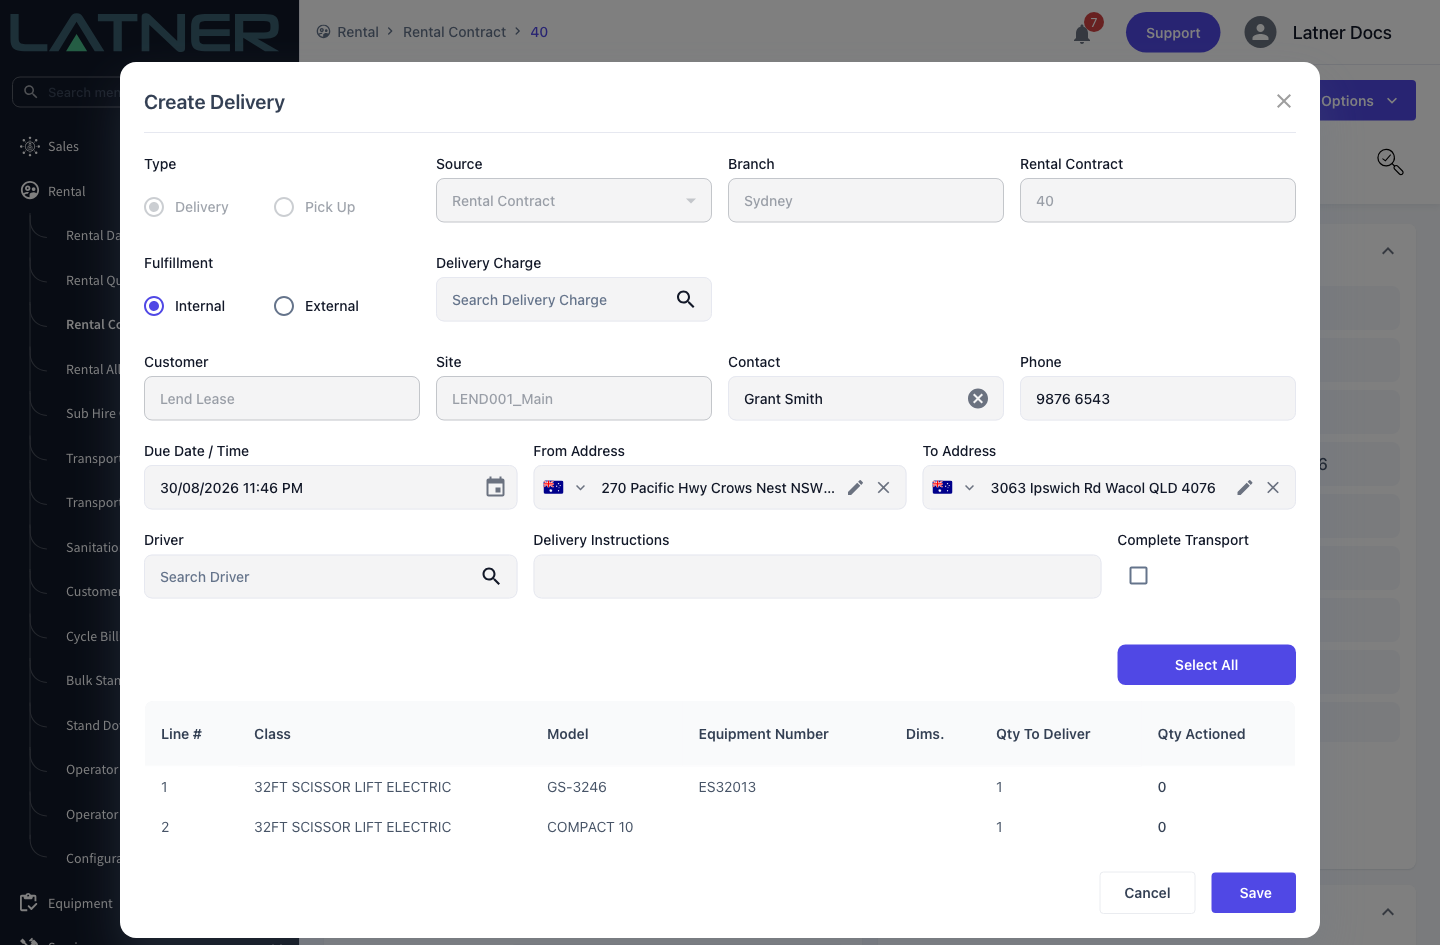
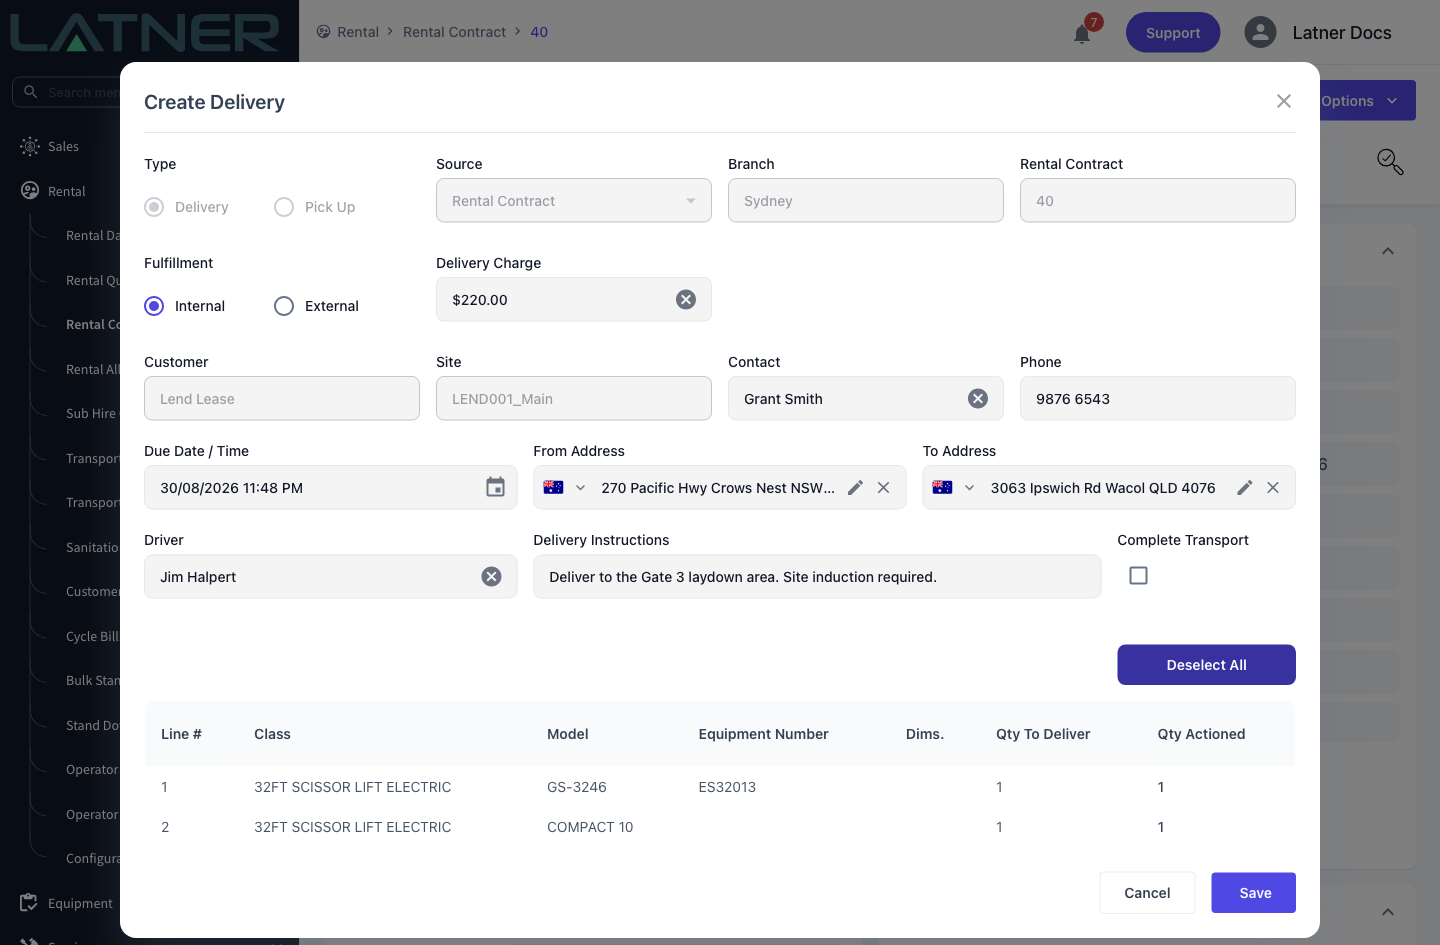
The form opens as Create Delivery with most of the header already answered from the contract. The greyed-out fields are the ones you can't change here.
-
Type - locked to Delivery, because you started from Create Delivery.
-
Source - fixed at Rental Contract, and Rental Contract shows the contract number. That pair is what separates this docket from a manual one.
-
Branch - starts on the contract's branch and is read-only unless Allow Equipment Rentals from Different Branches is enabled. It decides which lines you can put on the docket: only lines whose own branch matches. If a line has been moved to another branch, set Branch to that branch to deliver it. Either way, the docket takes its branch from the lines it carries at the moment it's created, not from the contract header - so a docket can show a different branch to the contract.
-
Customer and Site - taken from the contract and read-only.
-
Contact and Phone - seeded from the contract's delivery contact, and editable if the site has someone else meeting the truck.
Step 3 - Leave Fulfillment on Internal
Fulfillment decides who drives the job, and it's the only difference between this article and its external counterpart.
-
Internal - your own driver. The Driver field is available, and no supplier or cost fields appear.
-
External - a transport supplier. Supplier and a supplier cost field appear, a Delivery Charge becomes mandatory, and Driver is greyed out with the tooltip Only applicable for Internal transport unless Allow Assigning Drivers to an External Transport is enabled.
Internal is the default on a rental contract docket, so unless you switch it there is nothing to do in this step.
Step 4 - Pick the delivery charge
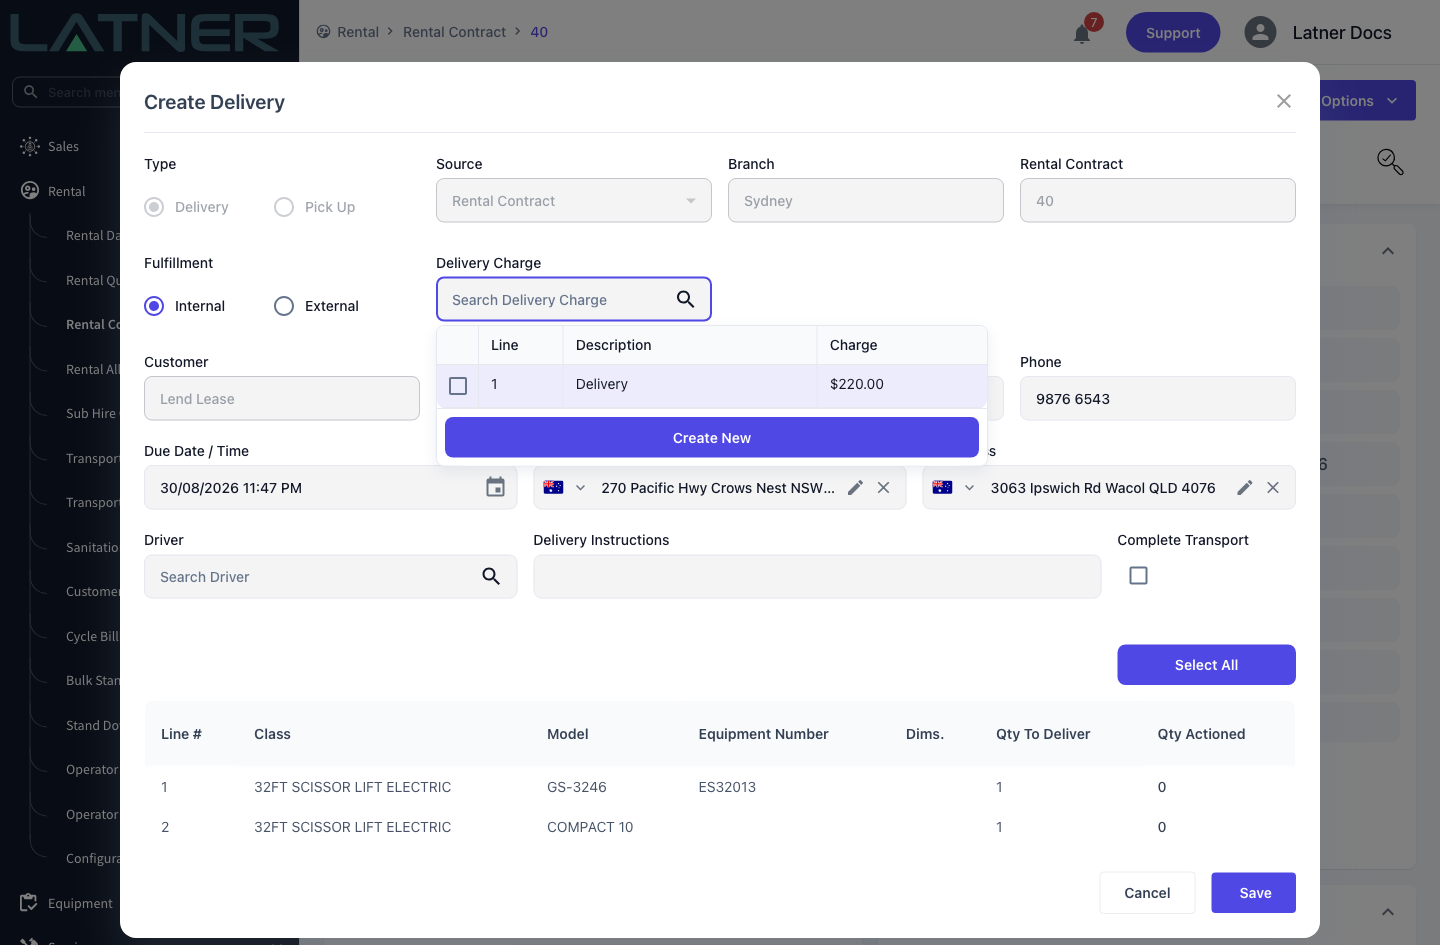
On a contract docket you don't type a charge in. Click Delivery Charge and pick from the transport charge lines already sitting on the rental contract - the picker only offers Delivery lines that haven't been used on another docket. If the contract hasn't got one, Create New adds a transport line to the contract without leaving the form.
On an internal docket this is optional; leave it blank and the delivery simply isn't charged.
Step 5 - Set the timing, addresses and driver
These are the details the driver actually works from.
-
Due Date / Time - required. It defaults to the contract's delivery date, or to now if that date has already passed.
-
From Address - defaults to the branch's address, because that's where the machine is.
-
To Address - defaults to the contract's delivery address, falling back to the site's address.
-
Driver - optional. Choose one now and the docket goes straight to that driver; leave it blank and it waits to be allocated.
-
Delivery Instructions - copied from the contract and editable. This is what the driver reads on their phone.
Step 6 - Choose the lines and quantities
The table at the bottom lists every line this docket can carry. Nothing goes on the docket until you give it a Qty Actioned: click Select All to load every line in full, or click a single Qty Actioned cell and type a number.
-
Saving with every line still at zero is rejected with At least one piece of equipment must be selected for transport.
-
Delivering part of a line's quantity splits it. Send two of five units and the other three stay behind on their own Reserved line, ready for a second docket.
-
A line with no Equipment Number yet can still go on the docket - allocation can happen later - but the docket can't be completed until every managed line has one.
Step 7 - Save
Click Save. Latner confirms the new docket by number and offers a link straight to it.
Ticking Complete Transport before saving creates and completes the docket in one go, which is what you want when the machine has already gone out. You'll be asked Are you sure you want to complete this transport docket and put the equipment on rent? first, and the checkbox is disabled without the Complete Transport on Delivery/Pick Up Dockets permission.
After Creation
-
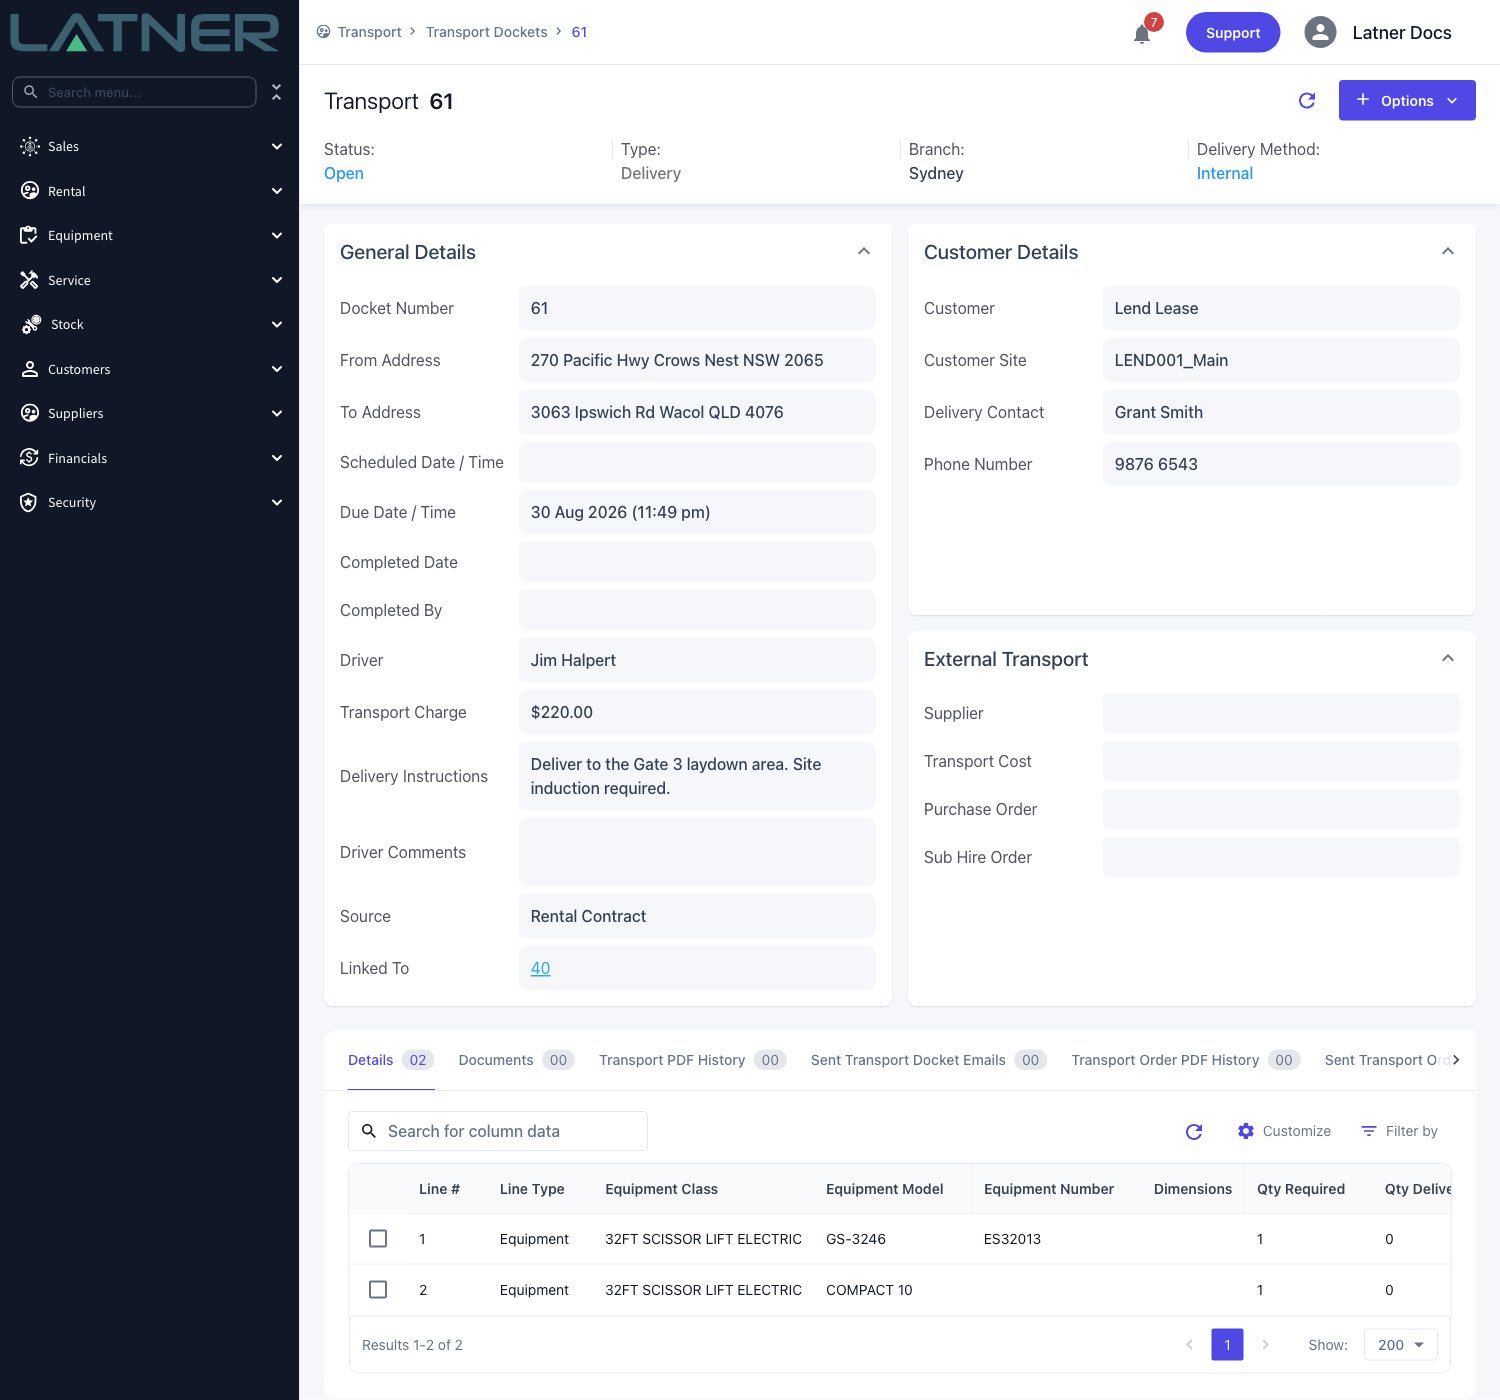
The docket is created with status Open, Delivery Method of Internal, Source of Rental Contract, and Linked To pointing back at the contract.
-
The delivery charge you picked is now attached to the docket and can't be used on another one.
-
The docket keeps the branch it was created with. Changing a line's Branch afterwards doesn't move the docket - see The docket shows a different branch to its line below.
-
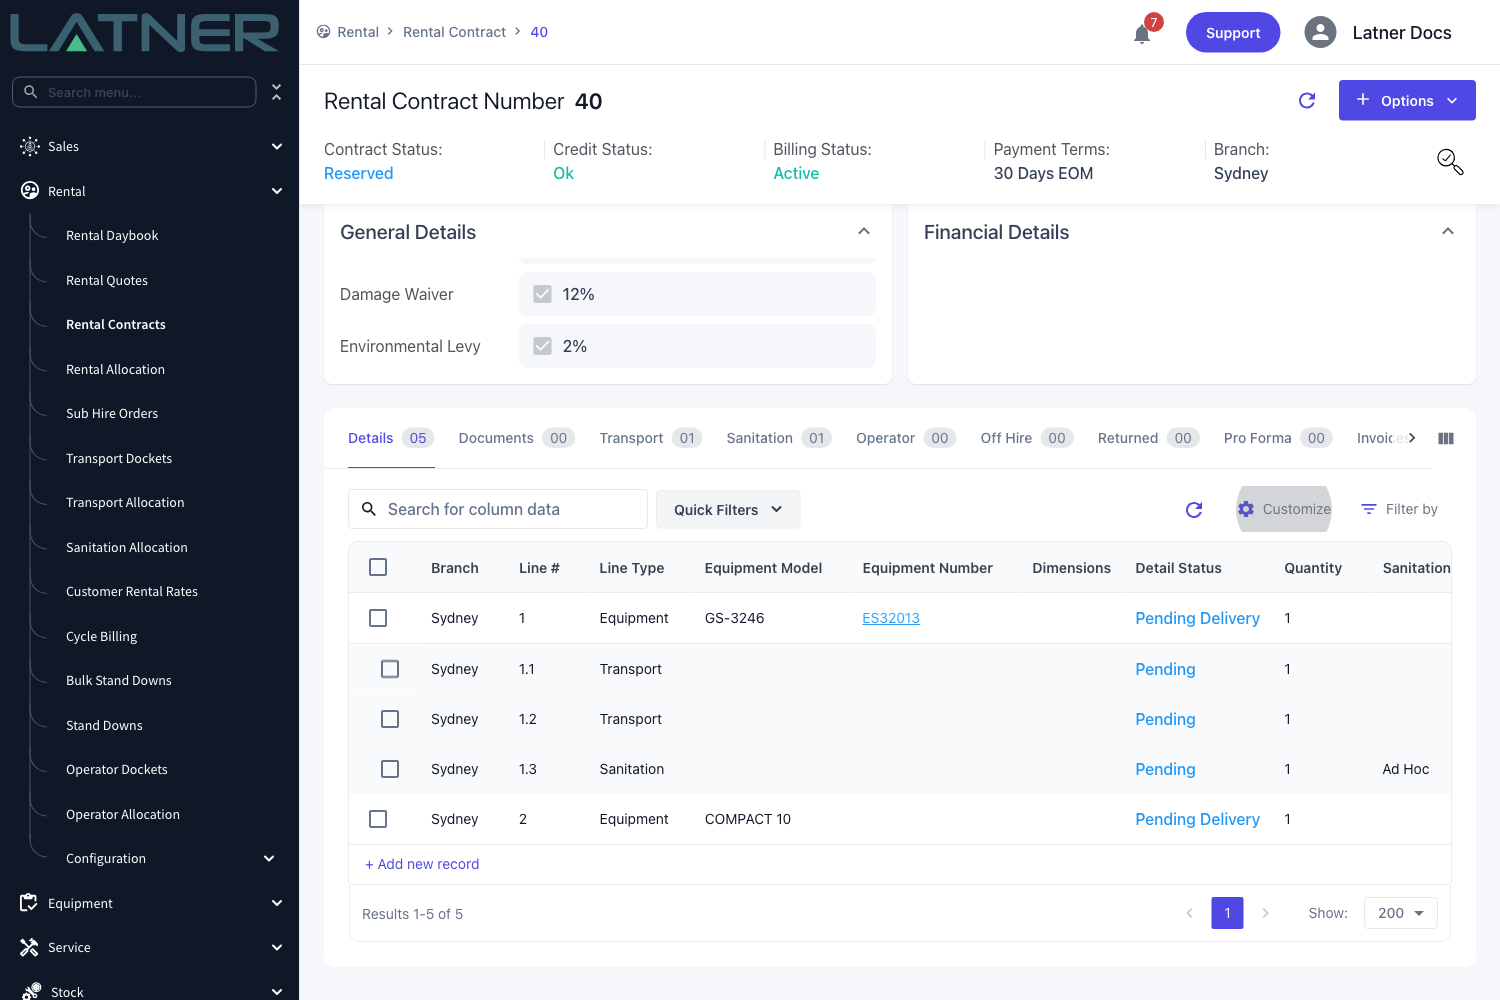
The contract's equipment lines move to Pending Delivery, so they're no longer offered to a second delivery docket.
-
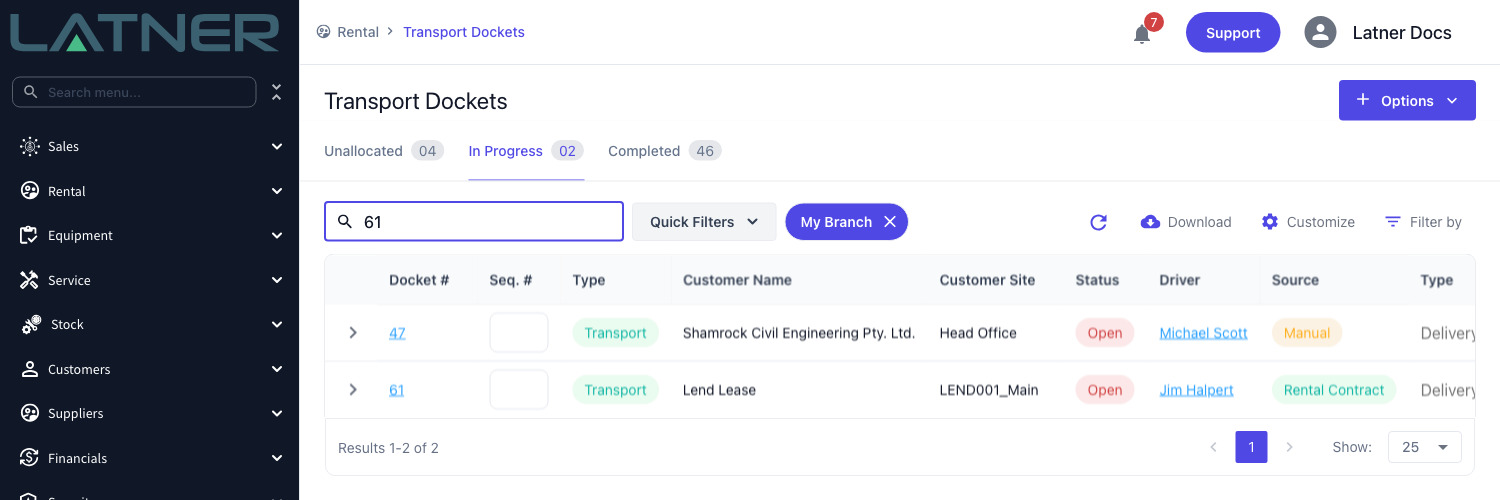
The docket appears on Rental › Transport Dockets - under Unallocated if you left the driver blank, under In Progress once one is assigned - and on the Transport Allocation board for scheduling.
-
It also shows up on the driver's mobile app, where they complete it on site.
-
Completing the docket puts each delivered line On Rent and moves the contract from Reserved to Active. Billing starts from there.
Completing a docket isn't the end of the story, but undoing it is awkward. If the docket raised a customer invoice, Latner refuses to reopen it with Cannot reopen Transport with Invoice(s) attached to it: Please Cancel the Invoice(s) first. Check the quantities and the charge before you complete a docket rather than after - and if the job simply didn't happen, cancel the docket instead, which puts the lines back to Reserved.
FAQs
Watch the Demo
Prefer to watch it? Step through the same flow here.