
Quick Return takes a hire from equipment back on the counter to a settled, invoiced contract on a single screen, so you can check the items in, add any fuel or damage charges, raise the final invoice and refund the bond while the customer waits.
Overview
When a customer drops a machine back, they want their bond and a receipt, not a wait while you work through the off hire, return and invoicing screens. Quick Return does all of that in three steps and shows you exactly where the money lands before anything is written. It's the other half of Quick Hire, but it works on any active rental contract, however it was created.
-
A return has three steps: Find the hire, Return and Settle, followed by a Done screen where you email or print the invoice.
-
The Return step takes the items off hire and returns them in one go, records meter readings and fuel, and lets you add damage, fuel and admin charges.
-
The Settle step raises the final invoice, applies the customer's deposit to it, and refunds what's left over or collects what's still owing. You can also hold the bond back instead of refunding it.
-
If some items are still out, Quick Return records the ones that came back and stops there. The final invoice is raised when the last item is back.
-
Nothing is written until you click each step's main button. Charges you add on the Return step stay on the screen until you click Return.
Before You Begin
Quick Return is part of the Counter module, which needs to be switched on for your company. The person at the counter also needs these permissions, and a few settings change what the screen asks for.
|
Requirement |
Where to Find It |
|---|---|
|
The Counter module (Quick Hire and Quick Return) switched on for your company. It is available on request. |
Contact Latner to have it switched on |
|
Quick Return permission. It is switched on for the Administrator, View Administrator, Hire Controller, Senior Hire Controller and Branch Manager permission groups. |
Security › Configuration › Permission Groups › [group] › Counter › Screen |
|
Create Return and Create Off Hire permissions, to take items off hire and return them |
Security › Configuration › Permission Groups › [group] › Rental › Option |
|
Add Rental Contract Details permission, to add charges (and Delete Rental Contract Details to remove them) |
Security › Configuration › Permission Groups › [group] › Rental › Option |
|
Invoice Rental Contract and Edit Rental Contract permissions, to raise the final invoice and complete the contract |
Security › Configuration › Permission Groups › [group] › Rental › Option |
|
Create Customer Payment permission, to apply the deposit, refund the customer and take payment |
Security › Configuration › Permission Groups › [group] › Customers › Option |
|
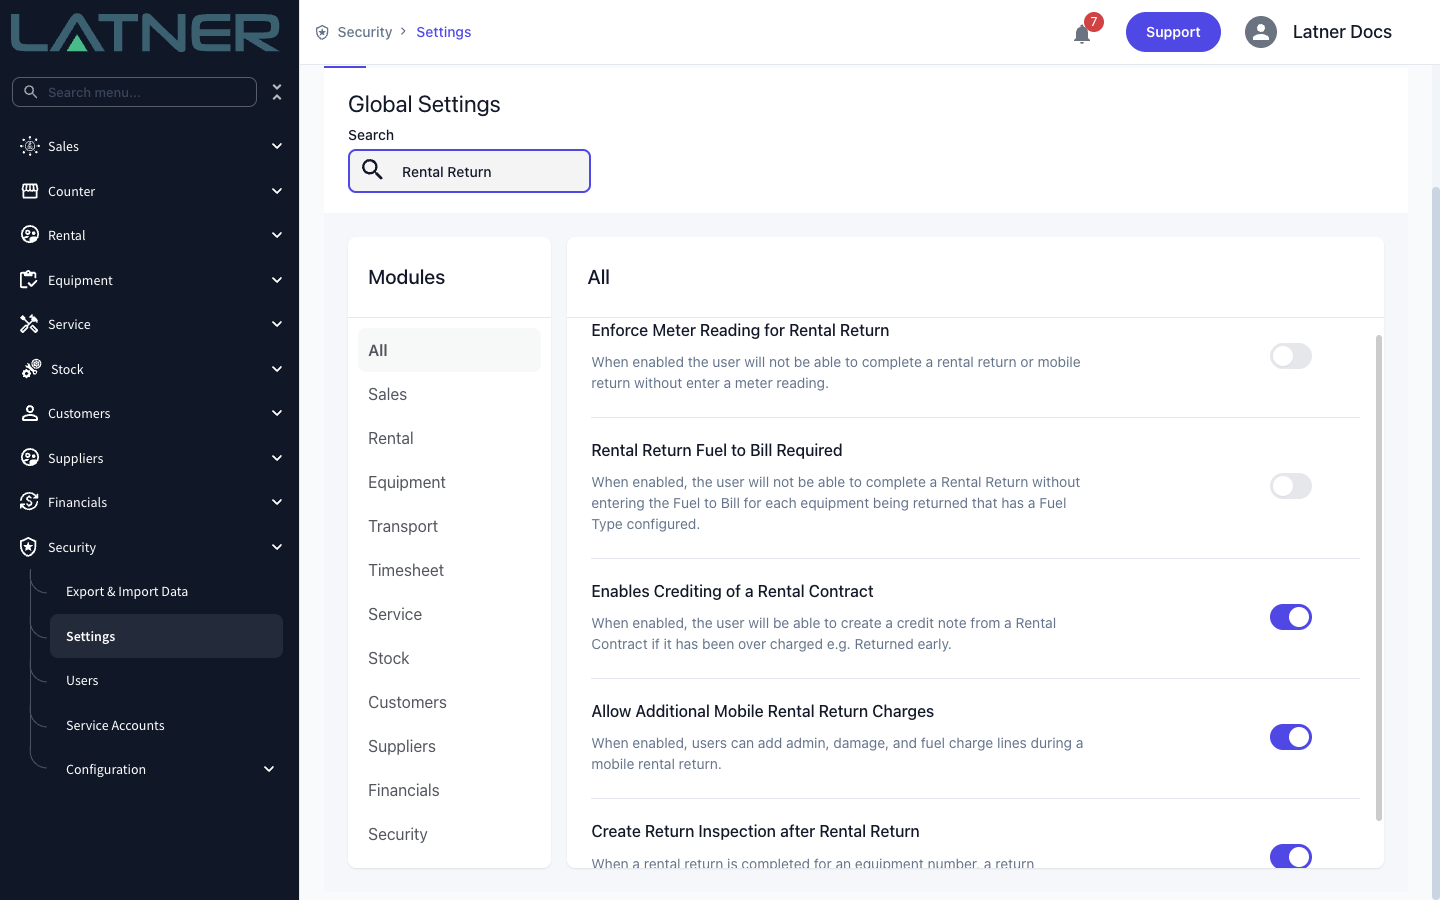
Optional: Allow Additional Mobile Rental Return Charges must be on for the Admin, Damage and Fuel charge buttons to appear |
Security › Settings › Rental |
|
Optional: Record Fuel to Bill in must include Rental Return for the Fuel to bill field to appear |
Security › Settings › Rental |
|
Optional: Enforce Meter Reading for Rental Return and Rental Return Fuel to Bill Required make the meter reading and fuel compulsory |
Security › Settings › Rental |
|
Optional: Create Return Inspection after Rental Return raises a return inspection for each unit that comes back |
Security › Settings › Equipment |
|
Optional: Allowed Payment Methods and Default Payment Method decide which payment buttons appear when the customer owes money |
Security › Settings › Financials |
If Block Completing Rental Contract with Open Inspection (Security › Settings › Rental) is switched on as well as Create Return Inspection after Rental Return, Quick Return settles the money but leaves the contract open until the return inspection is done. That's expected: complete the inspection, then complete the contract (see the FAQs).
Processing a Quick Return
Step 1 - Open Quick Return and find the hire
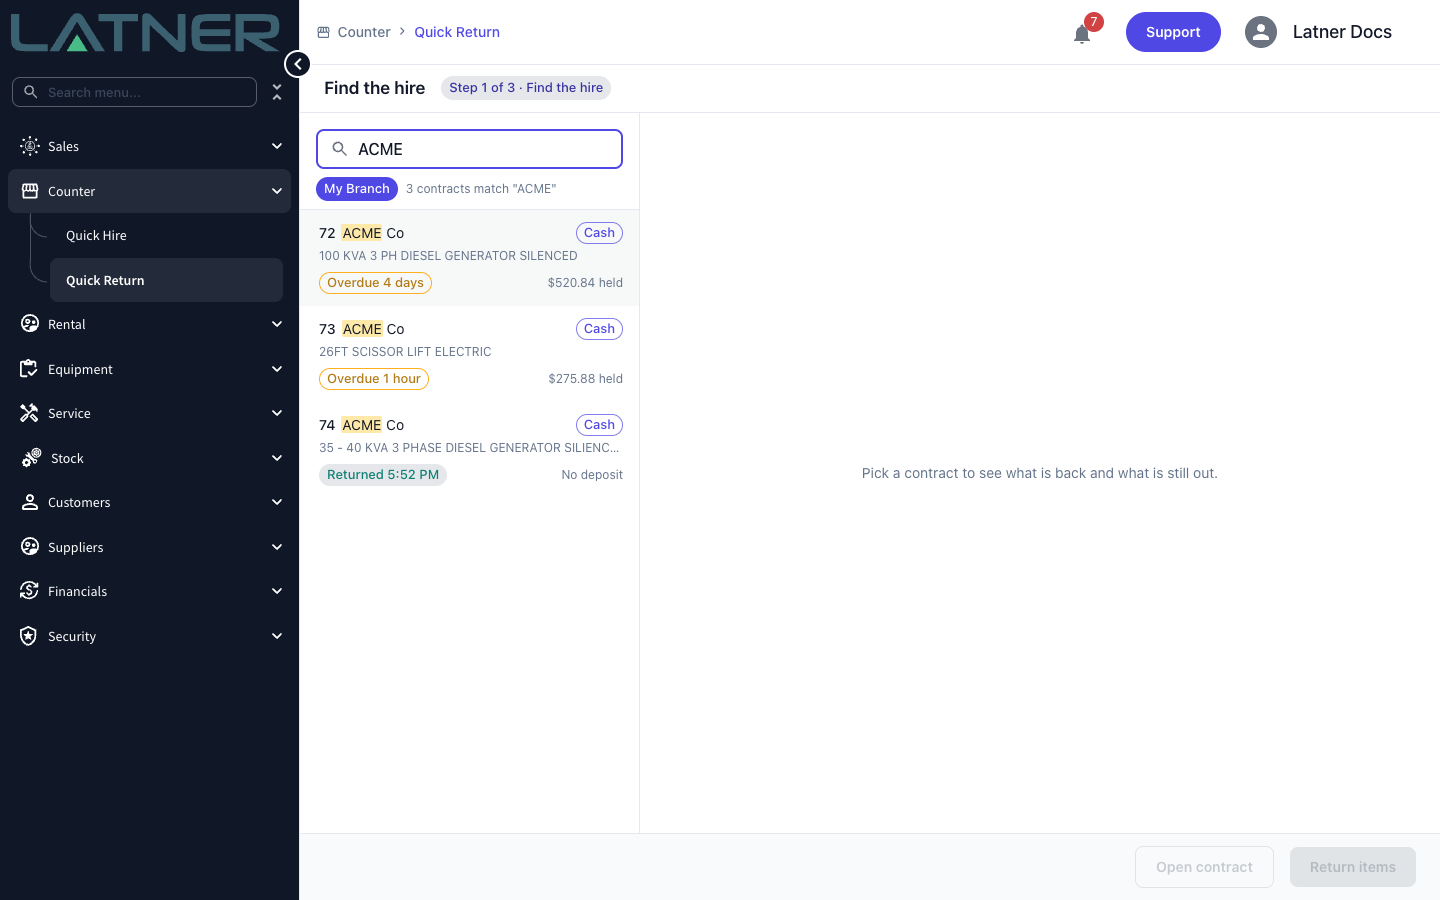
Go to Counter › Quick Return. The screen opens on Step 1 of 3 · Find the hire, with every active rental contract at your branch listed on the left, oldest due first. Each row shows the contract number, the customer, whether they're a Cash or Account customer, the equipment, when it's due (or how long it's Overdue) and how much deposit is held.
Type in the search box to narrow the list. It matches the contract number, the customer's name and ID number, the name, phone number or ID number of any of their contacts, and the equipment number, so you can scan the unit's number plate or ask the customer's name. Use the arrow keys and Enter, or click the contract to select it.
The My Branch chip keeps the list to your branch. Click it to turn it off and see contracts from every branch, for example when a customer drops a machine back at a different depot.
Step 2 - Check the contract
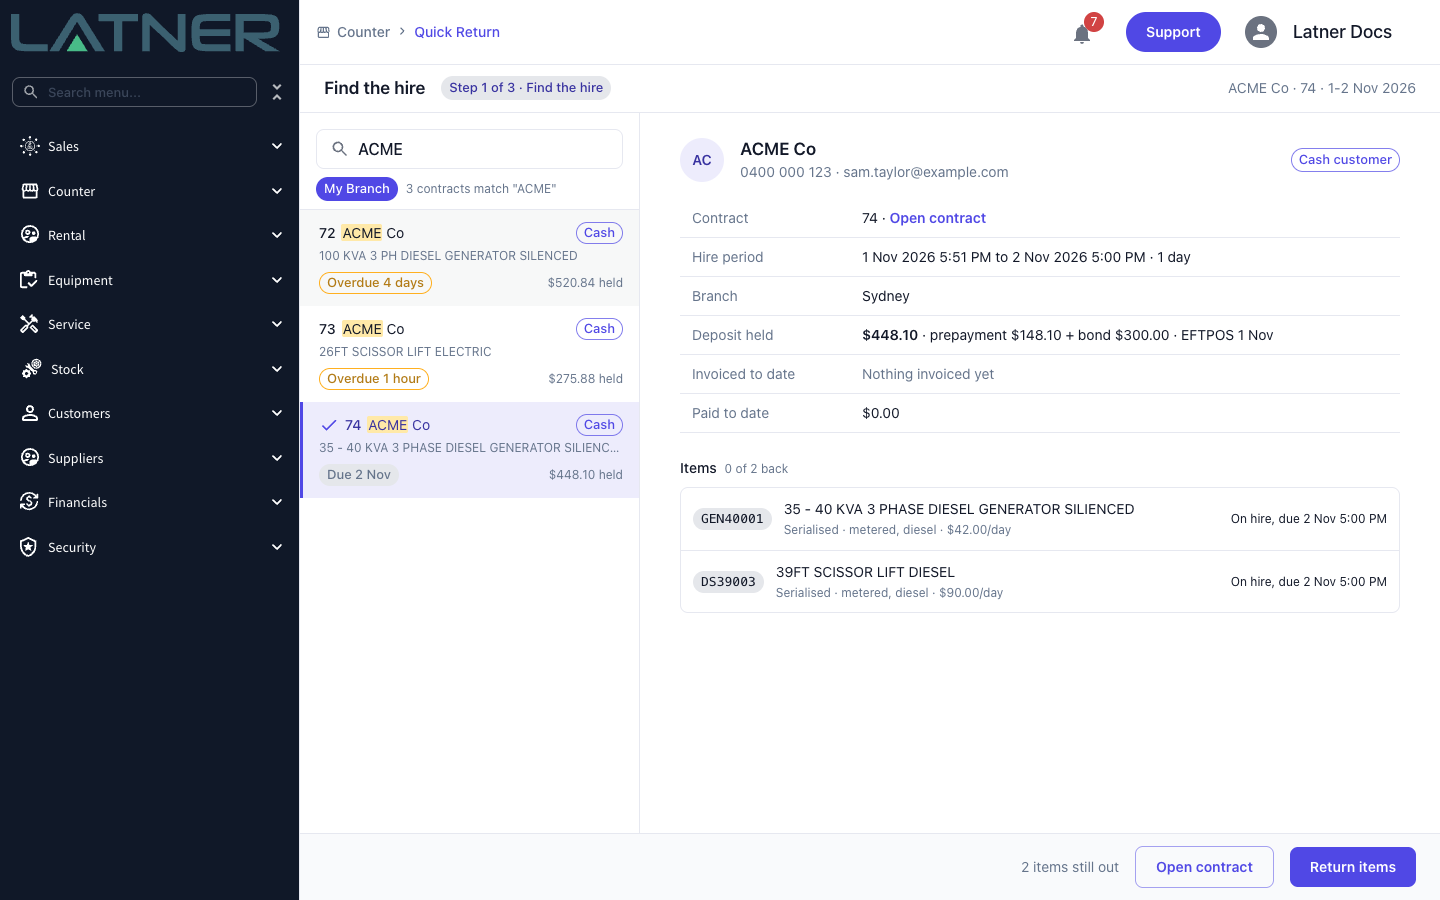
The contract's summary appears on the right: the Hire period, the Branch, the Deposit held (split into the prepayment and the bond, with how it was paid), what's been Invoiced to date and Paid to date, and the Items on hire with how many are already back.
Look out for warnings above the items:
-
An earlier invoice on the contract is unpaid. You can pay it from the deposit on the Settle step, or click Open invoice to look at it.
-
A unit is on an open pick-up docket that hasn't been completed. If Auto Complete Pickup Dockets when Returning Equipment is switched on, returning it here completes the docket. Otherwise, call the driver off and cancel the docket before you return the unit.
Click Return items.
Step 3 - Set the return time and tick what's coming back
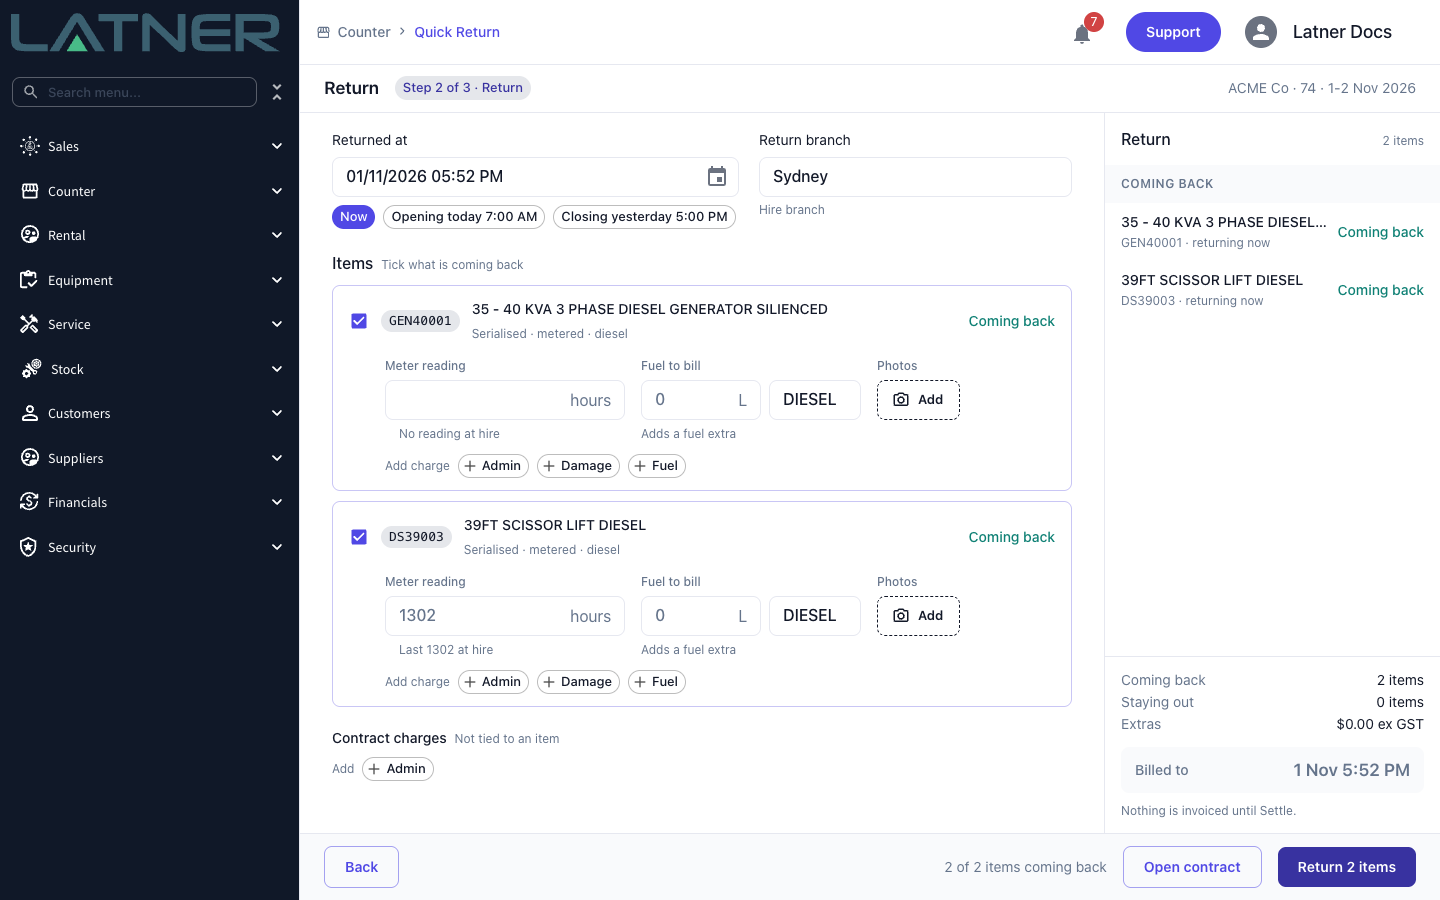
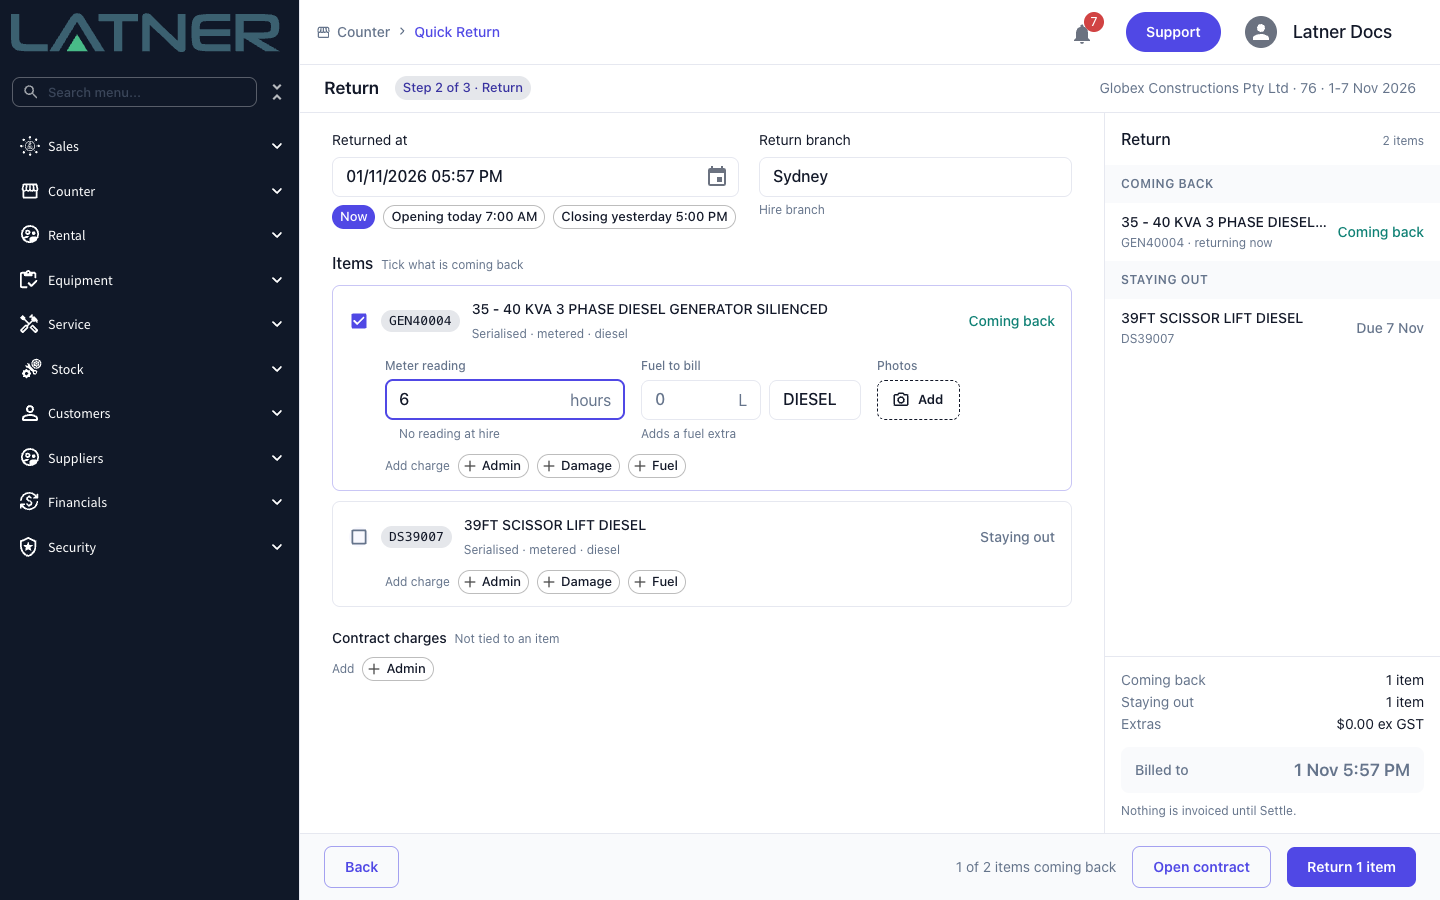
Step 2 of 3, Return, opens with two fields at the top:
-
Returned at - when the equipment came back. It starts at now. Click Now, Opening today or Closing yesterday for a quick setting, for example for a machine left in the yard overnight. It can't be in the future or before the hire started. The final invoice bills up to this time.
-
Return branch - where the equipment is coming back to. It starts on your branch. If that isn't the hire branch, the units move into your branch's stock and Latner asks you to confirm.
Every item that's still out is listed under Items and ticked for you. Untick anything the customer hasn't brought back, and it moves to Staying out in the panel on the right. Items already returned (for example on the mobile app) and items that haven't gone out yet are shown, but locked.
Step 4 - Record readings, fuel and charges
For each item that's coming back, fill in what applies:
-
Qty - bulk items only. Return part of the hired quantity and the rest stays on hire.
-
Meter reading - metered equipment only. The note underneath shows the reading at hire. If the line has a maximum daily hours limit and an excess hours rate, and the reading goes over the limit, an excess hours charge is added to the contract for you.
-
Fuel to bill - the litres to charge for. Entering an amount adds a fuel line, priced from the unit's fuel type. To remove it, clear the field.
-
Photos - click Add to attach photos of the unit's condition to its line on the contract. Photos are saved as soon as you add them.
To charge for something else, click a button next to Add charge on the item:
-
Damage - enter a Damage description, the Qty and the Unit price.
-
Fuel - a fuel charge by the litre. The Fuel type starts on the unit's own.
-
Admin - pick an Admin charge, such as cleaning, and set the price.
Use Contract charges under the items for an admin charge that isn't tied to one item. Charges already on the contract that haven't been invoiced are listed too, and you can remove them with ×. Click Return (for example Return 2 items) when you're done.
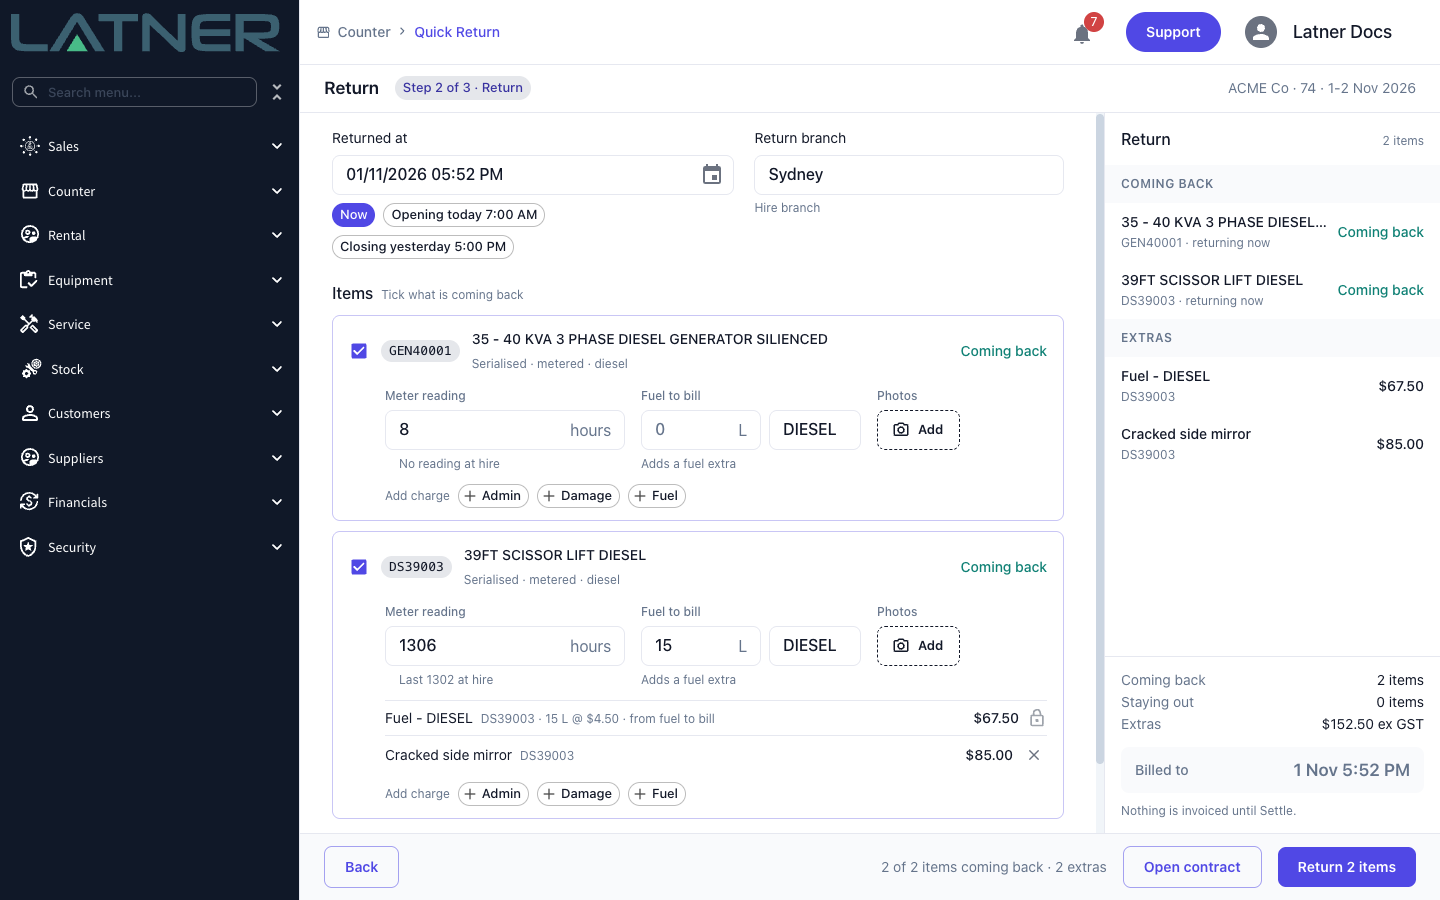
Quick Return takes the ticked items off hire, returns them, saves the charges and moves straight on to Settle. If Create Return Inspection after Rental Return is switched on, an open return inspection is created for each unit whose model or class has return inspections. Otherwise the unit goes back to Available.
Step 5 - Review the final invoice and the deposit
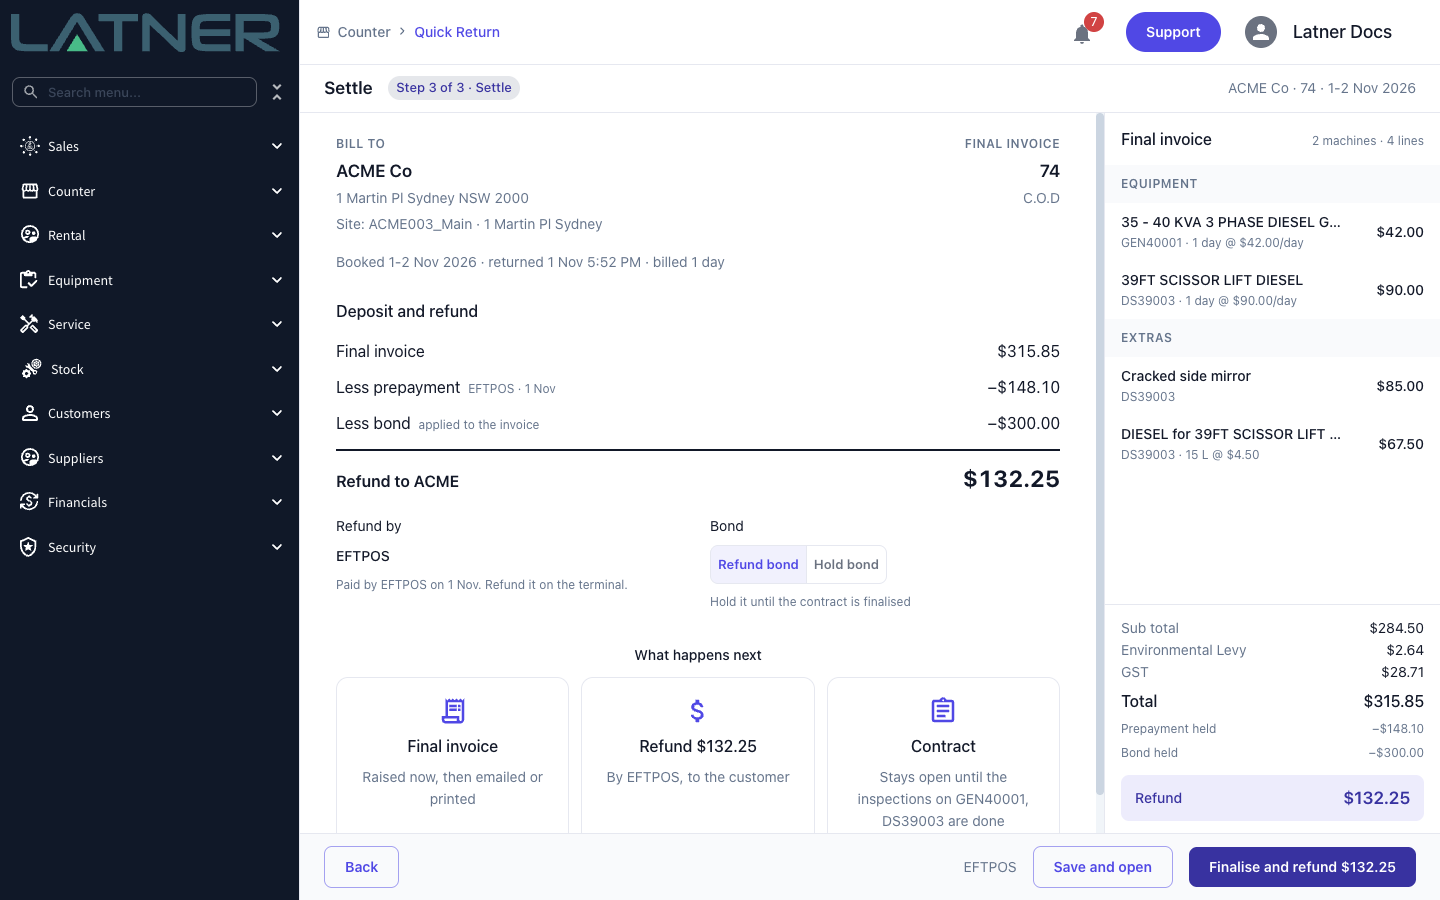
Step 3 of 3, Settle, shows the final invoice on the right, billed up to the return time, with the hire, the extras you added, any levies and GST. Nothing has been invoiced yet.
Under Deposit and refund, Quick Return applies the customer's whole deposit to the invoice, prepayment first and then the bond, and shows what that leaves:
-
Refund to the customer, when the deposit is more than the invoice. Refund by shows how: the refund always goes back the way the deposit was paid. A card deposit taken through your payment gateway is refunded to the same card. For EFTPOS, cash or EFT, you refund it yourself and Latner records it.
-
To collect, when the invoice is more than the deposit. Choose a payment method under Take payment. The buttons come from your Allowed Payment Methods.
-
Nothing to collect, when the deposit covers the invoice exactly.
An account customer with no deposit sees On account instead: the final invoice goes on their account and there's nothing to take or refund today. If earlier invoices on the contract are still unpaid, they're listed above the money section. Click Pay from deposit to pay them from the deposit first. The deposit can't be refunded while an earlier invoice is left unpaid.
Step 6 - Refund or hold the bond
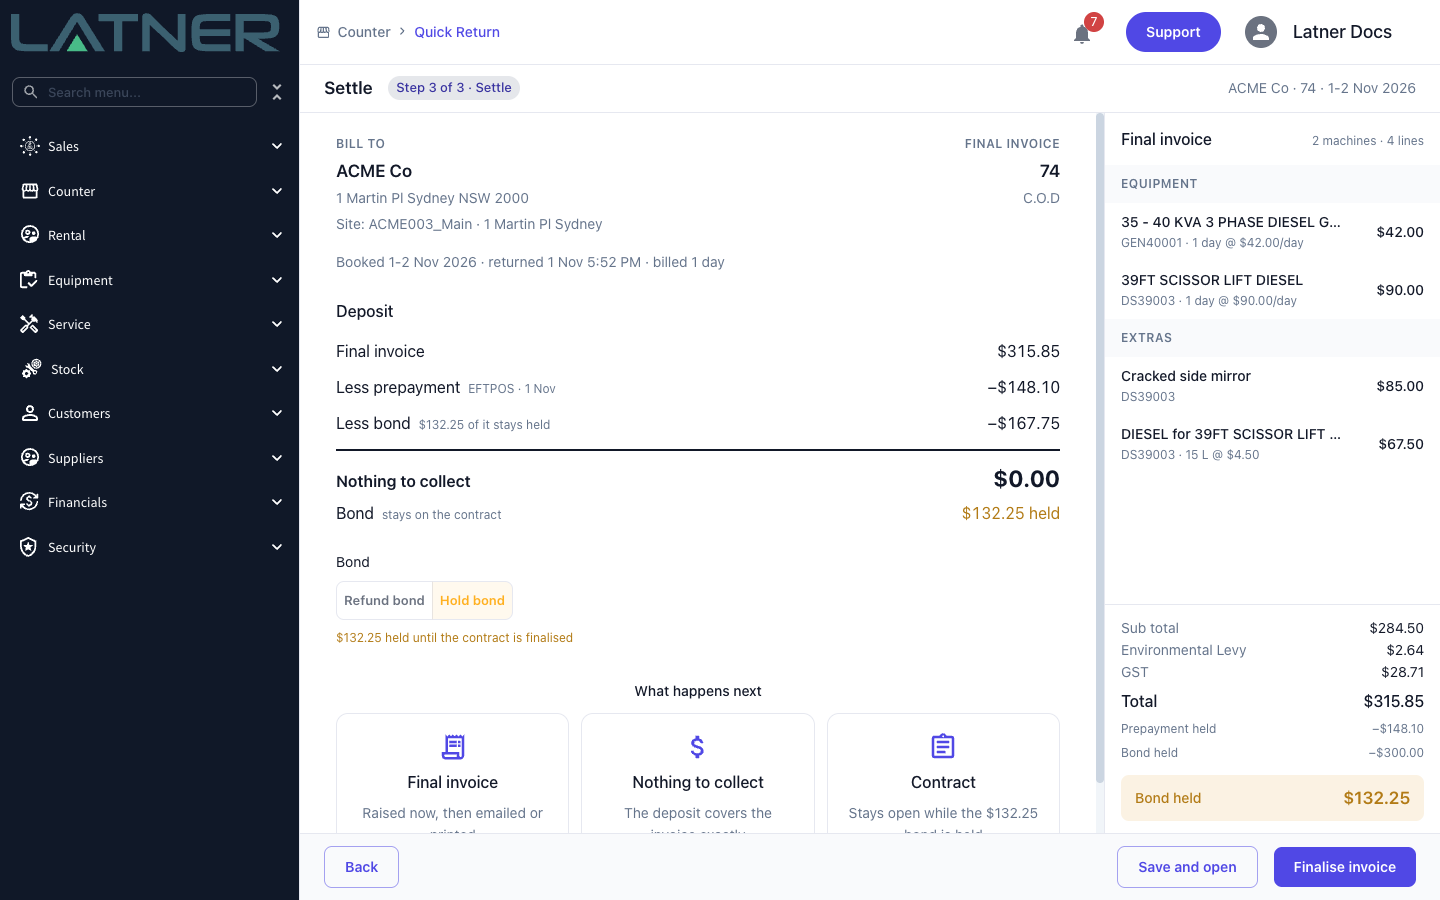
When the customer paid a bond and some of it is left over, choose what happens to it under Bond:
-
Refund bond (the default) - the left-over deposit is refunded now and the contract is completed.
-
Hold bond - the bond still pays whatever the prepayment doesn't cover, but the rest stays held on the contract, for example until you've checked the machine for damage. Only unused prepayment is refunded. The contract stays open while the bond is held.
What happens next sums up the invoice, the money and what happens to the contract.
Step 7 - Finalise and confirm the money
Click the main button. Its label tells you what it will do, for example Finalise and refund $132.25, Finalise and take $50.00 or Finalise invoice.
Before any money is recorded, Latner asks you to confirm it has really moved. For EFTPOS it asks whether the terminal has approved or refunded the amount, and for cash whether you've received or handed over the cash. Recording an EFTPOS refund doesn't start one on the terminal, so process it on the terminal first, then click Yes, refunded (or Yes, approved). For a card, Latner charges or refunds it through your payment gateway.
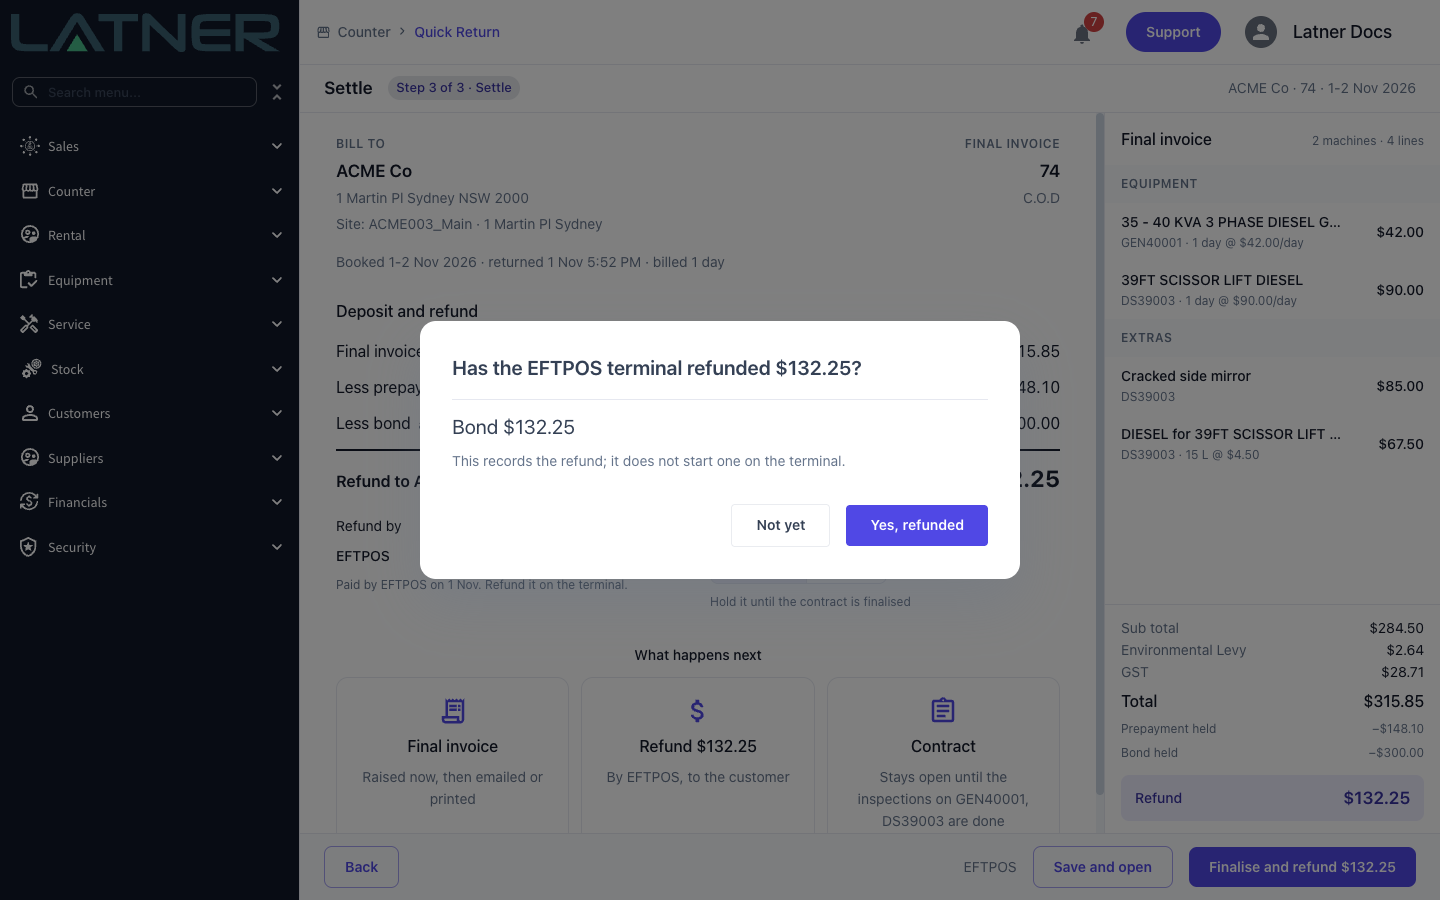
Quick Return then raises and completes the final invoice, applies the deposit to it, records the refund or payment, and completes the rental contract.
Step 8 - Send the invoice
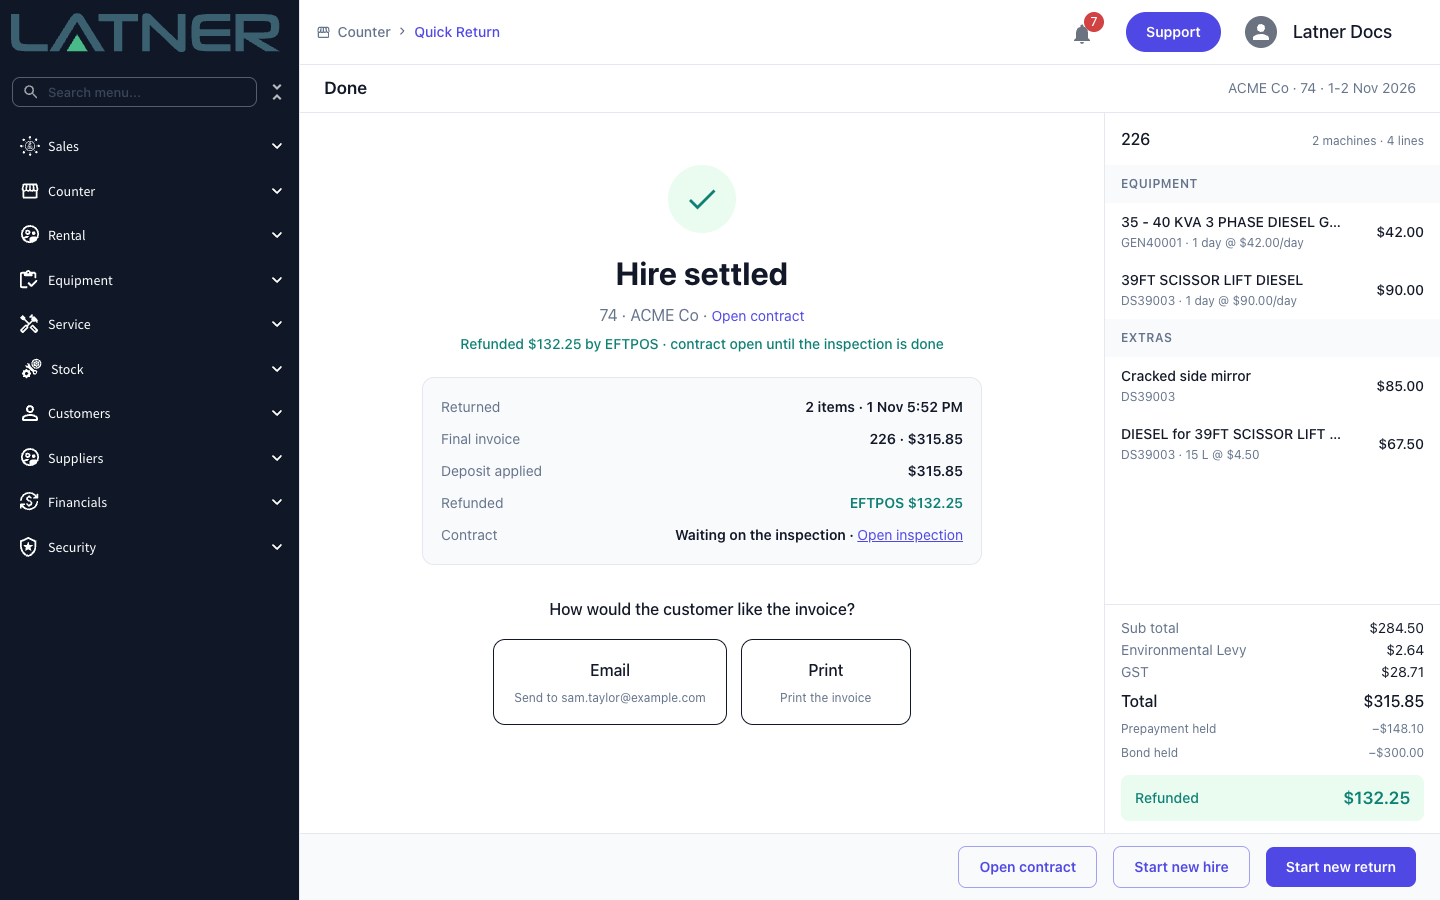
The Done screen reads Hire settled and sums up what was returned, the final invoice number and total, how much deposit was applied, the refund or payment, and the state of the contract.
Under How would the customer like the invoice?, choose:
-
Email - sends the invoice to the customer's billing email.
-
Print - prints the invoice to hand over at the counter.
Click Start new return to clear the screen for the next customer. Start new hire opens Quick Hire with the same customer, for when they're swapping one machine for another.
Returning Part of a Hire
When a customer brings back some of the equipment and keeps the rest, return just what came back.
Step 1 - Untick what's staying out
Find the contract and click Return items as usual. On the Return step, untick the items that aren't coming back. They move to Staying out on the right. Record the readings and charges for the items that are back, then click Return.
Step 2 - Done, with no invoice yet
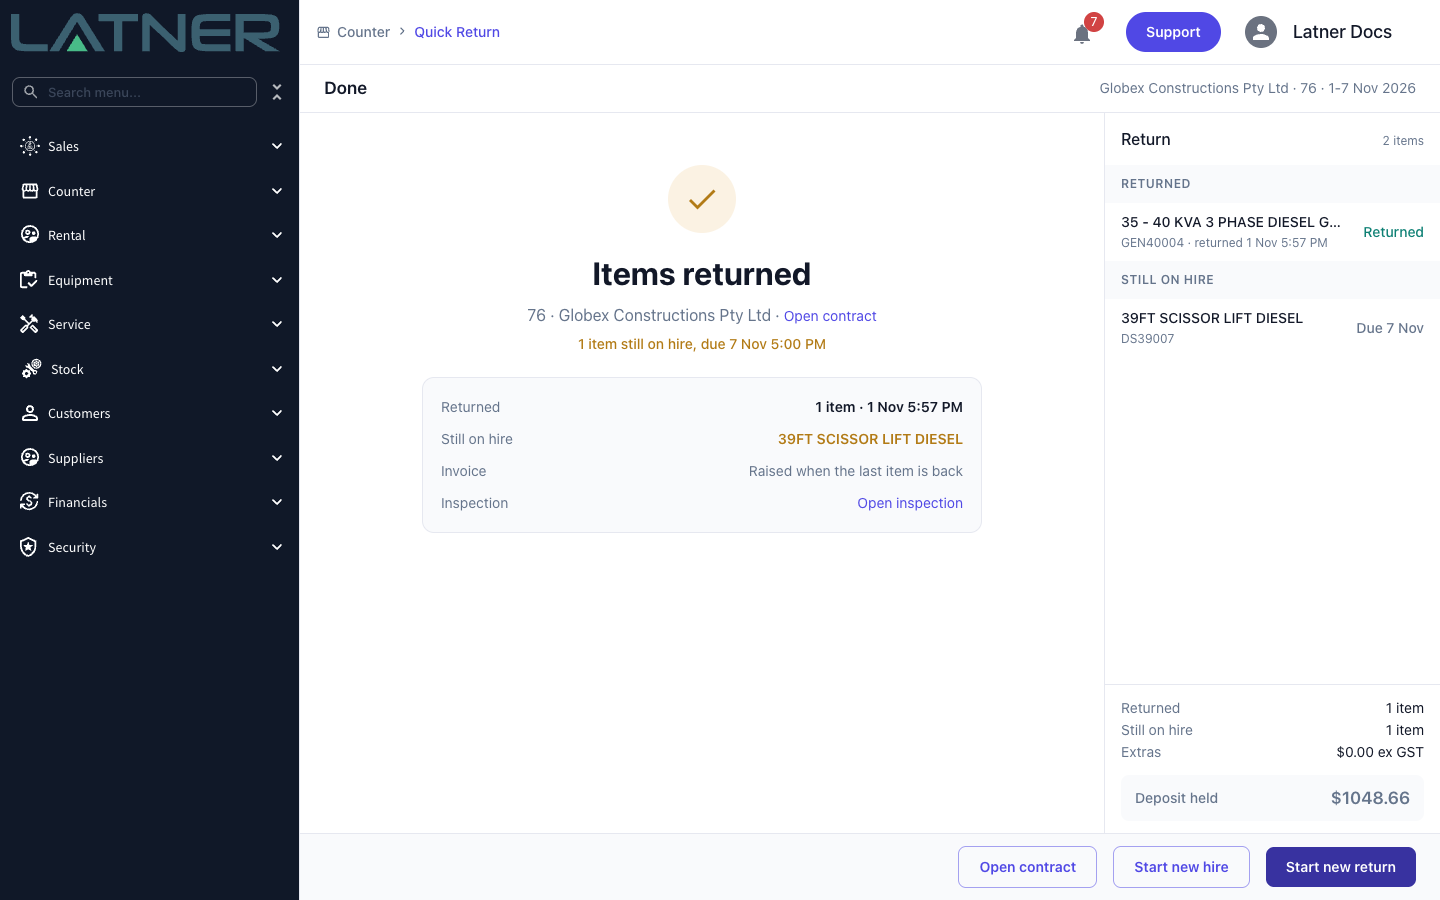
Because something is still on hire, Quick Return skips Settle and goes straight to Items returned. It lists what's Still on hire, and the invoice reads Raised when the last item is back. The deposit stays held. When the customer brings the rest back, find the contract again and return the remaining items. Items already back are shown as Returned, and this time Quick Return goes on to Settle and invoices the whole hire.
After the Return
-
The returned items are off hire and Returned on the rental contract, with the return time, branch and meter readings recorded. Find the contract under Rental › Rental Contracts, or click Open contract.
-
The final invoice is a normal customer invoice, already completed. The deposit is applied to it as a payment, so it shows as paid (or part-paid, if the customer still owes money).
-
The refund or payment is recorded against the customer's deposit. Card refunds and charges go through your payment gateway.
-
The contract is completed, unless you held the bond, or an open return inspection is blocking it.
-
Photos you added are saved against the item's line on the rental contract straight away, even if you leave Quick Return before finishing.
Once you click Return, the return is recorded, and once Settle starts writing, its Back button disappears. If something is wrong after that, click Open contract and fix it on the rental contract, for example by raising a credit note for an overcharge, rather than running the return again. If something fails part-way through Settle, clicking the button again picks up where it stopped, so nothing is invoiced or refunded twice.