
Quick Hire takes a walk-in customer from the counter to a signed rental contract on a single screen, so you can find or add the customer, add the equipment, take payment and hand over the keys without working through the full rental contract screens.
Overview
A customer standing at the counter doesn't want to wait while you click through a full contract. Quick Hire walks you through the hire one step at a time, shows each item's rate and availability as you go, and keeps a running total of the contract beside the catalogue so there are no surprises at the end.
-
A cash hire has four steps: ID & customer, Equipment & lines, Payment and Pro forma invoice. An account customer skips the payment step, so their hire has three.
-
Quick Hire treats a customer as a cash customer when their payment terms are C.O.D (or they have no payment terms at all). Everyone else is an account customer.
-
Nothing is saved until the last step. The exceptions are customers, contacts and sites you create or edit along the way, which are saved straight away.
-
At the end, Quick Hire creates a normal rental contract, records the payment and bond as a customer deposit against it, and completes the collection docket so the equipment goes on rent.
-
You can also book a reservation for a future hire. Upcoming reservations at your branch are listed on the first screen, so you can pick one up when the customer arrives.
Before You Begin
Quick Hire needs to be switched on for your company, and the person at the counter needs these permissions and settings.
|
Requirement |
Where to Find It |
|---|---|
|
Quick Hire switched on for your company. It is available on request. |
Contact Latner to have it switched on |
|
Quick Hire permission. It is switched on for the Administrator, View Administrator, Hire Controller, Senior Hire Controller and Branch Manager permission groups. |
Security › Configuration › Permission Groups › [group] › Counter › Screen |
|
Create Rental Contract permission |
Security › Configuration › Permission Groups › [group] › Rental › Option |
|
Create Customer Deposit permission, to take payment and a bond |
Security › Configuration › Permission Groups › [group] › Customers › Option |
|
Create Delivery permission, to raise the collection or delivery docket |
Security › Configuration › Permission Groups › [group] › Rental › Option |
|
Customer rental rates for your equipment under the Default Rental Rate Variation. Quick Hire prices every line with this variation. |
Security › Settings › Rental |
|
Optional: Default Deposit Amount sets whether the bond starts at the equipment's Recommended Deposit (the default) or the Contract Value |
Security › Settings › Financials |
|
Optional: Allowed Payment Methods and Default Payment Method decide which payment buttons appear and which one is pre-selected |
Security › Settings › Financials |
|
Optional: COD Customer ID Number Required makes a driver's licence compulsory for cash customers |
Security › Settings › Rental |
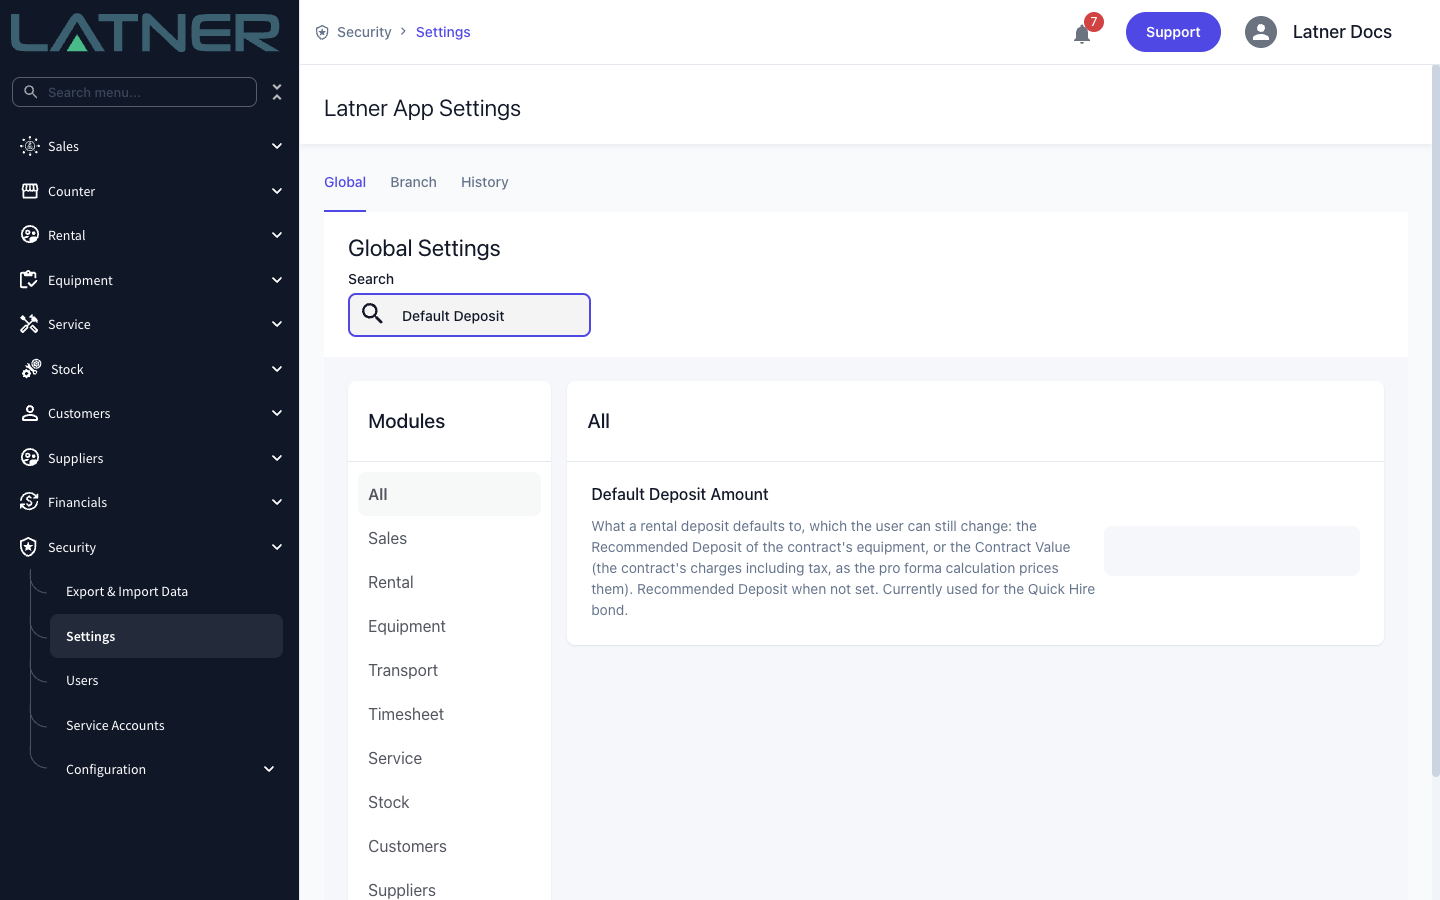
New customers created in Quick Hire get the payment term set in Default Payment Term (Security › Settings › Customers). If that default is an account term, a new walk-in customer will be an account customer and won't see the payment step. To hire them as a cash customer, change their payment terms to C.O.D on the customer record before you continue.
Creating a Quick Hire
Step 1 - Open Quick Hire
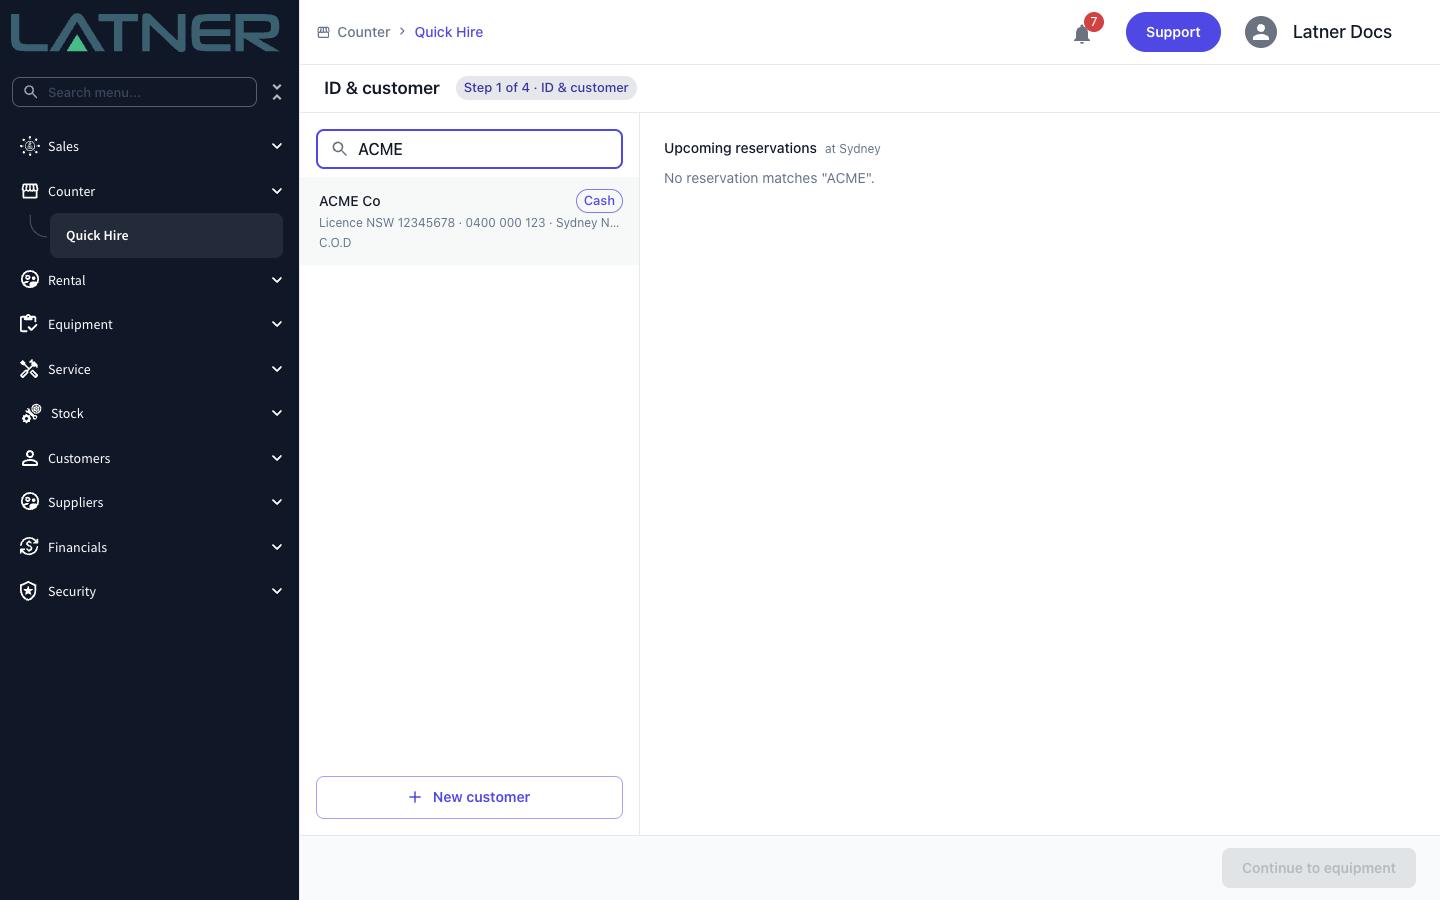
Go to Counter › Quick Hire. The screen opens on step 1, ID & customer, with a customer search on the left and your branch's Upcoming reservations on the right.
Step 2 - Find the customer, or add a new one
Type in Search customers. The search matches the customer's name, code, driver's licence, ABN and address, and also the name, phone number and email of any of their contacts, so you can find a business from the person standing in front of you. Use the arrow keys and Enter, or click the customer to select them.
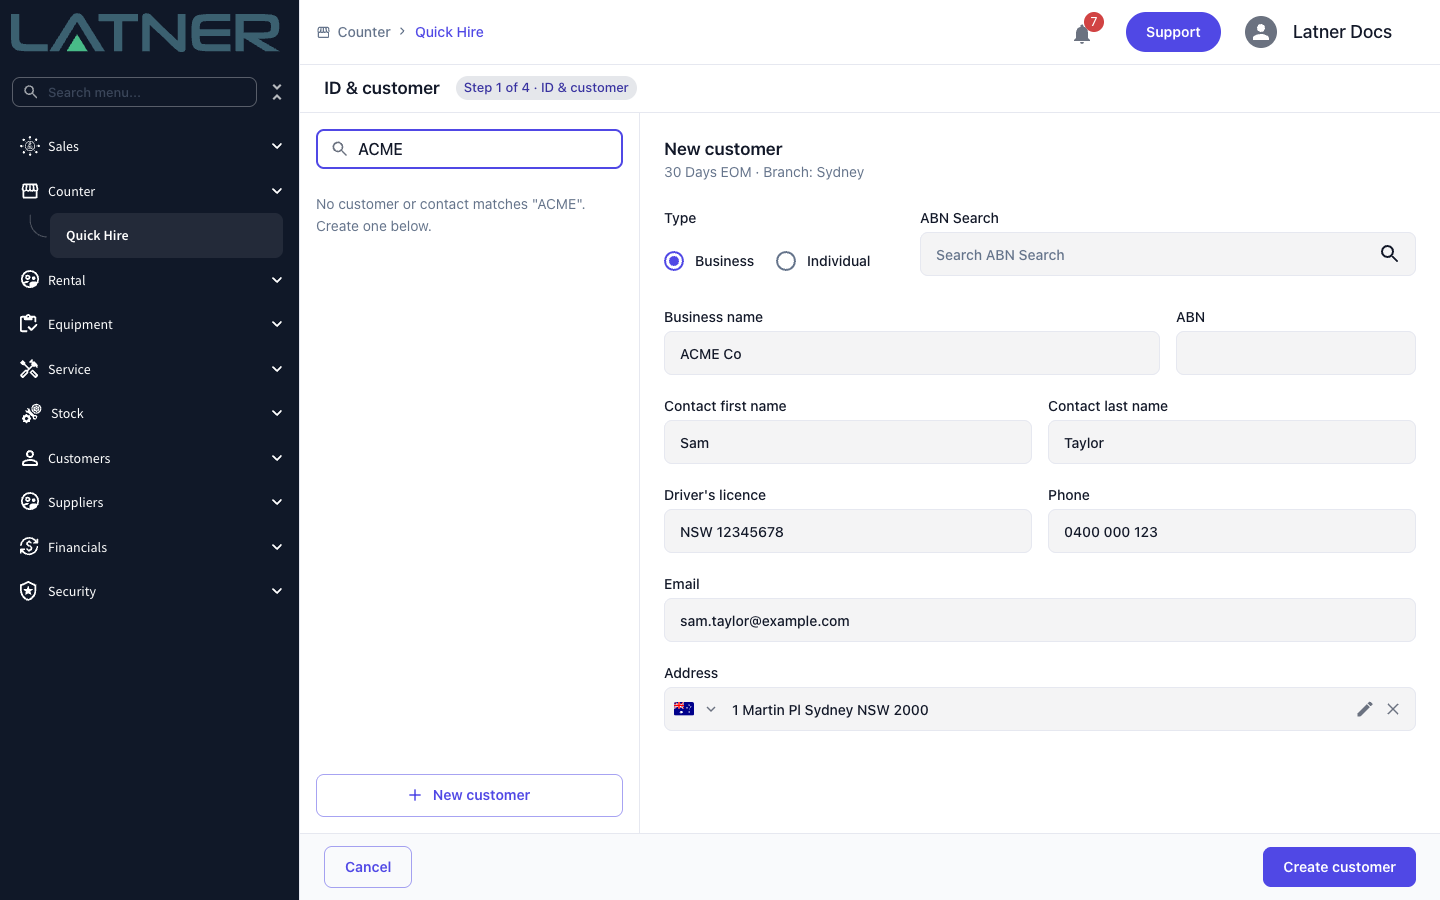
If the customer isn't in Latner yet, click New customer and fill in the form:
-
Type - Individual (the default) or Business.
-
First name and Last name - required for an individual.
-
Business name, Contact first name and Contact last name - required for a business. ABN Search looks the business up and fills in the name and ABN for you.
-
Driver's licence - required when COD Customer ID Number Required is switched on.
-
Phone and Address - required. Email is optional.
-
Lead source, Industry and Category - only appear when your company has made them mandatory.
Click Create customer. The customer is saved straight away, with their first contact and a main site at the address you entered.
Step 3 - Check the customer and choose who is ordering
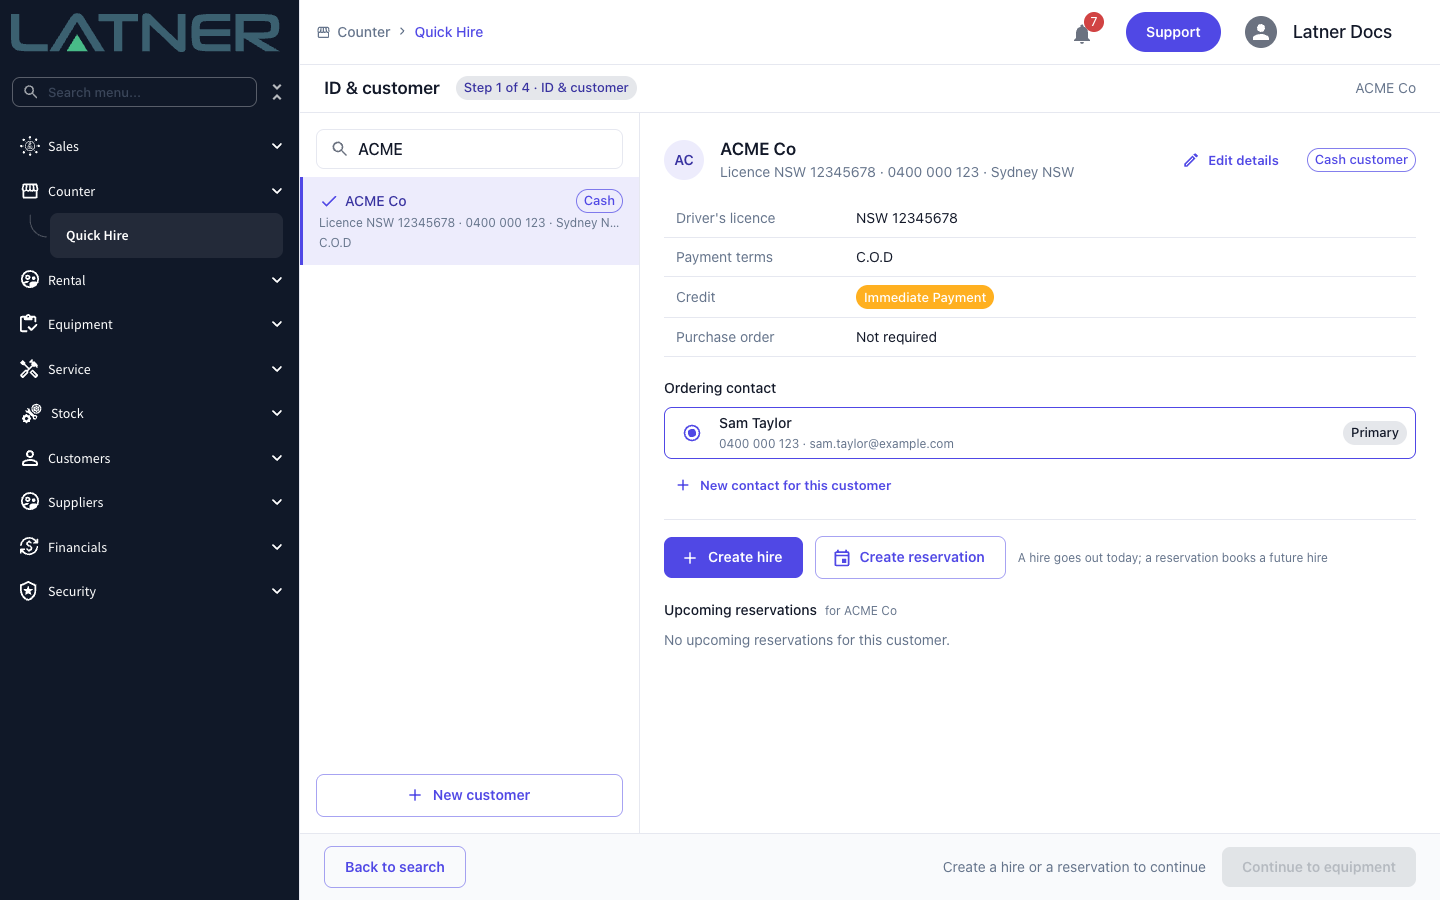
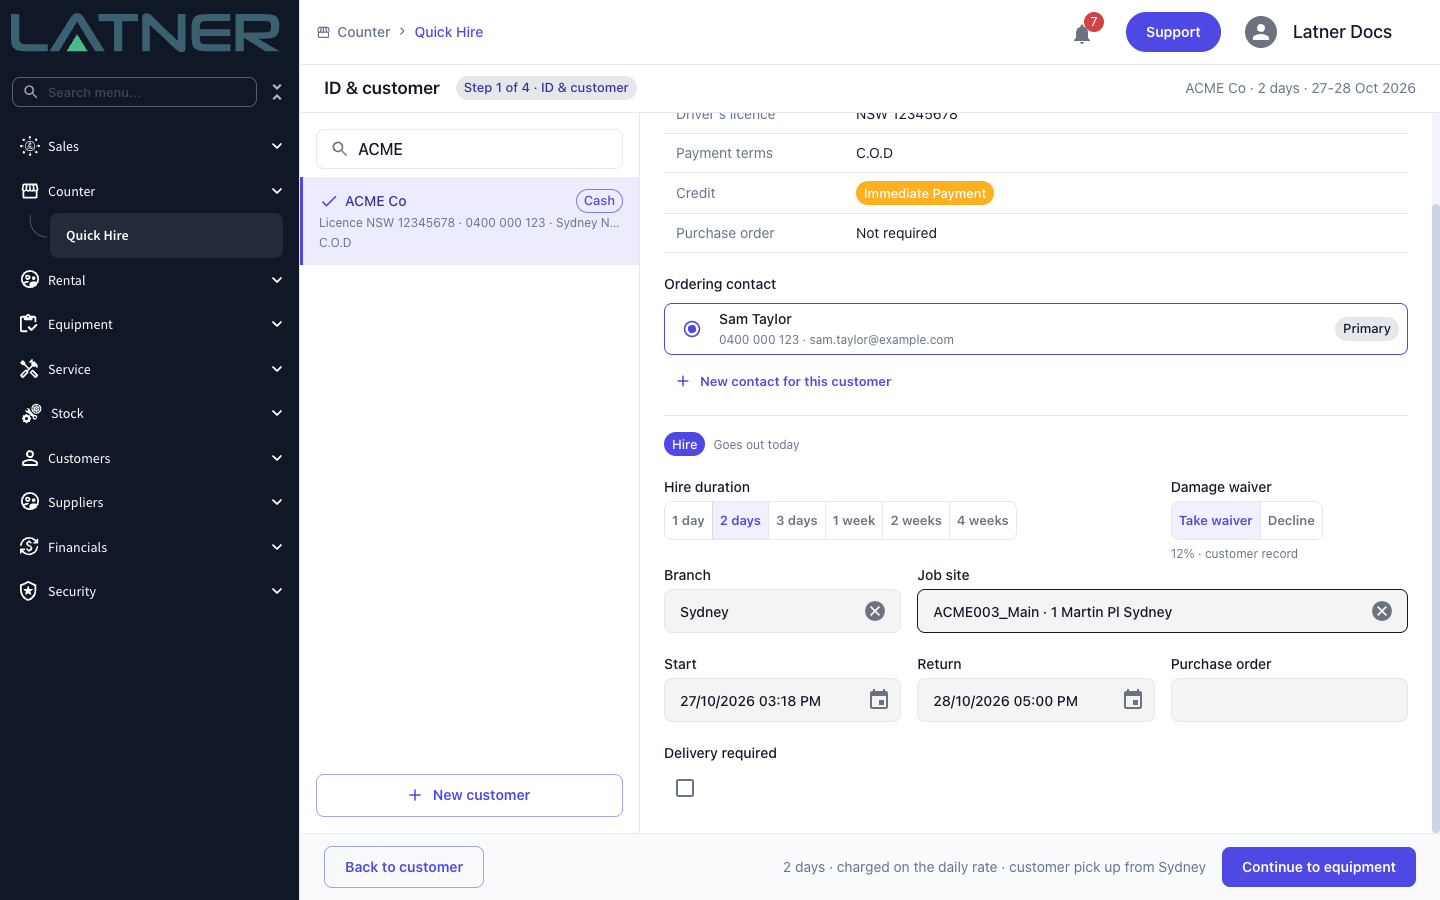
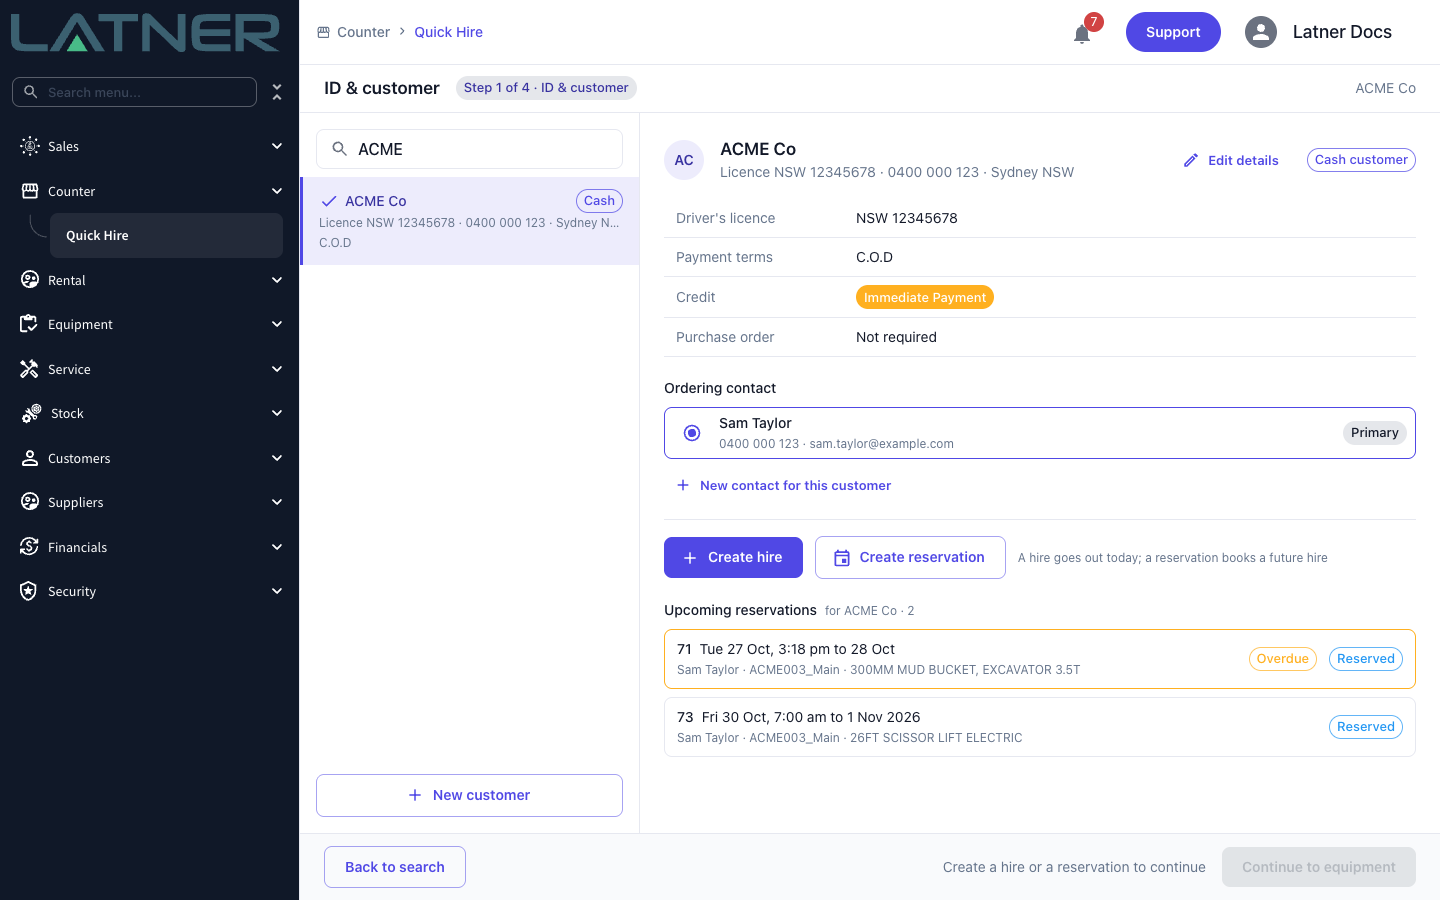
The customer's summary shows their Driver's licence, Payment terms, Credit status and whether a Purchase order is required. Click Edit details to fix anything that's out of date, such as the address or billing contact, without leaving the counter.
Under Ordering contact, pick the person hiring the equipment. The customer's primary contact is selected for you. If the person isn't listed, click New contact for this customer and enter their First name and Mobile (both required), plus a last name and email if you have them. The contact is saved against the customer.
Then click Create hire for equipment going out today, or Create reservation to book a future hire (see Booking a Reservation below). If the customer has already booked, pick up their reservation from Upcoming reservations instead (see Picking Up a Reservation).
Step 4 - Fill in the hire details
The hire details appear under the customer:
-
Hire duration - click 1 day, 2 days, 3 days, 1 week, 2 weeks or 4 weeks to set the return date. Day presets return at the branch's closing time on the last day. If your company uses Half Day pricing, a Half Day option appears first.
-
Damage waiver - cash customers only. Click Take waiver or Decline. When a waiver rate applies you have to choose one before you can continue. The note underneath shows the rate and where it comes from (the job site, the customer record or the global setting).
-
Branch - required. It starts on your branch.
-
Job site - required. It starts on the customer's first active site.
-
Start and Return - required. A hire starts now, and the return must be after the start. Picking a return date yourself clears the duration preset.
-
Purchase order - required when the customer needs a purchase order.
-
Delivery required - tick this if you're delivering the equipment, then check the Delivery address. Leave it unticked when the customer collects from the counter.
The footer sums up the hire, for example "2 days · charged on the daily rate · customer pick up from Sydney". Click Continue to equipment.
Step 5 - Add the equipment
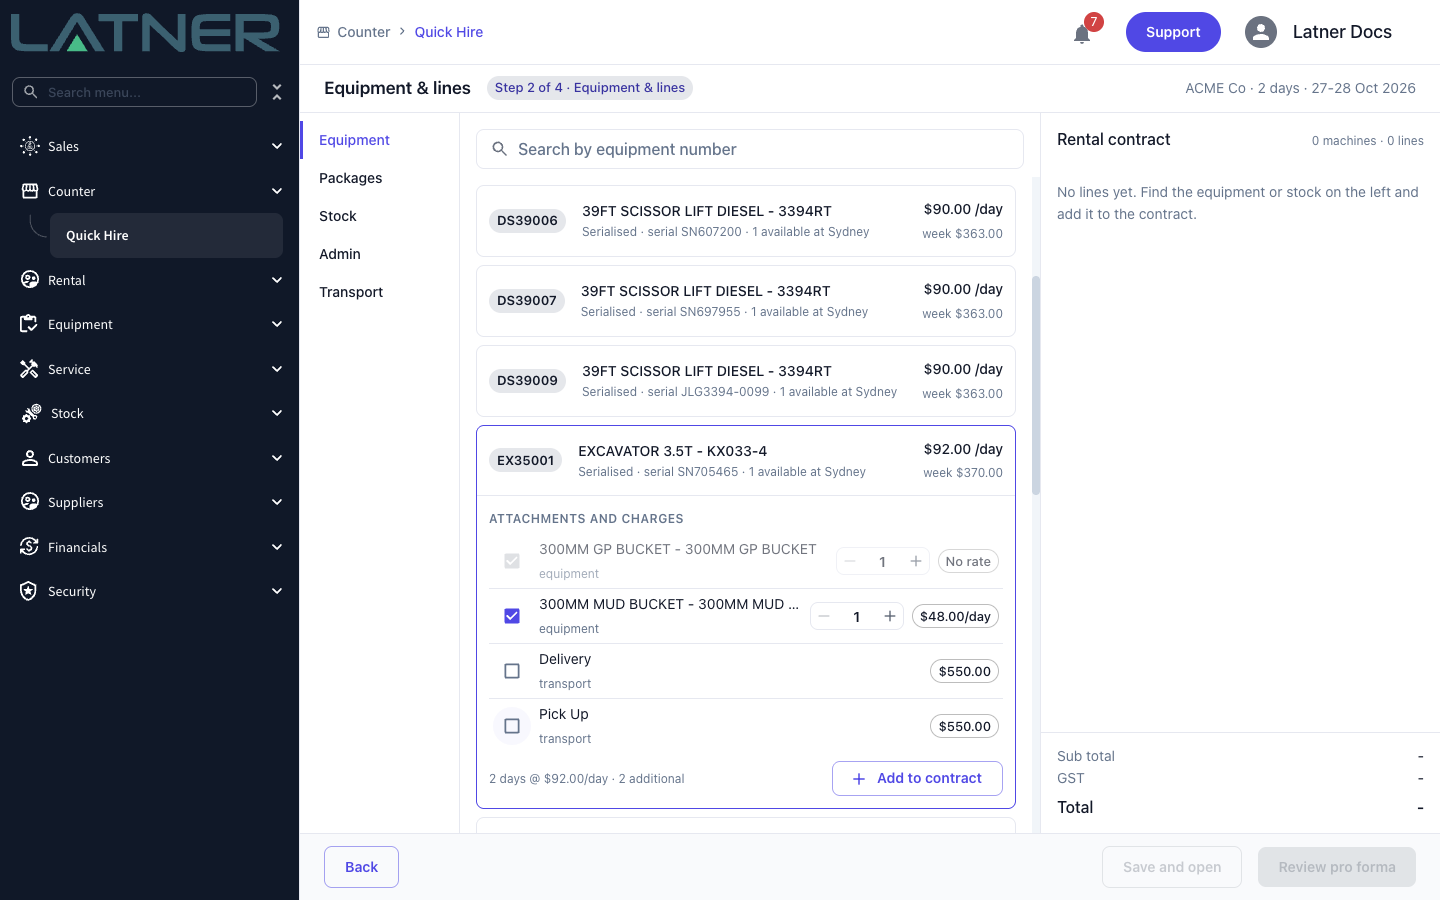
Step 2, Equipment & lines, shows a catalogue on the left with tabs for Equipment, Packages, Stock, Admin and Transport, and the Rental contract building up on the right.
The Equipment tab lists the units available at the hire branch, with the customer's rate for each one. Search by equipment number, then click a unit to open it. If it has extra items set up against it, they appear under Attachments and charges:
-
Required items are ticked for you. Untick anything the customer doesn't need, such as a delivery charge when they're collecting.
-
Use the quantity buttons to change how many of an item they need.
-
Items marked No rate have no price for this customer.
Click Add to contract. Equipment marked No rate for this customer can't be added until it has a rate.
Step 6 - Add stock, packages and other charges
Use the other tabs to finish the contract:
-
Packages - open a package to choose its lines. One package rate packages are charged as a single rate, and Priced per line packages charge each line separately.
-
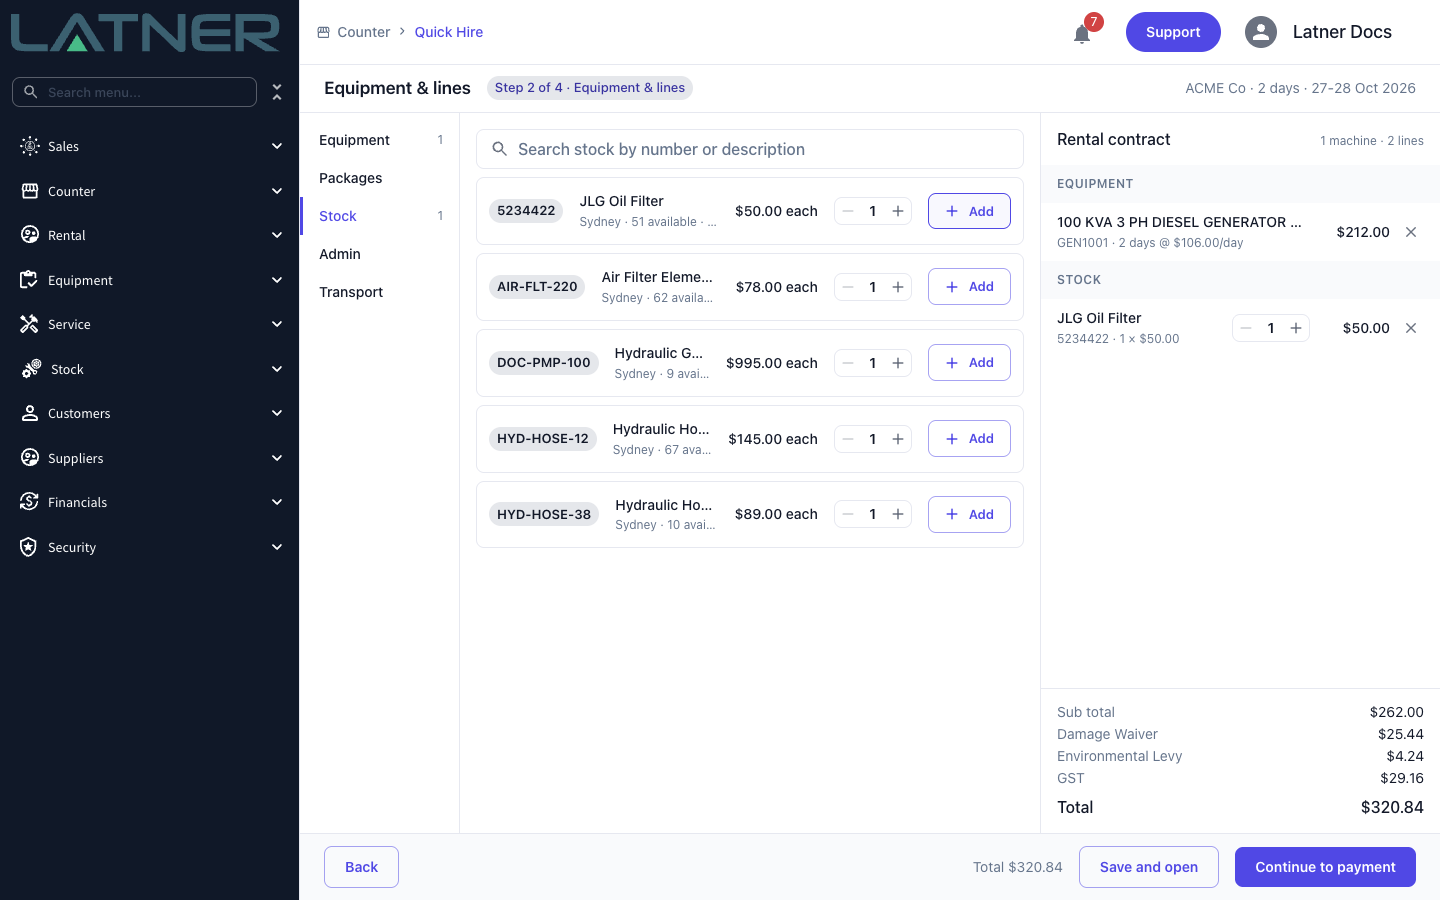
Stock - consumables sold with the hire at their retail price. Set the quantity and click Add. Stock is sold, not hired, so it isn't returned.
-
Admin - admin charges. You can change the Description, Qty and Unit price before clicking Add.
-
Transport - a Delivery, Pick Up or Site Move charge at a price you enter. These are charges only. To book a delivery, tick Delivery required in the hire details.
The Rental contract panel prices everything as you go, including the damage waiver, any levies and GST. Change quantities there, or click × to remove a line. When it's right, click Continue to payment for a cash customer or Review pro forma for an account customer.
If the customer needs something Quick Hire doesn't handle, click Save and open. This creates the contract without payment or a docket and opens it on the full rental contract screen.
Step 7 - Take payment and the bond
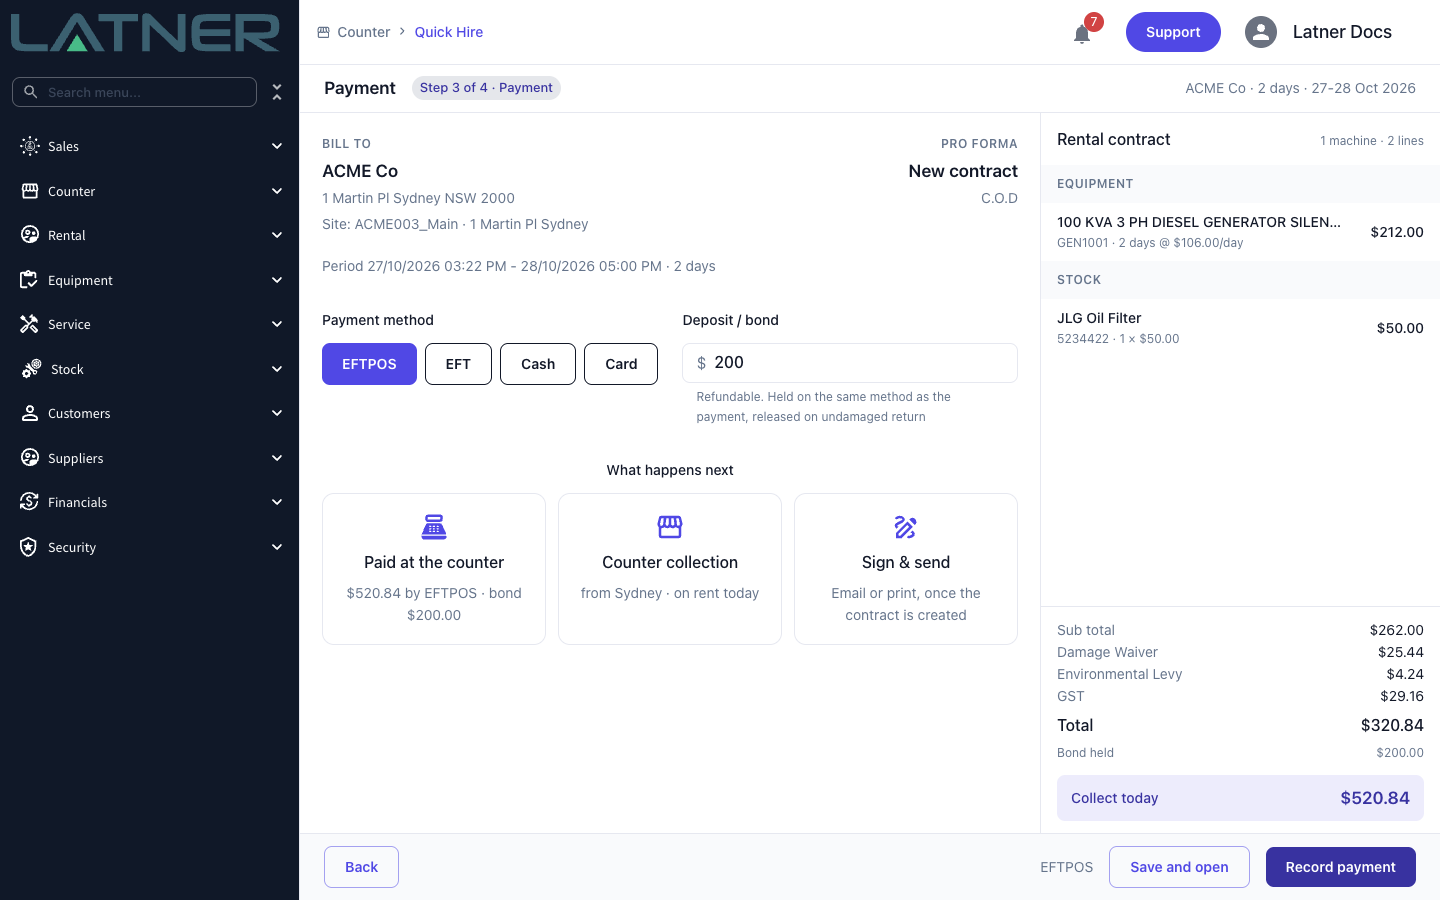
For a cash customer, step 3 is Payment. It shows who the contract is billed to, the hire period and the contract total, and asks for:
-
Payment method - the buttons come from your Allowed Payment Methods, with your Default Payment Method selected. Card payments appear when your company has a card payment integration, and list any card the customer has on file.
-
Deposit / bond - a refundable bond, held on the same method as the payment. It starts at the amount set by Default Deposit Amount, and you can change it.
What happens next sums up the payment, how the equipment leaves the yard and how the contract will be signed. The Collect today amount is the hire total plus the bond. Click Record payment, or Take payment for a card.
Account customers skip this step and go straight to the pro forma. There you can switch on Take payment now to take the hire charges up front, but account customers are never asked for a bond.
Step 8 - Confirm the payment
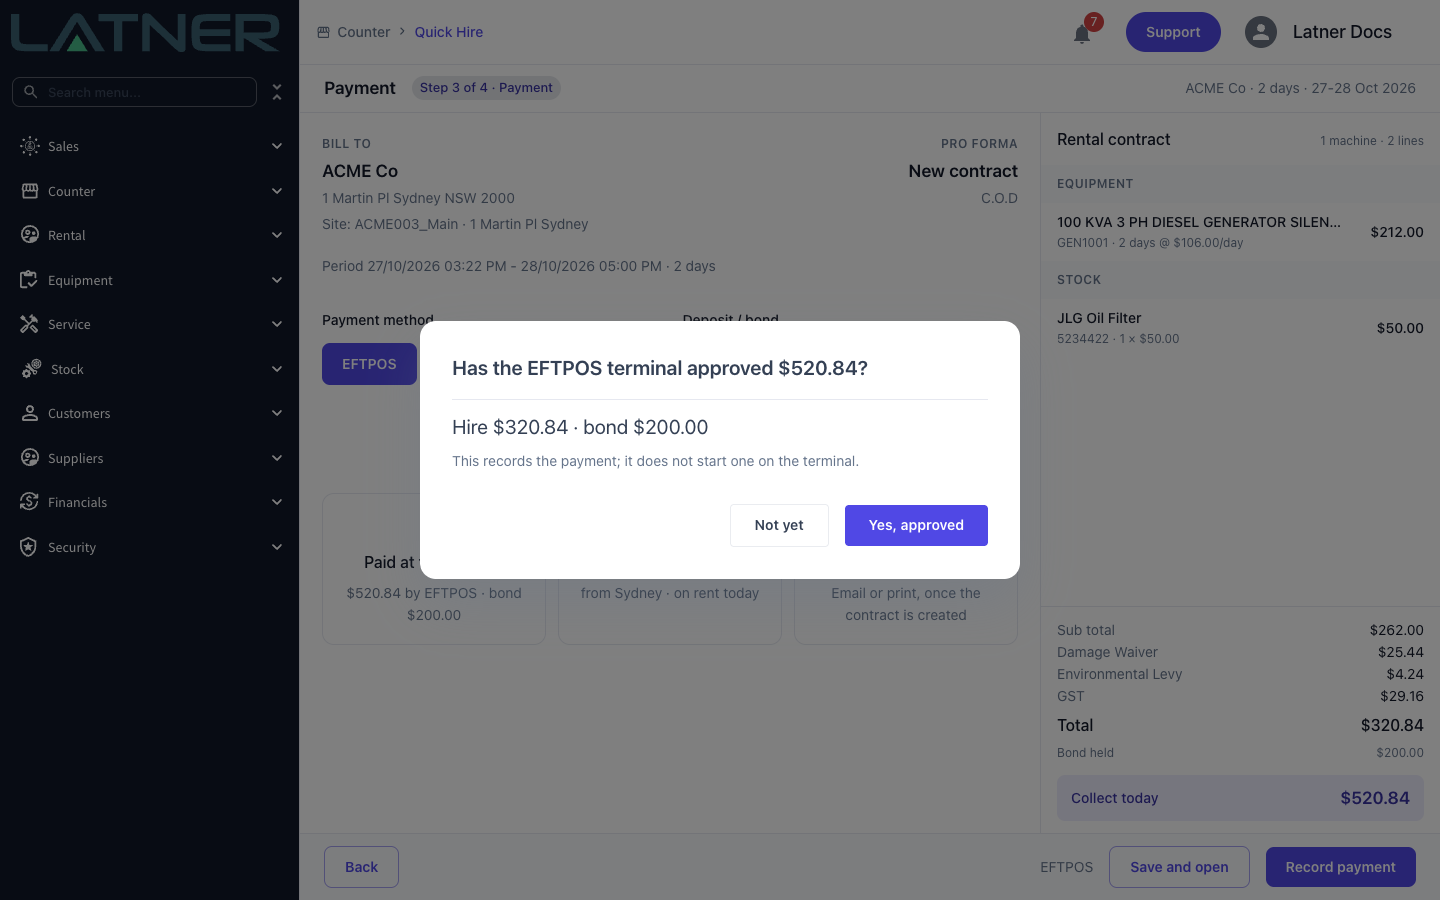
Latner asks you to confirm the money has really been received before it records anything. For EFTPOS it asks whether the terminal has approved the amount, and for cash whether you've received it. Recording an EFTPOS payment doesn't start a transaction on the terminal, so run the card on the terminal first, then click Yes, approved. For a card, click Charge to charge the card through your payment gateway.
Step 9 - Sign and hand over
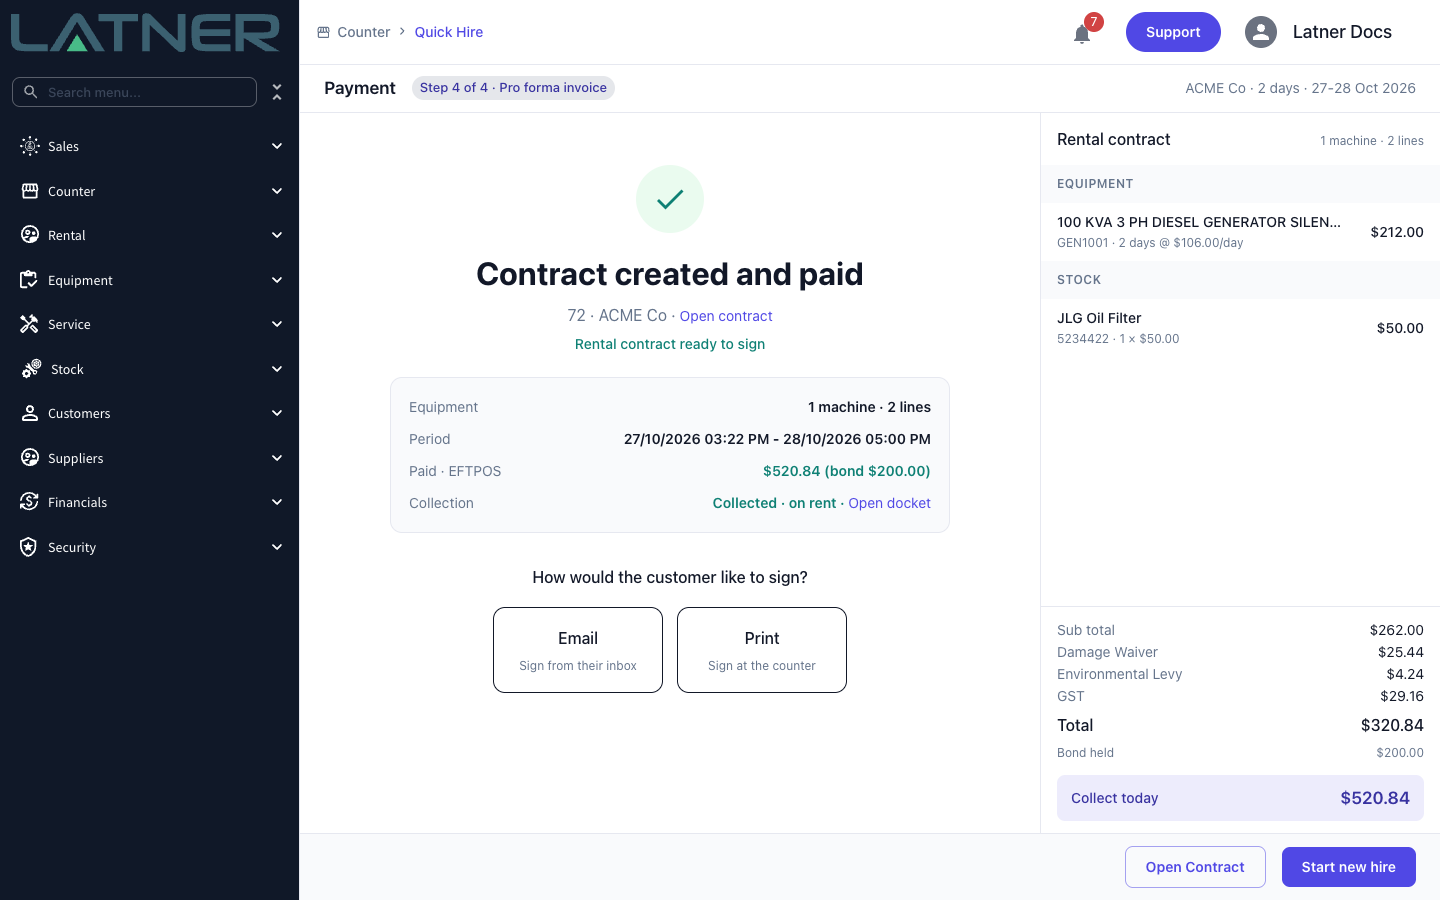
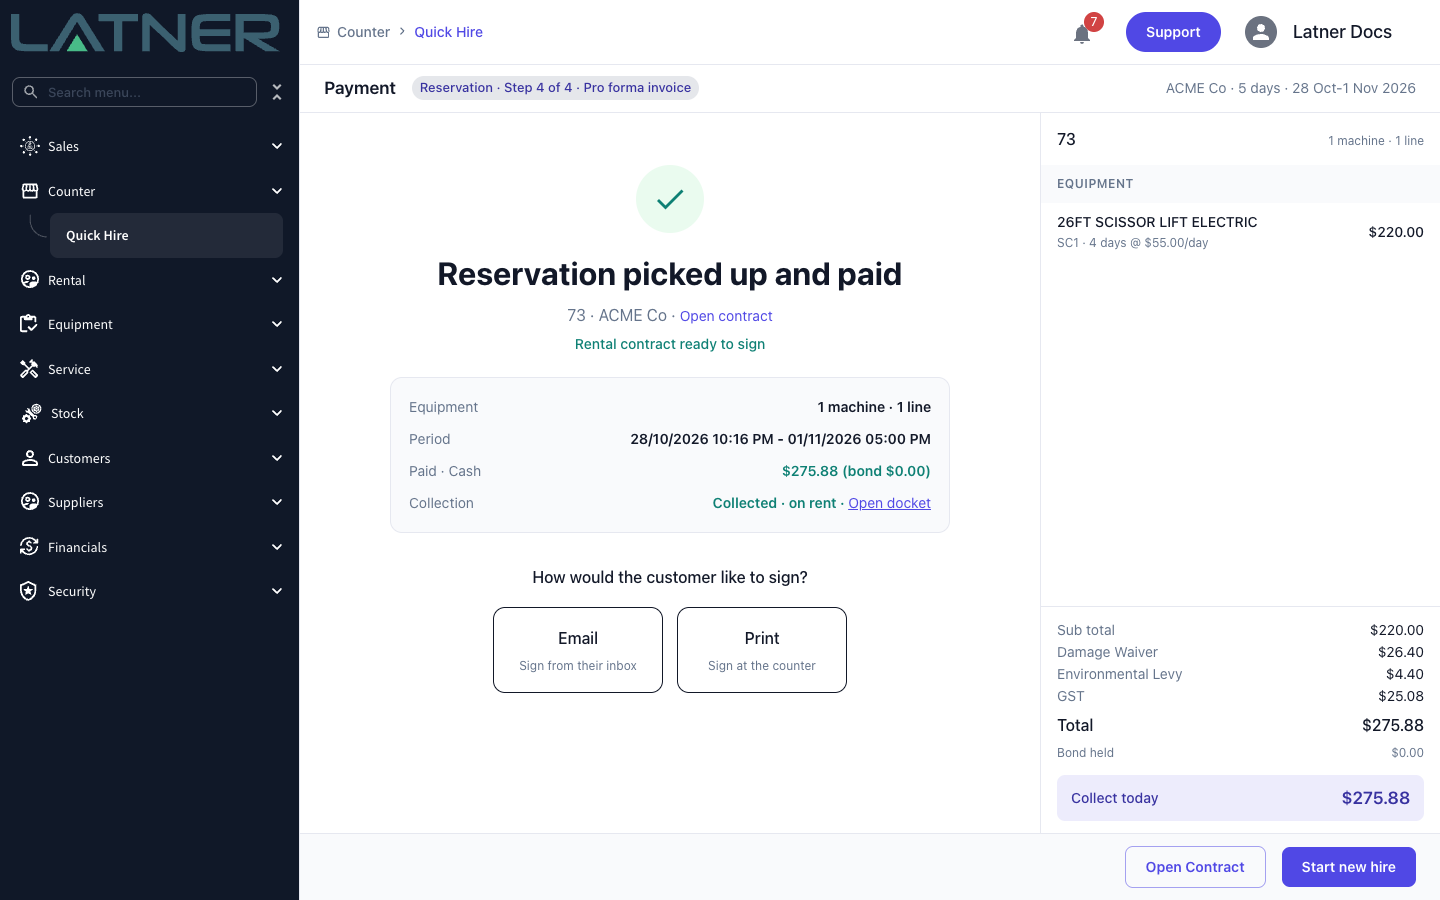
Quick Hire creates the rental contract, records the payment and completes the collection docket. The last step shows the contract number with an Open contract link, the payment, and the docket's status with an Open docket link.
Under How would the customer like to sign?, choose:
-
Email - opens the email dialog with the rental contract PDF, addressed to the ordering contact, so the customer can sign from their inbox.
-
Print - prints the contract so the customer can sign at the counter.
Click Start new hire to clear the screen for the next customer, keeping your branch.
Upcoming Reservations
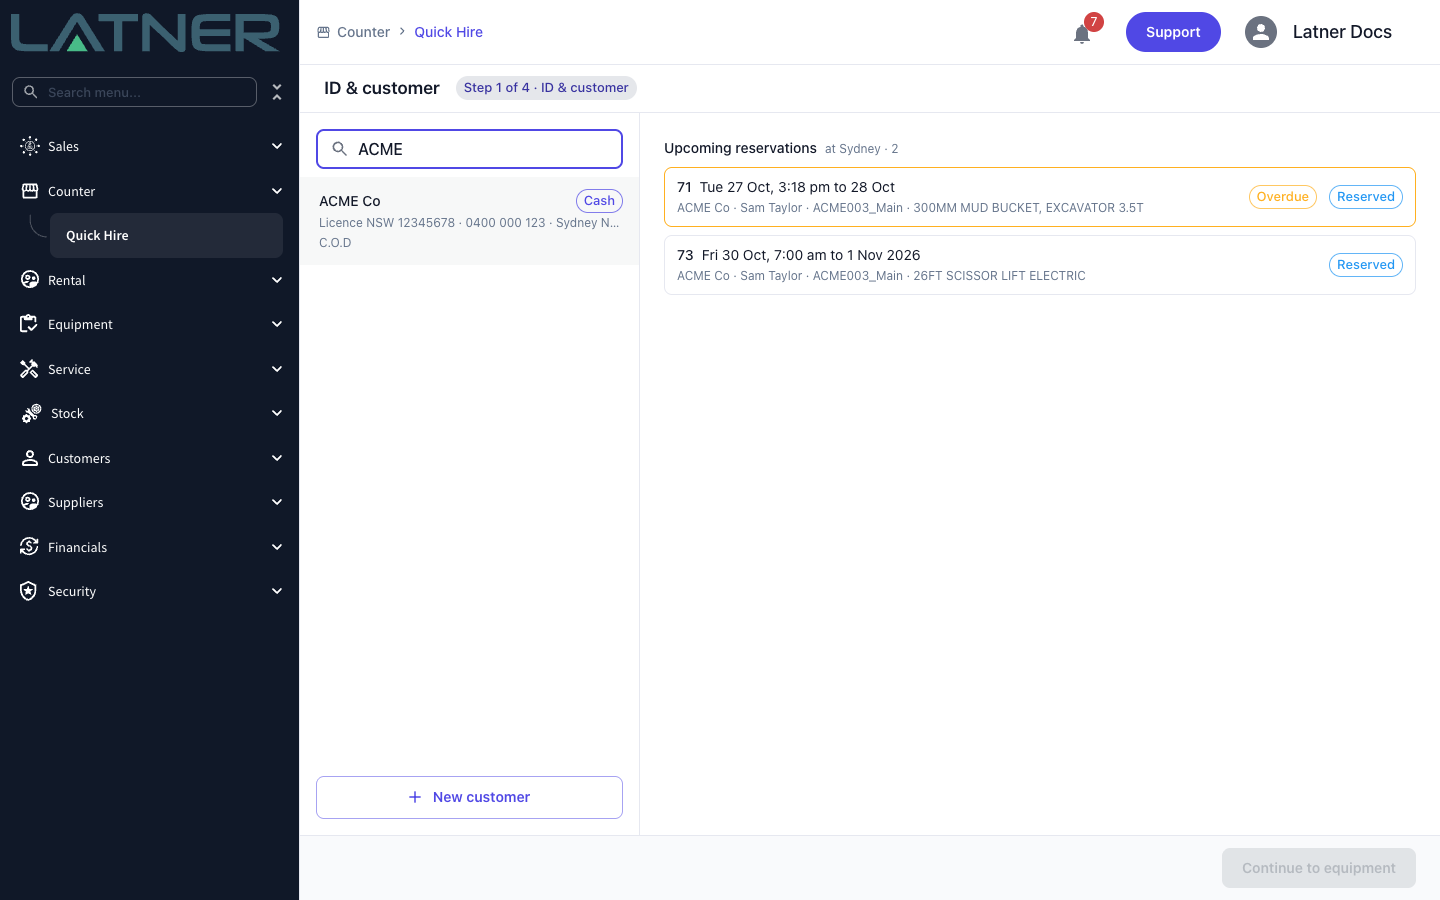
When a customer rings ahead, book the hire as a reservation. When they walk in, it's waiting for you on the first Quick Hire screen. Upcoming reservations sits on the right of step 1 and lists the reservations still to be picked up from your branch, so the counter can see what's due before anyone arrives.
-
The list shows every rental contract in Reserved status at your branch, soonest start first, 20 at a time. A button at the bottom (for example Show 3 more) loads the rest. The count beside the heading is the total.
-
Each row shows the contract number, the hire period, the customer, the ordering contact, the job site and the equipment classes reserved.
-
A reservation whose start time has passed is outlined and marked Overdue. Because the list is sorted by start time, overdue reservations stay at the top until they're picked up or cancelled.
-
The status chip reads Confirmed once the contract has been sent to the customer and is paid (or, for an account customer, has a purchase order). Otherwise it reads Reserved.
Find a reservation
Before you pick a customer, the list follows whatever you type in Search customers, and the heading reads "at" your branch. It matches the contract number, the customer's name, and the name, phone number or email of any of the customer's contacts. So when someone says "I booked a scissor lift yesterday", you can type their name or mobile number and find the booking straight away.
Once you select a customer, the list narrows to that customer's reservations and the heading changes to "for" the customer. It stays on screen until you click Create hire or Create reservation, so check it before you start a new hire for someone who has already booked.
Booking a Reservation
Step 1 - Choose the customer and the dates
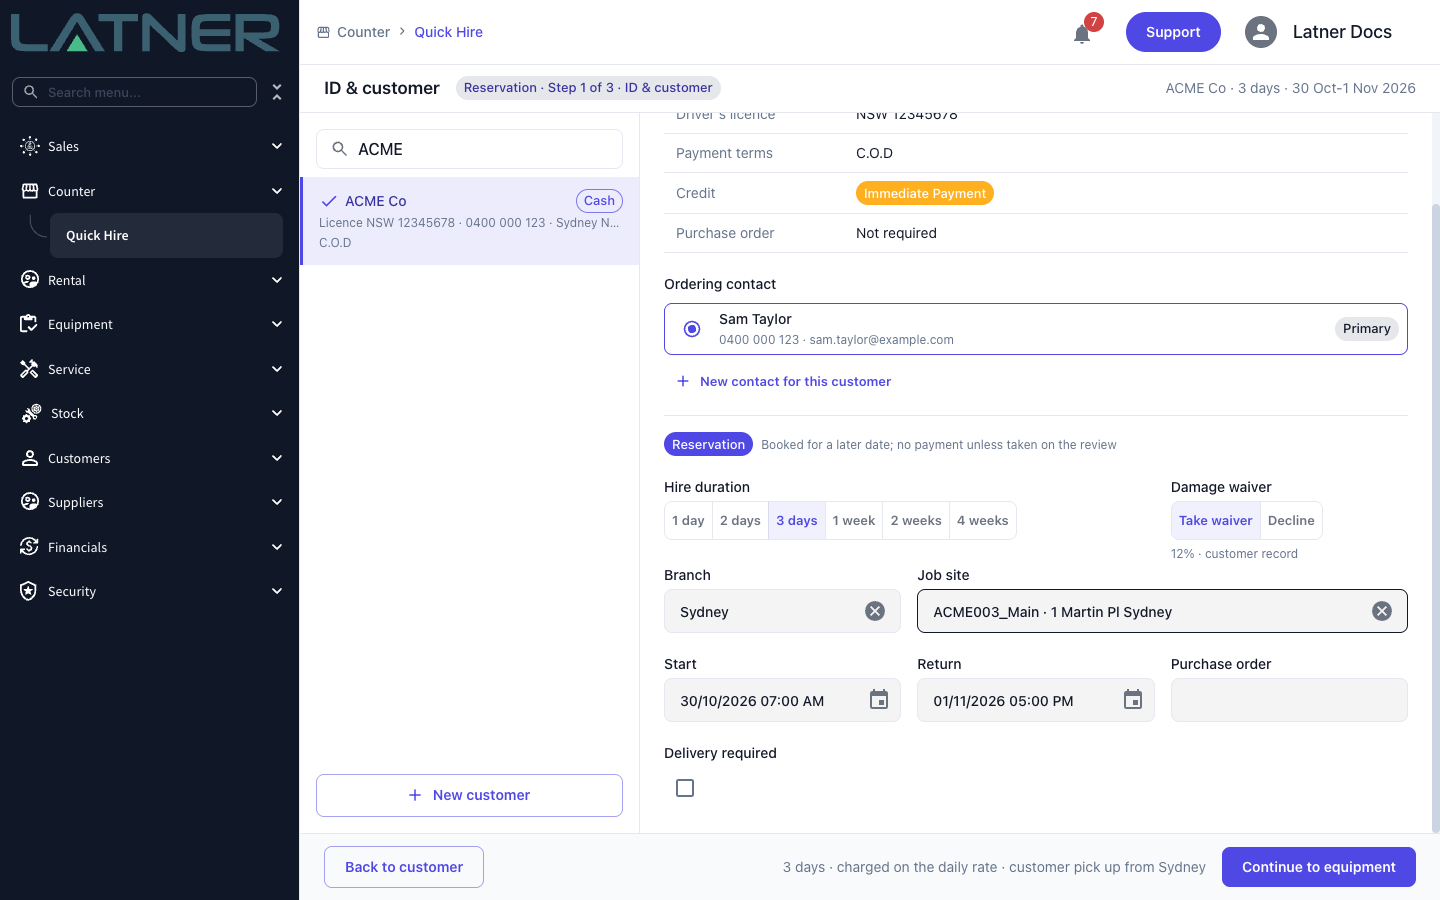
Find or add the customer as you would for a hire, then click Create reservation. The step chip changes to Reservation · Step 1 of 3, because a reservation has no payment step of its own. The hire details are the same as for a hire, with one difference: Start defaults to tomorrow at your branch's opening time rather than now. Change it to when the customer will collect, choose the Hire duration and, for a cash customer, take or decline the damage waiver. Then click Continue to equipment.
Step 2 - Reserve the equipment
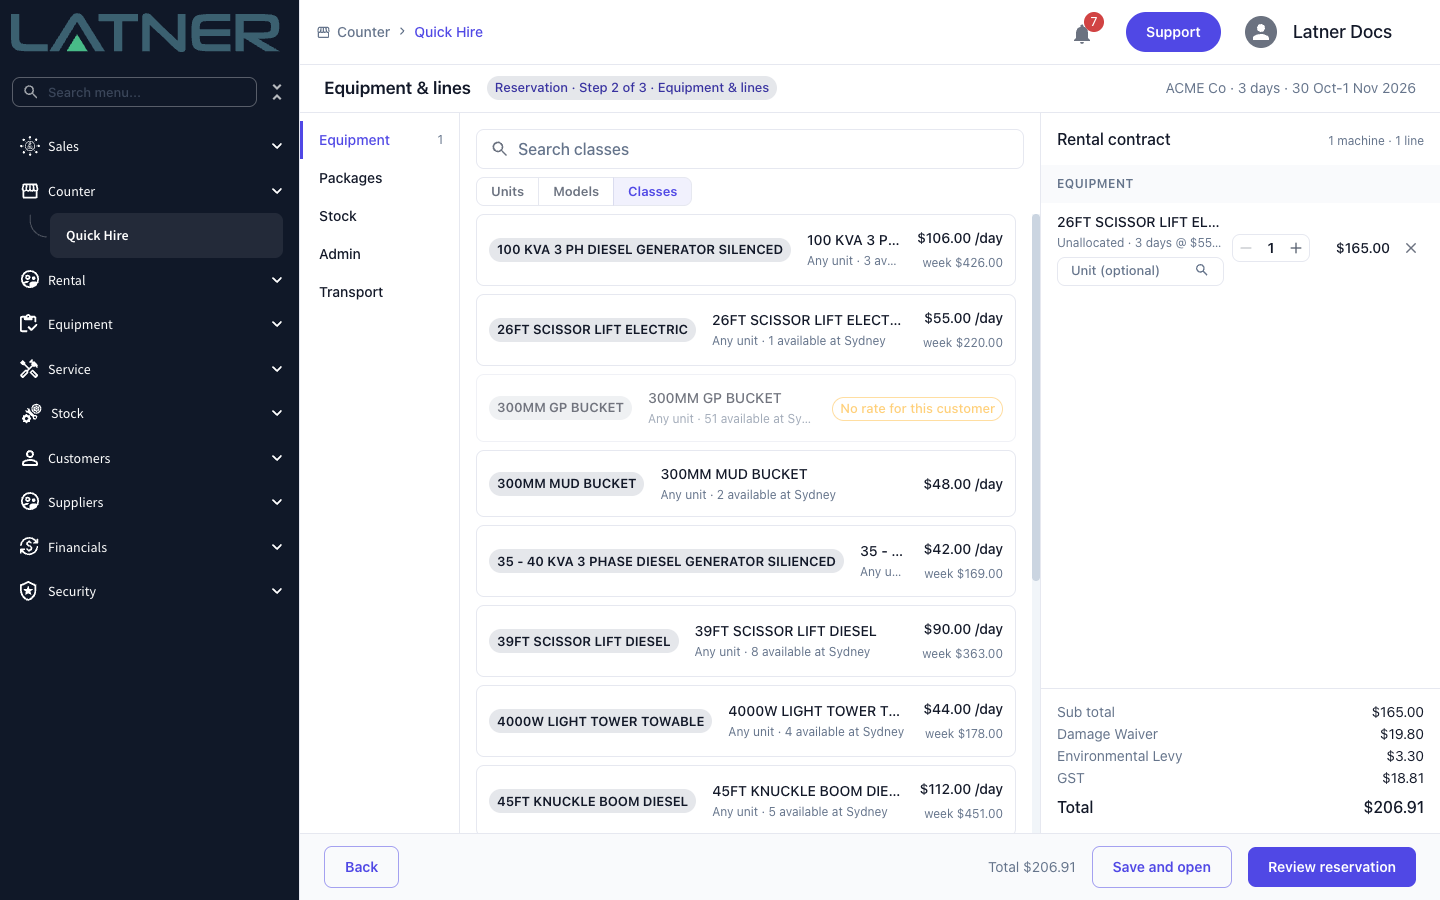
For a reservation, the Equipment tab has three views: Units, Models and Classes. It opens on Classes, so you can reserve "a 26ft electric scissor lift" without choosing the machine yet. The line goes on the contract as Unallocated, with an optional unit picker if you do want to lock in a specific unit now. Add stock, admin and transport charges from the other tabs as usual, then click Review reservation.
Step 3 - Review and create the reservation
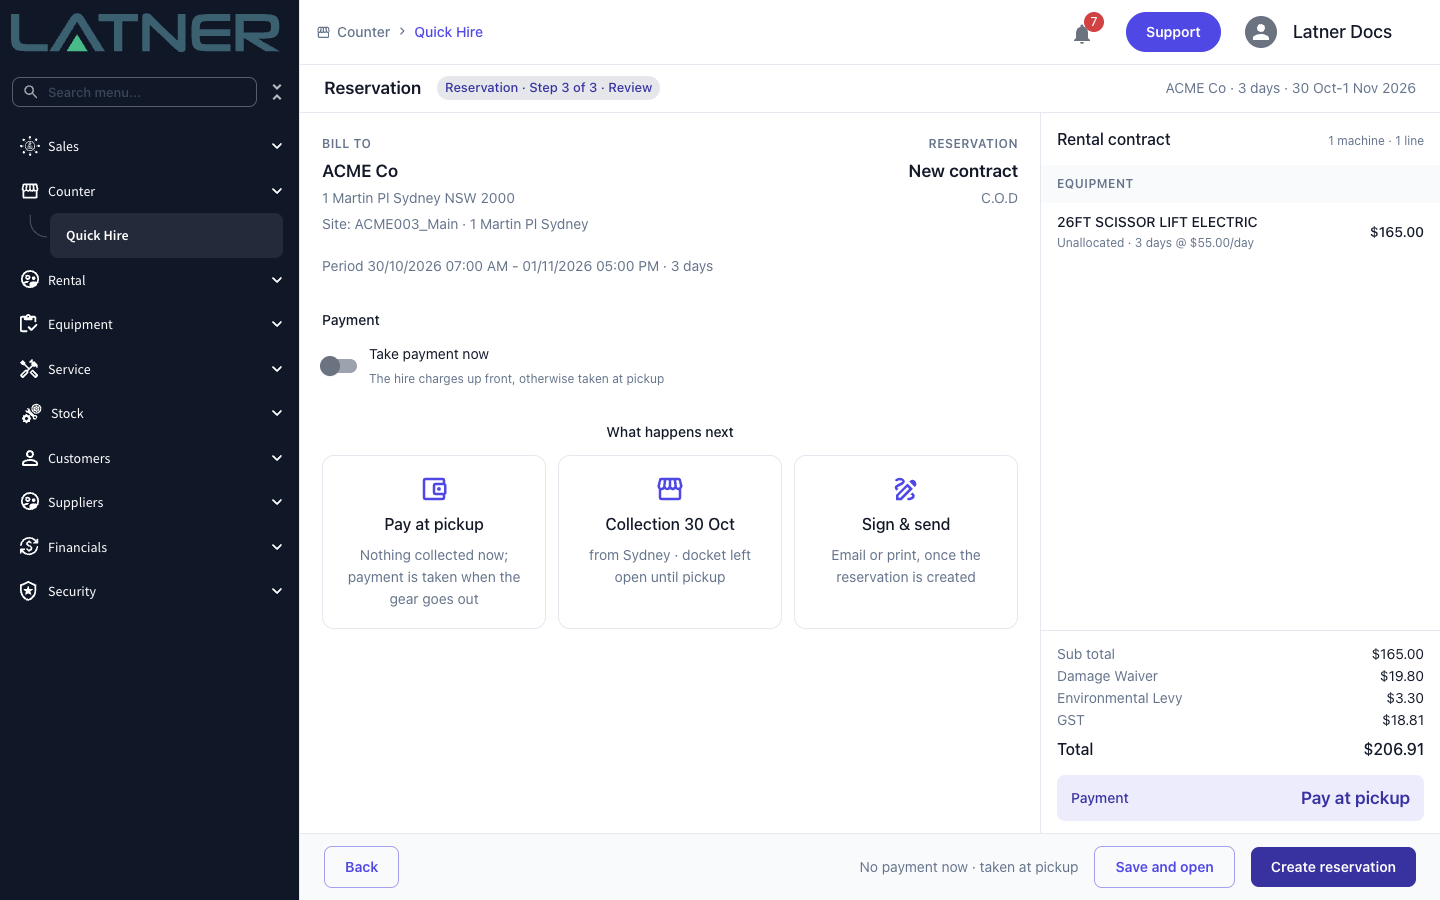
The review shows the bill-to details, the reserved period and what will happen next. Under Payment, leave Take payment now off to take payment when the customer collects (Pay at pickup). Switch it on to charge the hire up front, and a cash customer can pay a bond too. Click Create reservation, or Record payment if you're taking a payment. The reservation is created as a rental contract in Reserved status and appears in Upcoming reservations straight away.
A cash (C.O.D) customer's collection docket can only be raised once the contract is paid, unless Allow Create Transports for unpaid COD Rental Contracts is switched on (Security › Settings › Rental). If you book a cash reservation without taking payment, the last step shows the collection as Not created with that reason. The reservation itself is saved, and the docket is raised when the customer pays at pickup.
Picking Up a Reservation
Step 1 - Open the reservation
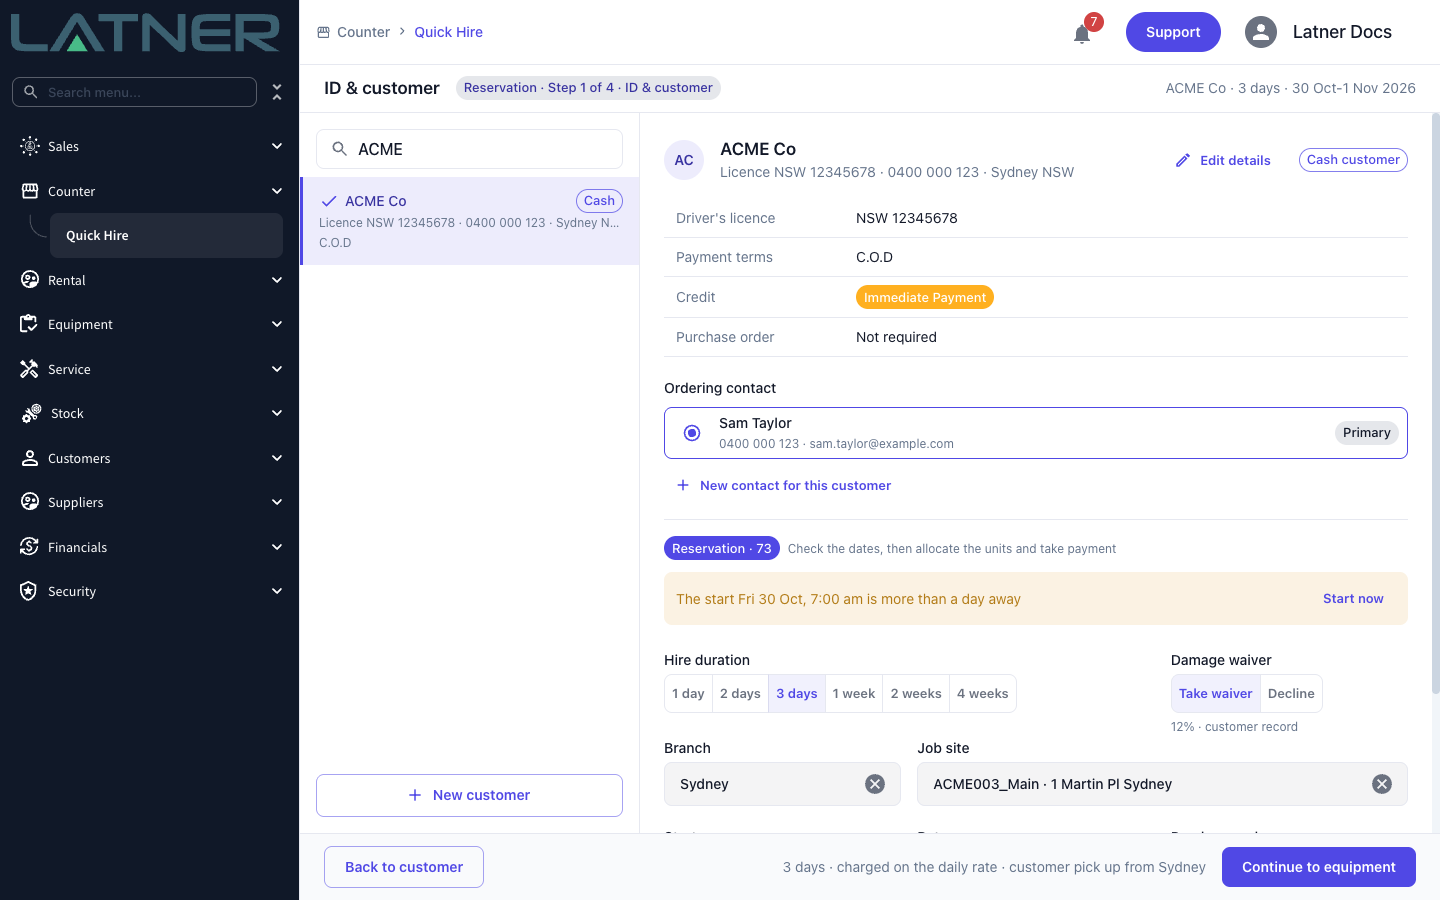
When the customer arrives, click their booking in Upcoming reservations. Quick Hire loads the customer, ordering contact, job site, damage waiver, dates, purchase order and lines from the reservation, and the step chip reads Reservation · 73 (the contract number). Check the hire details. If the reserved start time has passed, or is more than a day away, a banner says so. Click Start now to start the hire from now instead. Click Continue to equipment to save any changes to the reservation and move on.
Step 2 - Allocate the units
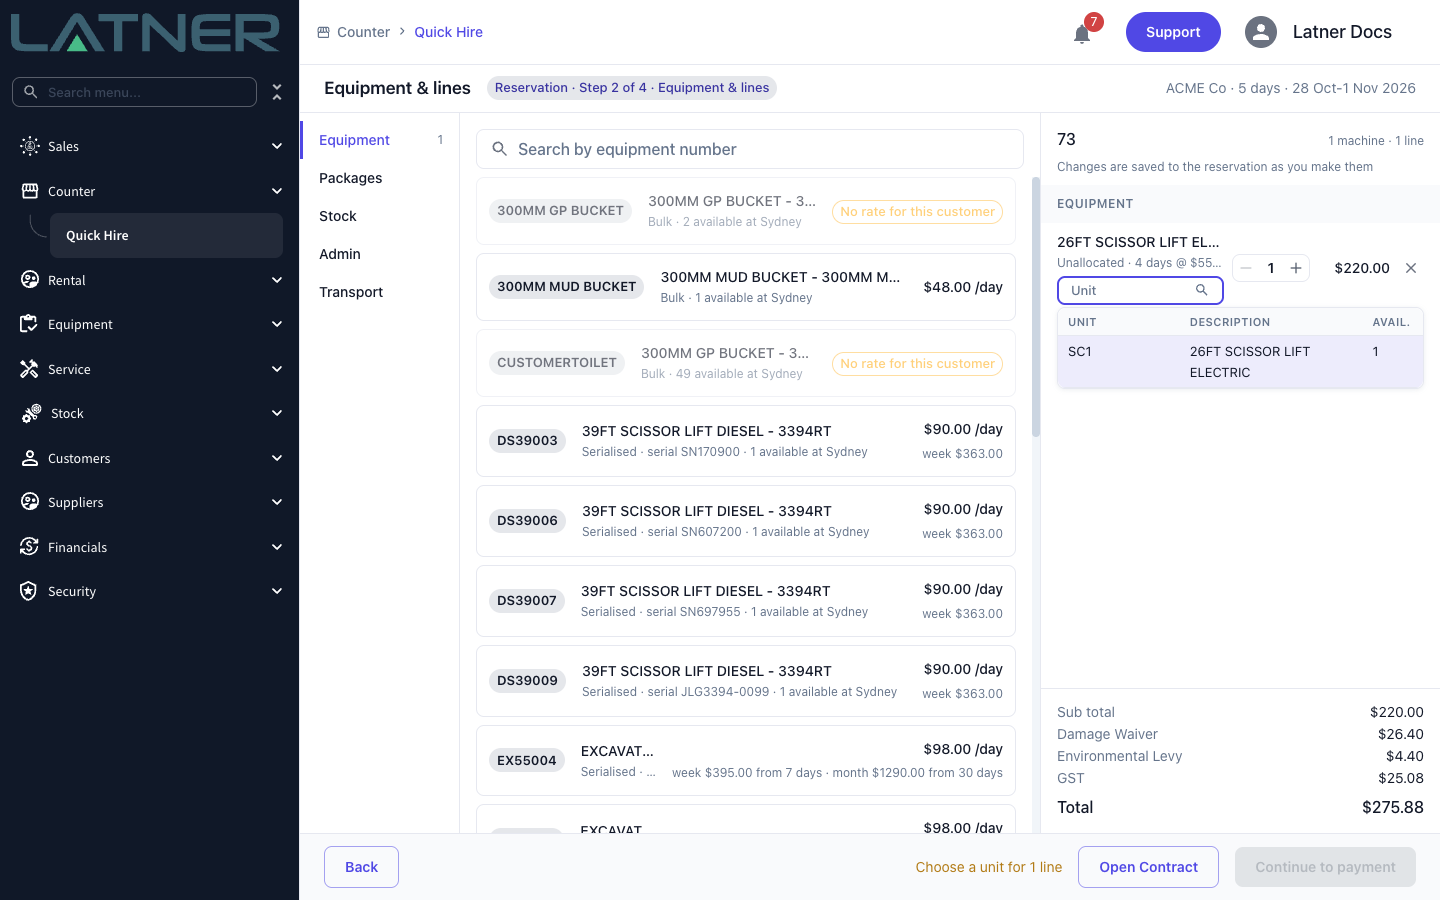
The contract panel now shows the reservation number and the note "Changes are saved to the reservation as you make them". Every line going out today needs a unit, so pick one from the unit picker on each Unallocated line. The picker lists the units available at your branch. Until every line has a unit, the footer reads Choose a unit for 1 line (or however many are left) and you can't continue. You can also add or remove lines here, just like a new hire.
Step 3 - Take payment and hand over
Take payment exactly as for a new hire. Anything the customer already paid when they booked comes off Collect today, and a bond that's already held isn't taken again. Quick Hire then completes the collection docket, so the equipment goes on rent and the contract becomes Active. The reservation drops off Upcoming reservations, and you can send the contract for signing by Email or Print.
After Creation
-
The hire is a normal rental contract. Find it under Rental › Rental Contracts, or click Open Contract. Once the collection is completed, the contract is Active.
-
The payment and bond are recorded as a customer deposit against the contract. No invoice is raised at the counter. The hire charges paid up front are used when the contract is invoiced, and the bond is held until the equipment comes back.
-
For a counter collection, the collection docket is created and completed straight away, so the equipment is on rent. If you ticked Delivery required, a delivery docket is booked instead and stays open for your transport team.
-
If Rental Contract Must Be Sent Before Creating Transports is switched on (Security › Settings › Rental), the docket isn't raised until you email the contract to the customer. Printing doesn't count. Latner raises the docket as soon as the email is sent.
-
Customers, contacts and sites you created along the way stay on the customer record, even if you abandon the hire.
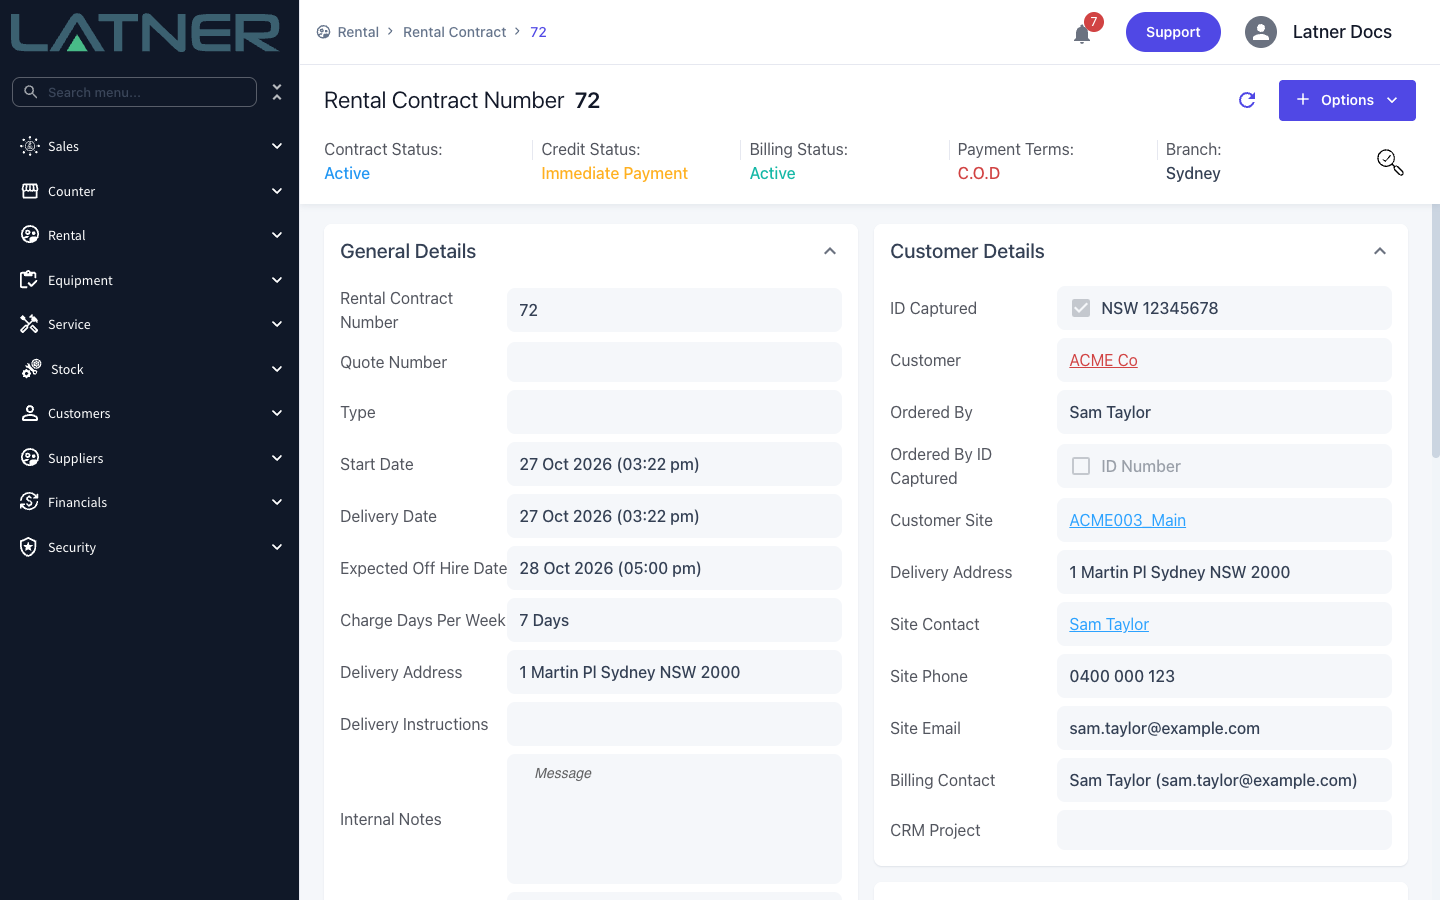
Once the contract has been created, Quick Hire's Back button disappears and the hire can't be changed from the counter screen. If something needs fixing, click Open Contract and change it on the rental contract. Until then, leaving Quick Hire with lines added asks you to confirm, because the lines haven't been saved and will be lost.