
Exporting and importing data lets you pull records out of Latner as a spreadsheet and push bulk changes back in, so you can review information offline or make large updates without editing records one at a time.
Overview
Sometimes it is quicker to work with a whole module at once - a full list of your equipment, customers or rental rates - than to open each record in turn. The Export & Import Data screen lets you do exactly that, and a few list screens add their own one-click download for the grid you are looking at.
-
Export generates a CSV file of the records in a chosen table - every record, or a date range for a few transaction tables such as customer invoices - ready to open in Excel or Google Sheets.
-
Import reads a CSV file back into Latner to create new records or update existing ones in bulk.
-
Both run in the background, and each attempt is kept in a history list with its status and a link to the file that was produced or uploaded.
-
Latner works with CSV UTF-8 files only. There is no separate blank template - you export a table first to get the exact column headings, then edit and re-import.
-
Many list screens also carry a dedicated Download button that saves the current grid as CSV, and some records offer Generate PDF options.
Before You Begin
Exporting and importing are controlled by permissions. You will need the following on your permission group.
|
Requirement |
Where to Find It |
|---|---|
|
Export & Import screen permission |
Grants access to the screen itself. Set in Security › Configuration under your permission group. |
|
Export Data permission |
Allows you to run exports. Set in Security › Configuration. |
|
Import Data permission |
Allows you to upload and run imports. Set in Security › Configuration. |
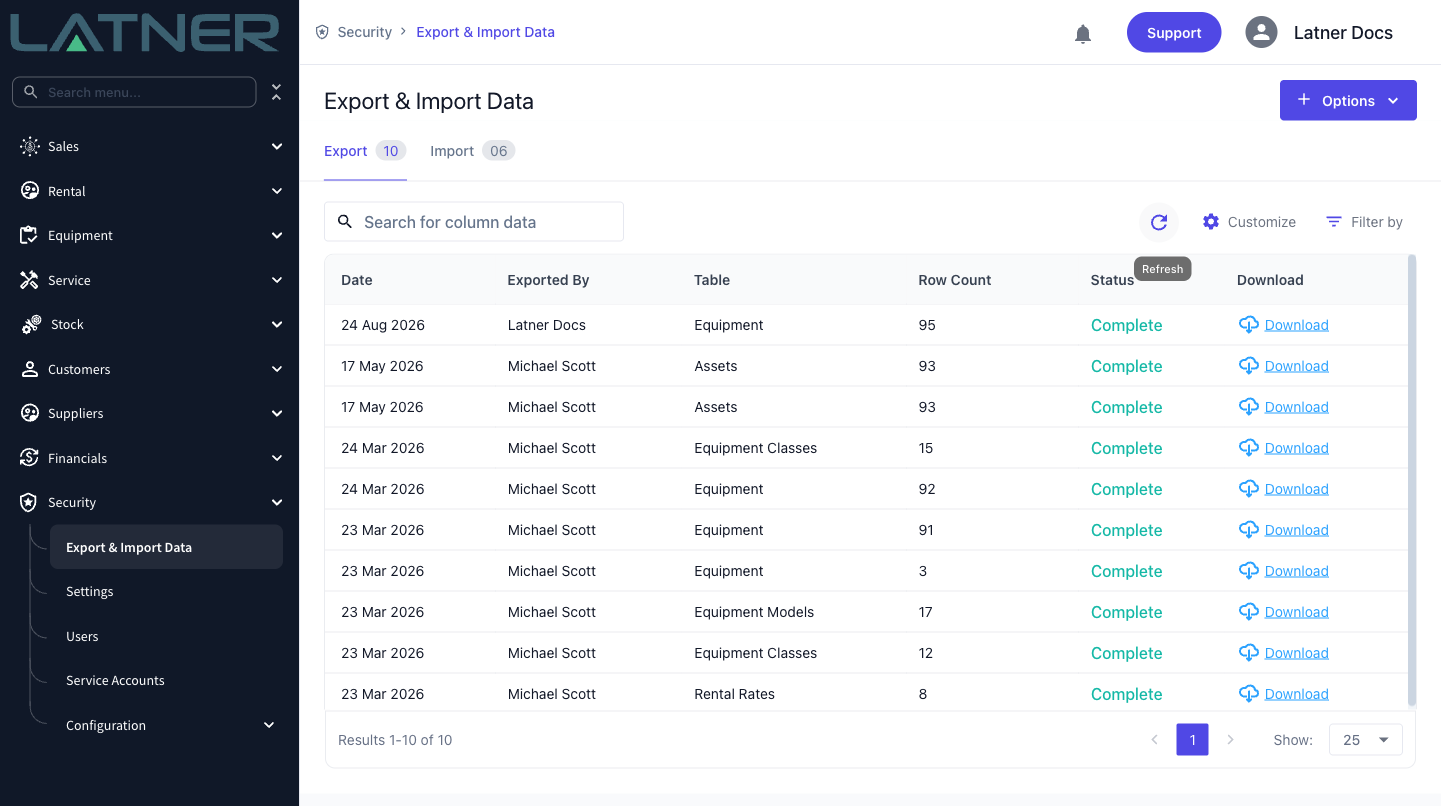
Open the screen from Security › Export & Import Data. It has two tabs - Export and Import - each listing the history of what has been run.
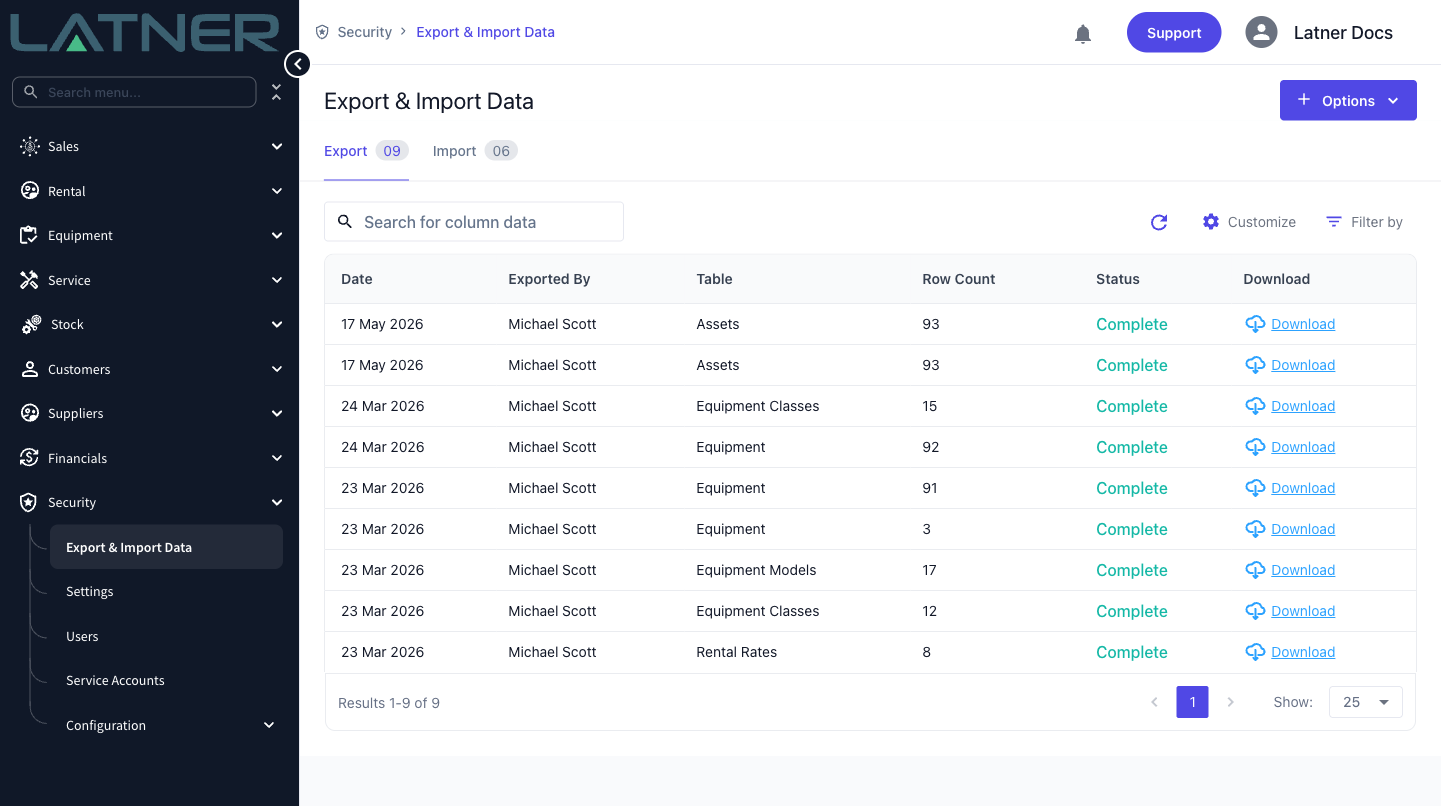
Always export before you import. The export gives you a file whose column headings exactly match what Latner expects, so you can edit it and send it straight back. A file with the wrong or missing headings will be rejected.
Exporting Data
Step 1 - Open the Export dialog
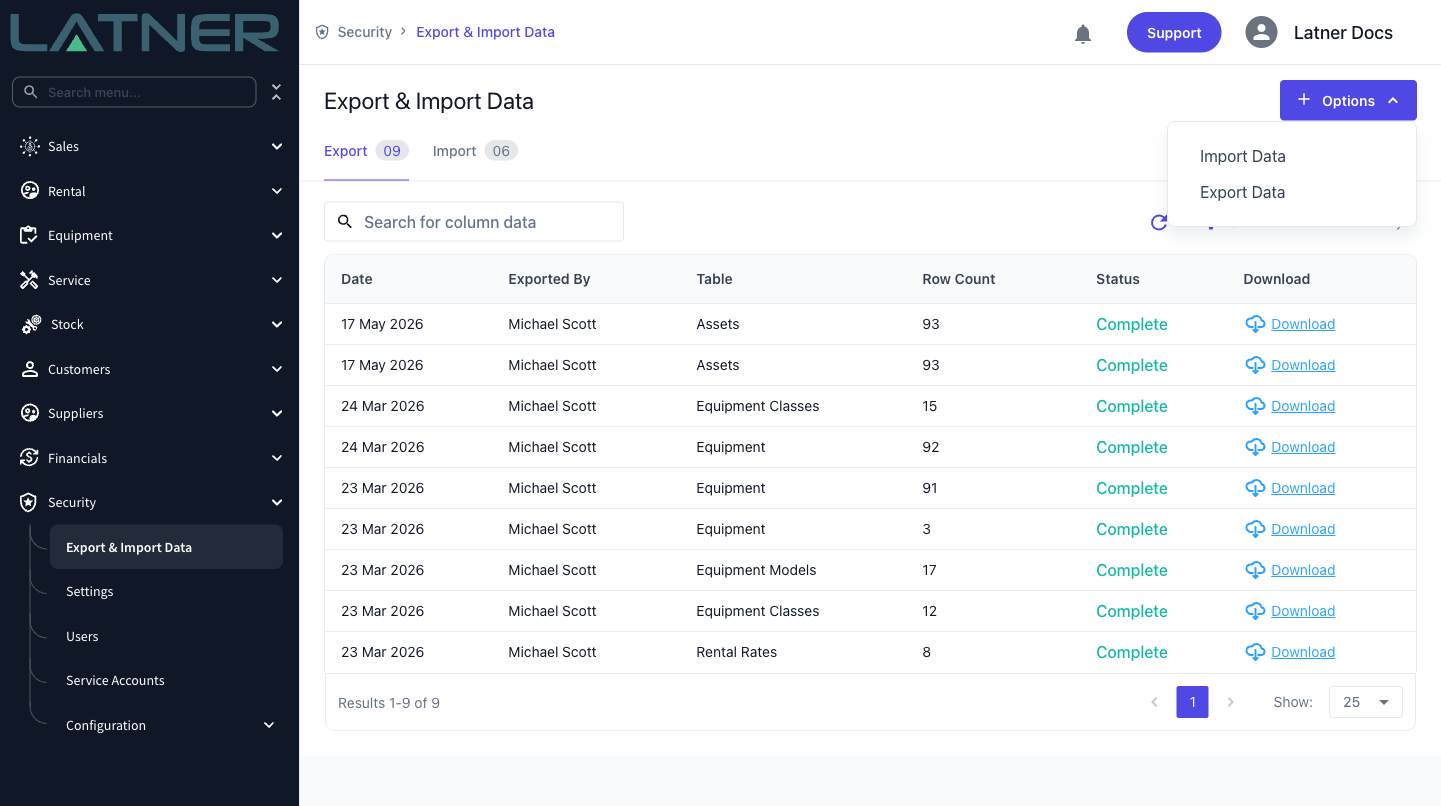
On the Export & Import Data screen, open the Options menu (top right) and choose Export Data.
Step 2 - Choose a table and start the export
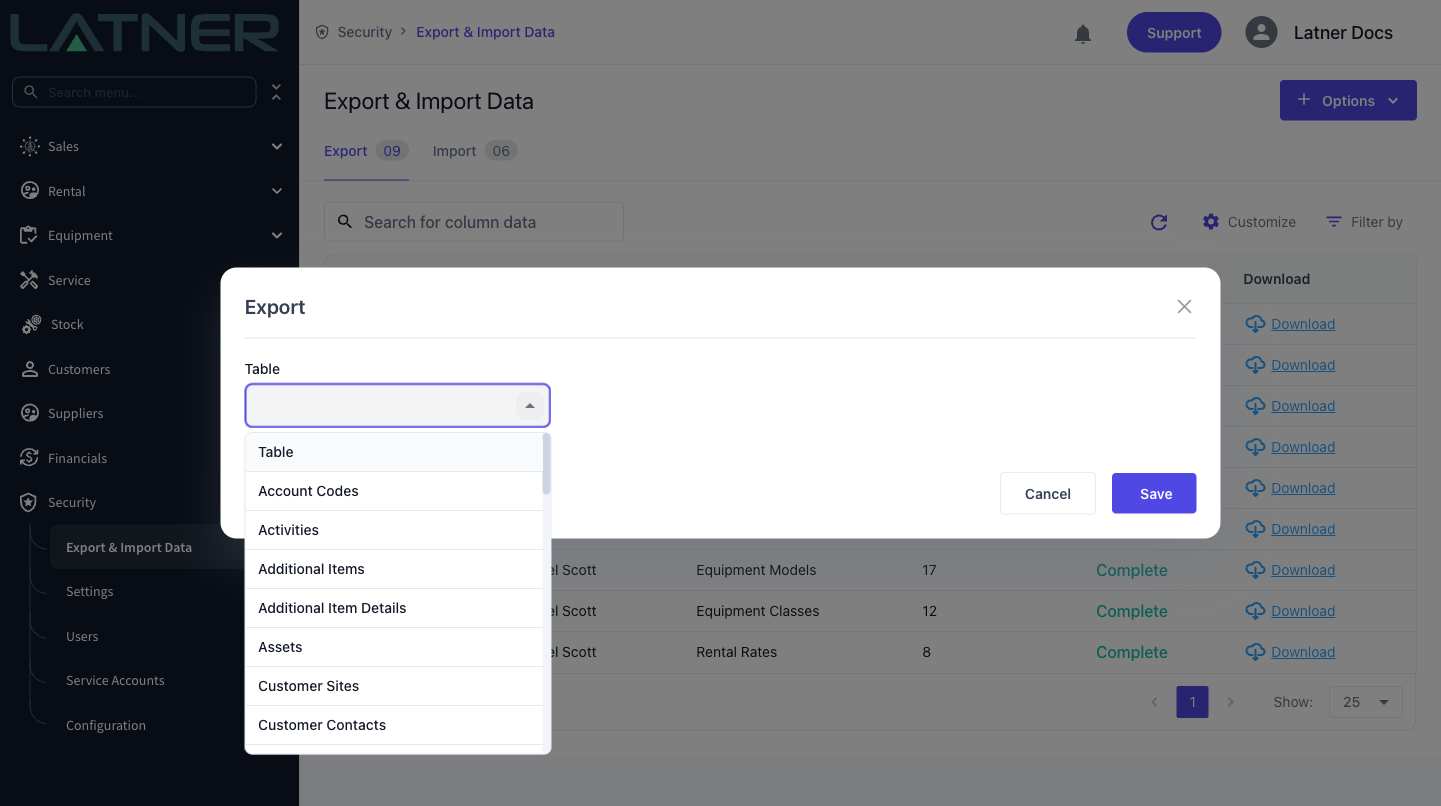
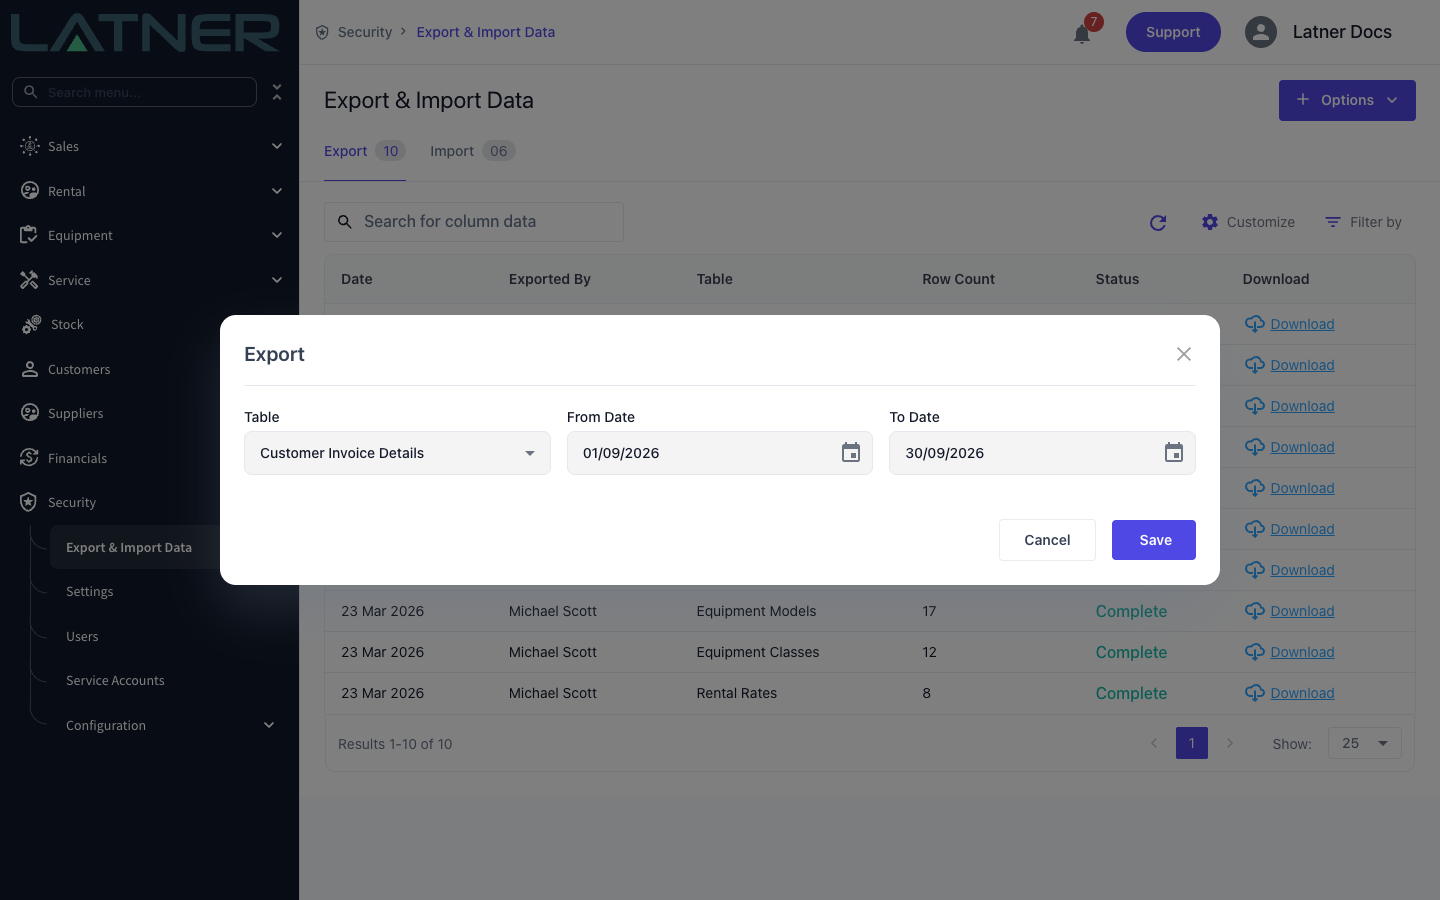
Pick the module you want from the Table dropdown - for example Equipment, Customers, Rental Rates or Suppliers. Some tables show extra options (such as a date range or a specific customer) so you can narrow what is exported - see What Each Export Table Contains below for the full list. Click Save to start. You will see a Data Export Started confirmation.
-
Table - the module to export. Required.
-
From Date and To Date - appear only for Customer Invoice Details, Customer Payments, Depreciation Details (Account), Depreciation Details (Tax), Transport Dockets (Docketbook) and Rental Contract Details (Docketbook). When they appear, both are required.
Step 3 - Download the file
The export runs in the background and appears at the top of the Export tab. When its Status reads Complete, click Download on that row to save the CSV. Use the refresh button if the status still shows Pending.
Importing Data
An import can change a large number of records at once and there is no single undo. Check your file carefully first, and for large or unfamiliar imports raise a ticket with Latner Support before you run it, so someone can confirm the file is safe.
Step 1 - Prepare your file
Start from an export of the same table (see above) so your headings are correct. Edit the rows in your spreadsheet, then save as CSV UTF-8. How the ID column is filled in decides what happens:
-
Creating new records - leave the ID column blank. Latner generates the ID for you.
-
Updating existing records - keep the ID from the export in place, so Latner knows which record each row belongs to. Never type an ID in by hand - an ID that doesn't exist in Latner stops the whole import.
-
Only the rows you need - the file doesn't have to hold the whole table. Delete the rows you aren't changing. Records that aren't in the file are left exactly as they are; an import never deletes anything.
A couple of tables work slightly differently: Equipment Service Schedule Details can only update existing rows, so its ID is always required, and in Work Orders the ID column holds the work order number.
Step 2 - Open the Import dialog and upload
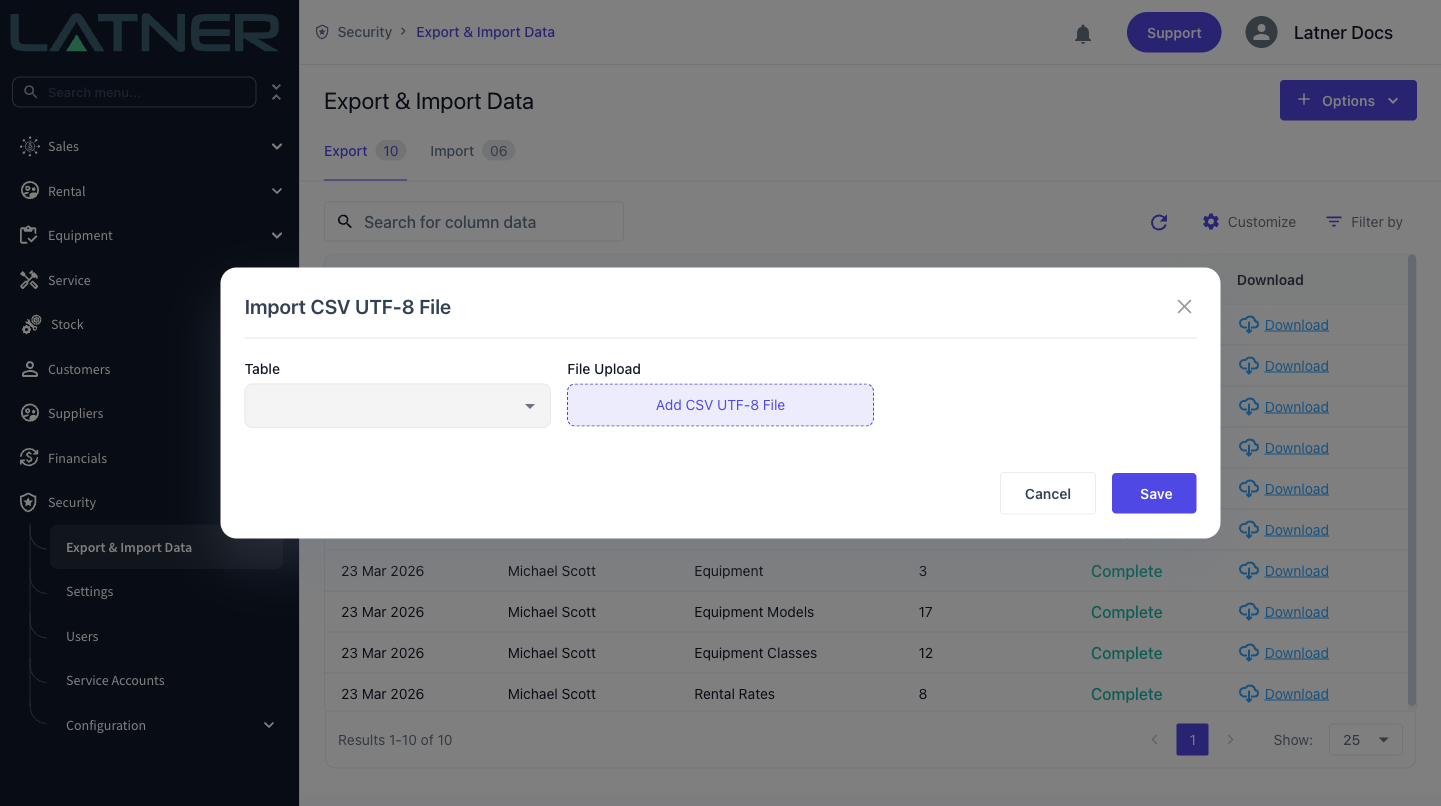
Open the Options menu and choose Import Data. In the Import CSV UTF-8 File dialog, pick the matching Table, then click Add CSV UTF-8 File to attach your file. Click Save to start - you will see a Data Import Started confirmation.
-
Table - must match the table your file was exported from.
-
File Upload - a single CSV UTF-8 file. Other file types are not accepted.
Step 3 - Check the result
Switch to the Import tab. Your import appears at the top with a Status of Complete or Failed, the number of rows processed, and a Download link to the file you uploaded.
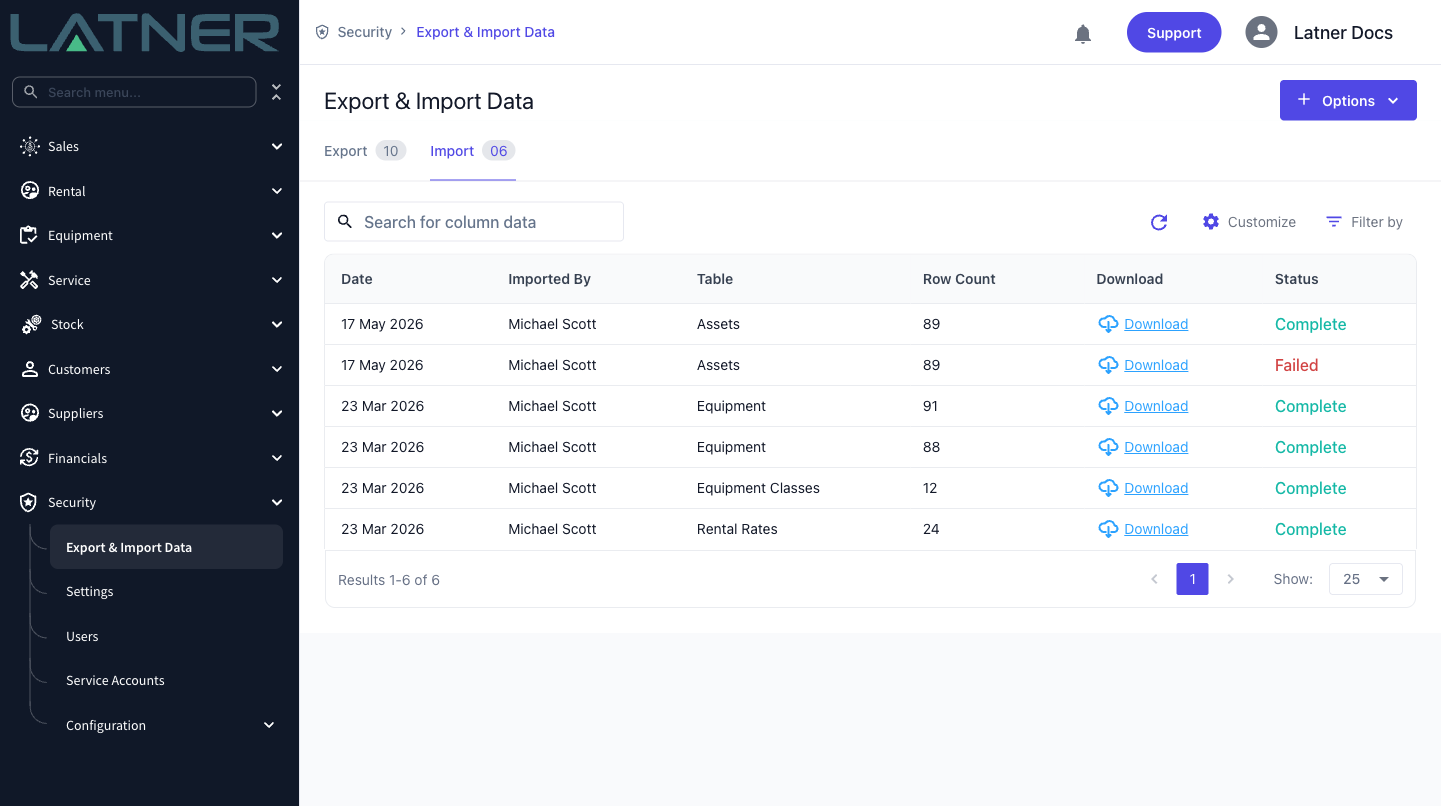
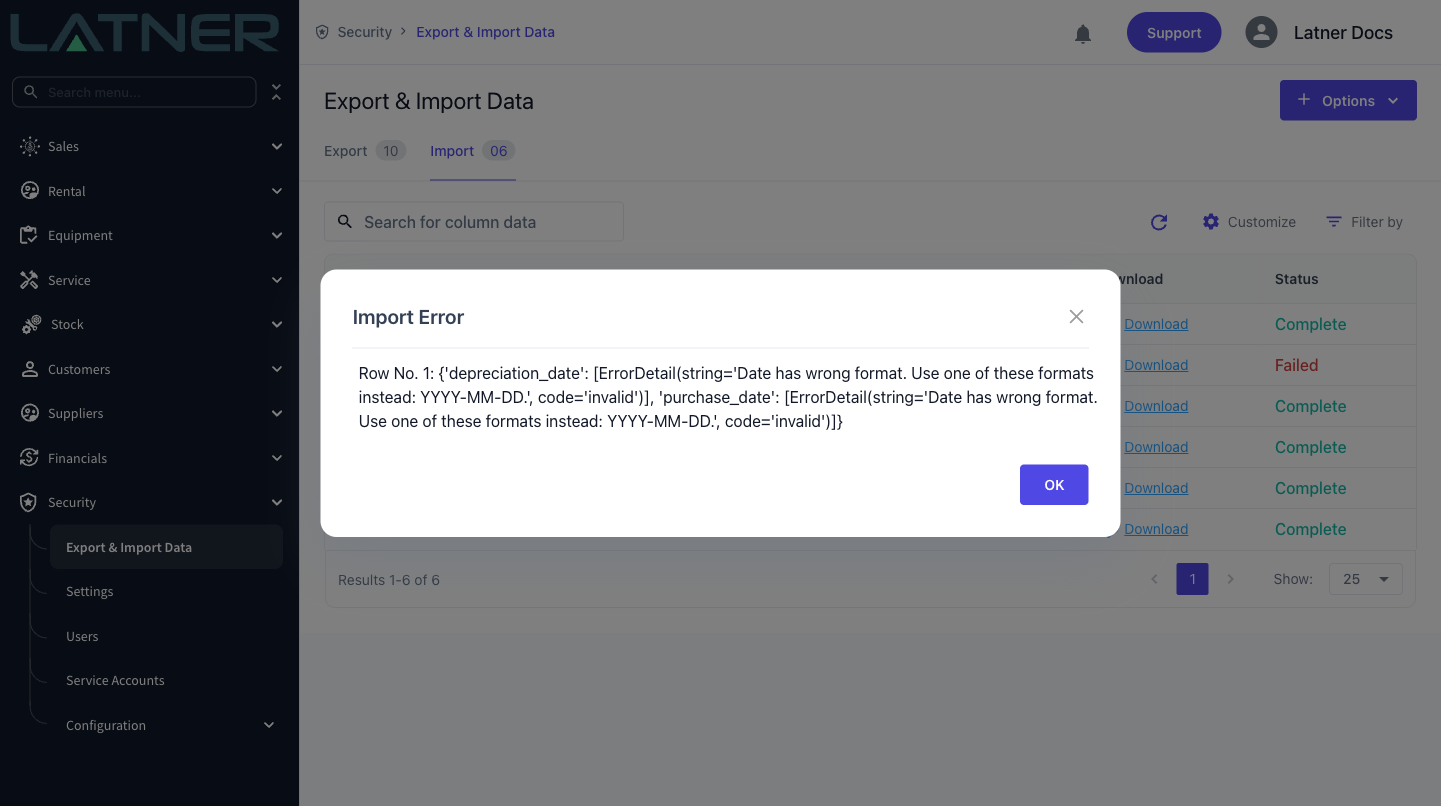
If an import shows Failed, click the status to open the Import Error dialog. It names the row number and the problem - for example a date that is not in YYYY-MM-DD format. Fix the file and import it again.
Reading an Import Error
The message in the Import Error dialog has the form Row No. <number>: <problem>. An import is all or nothing - if any row fails, no rows from that file are saved - so once you've fixed the problem you can import the whole file again.
Latner checks every row in the file first, then saves the rows one at a time. The row number tells you which stage failed:
-
Row No. 0 - the problem was found while the file was being checked, before anything was saved. It doesn't point at a particular row. Search your file for the value the message names.
-
Row No. 1 or higher - the problem was found while saving that row. Rows are counted from the first data row and the heading row isn't counted, so Row No. 1 is line 2 of your spreadsheet, and Row No. N is line N + 1.
Common messages:
-
Missing Headers: ... - a column heading is missing or has been renamed. Start again from a fresh export.
-
<Record> matching query does not exist (for example Row No. 0: Equipment matching query does not exist) - a row's own ID column holds an ID that isn't in Latner. Clear the ID on rows meant to be new records.
-
<Record> with id=... does not exist or with name=... does not exist - a reference column (a branch, model, customer or similar) doesn't match anything in Latner. Check the spelling, or use the ID from an export of that table.
A few tables report rows differently. Leads and Activities show Row No. 0: Import failed on row N - read N using the rules above. Rental Rate Details, Sub Hire Rental Rates and Package Details count records rather than lines, and several lines for the same item (one per rate) count as one record, so the number can be lower than the spreadsheet line. Stock Compatible Models names the stock number instead of a row.
Downloading From a List Screen
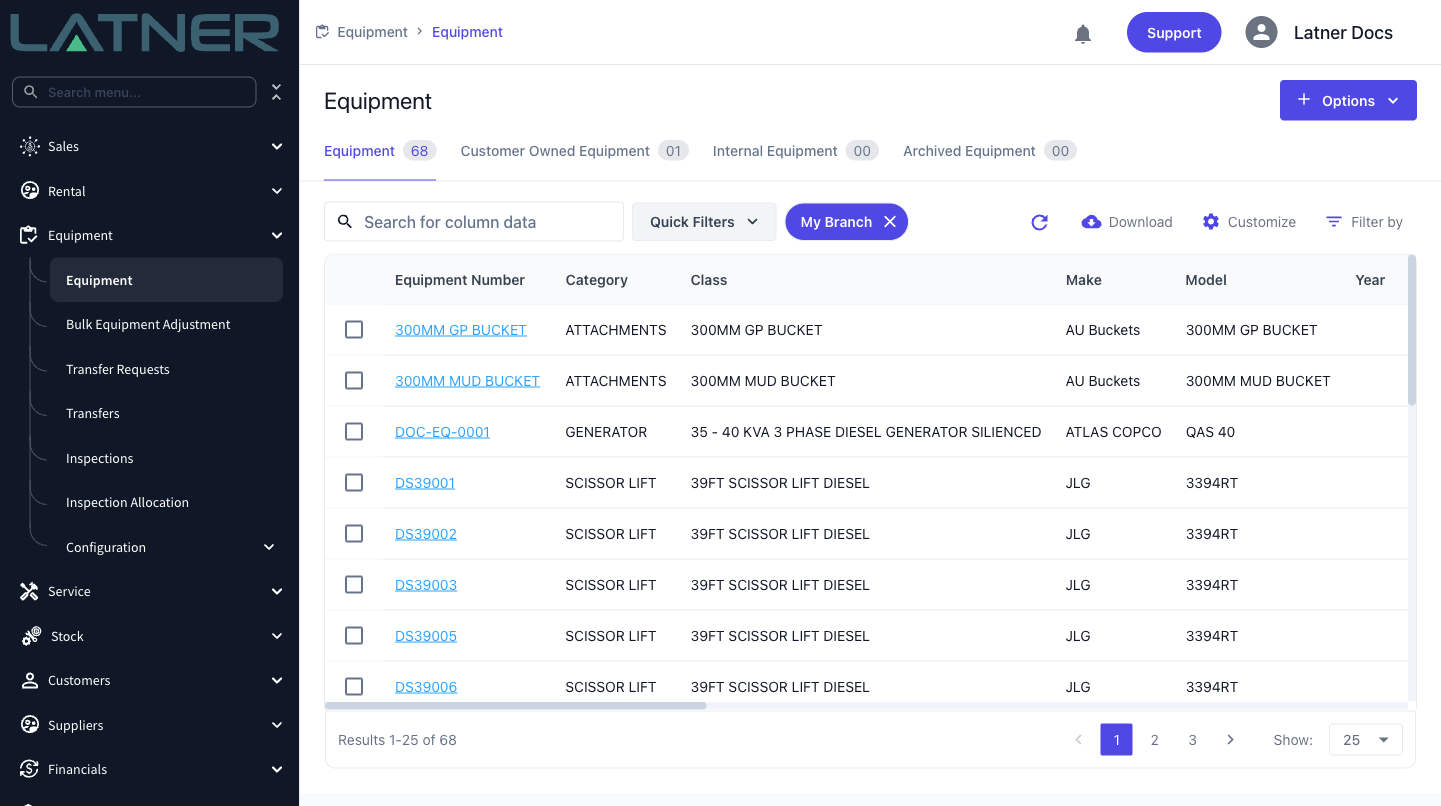
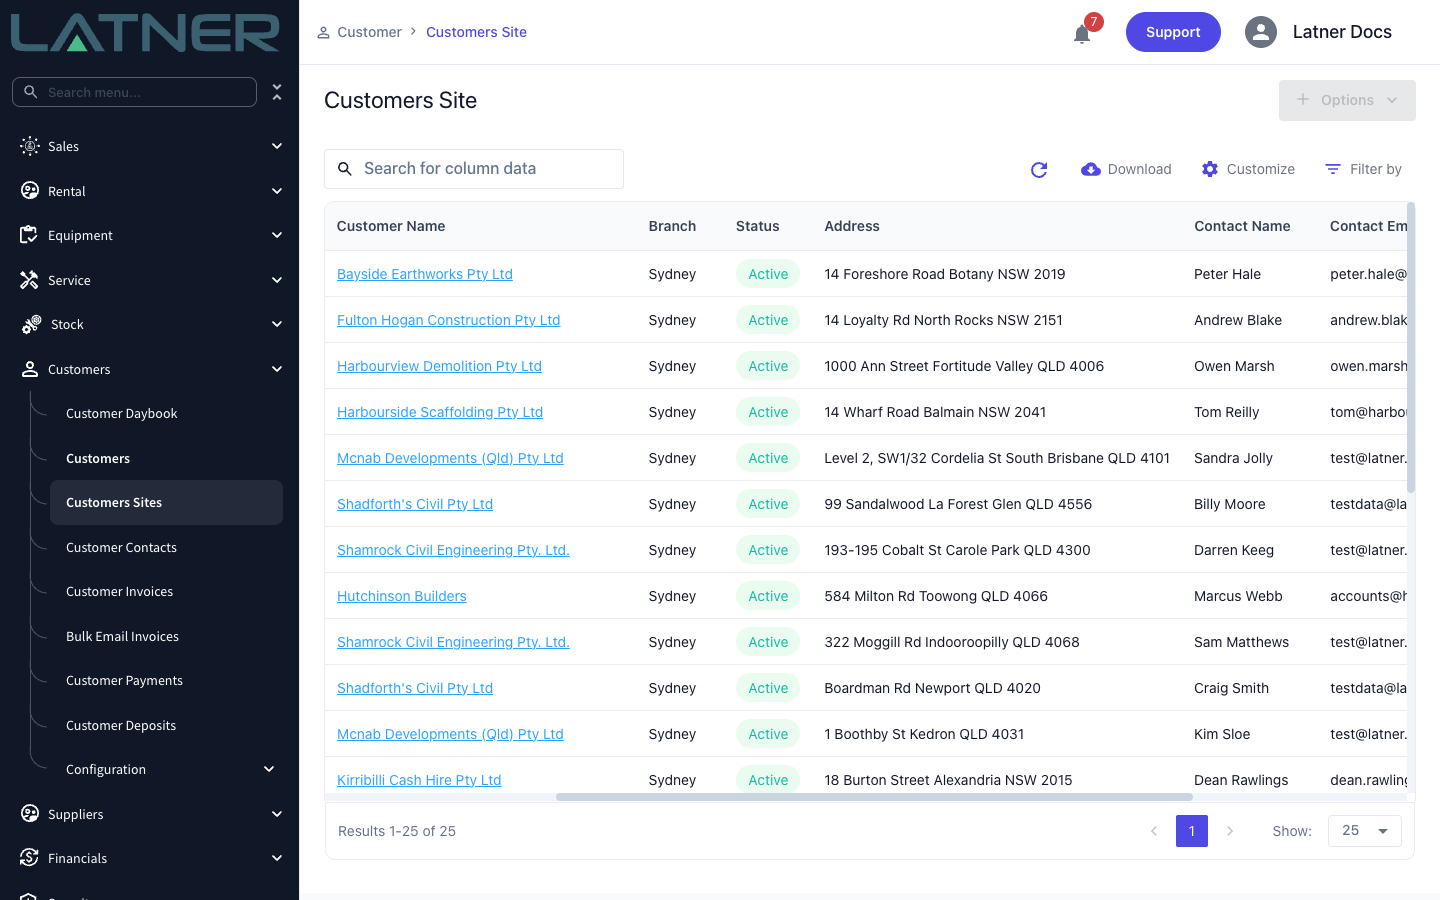
You do not always need the Export & Import Data screen. Many list screens - such as Equipment, Customers, Customers Sites and Stock - have their own Download button in the table toolbar that saves the grid you are viewing (with your current filters and columns) as a CSV. The file includes every row that matches your filters, not just the page on screen. On Equipment and Customers the button also needs the Download Equipment or Download Customers permission. Separately, records like rental quotes, rental contracts and transport dockets offer Generate PDF options that produce a printable document you can download from the record.
What Each Export Table Contains
These are the tables in the Table dropdown of the Export dialog. Unless a table has date options, it exports every record - active or not. Values such as statuses and types are written as system codes (for example COMPLETED or CREDIT_NOTE), and dates with a time are in UTC. The Import? column shows whether the same table can be brought back in through Import Data.
|
Table |
What It Contains |
Extra Options |
Import? |
|---|---|---|---|
|
Account Codes |
One row per account code mapping - company, integration, account code and the line type, category, class, stock group or charge it applies to. |
- |
No |
|
Activities |
One row per CRM activity - type, status, account, site, contact, lead, due and completed dates, sales rep. |
- |
Yes |
|
Additional Items |
One row per additional item - description and the equipment class, model or equipment it is attached to. |
- |
Yes |
|
Additional Item Details |
One row per additional item line - line type, stock, labour or admin charge, unit price, quantity, required. |
- |
Yes |
|
Assets |
One row per asset - number, branch, type, group, status, purchase and activation dates, values, and account and tax depreciation settings. |
- |
Yes |
|
Customer Sites |
One row per customer site - code, name, status, customer, Branch, address (with a separate Address State column), delivery contact with email and phone, sales rep, call type. |
- |
Yes |
|
Customer Contacts |
One row per customer contact - name, status, customer, the IDs and names of the sites they are linked to, email, phone, job title, notes. Contacts have no branch. |
- |
Yes |
|
Customer Invoice Details |
One row per invoice line. Every status is included (Open, Pending Approval, Completed, Paid and Cancelled), and credit notes appear with positive amounts - use the Invoice Status and Invoice Type columns to tell them apart. Each line carries its invoice's customer, sales rep, invoice number, date, branch, totals and balance, then the line's own type, description, billing period, amounts (Invoicedetail Sub Total ex GST, Invoicedetail Tax, Invoicedetail Total inc GST) and the equipment, stock or charge it is for. The invoice-level Invoice Sub Total, Invoice Tax and Invoice Total repeat on every line of the same invoice. |
From Date and To Date (required) - the invoice date, inclusive of both days. |
No |
|
Customer Payments |
One row per customer payment or refund (open or completed) - invoice number, type, method, status, amounts, customer, site, branch, who created and completed it and when. |
From Date and To Date (required) - when the payment was created, measured in UTC, with the To Date counted from its very start. To be sure nothing at either end is missed, set the range a day wider on each side and then filter on Created Datetime in your spreadsheet. |
No |
|
Customers |
One row per customer - code, name, registered name, status, type, ABN, billing address and contact, payment terms, credit limit, branch, sales rep, tax, damage waiver and environmental levy, source, industry. |
- |
Yes |
|
Depreciation Details (Account) |
One row per account depreciation period for each asset - opening and closing quantity and book value, depreciation, and disposal, sale and scrapping values. |
From Date and To Date (required) - the period start date. An Aggregate tick box gives one total row per asset instead. |
No |
|
Depreciation Details (Tax) |
As above, for tax depreciation. |
From Date and To Date (required). |
No |
|
Equipment Category |
One row per equipment category. |
- |
Yes |
|
Equipment Classes |
One row per equipment class - category, meter type, inspection and checklist settings, notes. |
- |
Yes |
|
Equipment Details |
One row per equipment item per branch - quantities in management, available, on rent, in transfer, reserved and inactive. Serialised equipment with no quantities is left out. |
- |
No |
|
Equipment Makes |
One row per equipment make. |
- |
Yes |
|
Equipment Models |
One row per equipment model - make, class, fuel type, inspection and checklist settings. |
- |
Yes |
|
Equipment Service Schedule Details |
One row per upcoming service for a piece of equipment - schedule, due date, due meter, due days on rent. Pending and disabled services only. |
- |
Yes (update only) |
|
Equipment Service Schedules |
One row per service schedule - group, class, model or equipment it covers, checklist, work order category, and the meter, day or days-on-rent interval. |
- |
Yes |
|
Equipment |
One row per equipment record, including sold and disposed - number, description, type, usage type, serial, engine and registration numbers, purchase details, meter reading, branch, model, warranty and opening balances. |
- |
Yes |
|
Finance Schedule Details |
One row per finance repayment - date, repayment, principal and interest split, principal outstanding. |
- |
Yes |
|
Finance Schedules |
One row per finance schedule - branch, supplier, amount financed, residual, repayment, interest rate, term, start date. |
- |
Yes |
|
Leads |
One row per lead - status, branch, sales rep, source, address, estimated value, dates, notes. |
- |
Yes |
|
Package Details |
One row per package line, with one row per rate for equipment lines - line type, item, quantity, rates, pricing method, unit price. |
- |
Yes |
|
Packages |
One row per package - name, description, status, pricing type. |
- |
Yes |
|
Rental Contract Details (Docketbook) |
One row per charge per day for each rental contract line, in docket book format - docket number, date, order number, resource, quantity, unit price, daily and weekly rate, charge. |
Customer (required), Rental Contract (optional), From Date and To Date (required). |
No |
|
Rental Rates |
One row per rental rate card - description, level, branch, review and expiry dates. |
- |
Yes |
|
Rental Rate Details |
One row per rental rate line, with one row per rate type for equipment lines. |
- |
Yes |
|
Serialized Stock Accessories |
One row per serialised stock accessory - class, model, serialised stock, description. |
- |
Yes |
|
Serialized Stock Accessory Details |
One row per accessory line - stock item, quantity, unit price, required. |
- |
Yes |
|
Stand Down Details |
One row per stood-down contract line - stand down number, customer, contract, equipment, dates, discount, status, reason. |
- |
No |
|
Stock Compatible Models |
One row per stock item and equipment model it fits. |
- |
Yes |
|
Stock Details |
One row per stock item per warehouse - quantity available, minimum and maximum, bin locations, preferred supplier, costs, retail price. |
- |
Yes |
|
Stock Supplier Prices |
One row per supplier price - stock item, supplier, supplier site, part number, price, lead time. |
- |
Yes |
|
Stock |
One row per stock item - number, description, status, barcode, type, group, sub group, brand, warehouse, average cost, retail price. |
- |
Yes |
|
Supplier Contacts |
One row per supplier contact - name, status, email, phone, supplier. |
- |
Yes |
|
Sub Hire Rental Rates |
One row per sub-hire rate line. |
- |
Yes |
|
Supplier Sites |
One row per supplier site - code, name, status, phone, billing address and contact, purchase tax. |
- |
Yes |
|
Suppliers |
One row per supplier - code, name, status, billing address and contact, branch, purchase tax, ABN, payment terms. |
- |
Yes |
|
Telematics Equipment |
One row per equipment-to-telematics link - equipment, integration, external ID. |
- |
Yes |
|
Transport Dockets (Docketbook) |
One row per completed transport line with a delivered quantity - docket number, completed date, type, customer, order number, driver or supplier, from and to addresses, branch, model, quantity delivered. |
Transport Type and Customer (optional), From Date and To Date (required) - the completed date. |
No |
|
Work Orders |
One row per work order - equipment, description, type, category, reason, status, due and completed dates, allocated technician or supplier, branch. |
- |
Yes |
After Export or Import
-
Exports and imports are listed permanently in their tabs, each with the date, who ran it, the table, the row count and a link to the file.
-
A completed import writes straight to your live data - new records appear in their module immediately, and updated records show the new values.