
The External API lets another system read from and write to your Latner data over HTTPS, so equipment, enquiries and revenue figures can flow between Latner and your own website, dashboards or reporting tools without anyone re-keying them.
Overview
Not every job needs a person at a keyboard. If your website already collects enquiries, or your finance team already has a reporting tool, the External API is how those systems talk to Latner directly. It is deliberately narrow: a small set of published endpoints, each one guarded by its own permission.
-
Every path lives under /api/external/v1/ on your own Latner address, for example
https://yourcompany.latner.app/api/external/v1/equipment/. -
API endpoints cover everything from Equipment (read a list, or one machine by its identifier), CRM Lead (create a lead), Revenue and Revenue Forecast (aggregated reporting figures).
-
Every request must carry an OAuth bearer token. There is no API key, and your Latner email and password will not work.
-
A token always resolves to an identity inside your Latner tenant: either a person (a User) or a machine (a Service Account).
-
What that identity can reach is controlled by permission groups, the same mechanism that controls what your staff can see on screen.
-
Requests are rate limited to 60 per minute per identity. Go over and Latner replies with HTTP 429.
-
Full endpoint documentation - every parameter, response field and code sample - lives on developer.latnersoftware.com. This article is about getting connected and staying in control of what the connection can do.
Good reasons to reach for it:
-
Show live fleet information on your own website, sourced from Latner rather than a spreadsheet someone updates on Fridays.
-
Push web enquiries straight into Latner as CRM Leads, so nothing sits in an inbox.
-
Feed revenue and forecast figures into a group-wide reporting tool alongside your other businesses.
It is not a bulk data extract tool. If you want a one-off spreadsheet of records, use Security › Export & Import Data instead.
Before You Begin
You will need a few things in place, some of which only Latner can provide.
|
Requirement |
Where to Find It |
|---|---|
|
Your Latner address |
The address you already log in to, for example https://yourcompany.latner.app. The API base URL is that address plus /api/external/v1. |
|
Kinde host, client ID and client secret |
Provided by Latner. Latner registers your application with Kinde, our authentication provider, and issues the credentials. |
|
A registered redirect URI (user-based integrations only) |
Tell your Latner contact the callback URL your application will use, so it can be added to the allow list. |
|
A Service Account (machine integrations only) |
Security › Service Accounts, then Latner links it to your application. |
|
A permission group for the integration |
Security › Configuration › Permission Groups, on the External API tab. |
|
Create Users and Create Permission Groups permissions |
Your own permission group, under Security. Without them you cannot add the service account or the group it needs. |
Nothing is open by default. A brand new service account with a valid token still gets 403 Forbidden on every endpoint until you grant it something, and External API permissions are not included in any of Latner's built-in permission groups - not even Administrator. Access is always something you grant deliberately, per integration.
Authenticating as a User or a Service Account
Both options end in the same place - a bearer token in the Authorization header - but they suit different jobs.
As a User. Your application sends someone to Latner's sign-in page, they log in as themselves, and your application receives a token that acts as that person. This is the authorization code flow, and it is the right choice when the integration works on behalf of a named person and should see exactly what they can see. Because you also ask for the offline scope, you get a refresh token alongside the access token, so you can keep going once the access token expires. The Authentication section of the developer site walks through both the initial exchange and the refresh.
As a Service Account. A service account is a machine identity with no password and no sign-in screen. Your application authenticates as itself and gets a token straight away, with nobody in the loop. This is what you want for anything unattended: a nightly figures sync, a website form handler, a reporting pipeline. Service accounts are the more common choice, and they are the option you need to contact Latner support to set up, because linking the account to your application happens on Latner's side.
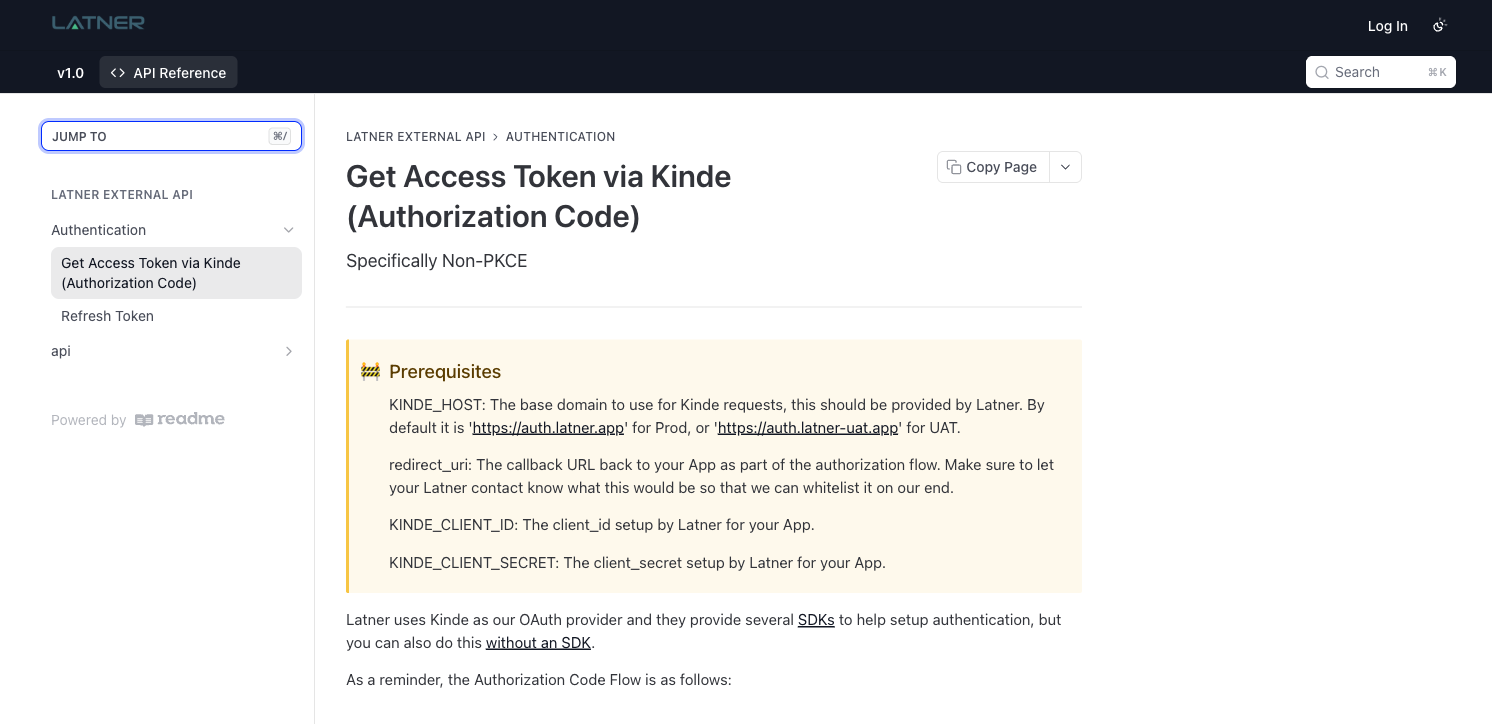
Whichever you use, the token is checked hard on the way in. It must be unexpired, signed by Kinde, and issued for your organisation - a token minted for one Latner tenant cannot be replayed against another. If the identity behind it has been made inactive, the request fails too, which makes deactivating a service account an effective way to switch an integration off in a hurry.
Setting Up Access for an Integration
The steps below set up a service account, which is the usual case. For a user-based integration, skip Steps 1 and 2 and assign the permission group to the user in Step 5 instead, from Security › Users.
Step 1 - Create the service account
Go to Security › Service Accounts and choose Options › Create Service Account.
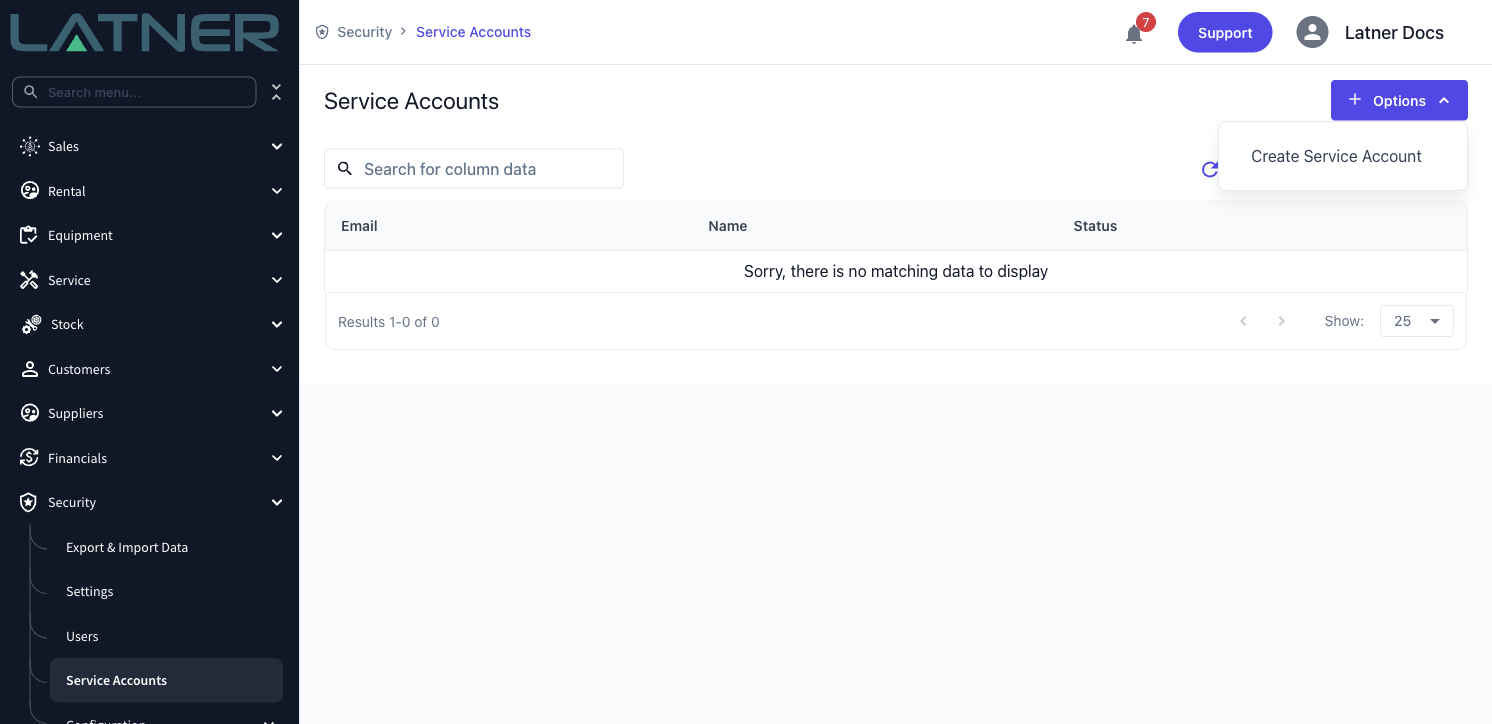
There is only one field to fill in:
-
Service Account Name - name it after the system that will be calling, not after a person. "Perspio Telematics" tells the next administrator what they are looking at; "API user 2" does not.
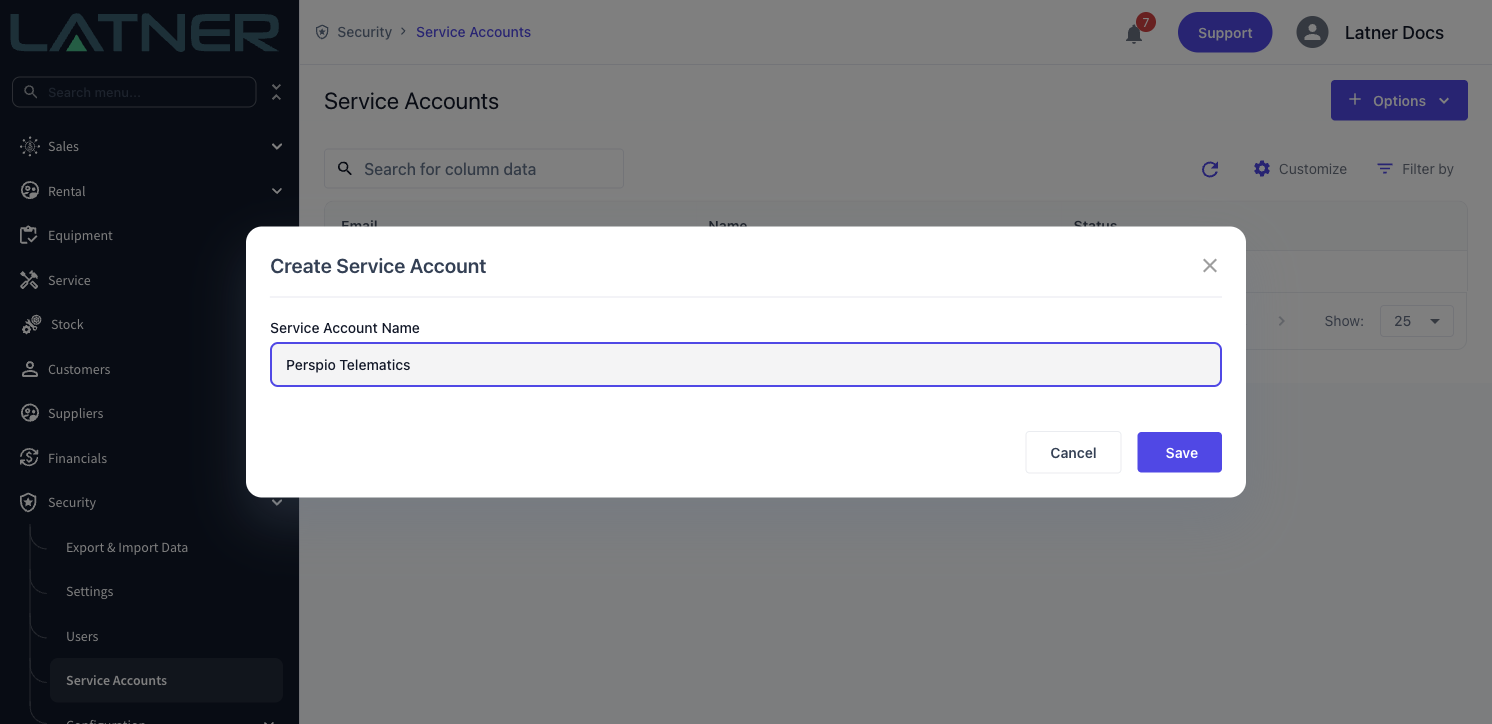
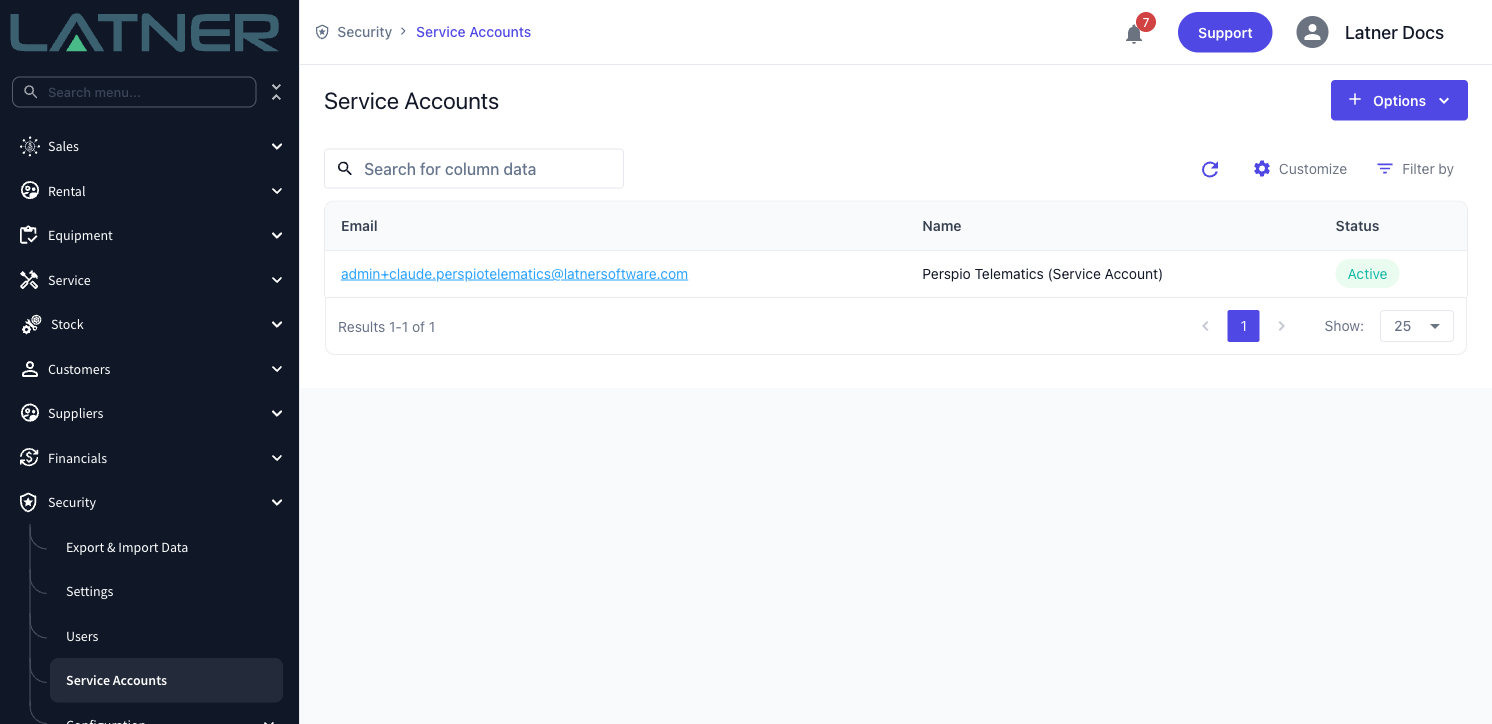
Choose Save. Latner generates the account's email identifier for you and marks the account Active. Service accounts are not real mailboxes and never receive email, so the address only matters as a label.
Step 2 - Ask Latner support to link it to your application
The account you just created cannot authenticate yet. It has no link to a Kinde application, and that link cannot be made from the Latner screens - it is deliberately not editable, so nobody can point an existing integration's credentials at a different account.
Raise a support request with:
-
The name of the service account you created, and which Latner site it is on.
-
What the integration is and what it needs to do.
Latner registers the application, links it to your service account, and sends you the client ID and client secret. Treat the secret like a password: anyone holding it can do everything the service account can do.
Step 3 - Create a permission group for the integration
Go to Security › Configuration › Permission Groups and choose Options › Create Permission Group. Name it after the integration, for example "External API - Perspio Telematics".
Give each integration its own group rather than reusing a staff group. It keeps the answer to "what can this thing reach?" to a single screen, and it means turning an integration's access off never touches anyone's day job. Latner's built-in groups are locked for editing anyway, so a new group is the only way to grant these permissions.
Step 4 - Grant only the endpoints the integration needs
Open the group and select the External API tab. Permissions here are a grid of resources against actions, with each row showing the exact endpoints it unlocks, so you are granting access to a route rather than guessing at a name.
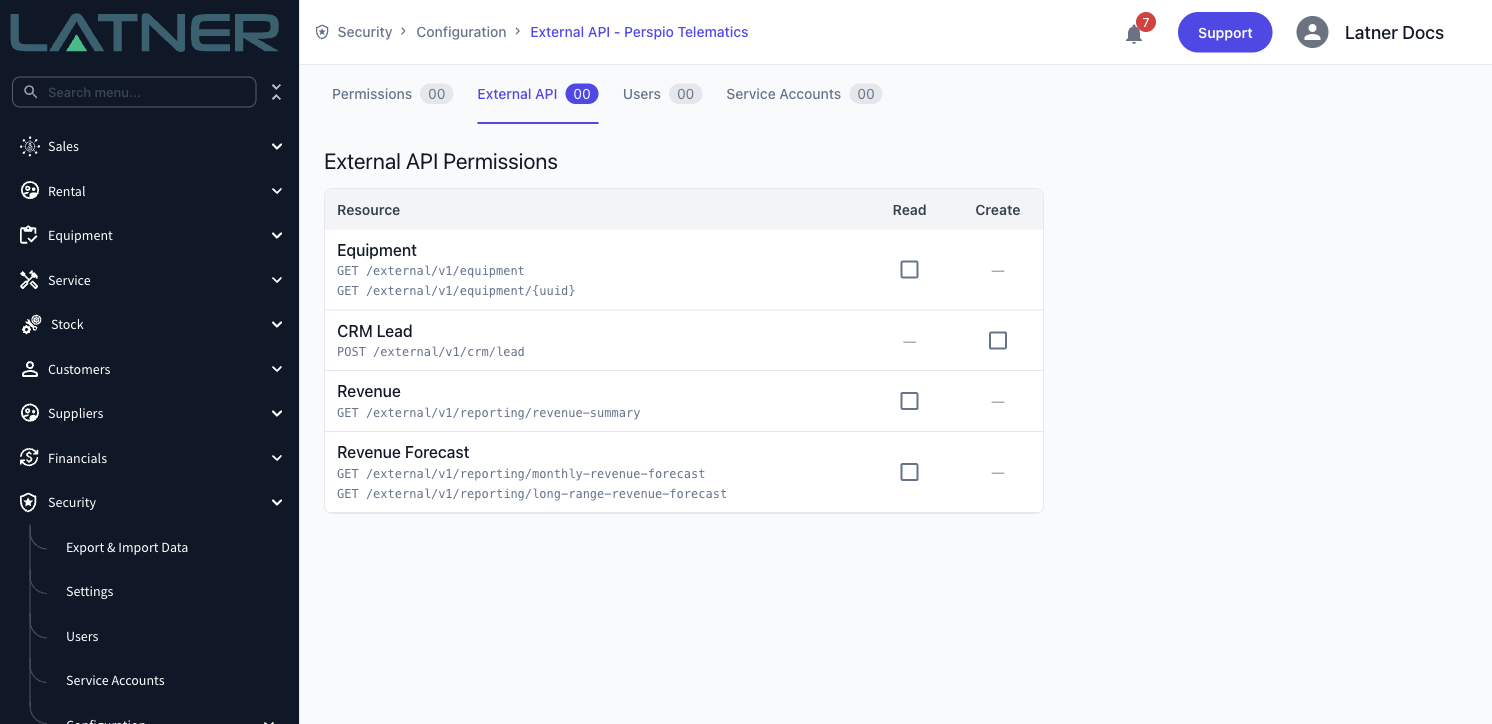
Tick only what the integration actually calls. A website form handler needs CRM Lead - Create and nothing else; a reporting pipeline needs Revenue - Read and Revenue Forecast - Read.
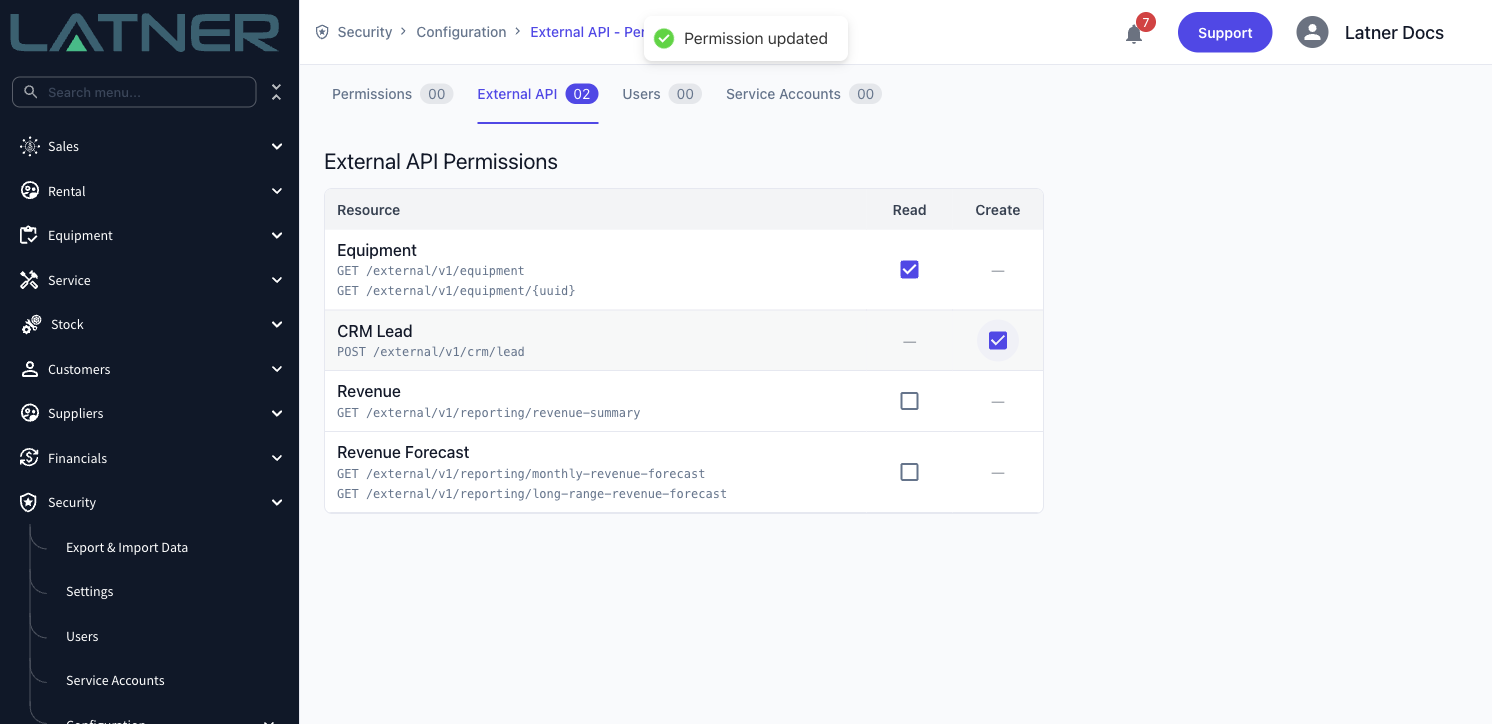
There is no Save button on this tab. Each checkbox saves on its own and you will see a Permission updated confirmation, so an accidental tick is live immediately - untick it to undo.
Step 5 - Assign the permission group
Open the service account from Security › Service Accounts and choose Options › Assign Permission Group.
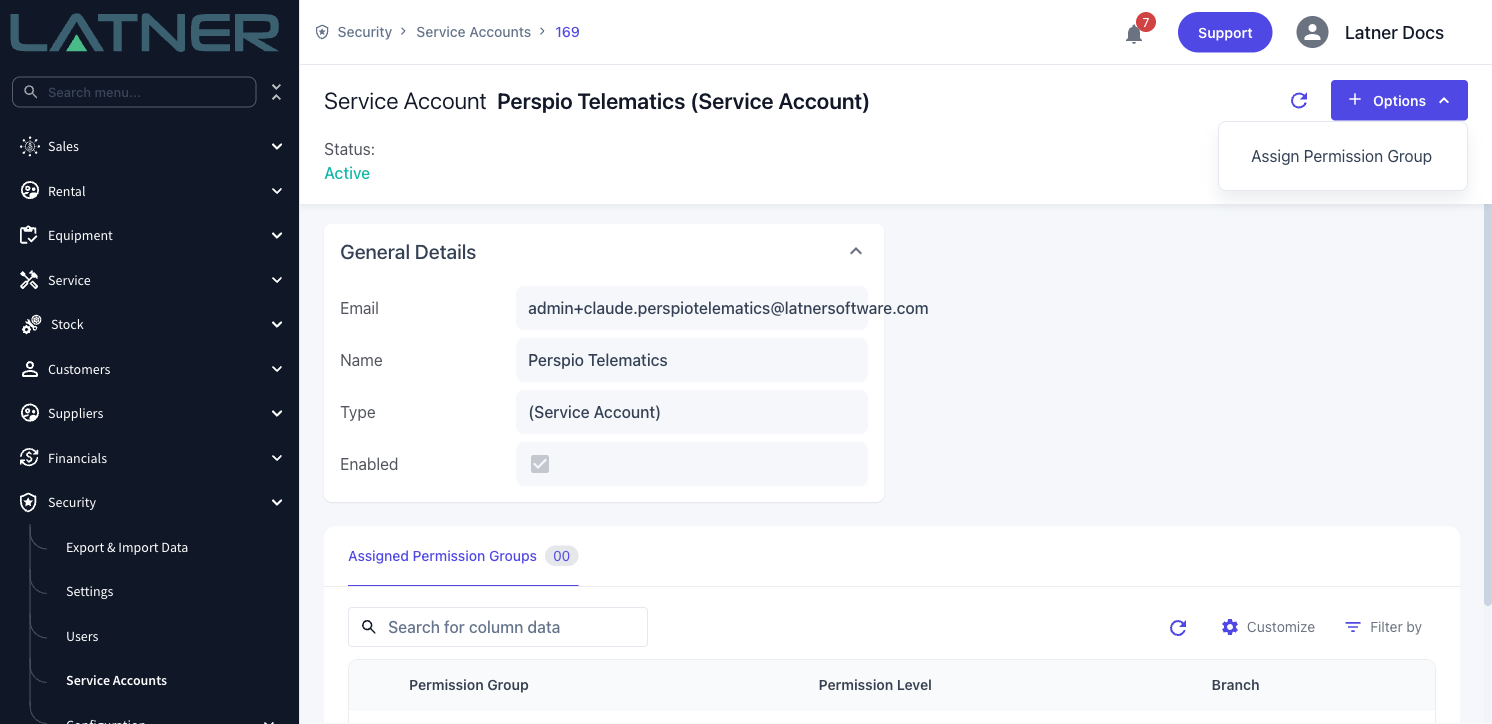
Fill in:
-
Permission Group - the group you built in Step 3. Required.
-
Level - leave this on All. Selecting Branch reveals a required Branch field, but it will not narrow what the External API returns.
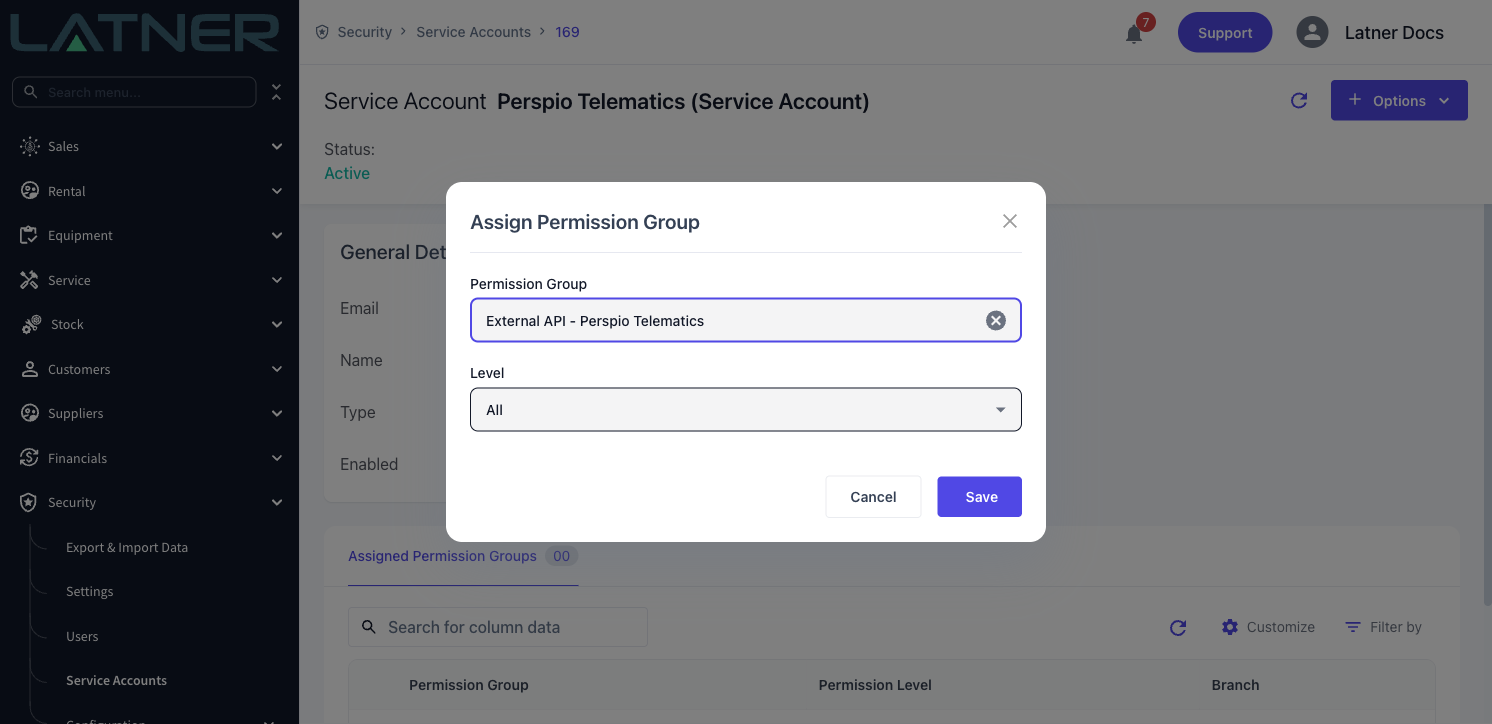
Choose Save. The group appears on the account's Assigned Permission Groups tab, which is the first place to look when an integration starts getting 403s.
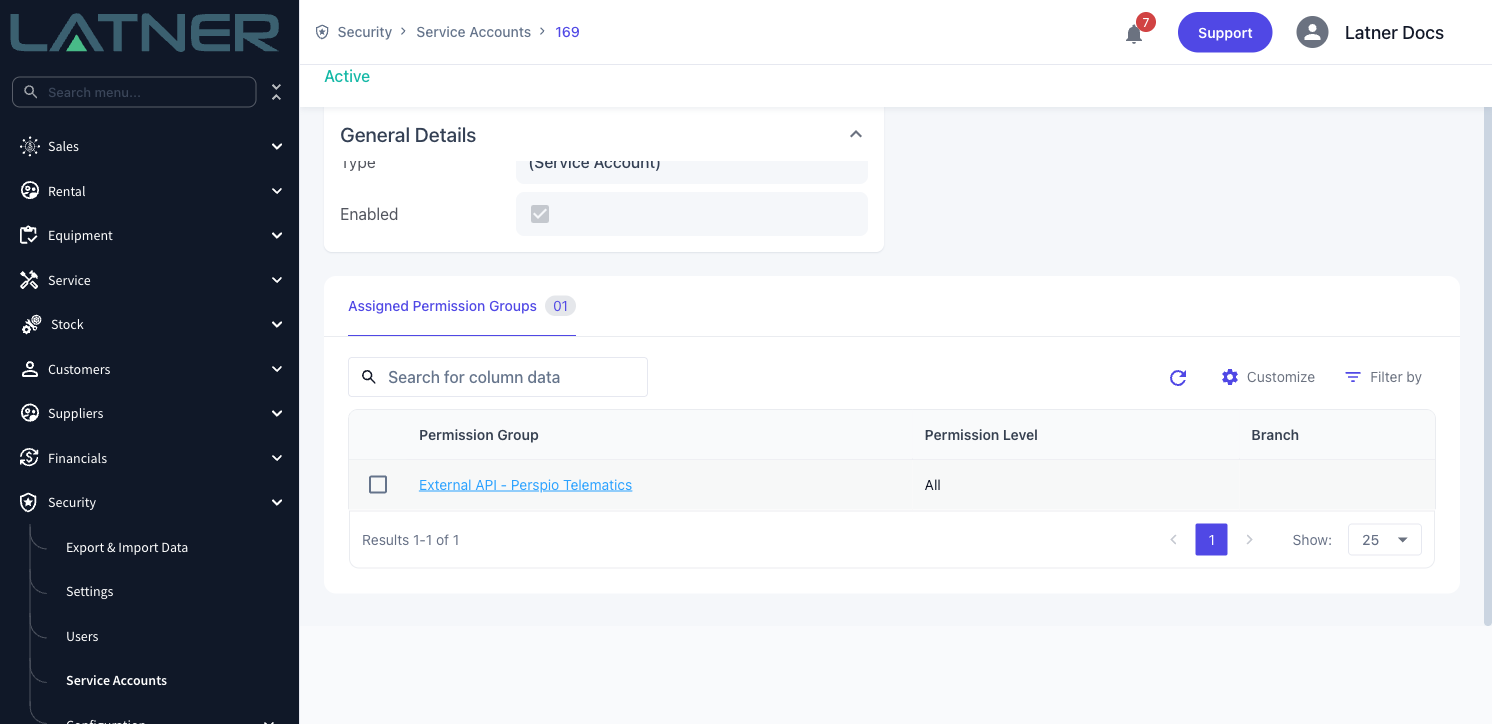
The Level you pick does not limit the data the External API hands back. External API permissions are checked without a branch, and the endpoints return records across your whole site, so a group assigned at Branch level still grants full read access to the resources it lists. If an integration should only see one branch's records, filter on your own side - don't rely on the assignment level to do it for you.
How External API Permissions Are Managed
External API access is managed alongside everything else in Security › Configuration › Permission Groups, but it is kept on its own tab and behaves a little differently from screen permissions.
-
Separate from screen access. The Permissions tab controls what a person sees in Latner; the External API tab controls what a token can call. Granting one never grants the other, so an integration cannot quietly inherit access from a staff role.
-
Granted per route. Each checkbox maps to one or two specific endpoints, listed under the resource name. Ticking Equipment - Read opens the equipment list and the single-equipment lookup, and nothing else.
-
Closed until opened. Any endpoint an identity has not been granted returns 403 Forbidden, even with a perfectly valid token.
-
Never in a built-in group. External API permissions are absent from every group Latner ships, because API access is not part of any job role. They only ever arrive through a group someone created.
-
Cumulative across groups. An identity gets the union of the permissions in every group assigned to it. To take access away, untick it in the group or unassign the group from the account - adding a second, emptier group changes nothing.
-
Auditable in one place. The tab's counter shows how many External API permissions a group holds, and each service account lists the groups assigned to it, so you can answer "what can this integration do?" from two screens.
A Latner user marked as a superuser passes every permission check, so a token issued for a superuser can call every External API endpoint regardless of what any group says. Never point an integration at a superuser account. Service accounts sidestep this entirely - Latner refuses to make one a superuser - which is another reason to prefer them over user tokens for unattended work.
Making Your First Request
Once the token is in hand, a request is an ordinary HTTPS call. Put the token in the Authorization header as Bearer plus the token, and use your own Latner address as the base URL.
curl --request GET \
  --url 'https://yourcompany.latner.app/api/external/v1/equipment/?page_size=25' \
  --header 'accept: application/json' \
  --header 'authorization: Bearer <access_token>'
A few things worth knowing before you write much code:
-
List endpoints are paginated. They return count, next, previous and data. Follow next until it comes back empty rather than assuming one page holds everything, and use page and page_size to control the slices.
-
Searching is narrow on purpose. The equipment search parameter looks at the equipment number only - it is not a general-purpose search across every field.
-
Reporting endpoints aggregate, they don't list rows. You ask for a window with from_date and to_date and optionally group by month or year. The revenue summary requires from_date, and when you supply both dates they cannot be more than 12 months apart, so a multi-year backfill needs several calls.
-
Amounts are tax-exclusive. Revenue figures are invoice sub-totals, not totals including tax. Don't reconcile them against a tax-inclusive figure and expect a match.
-
Respect the 60-per-minute limit. It is counted per identity, so splitting work across threads makes it worse, not better. Back off when you see a 429 and retry after a pause.
Build against your UAT site first. It has its own address (https://yourcompany.latner-uat.app) and its own credentials, so you can create test leads and hammer the endpoints without touching live data. Both addresses are listed as selectable servers on the developer site.
Reading the Developer Site
Every endpoint is documented in full at developer.latnersoftware.com. That site, not this article, is the place to look up parameters and response fields - it is generated from the API itself, so it cannot drift out of date.
Finding your way around:
-
The sidebar splits into Authentication - how to get and refresh a token - and api, which holds the endpoints grouped by area: crm, equipment and reporting.
-
Each endpoint page is headed by its method and path, with {tenant} standing in for your own site name. Replace it with the first part of your Latner address.
-
Query Params and Body Params list every input with its type and description; the response schema and worked examples sit below.
-
The panel on the right generates a ready-made code sample in Shell, Node, Ruby, PHP or Python. Paste a token into Credentials, set the tenant in the URL, and Try It! sends a real request from your browser.
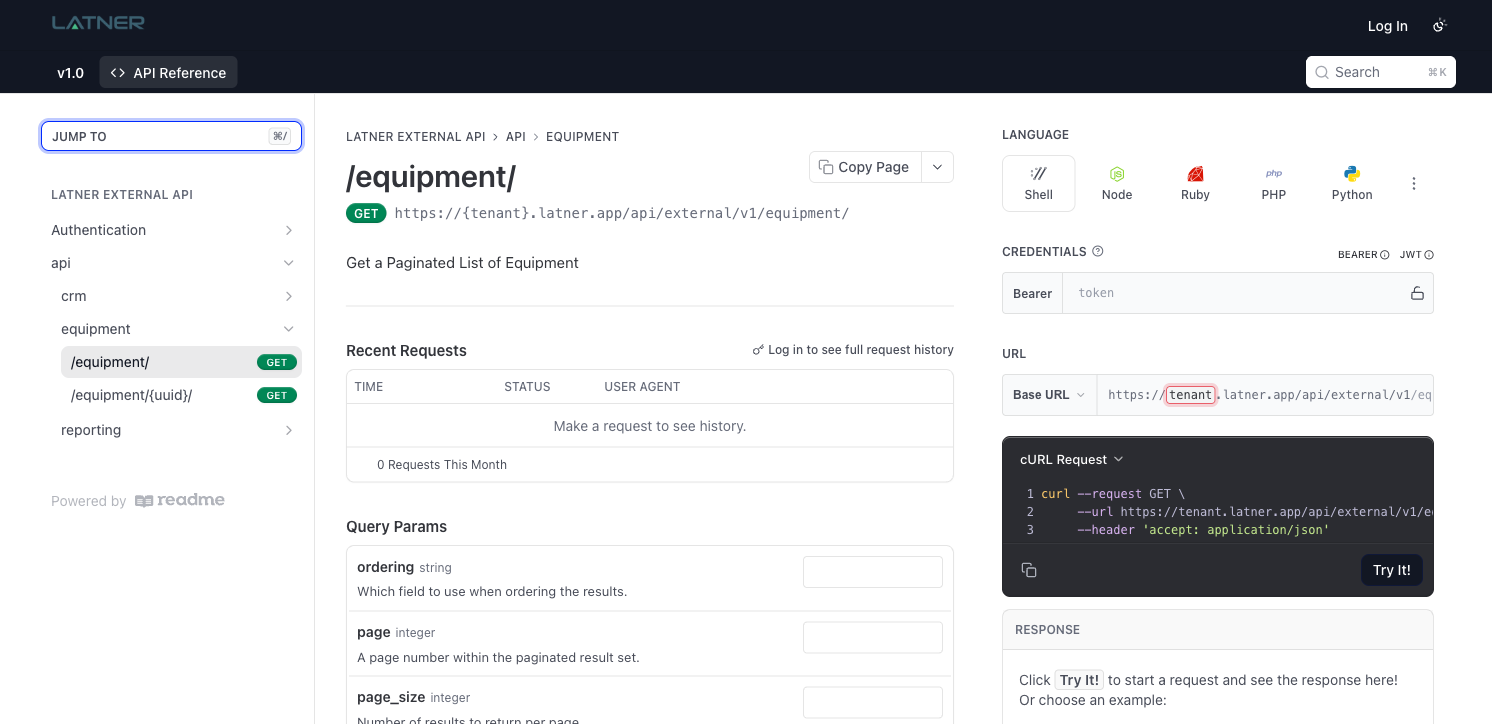
Because Try It! fires a genuine request against whichever site you name, point it at your UAT address while you are experimenting. A test lead created against your live site is a real lead that someone will have to chase.